Flask is fun. This bold declaration is one of the first things you see when you view the official Flask documentation and, over the course of this book, you will come to understand why so many Python developers agree.
In this chapter we shall:
Briefly discuss the features of the Flask framework
Set up a development environment and install Flask
Implement a minimal Flask app and analyze how it works
Experiment with commonly used APIs and the interactive debugger
Start working on the blog project that will be progressively enhanced over the course of the book
Flask is a lightweight Web framework written in Python. Flask started out as an April fool's joke that became a highly popular underdog in the Python web framework world. It is now one of the most widely used Python web frameworks for start-ups, and is becoming commonly accepted as the perfect tool for quick and simple solutions in most businesses. At its core, it provides a set of powerful libraries for handling the most common web development tasks, such as:
URL routing that makes it easy to map URLs to your code
Template rendering with Jinja2, one of the most powerful Python template engines
Session management and securing cookies
HTTP request parsing and flexible response handling
Interactive web-based debugger
Easy-to-use, flexible application configuration management
This book will teach you how to use these tools through practical, real-world examples. We will also discuss commonly used third-party libraries for things that are not included in Flask, such as database access and form validation. By the end of this book you will be ready to tackle your next big project with Flask.
As the documentation states, Flask is fun, but it can also be challenging, especially when you are building a large application. Unlike other popular Python web frameworks, such as Django, Flask does not enforce ways of structuring your modules or your code. If you have experience with other web frameworks, you may be surprised how writing applications in Flask feels like writing Python as opposed to the framework boilerplate.
This book will teach you to use Flask to write clean, expressive applications. As you progress through this book, you will not only become a proficient Flask developer but you will also become a stronger Python developer.
Flask is written in Python, so before we can start writing Flask apps we must ensure that Python is installed. Most Linux distributions and recent versions of OSX come with Python pre-installed. The examples in this book will require Python 2.6 or 2.7. Instructions for installing Python can be found at http://www.python.org.
If this is your first time using Python, there are a number of excellent resources available for free on the web. I would recommend Learn Python The Hard Way, by Zed Shaw, available for free online at http://learnpythonthehardway.org. Looking for more? You can find a large list of free Python resources at http://resrc.io/list/10/list-of-free-programming-books/#python.
You can verify that Python is installed and that you have the correct version by running the Python interactive interpreter from a command prompt:
$ python
Python 2.7.6 (default, Nov 26 2013, 12:52:49)
[GCC 4.8.2] on linux2
Type "help", "copyright", "credits" or "license" for more information.
>>>
At the prompt (>>>) type exit() and hit Enter to leave the interpreter.
This book will include code that is compatible with both Python 2 and Python 3 where possible. Unfortunately, since Python 3 is still relatively new as compared to Python 2, not all third-party packages used in this book are guaranteed to work seamlessly with Python 3. There is a lot of effort being put into making popular open-source libraries compatible with both versions but, at the time of writing, some libraries have still not been ported. For best results, ensure that the version of Python that you have installed on your system is 2.6 or above.
Now that you have ensured that Python is installed correctly, we will install some popular Python packages that will be used over the course of this book.
We will be installing these packages system-wide but, once they are installed, we will be working exclusively in virtual environments.
The de-facto Python package installer is pip . We will use it throughout the book to install Flask and other third-party libraries.
If you already have setuptools installed, you can install pip by simply running the following command:
$ sudo easy_install pip
After completing the installation, verify that pip is installed correctly:
$ pip --version
pip 1.2.1 from /usr/lib/python2.7/site-packages/pip-1.2.1-py2.7.egg (python 2.7)
The version numbers are likely to change, so for a definitive guide please consult the official instructions, which can be found at http://www.pip-installer.org/en/latest/installing.html.
Once pip is installed, we can proceed to install the most important tool in any Python developer's toolkit: virtualenv. Virtualenv makes it easy to produce isolated Python environments, complete with their own copies of system and third-party packages.
Virtualenv solves a number of problems related to package management. Imagine you have an old application that was built using a very early version of Flask, and you would like to build a new project using the most-recent version of Flask. If Flask was installed system-wide, you was be forced to either upgrade your old project or write your new project against the old Flask. If both projects were using virtualenv, then each could run its own version of Flask, with no conflicts or issues.
Virtualenv makes it easy to control which versions of the third-party package is used by your project.
Another consideration is that installing packages system-wide generally requires elevated privileges (sudo pip install foo). By using virtualenvs, you can create Python environments and install packages as a regular user. This is especially useful if you are deploying to a shared hosting environment or are in a situation where you do not have administrator privileges.
We will use pip to install virtualenv; since it is a standard Python package, it can be installed just like any other Python package. To ensure that virtualenv is installed system-wide, run the following command (it requires elevated privileges):
$ sudo pip install virtualenv
$ virtualenv --version
1.10.1
The version numbers are likely to change, so for a definitive guide please consult the official instructions at http://virtualenv.org.
Now that we have the proper tools installed, we're ready to create our first Flask app. To begin, create a directory somewhere convenient that will hold all of your Python projects. At the command prompt or terminal, navigate to your projects directory; mine is /home/charles/projects, or ~/projects for short on Unix-based systems.
$ mkdir ~/projects
$ cd ~/projects
Now we will create a virtualenv. The commands below will create a new directory named hello_flask inside your projects folder that contains a complete, isolated Python environment.
$ virtualenv hello_flask

New python executable in hello_flask/bin/python2.
Also creating executable in hello_flask/bin/python
Installing setuptools............done.
Installing pip...............done.
$ cd hello_flask
If you list the contents of the hello_flask directory, you will see that it has created several sub-directories, including a bin folder (Scripts on Windows) that contains copies of both Python and pip. The next step is to activate your new virtualenv. The instructions differ depending on whether you are using Windows or Mac OS/Linux. To activate your virtualenv refer to the following screenshot:
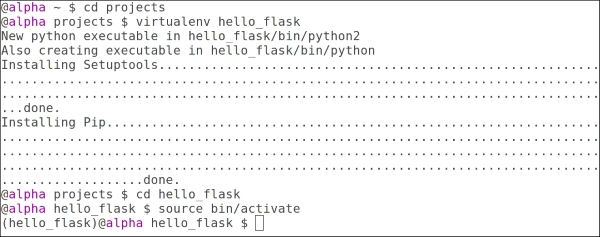
Creating the hello_flask virtualenv
When you activate a virtualenv, your PATH environment variable is temporarily modified to ensure that any packages you install or use are restricted to your virtualenv.
Now that we've verified that our virtualenv is set up correctly, we can install Flask.
When you are inside a virtualenv, you should never install packages with administrator privileges. If you receive a permission error when attempting to install Flask, double-check that you have activated your virtualenv correctly (you should see (hello_flask) in your command prompt).
(hello_flask) $ pip install Flask
You will see some text scroll by as pip downloads the Flask package and the related dependencies before installing it into your virtualenv. Flask depends on a couple of additional third-party libraries, which pip will automatically download and install for you. Let's verify that everything is installed properly:
(hello_flask) $ python
>>> import flask
>>> flask.__version__
'0.10.1'
>>> flask
<module 'flask' from '/home/charles/projects/hello_flask/lib/python2.7/site-packages/flask/__init__.pyc'>
Congratulations! You've installed Flask and now we are ready to start coding.
Create a new file in the hello_flask virtualenv named app.py. Using your favorite text editor or IDE, enter the following code:
from flask import Flask

app = Flask(__name__)

@app.route('/')
def index():
    return 'Hello, Flask!'

if __name__ == '__main__':
    app.run(debug=True)
Save the file and then execute app.py by running it from the command line. You will need to ensure that you have activated the hello_flask virtualenv:
$ cd ~/projects/hello_flask
(hello_flask) $ python app.py
* Running on http://127.0.0.1:5000/
Open your favorite web-browser and navigate to the URL displayed (http://127.0.0.1:5000). You should see the message Hello, Flask! displayed on a blank white page. By default, the Flask development server runs locally on 127.0.0.1, bound to port 5000.

Your first Flask app.
We just created a very basic Flask app. To understand what's happening let's take this code apart line-by-line.
from flask import Flask
Our app begins by importing the Flask class. This class represents a single WSGI application and is the central object in any Flask project.
WSGI is the Python standard web server interface, defined in PEP 333. You can think of WSGI as a set of behaviors and methods that, when implemented, allow your web app to just work with a large number of webservers. Flask handles all the implementation details for you, so you can focus on writing you web app.
app = Flask(__name__)
In this line, we create an application instance in the variable app and pass it the name of our module. The variable app can of course be anything, however app is a common convention for most Flask applications. The application instance is the central registry for things such as views, URL routes, template configuration, and much more. We provide the name of the current module so that the application is able to find resources by looking inside the current folder. This will be important later when we want to render templates or serve static files.
@app.route('/')def index():return 'Hello, Flask!'
In the preceding lines, we are instructing our Flask app to route all requests for / (the root URL) to this view function (index). A view is simply a function or a method that returns a response of some kind. Whenever you open a browser and navigate to the root URL of our app, Flask will call this view function and send the return value to the browser.
There are a few things to note about these lines of code:
@app.routeis a Python decorator from theappvariable defined above. This decorator (app.route) wraps the following function, in this case,index, in order to route requests for a particular URL to a particular view. Index is chosen as the name for the function here, as it's the common name for the first page that a web server uses. Other examples could be homepage or main. Decorators are a rich and interesting subject for Python developers, so if you are not familiar with them, I recommend using your favorite search engine to find a good tutorial.The
indexfunction takes no arguments. This might seem odd if you are coming from other web-frameworks and were expecting a request object or something similar. We will see in the following examples how to access values from the request.The
indexfunction returns a plain string object. In later examples, we will see how to render templates to return HTML.The following lines execute our app using the built-in development server in debug mode. The 'if' statement is a common Python convention that ensures that the app will only be run when we run our script via python
app.py, and will not run if we try to import this app from another Python file.if __name__ == '__main__': app.run(debug=True)
Right now our Flask app isn't much fun, so let's look at the different ways in which we can add more interesting behavior to our web app. One common way is to add responsive behavior so that our app will look at values in the URL and handle them. Let's add a new route to our Hello Flask app called hello. This new route will display a greeting to the person whose name appears in the URL:
from flask import Flask
app = Flask(__name__)
@app.route('/')
def index():
    return 'Hello, Flask!'
@app.route('/hello/<name>')
def hello(name):
return 'Hello, %s' % name
if __name__ == '__main__':
app.run(debug=True)Again, let's run our app and open it up in a web browser. We can now navigate to a URL such as http://127.0.0.1/hello/Charlie and see our custom message:

Our Flask app displaying a custom message
In the preceding example, the route we added specifies a single parameter: name. This parameter also appears in the function declaration as the sole argument. Flask is automatically matching the URL /hello/Charlie to the hello view; this is known as mapping. It then passes the string Charlie into our view function as an argument.
What happens if we navigate to http://127.0.0.1:5000/hello/ without specifying a name? As you can see, the Flask development server will return a 404 response, indicating that the URL did not match any known routes.
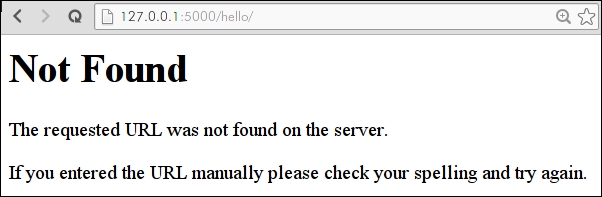
Flask 404 page
In addition to the URL, values can be passed to your app in the query string. The query string is made up of arbitrary keys and values that are tacked onto the URL, using a question-mark:
|
URL |
Argument Values |
|---|---|
|
|
name: Charlie |
|
|
name: Charlie favorite_color: green |
In order to access these values inside your view functions, Flask provides a request object that encapsulates all sorts of information about the current HTTP request. In the following example, we will modify our hello view to also respond to names passed in via the query string. If no name is specified either on the query-string or in the URL, we will return a 404.
from flask import Flask, abort, request

app = Flask(__name__)

@app.route('/')
def index():
    return 'Hello, Flask!'

@app.route('/hello/<name>')
@app.route('/hello/')
def hello(name=None):
    if name is None:
        # If no name is specified in the URL, attempt to retrieve it
        # from the query string.
        name = request.args.get('name')
        if name:
            return 'Hello, %s' % name
    else:
        # No name was specified in the URL or the query string.
        abort(404)

if __name__ == '__main__':
    app.run(debug=True)
As you can see, we have added another route decorator to our hello view: Flask allows you to map multiple URL routes to the same view. Because our new route does not contain a name parameter, we need to modify the argument signature of our view function to make name an optional parameter, which we accomplish by providing a default value of None.
The function body of our view has also been modified to check for the presence of a name in the URL. If no name is specified, we will abort with a 404 page not found status code.

Greet someone using the query string
It is inevitable that, sooner or later, we will introduce a bug into our code. Since bugs are inevitable, the best thing we can hope for as developers is good tools that help us diagnose and fix bugs quickly. Luckily, Flask comes bundled with an extremely powerful web-based debugger. The Flask debugger makes it possible to introspect the state of your application the moment an error occurs, removing the need to sprinkle in print statements or breakpoints.
This can be enabled by telling the Flask app to run in debug mode at run time. We can do this in a few ways but we have actually already done this through the following code:
if __name__ == '__main__':
    app.run(debug=True)
In order to try it out, let's introduce a bug to the hello_flask app by creating a typo. Here I have simply deleted the trailing e from the variable name:
@app.route('/hello/<name>')
@app.route('/hello/')
def hello(name=None):
    if nam is None:
        # No name was specified in the URL or the query string.
        abort(404)
When we fire up the development server and attempt to access our view, we are now presented with the debugging page:
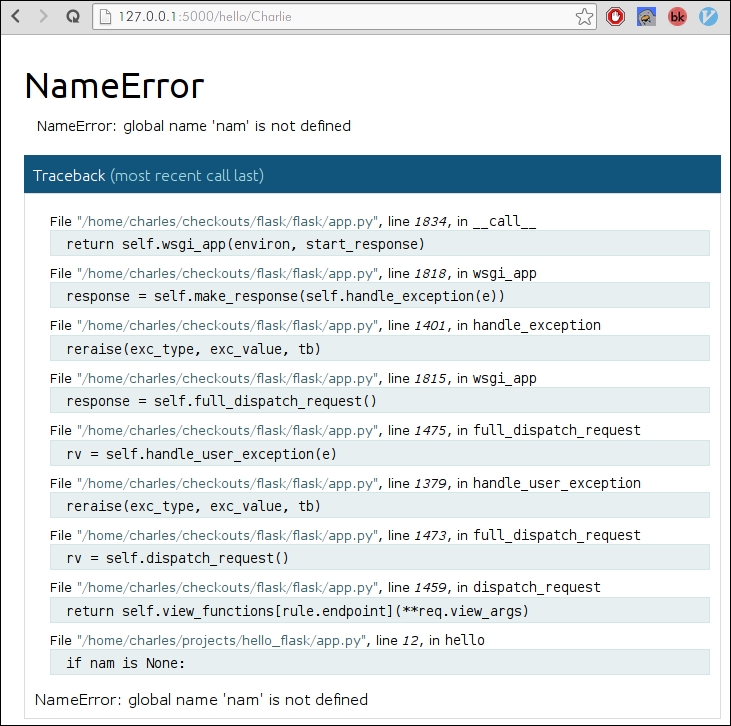
The Flask interactive debugger running in a web browser
This list of code is called a Traceback and it is made up of the call stack, the nested list of function calls that preceded the actual error. The traceback usually provides a very good clue as to what may have happened. At the very bottom we see the line of code we intentionally mistyped along with the actual Python error, which is a NameError exception telling us that nam is not defined.

Traceback detail showing our typo and a description of the error
The real magic happens when you place your mouse on the highlighted line with the mouse. On the right-hand side you will see two small icons representing a terminal and a source code file. Clicking the Source Code icon will expand the source code surrounding the line that contained the error. This is very useful for establishing some context when interpreting an error.
The terminal icon is the most interesting. When you click the Terminal icon, a small console appears with the standard Python prompt. This prompt allows you to inspect, in real-time, the values of the local variables at the time of the exception. Try typing in name and hitting Enter—it should display the value, if any, that was specified in the URL. We can also introspect the current request arguments as follows:

Introspecting variables using the debugging console
As you work through the chapters and experiment on your own, being able to quickly diagnose and correct any bugs will be an extremely valuable skill. We will return to the interactive debugger in Chapter 8, Testing Flask Apps but, for now, be aware that it exists and can be used to introspect your code when and where it breaks.
Over the rest of this book, we will be building, enhancing, and deploying a programmer-friendly blogging site. This project will introduce you to the most common web development tasks, such as working with relational databases, processing and validating form data, and (everyone's favorite), testing. In each chapter, you will learn a new skill through practical, hands-on coding projects. In the following table, I've listed a brief description of the core skills paired with the corresponding features of the blog:
It's always a good idea when starting a large project to have a functional specification in mind. For the blogging site, our spec will simply be the list of features that we want our blog to have. These features are based on my experience in building my personal blog:
Entries should be entered using web-based interfaces. For formatting, the author can use Markdown, a lightweight, visually appealing markup language.
Images can be uploaded to the site and easily embedded in blog entries.
Entries can be organized using any number of tags.
The site should support multiple authors.
Entries can be displayed in order of publication, but also listed by month, by tag, or by author. Long lists of entries will be paginated.
Entries can be saved as drafts and viewed by their author but nobody else until they are published.
Visitors to the site can post comments on entries, which will be checked for spam and then left to the author's discretion as to whether they should remain visible.
Atom feeds will be made available for all posts, including separate feeds for each author and tag.
Entries can be accessed using a RESTful API. Authors will be given an API token that will allow them to modify entries using the API.
While this list is not exhaustive, it covers the core functionality of our blogging site and you will hopefully find it both fun and challenging to build. At the end of the book, I will present some ideas for additional features that you might add, but first you need to become comfortable working with Flask. I'm sure you're eager to get started, so let's set up our blogging project.
Let's start by creating a new project within our working directory; on my laptop this is /home/charles/projects, or on a Unix system ~/projects, for short. This is exactly what we did when we created the hello_flask app:
$ cd ~/projects
$ mkdir blog
$ cd blog
We will then need to set up our virtualenv environment. This differs from what we did earlier as this is a more structured way of using virtualenv:
$ virtualenv blog
The next step will be to install Flask into our virtualenv. To do this, we will activate the virtualenv and use pip to install Flask:
$ source blog/bin/activate
(blog) $ pip install Flask
Up until now, all of this should be somewhat familiar to you. However, instead of creating a single file for our app, which we are definitely allowed to do and that makes sense for very small apps, we can also create a new folder named app that will allow us to make our app modular and more logical. Inside that folder, we will create five empty files named __init__.py, app.py, config.py, main.py, and views.py as follows:
mkdir app
touch app/{__init__,app,config,main,views}.py
This last command uses a little trick of your shell to create multiple files with the names within the brackets. If you use version control, you will want to treat the app directory as the root of your repository. The app directory will contain the source code, templates, and static assets for the blog app. If you haven't used version control, now would be a great time to give it a try. Pro Git is a great resource and is available for free at http://git-scm.com/book.
What are these files that we just created? As you will see, each file serves an important purpose. Hopefully their names provide a clue as to their purpose, but here is a brief overview of each module's responsibility:
|
|
Tells Python to use the app/ directory as a python package |
|
|
The Flask app |
|
|
Configuration variables for our Flask app |
|
|
Entry-point for executing our application |
|
|
URL routes and views for the app |
Let's fill in these files with the minimum amount of code needed to create a runnable Flask app. This will get our project in good shape for the second chapter, in which we'll start working on the code to store and retrieve blog entries from the database.
We will start with the config.py module. This module will contain a Configuration class that instructs Flask that we want to run our app in the DEBUG mode. Add the following two lines of code to the config.py module as follows:
class Configuration(object):
    DEBUG = True
Next we will create our Flask app and instruct it to use the configuration values specified in the config module. Add the following code to the app.py module:
from flask import Flask

from config import Configuration  # import our configuration data.

app = Flask(__name__)
app.config.from_object(Configuration)  # use values from our Configuration object.
The views module will contain a single view mapped to the root URL of the site. Add the following code to views.py:
from app import app

@app.route('/')
def homepage():
    return 'Home page'
As you probably noticed, we are still missing our call to app.run(). We will put that code in main.py, which we will use as the entry-point into our app. Add the following code to the main.py module:
from app import app  # import our Flask app
import views

if __name__ == '__main__':
    app.run()
We do not call app.run(debug=True) because we have already instructed Flask to run our app in the debug mode in the Configuration object.
You can run the app from the command-line by executing the main module as follows:
$ python main.py
 * Running on http://127.0.0.1:5000/
* Restarting with reloader
From humble beginnings...
Other than the Configuration class, most of this code should look familiar to you. We have basically taken the code from the hello_flask example and separated it into several modules. It may seem silly to write only two or three lines of code per file, but as our project grows you will see how this early commitment to organization pays off.
You may have noticed that there is an internal prioritization to these files, based on the order in which they are imported—this is to mitigate the possibility of a circular import. A circular import occurs when two modules mutually import each other and, hence, cannot be imported at all. When using the Flask framework, it is very easy to create circular imports because so many different things depend on the central app object. To avoid problems, some people just put everything into a single module. This works fine for smaller apps, but is not maintainable beyond a certain size or complexity. That is why we have broken our app into several modules and created a single entry-point that controls the ordering of imports.
Execution starts when you run python main.py from the command line. The first line of code that the Python interpreter runs into imports the app object from the app module. Now we're inside app.py, which imports Flask and our Configuration object. The rest of the app.py module is read and interpreted, and we're back into main.py again. The second line of main.py imports the views module. Now we're in views.py, which depends on app.py for @app.route and is, in fact, already available from main.py. The URL route and view are registered as the views module is interpreted, and we're back into main.py again. Since we are running main.py directly, the 'if' check will evaluate to True and our app will run.
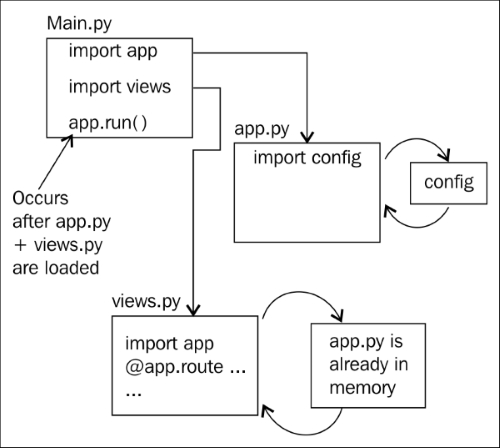
Import flow when executing main.py
By now you should be familiar with the process of setting up a new virtualenv for your Python project, be able to install Flask, and have created a simple app. In this chapter,we discussed how to create virtualenvs for your projects and install third-party packages using pip. We also learnt how to write a basic Flask app, route requests to views, and to read request arguments. We familiarized ourselves with the interactive debugger and with how the Python interpreter processes the import statements.
If you were already familiar with most of the subject-matter in this chapter, do not worry; things will soon get more challenging.
In the next chapter, you will discover how to work with a relational database to store and retrieve blog entries. We'll add a new module to our project for storing our database-specific code and create some models to represent blog entries and tags. Once we are able to store the entries, we will learn how to read them back in a variety of ways through filtering, sorting, and aggregation. For more information, you can refer to the following links: