Home Programming Learning C++ Functional Programming

Learning C++ Functional Programming

By Wisnu Anggoro
books-svg-icon Book
eBook $43.99 $29.99
Print $54.99
Subscription $15.99 $10 p/m for three months
$10 p/m for first 3 months. $15.99 p/m after that. Cancel Anytime!
What do you get with a Packt Subscription?
This book & 7000+ ebooks & video courses on 1000+ technologies
60+ curated reading lists for various learning paths
50+ new titles added every month on new and emerging tech
Early Access to eBooks as they are being written
Personalised content suggestions
Customised display settings for better reading experience
50+ new titles added every month on new and emerging tech
Playlists, Notes and Bookmarks to easily manage your learning
Mobile App with offline access
What do you get with a Packt Subscription?
This book & 6500+ ebooks & video courses on 1000+ technologies
60+ curated reading lists for various learning paths
50+ new titles added every month on new and emerging tech
Early Access to eBooks as they are being written
Personalised content suggestions
Customised display settings for better reading experience
50+ new titles added every month on new and emerging tech
Playlists, Notes and Bookmarks to easily manage your learning
Mobile App with offline access
What do you get with eBook + Subscription?
Download this book in EPUB and PDF formats, plus a monthly download credit
This book & 6500+ ebooks & video courses on 1000+ technologies
60+ curated reading lists for various learning paths
50+ new titles added every month on new and emerging tech
Early Access to eBooks as they are being written
Personalised content suggestions
Customised display settings for better reading experience
50+ new titles added every month on new and emerging tech
Playlists, Notes and Bookmarks to easily manage your learning
Mobile App with offline access
What do you get with a Packt Subscription?
This book & 6500+ ebooks & video courses on 1000+ technologies
60+ curated reading lists for various learning paths
50+ new titles added every month on new and emerging tech
Early Access to eBooks as they are being written
Personalised content suggestions
Customised display settings for better reading experience
50+ new titles added every month on new and emerging tech
Playlists, Notes and Bookmarks to easily manage your learning
Mobile App with offline access
What do you get with eBook?
Download this book in EPUB and PDF formats
Access this title in our online reader
DRM FREE - Read whenever, wherever and however you want
Online reader with customised display settings for better reading experience
What do you get with video?
Download this video in MP4 format
Access this title in our online reader
DRM FREE - Watch whenever, wherever and however you want
Online reader with customised display settings for better learning experience
What do you get with video?
Stream this video
Access this title in our online reader
DRM FREE - Watch whenever, wherever and however you want
Online reader with customised display settings for better learning experience
What do you get with Audiobook?
Download a zip folder consisting of audio files (in MP3 Format) along with supplementary PDF
What do you get with Exam Trainer?
Flashcards, Mock exams, Exam Tips, Practice Questions
Access these resources with our interactive certification platform
Mobile compatible-Practice whenever, wherever, however you want
BUY NOW $10 p/m for first 3 months. $15.99 p/m after that. Cancel Anytime!
eBook $43.99 $29.99
Print $54.99
Subscription $15.99 $10 p/m for three months
What do you get with a Packt Subscription?
This book & 7000+ ebooks & video courses on 1000+ technologies
60+ curated reading lists for various learning paths
50+ new titles added every month on new and emerging tech
Early Access to eBooks as they are being written
Personalised content suggestions
Customised display settings for better reading experience
50+ new titles added every month on new and emerging tech
Playlists, Notes and Bookmarks to easily manage your learning
Mobile App with offline access
What do you get with a Packt Subscription?
This book & 6500+ ebooks & video courses on 1000+ technologies
60+ curated reading lists for various learning paths
50+ new titles added every month on new and emerging tech
Early Access to eBooks as they are being written
Personalised content suggestions
Customised display settings for better reading experience
50+ new titles added every month on new and emerging tech
Playlists, Notes and Bookmarks to easily manage your learning
Mobile App with offline access
What do you get with eBook + Subscription?
Download this book in EPUB and PDF formats, plus a monthly download credit
This book & 6500+ ebooks & video courses on 1000+ technologies
60+ curated reading lists for various learning paths
50+ new titles added every month on new and emerging tech
Early Access to eBooks as they are being written
Personalised content suggestions
Customised display settings for better reading experience
50+ new titles added every month on new and emerging tech
Playlists, Notes and Bookmarks to easily manage your learning
Mobile App with offline access
What do you get with a Packt Subscription?
This book & 6500+ ebooks & video courses on 1000+ technologies
60+ curated reading lists for various learning paths
50+ new titles added every month on new and emerging tech
Early Access to eBooks as they are being written
Personalised content suggestions
Customised display settings for better reading experience
50+ new titles added every month on new and emerging tech
Playlists, Notes and Bookmarks to easily manage your learning
Mobile App with offline access
What do you get with eBook?
Download this book in EPUB and PDF formats
Access this title in our online reader
DRM FREE - Read whenever, wherever and however you want
Online reader with customised display settings for better reading experience
What do you get with video?
Download this video in MP4 format
Access this title in our online reader
DRM FREE - Watch whenever, wherever and however you want
Online reader with customised display settings for better learning experience
What do you get with video?
Stream this video
Access this title in our online reader
DRM FREE - Watch whenever, wherever and however you want
Online reader with customised display settings for better learning experience
What do you get with Audiobook?
Download a zip folder consisting of audio files (in MP3 Format) along with supplementary PDF
What do you get with Exam Trainer?
Flashcards, Mock exams, Exam Tips, Practice Questions
Access these resources with our interactive certification platform
Mobile compatible-Practice whenever, wherever, however you want
  1. Free Chapter
    Diving into Modern C++
About this book
Functional programming allows developers to divide programs into smaller, reusable components that ease the creation, testing, and maintenance of software as a whole. Combined with the power of C++, you can develop robust and scalable applications that fulfill modern day software requirements. This book will help you discover all the C++ 17 features that can be applied to build software in a functional way. The book is divided into three modules—the first introduces the fundamentals of functional programming and how it is supported by modern C++. The second module explains how to efficiently implement C++ features such as pure functions and immutable states to build robust applications. The last module describes how to achieve concurrency and apply design patterns to enhance your application’s performance. Here, you will also learn to optimize code using metaprogramming in a functional way. By the end of the book, you will be familiar with the functional approach of programming and will be able to use these techniques on a daily basis.
Publication date:
August 2017
Publisher
Packt
Pages
304
ISBN
9781787281974


Chapter 1. Diving into Modern C++

The C++ programming language has been changed dramatically since its invention in 1979. Some people in this era might be a little bit scared to code using C++ language since it is not user-friendly. The memory management we have to deal with sometimes makes people unwilling to use this language. Fortunately, since C++11--also known as modern C++, along with C++14 and C++17--has been released, numerous features have been introduced to simplify our code in the C++ language. Moreover, the best part of it is that the C++ programming language is a great language for any project, from low-level programming to web programming, as well as functional programming.

This chapter is the best place to start our journey in this book, as it is addressed to the C++ programmers to refresh their knowledge and will discuss the following topics:

  • Understanding several new features in modern C++
  • Implementing the C++ Standard Libraries in modern C++
  • The use of the Lambda expression and all features included in C++ Lambda
  • Using smart pointer to avoid manual memory management
  • Dealing with many return values using tuples
 

Getting closer with several new features in modern C++


So, what is new in modern C++ in comparison to the old one? There are so many changes in modern C++ compared to the old one, and the book pages will dramatically increase if we discuss all of them. However, we will discuss the new features in modern C++, which we should know about, to make us more productive in coding activities. We will discuss several new keywords, such as auto, decltype, and nullptr. We will also discuss the enhancement of the begin() and end() function that has now become a non-member class function. We will also discuss the augmented support for the for-eachtechnique to iterate over collections using the range-based for looptechniques.

The next few subsections in this chapter will also discuss the new features of modern C++, namely Lambda expressions, smart pointers, and tuples, which were just added in the C++11 release.

Defining the data type automatically using the auto keyword

Prior to the modern C++, the C++ language has a keyword named auto that is used to explicitly specify that the variable should have automatic duration. The automatic duration that adheres to the variable will create the variable at the point of definition (and initialized, if relevant) and destroy the variable when the block they are defined in is exited. For instance, the local variable will be created when it is defined at the beginning of the function and destroyed when the program exits the function where the local variable is there.

Since C++11, the auto keyword is used to tell the compiler to deduce the actual type of a variable that is being declared from its initializer. And since C++14, the keyword can also be applied to a function to specify the return type of the function that is a trailing return type. Now, in modern C++, the use of the auto keyword to specify the automatic duration is abolished since all variables are set to automatic duration by default.

The following is an auto.cpp code demonstrating the use of the auto keyword in the variables. We will define four variables with the auto keyword, and then find out the data type for each variable using the typeid() function. Let's take a look:

    /* auto.cpp */

    #include <iostream>
    #include <typeinfo>

    int main()
    {
      std::cout << "[auto.cpp]" << std::endl;

      // Creating several auto-type variables
      auto a = 1;
      auto b = 1.0;
      auto c = a + b;
      auto d = {b, c};

      // Displaying the preceding variables' type
      std::cout << "type of a: " << typeid(a).name() << std::endl;
      std::cout << "type of b: " << typeid(b).name() << std::endl;
      std::cout << "type of c: " << typeid(c).name() << std::endl;
      std::cout << "type of d: " << typeid(d).name() << std::endl;
      return 0;
    }

As we can see in the preceding code, we have an a variable that will store the integer value and have a b variable that will store the double value. We calculate the addition of a and b and store the result in variable c. Here, we expect that c will store the double object since we add the integer and double object. The last is the d variable that will store the initializer_list<double> data type. When we run the preceding code, we will see the following output on the console:

As can be seen in the preceding snapshot, we are just given the first character of the data type, such as i for integer, d for double, and St16initializer_listIdE for initializer_list<double>, that is the last lowercase d character that stands for double.

Note

We may have to enable the Run-Time Type Information (RTTI) feature in our compiler options to retrieve the data type object. However, GCC has enabled the feature by default. Also, the output of the use of the typeid() function depends on the compiler. We may get the raw type name or just a symbol as we did in the preceding example.

Besides, for variable, as we discussed earlier, the auto keyword can also be applied to a function to deduce a function's return type automatically. Suppose we have the following trivial function named add() to calculate the addition of two parameters:

    int add(int i, int j)
    {
      return i + j;
    }

We can refactor the preceding method to use the auto keyword, as we can see in the following lines of code:

    auto add(int i, int j)
    {
      return i + j;
    }

Similar to the auto-type variable, the compiler can decide the correct return type based on the returned value of the function. And, as shown in the preceding code, the function will indeed return the integer value since we just add two integer values.

Another feature that uses the auto keyword in modern C++ is trailing the return type syntax. By using this feature, we can specify the return type, the rest of the function prototype, or function signature. From the preceding code, we can refactor it to use the feature as follows:

    auto add(int i, int j) -> int
    {
      return i + j;
    }

You might ask me why we have to specify the data type again after the arrow symbol (->), even though we have used the auto keyword. We will find the answer when we cover the decltype keyword in the next section. Also, by using this feature, we can now refactor the preceding auto.cpp code a little bit by modifying the syntax of the main() method, instead of the following syntax of main() function signature:

    int main()
    {
      // The body of the function
    }

We can change the signature syntax into the following line of code:

    auto main -> int
    {
      // The body of the function
    }

Now, we will see all of our code in this book using this trailing return type feature to apply the modern C++ syntax.

Querying the type of an expression using the decltype keyword

We discussed in the preceding section that the auto keyword can automatically deduce the type of the variable based on the type of values it stores. The keyword can also deduce the function's return type based on the type of its return value. Now, let's combine the auto keyword and the decltype keyword to gain the power of modern C++.

Before we combine the two keywords, we will find out what the decltype keyword is used for--it is used for asking the type of an object or an expression. Let's take a look at the following several lines of trivial variable declaration:

    const int func1();
    const int& func2();
    int i;

    struct X { double d; };
    const X* x = new X();

Now, based on the preceding code, we can declare other variables using the decltype keyword as follows:

    // Declaring const int variable
    // using func1() type
    decltype(func1()) f1;

    // Declaring const int& variable
    // using func2() type
    decltype(func2()) f2;

    // Declaring int variable
    // using i type
    decltype(i) i1;

    // Declaring double variable
    // using struct X type
    decltype(x->d) d1; // type is double
    decltype((x->d)) d2; // type is const double&

As we can see in the preceding code, we can specify the type of an object based on another object's type. Now, let's suppose we need to refactor the preceding add() method to become a template. Without the auto and decltype keyword, we will have the following template implementation:

    template<typename I, typename J, typename K>
    K add(I i, J j)
    {
      return i + j;
    }

Fortunately, since the auto keyword can specify the return type of the function, which is a trailing return type, and the decltype keyword can deduce the type based on the expression, we can refactor the preceding template as follows:

    template<typename I, typename J>
    auto add(I i, J j) -> decltype(i + j)
    {
      return i + j;
    }

To prove, let's compile and run the following decltype.cpp code. We will use the following template to calculate the addition of two different value types--integer and double:

    /* decltype.cpp */
    #include <iostream>

    // Creating template
    template<typename I, typename J>
    auto add(I i, J j) -> decltype(i + j)
    {
      return i + j;
    }

    auto main() -> int
    {
      std::cout << "[decltype.cpp]" << std::endl;

      // Consuming the template
      auto d = add<int, double>(2, 2.5);

      // Displaying the preceding variables' type
      std::cout << "result of 2 + 2.5: " << d << std::endl;

      return 0;
    }

The compilation process should run smoothly without error. We will see the following output on the screen if we run the preceding code:

As we can see, we have successfully combined the auto and decltype keyword to create a template simpler than we usually do before the modern C++ is announced.

Pointing to a null pointer

Another new feature in modern C++ is a keyword named nullptr that replaces the NULL macro to represent a null pointer. Now, there's no ambiguity in the use of the NULL macro for zero numeric or a null pointer. Let's suppose we have the following two method's signature in our declaration:

    void funct(const char *);
    void funct(int)

The former function will pass a pointer as the argument and the latter will pass the integer number as its argument. Then, we invoke the funct() method and pass the NULL macro as the parameter, as shown here:

    funct(NULL);

What we intend to call is the former function. However, since we pass the NULL parameters, which is basically defined as 0, the latter function will be invoked. In modern C++, we can use the nullptr keyword to ensure that we will pass a null pointer to the argument. The invocation of the funct() method should be as follows:

    funct(nullptr);

Now the compiler will invoke the former function since it passes a null pointer to the argument, and this is what we expect. There will be no ambiguity anymore, and it will avoid unnecessary future problems.

Returning an iterator using non-member begin() and end() function

Prior to modern C++, to iterate a sequence, we call the begin() and end() member method of each container. For array, we can iterate its element by iterating the index. Since C++11, the language has a non-member function--begin() and end()--to retrieve the iterator of the sequence. Let's suppose we have an array of the following elements:

    int arr[] = { 0, 1, 2, 3, 4, 5, 6, 7, 8, 9 };

When the language doesn't have the begin() and end() function, we need to iterate the elements of the array using the index we can see in the following lines of code:

    for (unsigned int i = 0; i < sizeof(arr)/sizeof(arr[0]); ++i)
    // Do something to the array

Fortunately, using the begin() and end() function, we can refactor the preceding for loop to become as follows:

    for (auto i = std::begin(arr); i != std::end(arr); ++i)
    // Do something to the array

As we can see, the use of the begin() and end() function creates a compact code since we don't need to worry about the length of the array because the iterator pointer of begin() and end() will do it for us. For comparison, let's take a look at the following begin_end.cpp code:

    /* begin_end.cpp */
    #include <iostream>

    auto main() -> int
    {
      std::cout << "[begin_end.cpp]" << std::endl;

      // Declaring an array
      int arr[] = { 0, 1, 2, 3, 4, 5, 6, 7, 8, 9 };

      // Displaying the array elements
      // using conventional for-loop
      std::cout << "Displaying array element using conventional for-
       loop";
      std::cout << std::endl;
      for (unsigned int i = 0; i < sizeof(arr)/sizeof(arr[0]); ++i)
      std::cout << arr[i] << " ";
      std::cout << std::endl;

      // Displaying the array elements
      // using non-member begin() and end()
      std::cout << "Displaying array element using non-member begin()
       and end()";
      std::cout << std::endl;
      for (auto i = std::begin(arr); i != std::end(arr); ++i)
       std::cout << *i << " ";
      std::cout << std::endl;

      return 0;
    }

To prove the preceding code, we can compile the code, and, when we run it, the following output should be displayed on the console screen:

As we can see in the screenshot, we've got the exact same output when we use the conventional for-loop or begin() and end() functions.

Iterating over collections using range-based for loops

In the modern C++, there is a new feature that is augmented to support the for-each technique to iterate over collections. This feature is useful if you want to do something to the elements of a collection or array without caring about the number of elements or the indexes. The syntax of the feature is also simple. Suppose we have an array named arr and we want to iterate each element using the range-based for loop technique; we can use the following syntax:

    for (auto a : arr)
    // Do something with a

So, we can refactor our preceding begin_end.cpp code to use range-based for loop as we can see in the following code:

    /* range_based_for_loop.cpp */
    #include <iostream>

    auto main() -> int
    {
      std::cout << "[range_based_for_loop.cpp]" << std::endl;

      // Declaring an array
      int arr[] = {0, 1, 2, 3, 4, 5, 6, 7, 8, 9};

      // Displaying the array elements
      // using non-member begin() and end()
      std::cout << "Displaying array element using range-based for
        loop";
      std::cout << std::endl;
for (auto a : arr) std::cout << a << " ";
      std::cout << std::endl;

      return 0;
    }

The syntax we see in the preceding code is simpler now. If we compile the preceding code, we should find no error and, if we run the code, we should see the following output on the console screen:

We now have a new technique to iterate over the collection without caring about the indexes of the collection. We will keep using it in this book.


Leveraging the use of C++ language with the C++ Standard Libraries


The C++ Standard Libraries are a powerful set of classes and functions that have many capabilities needed to create an application. They are controlled by the C++ ISO Standard Committee and is influenced by the Standard Template Libraries (STL), which were the generic libraries before C++11 was introduced. All features in Standard Libraries are declared in std namespace and no headers end in .h anymore (except 18 headers of the ISO C90 C Standard Library that is incorporated into the C++ Standard Libraries).

There are several header files containing the declaration of the C++ Standard Libraries. However, it is almost impossible to discuss all header files in these tiny chapters. We will, therefore, talk about some features that we will use most in our daily coding activities.

Placing any objects in the container

Container is an object that is used to store other objects and manage the memory that is used by the objects it contains. An array is a new feature added in C++11 to store the collection of specific data types. It is a sequence container since it stores the same data type objects and arranges them linearly. Let's take a look at the following code snippet:

    /* array.cpp */
    #include <array>
    #include <iostream>

    auto main() -> int
    {
      std::cout << "[array.cpp]" << std::endl;

      // Initializing an array containing five integer elements
      std::array<int, 10> arr = { 0, 1, 2, 3, 4, 5, 6, 7, 8, 9 };

      // Displaying the original elements of the array
      std::cout << "Original Data : ";
      for(auto a : arr) std::cout << a << " ";
      std::cout << std::endl;

      // Modifying the content of
      // the 1st and 3rd element of the array
      arr[1] = 9;
      arr[3] = 7;

      // Displaying the altered array elements
      std::cout << "Manipulated Data: ";
      for(auto a : arr) std::cout << a << " ";
      std::cout << std::endl;

      return 0;
     }

As we can see in the preceding code, we instance a new array named arr, set its length as 10, and only approve the int element. As we can guess, the output of the code is a line of numbers 0 through 9, which is shown in the original data, and the other line will show the altered data, as we can see in the following screenshot:

Note

There is no performance issue if we declare an array using std::array; we use in the array.cpp code and compare it with a usual array as we use in the begin_end.cpp code. However, in modern C++, we are given a new array declaration that has a friendly value semantic, so that it can be passed to or returned from functions by value. Also, the interface of this new array declaration makes it more convenient to find the size, and use it with Standard Template Library (STL)-style iterator-based algorithms.

It is good to use an array as the container since we can store the data and manipulate them. We can also sort and find a specific element if we want. However, since the array is a compile-time non-resizable object, we have to decide the size of the array we intend to use at the very beginning as we cannot change the size later. In other words, we cannot insert or remove the element from the existing array. As a solution to this problem, and for the best practice of using the container as well, we can now use a vector to store our collection. Let's take a look at the following code:

    /* vector.cpp */
    #include <vector>
    #include <iostream>

    auto main() -> int
    {
      std::cout << "[vector.cpp]" << std::endl;

      // Initializing a vector containing three integer elements
      std::vector<int> vect = { 0, 1, 2 };

      // Displaying the original elements of the vector
      std::cout << "Original Data : ";
      for (auto v : vect) std::cout << v << " ";
      std::cout << std::endl;

      // Adding two new data
      vect.push_back(3);
      vect.push_back(4);

      // Displaying the elements of the new vector
      // and reverse the order
      std::cout << "New Data Added : ";
      for (auto v : vect) std::cout << v << " ";
      std::cout << std::endl;

      // Modifying the content of
      // the 2nd and 4th element of the vector
      vect.at(2) = 5;
      vect.at(4) = 6;

      // Displaying the altered array elements
      std::cout << "Manipulate Data: ";
      for (auto v : vect) std::cout << v << " ";
      std::cout << std::endl;

      return 0;
    }

Now, we have a vector instance in our preceding code instead of an array instance. As we can see, we give an additional value for the vector instance using the push_back() method. We can add the value anytime we want. The manipulation of each element is also easier since vector has an at() method that returns a reference to the element of the specific index. The following screenshot is what we will see as the output when running the code:

Note

It is better to always use the at() method instead of the [] operator when we want to access the specific element by its index in a vector instance. It's because, when we accidentally access the out of range position, the at() method will throw an out_of_range exception. Otherwise, the [] operator will give undefined behavior.

Using algorithms

We can sort the elements of the collection we have in array or vector, as well as find specific content of the element. For these purposes, we have to use the algorithm feature provided by the C++ Standard Library. Let's take a look at the following code to demonstrate the sorting element capability in the algorithm feature:

    /* sort.cpp */
    #include <vector>
    #include <algorithm>
    #include <iostream>

    bool comparer(int a, int b)
    {
      return (a > b);
    }

    auto main() -> int
    {
      std::cout << "[sort.cpp]" << std::endl;

      // Initializing a vector containing several integer elements
      std::vector<int> vect = { 20, 43, 11, 78, 5, 96 };

      // Displaying the original elements of the vector
      std::cout << "Original Data : ";
      for (auto v : vect)
      std::cout << v << " ";
      std::cout << std::endl;

      // Sorting the vector element ascending
      std::sort(std::begin(vect), std::end(vect));

      // Displaying the ascending sorted elements
      // of the vector
      std::cout << "Ascending Sorted : ";
      for (auto v : vect)
      std::cout << v << " ";
      std::cout << std::endl;

      // Sorting the vector element descending
      // using comparer
      std::sort(std::begin(vect), std::end(vect), comparer);

      // Displaying the descending sorted elements
      // of the vector
      std::cout << "Descending Sorted: ";
      for (auto v : vect)
      std::cout << v << " ";
      std::cout << std::endl;

      return 0;
   }

As we see in the preceding code, we invoked the sort() method twice. First, we just supplied the range of the elements we wanted to sort. Then we added the comparison function, comparer(), to be provided to the sort() method to gain more flexibility the method has. The output we will see on the console from the preceding code is as follows:

From the preceding screenshot, we can see that we have six elements in a vector at the beginning. We then sort the elements of the vector using a simple sort() method. Then, we invoke the sort() method again, but instead of a simple sort() method, we now supply comparer() to the sort() method. As a result, the vector elements will be sorted descendingly since the comparer() function looks for the greater value from two inputs.

Now, let's move to another capability the algorithm feature has, which is finding a particular element. Let's suppose we have the Vehicle class in our code. It has two private fields named m_vehicleType and m_totalOfWheel, and we can retrieve the value from the getter methods named GetType() and GetNumOfWheel() respectively. It also has two constructors, which are the default constructor and the user-defined one. The declaration of the class should be as follows:

    /* vehicle.h */
    #ifndef __VEHICLE_H__
    #define __VEHICLE_H__

    #include <string>

    class Vehicle
    {
      private:
        std::string vehicleType;
        int totalOfWheel;

      public:
        Vehicle(
          const std::string &type,
          int _wheel);
        Vehicle();
        ~Vehicle();
        std::string GetType() const {return vehicleType;}
        int GetNumOfWheel() const {return totalOfWheel;}
    };

    #endif // End of __VEHICLE_H__

The implementation of the Vehicle class is as follows:

    /* vehicle.cpp */
    #include "vehicle.h"

    using namespace std;

    // Constructor with default value for
    // m_vehicleType and m_totalOfWheel
    Vehicle::Vehicle() : m_totalOfWheel(0)
    {
    }

    // Constructor with user-defined value for
    // m_vehicleType and m_totalOfWheel
    Vehicle::Vehicle( const string &type, int wheel) :
     m_vehicleType(type),
     m_totalOfWheel(wheel)
    {
    }

    // Destructor
    Vehicle::~Vehicle()
    {
    }

We will store a collection of Vehicle in the vector container, and then we will search for some elements based on its property. The code will be as follows:

    /* find.cpp */
    #include <vector>
    #include <algorithm>
    #include <iostream>
    #include "../vehicle/vehicle.h"

    using namespace std;

    bool TwoWheeled(const Vehicle &vehicle)
    {
      return _vehicle.GetNumOfWheel() == 2 ? 
        true : false;
     }

    auto main() -> int
    {
      cout << "[find.cpp]" << endl;

      // Initializing several Vehicle instances
      Vehicle car("car", 4);
      Vehicle motorcycle("motorcycle", 2);
      Vehicle bicycle("bicycle", 2);
      Vehicle bus("bus", 6);

      // Assigning the preceding Vehicle instances to a vector
      vector<Vehicle> vehicles = { car, motorcycle, bicycle, bus };

      // Displaying the elements of the vector
      cout << "All vehicles:" << endl;;
      for (auto v : vehicles)
        std::cout << v.GetType() << endl;
      cout << endl;

      // Displaying the elements of the vector
      // which are the two-wheeled vehicles
      cout << "Two-wheeled vehicle(s):" << endl;;
      auto tw = find_if(
                      begin(vehicles),
                      end(vehicles),
                      TwoWheeled);
      while (tw != end(vehicles))
      {
        cout << tw->GetType() << endl ;
        tw = find_if(++tw, end(vehicles), TwoWheeled);
      }
      cout << endl;

      // Displaying the elements of the vector
      // which are not the two-wheeled vehicles
      cout << "Not the two-wheeled vehicle(s):" << endl;;
      auto ntw = find_if_not(begin(vehicles),
                           end(vehicles),
                           TwoWheeled);
      while (ntw != end(vehicles))
      {
        cout << ntw->GetType() << endl ;
        ntw = find_if_not(++ntw, end(vehicles), TwoWheeled);
      }

      return 0;
     }

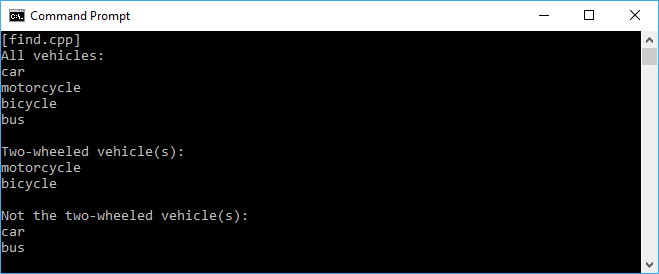
As we can see, we instance four Vehicle objects, then store them in vector. There, we try to find the vehicle that has two wheels. The find_if() function is used for this purpose. We also have the TwoWheeled() method to provide the comparison value. Since we are finding the two-wheeled vehicle, we will inspect the totalOfWheel variable in the Vehicle class by invoking the GetNumOfWheel() method. In contrast, if we want to find the element that doesn't conform to the comparison value, we can use the find_if_not() function, which had been added in C++11. The output we get should look like this:

Note

As we can see in the vehicle.cpp code and find.cpp code, we now add the using namespace std; line in the *.cpp files. We do this to make our coding activity become more productive since we don't have to type many words. In contrast, in vehicle.h, we still using std:: followed by the methods or properties name rather than use the std namespace at the beginning. It's best practice to not declare using namespace in header files since the header files are the files we will deliver if we create some libraries for instances. The user of our library may have another method with the same name as the function our library has. It will definitely create conflict between these two functions.

Another algorithm feature we will use most is the for_each loop. Instead of using the for loop, the use of the for_each loop will make our code more concise in many cases. It's also simpler and less error prone than a for loop because we can define a specific function for the for_each loop. Now let's refactor our previous code to use the for_each loop. The code is written as follows:

    /* for_each.cpp */
    #include <vector>
    #include <algorithm>
    #include <iostream>
    #include "vehicle.h"

    using namespace std;

    void PrintOut(const Vehicle &vehicle)
    {
      cout << vehicle.GetType() << endl;
    }

    auto main() -> int
   {
      cout << "[for_each.cpp]" << endl;

      // Initializing several Vehicle instances
      Vehicle car("car", 4);
      Vehicle motorcycle("motorcycle", 2);
      Vehicle bicycle("bicycle", 2);
      Vehicle bus("bus", 6);

      // Assigning the preceding Vehicle instances to a vector
      vector<Vehicle> vehicles = { car, motorcycle, bicycle, bus };

      // Displaying the elements of the vector
      cout << "All vehicles:" << endl;
      for_each(begin(vehicles), end(vehicles), PrintOut);

      return 0;
    }

Now, with the for_each loop, we have a clearer code. We only need to provide the first and last iterator and then pass a function--the PrintOut() function in this case--that will be invoked in each element in the range.


Simplifying the function notation using a Lambda expression


The Lambda expression is an anonymous notation that represents something that performs an operation or calculation. In functional programming, the Lambda expression is useful to produce the first class and pure function, which we will discuss in separate chapters in this book. For now, let's familiarize ourselves with this new feature introduced in C++11 by investigating three basic parts of the Lambda expression:

  • capturing list: []
  • parameter list: ()
  • body: {}

The order of these three basic parts is as follows:

    [](){} 

The capturing list part is also used as a mark to identify the Lambda expression. It is a placeholder to value to be involved in the expression. The only capture defaults are the ampersand symbol (&), which will implicitly capture the automatic variables by reference, and the equal sign (=), which will implicitly capture the automatic variables by copy (we will discuss it further in the upcoming section). The parameter list is similar to the capturing list in every function where we can pass the value to it. The body is the implementation of the function itself.

Using the Lambda expression for a tiny function

Imagine we have a tiny one-line function that we invoke only once. It's better if we write the operation of that function directly when we need it. We actually had this function in our previous example when discussing the C++ Standard Library. Just go back to the for_each.cpp file and we will find the PrintOut() function that is only invoked once by for_each(). We can make this for_each loop more readable if we use Lambda. Let's take a look at the following code snippet to examine how we refactor the for_each.cpp file:

    /* lambda_tiny_func.cpp */
    #include <vector>
    #include <algorithm>
    #include <iostream>
    #include "../vehicle/vehicle.h"

    using namespace std;

    auto main() -> int
    {
      cout << "[lambda_tiny_func.cpp]" << endl;

      // Initializing several Vehicle instances
      Vehicle car("car", 4);
      Vehicle motorcycle("motorcycle", 2);
      Vehicle bicycle("bicycle", 2);
      Vehicle bus("bus", 6);

      // Assigning the preceding Vehicle instances to a vector
      vector<Vehicle> vehicles = { car, motorcycle, bicycle, bus };

      // Displaying the elements of the vector
      // using Lambda expression
      cout << "All vehicles:" << endl;
      for_each(
             begin(vehicles),
             end(vehicles),
             [](const Vehicle &vehicle){
                 cout << vehicle.GetType() << endl;
            });

      return 0;
    }

As we can see, we have transformed the PrintOut() function that we used in the for_each.cpp file into a Lambda expression and passed it to the for_each loop. It will indeed give the same output as the for_each.cpp file does. However, now our code becomes more concise and readable.

Using the Lambda expression for multiline functions

The Lambda expression can also be used for multiline functions, so we can put the body of the function on it. This will make our code more readable as well. Let's make a new code. In that code, we will have an integer collection and an intent to inspect whether the selected element is the prime number or not. We can make a separate function, for instance, PrintPrime(), then invoke it. However, since the prime number checking operation is called only once, it's more readable if we transform it into a Lambda expression. The code should look like this:

    /* lambda_multiline_func.cpp */
    #include <vector>
    #include <algorithm>
    #include <iostream>

    using namespace std;

    auto main() -> int
    {
      cout << "[lambda_multiline_func.cpp]" << endl;

      // Initializing a vector containing integer element
      vector<int> vect;
      for (int i = 0; i < 10; ++i)
        vect.push_back(i);

      // Displaying whether or not the element is prime number
      for_each(
             begin(vect),
             end(vect),
             [](int n) {
                cout << n << " is";
                if(n < 2)
                {
                  if(n == 0)
                  cout << " not";
                }
                else
                {
                  for (int j = 2; j < n; ++j)
                    {
                       if (n % j == 0)
                       {
                         cout << " not";
                         break;
                       }
                   }
                 }

                cout << " prime number" << endl;
            });

        return 0;
     }

The output we should see on the screen is as follows:

As we can see in the preceding screenshot, we have successfully identified the prime number by using the Lambda expression.

Returning a value from the Lambda expression

Our two preceding samples of the Lambda expression are just for the purpose to print on console. It means the function does not need to return any value. However, we can ask the Lambda expression to return a value for an instance if we do the calculation inside the function and return the calculation result. Let's take a look at the following code to examine the use of this Lambda:

    /* lambda_returning_value.cpp */
    #include <vector>
    #include <algorithm>
    #include <iostream>

    using namespace std;

    auto main() -> int
    {
      cout << "[lambda_returning_value.cpp]" << endl;

      // Initializing a vector containing integer element
      vector<int> vect;
      for (int i = 0; i < 10; ++i)
        vect.push_back(i);

      // Displaying the elements of vect
      cout << "Original Data:" << endl;
      for_each(
             begin(vect),
             end(vect),
             [](int n){
                cout << n << " ";
            });
      cout << endl;

      // Creating another vect2 vector
      vector<int> vect2;
      // Resize the size of vect2 exactly same with vect
      vect2.resize(vect.size());
      // Doubling the elements of vect and store to vect2
      transform(
              begin(vect),
              end(vect),
              begin(vect2),
              [](int n) {
                return n * n;
            });

      // Displaying the elements of vect2
      cout << "Squared Data:" << endl;
      for_each(
             begin(vect2),
             end(vect2),
             [](int n) {
                cout << n << " ";
            });
      cout << endl;

      // Creating another vect3 vector
      vector<double> vect3;
      // Resize the size of vect3 exactly same with vect
      vect3.resize(vect.size());
      // Finding the average of the elements of vect
      // and store to vect2
      transform(
              begin(vect2),
              end(vect2),
              begin(vect3),
              [](int n) -> double {
                return n / 2.0;
            });

      // Displaying the elements of vect3
      cout << "Average Data:" << endl;
      for_each(
             begin(vect3),
             end(vect3),
             [](double d) {
                cout << d << " ";
            });
      cout << endl;

      return 0;
     }

When we use the transform() method in the preceding code, we have a Lambda expression that returns a value from the calculation of n * n. However, there's no return type stated in the expression. This is because we can omit the statement of the return type since the compiler has understood that the expression will return an integer value. So, after we have another vector, vect2, which has the same size as vect, we can invoke the transform() method along with the Lambda expression, and the value of vect will be doubled and stored in vect2.

We can, if we want to, specify the return type to the Lambda expression. As we can see in the preceding code, we transformed the vect3 vector based on all values of the vect vector, but now we specify the return type to double using the arrow symbol (->). The result of the preceding code should be like the following screenshot:

As we can see from the preceding screenshot, we have successfully found the doubled and average result using the Lambda expression.

Capturing a value to the Lambda expression

In our previous Lambda expression examples, we keep the capturing part and the square bracket ([]) empty since the Lambda doesn't capture anything and doesn't have any extra member variable in the anonymous object generated by the compiler. We can also specify the object we want to capture in the Lambda expression by specifying it in this square bracket. Let's take a look at the following piece of code to go through the discussion:

    /* lambda_capturing_by_value.cpp */
    #include <vector>
    #include <algorithm>
    #include <iostream>

    using namespace std;

    auto main() -> int
    {
      cout << "[lambda_capturing_by_value.cpp]" << endl;

      // Initializing a vector containing integer element
      vector<int> vect;
      for (int i = 0; i < 10; ++i)
      vect.push_back(i);

      // Displaying the elements of vect
      cout << "Original Data:" << endl;
      for_each(
             begin(vect),
             end(vect),
             [](int n){
                cout << n << " ";
             });
      cout << endl;

      // Initializing two variables
      int a = 2;
      int b = 8;

      // Capturing value explicitly from the two variables
      cout << "Printing elements between " << a;
      cout << " and " << b << " explicitly [a,b]:" << endl;
      for_each(
             begin(vect),
             end(vect),
             [a,b](int n){
                if (n >= a && n <= b)
                cout << n << " ";
             });
      cout << endl;

      // Modifying variable a and b
      a = 3;
      b = 7;

      // Capturing value implicitly from the two variables
      cout << "printing elements between " << a;
      cout << " and " << b << " implicitly[=]:" << endl;
      for_each(
             begin(vect),
             end(vect),
             [=](int n){
                if (n >= a && n <= b)
                cout << n << " ";
            });
      cout << endl;

      return 0;
    }

In the preceding code, we will try to capture the value in the Lambda expression, explicitly and implicitly. Let's suppose we have two variables, a and b, and we want to explicitly capture the values, we can specify them in the Lambda expression using the [a,b] statement, and then using the values inside the function body. Moreover, if we wish to capture the value implicitly, just use [=] for the capturing part and then the expression will know which variable we intend to use when we specify them in the function body. If we run the preceding code, we will get the following output on the screen:

We can also mutate the state of the values we capture without modifying the value outside the Lambda expression function body. For this purpose, we can use the same techniques as used previously, and add the mutable keyword as shown in the following block of code:

    /* lambda_capturing_by_value_mutable.cpp */
    #include <vector>
    #include <algorithm>
    #include <iostream>

    using namespace std;

    auto main() -> int
    {
      cout << "[lambda_capturing_by_value_mutable.cpp]" << endl;

      // Initializing a vector containing integer element
      vector<int> vect;
      for (int i = 0; i < 10; ++i)
        vect.push_back(i);

      // Displaying the elements of vect
      cout << "Original Data:" << endl;
      for_each(
             begin(vect),
             end(vect),
             [](int n){
                 cout << n << " ";
            });
      cout << endl;

      // Initializing two variables
      int a = 1;
      int b = 1;

      // Capturing value from the two variables
      // without mutate them
      for_each(
             begin(vect),
             end(vect),
             [=](int& x) mutable {
                 const int old = x;
                 x *= 2;
                 a = b;
                 b = old;
             });

      // Displaying the elements of vect
      cout << "Squared Data:" << endl;
      for_each(
             begin(vect),
             end(vect),
             [](int n) {
                  cout << n << " ";
            });
      cout << endl << endl;

      // Displaying value of variable a and b
      cout << "a = " << a << endl;
      cout << "b = " << b << endl;

      return 0;
    }

The preceding code will double the element of the vect vector. It uses capturing by value in the Lambda expression and also the mutable keyword. As we can see, we passed the vector element by reference (int& x) and multiplied it by two, then changed the value of a and b. However, since we use the mutable keyword, the final result of a and b will remain the same, although, we have passed the vector by reference. The output on the console looks like the following screenshot:

If we want to change the value of the a and b variables, we have to use the Lambda expression to capture by reference. We can do this by passing the reference to the angle bracket in the Lambda expression, for instance, [&a, &b]. For more detail, let's take a look at the following piece of code:

    /* lambda_capturing_by_reference.cpp */
    #include <vector>
    #include <algorithm>
    #include <iostream>

    using namespace std;

    auto main() -> int
    {
      cout << "[lambda_capturing_by_reference.cpp]" << endl;

      // Initializing a vector containing integer element
      vector<int> vect;
      for (int i = 0; i < 10; ++i)
        vect.push_back(i);

      // Displaying the elements of vect
      cout << "Original Data:" << endl;
      for_each(
             begin(vect),
             end(vect),
             [](int n){
                 cout << n << " ";
            });
      cout << endl;

      // Initializing two variables
      int a = 1;
      int b = 1;

      // Capturing value from the two variables
      // and mutate them
      for_each(
             begin(vect),
             end(vect),
             [&a, &b](int& x){
                 const int old = x;
                 x *= 2;
                 a = b;
                 b = old;
            });

      // Displaying the elements of vect
      cout << "Squared Data:" << endl;
      for_each(
             begin(vect),
             end(vect),
             [](int n) {
                 cout << n << " ";
            });
      cout << endl << endl;

      // Displaying value of variable a and b
      cout << "a = " << a << endl;
      cout << "b = " << b << endl;

      return 0;
     }

The preceding code has the same behavior with the lambda_capturing_by_value_mutable.cpp file that will double the element of the vect vector. However, by capturing by reference, it now also modifies the value of a and b when they are processed in the for_each loop. The a and b values will be changed at the end of the code, as we can see in the following screenshot:

Preparing the value using initialization captures

Another great feature of the Lambda expression coming up in C++14 is its initialization captures. The expression can capture a value of the variable and assign it to the expression's variable. Let's take a look at the following piece of code implementing the initialization captures:

    /* lambda_initialization_captures.cpp */
    #include <iostream>

    using namespace std;

    auto main() -> int
    {
      cout << "[lambda_initialization_captures.cpp]" << endl;

      // Initializing a variable
      int a = 5;
      cout << "Initial a = " << a << endl;

      // Initializing value to lambda using the variable
      auto myLambda = [&x = a]() { x += 2; };

      // Executing the Lambda
      myLambda();

      // Displaying a new value of the variable
      cout << "New a = " << a << endl;

      return 0;
     }

As we can see in the preceding code, we have an int variable named a with the value 5. The Lambda expression, myLambda, then captures the a value and executes it in the code. The result is that now the a value will be 7 since it is added by 2. The following output screenshot should appear in our console window when we run the preceding code:

From the preceding snapshot, we see that we can prepare the value to be included in the calculation inside the Lambda expression.

Writing a generic Lambda expression to be used many times with many different data types

Before C++14, we have to specifically state the type of the parameter list. Fortunately, now in C++14, Lambda expressions accept auto as a valid parameter type. Therefore, we can now build a generic Lambda expression as demonstrated in the following code. In that code, we have only one Lambda expression to find out which is the greatest value between two numbers passed to the expression. We will use the auto keyword in parameter declaration so it can be passed by any data type. Therefore, the findMax() function parameters can be passed by both the int and float data type. The code should be as follows:

    /* lambda_expression_generic.cpp */
    #include <iostream>

    using namespace std;

    auto main() -> int
    {
      cout << "[lambda_expression_generic.cpp]" << endl;

      // Creating a generic lambda expression
      auto findMax = [](auto &x, auto &y){
        return x > y ? x : y; };

      // Initializing various variables
      int i1 = 5, i2 = 3;
      float f1 = 2.5f, f2 = 2.05f;

      // Consuming generic lambda expression
      // using integer data type
      cout << "i1 = 5, i2 = 3" << endl;
      cout << "Max: " << findMax(i1, i2) << endl << endl;

      // Consuming generic lambda expression
      // using double data type
      cout << "f1 = 2.5f, f2 = 2.05f" << endl;
      cout << "Max: " << findMax(f1, f2) << endl << endl;

      return 0;
     }

The output we will see on the console should be as follows:

Note

The C++17 language plans to introduce two new features for the Lambda expression--they are capturing *this, which allows the expression to capture the enclosing object by copy, and the constexpr Lambda expressions, which allows us to use the result of the Lambda expressions and generate constexpr objects at compile time. However, since C++17 has not been released yet, we cannot try it for now.


Avoiding manual memory management with smart pointers


The smart pointers are highly useful and have an essential knowledge in using C++ efficiently. C++11 added many new abilities for the smart pointer we can find in the memory header file. For a long time, before C++11, we used auto_ptr as a smart pointer. However, it was quite unsafe since it had incompatible copy semantics. It's also deprecated now, and we should not use it anymore. Fortunately, C++ has presented unique_ptr, which has a similar functionality, but with additional features, such as adding deleters and support for arrays. Anything we can do with auto_pt, we can and should do with unique_ptr instead. We will discuss unique_ptr in depth along with other new smart pointers in C++11--shared_ptr and weak_ptr.

Replacing a raw pointer using unique_ptr

The next pointer we will see is the unique_ptr pointer. It is fast, efficient, and a near drop-in replacement for raw or naked pointers. It provides exclusive ownership semantics, which exclusively owns the object that it points to. By its exclusiveness, it can destroy the object when its destructor is called if it has a non-null pointer. It also cannot be copied due to its exclusiveness. It has no copy constructor and copy assignment. Although it cannot be copied, it can be moved since it provides a move constructor and a move assignment.

These are the methods we can use to construct unique_ptr:

    auto up1 = unique_ptr<int>{};
    auto up2 = unique_ptr<int>{ nullptr };
    auto up3 = unique_ptr<int>{ new int { 1234 } };

Based on the preceding code, up1 and up2 will construct two new unique_ptr that point to nothing (null), whereas up3 will point to the address that holds the 1234 value. However, C++14 adds a new library function to construct unique_ptr, that is, make_unique. So, we can construct a new unique_ptr pointer as follows:

    auto up4 = make_unique<int>(1234);

The up4 variable will also point to the address that holds the 1234 value.

Now, let's take a look at the following block of code:

    /* unique_ptr_1.cpp */
    #include <memory>
    #include <iostream>

    using namespace std;

    struct BodyMass
    {
      int Id;
      float Weight;

      BodyMass(int id, float weight) :
        Id(id),
        Weight(weight)
        {
          cout << "BodyMass is constructed!" << endl;
          cout << "Id = " << Id << endl;
          cout << "Weight = " << Weight << endl;
        }

       ~BodyMass()
       {
         cout << "BodyMass is destructed!" << endl;
       }
     };

     auto main() -> int
     {
       cout << "[unique_ptr_1.cpp]" << endl;
       auto myWeight = make_unique<BodyMass>(1, 165.3f);
       cout << endl << "Doing something!!!" << endl << endl;
       return 0;
     }

We try to construct a new unique_ptr pointer that points to the address that holds a BodyMass data type. In BodyMass, we have a constructor as well as a destructor. Now, let's see how the unique_ptr pointer works by running the preceding code. The output we get on the screen should be like the following screenshot:

As we can see in the preceding screenshot, the constructor is invoked when we construct unique_ptr. Moreover, unlike the traditional C++ language, where we have to free the memory up when we use a pointer, in modern C++, the memory will be freed up automatically when it is out of scope. We can see that the destructor of BodyMass is invoked when the program exits, which means myWeight is out of scope.

Now, let's test the exclusiveness of unique_ptr by analyzing the following code snippet:

    /* unique_ptr_2.cpp */
    #include <memory>
    #include <iostream>

    using namespace std;

    struct BodyMass
    {
      int Id;
      float Weight;

      BodyMass(int id, float weight) :
        Id(id), 
        Weight(weight)
        {
          cout << "BodyMass is constructed!" << endl;
          cout << "Id = " << Id << endl;
          cout << "Weight = " << Weight << endl;
        }

      BodyMass(const BodyMass &other) :
        Id(other.Id),
        Weight(other.Weight)
        {
          cout << "BodyMass is copy constructed!" << endl;
          cout << "Id = " << Id << endl;
          cout << "Weight = " << Weight << endl;
        }

      ~BodyMass()
       {
          cout << "BodyMass is destructed!" << endl;
       }
    };

    auto main() -> int
    {
      cout << "[unique_ptr_2.cpp]" << endl;

      auto myWeight = make_unique<BodyMass>(1, 165.3f);

      // The compiler will forbid to create another pointer
      // that points to the same allocated memory/object
      // since it's unique pointer
      //auto myWeight2 = myWeight;

      // However, we can do the following expression
      // since it actually copies the object that has been allocated
      // (not the unique_pointer)
      auto copyWeight = *myWeight;

      return 0;
    }

As we can see in the preceding code, we see that we can't assign the unique_ptr instance to another pointer since it will break the exclusiveness of unique_ptr. The compiler will throw an error if we make the following expression:

    auto myWeight2 = myWeight;

However, we can assign the value of the unique_ptr to another object since it has been allocated. To prove it, we have added a copy constructor to log when the following expression is executed:

    auto copyWeight = *myWeight;

If we run the preceding unique_ptr_2.cpp code, we will see the following output on the screen:

As we can see in the preceding screenshot, the copy constructor is called when the copy assignment is executed. It proves that we can copy the value of the unique_ptr object but not the object itself.

As we discussed earlier, unique_ptr has moved the constructor, although it has no copy constructor. The use of this construction can be found in the following piece of code:

    /* unique_ptr_3.cpp */
    #include <memory>
    #include <iostream>

    using namespace std;

    struct BodyMass
    {
      int Id;
      float Weight;

      BodyMass(int id, float weight) :
        Id(id), 
        Weight(weight)
        {
          cout << "BodyMass is constructed!" << endl;
          cout << "Id = " << Id << endl;
          cout << "Weight = " << Weight << endl;
        }

      ~BodyMass()
       {
         cout << "BodyMass is destructed!" << endl;
       }
    };

    unique_ptr<BodyMass> GetBodyMass()
    {
      return make_unique<BodyMass>(1, 165.3f);
    }

    unique_ptr<BodyMass> UpdateBodyMass(
      unique_ptr<BodyMass> bodyMass)
      {
        bodyMass->Weight += 1.0f;
        return bodyMass;
      }

     auto main() -> int
     {
       cout << "[unique_ptr_3.cpp]" << endl;

       auto myWeight = GetBodyMass();

       cout << "Current weight = " << myWeight->Weight << endl;

       myWeight = UpdateBodyMass(move(myWeight));

       cout << "Updated weight = " << myWeight->Weight << endl;

       return 0;
     }

In the preceding code, we have two new functions--GetBodyMass() and UpdateBodyMass(). We construct a new unique_ptr object from the GetBodyMass() function, then we update the value of its Weight using the UpdateBodyMass() function. We can see that we use the move function when we pass an argument to the UpdateBodyMass() function. It's because unique_ptr has no copy constructor, and it has to be moved in order to update the value of its property. The screen output of the preceding code is as follows:

Sharing objects using shared_ptr

In contrast to unique_ptr, shared_ptr implements shared ownership semantics, so it offers the ability of copy constructor and copy assignment. Although they have a difference in the implementation, shared_ptr is actually the counted version of unique_ptr. We can call the use_count() method to find out the counter value of the shared_ptr reference. Each instance of the shared_ptr valid object is counted as one. We can copy the shared_ptr instance to other shared_ptr variables and the reference count will be incremented. When a shared_ptr object is destroyed, the destructor decrements the reference count. The object will be deleted only if the count reaches zero. Now let's examine the following shared_ptr code:

    /* shared_ptr_1.cpp */
    #include <memory>
    #include <iostream>

    using namespace std;

    auto main() -> int
    {
      cout << "[shared_ptr_1.cpp]" << endl;

      auto sp1 = shared_ptr<int>{};

      if(sp1)
         cout << "sp1 is initialized" << endl;
      else
         cout << "sp1 is not initialized" << endl;
      cout << "sp1 pointing counter = " << sp1.use_count() << endl;
      if(sp1.unique())
         cout << "sp1 is unique" << endl;
      else
        cout << "sp1 is not unique" << endl;
      cout << endl;

      sp1 = make_shared<int>(1234);

      if(sp1)
        cout << "sp1 is initialized" << endl;
      else
        cout << "sp1 is not initialized" << endl;
      cout << "sp1 pointing counter = " << sp1.use_count() << endl;
      if(sp1.unique())
        cout << "sp1 is unique" << endl;
      else
        cout << "sp1 is not unique" << endl;
      cout << endl;

      auto sp2 = sp1;

      cout << "sp1 pointing counter = " << sp1.use_count() << endl;
      if(sp1.unique())
        cout << "sp1 is unique" << endl;
      else
        cout << "sp1 is not unique" << endl;
      cout << endl;

      cout << "sp2 pointing counter = " << sp2.use_count() << endl;
      if(sp2.unique())
        cout << "sp2 is unique" << endl;
      else
        cout << "sp2 is not unique" << endl;
      cout << endl;

      sp2.reset();

      cout << "sp1 pointing counter = " << sp1.use_count() << endl;
      if(sp1.unique())
        cout << "sp1 is unique" << endl;
      else
        cout << "sp1 is not unique" << endl;
      cout << endl;

      return 0;
    }

Before we examine each line of the preceding code, let's take a look at the following output that should appear on the console window:

First, we create a shared_ptr object named sp1 without instantiating it. From the console, we see that sp1 is not initialized and the counter is still 0. It is also not unique since the pointer is pointed to nothing. We then construct sp1 using the make_shared method. Now, sp1 is initialized and the counter becomes 1. It also becomes unique since it's only one of the shared_ptr object (proven by the value of the counter that is 1). Next, we create another variable named sp2, and copy sp1 to it. As a result, sp1 and sp2 now share the same object proven by the counter and the uniqueness value. Then, invoking the reset() method in sp2 will destroy the object of sp2. Now, the counter of sp1 becomes 1, and it is unique again.

Note

In the shared_ptr_1.cpp code, we declare the unique_ptr object using shared_ptr<int>, then invoke make_shared<int> to instance the pointer. It's because we just need to analyze the shared_ptr behavior. However, we should use make_shared<> for shared pointers since it has to keep the reference counter somewhere in memory and allocates the counter and memory for objects together instead of two separate allocations.

Tracking the objects using a weak_ptr pointer

We have discussed the shared_ptr in the preceding section. The pointer is actually a little bit fat pointer. It logically points to two objects, the object being managed and the pointing counter using the use_count() method. Every shared_ptr basically has a strong reference count that prevents the object from being deleted and a weak reference count that does not prevent the object being deleted if the shared_ptr object's use count reaches 0, although we don't even use the weak reference count. For this reason, we can use only one reference count so we can use the weak_ptr pointer. The weak_ptr pointer refers to an object that is managed by shared_ptr. The advantage of weak_ptr is that it can be used to refer to an object, but we can only access it if the object still exists and without preventing the object from being deleted by some other reference holder if the strong reference count reaches zero. It is useful when we deal with data structures. Let's take a look at the following block of code to analyze the use of weak_ptr:

    /* weak_ptr_1.cpp */
    #include <memory>
    #include <iostream>

    using namespace std;

    auto main() -> int
    {
      cout << "[weak_ptr_1.cpp]" << endl;

      auto sp = make_shared<int>(1234);

      auto wp = weak_ptr<int>{ sp };

      if(wp.expired())
       cout << "wp is expired" << endl;
      else
       cout << "wp is not expired" << endl;
      cout << "wp pointing counter = " << wp.use_count() << endl;
      if(auto locked = wp.lock())
       cout << "wp is locked. Value = " << *locked << endl;
      else
      {
        cout << "wp is unlocked" << endl;
        wp.reset();
      }
      cout << endl;

      sp = nullptr;

      if(wp.expired())
       cout << "wp is expired" << endl;
      else
       cout << "wp is not expired" << endl;
      cout << "wp pointing counter = " << wp.use_count() << endl;
      if(auto locked = wp.lock())
       cout << "wp is locked. Value = " << *locked << endl;
      else
      {
        cout << "wp is unlocked" << endl;
        wp.reset();
      }
      cout << endl;

      return 0;
     }

Before we analyze the preceding code, let's take a look at the following screenshot from the output console if we run the code:

At first, we instantiate shared_ptr and, as we discussed previously, the weak_ptr points to the object managed by shared_ptr. We then assign wp to the shared_ptr variable, sp. After we have a weak_ptr pointer, we then check its behavior. By calling the expired() method, we can figure out whether the referenced object was already deleted. And, since the wp variable is just constructed, it is not expired yet. The weak_ptr pointer also holds the value of the object counting by calling the use_count() method, as we used in shared_ptr. We then invoke the locked() method to create a shared_ptr that manages the referenced object and finds the value weak_ptr is pointing at. We now have a shared_ptr variable pointing to the address that holds the 1234 value.

We reset sp to nullptr afterward. Although we don't touch the weak_ptr pointer, it is also changed. As we can see from the console screenshot, now wp is expired since the object has been deleted. The counter also changes and becomes 0 since it points to nothing. Moreover, it is unlocked since the shared_ptr object has been deleted.


Storing many different data types using tuples


We will get acquainted with tuples, an object that is able to hold a collection of elements, and each element can be of a different type. It is a new feature in C++11 and gives power to functional programming. The tuples will be most useful when creating a function that returns the value. Moreover, since functions don't change the global state in functional programming, we can return the tuples for all the values we need to change instead. Now, let's examine the following piece of code:

    /* tuples_1.cpp */
    #include <tuple>
    #include <iostream>

    using namespace std;

    auto main() -> int
    {
      cout << "[tuples_1.cpp]" << endl;

      // Initializing two Tuples
      tuple<int, string, bool> t1(1, "Robert", true);
      auto t2 = make_tuple(2, "Anna", false);

      // Displaying t1 Tuple elements
      cout << "t1 elements:" << endl;
      cout << get<0>(t1) << endl;
      cout << get<1>(t1) << endl;
      cout << (get<2>(t1) == true ? "Male" : "Female") << endl;
      cout << endl;

      // Displaying t2 Tuple elements
      cout << "t2 elements:" << endl;
      cout << get<0>(t2) << endl;
      cout << get<1>(t2) << endl;
      cout << (get<2>(t2) == true ? "Male" : "Female") << endl;
      cout << endl;

      return 0;
    }

In the preceding code, we created two tuples, t1 and t2, with different constructing techniques using tuple<int, string, bool> and make_tuple. However, these two different techniques will give the same result. Obviously, in the code, we access each element in tuples using get<x>(y), where x is the index and y is the tuple object. And, with confidence, we will get the following result on the console:

Unpacking tuples values

Another useful member that functions in the tuples classes is tie(), which is used to unpack a tuple into individual objects or create a tuple of lvalue references. Also, we have the ignore helper class in tuples, a placeholder to skip an element when unpacking a tuple is using tie(). Let's see the use of tie() and ignore in the following block of code:

    /* tuples_2.cpp */
    #include <tuple>
    #include <iostream>

    using namespace std;

    auto main() -> int
   {
      cout << "[tuples_2.cpp]" << endl;

      // Initializing two Tuples
      tuple<int, string, bool> t1(1, "Robert", true);
      auto t2 = make_tuple(2, "Anna", false);

      int i;
      string s;
      bool b;

      // Unpacking t1 Tuples
      tie(i, s, b) = t1;
      cout << "tie(i, s, b) = t1" << endl;
      cout << "i = " << i << endl;
      cout << "s = " << s << endl;
      cout << "b = " << boolalpha << b << endl;
      cout << endl;

      // Unpacking t2 Tuples
      tie(ignore, s, ignore) = t2;
      cout << "tie(ignore, s, ignore) = t2" << endl;
      cout << "new i = " << i << endl;
      cout << "new s = " << s << endl;
      cout << "new b = " << boolalpha << b << endl;
      cout << endl;

      return 0;
    }

In the preceding code, we have the same two tuples that tuples_1.cpp has. We want to unpack t1 into variables i, s, and b respectively, using the tie() method. Then, we unpack t2 to the s variable only, ignoring the int and bool data in t2. If we run the code, the output should be as follows:

Returning a tuple value type

As we discussed earlier, we can maximize the use of tuples in functional programming when we want to write a function that returns multiple data. Let's take a look at the following block of code to know how to return the tuple and access the return value:

    /* tuples_3.cpp */
    #include <tuple>
    #include <iostream>

    using namespace std;

    tuple<int, string, bool> GetData(int DataId)
    {
      if (DataId == 1) 
        return std::make_tuple(0, "Chloe", false);
      else if (DataId == 2) 
        return std::make_tuple(1, "Bryan", true);
      else 
        return std::make_tuple(2, "Zoey", false);
     }

    auto main() -> int
    {
      cout << "[tuples_3.cpp]" << endl;

      auto name = GetData(1);
      cout << "Details of Id 1" << endl;
      cout << "ID = " << get<0>(name) << endl;
      cout << "Name = " << get<1>(name) << endl;
      cout << "Gender = " << (get<2>(name) == true ? 
        "Male" : "Female");
      cout << endl << endl;

      int i;
      string s;
      bool b;
      tie(i, s, b) = GetData(2);
      cout << "Details of Id 2" << endl;
      cout << "ID = " << i << endl;
      cout << "Name = " << s << endl;
      cout << "Gender = " << (b == true ? "Male" : "Female");
      cout << endl;

      return 0;
    }

As we can see in the preceding code, we have a new function named GetData() returning a Tuple value. From that function, we will consume the data returning from it. We begin with creating the name variable and get the value from the GetData() function. We can also use the tie() method to unpack the tuple coming from the GetData() function, as we can see in the code when we access the data when ID = 2. The output on the console should be like the following screenshot when we run the code:


Summary


We have refreshed our experience in the C++ language by completing this chapter. Now we know that C++ is more modern, and it comes with numerous features that assist us in creating a better program. We can use the Standard Library to make our code efficient since we don't need to write too many redundant functions. We can use the Lambda expression to make our code tidy, easy to read, and easy to maintain. We can also use the smart pointer so we don't need to worry about memory management anymore. Moreover, as we are concerned about immutability in functional programming, we will discuss that deeper in the next chapter; the use of tuples can help us ensure that no global state is involved in our code.

In the next chapter, we will discuss First-Class and Pure Function, which is used to purify our class and ensure that no outside state is involved in the current function. As a result, it will avoid side effects in our functional code.

About the Author
  • Wisnu Anggoro

    Wisnu Anggoro is a Microsoft Certified Professional in C# programming and an experienced C/C++ developer. He has also authored the books Boost.Asio C++ Network Programming - Second Edition and Functional C# by Packt. He has been programming since he was in junior high school, which was about 20 years ago, and started developing computer applications using the BASIC programming language in the MS-DOS environment. He has solid experience in smart card programming, as well as desktop and web application programming, including designing, developing, and supporting the use of applications for SIM Card Operating System Porting, personalization, PC/SC communication, and other smart card applications that require the use of C# and C/C++. He is currently a senior smart card software engineer at CIPTA, an Indonesian company that specializes in innovation and technology for smart cards. He can be reached through his email at wisnu@anggoro.net

    Browse publications by this author
Latest Reviews (5 reviews total)
I bought 5 books at once and could only give a fast glance at this one in order to write he review. It seems I have to write the reviews in order. I have been developping a lot in C++, and also used modern features of C++11 and above. The book discusses and shows examples on how to use these modern features. The advanced features are difficult to grasp: short examples don;t show enough, long examples are hard to read. The example in the book are fairly long, but they are given with detailed explanations.
Alles erwartungsgemäß, aber Befragung sehr lästig
Excellent, this book showed me a better way to code
Learning C++ Functional Programming
Unlock this book and the full library FREE for 7 days
Start now