


Since you have picked this book, this means you want to learn both about programming and electronics, especially microcontrollers. The book is designed to enable you to learn C programming easily and implement the language with an Arduino. I would suggest you do every code of the book by yourself and run them on the Arduino IDE. Microcontroller programming was hard before, but since the innovation of Arduino and the use of C programming on the Arduino board, microcontroller programming has become easy and fun.
Before going any further, let's understand the programming language C better. You may wonder why C programming is called C.
Well, before the creation of C, there was its predecessor programming language, called B. So, you should be able to guess from this where the name came from. The B language was developed by Ken Thompson at Bell Labs. At the same lab, the C language was developed in 1972 by Dennis Ritchie. The main purpose of creating this language was to design a UNIX operating system. Ken Thomson and Dennis Ritchie were the main developers of the UNIX operating system, so Dennis developed C to design UNIX.
C is not just a powerful language but a flexible one too. It is a portable language, because we can write a C program on one computer and compile to another with almost no modification.
To compile the source code of C, we need to have an IDE installed to our computers. Throughout this book we will learn C programming using the Arduino IDE. We will also be introduced to the Arduino IDE, its installation process, and how we can run our very first C program using an Arduino and the Arduino IDE.
Note
IDE stands for Integrated Development Environment. IDEs are used for software development. An IDE usually consists of an editor (where we can type code and comments), and a few tools along with a debugger (which is used to test the code to see if it has any errors). Most IDEs have a built in compiler (which converts source code/programming language into machine language).
Let's get introduced to an Arduino now.
Arduino is a microcontroller board. People also call it a prototype board. In a nutshell, an Arduino board is a small computer with a processor, RAM, ROM etc. Arduino is open source hardware - you might have heard of open source software. Open source software is computer software distributed with a license that gives the users the right to see its source code. A Free Open Source Software license provides the rights to study, change and distribute the software to anyone for any kind of purpose. Open source software is usually developed by a group of open source enthusiasts who develop and gradually fix bugs of the software.
Since Arduino is open source hardware, we can build our own Arduino and also develop it for the purpose of our goals. We can change it to whatever we want.
Since Arduino is open source hardware, people around the world modify the board according to their needs. There are a few companies that produce different versions and types of Arduino. Let's get introduced to a few famous types of Arduinos.
Arduino Uno is the most-used Arduino board. It is based on the ATmega328 microcontroller. It has 14 digital pins and six analog inputs. We will know more about analog and digital pins in the next chapters.
The ATmega328 has 32Kbytes flash memory, 32 pins, 20MHz maximum operating frequency and 8-bit AVR CPU. The following image is an Arduino Uno board and an ATmega328 microcontroller with its pin out:

Arduino Mega is a microcontroller board that is famous for providing more pins. It uses ATmega2560, and has 54 digital pins and 16 analog inputs.
The ATmega2560 has 256Kbytes of flash memory, 100 pins, 16MHz operating frequency and 8-bit AVR CPU. The following image is an Arduino Mega and an ATmega2560 microcontroller with its pin out:

Arduino Nano is usually chosen for prototypes with a small form factor. It is based on the ATmega328 microcontroller, which is same as the Arduino Uno. It has 14 digital pins and eight analog inputs. The following image is an Arduino Nano:

Arduino Leonardo is similar to Arduino Uno. The main difference is that it has a soldered microcontroller instead of a removable one, and the model of the microcontroller is ATmega32U4. It has 20 digital pins and 12 analog inputs. The following image is an Arduino Leonardo with the ATmega32U4 microcontroller's pin out:

Arduino Mini is a small prototyping device that is based on the ATmega168. It does not come with a USB port. Arduino Mini has 14 digital pins and eight analog inputs. The ATmega168 has 16Kbytes of flash memory, 20MHz maximum operating frequency and an 8-bit AVR CPU. The following image is an Arduino Mini and an ATmega168 microcontroller with its pin out. The following image is image of an Arduino menu with the ATmega168's pin out:

Arduino Micro is based on the ATmega32u4 microcontroller. It uses the same microcontroller as the Arduino Leonardo. There are fewer digital and analog pins than in the Arduino Leonardo - the Micro has 20 digital pins. It comes with a micro USB port and ICSP pins. The following image is an Arduino Micro:

Throughout this book, we will use the most famous board, Arduino Uno. Arduino Uno has a replaceable microcontroller, ATmega 328. Before connecting an Arduino to our PC, let's get to know our Arduino better.
An Arduino Uno consists of a number of parts. The important ones are as follows:
USB port
External power supply port
Analog pins
Digital pins
ICSP
Microcontroller
Reset button
Let's know about them in detail.
This port is used to power up the Arduino board and upload programs into the microcontroller:
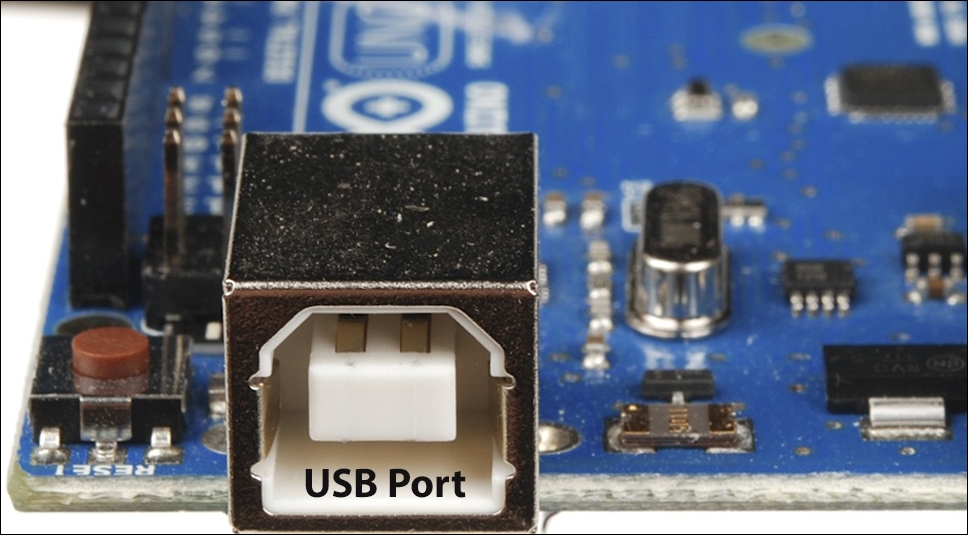
On the Arduino Uno, the USB port is situated in between the reset button and the voltage regulator.
A-B cable is needed for powering up the board and uploading code to the microcontroller. The following picture is an A-B cable:
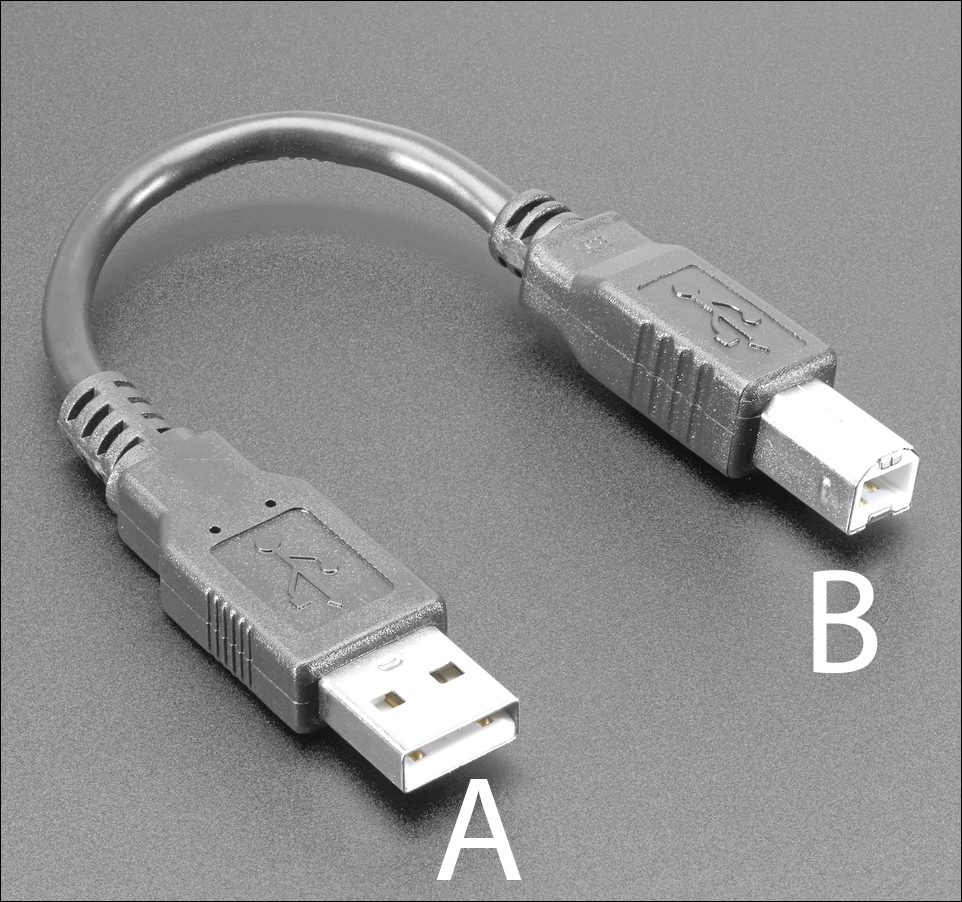
The 'A' side is connected to the Arduino board and the 'B' side is connected to the USB port of the computer.
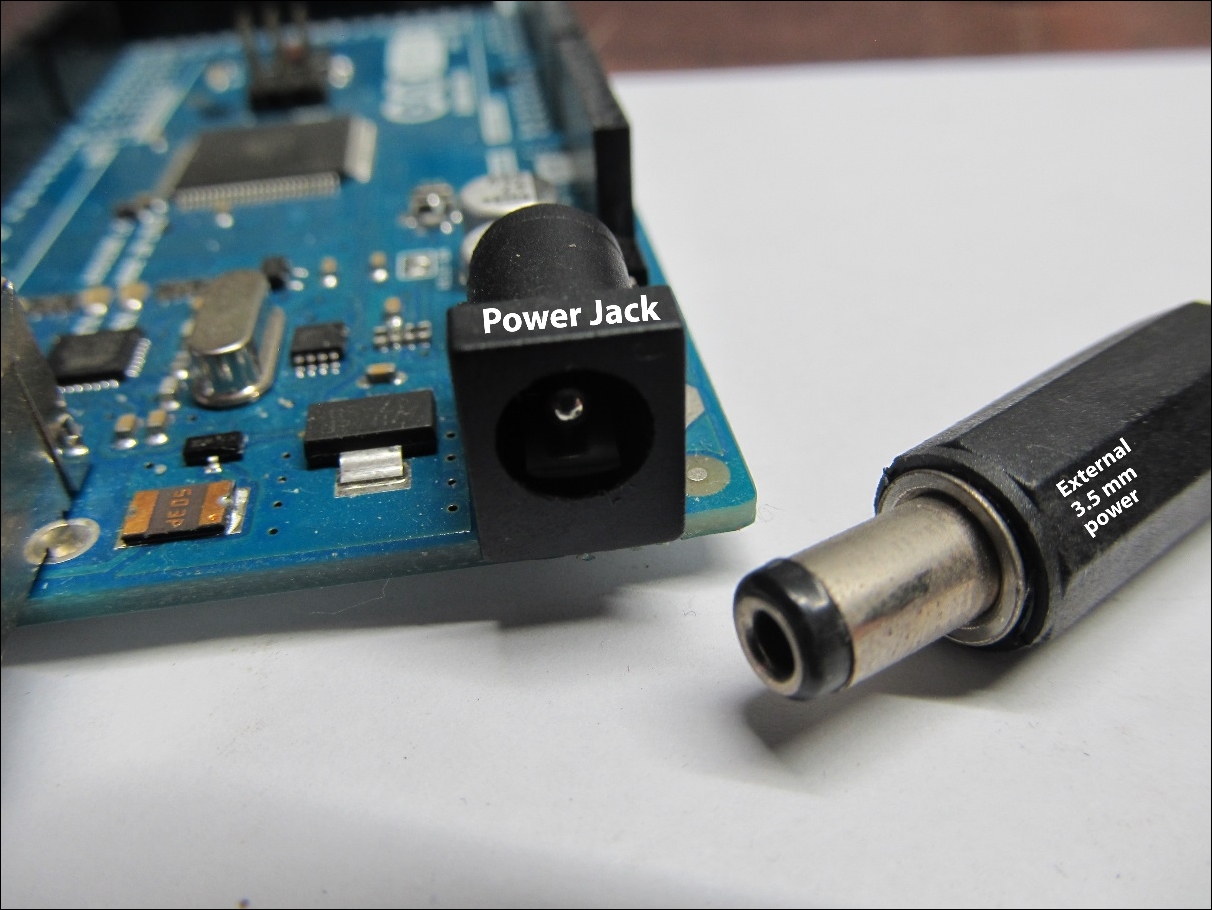
Via this port, we can power the Arduino, but we cannot upload a program using it. This port is usually a 7-12 volt DC input. The following picture is a spare port and an adapter of 7-12 volts. The following picture is an external power jack and a port of 3.5mm power:
On an Arduino Uno, there are six analog pins (A0, A1, A2, A3, A4 and A5). The analog pins are used for reading analog values. We will discuss the uses of the analog pins in the next chapter.
The following image shows the analog inputs of the Arduino Uno:
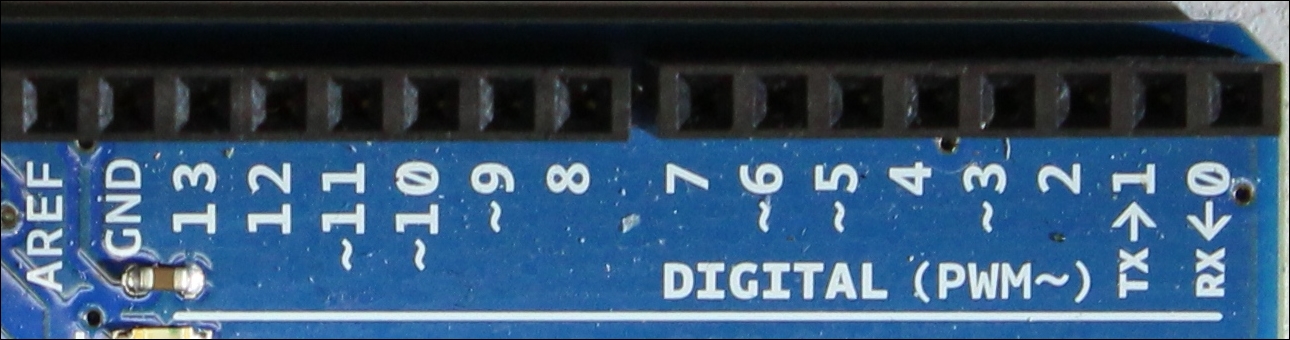
On an Arduino Uno there are 14 digital pins (0-13). The digital pins are used for reading digital values from sensors, generating digital signals and communicating with other devices through digital interfaces. The following image shows the position of the digital pins of the Arduino Uno:
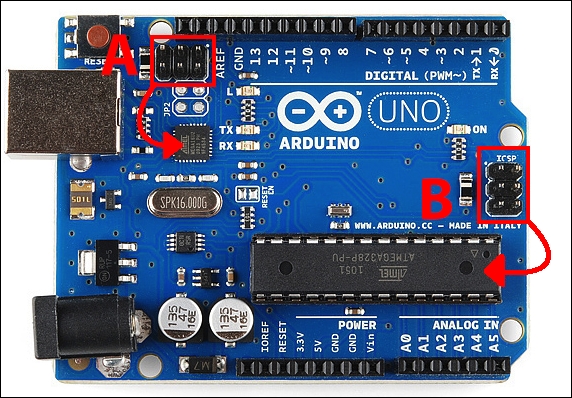
There are two sets of ICSP (In Circuit Serial Programming) pins on an Arduino Uno board. On the image below, you can see both of them (A and B). These ICSP pins are used for updating the firmware or reinstalling the bootloader, which is something you should not worry about in this book:
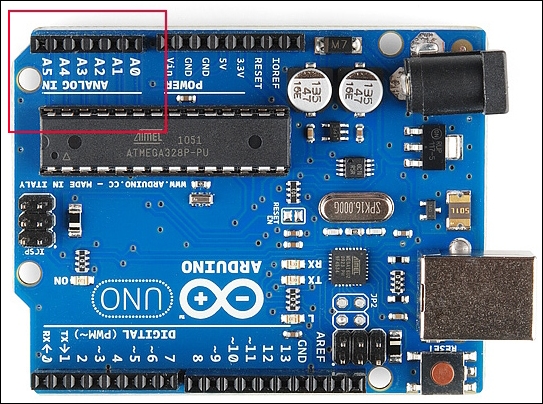
There is a main microcontroller on our Arduino. By microcontroller we mean a single computer or a collection of processor core, memory and input/output peripherals. On our Arduino Uno we have ATmega328. Let's see the pin out of the microcontroller:
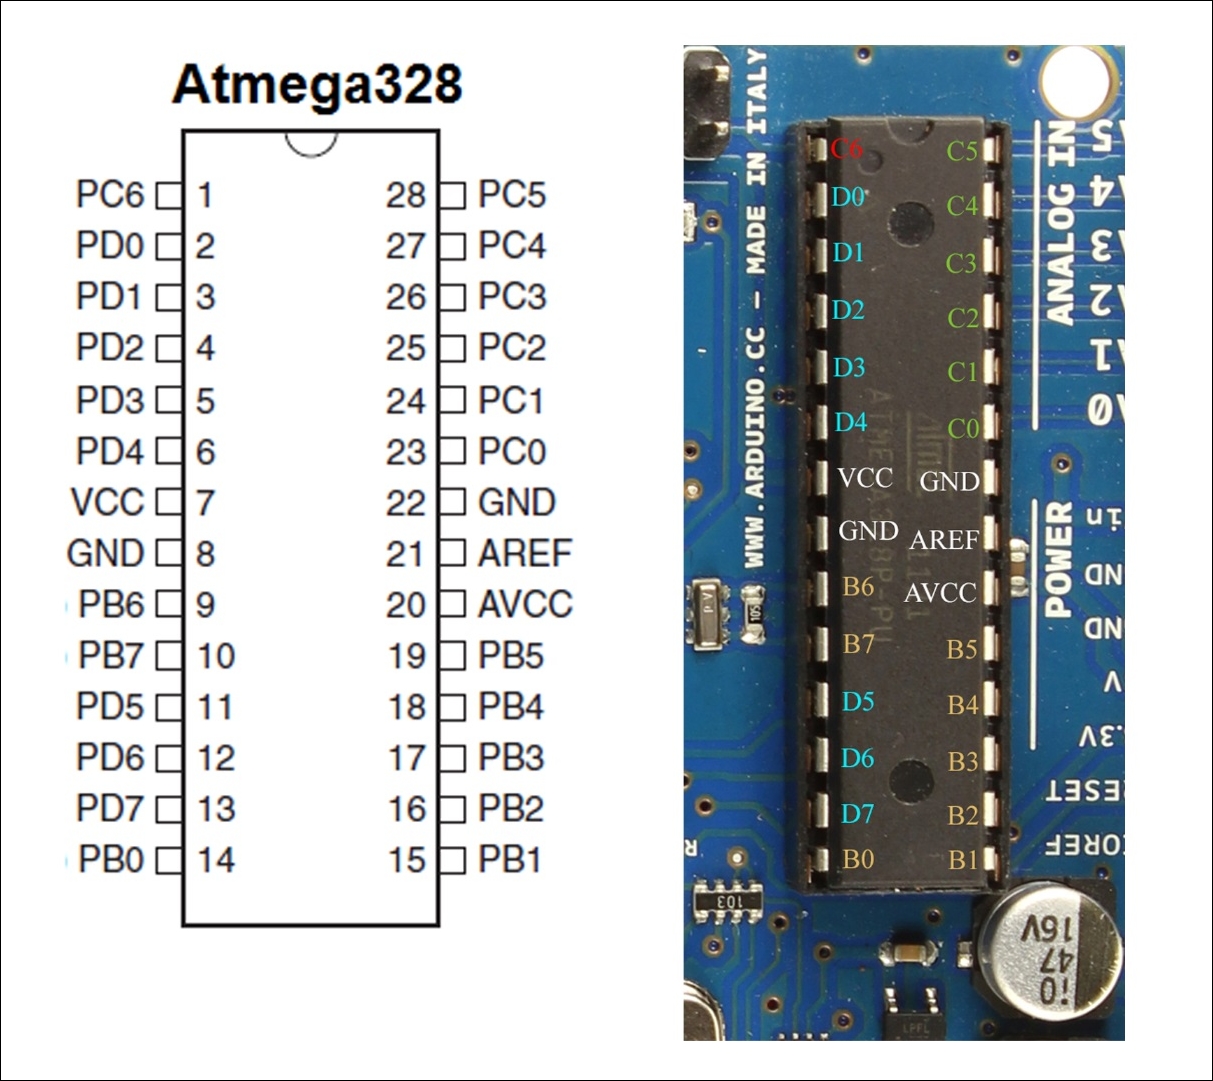
The pins are defined as follows:
|
Pin number |
Pin name on the microcontroller |
Pin name on Arduino |
|
1 |
PC6 |
Reset |
|
2 |
PD0 |
0 (RX) |
|
3 |
PD1 |
1 (TX) |
|
4 |
PD2 |
2 |
|
5 |
PD3 |
3 (PWM) |
|
6 |
PD4 |
4 |
|
7 |
VCC |
VCC |
|
8 |
GND |
GND |
|
9 |
PB6 |
Crystal |
|
10 |
PB7 |
Crystal |
|
11 |
PD5 |
5 (PWM) |
|
12 |
PD6 |
6 (PWM) |
|
13 |
PD7 |
7 |
|
14 |
PB0 |
8 |
|
15 |
PB1 |
9 (PWM) |
|
16 |
PB2 |
10 (PWM) |
|
17 |
PB3 |
11 (PWM) |
|
18 |
PB4 |
12 |
|
19 |
PB5 |
13 |
|
20 |
AVCC |
VCC |
|
21 |
AREF |
AREF |
|
22 |
GND |
GND |
|
23 |
PC0 |
A0 |
|
24 |
PC1 |
A1 |
|
25 |
PC2 |
A2 |
|
26 |
PC3 |
A3 |
|
27 |
PC4 |
A4 |
|
28 |
PC5 |
A5 |
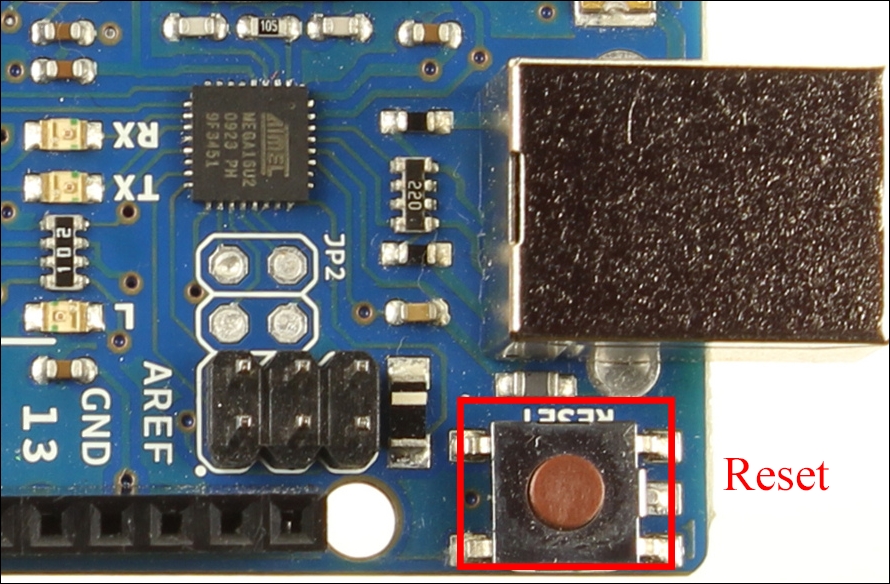
On Arduino Uno there is a reset button between the USB port and the digital pins. The following pins show a reset button of Arduino Uno. This button is used to refresh the board or restart the system:
Now we know all we need about Arduino Uno, let's connect it to the computer and program for our Arduino Uno.
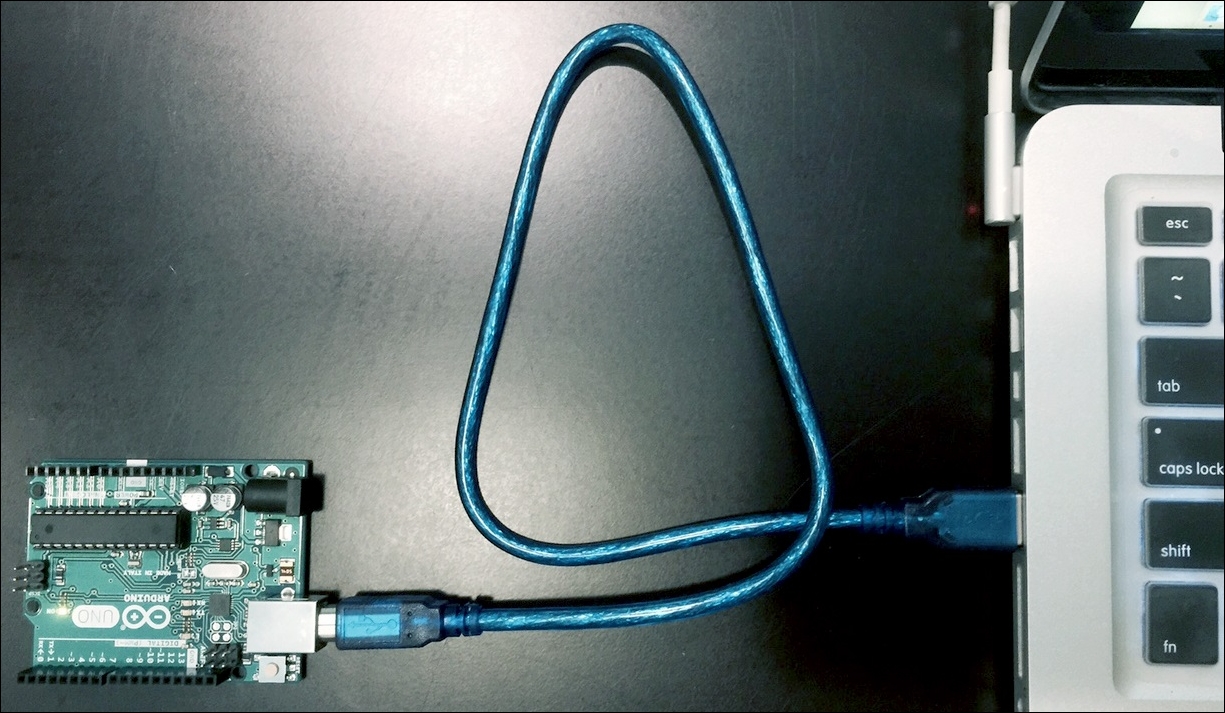
To connect Arduino Uno to our system we will need an A-B cable, about which we have already learned. Let's connect the Arduino as shown in the following image:
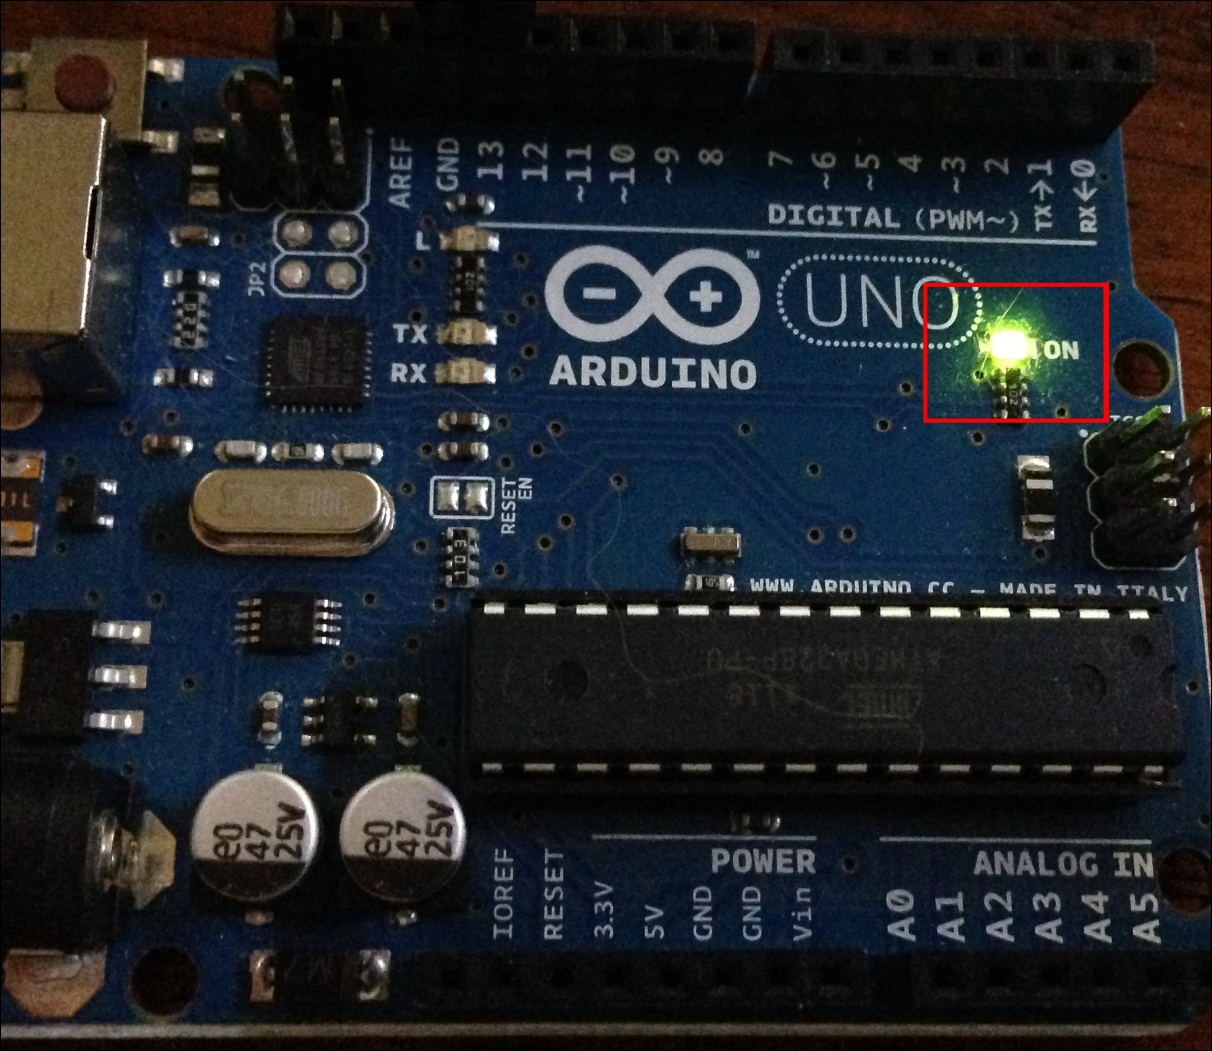
You will hear a sound on your system after connecting the Arduino Uno to the PC. A green light on the Arduino Uno will glow. If the green light does not glow, something went wrong. You need to check the connection or see Chapter 10, Few Error Handlings:
Now, we will download the IDE for coding for the Arduino and uploading to the board.
Arduino IDE is an Integrated Development Environment where we can write code, debug and upload to our Arduino Uno or any other board.
To download Arduino IDE, we need to go to https://www.arduino.cc/en/Main/Software and you will see the following page:

We will download the package associated with our Operating System.
Let's install Arduino IDE on our system.
To install Arduino IDE on Windows, go to the previous link and download Windows Installer or Windows Zip file for non admin install. I would recommend you choose the installer file because the other file is a portable IDE, which may show errors with the drivers of the Arduino.
You will see the following page after clicking on any of the files:

You may Contribute and Download or Just Download.
After downloading the Windows Installer file, you will have an .exe file. Double click on the file to get started. I would recommend right clicking on the .exe file and selecting Run as Administrator,as shown in the image below:

The rest of the processes are similar to an ordinary installation.
On most modern Linux distributions you can download the Linux 32 bits or Linux 64 bits depending on your system architecture.
On Ubuntu and most Debian-based distributions you can use the command line to download and install the IDE from official package sources. Open your terminal ( Ctrl+Alt+T) and write the following line and press Enter.
sudo apt-get install arduino arduino-core
You will be prompted to enter your password. Enter your password and hit Enter :

You will be shown the following message on your terminal. Type
Y
and hit
Enter
:

If no error occurs, you will see the following screen:

To install Arduino IDE for mac, download the Mac OS X
10.7 Lion or newer file. You will see the Arduino.app file in your download folder. Double click on the file and you will first see a message that says verifying the Arduino.app. Then you will see a warning as the following image:

Click Open to open the Arduino IDE.
You may not see the option Open
. All you need is to press the
Control/Option Key of your mac and click on the Arduino.app
file, and you will see the Open option.
You may copy the Arduino.app file into your Application folder for frequent access.
Now we have downloaded and installed the Arduino IDE on our system, let's explore the IDE.
In Windows, just open the installed Arduino software. On Ubuntu/Linux, type the following line in the terminal and hit Enter :
sudo Arduino

On the mac, just open the Arduino.app file.
No matter which operating system you use, you will see almost the following screen on every platform:

At the top of the screen you will find all the menus for the Arduino Uno. Before learning anything, let's configure our Arduino Uno with the Arduino IDE. We have already connected our Arduino to our PC via an A-B cable. Now, from the menu, go to Tools | Board and select Arduino Uno. Then go to port and select the port on which the Arduino is connected:

If you find difficulty in selecting the port, please have a look at Chapter 10, Few Error Handlings.
If everything looks good, then we are now ready to write code for Arduino and upload it to the board.
Let's explore all the menus and their functions. In the File menu you will see the following options:

New: This option enables you to create a new Arduino file.
Open: This option opens an existing Arduino file.
Open Recent: This shows the recent Arduino files.
Sketchbook: This shows the stored files.
Examples: This shows the common Arduino Programs and other library file-related examples.
Close: This option closes the Arduino tab.
Save: This option saves the Arduino code you want to save inside a folder and adds an
.inoextension to the file.Save as: This allows you to save the file as other formats (for example a text file).
Page Setup: This option helps to set up the print screen of the code.
Print options let you print the code.
Preference: This shows the following screen, where you can customize the look of your Arduino IDE, for example the location of your sketchbooks, size of fonts, type of fonts, display line numbers and so on. I would suggest checking the Display.
Line numbers option for the debugging suitability:

Quit option helps to exit the Arduino IDE at any time
The Edit option shows the following screen:

In the Edit menu, you will see the following options:
Undo: This option allows you to undo any error in the code or go back to the previous step of the code.
Redo: This option allows you to go forward if you have selected undo before.
Cut: This option cuts the line of code.
Copy: This option copies the selected text.
Copy for Forum: This formats code for the Arduino forum.
* Copy as HTML: This copies code as an HTML document. This option is used to publish the Arduino code to the web. It's an option that allows you to export the code in a web format (using HTML, CSS etc). Just click this option after writing the code, and your code will be copied as the web format. You can then use it in an HTML file.
Paste: This option allows you to paste the copied text.
Select All: This selects all the code.
Go to line: This allows you to go to the desired line.
Comment/Uncomment: This allows you to comment or uncomment any text on the code.
Increase Indent: This moves code to the right using spaces (organizes code for better readability).
Decrease Indent: This moves code to the left, removing spaces.
Find: This helps to find any text in the text editor.
Find Next: This helps you to find the next keyword when searching in the text editor.
Find Previous: This helps you to find the previous keyword that was searched for in the text editor:

In the Sketch menu you will see the following options:
Verify/Compile: This option compiles the code we write in the text editor into machine code for the Arduino microcontroller. In doing so, it also verifies the code to find any programming errors.
Upload : This option helps to upload the code we write in the text editor to the Arduino board.
Upload Using programmer: In the Arduino Uno, we use an ATmega328 microcontroller. By default, when we purchase it, it comes preinstalled with a tiny program known as a bootloader, and using this we can upload code to the board directly. If there was no bootloader, we would need an external programmer to upload code to the Arduino. So, if we need to change the removable microcontroller for a new one, it might not contain the bootloader pre-installed. For this reason, we use this option. We connect the Arduino with a fresh microcontroller and another old Arduino with a pre-installed bootloader. Then we upload to the new one using the old one as a programmer.
Export compiled binary: We sometimes need .hex files for microcontrollers. This option allows us to convert the Arduino code into hex format.
Show Sketch Folder: This folder shows the directory of the sketch files we save.
Include Library: There are a number of libraries for Arduino, about which we will learn more in Chapter 8, Working with Arduino Libraries. Using this option, we can add libraries to our code. All we need to do is just select a library and the Arduino application will automatically add the library to the code.
Add File... By using this option, we can add files (any file) to our sketch folder:

In the Tools menu, you will see the following options:
Auto Format: We sometime do not maintain clean code. The code might not be understood by others if we do so. This option auto formats the whole code and makes it readable.
Archive Sketch: To make a zip folder that includes all the sketch files inside our sketch folder, we use this option.
Fix Encoding and Reload: This fixes the character encoding of the text file and reloads it.
Serial Monitor: This is one of the most useful options of the Arduino application. With this option we can monitor the data input/output on the Arduino. We will discuss this option later.
Serial Plotter: With this option we can also monitor the serial, but visually. We can create graphs using this option. You will be given examples of the serial plotter later.
Board: Using this option you can select your Arduino board, which is connected to your PC.
Port: With this option, we can select the port to which our Arduino is connected.
Get Board Info: This option shows the Arduino board information, which is connected to the PC.
* Programmer: This option selects the programmer if we want to burn our microcontroller or burn a bootloader on another Arduino. By default, AVRISP mkll is selected.
Burn Bootloader: This option helps to burn the bootloader on another Arduino.
In this first chapter we have learned all the basic information about an Arduino, especially Arduino Uno. Don't worry about other types of Arduino, because they have almost the same functionalities. Sometimes the number of pins is greater, or the microcontroller is faster (and so on) on other types of Arduino.
I would suggest you read the whole chapter and get to know your Arduino better for the following chapters. If you want to learn only C programming, not for Arduino, then you can skip this chapter.


