Download code from GitHub
Docker and Container Essentials
Containers are one of the most transformational technologies that we have seen in years. Technology companies, corporations, and end users have all adopted them to handle everyday workloads. Increasingly, commercial off-the-shelf (COTS) applications are transforming from traditional installations into fully containerized deployments. With such a large technology shift, it is essential for anyone in the information technology realm to learn about containers.
In this chapter, we will introduce the problems that containers address. After an introduction to why containers are important, we will introduce the runtime that launched the modern container frenzy, Docker, and explain its relationship to Kubernetes. We'll also cover how Kubernetes' recent deprecation of support for Docker as a runtime impacts the use of Docker and why you should still be familiar with how to use it. By the end of this chapter, you will understand how to install Docker and how to use the most common Docker CLI commands.
In this chapter, we will cover the following topics:
- Understanding the need for containerization
- Kubernetes deprecating Docker
- Understanding Docker
- Installing Docker
- Using the Docker CLI
Before we begin, you may have read that Kubernetes will be deprecating Docker as a compatible runtime in an upcoming release. This change will affect many businesses that work with containerization and Kubernetes. We will dig into it in the Understanding why Kubernetes is depreciating Docker section but rest assured that Docker is still the best way to introduce you to containers and the advantages that they deliver. It will still be used on many systems that run containers locally, rather than with an orchestration platform like Kubernetes.
Technical requirements
This chapter has the following technical requirement:
- An Ubuntu 20.04+ server with a minimum of 4 GB of RAM, though 8 GB is suggested.
- You can access the code for this chapter by going to this book's GitHub repository: https://github.com/PacktPublishing/Kubernetes---An-Enterprise-Guide-2E/tree/main/chapter1.
Understanding the need for containerization
You may have experienced a conversation like this at your office or school:
Developer: "Here's the new application. It went through weeks of testing and you are the first to get the new release."
….. A little while later …..
User: "It's not working. When I click the submit button, it shows an error about a missing dependency."
Developer: "That's weird; it's working fine on my machine."
This is one of the most frustrating things a developer can encounter when delivering an application. Often, the issues that creep up are related to a library that the developer had on their machine, but it wasn't included in the distribution of the package. It may seem like an easy fix for this would be to include all the libraries alongside the release, but what if this release contains a newer library that overwrites the older version, which may be required for a different application?
Developers need to consider their new releases, as well as any potential conflicts with any existing software on users' workstations. This often becomes a careful balancing act that requires larger deployment teams to test the application on different system configurations. It can also lead to additional rework for the developer or, in some extreme cases, full incompatibility with an existing application.
There have been various attempts to make application delivery easier over the years. First, there are solutions such as VMware's ThinApp, which virtualizes an application (not to be confused with virtualizing an operating system). It allows you to package the application and its dependencies into a single executable package. This packaging eliminates the issues of an application's dependencies conflicting with another application's dependencies since the application is in a self-contained package. This provided application isolation not only eliminates dependency issues but also provides an enhanced level of security and eases the burden of operating system migrations.
You may or may not have heard of application packaging, or the term application-on-a-stick, before reading this book. It sounds like a great solution to the "it worked on my machine" issue. There are many reasons it hasn't taken off as expected, though. For starters, most offerings are paid solutions that require a substantial investment. Besides licensing, they require a "clean PC," which means that for every application you want to virtualize, you need to start with a base system. The package you want to create uses the differences between the base installation and anything that was added after the initial system snapshot. The differences are then packaged into your distribution file, which can be executed on any workstation.
We've mentioned application virtualization to highlight that application issues such as "it works on my machine" have had different solutions over the years. Products such as ThinApp are just one attempt at solving the problem. Other attempts include running the application on a server using Citrix, Remote Desktop, Linux containers, chroot jails, and even virtual machines.
Understanding why Kubernetes is deprecating Docker
In December 2020, Kubernetes announced the deprecation of Docker as a supported container runtime. We thought it would be important to explain how the announcement affects any reason for using, or not using, Docker.
The announcement is only related to using Docker as the container runtime in a cluster – it is important to note that this is the only impact that removing Docker will have. You can still create new containers using Docker and they will run on any runtime that supports the Open Container Initiative (OCI) specification.
When you create a container using Docker, you are creating a container that is OCI compliant, so it will still run on Kubernetes clusters that are running any Kubernetes-compatible container runtime.
To fully explain the impact and the alternatives that will be supported, we need to understand what a container runtime is. A high-level definition would be that a container runtime is the software layer that runs and manages containers. Like many components that make up a Kubernetes cluster, the runtime is not included as part of Kubernetes – it is a pluggable module that needs to be supplied by a vendor, or by you, to create a functioning cluster.
There are many technical reasons that led up to the decision to deprecate Docker, but at a high level, the main concerns were:
- Docker contains multiple pieces inside of the Docker executable to support its own remote API and user experience (UX). Kubernetes only requires one component in the executable, dockerd, which is the runtime process that manages containers. All other pieces of the executable contribute nothing to using Docker in a Kubernetes cluster. These extra components made the binary bloated, and could lead to additional bugs, security, or performance issues.
- Docker does not conform to the Container Runtime Interface (CRI) standard, which was introduced to create a set of standards to easily integrate container runtimes in Kubernetes. Since it doesn't comply, the Kubernetes team has had extra work that only caters to supporting Docker.
When it comes to local container testing and development, you can still use Docker on your workstation or server. Building on the previous statement, if you build a container on Docker and the container successfully runs on your Docker runtime system, it will run on a Kubernetes cluster that is not using Docker as the runtime.
Removing Docker will have very little impact on most users of Kubernetes in new clusters. Containers will still run using any standard method, as they would with Docker as the container runtime. If you happen to manage a cluster, you may need to learn new commands when you troubleshoot a Kubernetes node – you will not have a Docker command on the node to look at running containers, or to clean up volumes, etc…
At the time of writing this chapter, Kubernetes supports the following runtimes in place of Docker:
containerdRocket (rkt)CRI-OFrakticri-containerdL: https://github.com/containerd/crisingularity-cri: https://github.com/sylabs/singularity-cri
This list will evolve; you can always view the latest supported runtimes on the Kubernetes Git at https://github.com/kubernetes/community/blob/master/contributors/devel/sig-node/container-runtime-interface.md.
Since we are focusing on general containers and we will be using Docker as our runtime to create KinD clusters, we will not go into too many details on the alternative runtimes. They are only being mentioned here to explain the alternatives that can be used on a cluster.
For more details on the impact of deprecating Docker, refer to the article called Don't Panic: Kubernetes and Docker on the Kubernetes.io site at https://kubernetes.io/blog/2020/12/02/dont-panic-kubernetes-and-docker/.
Now, let's introduce Docker and how you can use it to create and manage containers.
Introducing Docker
The industry and even end users needed something that was easier and cheaper – enter Docker containers. Containers are not a new technology; they have been used in various forms for years. What Docker did was make them accessible to the average developer.
Docker brought an abstraction layer to the masses. It was easy to use and didn't require a clean PC for every application before creating a package, thus offering a solution for dependency issues, but most attractive of all, it was free. Docker became a standard for many projects on GitHub, where teams would often create a Docker container and distribute the Docker image or Dockerfile to team members, providing a standard testing or development environment. This adoption by end users is what eventually brought Docker to the enterprise and, ultimately, what made it the standard it has become today.
While there are many books on Docker, this book focuses on the base topics of Docker that are used to interact with containers. This book will be focusing on what you will need to know when trying to use a local Kubernetes environment. There is a long and interesting history of Docker and how it evolved into the standard container image format that we use today. We encourage you to read about the company and how they ushered in the container world we know today.
While our focus is not to teach Docker inside out, we felt that those of you who are new to Docker would benefit from a quick primer on general container concepts.
If you have some Docker experience and understand terminology such as ephemeral and stateless, feel free to continue to the Installing Docker section.
Understanding Docker
This book was created with the assumption that you have some basic knowledge of Docker and container concepts. We realize that not everyone may have played with Docker or containers in the past, so we wanted to present a crash course on container concepts and using Docker.
If you are new to containers, we suggest reading the documentation that can be found on Docker's website for additional information: https://docs.docker.com/.
Containers are ephemeral
The first thing to understand is that container images are ephemeral.
For those of you who are new to Docker, the term "ephemeral" means short-lived. By design, a container can be destroyed at any time and brought back up with no interaction from a user. In the following example, someone interactively adds files to a web server. These added files are only temporary since the base image does not have these files included in it.
This means that once a container is created and running, any changes that are made to the image will not be saved once the container is removed, or destroyed, from the Docker host. Let's look at an example:
- You start a container running a web server using NGINX on your host without any base HTML pages.
- Using a Docker command, you execute a
copycommand to copy some web files into the container's filesystem. - To test that the copy was successful, you browse to the website and confirm that it is serving the correct web pages.
- Happy with the results, you stop the container and remove it from the host. Later that day, you want to show a co-worker the website and you start your NGINX container. You browse to the website again, but when the site opens, you receive a 404 error (page not found error).
What happened to the files you uploaded before you stopped and removed the container from the host?
The reason your web pages cannot be found after the container was restarted is that all containers are ephemeral.
Whatever is in the base container image is all that will be included each time the container is initially started. Any changes that you make inside a container are short-lived.
If you need to add permanent files to an existing image, you need to rebuild the image with the files included or, as we will explain in the Persistent data section later in this chapter, you could mount a Docker volume in your container. At this point, the main concept to understand is that containers are ephemeral.
But wait! You may be wondering, "If containers are ephemeral, how did I add web pages to the server?". Ephemeral just means that changes will not be saved; it doesn't stop you from making changes to a running container.
Any changes made to a running container will be written to a temporary layer, called the container layer, which is a directory on the local host filesystem. The Docker storage driver is in charge of handling requests that use the container layer. This location will store any changes in the container's filesystem so that when you add the HTML pages to the container, they will be stored on the local host. The container layer is tied to the container ID of the running image and it will remain on the host system until the container is removed from Docker, either by using the CLI or by running a Docker prune job.
If a container is ephemeral and the image cannot be written to, how can you modify data in the container? Docker uses image layering to create multiple linked layers that appear as a single filesystem.
Docker images
At a high level, a Docker image is a collection of image layers, each with a JSON file that contains metadata for the layer. These are all combined to create the running application that you interact with when a container image is started.
You can read more about the contents of an image on Docker's GitHub at https://github.com/moby/moby/blob/master/image/spec/v1.md.
Image layers
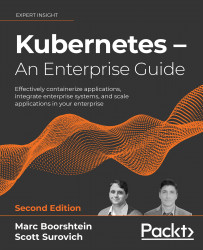
As we mentioned in the previous section, a running container uses a container layer that is "on top" of the base image layer, as shown in the following diagram:
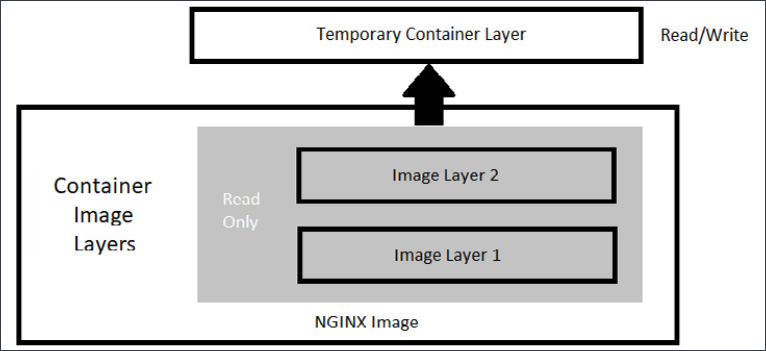
Figure 1.1: Docker image layers
The image layers cannot be written to since they are in a read-only state, but the temporary container layer is in a writeable state. Any data that you add to the container is stored in this layer and will be retained as long as the container is running.
To deal with multiple layers efficiently, Docker implements copy-on-write, which means that if a file already exists, it will not be created. However, if a file is required that does not exist in the current image, it will be written. In the container world, if a file exists in a lower layer, the layers above it do not need to include it. For example, if layer 1 had a file called /opt/nginx/index.html in it, layer 2 does not need the same file in its layer.
This explains how the system handles files that either exist or do not exist, but what about a file that has been modified? There will be times where you'll need to "replace" a file that is in a lower layer. You may need to do this when you are building an image or as a temporary fix to a running container issue. The copy-on-write system knows how to deal with these issues. Since images read from the top down, the container uses only the highest layer file. If your system had a /opt/nginx/index.html file in layer 1 and you modified and saved the file, the running container would store the new file in the container layer. Since the container layer is the topmost layer, the new copy of index.html would always be read before the older version in the image layer.
Persistent data
Being limited to ephemeral-only containers would severely limit the use cases for Docker. It is very likely that you will have some use cases that will require persistent storage, or data that will remain if you stop a container.
This may seem like we are contradicting our earlier statement that containers are ephemeral, but that is still true. When you store data in the container image layer, the base image does not change. When the container is removed from the host, the container layer is also removed. If the same image is used to start a new container, a new container image layer is also created. So, the container is ephemeral, but by adding a Docker volume to the container, you can store data outside of the container, thus gaining data persistency.
Accessing services running in containers
Unlike a physical machine or a virtual machine, containers do not connect to a network directly. When a container needs to send or receive traffic, it goes through the Docker host system using a bridged NAT network connection. This means that when you run a container and you want to receive incoming traffic requests, you need to expose the ports for each of the containers that you wish to receive traffic on. On a Linux-based system, iptables has rules to forward traffic to the Docker daemon, which will service the assigned ports for each container.
That completes the introduction to base containers and Docker. In the next section, we will explain how to install Docker on a host.
Installing Docker
The hands-on exercises in this book will require that you have a working Docker host. You can follow the steps in this book, or you can execute the script located in this book's GitHub repository, in the chapter1 directory, called install-docker.sh.
Today, you can install Docker on just about every hardware platform out there. Each version of Docker acts and looks the same on each platform, making development and using Docker easy for people who need to develop cross-platform applications. By making the functions and commands the same between different platforms, developers do not need to learn a different container runtime to run images.
The following is a table of Docker's available platforms. As you can see, there are installations for multiple operating systems, as well as multiple CPU architectures:
Figure 1.2: Available Docker platforms
Images that are created using one architecture cannot run on a different architecture. This means that you cannot create an image based on x86 hardware and expect that same image to run on your Raspberry Pi running an ARM processor. It's also important to note that while you can run a Linux container on a Windows machine, you cannot run a Windows container on a Linux machine.
The installation procedures that are used to install Docker vary between platforms. Luckily, Docker has documented many of the installation procedures on their website: https://docs.docker.com/install/.
In this chapter, we will install Docker on an Ubuntu 18.04 system. If you do not have an Ubuntu machine to install on, you can still read about the installation steps, as each step will be explained and does not require that you have a running system to understand the process. If you have a different Linux installation, you can use the installation procedures outlined on Docker's site at https://docs.docker.com/. Steps are provided for CentOS, Debian, Fedora, and Ubuntu, and there are generic steps for other Linux distributions.
Preparing to install Docker
Before we start the installation, we need to consider what storage driver to use. The storage driver is what provides the union filesystem, which manages the layers of the container and how the writeable layer of the container is accessed.
In most installations, you won't need to change the default storage driver since a default option will be selected. If you are running a Linux kernel that is at least version 4.0 or above, your Docker installation will use the overlay2 storage driver; earlier kernels will install the AUFS storage driver.
For reference, along with the overlay2 and AUFS drivers, Docker supports the btrfs storage driver. However, these are rarely used in new systems and are only mentioned here as a reference.
If you would like to learn about each storage driver, take a look at the following Docker web page, which details each driver and its use cases: https://docs.docker.com/storage/storagedriver/select-storage-driver/.
Now that you understand the storage driver requirements, the next step is to select an installation method. You can install Docker using one of three methods:
- Add the Docker repositories to your host system
- Install the package manually
- Use a supplied installation script from Docker
The first option is considered the best option since it allows for easy installation and making updates to the Docker engine. The second option is useful for enterprises that do not have internet access to servers, also known as air-gapped servers. The third option is used to install edge and testing versions of Docker and is not suggested for production use.
Since the preferred method is to add Docker's repository to our host, we will use that option and explain the process we should use to add the repository and install Docker.
Installing Docker on Ubuntu
Now that we have finished preparing everything, let's install Docker. (If you ran the install script from the book repo, you do not need to execute any of the installation steps)
- The first step is to update the package index by executing
apt-get update:sudo apt-get update - Next, we need to add any packages that may be missing on the host system to allow HTTPS apt access:
sudo apt-get install -y apt-transport-https ca-certificates curl gnupg lsb-release - To pull packages from Docker's repository, we need to add their keys. You can add keys by using the following command, which will download the
gpgkey and add it to your system:curl -fsSL https://download.docker.com/linux/ubuntu/gpg | sudo gpg --dearmor -o /usr/share/keyrings/docker-archive-keyring.gpgNow, add Docker's repository to your host system:
echo "deb [arch=amd64 signed-by=/usr/share/keyrings/docker-archive-keyring.gpg] https://download.docker.com/linux/ubuntu $(lsb_release -cs) stable" | sudo tee /etc/apt/sources.list.d/docker.list > /dev/nullWith all the prerequisites completed, you can install Docker on your server:
sudo apt-get update && sudo apt-get install -y docker-ce docker-ce-cli containerd.io - Docker is now installed on your host, but like most new services, Docker is not currently running and has not been configured to start with the system. To start Docker and enable it on startup, use the following command:
sudo systemctl enable docker && systemctl start docker
Now that we have Docker installed, let's get some configuration out of the way. First, we'll grant permissions to Docker.
Granting Docker permissions
In a default installation, Docker requires root access, so you will need to run all Docker commands as root. Rather than using sudo with every Docker command, you can add your user account to a new group on the server that provides Docker access without requiring sudo for every command.
If you are logged on as a standard user and try to run a Docker command, you will receive an error:
Got permission denied while trying to connect to the Docker daemon socket at unix:///var/run/docker.sock: Get http://%2Fvar%2Frun%2Fdocker.sock/v1.40/images/json: dial unix /var/run/docker.sock: connect: permission denied
To allow your user, or any other user you may want to add, to execute Docker commands, you need to add the users to a new group called docker that was created during the installation of Docker. The following is an example command you can use to add the currently logged-on user to the group:
sudo usermod -aG docker $USER
To add the new members to your account, you can either log off and log back into the Docker host, or activate the group changes using the newgrp command:
newgrp docker
Finally, you can test that it works by running the standard hello-world image (note that we do not require sudo to run the Docker command):
docker run hello-world
You should see the output shown below, which verifies that your user has access to Docker:
Unable to find image 'hello-world:latest' locally
latest: Pulling from library/hello-world
2db29710123e: Pull complete
Digest: sha256:37a0b92b08d4919615c3ee023f7ddb068d12b8387475d64c622ac30f45c29c51
Status: Downloaded newer image for hello-world:latest

Hello from Docker!
This message shows that your installation appears to be working correctly.
To generate this message, Docker took the following steps:
- The Docker client contacted the Docker daemon
- The Docker daemon pulled the hello-world image from Docker Hub (amd64)
- The Docker daemon created a new container from that image that runs the executable that produces the output you are currently reading
- The Docker daemon streamed that output to the Docker client, which sent it to your terminal
To try something more ambitious, you can run an Ubuntu container with:
$ docker run -it ubuntu bash
Share images, automate workflows, and more with a free Docker ID: https://hub.docker.com/
For more examples and ideas, visit https://docs.docker.com/get-started/
Now that we've granted Docker permission to run without sudo, we can start unlocking the commands at our disposal by learning how to use the Docker CLI.
Using the Docker CLI
You used the Docker CLI when you ran the hello-world container to test your installation. The Docker command is what you will use to interact with the Docker daemon. Using this single executable, you can do the following, and more:
- Start and stop containers
- Pull and push images
- Run a shell in an active container
- Look at container logs
- Create Docker volumes
- Create Docker networks
- Prune old images and volumes
This chapter is not meant to include an exhaustive explanation of every Docker command; instead, we will explain some of the common commands that you will need to use to interact with the Docker daemon and containers. Since we consider volumes and networking to be very important topics to understand for this book, we will go into additional details on those topics.
You can break down Docker commands into two categories: general Docker commands and Docker management commands. The standard Docker commands allow you to manage containers, while management commands allow you to manage Docker options such as managing volumes and networking.
docker help
It's common to forget an option or the syntax for a command, and Docker realizes this. Whenever you get stuck trying to remember a command, you can always use the docker help command to refresh your memory.
docker run
To run a container, use the docker run command with the provided image name. Before executing a docker run command, you should understand the options you can supply when starting a container.
In its simplest form, an example command you can use to run an NGINX web server would be docker run bitnami/nginx:latest. While this will start a container running NGINX, it will run in the foreground, showing logs of the application running in the container. Press Ctrl + C to stop running the container:
nginx 22:52:27.42
nginx 22:52:27.42 Welcome to the Bitnami nginx container
nginx 22:52:27.43 Subscribe to project updates by watching https://github.com/bitnami/bitnami-docker-nginx
nginx 22:52:27.43 Submit issues and feature requests at https://github.com/bitnami/bitnami-docker-nginx/issues
nginx 22:52:27.44
nginx 22:52:27.44 INFO  ==> ** Starting NGINX setup **
nginx 22:52:27.49 INFO  ==> Validating settings in NGINX_* env vars
nginx 22:52:27.50 INFO  ==> Initializing NGINX
nginx 22:52:27.53 INFO  ==> ** NGINX setup finished! **

nginx 22:52:27.57 INFO  ==> ** Starting NGINX **
To run a container as a background process, you need to add the -d option to your Docker command, which will run your container in detached mode. Now, when you run a detached container, you will only see the container ID, instead of the interactive, or attached, screen:

Figure 1.3: Container ID displayed
[root@localhost ~]# docker run -d bitnami/nginx:latest
13bdde13d0027e366a81d9a19a56c736c28feb6d8354b363ee738d2399023f80
[root@localhost ~]#
By default, containers will be given a random name once they are started. In our previous detached example, the container has been given the name silly_keldysh:
CONTAINER ID      IMAGE                      NAMES
13bdde13d002      bitnami/nginx:latest       silly_keldysh
If you do not assign a name to your container, it can quickly get confusing as you start to run multiple containers on a single host. To make management easier, you should always start your container with a name that will make it easier to manage. Docker provides another option with the run command: the --name option. Building on our previous example, we will name our container nginx-test. Our new docker run command will be as follows:
docker run --name nginx-test -d bitnami/nginx:latest
Just like running any detached image, this will return the container ID, but not the name you provided. In order to verify the container ran with the name nginx-test, we can list the containers using the docker ps command.
docker ps
Every day, you will need to retrieve a list of running containers or a list of containers that have been stopped. The Docker CLI has an option called ps that will list all running containers, or if you add an extra option to the ps command, all containers that are running and have been stopped. The output will list the containers, including their container ID, image tag, entry command, the creation date, status, ports, and the container name. The following is an example of containers that are currently running:

Figure 1.4: Currently running containers
CONTAINER ID   IMAGE                  COMMAND                 CREATED
13bdde13d002   bitnami/nginx:latest   "/opt/bitnami/script…"  Up 4 hours
3302f2728133   registry:2             "/entrypoint.sh /etc…"  Up 3 hours
This is helpful if the container you are looking for is currently running. What if the container was stopped, or even worse, what if you started the container and it failed to start and then stopped? You can view the status of all containers, including previously run containers, by adding the -a option to the docker ps command. When you execute docker ps -a, you will see the same output from a standard ps command, but you will notice that the list may include additional containers.
How can you tell what containers are running versus which ones have stopped? If you look at the STATUS field of the list, the running containers will show a running time; for example, Up xx hours, or Up xx days. However, if the container has been stopped for any reason, the status will show when it stopped; for example, Exited (0) 10 minutes ago.
IMAGE                  COMMAND                  CREATED         STATUS
bitnami/nginx:latest   "/opt/bitnami/script…"   10 minutes ago  Up 10 minutes
bitnami/nginx:latest   "/opt/bitnami/script…"   12 minutes ago  Exited (0) 10 minutes ago
A stopped container does not mean there was an issue running the image. There are containers that may execute a single task and, once completed, the container may stop gracefully. One way to determine whether an exit was graceful or whether it was due to a failed startup is to check the logs of the container.
docker start and stop
To stop a running container, use the docker stop option with the name of the container you want to stop. You may wish to stop a container due to the resources on the host since you may have limited resources and can only run a few containers simultaneously.
If you need to start that container at a future time for additional testing or development, execute docker start container name, which will start the container with all of the options that it was originally started with, including any networks or volumes that were assigned.
docker attach
You may need to access a container interactively to troubleshoot an issue or to look at a log file. One method to connect to a running container is to use the docker attach container name command. When you attach to a running container, you will connect to the running container's process, so if you attach to a container running a process, you are not likely to just see a command prompt of any kind. In fact, you may see nothing but a blank screen for some time until the container outputs some data to the screen.
You must be careful once you attach to the container – you may accidentally stop the running process and, in turn, stop the container. Let's use an example of attaching to a web server running NGINX. First, we need to verify that the container is running using docker ps:
CONTAINER ID   IMAGE                 COMMAND                   STATUS
4a77c14a236a   nginx                 "/docker-entrypoint.…"    Up 33 seconds
3302f2728133   registry:2            "/entrypoint.sh /etc…"    Up 8 minutes
13bdde13d002   bitnami/nginx:latest  "/opt/bitnami/script…"    Up 14 minutes
Using the attach command, we execute docker attach 4a77c14a236a.
Once you attach to the running container process, it may appear that nothing is happening. When you attach to a process, you will only be able to interact with the process, and the only output you will see is data being sent to standard output. In the case of the NGINX container, the attach command has attached to the NGINX process. To show this, we will leave the attachment and curl to the web server from another session. Once we curl to the container port, you will see logs outputted to the attached console:
[root@astra-master manifests]# docker attach 4a77c14a236a
172.17.0.1 - - [15/Oct/2021:23:28:31 +0000] "GET / HTTP/1.1" 200 615 "-" "curl/7.61.1" "-"
172.17.0.1 - - [15/Oct/2021:23:28:33 +0000] "GET / HTTP/1.1" 200 615 "-" "curl/7.61.1" "-"
172.17.0.1 - - [15/Oct/2021:23:28:34 +0000] "GET / HTTP/1.1" 200 615 "-" "curl/7.61.1" "-"
172.17.0.1 - - [15/Oct/2021:23:28:35 +0000] "GET / HTTP/1.1" 200 615 "-" "curl/7.61.1" "-"
172.17.0.1 - - [15/Oct/2021:23:28:36 +0000] "GET / HTTP/1.1" 200 615 "-" "curl/7.61.1" "-"
Attaching to a running container has varying benefits, depending on what is running in the container.
We mentioned that you need to be careful once you attach to the container. Those who are new to Docker may attach to the NGINX image and assume that nothing is happening on the server or the attach failed. Since they think that there may be an issue, since it's just sitting there, they may decide to break out of the container using the standard Ctrl + C keyboard command. This will send them back to a bash prompt, where they may run docker ps to look at the running containers:
root@localhost:~# docker ps
CONTAINER ID      IMAGE  COMMAND    CREATED    STATUS
root@localhost:~#
Where is the NGINX container? We didn't execute a docker stop command, and the container was running until we attached to the container. Why did the container stop after the attachment?
When an attachment is made to a container, you are attached to the running process. All keyboard commands will act in the same way as if you were at a physical server that was running NGINX in an interactive shell. This means that when the user used Ctrl + C to return to a prompt, they stopped the running NGINX process.
If a container's running process stops, the container will also stop, and that's why the docker ps command does not show a running container.
Rather than use Ctrl + C to return to a prompt, the user should have used Ctrl + P, followed by Ctrl + Q.
There is an alternative to the attach command: the docker exec command. The exec command differs from an attach command since you supply the process to execute on the container.
docker exec
A better option when it comes to interacting with a running container is the exec command. Rather than attach to the container, you can use the docker exec command to execute a process in the container. You need to supply the container name and the process you want to execute in the image. Of course, the process must be included in the running image – if you do not have the bash executable in the image, you will receive an error when trying to execute bash in the container.
We will use an NGINX container as an example again. We will verify that NGINX is running using docker ps and then, using the container ID or the name, we execute into the container. The command syntax is docker exec <options> <container name> <command>:
root@localhost:~# docker exec -it nginx-test bash
I have no name!@a7c916e7411:/app$
The option we included is -it, which tells exec to run in an interactive TTY session. Here, the process we want to execute is bash. Notice how the name changed from the original user and hostname. The hostname is localhost, while the container name is @a7c916e7411. You may also have noticed that the current working directory changed from ~ to /app and that the prompt is not running as a root user, as shown by the $ prompt.
You can use this session the same way you would a standard SSH connection; you are running bash in the container.
Since we are not attached to the container, Ctrl + C will not stop any process from running. To exit an interactive session, you only need to type in exit, followed by Enter, which will exit the container. If you then run docker ps, you will notice that the container is still in a running state.
Next, let's see what we can learn about Docker log files.
docker logs
The docker logs command allows you to retrieve logs from a container using the container name or container ID that you retrieved using the docker ps command. You can view the logs from any container that was listed in your ps command; it doesn't matter if it's currently running or stopped.
Log files are often the only way to troubleshoot why a container may not be starting up, or why a container is in an exited state. For example, if you attempted to run an image and the image starts and suddenly stops, you may find the answer by looking at the logs for that container.
To look at the logs for a container, you can use the docker logs <container ID or name> command.
To view the logs for a container with a container ID of 7967c50b260f, you would use the following command:
docker logs 7967c50b260f
This will output the logs from the container to your screen, which may be very long and verbose. Since many logs may contain a lot of information, you can limit the output by supplying the logs command with additional options. The following table lists the options available for viewing logs:
|
Logs Options |
Description |
|
|
Follow the log output (can also use |
|
|
Show log output starting from the end of the file and retrieve |
|
|
Show log output before the
|
|
|
Show log output after the
|
Table 1.1: Logs options
Checking log files is a process you will find yourself doing often, and since they can be very lengthy, knowing options like tail, until, and since will help you to find the information in a log quicker.
docker rm
Once you name a container, the assigned name cannot be used to start a different container unless you remove it using the docker rm command. If you had a container running called nginx-test that was stopped and you attempted to start another container with the name nginx-test, the Docker daemon would return an error, stating that the name is in use:
Conflict. The container name "/nginx-test" is already in use
This container is not running, but the daemon knows that the container name was used previously and that it's still in the list of previously run containers.
If you want to reuse the same name, you need to remove the container before starting another container with that name. This is a common scenario when you are testing container images. You may start a container only to discover an issue with the application or image. You stop the container, fix the image/application issue, and want to redeploy using the same name. Since the name was in use previously and is still part of the Docker history, you will need to remove the container before reusing the name.
To remove the nginx-test container, simply execute docker rm nginx-test:
root@localhost ~:# docker rm nginx-test
nginx-test
root@localhost ~:#
Assuming the container name is correct and it's not running, the only output you will see is the name of the image that you have removed.
We haven't discussed Docker volumes, but when removing a container that has a volume, or volumes, attached, it's a good practice to add the -v option to your remove command. Adding the -v option to the docker rm command will remove any volumes that were attached to the container.
Summary
In this chapter, you learned how Docker can be used to solve common development issues, including the dreaded "it works on my machine" problem. We also presented an introduction to the most commonly used Docker CLI commands that you will use on a daily basis. We closed out this chapter by looking at how to handle persistent data for a container and customizing container networking.
In the next chapter, we will start our Kubernetes journey with an introduction to KinD, a utility that provides an easy way to run multi-node Kubernetes test servers on a single workstation.
Questions
- A single Docker image can be used on any Docker host, regardless of the architecture used.
- True
- False
- What does Docker use to merge multiple image layers into a single filesystem?
- Merged filesystem
- NTFS filesystem
- EXT4 filesystem
- Union filesystem
- Kubernetes is only compatible with the Docker runtime engine.
- True
- False
- When you edit a container's filesystem interactively, what layer are the changes written to?
- Operating system layer
- Bottom-most layer
- Container layer
- Ephemeral layer
- Assuming the image contains the required binaries, what Docker command allows you to gain access to a container's bash prompt?
docker shell -it <container> /bin/bashdocker run -it <container> /bin/bashdocker exec -it <container> /bin/bashdocker spawn -it <container> /bin/bash
- When a container is stopped, the Docker daemon will delete all traces of the container.
- True
- False
- What command will show you a list of all containers, including any stopped containers?
docker ps -alldocker ps -adocker ps -listdocker list all
Join our book's Discord space
Join the book's Discord workspace for a monthly Ask me Anything session with the authors: