


This first chapter covers the basics of setting up and configuring a virtual security lab, which can be used to practice most of the scenarios and exercises addressed throughout this book. Topics addressed in this chapter include the installation of the virtualization software, the installation of various systems in the virtual environment, and the configuration of some of the tools that will be used in the exercises. The following recipes will be covered in this chapter:
Configuring a security lab with VMware Player (Windows)
Configuring a security lab with VMware Fusion (Mac OS X)
Installing Ubuntu Server
Installing Metasploitable2
Installing Windows Server
Increasing the Windows attack surface
Installing Kali Linux
Configuring and using SSH
Installing Nessus on Kali Linux
Configuring Burp Suite on Kali Linux
Using text editors (VIM and Nano)
You can run a virtual security lab on a Windows PC with relatively low available resources by installing VMware Player on your Windows workstation. You can get VMware Player for free, or the more functional alternative, VMware Player Plus, for a low cost.
To install VMware Player on your Windows workstation, you will first need to download the software. The download for the free version of VMware Player can be found at https://my.vmware.com/web/vmware/free. From this page, scroll down to the VMware Player link and click on Download. On the next page, select the Windows 32- or 64-bit installation package and then click on Download. There are installation packages available for Linux 32-bit and 64-bit systems as well.
Once the software package has been downloaded, you should find it in your default download directory. Double-click on the executable file in this directory to start the installation process. Once started, it is as easy as following the onscreen instructions to complete the install. After the installation is complete, you should be able to start VMware Player by accessing the desktop icon, the quick launch icon, or by browsing to it in All Programs. Once loaded, you will see the virtual machine library. This library will not yet contain any virtual machines, but they will be populated as you create them on the left-hand side of the screen, as shown in the following screenshot:

Once you have opened VMware Player, you can select Create a New Virtual Machine to get started. This will initialize a very easy-to-use virtual machine installation wizard:

The first task that you need to perform in the installation wizard is to define the installation media. You can choose to install it directly from your host machine's optical drive, or you can use an ISO image file. ISOs will be used for most of the installs discussed in this section, and the place where you can get them will be mentioned in each specific recipe. For now, we will assume that we browsed to an existing ISO file and clicked on Next, as shown in the following screenshot:

You then need to assign a name for the virtual machine. The virtual machine name is merely an arbitrary value that serves as a label to identify and distinguish it from other VMs in your library. Since a security lab is often classified by a diversity of different operating systems, it can be useful to indicate the operating system as part of the virtual machine's name. The following screenshot displays the Specify Disk Capacity window:

The next screen requests a value for the maximum size of the installation. The virtual machine will only consume hard drive space as required, but it will not exceed the value specified here. Additionally, you can also define whether the virtual machine will be contained within a single file or spread across multiple files. Once you are done with specifying the disk capacity, you get the following screenshot:

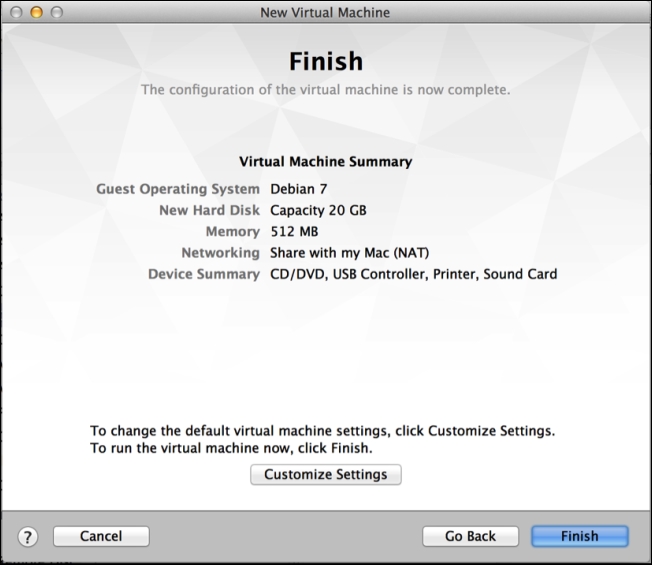
The final step provides a summary of the configurations. You can either select the Finish button to finalize the creation of the virtual machine or select the Customize Hardware… button to manipulate more advanced configurations. Have a look at the following screenshot for the advanced configurations:

The advanced configuration settings give you full control over shared resources, virtual hardware configurations, and networking. Most of the default configurations should be sufficient for your security lab, but if changes need to be made at a later time, these configurations can be readdressed by accessing the virtual machine settings. When you are done with setting up the advanced configuration, you get the following screenshot:

After the installation wizard has finished, you should see the new virtual machine listed in your virtual machine library. From here, it can now be launched by pressing the play button. Multiple virtual machines can be run simultaneously by opening multiple instances of VMware Player and a unique VM in each instance.
You can also run a virtual security lab on Mac OS X with relative ease by installing VMware Fusion on your Mac. VMware Fusion does require a license that has to be purchased, but it is very reasonably priced.
To install VMware Player on your Mac, you will first need to download the software. To download the free trial or purchase the software, go to the following URL: https://www.vmware.com/products/fusion/.
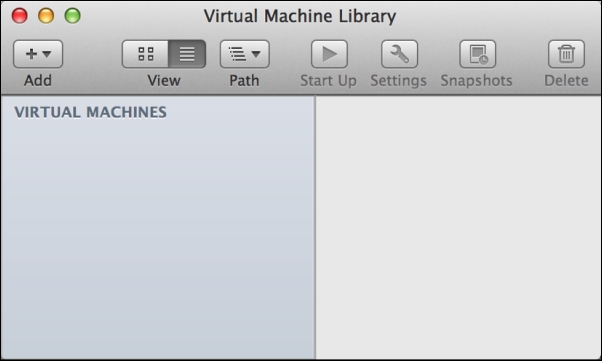
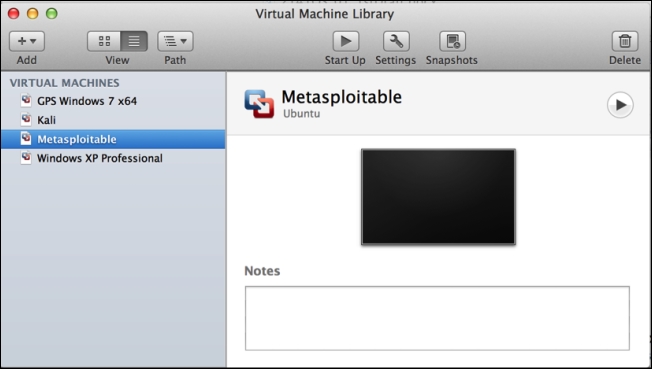
Once the software package has been downloaded, you should find it in your default download directory. Run the .dmg installation file and then follow the onscreen instructions to install it. Once the installation is complete, you can launch VMware Fusion either from the dock or within the Applications directory in Finder. Once loaded, you will see the virtual machine library. This library will not yet contain any virtual machines, but they will be populated as you create them on the left-hand side of the screen. The following screenshot shows the Virtual Machine Library:
To get started, click on the Add button in the top-left corner of the screen and then click on New. This will start the virtual machine installation wizard. The installation wizard is a very simple guided process to set up your virtual machine, as shown in the following screenshot:
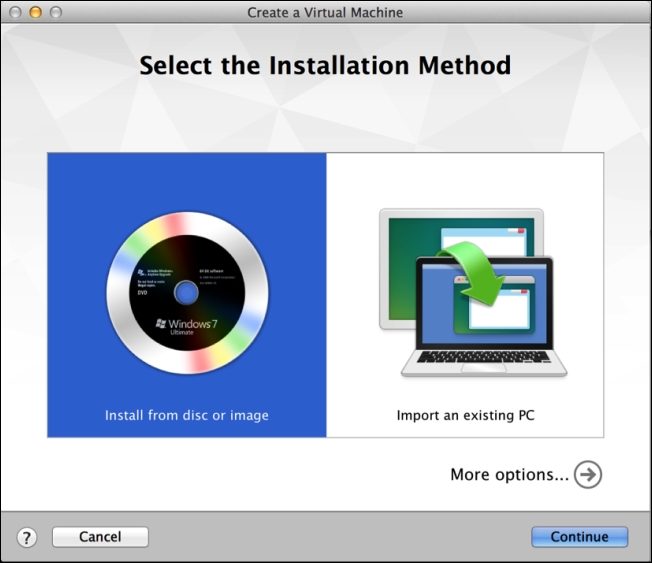
The first step requests that you select your installation method. VMware Fusion gives you options to install from a disc or image (ISO file), or offers several techniques to migrate existing systems to a new virtual machine. For all of the virtual machines discussed in this section, you will select the first option.
After selecting the first option, Install from disc or image, you will be prompted to select the installation disc or image to be used. If nothing is populated automatically, or if the automatically populated option is not the image you want to install, click on the Use another disc or disc image button. This should open up Finder, and it will allow you to browse to the image you would like to use. The place where you can get specific system image files will be discussed in later recipes in this section. Finally, we are directed to the Finish window:
After you have selected the image file that you wish to use, click on the Continue button and you will be brought to the summary screen. This will provide an overview of the configurations you selected. If you wish to make changes to these settings, click on the Customize Settings button. Otherwise, click on the Finish button to create the virtual machine. When you click on it, you will be requested to save the file(s) associated with the virtual machine. The name you use to save it will be the name of the virtual machine and will be displayed in you virtual machine library, as shown in the following screenshot:
As you add more virtual machines, you will see them included in the virtual machine library on the left-hand side of the screen. By selecting any particular virtual machine, you can launch it by clicking on the Start Up button at the top. Additionally, you can use the Settings button to modify configurations or use the Snapshots button to save the virtual machine at various moments in time. You can run multiple virtual machines simultaneously by starting each one independently from the library.
By using VMware Fusion within the Mac OS X operating system, you can create a virtualized lab environment to create an entire network environment on an Apple host machine. Virtualization software such as VMware has made it significantly easier and cheaper to build a security lab for personal, independent study.
Ubuntu Server is an easy-to-use Linux distribution that can be used to host network services and/or vulnerable software for testing in a security lab. Feel free to use other Linux distributions if you prefer; however, Ubuntu is a good choice for beginners because there is a lot of reference material and resources publicly available.
Prior to installing Ubuntu Server in VMware, you will need to download the image disk (ISO file). This file can be downloaded from Ubuntu's website at the following URL: http://www.ubuntu.com/server.
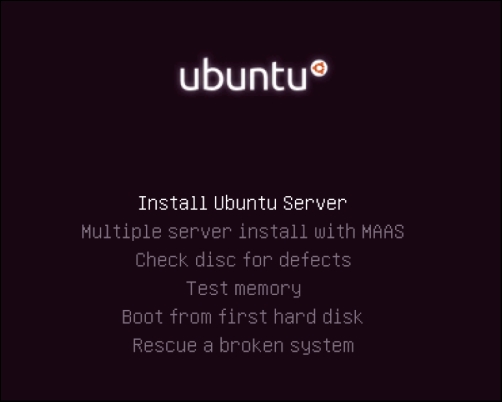
After the image file has been loaded and the virtual machine has been booted from it, you will see the default Ubuntu menu that is shown in the following screenshot. This includes multiple installation and diagnostic options. The menu can be navigated to with the keyboard. For a standard installation, ensure that the Install Ubuntu Server option is highlighted and press Enter.
When the installation process begins, you will be asked a series of questions to define the configurations of the system. The first two options request that you specify your language and country of residence. After answering these questions, you will be required to define your keyboard layout configuration as shown in the following screenshot:
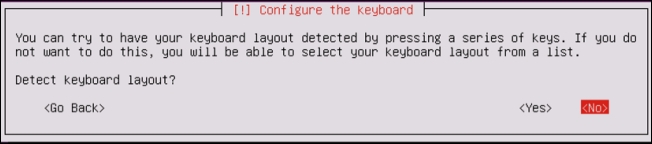
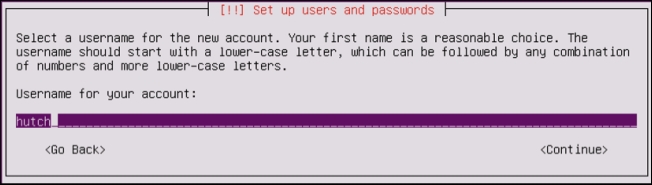
There are multiple options available to define the keyboard layout. One option is detection, in which you will be prompted to press a series of keys that will allow Ubuntu to detect the keyboard layout you are using. You can use keyboard detection by clicking on Yes. Alternatively, you can select your keyboard layout manually by clicking on No. This process is streamlined by defaulting to the most likely choice based on your country and language. After you have defined your keyboard layout, you are requested to enter a hostname for the system. If you will be joining the system to a domain, ensure that the hostname is unique. Next, you will be asked for the full name of the new user and username. Unlike the full name of the user, the username should consist of a single string of lowercase letters. Numbers can also be included in the username, but they cannot be the first character. Have a look at the following screenshot:
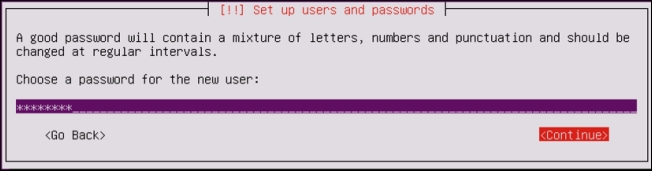
After you have provided the username of the new account, you will be requested to provide a password. Ensure that the password is something you can remember as you may later need to access this system to modify configurations. Have a look at the following screenshot:
After supplying a password, you will be asked to decide whether the home directories for each user should be encrypted. While this offers an additional layer of security, it is not essential in a lab environment as the systems will not be holding any real sensitive data. You will next be asked to configure the clock on the system as shown in the following screenshot:
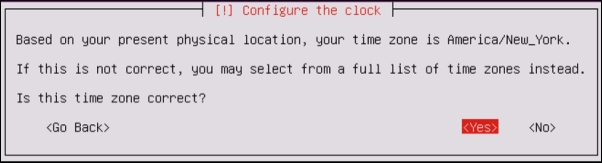
Even though your system is on an internal IP address, it will attempt to determine the public IP address through which it is routing out and will use this information to guess your appropriate time zone. If the guess provided by Ubuntu is correct, select Yes; if not, select No to manually choose the time zone. After the time zone is selected, you will be asked to define the disk partition configurations as shown in the following screenshot:

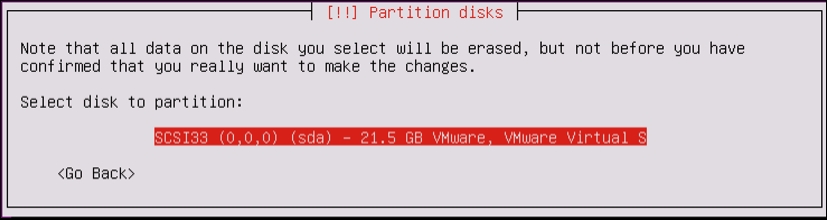
If you have no reason to select differently, it is recommended that you choose the default selection. It is unlikely that you will need to perform any manual partitioning in a security lab as each virtual machine will usually be using a single dedicated partition. After selecting the partitioning method, you will be asked to select the disk. Unless you have added additional disks to the virtual machine, you should only see the following option here:
After selecting the disk, you will be asked to review the configurations. Verify that everything is correct and then confirm the installation. Prior to the installation process, you will be asked to configure your HTTP proxy. For the purposes of this book, a separate proxy is unnecessary, and you can leave this field blank. Finally, you will be asked whether you want to install any software on the operating system as shown in the following screenshot:

To select any given software, use the Space bar. To increase the attack surface, I have included multiple services, only excluding virtual hosting and additional manual package selection. Once you have selected your desired software packages, press Enter to complete the process.
Metasploitable2 is an intentionally vulnerable Linux distribution and is also a highly effective security training tool. It comes fully loaded with a large number of vulnerable network services and also includes several vulnerable web applications.
Prior to installing Metasploitable2 in your virtual security lab, you will first need to download it from the Web. There are many mirrors and torrents available for this. One relatively easy method to acquire Metasploitable is to download it from SourceForge at the following URL: http://sourceforge.net/projects/metasploitable/files/Metasploitable2/.
Installing Metasploitable2 is likely to be one of the easiest installations that you will perform in your security lab. This is because it is already prepared as a VMware virtual machine when it is downloaded from SourceForge. Once the ZIP file has been downloaded, you can easily extract the contents of this file in Windows or Mac OS X by double-clicking on it in Explorer or Finder respectively. Have a look at the following screenshot:

Once extracted, the ZIP file will return a directory with five additional files inside. Included among these files is the VMware VMX file. To use Metasploitable in VMware, just click on the File drop-down menu and click on Open. Then, browse to the directory created from the ZIP extraction process and open Metasploitable.vmx as shown in the following screenshot:

Once the VMX file has been opened, it should be included in your virtual machine library. Select it from the library and click on Run to start the VM and get the following screen:

After the VM loads, the splash screen will appear and request login credentials. The default credential to log in is msfadmin for both the username and password. This machine can also be accessed via SSH, as addressed in the Configuring and using SSH recipe later in this section.
Metasploitable was built with the idea of security testing education in mind. This is a highly effective tool, but it must be handled with care. The Metasploitable system should never be exposed to any untrusted networks. It should never be assigned a publicly routable IP address, and port forwarding should not be used to make services accessible over the Network Address Translation (NAT) interface.
Having a Windows operating system in your testing lab is critical to learning security skills as it is the most prominent operating system environment used in production systems. In the scenarios provided, an install of Windows XP SP2 (Service Pack 2) is used. Since Windows XP is an older operating system, there are many flaws and vulnerabilities that can be exploited in a test environment.
To complete the tasks discussed in this recipe and some of the exercises later in this book, you will need to acquire a copy of a Windows operating system. If possible, Windows XP SP2 should be used because it is the operating system being used while this book is being written. One of the reasons this operating system was selected is because it is no longer supported by Microsoft and can be acquired with relative ease and at little to no cost. However, because it is no longer supported, you will need to purchase it from a third-party vendor or acquire it by other means. I'll leave the acquisition of this product up to you.
After booting from the Windows XP image file, a blue menu screen will load, which will ask you a series of questions to guide you through the installation process. Initially, you will be asked to define the partition that the operating system will be installed to. Unless you have made custom changes to your virtual machine, you should only see a single option here. You can then select either a quick or full-disk format. Either option should be sufficient for the virtual machine. Once you have answered these preliminary questions, you will be provided with a series of questions regarding operating system configurations. Then, you will be directed to the following screen:

First, you will be asked to provide a name and organization. The name is assigned to the initial account that was created, but the organization name is merely included for metadata purposes and has no effect on the performance of the operating system. Next, you will be requested to provide the computer name and administrator password as shown in the following screenshot:

If you will be adding the system to a domain, it is recommended that you use a unique computer name. The administrator password should be one that you will remember as you will need to log in to this system to test or configure changes. You will then be asked to set the date, time, and time zone. These will likely be automatically populated, but ensure that they are correct as misconfigurations of date and time can affect system performance. Have a look at the following screenshot:

After configuring the time and date, you will be asked to assign the system to either a workgroup or domain. Most of the exercises discussed within this book can be performed with either configuration. However, there are a few remote SMB auditing tasks, which will be discussed, that require that the system be domain joined. The following screenshot shows the Help Protect your PC window:

After the installation process has been completed, you will be prompted to help protect your PC with automatic updates. The default selection for this is to enable automatic updates. However, because we want to increase the amount of testing opportunities available to us, we will select the Not right now option.
Windows XP SP2 is an excellent addition to any beginner's security lab. Since it is an older operating system, it offers a large number of vulnerabilities that can be tested and exploited. However, as one becomes more skilled in the arts of penetration testing, it is important to begin to further polish your skills by introducing newer and more secure operating systems such as Windows 7.
To further increase the availability of the attack surface on the Windows operating system, it is important to add vulnerable software and to enable or disable certain integrated components.
Prior to modifying the configurations in Windows to increase the attack surface, you will need to have the operating system installed on one of your virtual machines. If this has not been done already, please see the Installing Windows Server recipe in this chapter.
Enabling remote services, especially unpatched remote services, is usually an effective way to introduce some vulnerabilities into a system. First, you'll want to enable Simple Network Management Protocol (SNMP) on your Windows system. To do this, open the start menu in the bottom-left corner and then click on Control Panel. Double-click on the Add or Remove Programs icon and then click on the Add/Remove Windows Components link on the left-hand side of the screen to get the following screen:

From here, you will see a list of components that can be enabled or disabled on the operating system. Scroll down to Management and Monitoring Tools and double-click on it to open the options contained within, as shown in the following screenshot:

Once opened, ensure that both checkboxes for SNMP and WMI SNMP Provider are checked. This will allow remote SNMP queries to be performed on the system. After clicking on OK, the installation of these services will begin. The installation of these services will require the Windows XP image disc, which VMware likely removed after the virtual machine was imaged. If this is the case, you will receive a pop up requesting you to insert the disc as shown in the following screenshot:

To do this, access the virtual machine settings. Ensure that the virtual optical media drive is enabled, then browse to the ISO file in your host filesystem to add the disc:

Once the disc is detected, the installation of SNMP services will be completed automatically. The Windows Components Wizard should notify you when the installation is complete. In addition to adding services, you should also remove some default services included in the operating system. To do this, open Control Panel again and double-click on the Security Center icon. Scroll to the bottom of the page, and click on the link for Windows Firewall and ensure that this feature is turned off, as shown in the following screenshot:

After you have turned off the Windows Firewall feature, click on OK to return to the previous menu. Scroll to the bottom once again, then click on the Automatic Updates link and ensure that it is also turned off.
The enabling of functional services and disabling of security services on an operating system drastically increases the risk of compromise. By increasing the number of vulnerabilities present on the operating system, we also increase the number of opportunities available to learn attack patterns and exploitation. This particular recipe only addressed the manipulation of integrated components in Windows to increase the attack surface. However, it can also be useful to install various third-party software packages that have known vulnerabilities. Vulnerable software packages can be found at the following URLs:
Kali Linux is an entire arsenal of penetration testing tools and will also be used as the development environment for many of the scanning scripts that will be discussed throughout this book.
Prior to installing Kali Linux in your virtual security testing lab, you will need to acquire the ISO file (image file) from a trusted source. The Kali Linux ISO can be downloaded at http://www.kali.org/downloads/.
After booting from the Kali Linux image file, you will be presented with the initial boot menu. Here, scroll down to the fourth option, Install, and press Enter to start the installation process:

Once started, you will be guided through a series of questions to complete the installation process. Initially, you will be asked to provide your location (country) and language. You will then be provided with an option to manually select your keyboard configuration or use a guided detection process. The next step will request that you provide a hostname for the system. If the system will be joined to a domain, ensure that the hostname is unique, as shown in the following screenshot:

Next, you will need to set the password for the root account. It is recommended that this be a fairly complex password that will not be easily compromised. Have a look at the following screenshot:

Next, you will be asked to provide the time zone you are located in. The system will use IP geolocation to provide its best guess of your location. If this is not correct, manually select the correct time zone:

To set up your disk partition, using the default method and partitioning scheme should be sufficient for lab purposes:

It is recommended that you use a mirror to ensure that your software in Kali Linux is kept up to date:

Next, you will be asked to provide an HTTP proxy address. An external HTTP proxy is not required for any of the exercises addressed in this book, so this can be left blank:

Finally, choose Yes to install the GRUB boot loader and then press Enter to complete the installation process. When the system loads, you can log in with the root account and the password provided during the installation:

Kali Linux is a Debian Linux distribution that has a large number of preinstalled, third-party penetration tools. While all of these tools could be acquired and installed independently, the organization and implementation that Kali Linux provides makes it a useful tool for any serious penetration tester.
Dealing with multiple virtual machines simultaneously can become tedious, time-consuming, and frustrating. To reduce the requirement of jumping from one VMware screen to the next and to increase the ease of communication between your virtual systems, it is very helpful to have SSH configured and enabled on each of them. This recipe will discuss how you can use SSH on each of your Linux virtual machines.
To use SSH on your virtual machines, you must first have an installed SSH client on your host system. An SSH client is integrated into most Linux and OS X systems and can be accessed from the terminal interface. If you are using a Windows host, you will need to download and install a Windows terminal services client. One that is free and easy to use is PuTTY. PuTTY can be downloaded at http://www.putty.org/.
You will initially need to enable SSH directly from the terminal in the graphical desktop interface. This command will need to be run directly within the virtual machine client. With the exception of the Windows XP virtual machine, all of the other virtual machines in the lab are Linux distributions and should natively support SSH. The technique to enable this is the same in nearly all Linux distributions and is shown as follows:

The /etc/init.d/ssh start command will start the service. You will need to prepend sudo to this command if you are not logged in with root. If an error is received, it is possible that the SSH daemon has not been installed on the device. If this is the case, the command apt-get install ssh can be used to install the SSH daemon. Then, ifconfig can be used to acquire the IP address of the system, which will be used to establish the SSH connection. Once activated, it is now possible to access the VMware guest system using SSH from your host system. To do this, minimize the virtual machine and open your host's SSH client.
If you are using Mac OSX or Linux for your host system, the client can be called directly from the terminal. Alternatively, if you are running your VMs on a Windows host, you will need to use a terminal emulator such as PuTTY. In the following example, an SSH session is established by supplying the IP address of the Kali virtual machine:
DEMOSYS:~ jhutchens$ ssh root@172.16.36.244
The authenticity of host '172.16.36.244 (172.16.36.244)' can't be established.
RSA key fingerprint is c7:13:ed:c4:71:4f:89:53:5b:ee:cf:1f:40:06:d9:11.
Are you sure you want to continue connecting (yes/no)? yes
Warning: Permanently added '172.16.36.244' (RSA) to the list of known hosts.
root@172.16.36.244's password:
Linux kali 3.7-trunk-686-pae #1 SMP Debian 3.7.2-0+kali5 i686

The programs included with the Kali GNU/Linux system are free software;
the exact distribution terms for each program are described in the
individual files in /usr/share/doc/*/copyright.

Kali GNU/Linux comes with ABSOLUTELY NO WARRANTY, to the extent
permitted by applicable law.
root@kali:~#
Tip
Downloading the example code
You can download the example code files for all Packt books you have purchased from your account at http://www.packtpub.com. If you purchased this book elsewhere, you can visit http://www.packtpub.com/support and register to have the files e-mailed directly to you.
The appropriate usage for the SSH client is ssh [user]@[IP address]. In the example provided, SSH will access the Kali system (identified by the provided IP address) using the root account. Since the host is not included in your list of known hosts, you will be prompted to confirm the connection the first time. To do this, enter the word, yes. You will then be prompted to enter the password for the root account. After entering it, you should be given remote shell access to the system. The same process can be accomplished in Windows by using PuTTY. This can be downloaded at the link provided in the Getting ready section of this recipe. Once downloaded, open PuTTY and enter the IP address of the virtual machine into the Host Name field and ensure that the SSH radio button is selected, as seen in the following screenshot:

Once the connection configurations have been set, click on the Open button to launch the session. We will then be prompted for the username and password. We should enter the credentials for the system that we are connecting to. Once the authentication process is completed, we will be granted remote terminal access to the system, as seen in the following screenshot:

It is possible to avoid having to authenticate every time by providing your public key into the authorized_keys file on the remote host. The process to do this is as follows:
root@kali:~# ls .ssh
ls: cannot access .ssh: No such file or directory
root@kali:~# mkdir .ssh
root@kali:~# cd .ssh/
root@kali:~/.ssh# nano authorized_keys
First, ensure that the .ssh hidden directory already exists in the root directory. To do this, use ls and the directory name. If it does not exist, use mkdir to create the directory. Then, use the cd command to change the current location into that directory. Then, create a file named authorized_keys using either Nano or VIM. If you are not familiar with how to use these text editors, see the Using text editors (VIM and Nano) recipe in this chapter. In this file, you should paste the public key used by your SSH client as follows:
DEMOSYS:~ jhutchens$ ssh root@172.16.36.244
Linux kali 3.7-trunk-686-pae #1 SMP Debian 3.7.2-0+kali5 i686

The programs included with the Kali GNU/Linux system are free software;
the exact distribution terms for each program are described in the
individual files in /usr/share/doc/*/copyright.

Kali GNU/Linux comes with ABSOLUTELY NO WARRANTY, to the extent
permitted by applicable law.
Last login: Sat May 10 22:38:31 2014 from 172.16.36.1
root@kali:~#
Once you have done this, you should be able to connect to SSH without having to supply the password for authentication.
Nessus is a highly functional vulnerability scanner that can be installed on the Kali Linux platform. This recipe will discuss the process to install, enable, and activate the Nessus service.
Prior to attempting to install the Nessus vulnerability scanner in Kali Linux, you will need to obtain a plugin feed activation code. This activation code is necessary to acquire the audit plugins used by Nessus to evaluate networked systems. If you are going to be using Nessus at home or exclusively within your lab, you can acquire a Home Feed Key for free. Alternatively, if you are going to be using Nessus to audit production systems, you will need to acquire a Professional Feed Key. In either case, you can acquire this activation code at http://www.tenable.com/products/nessus/nessus-plugins/obtain-an-activation-code.
Once you have acquired your plugin feed activation code, you will need to download the Nessus installation package available at http://www.tenable.com/products/nessus/select-your-operating-system. The following screenshot displays a list of various platforms that Nessus can run on and their corresponding installation packages:
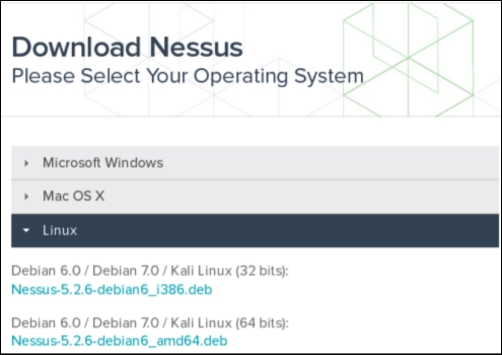
Select the appropriate installation package for the architecture of the operating system that you have installed. Once you have selected it, read and agree to the subscription agreement provided by Tenable. Your system will then download the installation package. Click on Save File and then browse to the location you would like to save it to:
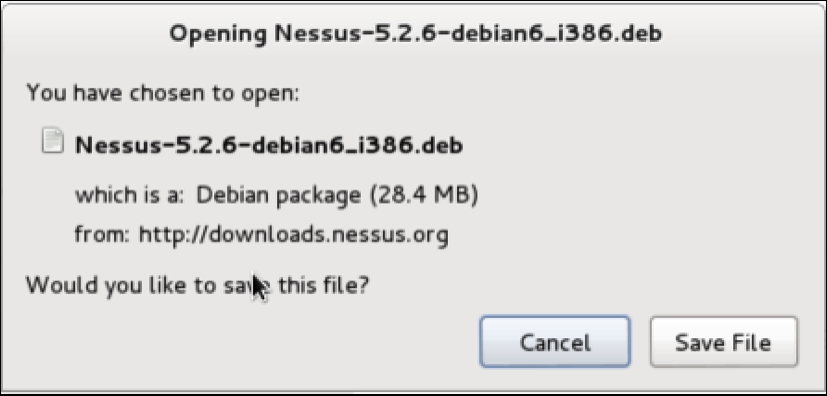
In the example provided, I have saved the installation package to the root directory. Once downloaded, you can complete the installation from the command line. This can be done over SSH or via a terminal on the graphic desktop in the following manner:
root@kali:~# ls
Desktop  Nessus-5.2.6-debian6_i386.deb
root@kali:~# dpkg -i Nessus-5.2.6-debian6_i386.deb
Selecting previously unselected package nessus.
(Reading database ... 231224 files and directories currently installed.)
Unpacking nessus (from Nessus-5.2.6-debian6_i386.deb) ...
Setting up nessus (5.2.6) ...
nessusd (Nessus) 5.2.6 [build N25116] for Linux
Copyright (C) 1998 - 2014 Tenable Network Security, Inc

Processing the Nessus plugins...
[##################################################]

All plugins loaded

 - You can start nessusd by typing /etc/init.d/nessusd start
 - Then go to https://kali:8834/ to configure your scanner

root@kali:~# /etc/init.d/nessusd start
$Starting Nessus : .
Use the ls command to verify that the installation package is in the current directory. You should see it listed in the response. You can then use the Debian Package Manager (dpkg) tool to install the service. The -i argument tells the package manager to install the specified package. Once the install is complete, the service can be started with the command, /etc/init.d/nessusd start. Nessus runs completely from a web interface and can easily be accessed from other machines. If you want to manage Nessus from your Kali system, you can access it via your web browser at https://127.0.0.1:8834/. Alternatively, you can access it from a remote system (such as your host operating system) via a web browser using the IP address of the Kali Linux virtual machine. In the example provided, the appropriate URL to access the Nessus service from the host operating system is https://172.16.36.244:8834:
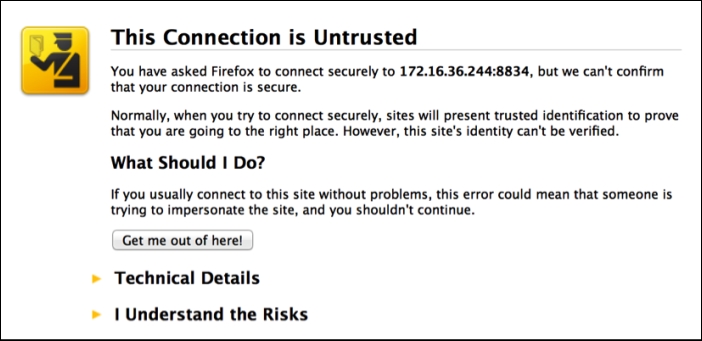
By default, a self-signed SSL certificate is used by the Nessus service, so you will receive an untrusted connection warning. For security lab usage, you can disregard this warning and proceed. This can be done by expanding the I Understand the Risks option as shown in the following screenshot:
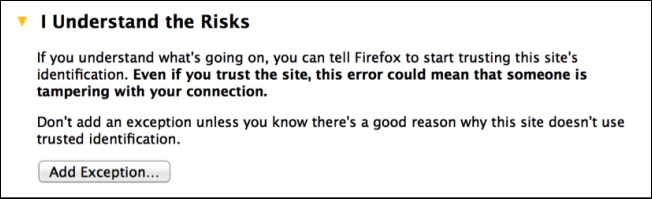
When you expand this option, you can click on the Add Exception button. This will prevent you from having to deal with this warning every time you try to access the service. After adding the service as an exception, you will receive a welcome screen. From here, click on the Get Started button. This will take you to the following screen:
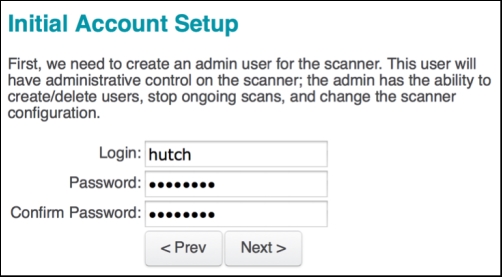
The first configurations that have to be set are the administrator's user account and associated password. These credentials will be used to log in and use the Nessus service. After entering the new username and password, click on Next to continue; you will see the following screen:
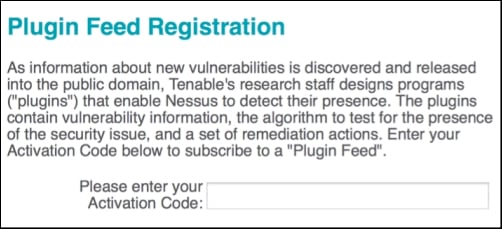
You will then need to enter your plugin feed activation code. If you do not have an activation code, refer back to the Getting ready section of this recipe. Finally, after you have entered your activation code, you will be returned to the login page and asked to enter your username and password. Here, you need to enter the same credentials that you created during the installation process. The following is the default screen that Nessus will load each time you access the URL in future:

Once installed properly, the Nessus vulnerability scanner should be accessible from the host system and all of the virtual machines that have a graphic web browser installed. This is due to the fact that the Nessus service is hosted on TCP port 8834 and both the host and all other virtual systems have network interfaces sitting in the same private IP space.
Burp Suite Proxy is one of the most powerful web application auditing tools available. However, it is not a tool that can easily be started with a single click. Configurations in both the Burp Suite application and in the associated web browser must be modified to ensure that each communicates with the other properly.
Nothing needs to be done to initially execute Burp Suite in Kali Linux. The free version is an integrated tool, and it is already installed. Alternatively, if you choose to use the professional version, a license can be purchased at https://pro.portswigger.net/buy/.
The license is relatively inexpensive and well worth the additional features. However, the free version is still highly useful and provides most of the core functionality at no cost to the user.
Burp Suite is a GUI tool and requires access to the graphics desktop in order to be run. As such, Burp Suite cannot be used over SSH. There are two ways to start Burp Suite in Kali Linux. You can browse to it in the Applications menu by navigating to Applications | Kali Linux | Top 10 Security Tools | burpsuite. Alternatively, you can execute it by passing it to the Java interpreter in a bash terminal, as follows:
root@kali:~# java -jar /usr/bin/burpsuite.jar
Once Burp Suite is loaded, ensure that the Proxy listener is active and running on the desired port. In the example provided, TCP port 8080 is used. These configurations can be verified by selecting the Proxy tab and then selecting the Options tab below it as shown in the following screenshot:

Here, you will see a list of all proxy listeners. If none exist, add one. To use with the IceWeasel web browser in Kali Linux, configure the listener to listen on a dedicated port on the 127.0.0.1 address. Also, ensure that the Running checkbox is activated. After configuring the listener in Burp Suite, you will also need to modify the IceWeasel browser configurations to route traffic through the proxy. To do this, open up IceWeasel by clicking on the weasel globe icon at the top of the screen. Once open, expand the Edit drop-down menu and click on Preferences to get the following screenshot:

In the IceWeasel preferences menu, click on the Advanced options button at the top and then select the Network tab. Then, click on the Settings button under the Connection header. This will bring up the Connection Settings configuration menu as shown in the following screenshot:

By default, the proxy radio button is set to Use system proxy settings. This needs to be changed to Manual proxy configuration. The manual proxy configurations should be the same as the Burp Suite Proxy listener configurations. In the example provided, the HTTP proxy address is set to 127.0.0.1 and the port value is set to TCP 8080. To capture other traffic, such as HTTPS, click on the Use this proxy server for all protocols checkbox. To verify that everything is working correctly, attempt to browse to a website using the IceWeasel browser as shown in the following screenshot:

If your configurations are correct, you should see the browser attempting to connect, but nothing will be rendered in the browser. This is because the request sent from the browser was intercepted by the proxy. The proxy intercept is the default configuration used in Burp Suite. To confirm that the request was captured successfully, return to the Burp Suite Proxy interface as shown:

Here, you should see the captured request. To continue using your browser for other purposes, you can change the proxy configurations to passively listen by clicking on the Intercept is on button to disable it, or you can change your proxy settings in your browser back to the Use system proxy settings option and only use the manual proxy settings when using Burp.
The initial configuration performed in Burp Suite creates a listening port on TCP 8080. This port is used by Burp Suite to intercept all web traffic and also to receive the incoming traffic returned in response. By configuring the IceWeasel web browser proxy configuration to point to this port, we indicate that all traffic generated in the browser should be routed through Burp Suite Proxy. Thanks to the capabilities provided by Burp, we can now modify the en-route traffic at will.
Text editors will be frequently used to create or modify existing files in the filesystem. You should use a text editor anytime you want to create a custom script in Kali. You should also use a text editor anytime you want to modify a configuration file or existing penetration testing tool.
There are no additional steps that must be taken prior to using the text editor tools in Kali Linux. Both VIM and Nano are integrated tools and are already installed in the operating system.
To create a file using the VIM text editor in Kali, use the vim command followed by the name of the file to be created or modified:
root@kali:~# vim vim_demo.txt
In the example provided, VIM is used to create a file named vim_demo.txt. Since no file currently exists in the active directory by that name, VIM automatically creates a new file and opens an empty text editor. To start entering text into the editor, press I or the Insert button. Then, start entering the desired text as follows:
Write to file demonstration with VIM
~
~
~
~
In the example provided, only a single line was added to the text file. However, in most cases, you will most likely use multiple lines when creating a new file. Once finished, press the Esc key to exit insert mode and enter the command mode in VIM. Then, type :wq and press Enter to save. You can then verify that the file exists and verify the contents of the file by using the following bash commands:
root@kali:~# ls
Desktop  vim_demo.txt
root@kali:~# cat vim_demo.txt
Write to file demonstration with VIM
The ls command can be used to view the contents of the current directory. Here, you can see that the vim_demo.txt file was created. The cat command can be used to read and display the contents of the file. An alternative text editor that can also be used is Nano. The basic usage of Nano is very similar to VIM. To get started, use the nano command, followed by the name of the file to be created or modified:
root@kali:~# nano nano_demo.txt
In the example provided, nano is used to open a file called nano_demo.txt. Since no file currently exists with that name, a new file is created. Unlike VIM, there is no separate command and writing mode. Instead, writing to the file can be done automatically, and commands are executed by pressing the Ctrl button in conjunction with a particular letter key. A list of these commands can be seen at the bottom of the text editor interface at all times:
  GNU nano 2.2.6             File: nano_demo.txt

Write to file demonstration with Nano
In the example provided, a single line was written to the nano_demo.txt file. To close the editor, you can use Ctrl + X. You will then be prompted to either save the file with y or not save it with n. You will be asked to confirm the filename to be written to. By default, this will be populated with the name that was provided when Nano was executed. However, this value can be changed and the contents of the file saved to a different filename as follows:
root@kali:~# ls
Desktop  nano_demo.txt  vim_demo.txt
root@kali:~# cat nano_demo.txt
Write to file demonstration with Nano
Once complete, the ls and cat commands can be used again to verify that the file was written to the directory and to verify the contents of the file, respectively. The intention of this recipe was to discuss the basic use of each of these editors to write and manipulate files. However, it is important to note that these are both very robust text editors that have a large number of other capabilities for file editing. For more information on the usage of either, access the man pages with the man command followed by the name of the specific text editor.
Text editors are nothing more than command-line-driven word processing tools. Each of these tools and all of their associated functions can be executed without the use of any graphical interface. Without any graphical component, these tools require very little overhead and are extremely fast. As such, they are highly effective to quickly modify files or handle them over a remote terminal interface such as SSH or Telnet.