Download code from GitHub
Kali - An Introduction
Kali was first introduced in 2012 with a completely new architecture. This Debian-based distribution was released with over 300 specialized tools for penetration testing and digital forensics. It is maintained and funded by Offensive Security Ltd, and the core developers are Mati Aharoni, Devon Kearns, and Raphaël Hertzog.
Kali 3.0 came into the picture in 2018 with tons of new updates, bug fixes such as AMD Secure Memory Encryption Support, and increased memory limits.
In the previous edition of this book, we saw some of the great tools in Kali that help penetration testers around the globe to perform their job efficiently. In this chapter, we will primarily cover the installation of Kali and setting up different desktop environments, as well as some custom tools that will help us.
In this chapter, we will cover the following recipes:
- Configuring Kali Linux
- Configuring the Xfce environment
- Configuring the MATE environment
- Configuring the LXDE environment
- Configuring the E17 environment
- Configuring the KDE environment
- Prepping Kali with custom tools
- Zone Walking using DNSRecon
- Setting up I2P for anonymity
- Pentesting VPN's ike-scan
- Setting up proxychains
- Going on a hunt with Routerhunter
Configuring Kali Linux
We will use the official Kali Linux official ISO provided by Offensive Security to install and configure different desktop environments.
Getting ready
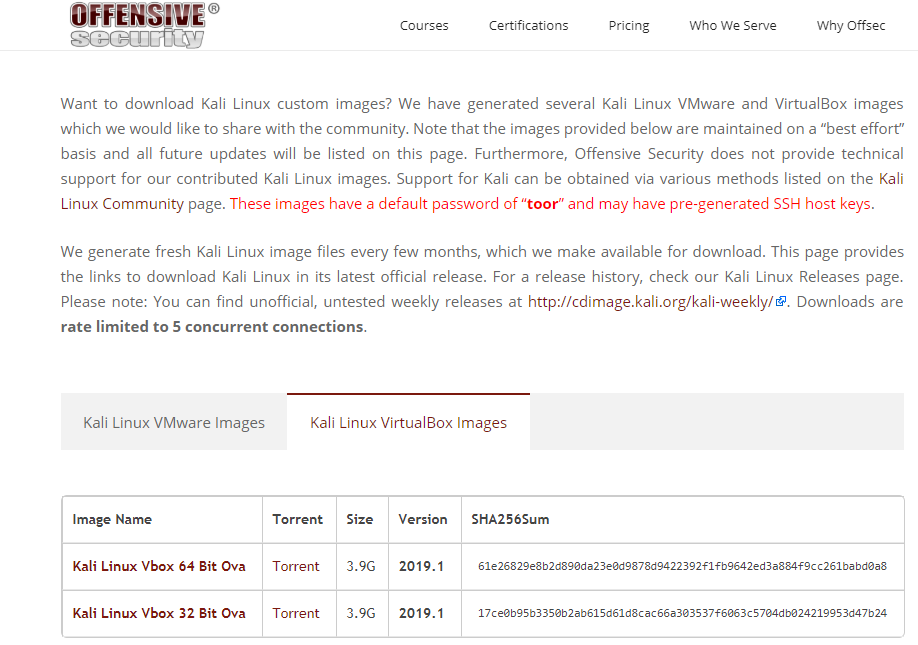
To start with this recipe, we will use the 64-bit Kali Linux ISO listed on the Offensive Security website: https://www.kali.org/downloads/.
For users looking to configure Kali for a virtual machine such as VMware and VirtualBox, a prebuilt image of the Linux can be downloaded from the following URL: https://www.offensive-security.com/kali-linux-vmware-virtualbox-image-download/.
We will use the virtual image in this chapter and customize it with some additional tools. We can download it from the website, as shown in the following screenshot:
How to do it...
- Double-click the VirtualBox image; it should open with VirtualBox.
- Click Import.
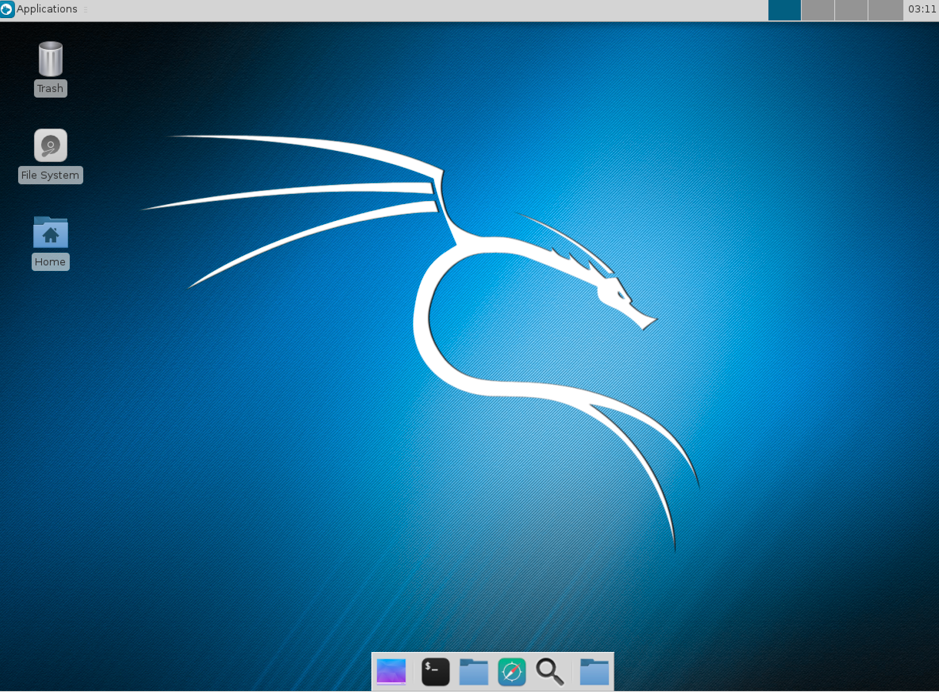
- Start the machine and enter the password toor.
- Now, Kali is by default configured with Gnome Desktop Environment.
How it works...
With the prebuilt image, you don't need to worry about the installation process. You can consider it as a ready-to-go solution. Simply click on Run and the virtual machine will boot up the Linux just like a normal machine.
Configuring the Xfce environment
Xfce is a free, fast, and lightweight desktop environment for Unix and Unix-like platforms. It was started by Olivier Fourdan in 1996. The name Xfce originally stood for XForms Common Environment, but since that time Xfce has been rewritten twice and no longer uses the XForms toolkit.
How to do it...
- We start by using the following command to install Xfce, along with all its plugins and goodies. If for some reason it fails, we should run apt update first:
apt-get install kali-defaults kali-root-login desktop-base xfce4 xfce4-places-plugin xfce4-goodies
The following screenshot shows the preceding command:

- Type Y when it asks for confirmation on additional space requirements.
- Select OK on the dialog box that appears.
- Select Lightdm as our default desktop manager and press Enter.
- When the installation is complete, open a Terminal window and type the following command:
update-alternatives --config x-session-manager
The following screenshot shows the output of the preceding command:
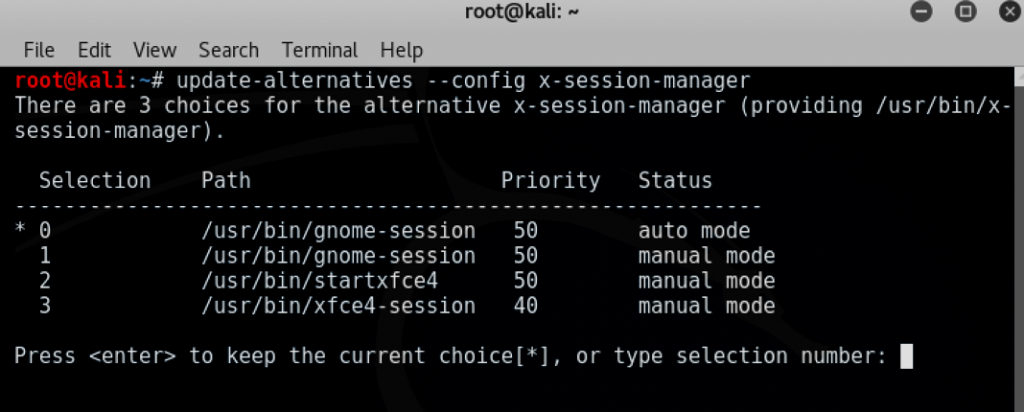
- Choose the xfce-session option (in our case, 3) and press Enter.
- Log out and log in again, and we will see the Xfce environment:
Now let's have a look at the configuration of MATE environment.
Configuring the MATE environment
The MATE desktop environment is the continuation of GNOME 2. It provides an intuitive and attractive desktop environment using traditional metaphors for Linux and other Unix-like operating systems. The latest version of MATE (1.20) was released on 07-02-2018, which added a lot of fixes and upgraded the theme.
The complete list of features can be viewed here: https://mate-desktop.org/blog/2018-02-07-mate-1-20-released/.
In this recipe, we will learn how to install MATE on Kali Linux.
How to do it...
- We start by using the following command to install the MATE environment:
apt-get install desktop-base mate-desktop-environment
- Type Y when it asks for confirmation on additional space requirements.
- When installation is complete, we will use the following command to set MATE as our default environment:
update-alternatives --config x-session-manager
- Choose the mate-session option (in our case, 2) and press Enter:

- Log out and log in again, and we will see the MATE environment:

Now let's have a look at the configuration of LXDE environment.
Configuring the LXDE environment
LXDE is a free open source environment written in C using the GTK+ toolkit for Unix and other POSIX platforms. LXDE stands for Lightweight X11 Desktop Environment.
LXDE is the default environment for many operating systems, such as Knoppix, Raspbian, and Lubuntu.
How to do it...
- We start by using the following command to install LXDE:
apt-get install lxde-core lxde
- Type Y when it asks for confirmation on additional space requirements.
- When the installation is complete, open a Terminal window and type the following command:
update-alternatives --config x-session-manager
The following screenshot shows the output of the preceding command:

- Choose the startlxde option session (in our case, 4) and press Enter.
- Log out and log in again, and we will see the LXDE environment:

Now let's have a look at the configuration of E17 environment.
Configuring the E17 environment
Enlightenment, otherwise known as E, is a window manager for the X Windows system. It was first released in 1997. It has lots of features, such as engage, virtual desktop, and tiling.
How to do it...
- Due to compatibility issues and hassle regarding dependencies, it is better to download Kali with the E17 environment directly from the following URL: https://www.kali.org/downloads/.
- The steps to set it up are simple: we just have to double-click and start the VM in VirtualBox or VMware.
Configuring the KDE environment
K Desktop Environment (KDE) is an open source graphical desktop environment for UNIX workstations. It was initially called Kool Desktop Environment. Matthias Ettrich first launched the KDE project in 1996 with the goal of making the UNIX platform more attractive and easy to use. In this recipe, we will learn how to set up KDE on Kali.
How to do it...
- We use the following command to install KDE:
apt-get install kali-defaults kali-root-login desktop-base kde-plasma-desktop
- Type Y when it asks for confirmation on additional space requirements.
- Click OK on both the windows that pop up.
- When the installation is complete, we open a Terminal window and type the following command:
update-alternatives --config x-session-manager
The following screenshot shows the output of the preceding command:

- Choose the startkde option (in our case, 2) and press Enter.
- Log out and log in again, and we will see the KDE environment:

Prepping with custom tools
In this recipe, we will set up a few tools beforehand; not to worry, we will be covering their usage in detail in later chapters.
Getting ready
Here is a list of some tools that we will need before we dive deeper into penetration testing. Don't worry, we will learn about their usage with some real-life examples in the next few chapters. But those of us who are excited about them right now can run the following simple commands to view the -help section where toolname is the name of the tool we would like to view the help of:
toolname -help
toolname -h
How to do it...
We will be looking at two tools in this section.
Aquatone
Aquatone is a tool for visually inspecting websites across a large amount of hosts and is convenient for quickly gaining an overview of an HTTP-based attack surface. Aquatone has four major modules: discover, scanner, gather, and takeover. Each of these can be used to perform in-depth enumeration of a target:
- We will use a simple command to install aquatone:
gem install aquatone
The following screenshot shows the output of the preceding command:

- Next, we create a directory in /root/folder using the following command:
mkdir /root/aquatone/
- As aquatone uses different modules to hunt for subdomains, we will have to configure aquatone's discovery module before running it.
- For example, to configure the shodan, we can use the following command:
aquatone-discover --set-key shodan XXXXXXXXXXX
The following screenshot shows the output of the preceding command:

- Similarly, we can set keys for other services too, such as Censys and PassiveTotal.
- Once it is all set, we can start our subdomain hunting. We can do this using the following command:
aquatone-discover -d domain.com
The following screenshot shows the output of the preceding command:

- Aquatone also allows us to set a custom wordlist by using the -w flag, and we can also set the threads by using the -t flag.
- By default, aquatone stores the output in TXT as well as JSON format in the /root/aquatone/ directory.
- After we find the subdomains, we can use the aquatone scanner to scan for open ports on the discovered hosts. Let's look at an example:
aquatone-scan --ports 80 -d packtpub.com
The following screenshot shows the output of the preceding command:

- This will look for the domain's hosts.json file in the aquatone directory.
Aquatone by default has four inbuilt port scanning flags (small, medium, large, and huge). These flags will decide the number of ports being scanned on the hosts, or we can define custom ports by using the -ports flag.- aquatone-gather: This tool makes a connection to the web services found using the discover and scanner modules of aquatone and takes screenshots of discovered web pages for later analysis.
- aquatone-takeover: This module is used to find subdomains that are vulnerable to the subdomain takeover vulnerability.
Let's refer to the following screenshot:

Subfinder
Subfinder is considered as a successor to sublist3r. It is amazingly fast and finds valid subdomains using passive online sources such as Ask, Archive.is, Baidu, Bing, Censys, CertDB, CertSpotter, Commoncrawl, CrtSH, DnsDB and so on.
- Install subfinder. It needs Go to be installed, which we can install by using the following command:
apt install golang
The following screenshot shows the output of the preceding command:

- Next, we clone subfinder by using the following command:
git clone https://github.com/subfinder/subfinder.git
The following screenshot shows the output of the preceding command:

Or you can download and save it from https://github.com/subfinder/subfinder.
- To install subfinder, we go to the cloned directory and run the go build command.
- Once the installation is complete, we will need a wordlist for it to run, so we can download dnspop's list. This list can be used in the previous recipe too: https://github.com/bitquark/dnspop/tree/master/results.
- Now that both are set up, we browse into subfinder's directory and run it using the ./subfinder -h command.
The following screenshot shows the output of the preceding command:

- To run it against a domain with our wordlist, we use the following command:
./subfinder -w /path/to/wordlist -d hostname.com
If we do not specify a wordlist the tool will run with a default wordlist as shown in the following screenshot:

Once the enumeration is complete, the output will be shown onscreen as follows:

- Subfinder is also designed to work with services such as shodan, censys, and virustotal, but they need to be configured in the config.json file shown here:

There's more...
A subdomain takeover vulnerability exists when a service that previously pointed to a subdomain is removed but the CNAME record still exists. More information can be read about it at the following GitHub link: https://github.com/EdOverflow/can-i-take-over-xyz/.
Aquatone-takeover is based on the same methodology described by EdOverflow at the preceding URL.
Zone Walking using DNSRecon
Zone Walking is a technique that is used by attackers to enumerate the full content of DNSSEC-signed DNS zones. We will cover more about it in later chapters; in this recipe, we will use DNSRecon.
Getting ready
DNSRecon is already included in Kali Linux, and we can use it for Zone Walking. Zone Walking is a technique used to find subdomains using domains whose NSEC records are set. However, before we jump into Zone Walking, let's take a quick look at the other features of this tool.
How to do it...
- To view the help, we type the following:
dnsrecon -h
The following screenshot shows the output of the preceding command:

- To do a simple recon of name servers, A records, SOA records, MX records, and so on, we can run the following command:
dnsrecon -d packtpub.com -n 8.8.8.8
The following screenshot shows the output of the preceding command:

- Now let's take an example of a domain that has NSEC records. To do a zone walk, we can simply run the following command:
dnsrecon -z -d icann.org -n 8.8.8.8
The following screenshot shows the output of the preceding command:

- We can do this manually by using the dig command along with dig +short NSEC domainname.com.
- The previous dig command will throw us one subdomain, and then we can rerun the same command with the subdomain we got in previous step to find the next subdomain: dig +short NSEC a.domain.com.
There's more...
When signing a zone, DNSSEC automatically chains all labels in alphabetical order using NSEC Resource Records. This is used to prove the absence of names.
For example, if someone requests the non-existent name name3, the name server responds with the NSEC entry name2 NSEC name5, indicating that no other entry exists between name2 and name5. We take advantage of that by starting with the first entry and then getting all domains by calling successive queries and getting other subdomains.
Setting up I2P for anonymity
Invisible Internet Project (I2P) is an unknown network layer. It offers P2P communication. To set up an anonymous connection, the user's traffic is encrypted (end to end) and is sent through a network of roughly 55,000 computers, which is distributed around the world and owned by volunteers.
How to do it...
- To install I2P, we need to first check whether apt-transport-https and curl are installed:
sudo apt-get install apt-transport-https curl
- Now we can install the tool using the following command:
apt install i2p
The following screenshot shows the output of the preceding command:

- When the installation is complete, we can run the service by using the following command:
i2prouter start
- We should not run it as root so we log in as another account and run the command as shown in the following screenshot:

- We will see that I2P service is up and running; now we add a proxy to our Firefox on port 4444:

- We can also access the I2P console at localhost 7657:

And now a whole new world of I2P is open for us to explore.
There's more...
I2P is designed and optimized for hidden services, which are much faster than in Tor. I2P allows us to use email, web browsing, hosting, IRC, file sharing, and decentralized storage anonymously. Here is a screenshot of this:

We will have a look at IKE in the next recipe.
Pentesting VPN's ike-scan
During a pentest, we may encounter VPN endpoints. However, finding vulnerabilities in those endpoints and exploiting them is not a well-known method. VPN endpoints use the Internet Key Exchange (IKE) protocol to set up a security association between multiple clients to establish a VPN tunnel.
IKE has two phases. Phase 1 is responsible for setting up and establishing a secure authenticated communication channel. Phase 2 encrypts and transports data.
Our focus of interest here is Phase 1. It uses two methods of exchanging keys:
- Main mode
- Aggressive mode
We hunt for Aggressive-mode-enabled VPN endpoints using PSK authentication.
Getting ready
For this recipe, we will use the ike-scan and ikeprobe tools. First, we install ike-scan by cloning the Git repository:
git clone https://github.com/royhills/ike-scan.git
Or, you can use the following URL: https://github.com/royhills/ike-scan.
How to do it...
- Browse to the directory where ike-scan is installed.
- Install autoconf by running the following command:
apt-get install autoconf
- Run autoreconf --install to generate a .configure file.
- Run ./configure.
- Run make to build the project.
- Run make check to verify the building stage.
- Run make install to install ike-scan.
- To scan a host for an Aggressive mode handshake, use the following command:
ike-scan x.x.x.x –M -A
The following screenshot shows the output of the preceding command:

- Sometimes, we will see the response after providing a valid group name such as vpn:
ike-scan x.x.x.x –M –A id=vpn
- To view the list of all available options, we can run the following command:
ike-scan -h
The following screenshot shows the output of the preceding command:

We can even brute force the group names using the following link: https://github.com/SpiderLabs/groupenum.
Here is the command:
./dt_group_enum.sh x.x.x.x groupnames.dic
Cracking the PSK
- Adding a –P flag in the ike-scan command will show a response with the captured hash.
- To save the hash, we provide a filename along with the –P flag.
- Next, we can use psk-crack with the following command:
psk-crack –b 5 /path/to/pskkey
-b is brute force mode and length is 5.
- To use a dictionary-based attack, we use the following command with -d flag to input the dictionary file:
psk-crack –d /path/to/dictionary /path/to/pskkey
The following screenshot shows the output of the preceding command:

There's more...
In Aggressive mode, the authentication hash is transmitted as a response to the packet of the VPN client that tries to establish a connection tunnel (IPSec). This hash is not encrypted and hence it allows us to capture the hash and perform a brute force attack against it to recover our PSK.
This is not possible in Main mode, as it uses an encrypted hash along with a 6-way handshake, whereas Aggressive mode uses only a 3-way handshake.
Setting up proxychains
Sometimes, we need to remain untraceable while performing a pentest activity. Proxychains helps us by allowing us to use an intermediary system whose IP can be left in the logs of the system without the worry of it tracing back to us.
Proxychains is a tool that allows any application to follow the connection via proxy, such as SOCKS5 and Tor.
How to do it...
Proxychains is already installed in Kali. However, we need a list of proxies in its configuration file that we want to use:
- To do that, we open the config file of proxychains in a text editor with this command:
leafpad /etc/proxychains.conf
The following screenshot shows the output of the preceding command:

We can add all the proxies we want in the place highlighted in the previous screenshot and then save. Proxychains also allows us to use dynamic chain or random chain while connection to proxyservers.
- In the config file, uncomment dynamic_chain or random_chain. The following screenshot shows the output of the preceding command:

Using proxychains with Tor
- To use proxychains with Tor, we first need to install Tor using the following command:
apt-get install tor
- Once it is installed, we run Tor by typing tor in the Terminal.
- We then open another Terminal and type the following command to use an application via proxychains:
proxychains toolname –arguments
The following screenshot shows the output of the preceding command:

Now let's have a look at the Routerhunter tool in the next recipe.
Going on a hunt with Routerhunter
Routerhunter is a tool that's used to find vulnerable routers on a network and perform various attacks on it to exploit the DNSChanger vulnerability. This vulnerability allows an attacker to change the DNS server of the router, directing all the traffic to desired websites.
Getting ready
For this recipe, you will again need to clone a Git repository.
We will use the following command:
git clone https://github.com/Exploit-install/Routerhunter-2.0.git
How to do it...
- Once the file is cloned, enter the directory.
- Run the following command:
python routerhunter.py -h
The following screenshot shows the output of the preceding command:

We can provide Routerhunter an IP range, DNS server IPs, and so on.