


This chapter will guide you through the wonderful world of Kali Linux v 2.0—a specialized Linux distribution for the purpose of penetration testing. In this chapter, we will cover the following topics:
A brief history of Kali
Several common usages of Kali
Downloading and installing Kali
Configuring and updating Kali
At the end of this chapter, we will describe how to install additional weapons and how to configure Kali Linux.
Kali Linux (Kali) is a Linux distribution system that was developed with a focus on penetration testing. Previously, Kali Linux was distributed as BackTrack, which itself is a merger between three different live Linux penetration testing distributions: IWHAX, WHOPPIX, and Auditor.
BackTrack is one of the most famous Linux distribution systems, as can be proven by the number of downloads, which reached more than four million as of BackTrack Linux 4.0 pre final.
Kali Linux Version 1.0 was released on March 12, 2013. Five days later, Version 1.0.1 was released, which fixed the USB keyboard issue. In those five days, Kali had been downloaded more than 90,000 times.
An updated version, Kali Linux 2.0, was released on August 11, 2015. This distribution aimed to provide a better end-user experience, while still maintaining the full functionality of the previous versions. One of the major improvements available in Kali Linux 2.0 was moving toward a rolling distribution. This meant that the Kali Linux developers were pulling updated base Linux packages directly as they were updated, giving the user a stable platform that is updated regularly.
The following are the major features of Kali Linux (http://docs.kali.org/introduction/what-is-kali-linux):
It is based on the Debian Linux distribution
It has more than 600 penetration testing applications
It has vast wireless card support (this will come in handy later on in this book)
It has a custom kernel patched for packet injection
All Kali software packages are GPG signed by each developer
Users can customize Kali Linux to suit their needs
It supports ARM-based systems
Kali Linux contains a number of tools that can be used during the penetration testing process. The penetration testing tools included in Kali Linux can be categorized into the following categories:
Information gathering: This category contains several tools that can be used to gather information about DNS, IDS/IPS, network scanning, operating systems, routing, SSL, SMB, VPN, voice over IP, SNMP, e-mail addresses, and VPN.
Vulnerability assessment: In this category, you can find tools to scan vulnerabilities in general. It also contains tools to assess the Cisco network, and tools to assess vulnerability in several database servers. This category also includes several fuzzing tools.
Web applications: This category contains tools related to web applications such as the content management system scanner, database exploitation, web application fuzzers, web application proxies, web crawlers, and web vulnerability scanners.
Database assessment: Tools in this category allow for the ability to test the security of a variety of databases. There are a number of tools designed specifically to test SQL databases.
Password attacks: In this category, you will find several tools that can be used to perform either off-line or on-line password attacks.
Wireless attacks: Testing wireless security is becoming more and more common. This category includes tools to attack Bluetooth, RFID/NFC, and wireless devices.
Exploitation tools: This category contains tools that can be used to exploit the vulnerabilities found in the target environment. You can find exploitation tools for the network, web, and database. There are also tools to perform social engineering attacks and find out about the exploit information.
Sniffing and spoofing: Tools in this category can be used to sniff network and web traffic. This category also includes network spoofing tools such as Ettercap and Yersinia.
Post exploitation: Tools in this category will be able to help you maintain access to the target machine. You might need to get the highest privilege level in the machine before you can install tools in this category. Here, you can find tools for backdooring the operating system and web application. You can also find tools for tunneling.
Reporting tools: In this category, you will find tools that help you document the penetration testing process and results.
System services: This category contains several services that can be useful during the penetration testing task, such as the Apache service, MySQL service, SSH service, and Metasploit service.
To ease the life of a penetration tester, Kali Linux has provided us with a category called Top 10 Security Tools. Based on its name, these are the top 10 security tools commonly used by penetration testers. The tools included in this category are aircrack-ng, burp-suite, hydra, john, maltego, metasploit, nmap, sqlmap, wireshark, and zaproxy.
Besides containing tools that can be used for the penetration testing task, Kali Linux also comes with several tools that you can use for the following:
Reverse engineering: This category contains tools that can be used to debug a program or disassemble an executable file.
Stress testing: This category contains tools that can be used to help you in stress testing your network, wireless, web, and VOIP environment.
Hardware hacking: Tools in this category can be used if you want to work with Android and Arduino applications.
Forensics: Tools in this category can be used for a variety of digital forensic tasks. This includes imaging disks; analyzing memory images, and file carving. One of the best forensic tools that is available with Kali Linux is Volatility. This command line tool has a number of features for analyzing memory images.
For the purposes of this book, we are focusing only on Kali Linux's penetration testing tools.
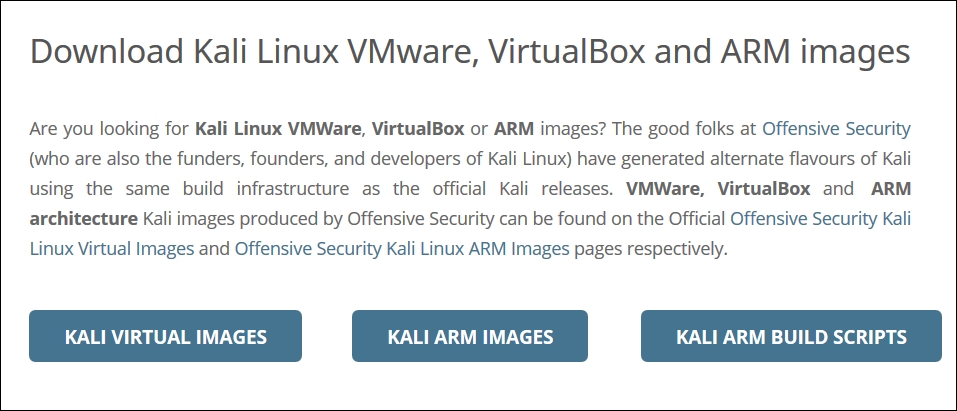
The first thing to do before installing and using Kali Linux is to download it. You can get Kali Linux from the Kali Linux website (http://www.kali.org/downloads/).
On the download page, you can select the official Kali Linux image based on the following items, which are also shown in the next screenshot:

Machine architecture: i386, amd64, armel, and armhf
Image type: ISO image or VMware image
If you want to burn the image to a DVD or install Kali Linux to your machine, you might want to download the ISO image version. However, if you want to use Kali Linux for VMWare, you can use the VMWare image file to speed up the installation and configuration for a virtual environment.
After you have downloaded the image file successfully, you need to compare the SHA1 hash value from the downloaded image with the SHA1 hash value provided on the download page. The purpose of checking the SHA1 value is to ensure the integrity of the downloaded image is preserved. This prevents the user from either installing a corrupt image or an image file that has been maliciously tampered with.
In the Unix/Linux/BSD operating system, you can use the sha1sum command to check the SHA1 hash value of the downloaded image file. Remember that it might take some time to compute the hash value of the Kali Linux image file due to its size. For example, to generate the hash value of the kali-linux-2.0-i386.iso file, the following command is used:
sha1sum kali-linux-2.0-i386.iso
6e5e6390b9d2f6a54bc980f50d6312d9c77bf30b kali-linux-2.0-i386.iso
In the Windows world, there are many tools that can be used to generate the SHA1 hash value; one of them is sha1sum. It is available from http://www.ring.gr.jp/pub/net/gnupg/binary/sha1sum.exe.
We like it because of its small size, and it just works. If you want an alternative tool instead of sha1sum, there is HashMyFiles (http://www.nirsoft.net/utils/hash_my_files.html). HashMyFiles supports MD5, SHA1, CRC32, SHA-256, SHA-384, and SHA-512 hash algorithms.
After you have downloaded HashMyFiles, just run the HashMyFiles and select the file by navigating to File | Add Files to find out the SHA1 hash value of a file. Or, you can press F2 to perform the same function. Then, choose the image file you want.
The following screenshot resembles the SHA1 hash value generated by HashMyFiles for the Kali Linux v 2.0 i386.iso image file:

You need to compare the SHA1 hash value generated by sha1sum, HashMyFiles, or other similar tools with the SHA1 hash value displayed on the Kali Linux download page.
If both the values match, you can go straight to the Using Kali Linux section. However, if they do not match, it means that your image file is broken; you may want to download the file again from an official download mirror. When we run the hash of our downloaded file and compare it to the hash on the website, we see that they match, indicating that the package has been fully downloaded and is complete.
You can use Kali Linux in one of the following ways:
You can run Kali Linux directly from the Live DVD
You can install Kali Linux on the hard disk and then run it
You can install Kali Linux on the USB disk (as a portable Kali Linux)
In the following sections, we will briefly describe each of those methods.
If you want to use Kali Linux without installing it first, you can do so by burning the ISO image file to a DVD. After the burn process finishes successfully, boot up your machine with that DVD. You need to make sure that you have set the machine to boot from the DVD.
The advantage of using Kali Linux as a Live DVD is that it is very fast to set up and is very easy to use.
Unfortunately, the Live DVD has several drawbacks; for example, any files or configuration changes will not be saved after the reboot. Additionally, running Kali Linux from the DVD is slow as compared to running Kali Linux from the hard disk because the DVD's reading speed is slower than the hard disk's reading speed.
This method of running Kali is recommended only if you just want to test Kali. However, if you want to work with Kali Linux extensively, we suggest that you install Kali Linux.
To install Kali Linux on your hard disk, you can choose one of the following methods:
Installation on a physical/real machine (regular installation)
Installation on a virtual machine
You can choose whichever method is suitable for you, but we personally prefer to install Kali Linux on a virtual machine.
Before you install Kali Linux on a physical/real machine, make sure that you install it on an empty hard drive. If your hard drive already has some data on it, that data will be lost during the installation process because the installer will format the hard drive. For the easiest installations, it is recommended that you use the entire hard disk. For more advanced setups, there is the option of installing Kali Linux on a partition of a single logical drive. To do this, you will have to have a primary partition that boots the operating system and another partition for Kali Linux. Take care when doing this because it is easy for the bootable operating system to become corrupted.
Note
The official Kali Linux documentation that describes how to install Kali Linux with the Windows operating system can be found at http://docs.kali.org/installation/dual-boot-kali-with-windows.
There are several tools that can be used to help you perform disk partitioning. In the open source area, the following Linux Live CDs are available:
SystemRescueCD (http://www.sysresccd.org/)
GParted Live (http://gparted.sourceforge.net/livecd.php)
Kali Linux (http://www.kali.org)
To use the Linux Live CD, you just need to boot it up and you are ready for disk partitioning. Make sure that you back up your data before you use the Linux Live CD disk-partitioning tool. Even though they are safe for use in our experience, there is nothing wrong with being cautious, especially if you have important data on the hard disk.
After you are done with the disk partitioning (or you just want to use all the hard disk space), you can boot your machine using the Kali Linux Live DVD and select the Install or Graphical install option when you are prompted with the Kali Linux Live CD menu:

After that, you will see an installation window. You need to set up several things during the installation process:
Set Language: The default is English.
Selection Location: Use the drop-down menu to select your country.
Configure the Keyboard: Select the keyboard that best fits your needs.
Host Name for the system.: The default is Kali. For beginners you can leave the default in place. Host names are often used in enterprise environments where an accounting of all systems connected to the network is necessary.
Set the Domain: For beginners, this should be left blank. This would only be used if the installation was to be part of a network domain.
Set Password: This will be the password for the ROOT account. Choose a strong one, do not share it and do not forget it.
Configure the clock: Choose your time zone.
Partition Disk: The installer will guide you through the disk partitioning process. If you use an empty hard disk, just select the default Guided - use entire disk option for better ease. If you have some other operating system installed on your machine, you might first want to create a separate partition for Kali Linux and then select Manual in this menu. After you have selected the suitable menu, the installer will create the partition.
The installer will ask you about the partitioning scheme; the default scheme is All files in one partition. Remember that if you want to store files in the home directory, you should select Separate /home partition so that those files won't be deleted if you reinstall the system. The /home partition's size really depends on your needs. If you want to put all your data in that directory, you may want a big partition size (more than 50 GB). For average usage, you can go ahead with 10 to 20 GB.
For beginners, it is recommended that you select the option Guided – use entire disk. Then select the disk that you want to install Kali Linux to. Select All files in one partition.
The installer will display an overview of your currently configured partitions, as shown in the following screenshot:

Make sure the Finish partitioning and write changes to disk is selected and then click Continue. Finally, click the Yes radio button and click Continue to write the changes to the disk.
Network Mirror: For beginners, choose no. We will cover updating Kali Linux.
Next, the installer will install the Kali Linux system. The installation will be completed in several minutes and you will have Kali Linux installed on your hard disk afterwards. In our test machine, the installation took around 20 minutes.
After the installation is finished, the installer will ask you to configure the package manager. Next, it will ask you to install GRUB to the Master Boot Record. You can just choose the default values for these two questions. Beware if you have some other operating system on the same machine, you should not choose to install GRUB to the Master Boot Record.
If you see the following message, it means that your Kali installation is complete:

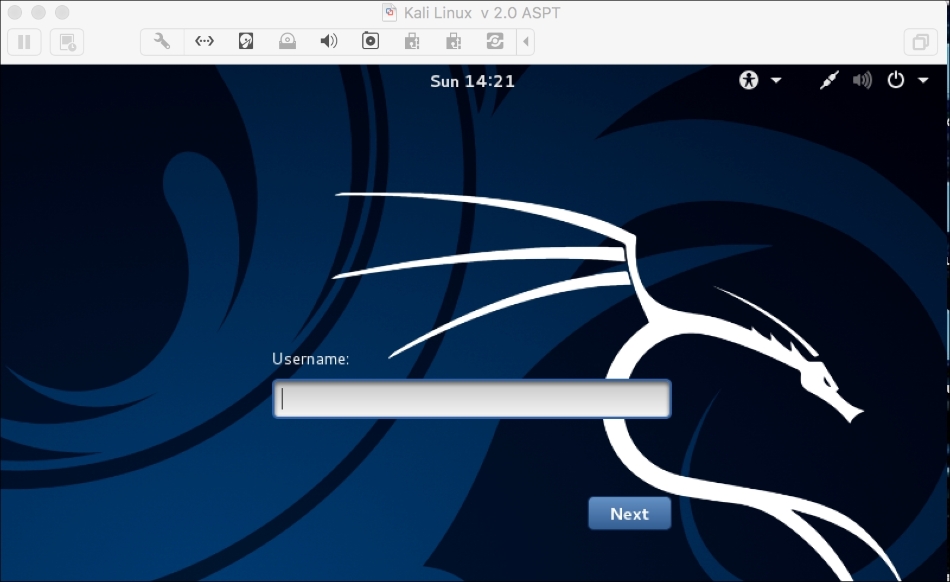
You can restart the machine to test your new Kali installation by selecting the Continue button. After restarting, you will see the following Kali login screen. You can log in using the credentials that you configured in the installation process:
You can also install Kali Linux to a virtual machine environment as a guest operating system. The advantages of this type of installation are that you do not need to prepare a separate physical hard disk partition for the Kali Linux image and can use your existing operating system as is.
Note
We will use VirtualBox (http://www.virtualbox.org) as the virtual machine software. VirtualBox is an open source virtualization software that is available for Windows, Linux, OS X, and Solaris operating systems.
Unfortunately, there is also a disadvantage of running Kali Linux on a virtual machine; it is slower than running Kali Linux on a physical machine.
There are two options that can be utilized for installing Kali Linux on a virtual machine. The first option is to install the Kali Linux ISO image into a virtual machine. This option will take more time compared to the VMware image installation. The advantage of this method is that you can customize your Kali installation.
To install a Kali Linux ISO image on a virtual machine, the following steps can be used:
Create a new virtual machine by selecting New from the VirtualBox toolbar menu:

After that, you need to define the virtual machine's name and the operating system's type. Here, we set the VM's name to
Kali Linuxand we choose Linux for the OS type and Debian for the version:
Then, you need to define the VM's base memory size. The more memory you provide, the better the virtual machine will be. Here, we allocated 2048 MB of memory to the Kali Linux virtual machine. Remember that you can't give all of your physical memory to the VM because you still need the memory to run your host operating system:

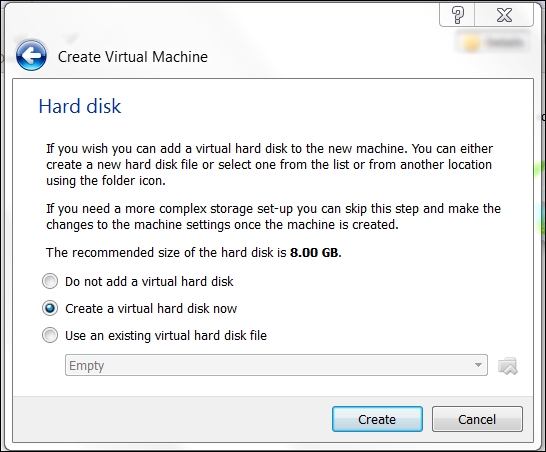
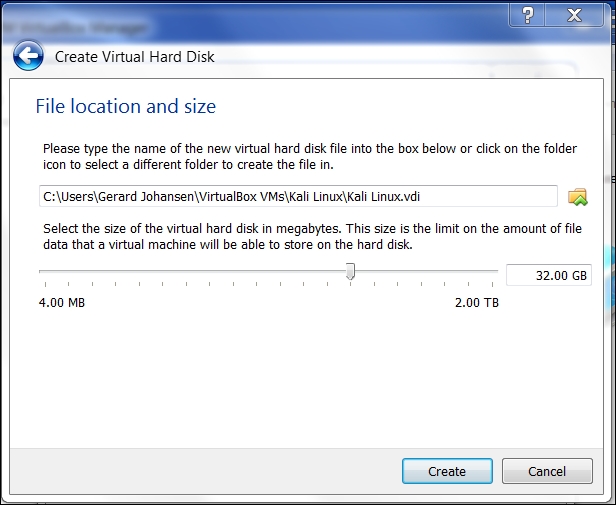
Next, you will be asked to create a virtual hard disk. You can just select the VDI as the hard disk type along with a dynamically allocated virtual disk file. We suggest creating at least a 32 GB virtual hard disk. If you want to install some software packages later on, you may want to create a larger virtual hard disk. Choose Create a virtual hard disk now and click Continue:
Now select a file location and size. Click Continue:
Read the dialog box and click Continue:

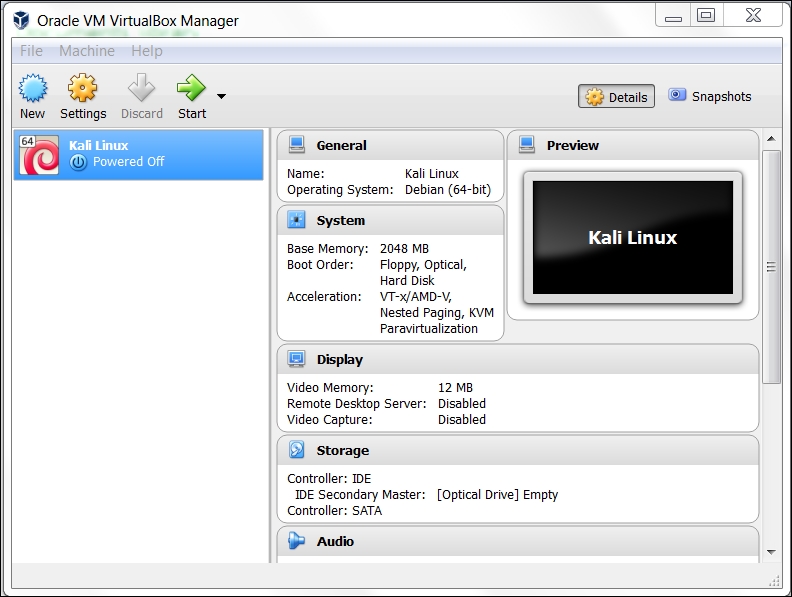
After this, your newly created VM will be listed on the VirtualBox menu:
Double-click on the new Kali Linux virtual machine:
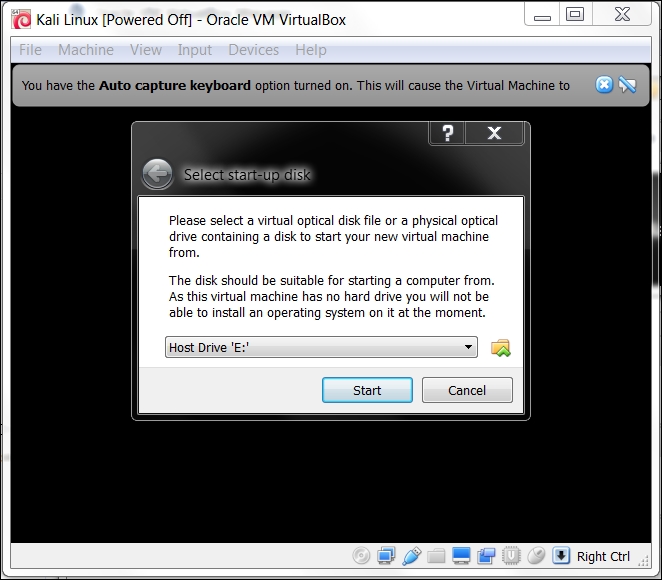
Using the file icon, navigate to where you have the Kali Linux 2.0 ISO of your choice. Once selected, click Start.
Once the installation starts, follow the directions as they were defined in the previous section on installing Kali Linux 2.0.
The second option is using the VMWare image provided by Kali Linux. With this option, you can install Kali Linux on a virtual machine with ease:
After clicking the Kali Virtual Images, we are brought to another page listing the packages and their associated SHA1 values:
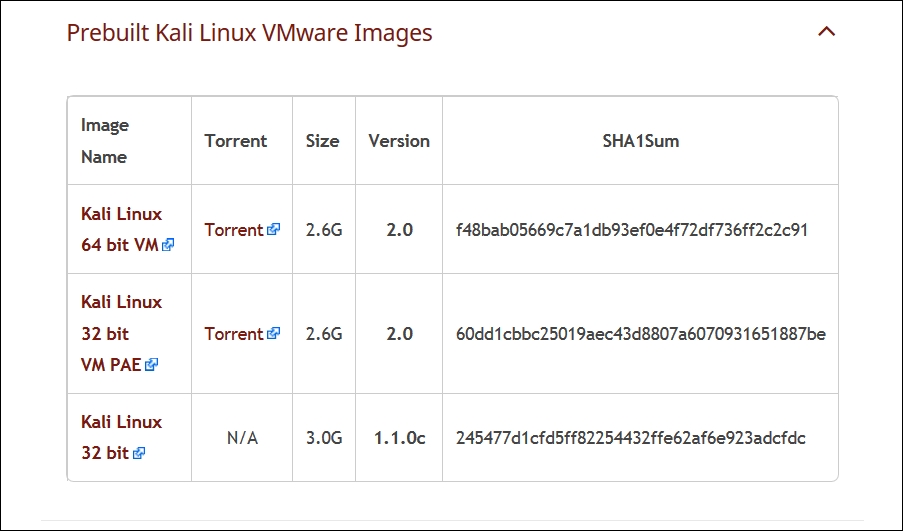
After downloading the Kali Linux VMware image (Kali-Linux-2.0.0-vm-amd64.7z), you need to verify the SHA1 hash of the downloaded file with the hash value provided in the download page. If the hash value is the same, you can extract the image file to the appropriate folder.
As the Vmware image is compressed in the GZ format, you can use any software that can extract a .gz file such as gzip, or 7-Zip if you use a Windows operating system. If you have extracted it successfully, you will find 13 files in the directory:
To create the new virtual machine using this VM image file, select New from the VirtualBox icon toolbar.
We will use Kali Linux from VM as the VM name and choose Linux as the operating system and Debian as the version.
We configure the Kali Linux virtual machine to use 2048 MB as its memory size.
Next, we define the virtual hard disk to Use an existing virtual hard drive file. Then, we select the
Kali-Linux-2.0.0-vm-amd64.vmdkfile for the hard disk. After that, we choose Create to create the virtual machine, as shown in the following screenshot: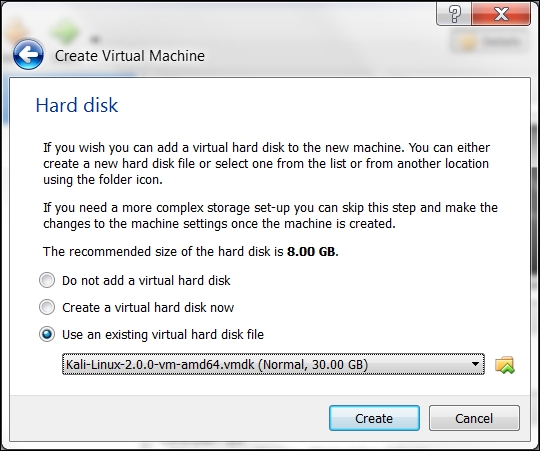
The following is the default configuration of the Kali Linux VMware image:
Hard disk size: 30 GB
Network type: NAT
Username: root
Password: toor
Note
For penetration purposes, we should avoid using NAT as the network type. The recommended network type is bridged. Change the default password for Kali when you configure the Kali VM.
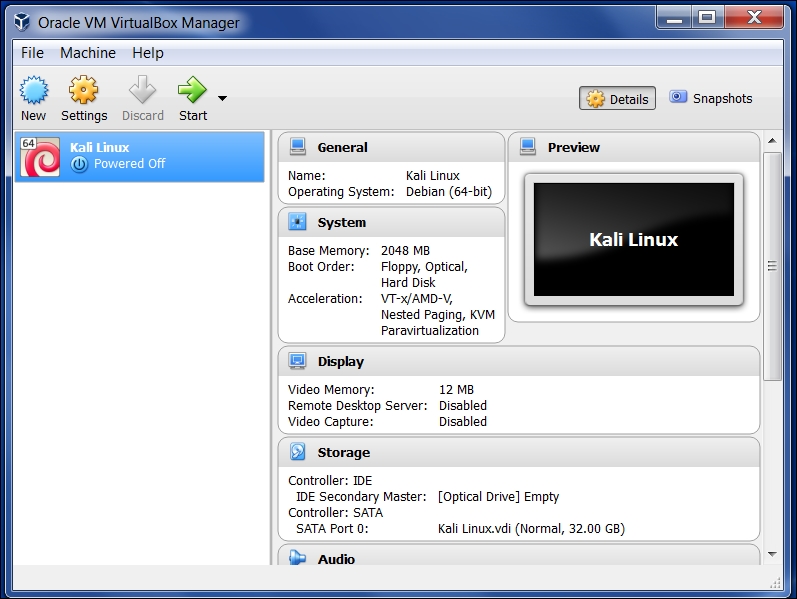
If successful, you will see the new virtual machine in the virtual manager list within Virtual Box.
To run the Kali Linux virtual machine, click on the Start icon at the top of the VirtualBox menu bar. After the boot process, Kali Linux will display its login prompt.
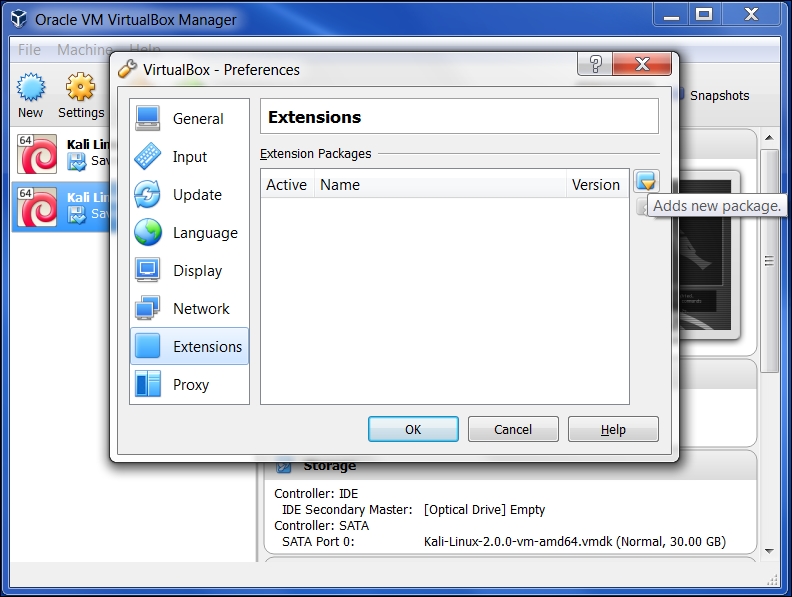
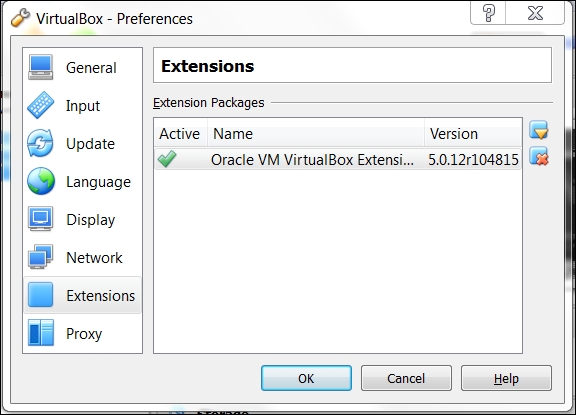
If you got the following error message, you need to install the VirtualBox Extension Pack. You can get it from http://www.virtualbox.org/wiki/Downloads:
Clicking OK will bring you to the following:

Go ahead and click on Install and the following will appear:
There are two other advantages to using Kali Linux as a virtual machine. The first is the ease with which the virtual machine can be paused. Pausing the virtual machine allows you to suspend your activity without losing any of your work. For example, if you have to shut down the host system and the virtual machine is still processing an action, suspending it will allow you to pick up right where you left off. To pause the virtual machine, click on the pause button located at the upper left-hand corner of the virtual machine window:

Another feature of the virtual machine is the ability to move it from one host to another. This is very handy if you need to change host systems. For example, running on a laptop and then moving it to a newer, more powerful laptop. This ensures that any configurations or modifications you have made remain so that you do not have to go through the whole process again.
To export a virtual machine, go to File and click on Export Virtual Appliance. You will then be guided through exporting the Kali Linux virtual machine. Select a location to export to and leave the application settings the same. Finally, click Export and the virtual machine will be exported to the location. This may take some time, depending on how large the virtual machine is.
Once the export has concluded, you can use whatever storage device you would like and transfer the virtual machine to another host system. Keep in mind that if you use Oracle Virtual Box to create the virtual machine, use the same version on the new host computer. Once it has transferred, you can import the virtual machine by going to File, Import virtual machine, and following the instructions.
The third option to use Kali Linux is by installing it to a USB flash disk; we call this method Portable Kali Linux. According to the official Kali documentation, this is the Kali developer's favorite and fastest method of booting and installing Kali. Compared to the hard disk installation, you can run Kali Linux using any computer that supports booting from the USB flash disk with this method.
Note
The installation procedure for the USB flash disk is also applicable to the installation of memory cards (SSD, SDHC, SDXC, and so on).
There are several tools available to create portable Kali Linux. One of them is Rufus (http://rufus.akeo.ie/). This tool can be run only from a Windows operating system.
You can use other tools to create a bootable disk from the ISO image, such as:
Win32DiskImager (https://launchpad.net/win32-image-writer)
Universal USB Installer (http://www.pendrivelinux.com/universal-usb-installer-easy-as-1-2-3/)
Linux Live USB Creator (http://www.linuxliveusb.com)
Before creating portable Kali Linux, you need to prepare a couple of things:
Kali Linux ISO image: Even though you can use the portable creator tool to download the image directly while making the Kali Linux portable, we think it's much better to download the ISO first and then configure Rufus to use the image file.
USB flash disk: You need an empty USB flash disk with enough space on it. We suggest using a USB flash disk with a minimum size of 16 GB.
After downloading Rufus, you can run it on your Windows computer by double-clicking on the rufus.exe file. You will then see the Rufus window.
Tip
If you use a Unix-based operating system, you can create the image using the dd command. The following is an example of imaging:
dd if=kali-linux-2.0-i386.iso of=/dev/sdb bs=512k
Here, /dev/sdb is your USB flash disk.
To create a bootable Kali USB flash disk, we need to fill in the following options:
For Device, we choose the location of the USB flash disk. In my case, it is the E: drive in my Windows system.
For Partition scheme and target system type, set it to MBR partition scheme for BIOS or UEFI computers.
In the Create a bootable disk using option, set the value to ISO image and select the ISO image using the disk icon:
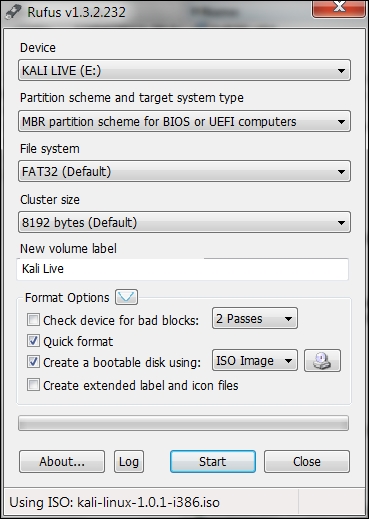
Click on Start to create the bootable image:

After the process is complete, save all your work first and then reboot your system if you want to try the USB flash disk right away. You may want to configure your Basic Input Output System (BIOS) to boot it from the USB disk. If there is no error, you can boot up Kali Linux from the USB flash disk.
Tip
If you want to add persistence capabilities to the USB flash disk, you can follow the steps described in the documentation section Adding Persistence to Your Kali Live USB located at http://docs.kali.org/installation/kali-linux-live-usb-install.
Once installed, there are several configuration steps necessary for the Kali Linux virtual machine. These steps allow for greater functionality and usability.
It is recommended that after you have successfully created the Kali Linux virtual machine using VirtualBox, you install VirtualBox guest additions. This add-on will provide you with the following additional features:
It will enable the virtual machine to be viewed in full screen
It will make the mouse move faster in the virtual machine
It will enable you to copy and paste the text between the host and guest machine
It will enable the guest and host machines to share folders
To install the guest additions, you can perform the following steps:
From the VirtualBox menu, navigate to Devices | Install Guest Additions. You will then see that the VirtualBox guest addition file is mounted as a disk.
The VirtualBox will then display the following message. Click on Cancel to close the window:

Open the terminal console and change the VirtualBox guest additions CDROM mount point (
/media/cdrom0):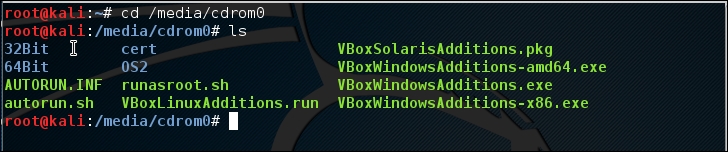
Execute
VBoxLinuxAdditions.runto run the VirtualBox guest additions installer:sh ./VBoxLinuxAdditions.run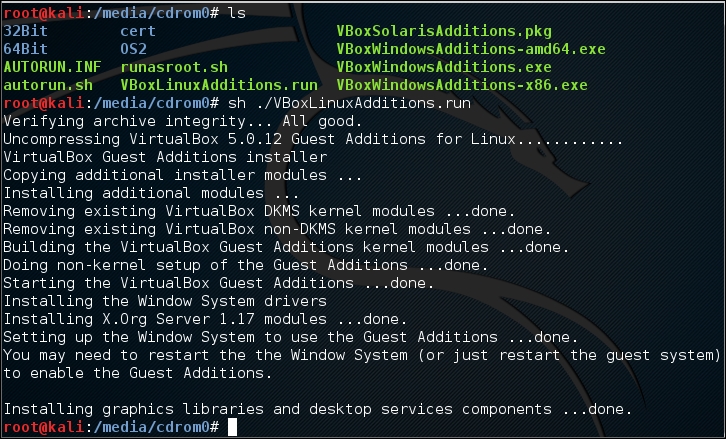
You may need to wait for several minutes until all of the required modules are successfully built and installed:
Change to the root home directory.
Eject the VBoxAdditions CD Image by right-clicking on the icon and selecting Eject from the menu. If successful, the VBoxAdditions icon will disappear from the desktop.
Reboot the virtual machine by typing the
rebootcommand in the terminal console.After the reboot, you can switch to full screen (View | Switch to fullscreen) from the VirtualBox menu.
In the following section, we will discuss how to set up networking in Kali Linux for a wired and wireless network.
In the default Kali Linux VMware image or ISO configuration, Kali Linux uses NAT (Network Address Translation) as the network's connection type. In this connection mode, the Kali Linux machine will be able to connect to the outside world through the host operating system, whereas the outside world, including the host operating system, will not be able to connect to the Kali Linux virtual machine.
For the penetration testing task, you might need to change this networking method to Bridged Adapter. The following are the steps to change it:
First, make sure you have already powered off the virtual machine.
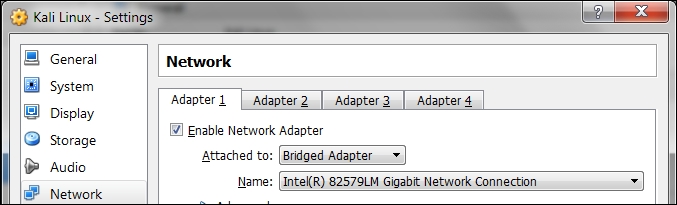
Then, open up the VirtualBox Manager, select the appropriate virtual machine—in this case we are using the Kali Linux virtual machine—and then click on the Network icon on the right-hand side and change the Attached to drop-down box from NAT to Bridged Adapter in Adapter 1. In the Name field, you can select the network interface that is connected to the network you want to test, as shown in the following screenshot:
To be able to use the bridge network connection, the host machine needs to connect to a network device that can give you an IP address via DHCP, such as a router or a switch.
As you may be aware, a DHCP IP address is not a permanent IP address; it's just a lease IP address. After several times (as defined in the DHCP lease time), the Kali Linux virtual machine will need to get a lease IP address again. This IP address might be the same as the previous one or might be a different one.
If you want to make the IP address permanent, you can do so by saving the IP address in the /etc/network/interfaces file.
The following is the default content of this file in Kali Linux:
auto loiface lo inet loopback
In the default configuration, all of the network cards are set to use DHCP to get the IP address. To make a network card bind to an IP address permanently, we have to edit that file and change the content to the following:
auto eth0
iface eth0 inet static
address 10.0.2.15
netmask 255.255.255.0
network 10.0.2.0
broadcast 10.0.2.255
gateway 10.0.2.2
Here, we set the first network card (eth0) to bind to the IP address of 10.0.2.15. You may need to adjust this configuration according to the network environment you want to test.
By running Kali Linux as a virtual machine, you cannot use the wireless card that is embedded in your host OS. Fortunately, you can use an external USB-based wireless card. For this demonstration, we are using the USB Ralink wireless card/external antenna (there will be an in-depth discussion of wireless antenna selection later on in the section concerning wireless penetration testing):
To activate your USB-based wireless card in the Kali virtual machine, plug in the wireless card to a USB port, navigate to Devices | USB Devices, and select your wireless card from the VirtualBox menu:

In this screenshot, we can see the USB device listed.
If your USB wireless card has been successfully recognized by Kali, you can use the
dmesgprogram to see the wireless card's information. Another option to determine if your wireless device is properly connected is to open a terminal and run the command:Ifconfig If the wireless connection is properly configured, you should see a listing under the output with WLAN0 or WLAN1 listed.
The output should include a listing for a WLAN. This is the wireless network connection.
In the top-right section of the Kali menu, you will see the Network Connections icon. You can click on it to display your network information.
You will see several network names, wired or wireless, available for your machine:

To connect to the wireless network, just select the particular SSID you want by double-clicking on its name. If the wireless network requires authentication, you will be prompted to enter the password. Only after you give the correct password will you be allowed to connect to that wireless network.
Kali Linux consists of hundreds of pieces of application software and an operating system kernel. You may need to update the software if you want to get the latest features.
We suggest that you only update the software and kernel from the Kali Linux software package repository.
The first thing to do after you have successfully installed and configured Kali Linux is to update it. As Kali is based on Debian, you can use the Debian command (apt-get) for the updating process.
The apt-get command will consult the /etc/apt/sources.list file to get the update servers. You need to make sure that you have put the correct servers in that file.
The default sources.list file included in Kali Linux contains the following entries:
# deb cdrom:[Debian GNU/Linux 2.0 _Sana_ - Official Snapshot i386 LIVE/INSTALL Binary 20150811-09:06]/ sana contrib main non-free
#deb cdrom:[Debian GNU/Linux 2.0 _Sana_ - Official Snapshot i386 LIVE/INSTALL Binary 20150811-09:06]/ sana contrib main non-free
deb http://security.kali.org/kali-security/ sana/updates main contrib non-free
deb-src http://security.kali.org/kali-security/ sana/updates main contrib non-free
You need to synchronize the package's index files from the repository specified in the /etc/apt/sources.list file before you can perform the update process. The following is the command for this synchronization:
apt-get update
Make sure that you always run an apt-get update before performing a software update or installation in Kali. After the package index has been synchronized, you can perform software updates.
Two command options are available to perform an upgrade:
apt-get upgrade: This command will upgrade all of the packages that are currently installed on the machine to the latest version. If there is a problem in upgrading a package, that package will be left intact in the current version.apt-get dist-upgrade: This command will upgrade the entire Kali Linux distribution; for example, if you want to upgrade from Kali Linux 1.0.2 to Kali Linux 2.0, you can use this command. This command will upgrade all of the packages that are currently installed and will also handle any conflicts during the upgrade process; however, some specific action may be required to perform the upgrade.
After you choose the appropriate command option to update Kali Linux, the apt-get program will list all of the packages that will be installed, upgraded, or removed. The apt-get command will then wait for your confirmation.
If you have given the confirmation, the upgrade process will start. Beware, the upgrade process might take a long time to finish depending on your Internet connection speed.
There are several network services available in Kali Linux; in this section, we will describe only some of them: the HTTP, MySQL, and SSH services. You can find the other services by navigating to Kali Linux | System Services.
In your penetration testing work, you may want to have a web server for various reasons, such as to serve malicious web application scripts. In Kali Linux, there is already an Apache web server installed; you just need to start the service.
The following are the steps that are required to activate your HTTP server in Kali Linux:
To start the Apache HTTP service, open a command line terminal and type the following command to start the Apache server:
service apache2 startAfter this, you can browse to the web page at
127.0.0.1; it will display the It works! page by default:
To stop the Apache HTTP service, perform the following steps:
Open a command line terminal and type the following command to stop the Apache server:
service apache2 stopNote
Remember that the previous command will not survive the boot up. After the boot up, you need to give the command again. Fortunately, there is a way to start the Apache HTTP service automatically after the Kali Linux boots up by giving the following command:
update-rc.d apache2 defaultsThe command will add the apache2 service to be started on boot up.
The second service that we will discuss is MySQL. It is one of the relational database systems. MySQL is often used with the PHP programming language and Apache web server to create a dynamic, web-based application. For the penetration testing process, you can use MySQL to store your penetration testing results; for example, the vulnerability information and network mapping result. Of course, you need to use the application to store those results.
To start the MySQL service in Kali Linux, you can perform the following steps:
In a terminal window, type the following:
service mysql startTo test whether your MySQL has already started, you can use the MySQL client to connect to the server. We define the username (
root) and the password to log in to the MySQL server:mysql -u rootThe system will respond with the following:
Enter password:
Welcome to the MySQL monitor. Commands end with ; or \g.
Your MySQL connection id is 39
Server version: 5.5.44-1 (Debian)
Copyright (c) 2000, 2015, Oracle and/or its affiliates. All rights reserved.

Oracle is a registered trademark of Oracle Corporation and/or its
affiliates. Other names may be trademarks of their respective
owners.

Type ''help;'' or ''\h'' for help. Type ''\c'' to clear the current input statement.
mysql>
After this MySQL prompt, you can give any SQL commands. To exit from MySQL, just type
quit.
Note
By default, for security reasons, the MySQL service in Kali Linux can be accessed only from a local machine. You can change this configuration by editing the bind-address stanza in the MySQL configuration file located in /etc/mysql/my.cnf. We don't recommend that you change this behavior unless you want your MySQL to
To stop the MySQL service, you can perform the following steps:
For the next service, we will look into the Secure Shell (SSH). SSH can be used to log in to a remote machine securely; apart from that, there are several other usages of SSH, such as securely transferring a file between machines, executing a command in a remote machine, and X11 session forwarding.
To manage your SSH service in Kali Linux, you can perform the following steps:
To start the SSHD service, from the command line, type the following:
service ssh startTo test your SSH, you can log in to the Kali Linux server from another server using a SSH client such as putty (http://www.chiark.greenend.org.uk/~sgtatham/putty/) if you are using the Microsoft Windows operating system.
To stop the SSHD service, from the command line, type the following:
service ssh stopTo start the SSH service automatically after Kali Linux boots up, you can give the following command:
update-rc.d ssh defaults
This command will add the SSH service to be started on boot up.
In this section, we will install a vulnerable virtual machine as a target virtual machine. This target will be used in several chapters of the book, when we explain particular topics. The reason we chose to set up a vulnerable server in our machine instead of using vulnerable servers available on the Internet is because we don't want you to break any laws. We should emphasize that you should never pen test other servers without written permission. Another purpose of installing another virtual machine would be to improve your skills in a controlled manner. This way, it is easy to fix issues and understand what is going on in the target machine when attacks do not work.
In several countries, even port scanning a machine that you don't own can be considered a criminal act. Also, if something happens to the operating system using a virtual machine, we can repair it easily.
The vulnerable virtual machine that we are going to use is Metasploitable 2. The famous HD Moore of Rapid7 creates this vulnerable system.
Note
There are other deliberately vulnerable systems besides Metasploitable 2 that you can use for your penetration testing learning process, as can be seen on the following site: http://www.felipemartins.info/2011/05/pentesting-vulnerable-study-frameworks-complete-list/.
Metasploitable 2 has many vulnerabilities in the operating system, network, and web application layers.
Note
Information about the vulnerabilities contained in Metasploitable 2 can be found on the Rapid7 site at https://community.rapid7.com/docs/DOC-1875.
To install Metasploitable 2 in Virtual Box, you can perform the following steps:
Download the Metasploitable 2 file from http://sourceforge.net/projects/metasploitable/files/Metasploitable2/.
Extract the Metasploitable 2 ZIP file. After the extraction process is completed successfully, you will find five files:
Metasploitable.nvram
Metasploitable.vmdk
Metasploitable.vmsd
Metasploitable.vmx
Metasploitable.vmxf
Create a new virtual machine in VirtualBox. Set Name to
Metasploitable2, operating system toLinux, and Version toUbuntu.Set the memory to
1024MB.In the Virtual Hard Disk setting, select Use existing hard disk. Choose the
Metasploitablefiles that we have already extracted in the previous step:Change the network setting to Host-only adapter to make sure that this server is accessible only from the host machine and the Kali Linux virtual machine. The Kali Linux virtual machine's network setting should also be set to Host-only adapter for pen-testing local VMs.
Start the Metasploitable 2 virtual machine. After the boot process is finished, you can log in to the Metasploitable 2 console using the following credentials:
Username:
msfadminPassword:
msfadmin
The following is the Metasploitable 2 console after you have logged in successfully:

Prior to or during a penetration test, it may be necessary to include other tools that are not commonly available with Kali Linux. The art of penetration testing has a great many individuals constantly creating tools that you can include. As a result, it may be necessary to install these tools to your Kali Linux setup. In other circumstances, it is generally a good idea to ensure that your tools are up to date prior to starting any penetration test.
When including additional penetration testing tools, it is advised to look within the Kali Linux repository first. If the package is available there, you can use the package and install using commands detailed below. Another option, if the tool is not available from the repository, the creator will often have a download option either on their website or through the software sharing and aggregation site GitHub.com.
While there are a number of tools available outside the Kali Linux repository, you should rely on those as it is easy to add these to your Kali Linux installation. Also, many of the packages that are not in the repository have dependencies on other software and may cause stability issues.
There are several package management tools that can be used to help you manage the software package in your system, such as dpkg, apt, and aptitude. Kali Linux comes with dpkg and apt installed by default.
Note
If you want to find out more about the apt and dpkg command, you can go through the following references: https://help.ubuntu.com/community/AptGet/Howto/ and http://www.debian.org/doc/manuals/debian-reference/ch02.en.html.
In this section, we will briefly discuss the apt command in a practical way that is related to the software package installation process.
To search for a package name in the repository, you can use the following command:
apt-cache search <package_name>
This command will display the entire software package that has the name package_name. To search for a specific package, use the following command:
apt-cache search <package_name>
If you have located the package but want more detailed information, use the following command:
apt-cache show <package_name>
To install a new package or to update an existing package, use the apt-get command. The following is the command:
apt-get install <package_name>
If the package is not available in the repository, you can download it from the developer's site or through the https://github.com/ website. Be sure to only include software from trusted sources. For those developers that include a Debian package format (the package will have the file extension .deb), you can utilize the dpkg command. For other packages, you will often find that they are compressed using a compression program such as 7-Zip and will often have the extension .zip or .tar.
To install a compressed file, the following steps usually work:
Extract the software package using archiver programs such as Tar and 7-Zip.
Change to the extracted directory.
Run the following commands:
./configuremakemake installh
In this section, we will provide you with examples on how to install several additional security tools that are not available from the Kali Linux repository. We will give various mechanisms that can be used to install the software:
Downloading the Debian package and installing it
Downloading from the source package and installing it
As an example, we want to install the latest Nessus vulnerability scanner (Version 6) for the first installation mechanism. We have searched the Kali Linux repository but are unable to find Nessus.
Nessus Version 6 has many new features as compared to Nessus Version 4, such as more flexible results filtering and report creation and simplified policy creation; we chose to use this version instead of Nessus Version 5.
Note
You can find more information about the features and enhancement in Nessus Version 6 from http://www.tenable.com/products/nessus/nessus-product-overview/why-upgrade-to-nessus-6.
We can download the latest Nessus package generated for Debian 6 Linux distribution from the Nessus website (http://www.nessus.org/products/nessus/nessus-download-agreement). To install this package, we issue the following command:
dpkg -i Nessus-x.y.z-debian6_i386.deb
Tip
We used x.y.z in the previous command to denote the Nessus version number. You need to change those numbers to the Nessus version that you just downloaded successfully.
You can then follow the instructions given on the screen to configure your Nessus server:
Start the Nessus server by typing the following if it has not started yet:
/etc/init.d/nessusd startOpen your browser and connect to
https://localhost:8834. You will then be prompted with a warning about an invalid SSL certificate used by Nessus. You need to check the SSL certificate and then store the exception for that SSL certificate. The following is the Nessus page that will be shown after you have stored the SSL certificate exception.After that, you will be guided to create a Nessus admin credential. Next, you will be asked to enter your activation code to register the Nessus scanner to Tenable. You need to register at http://www.nessus.org/register/ to obtain the activation code:

After you have registered successfully, you will be able to download the newest Nessus plugins. The plugin download process will take some time to complete; you can do something else while waiting for the download process to finish:

For the second example, we will use a simple program called cisco_crack (http://insecure.org/sploits/cisco.passwords.html). This tool is used to crack the Cisco type 7 password.
Note
Cisco type 7 password is a very weak password, so it should not be used anymore. However, for penetration testing, we see that it is still being used, although it's not widespread anymore. This tool will be a help for this occasion.
After downloading the source code, the next step is to compile it. Before you can compile the source code cleanly, you need to add the following include statements:
#include <string.h>#include <stdlib.h>
Now you have four include statements in the source code.
To compile the code, you can just give the following command:
gcc cisco_crack.c –o cisco_crack
If there is no error, an executable file with the name of cisco_crack will be created. The following is the help screen of cisco_crack:
# ./cisco_crack  -h
Usage: ./cisco_crack -p <encrypted password>
       ./cisco_crack <router config file> <output file>
This chapter introduced you to the amazing world of Kali Linux, which is a Live DVD Linux distribution that has been specially developed to help you in the penetration testing process. Kali is the successor of BackTrack, a famous Linux distribution focused on the purpose of penetration testing.
The chapter started with a brief description of Kali Linux's history. Next, it moved on to see what functionalities Kali Linux has to offer. When looking at the vast array of tools in the latest version of Kali Linux, we can see that there is functionality for a wide variety of security tasks. These include digital forensics, wireless security assessments, reverse engineering software, hacking hardware, and penetration testing.
There was also discussion on the variety of ways that Kali Linux can be deployed. There is the ability to deploy Kali Linux using a live DVD or USB, installing it as a virtual machine and finally, using it as the primary operating system on a stand-alone system.
To ensure that penetration testing can be conducted, Kali Linux requires the networking connections be configured. Kali Linux makes use of a wired connection through the computer's ethernet connection or shared connections with the virtual machine host. In addition, Kali Linux can also be configured with a wireless connection using an external antenna. We also discussed how to use several features in the VirtualBox machine to make it easier to work with the virtual machine; for example, installing additional tools, configuring shared folders, exporting the virtual machine for a backup purpose or to share it with other people, and taking a snapshot to back up the virtual machine temporarily.
As with any other software, Kali Linux also needs to be updated, whether we only update the software applications or the Linux kernel included in the distribution.
You may need to test your penetration testing skills; unfortunately, you don't have permission to do this to other servers as it is considered illegal in several countries. To help you with this, there are several intentionally vulnerable systems that can be installed and used on your own machine. In this chapter, we looked into Metasploitable 2 from Rapid7.
We also discussed several network services included with the latest Kali Linux, such as HTTP, MySQL, and SSH. We started by giving you a brief introduction to each service and then we continued with how to manage the service; for example, how to start or stop the service.
At the end of the chapter, we looked at installing additional information security tools that are not included in the latest Kali Linux version by default, such as the Nessus network scanner and Cisco password cracker.
In the next chapter, we will introduce you to several penetration testing methodologies.