"Pictures are worth a thousand words; images are one of the best ways to make our site interesting and grab our visitors' attention."
Although some people will agree with this statement more than others, the truth is that images have been one of the most important aspects of websites to date. From images incorporated into the layout to images used in content, they all help to make our site look interesting and appealing. And that's very, very important. We can have the best content, products, and articles; however, if our site is not appealing enough, our visitors will leave before we can even show them all of our site's great features.
If you stop to think about it, this makes a lot of sense. A good looking site denotes a good quantity of effort being put into it, and in the end it gives a sense of seriousness to our site or business, which makes our visitors more confident.
In this chapter we are going to work with images, and will make use of some Joomla! modules to give our site the extra appeal that it needs.
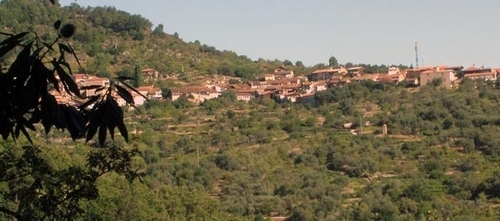
These are some very nice additions for any site. If you don't have a live site, you can try them with the sample template that is provided with the book code. For now, our site looks similar to the following screenshot:

As you can see, there is a lot of work to be done on the layout mock-up. Let's see an overview of what we are going to cover in this chapter.
First, we will see how Joomla! handles images by default, without the help of any module or extension, using just Joomla! and images. Then, we will see some modules and extensions that will help us to:
Add an image slideshow to our site
Incorporate image pop ups—a great way of making our images stand out from our contents
Create galleries
Through all of the examples in this book, we will look at jQuery-powered extensions to help us in our work. For now, let's stop talking and start working on our site.
Even though these basic ways of putting images onto our site won't make our site stand out from the competition, we are going to take a look at them. This will also show us the improvement achieved once we have used some of the modules previously commented on.
Let's add an image to one of our content articles. Log in to your Joomla! Administration zone. Go to the Media Manager, and then to stories. Once you are there, upload an image.
For this example, we will be using the following image:
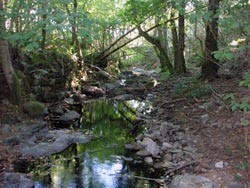
This image is named image_1.png. You can find it in the
code for Chapter 1 in the code bundle of the book. Then go to Content | Article Manager; here we will create a
sample article. Don't worry about the structure; it's not important for
now. Create the article in the Uncategorised
section and category:

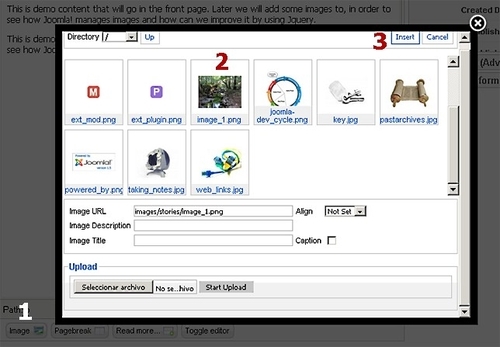
To insert the image into the article, click on the Image control button at the bottom of the editor (action 1). Then, select the image (action 2) and click on the Insert button (action 3). The image is now inserted into the editor at the location where the cursor was placed. The actions involved are displayed in the following screenshot:
If all has gone OK, the result will be an image inserted into our article—nothing more, and nothing less. Do you want to see it? The result is as follows:
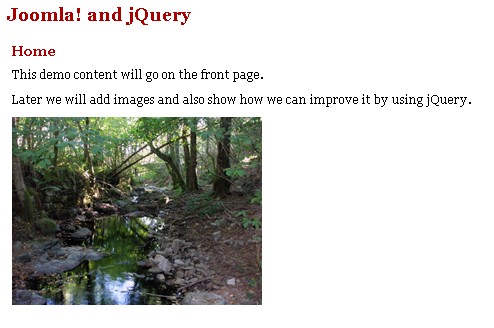
An image, like the one we have used, can make the article more interesting and is easy to incorporate.
Placing images in modules works in the same way as placing them in articles.
However, images end up in module positions, and therefore you can use them as
banners, ads, or something equally useful. For this example, we are going to
use image_2.png (the following image), which is included
in the code bundle. Don't forget to upload it to our Joomla! installation
before continuing:
To create a module, go to Extensions | Module Manager | New | Custom HTML, and give the module a name you want. In this example, we will be placing the module in the module_1 position.
As we have selected the Custom HTML module type, we will be presented with a WYSIWYG editor, similar to the one we had when creating the previous article. Insert the image as we have done before, and then save the module. When this is done, and if the module is published, the result will be similar to the following screenshot:
For now, this will be enough. Later, we will continue working with this module position. However, before that let's take a look at the process of placing images.
Most templates use images in the layout in order to make them more
interesting; and, of course, our example template is no exception! To see how
this is done, open your Joomla! installation folder. Go to the
templates folder, and then to our jj15 template
folder.
Note that we are opening the jj15 folder as it's the
name of our template. Now open the index.php file and search
for the following piece of code:
<div id="header"> <img src="<?php echo $this->baseurl ?>/templates/jj15/ images/header_image.gif" /> </div><!-- End of header -->
This will result in our header image being shown, as follows:

To get this to work, we have used the typical HTML
<img> tag and a bit of PHP scripting, such as
<?php echo $this->baseurl ?>, to generate the base URL of
our site. This will, therefore, produce the following code:
<img src="/jj15/templates/jj15/images/header_image.gif" />
That's it! Enough of the basics. We want to make our site very interesting, so let's use jQuery for further improvement of our site along with the use of third-party extensions.
One of the most interesting features of working with Joomla! is that there are lots of extensions already built. These extensions will surely help us in the development of our site, saving time and effort, and will give great results in no time. In this chapter, we are going to take a look at some interesting Joomla! extensions.
Don't worry, later in the book we will also see how to create our own extension. But don't go so fast my friend, stay with me and we will go step by step and create a very interesting site.
Slideshow is one of my favorite effects, and there are many Joomla! modules available to achieve this effect. For example, take a look at AJAX Header Rotator, which is available at http://extensions.joomla.org/extensions/photos-a-images/images-rotators/10036.
Note
Or, you can simply perform a search in the Joomla! Extension Directory (JED) for "AJAX header rotator" and download the module—do so now, so that you can follow the example. After downloading the ZIP file, go to Extensions | Install/Uninstall, select the file, and click on Upload File and Install. After installing the file, on navigating to Extensions | Module Manager you will see that the AJAX Header Rotator module is still not enabled, so we will enable it.
Next, we are going to upload some images. You can upload any image whose
dimensions are 587 x 257 px. However, if you wish, you can use
image_3.png and image_4.png provided in the code
bundle.
Navigate to the Media Manager, then to
the stories folder, create a folder called
module_1, and upload the images to this folder. After uploading the
images, we can return to Extensions | Module
Manager and open our AJAX Header
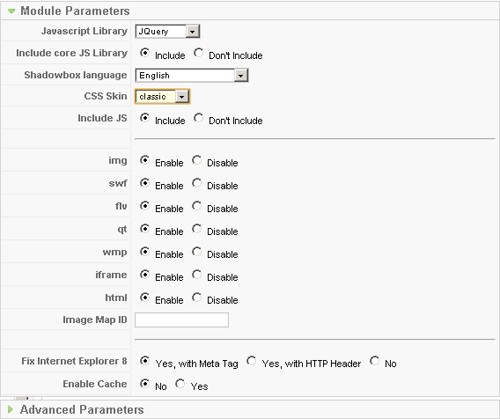
Rotator module. Here you will see the module parameters, as shown in
the following screenshot:

Let's go through these parameters:
Unique ID for this AJAX Header Rotator—is important if we need more than one instance of this module.
Image Folder path—is a very important parameter as it indicates the location of the folder where the images are placed. The images that we place in this folder will be the ones used by the module. In our example, we are going to use
images/stories/module_1as the path.Rotation speed and Rotation timeout—will control the speed between image fades and the time for which each image is being shown. It's stated in milliseconds.
Image width and Image height—well, these are very self explanatory; we will go for 587 x 257px as the size of the images in our example. That is also the size of our module in the template. However, we could state any dimensions that we need in these parameters.
For now, we are not going to use links in the images, so leave the other parameters at their default values. Before saving these changes, remember to select the module position value to module_1, as we will use this in our example.
On refreshing our site, you will see something similar to the following screenshot:

I've tried to capture the very moment of the transition between two images. However, you will surely see it better on your own Joomla! installation, so why don't you try it?
Let me suggest some slideshow modules in case you would like to try them out. You can find all of them by searching the JED:
RokSlideshow—is one of my favorite modules. Although it uses MooTools instead of jQuery, it has more effects and transitions. You should really try this module.
ImageSlideShow—works in the same way as the module that we have seen in our example.
JT SlideShow —isalso jQuery-based, but also offers some nice features, such as pause-on-hover, auto-stop, auto-fit, before/after callbacks, and also some transitions to choose from.
Using image pop ups is another way of making our site interesting, and is very common these days. You can see this effect in almost every site. So our site is not going to be lighter on effects than others; we are going to incorporate image pop ups, and in an easy way as you will see.
First we are going to download the module from http://extensions.joomla.org/extensions/multimedia/multimedia-display/4577.
You can also search the JED for "Ninja ShadowBox". Once we have
downloaded the file, we can install it, as always, by navigating to Extensions | Install/Uninstall. In the field where it
says Package File you will click on Select file. In my installation, the file is
called mod_ninja_shadowbox-2.0.9.zip. Select the file and
click on Upload File and Install. Although the
version number can change, the installation process will remain the same.
When the installation process finishes, we can find this extension under Extensions | Module Manager. At first, we may assume that this extension, as it behaves more like a plugin, would be found in the Plugin Manager, but no, this extension can be found in the modules section.
In this section, we will find a module called Ninja ShadowBox. Click on it to open its admin section (shown in the following screenshot):
We could leave these parameters at their default values, and the module would work correctly. However, let's take a look at them:
Javascript Library—lets us select which JavaScript library we are going to use. As the book is about Joomla! and jQuery, I think we will be leaving the default option, jQuery.
Include core JS Library—can be set to Don't include if you are loading your own library in the template. Your library would be used instead of the ones provided by the module. Otherwise, this parameter could be left at its default value.
Shadowbox language—provides lots of languages from which we can select our favorite. For the purposes of the example, I will be using the default selection of English as the language. However, please select your favorite language here.
CSS Skin—is an important parameter, as it affects how the images are shown. For now, we are going to leave it as it is, but later you can come back here and change it.
Include JS—relates to the shadowbox library. However, if you are going to use your own library (if there is a newer version or for some other reason) you can disable this parameter. For now, we'll be leaving this parameter as it is.
Media formats—shows all of the media formats available. If you don't want to use some of them, you can disable them here. However, there's no need to do that for now.
Image Map ID—is used to link image maps to images by placing the ID in this field. It is a parameter that we are not going to use.
Fix Internet Explorer 8—lets us emulate the IE 7 behavior. Sometimes, code that worked well in IE 7 and other browsers may not work in IE 8. For me, the first option is working well, but you can change it if it's not working for you. This option generates the following line in the template:
<meta http-equiv="x-ua-compatible" content="IE=EmulateIE7" />So our browser will try to emulate IE 7's way of rendering pages.
Enable Cache—is a very useful parameter to use cache on a working site. However, as we are still in a development environment, we will leave this option at No—its default value.
Let's continue and see what we need to do in our articles to get this module to work. You may be thinking "But Jose, there's an Advanced Parameters tab!"—I know my friends, it's just that I want to show you many other things and don't have the space for all of it!
Anyway, the advance options are to be left at the default values. You need to enable them by selecting True in Use Advanced Mode. Later, when we finish this topic, I recommend you come back here and try all of these options. We don't need them now, but they can be interesting if you wish to give them a try.
Now save the module and go to Content | Article Manager.
Note
Remember that in order for the module to work, we have to enable it. The position doesn't really matter as the module is not going to show anything in the module position.
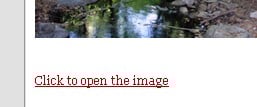
Any article would be good for us. However, I'm going to use the one we created previously—you can use any other one though. After opening the article, add the following text to the end of it:
Click to open the image
Then click on the Insert/edit link button. A form similar to the following screenshot will open:
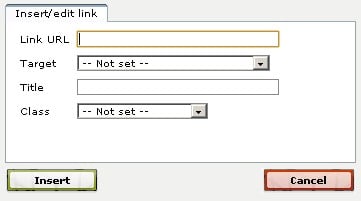
In the Link URL field we will enter the following path:
images/stories/image_1.png
This will create the link to the image, as we can see in the following screenshot.
However, when we click on this link we will be directed to another page, where we will be able to see the image. This is not the expected result, and that's because we still need to perform some tasks.
Well, in fact, we only need to modify the link code generated by the editor. So go back to the article editor, and click on the HTML button, as shown in the following screenshot:
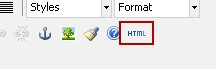
This will open the source code editor, but don't worry, the changes needed are very easy to achieve. First, we need to find the link code. As of now, it will look more or less similar to the following:
<p><a href="images/stories/image_1.png">Click to open the image</a> </p>
The tiny change required in this code is as follows:
<p><a href="images/stories/image_1.png" rel="shadowbox">Click to open the image</a></p>
That's it, we have only added rel="shadowbox".
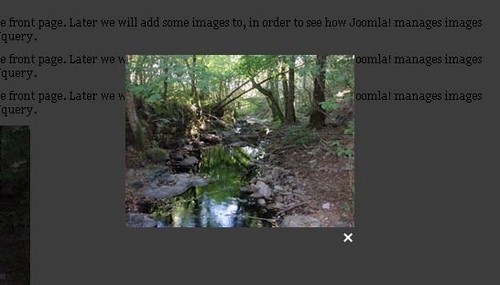
Now apply the changes or save the article, go to the frontend, refresh the page, and click on the link again. If all has gone OK—and it should have—the image will pop up over the article. It should look similar to the following screenshot:
Note
Remember that we can change the CSS skin and thus change the way the pop up will look. In order to do so, we only need to go back to the module admin skin, and select a different one.
Looks nice doesn't it? But we are not limiting the possibilities to only pop-up images. For example, take a look at the following code:
<p><a href="images/stories/image_1.png" rel="shadowbox[gallery]">Click to open the image</a></p>
Using this code, in more than one image, we can create an image gallery with arrows to browse the images both forwards and backwards. However, try writing the following code:
<p><a href="http://www.google.com" rel="shadowbox">Click to open google</a></p>
A pop up with the Google website inside will appear. As you can see, the possibilities are almost endless.
Of course, Ninja Shadowbox is not the only module that can help us with image pop ups. If we search the JED, we will find many other modules that can suit our needs. Take a look at the following modules:
BK-Thumb—is a good module, and has lots of features, such as watermarking images, resize images, and many others—it seems only to work with images though.
YOOeffects—is for the MooTools library, and works mostly in the same way. However, it can also add some other effects, such as reflection, to our pages.
In this last part of the chapter, we are going to take a look at image galleries. Image pop ups are a very good option, but when we need to show a number of images, galleries are a better option. This time, we are going to use a very new plugin available at http://extensions.joomla.org/extensions/photos-a-images/photo-gallery/10809, which will help us in building the gallery.
As always, we can also perform a search for "pPGallery" in the JED. After we download it, we need to go to Extensions | Install/Uninstall, select the file, and upload it.
Once we have it installed, we need to go to Extensions | Plugin Manager and enable the plugin. Now navigate to the Plugin Manager and look for Content pPGallery. Click on it to open its administrative panel.
First, we will enable the plugin—before we forget. And next, let's take a look at the parameters that the plugin provides, as shown in the following screenshot:
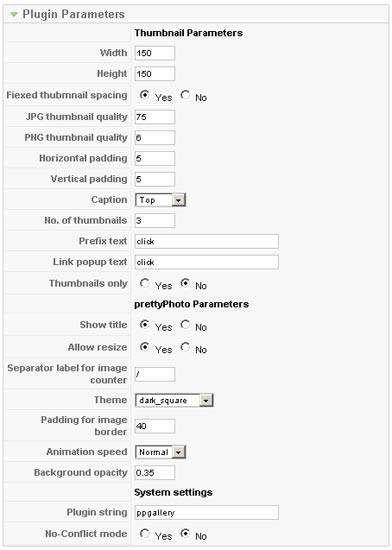
The parameters are listed as follows:
Width and Height—will define the height and width of the thumbnails that will be shown on the front page.
Fixed thumbnail spacing—will define the same amount of space between portrait images and landscape images.
Quality—sums up the next two parameters for JPG and PNG thumbnail quality. These are for defining the quality of the thumbnails. We can leave these parameters at their default values.
Horizontal padding and Vertical padding—are parameters that could also be defined in our CSS files. Defining these parameters here is also convenient.
Caption—is used if images have
alttags in them to show captions. Here we can define the position of those captions. We can leave this parameter at its default value as we are not going to use captions for now.No. of thumbnails—is used if we don't want to show all of the images until the gallery pop up is opened. We can enter the number of thumbnails that we need to show in this field. In this example we have entered 3.
Prefix text—is the text that will appear before the descriptions of the images.
Link popup text—is the text that will appear as links text in the images.
Thumbnails only—is used if we don't want to use the pop-up gallery, and if we only want to have the thumbnail images, we can select Yes in this parameter. For our example, leave this at its default value.
Next, you will find the parameters for the pop-up image gallery. You can try them out later and modify them as you wish. However, for now, leave them at the default values. I've separated the next two parameters because one of them will help us with the appearance, and the other with possible problems:
Theme—is used to change the style of the gallery.
No-Conflict mode—can be set to Yes if you are having problems with other libraries. For now, we can leave it at its default value.
In order to save the changes, click on the Save icon. Now, let's move on to the interesting part, that is, to try the gallery! Open any article in the Article Manager. For this example, we are going to use the one we created earlier in this chapter.
And here comes the magic; where we want the gallery to be created, place the following code:
{ppgallery}/stories/ppgallery{/ppgallery}
Here you can see that the {ppgallery} tag needs to be used.
Between the opening and closing tags, we will place the folder where our images are
placed. You can use any folder, but of course, you will need it to have images. In
the code bundle of the book, in the Chapter 1 subfolder, you can find another
subfolder named ppgallery. I have placed some images in there for
you to try. I hope you like them!
By default this plugin searches inside the images folder, and
so we need to place /stories/ppgallery (where
ppgallery is the sample folder where I have placed the images). You
will need to change these values in your own installation.
After saving these changes, and refreshing the frontend, you will see something similar to the following screenshot:
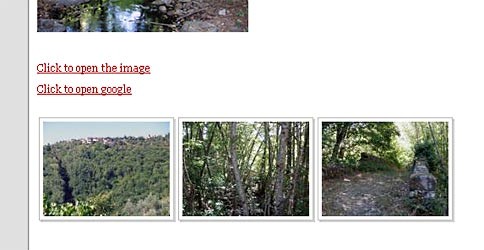
As you can see, three images are shown, and this can be changed by modifying the No. of thumbnails parameter in the plugin administration skin. Now, if we click on an image, a pop up will open, with the full-size version of that image, as shown in the following screenshot:

At the bottom of the image we can see some arrows. If we take a look at it, we can
now see that there are six images in total, though in the gallery we could see only
three of them. This is because the folder /stories/ppgallery has
six images, but we have selected only three in the parameters of the module to be
shown. In our article, only three images are shown (as indicated by the parameter).
However, in the gallery pop up all of the images can be viewed.
Note
If you encounter any problem while using this plugin, it may be due to one or more extensions using the jQuery library simultaneously, or if the jQuery library is loaded after our plugin is loaded. For example, consider the following sequence of events:
1. Load of the jQuery library.
2. Load of the pPgallery script.
3. Load of another instance of the jQuery library, used by another extension.
In this case, the gallery will not work. The gallery script needs to be loaded after the jQuery library is loaded because the gallery script extends the jQuery library. If another Joomla! extension then loads another jQuery instance, without the addition of the gallery script, it will end up with the removal of the gallery script that was previously added.
In order to solve this, try to find out which extension is interfering. For example, in our case, the module "Ninja Shadowbox" may be causing the problem. To solve it, we only need to change the parameter Include core JS Library to Don't include. It should now work perfectly.
As we have seen, this is a very easy-to-use plugin, and a very helpful one too. It will help us show a group of images or form a gallery in just a few clicks.
Again, I would like to show you some extensions that you can find in the JED:
Simple Image Gallery—is a very interesting option. Though it uses MooTools, I recommend you to check it out, as it offers some interesting options.
Art Pretty Photo—can show images from flicker, and also lets us create our own image thumbnails. We can even play videos with this plugin, which would be a very nice option too.
Now we are going to see some interesting tips and tricks. Don't miss them, because they can be very useful:
Did you know that the Ninja Shadowbox module will resize the images according to browser size? We can therefore upload good quality images, with a good size, as visitors with smaller screen resolutions will also view the entire image without needing to use the scrollbars.
To use a plugin, for example, the gallery plugin we have just seen, within a module, we need to use an extension such as the Plugin In Module. Check it out, it can come in handy at any time.
While developing, take frequent backups so that you always have some working copies of the site. An extension that I like is Akeeba backup.
I hope this has been an interesting chapter for you. At first we had a look at how Joomla! works with images by default. Later, we worked with images in other interesting ways, such as image slideshows, pop ups, and galleries.
Go ahead and try them out now! I will be waiting for you in Chapter 2, in which we will work with site content such as:
Article slideshows
Putting content into tabs
AJAX search
These are just a summary of what we are about to see, interesting isn't it? See you there soon!