Download code from GitHub
Jenkins with Docker on HTTPS on AWS and inside a Corporate Firewall
With an understanding of the architecture from Chapter 1, Jenkins Infrastructure with TLS/SSL and Reverse Proxy, we are ready to run Jenkins. We'll learn two ways of running Jenkins – one on AWS and another inside a corporate firewall. We'll see that they're generally similar, but the reverse proxy and the port opening for inbound agent configuration are different. Don't worry – we'll configure not only a Jenkins controller but also the reverse proxy, HTTPS, agents, and even Docker Cloud together. By the end of the chapter, we will have a fully functioning Jenkins instance that's ready to take on a production workload.
In this chapter, we're going to cover the following main topics:
- Running a Jenkins controller with Docker on HTTPS
- Reverse proxy and TLS/SSL termination options
- Installing plugins and configuring Jenkins
- Attaching SSH and inbound agents
- Creating a secure Docker Cloud
Technical requirements
From Chapter 1, Jenkins Infrastructure with SSL and Reverse Proxy, we carry over the same set of VMs running Ubuntu 20.04 with Docker installed. We need a domain for each Jenkins instance (for example, jenkins-aws.lvin.ca, jenkins-firewalled.lvin.ca). For AWS Jenkins, using Route 53 to manage the domain is recommended as it simplifies the TLS certificate acquisition steps from AWS Certificate Manager.
Files in the chapter are available on GitHub at https://github.com/PacktPublishing/Jenkins-Administrators-Guide/blob/main/ch2.
Running a Jenkins controller with Docker on HTTPS
Let's dive right into deploying a Jenkins controller with Docker on HTTPS.
Custom image to match the UID/GID for a bind mount
We may need to customize the UID/GID of the user inside the container.
Let's take a look at the Dockerfile for the jenkins/jenkins image, lines 20 to 26 (https://github.com/jenkinsci/docker/blob/jenkins-docker-packaging-2.235.1/Dockerfile):

Figure 2.1 – UID mismatch warning in a Jenkins Dockerfile
Our Jenkins controller Docker container does bind mount a volume from the host, and therefore the directory on the host must be owned by a UID and GID that matches the user inside the container. The default user inside the container is jenkins, which has UID 1000 and GID 1000.
On an AWS EC2 Ubuntu 20.04 instance, the default ubuntu user is already 1000:1000, so no changes are necessary:
ubuntu@aws-controller:~$ echo "$(whoami) $(id -u) $(id -g)"
ubuntu 1000 1000
On a VM in the corporate network, the user for running Jenkins may not be 1000:1000. This is especially true if you are using a robot account with its UID/GID predefined in the corporate Active Directory. In our example, robot_acct has UID 123 and GID 30, which we cannot change:
robot_acct@firewalled-controller:~$ echo "$(whoami) $(id -u) $(id -g)"
robot_acct 123 30
In such a case, we need to extend the Docker image to change the UID/GID of the jenkins user to match our robot account, so that the files created from inside the container by the jenkins user are accessible on the host by the robot_acct user, as illustrated in Figure 2.2:

Figure 2.2 – Container user and host user with matching UID/GID
- Create the following Dockerfile. Let's use the
2.263.1-ltstag for now – we will upgrade to the latest LTS in Chapter 8, Upgrading the Jenkins Controller, Agents, and Plugins:jenkins.dockerfile
FROM jenkins/jenkins:2.263.1-lts
USER root
RUN usermod -u 123 -g 30 jenkins
USER jenkins
- Build the image and name it
<Docker Hub ID>/jenkins:2.263.1-lts:
robot_acct@firewalled-controller:~$ docker build
-t calvinpark/jenkins:2.263.1-lts -f jenkins.dockerfile .
[...]
Successfully tagged calvinpark/jenkins:2.263.1-lts
All users now have a matching UID/GID and we avoid a headache with file permission issues.
Running Jenkins
Let's launch the Jenkins controller. This is what the architecture looks like:

Figure 2.3 – Architecture of VMs and containers for Jenkins controllers
Let's begin:
- Create
jenkins_home. Skipping this will cause Docker to create the directory asroot, causing Jenkins to fail with permission issues:controller:~$ mkdir jenkins_home
- Then, run the Jenkins container. We can use jenkins/jenkins on an AWS controller or our custom image on a firewalled controller:
controller:~$ docker run \
    --detach \
    --restart on-failure \
    -u $(id -u):$(id -g) \
    -v ~/jenkins_home:/var/jenkins_home \
    -p 8080:8080 -p 50000:50000 \
    --name jenkins_controller \
    calvinpark/jenkins:2.263.1-lts
There are a few flags in this command. Let's examine what they mean:
--detach: Run in the background.--restart on-failure: Automatically restart if the container crashes or the machine reboots.-u $(id -u):$(id -g): Run as the UID and GID of the host user.-v ~/jenkins_home:/var/jenkins_home: Bind mount the host~/jenkins_homedirectory to/var/jenkins_homeinside the container so that the Jenkins data is written on the host directory.-p 8080:8080: Bind TCP port8080on the host to port8080inside the container. Jenkins, by default, runs HTTP on8080. Traffic to HTTP port80and HTTPS port443will be forwarded to port8080through a reverse proxy.-p 50000:50000: This port is for inbound agents. If your Jenkins will not have any inbound agents, this port doesn't need to be bound.--name jenkins_controller: Name the running containerjenkins_controllerfor a memorable name and easier access.
- Verify that the container is running and didn't crash:
controller:~$ docker ps
CONTAINER ID   IMAGE                         COMMAND
         CREATED         STATUS         PORTS
                           NAMES
597e509542eb jenkins/jenkins:2.263.1-lts "/sbin/tini -- /
usr/…" 5 seconds ago Up 4 seconds 0.0.0.0:8080->8080/tcp,
0.0.0.0:50000->50000/tcp jenkins_controller - In a minute, Jenkins should be up and running. Open a web browser to the IP of your VM on port
8080to see a prompt to unlock Jenkins. If you're on AWS, the IP should be the public IP of your VM, such ashttp://54.70.250.76:8080. If you're using a VM inside the corporate firewall, the IP should be the IP of your VM, such ashttp://192.168.1.16:8080:
Figure 2.4 – First boot unlock prompt
- We can find the initial admin password in the
~/jenkins_home/secrets/initialAdminPasswordfile:controller:~$ cat ~/jenkins_home/secrets/initialAdminPassword
98b13e64bebf4003844baa863d1dc2fd
- Copy and paste the value into the password box in the browser and click Continue.
- At the Customize Jenkins screen, click Install suggested plugins to continue. We will install more packages soon.
In a few minutes, Jenkins finishes installing the plugins and asks you to create the
adminuser. Do not skip this step! The default password foradminis the long string that you had to look up before, and now is the best time to change it:
Figure 2.5 – First boot Create First Admin User screen
- Finally, it asks us to configure the Jenkins URL. Click Save and Finish to continue (we will change this soon), and then click Start using Jenkins:

Figure 2.6 – Jenkins is ready
Jenkins is fully up and running. While we can start using Jenkins as is, let's continue to set up a reverse proxy and HTTPS so that the URL is easier to remember and the traffic is encrypted.
Locked out?
If you didn't change the admin password during the first boot, you'll need an admin password to get back into Jenkins. The password is the long string in ~/jenkins_home/secrets/jenkins_controller.
Reverse proxy and TLS/SSL termination options
TLS enables HTTPS to encrypt the message between two parties, but the message needs to be decrypted in the end so that each party can read it. In Jenkins, there are two places where the message can be decrypted, or in industry lingo, where the TLS is terminated.
TLS termination at the reverse proxy
A popular configuration is to set up a reverse proxy in front of Jenkins and terminate the TLS at the reverse proxy:
- DNS resolves the URL to the IP of the reverse proxy.
- If the traffic is on HTTP port
80, the reverse proxy redirects the traffic to HTTPS port443. - If the traffic is on HTTPS port
443, the reverse proxy decrypts the message and forwards it to the Jenkins controller on HTTP port8080. - The Jenkins controller processes the incoming message from HTTP port
8080.
This is what the configuration looks like:

Figure 2.7 – Architecture of Jenkins with reverse proxy
There are several benefits to this configuration:
- The reverse proxy acts as a public face of the application. Therefore, the applications can stay in a private network where an attacker cannot directly access.
- Attacks are easier to mitigate since reverse proxies are built to handle attacks. In AWS, Elastic Load Balancer (ELB) can act as a reverse proxy and provide additional protections through AWS Shield.
- Traffic to HTTP is automatically redirected to HTTPS.
- Connections are pooled and compressed for higher performance.
- The processing cost of terminating the TLS is offloaded to the reverse proxy, however small it is in reality.
There are also drawbacks:
- It adds to the amount of infrastructure to manage.
- Communication between the reverse proxy and Jenkins can fail due to misconfigurations. Reverse proxy issues are, in fact, quite common.
- Communication between the reverse proxy and Jenkins is unencrypted, creating a window of opportunity for an attack, however small it is in reality.
Let's examine the steps for configuring a reverse proxy for each Jenkins controller.
Setting up an Application ELB for the AWS Jenkins controller
Setting up an ELB for Jenkins is largely a three-part exercise:
- Create a TLS certificate through AWS Certificate Manager.
- Create a target group that does the following:
- Has the Jenkins controller EC2 instance
- Listens to port
8080 - Runs health checks on the
/loginpath
- Create a load balancer that does the following:
- Listens to port
80, which is redirected to port443 - Listens to port
443, which is forwarded to the target group from step 2 - Uses the TLS certificate from step 1
- Listens to port
Here are the actual steps that we can follow:
- From the AWS console, go to the EC2 service and click Load Balancers.
- Create a new Application Load Balancer named
jenkins. Add two listeners, HTTP and HTTPS. Choose the availability zones for the ELB and click Next. - Create a certificate in AWS Certificate Manager for our domain by selecting the first option, Choose a certificate from ACM, and then clicking the Request a new certificate from ACM link:

Figure 2.8 – Choose the first option and click the link below to create a new certificate from ACM
- Once the certificate is created, choose the certificate from the drop-down menu for Certificate name and then click Next.
- Choose the two security groups,
defaultandjenkins-elb, which we made in Chapter 1, Jenkins Infrastructure with TLS/SSL and Reverse Proxy. Click Next. - Create a new target group named
jenkins-controller-8080and change the Port from80to8080so that it points to the Jenkins controller running on port8080. Set the Health checks Path to/login. The default/fails the health check because unauthenticated access returns403 authentication error,whereas/loginalways succeeds as long as Jenkins is running. Click Next. - Add the Jenkins controller instance to registered targets, and then click Next, Create, and Close.
- Choose the new
jenkinsload balancer, click the Listeners tab, and then edit HTTP : 80. Delete the current rule of forwarding tojenkins-controller-8080and replace it with a Redirect to HTTPS at port443, so that the traffic to HTTP is redirected to HTTPS.This is what we should see on the Application ELB Listeners configuration:

Figure 2.9 – Application ELB Listener configuration
- We can now go to the load balancer's URL (for example,
jenkins-1394494507.us-west-2.elb.amazonaws.com) on HTTP or HTTPS to see that Jenkins loads with a TLS certificate error. You can find the load balancer's URL at EC2 Dashboard | Load Balancing | Load Balancers |jenkins| Description | DNS name:
Figure 2.10 – AWS Jenkins on the load balancer URL showing a TLS certificate error
- Create an A record alias on our domain for Jenkins (for example,
jenkins-aws.lvin.ca) and point it to the ELB. Once the DNS cache refreshes, we can go to the Jenkins URL on HTTP or HTTPS and see it load without an error:

Figure 2.11 – AWS Jenkins on the Jenkins URL showing a valid TLS certificate
AWS Jenkins with ELB is up and running using HTTPS.
Setting up an NGINX reverse proxy for the firewalled Jenkins controller
Let's create an NGINX Docker container on the firewalled Jenkins controller host that acts as the reverse proxy for the Jenkins controller Docker container:
- Copy the TLS certificate and the key that we made using Let's Encrypt (covered in Chapter 1, Jenkins Infrastructure with TLS/SSL and Reverse Proxy), and move them to
~/nginx/certs/directory.robot_acct@firewalled-controller:~$ mkdir -p nginx/certs/
robot_acct@firewalled-controller:~$ cp ~/letsencrypt/certs/live/jenkins-firewalled
.lvin.ca/{fullchain.pem,privkey.pem} ~/nginx/certs/ - Create the
~/nginx/nginx.confNGINX configuration file as seen in the following snippet. Replace the domains in the twoserver/server_namesections with your own domains. This file can be downloaded from the book's GitHub repository (https://github.com/PacktPublishing/Jenkins-Administrators-Guide/blob/main/ch2/nginx.conf):~/nginx/nginx.conf
server {
  listen       80;
  server_name  jenkins-firewalled.lvin.ca;
  return       301  https://$host$request_uri;
}
server {
listen 443 ssl;
server_name jenkins-firewalled.lvin.ca;ssl_certificate /certs/fullchain.pem;
ssl_certificate_key /certs/privkey.pem;location / {
proxy_pass http://localhost:8080;
proxy_http_version 1.1;proxy_set_header Host $host:$server_port;
proxy_set_header X-Real-IP $remote_addr;
proxy_set_header X-Forwarded-For $proxy_add_x_forwarded_for;
proxy_set_header X-Forwarded-Proto $scheme;# Max upload size. Useful for a custom plugin.
client_max_body_size 10m;
client_body_buffer_size 128k;proxy_buffering off;
proxy_request_buffering off;
proxy_set_header Connection "";
}
} - With the three files in place, start the NGINX container:
robot_acct@firewalled-controller:~$ docker run \
    --detach \
    --restart on-failure \
    -v ~/nginx/certs:/certs:ro \
    -v ~/nginx/nginx.conf:/etc/nginx/conf.d/default.conf:ro \
    --network=host \
    --name nginx \
    nginx
There are a few flags in this command. Let's examine what they mean:
--detach: Run in the background.--restart on-failure: Automatically restart if the container crashes or the machine reboots.-v ~/nginx/certs:/certs:ro: Bind mount the host~/nginx/certsdirectory to/certsinside the container so that the TLS certificates are available to the NGINX process. Mount as read-only because NGINX doesn't need to modify them.-v ~/nginx/nginx.conf:/etc/nginx/conf.d/default.conf:ro: Bind mount the host~/nginx/nginx.conffile to/etc/nginx/conf.d/default.confinside the container so that the configuration file is available to the NGINX process. Mount as read-only because NGINX doesn't need to modify it.--network=host: Allow the container to have direct access to the host's network so that it can manage the traffic for the Jenkins controller container.--name nginx: Name the running containernginxfor a memorable name and easier access.
- We can now go to the NGINX container host's IP (for example,
192.168.1.16) on HTTP or HTTPS to see that Jenkins loads with a TLS certificate error:
Figure 2.12 – Firewalled Jenkins on a reverse proxy IP showing a TLS certificate error
- Create an A record on our domain for Jenkins (for example,
jenkins-firewalled.lvin.ca) and point it to the reverse proxy. Once the DNS cache refreshes, we can go to the Jenkins URL on either HTTP or HTTPS and see it load without an error:
Figure 2.13 – Firewalled Jenkins on the Jenkins URL showing a valid TLS certificate
Firewalled Jenkins with an NGINX reverse proxy is up and running using HTTPS.
Terminating the TLS certificate directly on the Jenkins controller
It is also possible to terminate the TLS directly on the Jenkins controller instead of using a reverse proxy. This reduces the amount of infrastructure to manage; however, it is suitable only in a trusted environment for a small-scale Jenkins instance, due to the lack of protection and scaling that a reverse proxy provides. It also lacks the HTTP to HTTPS redirect, as illustrated in the following figure:

Figure 2.14 – Architecture of Jenkins terminating the TLS certificate directly on the controller
Let's begin:
- Copy the TLS certificate and the key that we made in Chapter 1, Jenkins Infrastructure with TLS/SSL and Reverse Proxy, using Let's Encrypt in the
~/certs/directory:robot_acct@firewalled-controller:~$ mkdir ~/certs/
robot_acct@firewalled-controller:~$ cp ~/letsencrypt/certs/live/jenkins-firewalled.lvin.ca/{fullchain.pem,privkey.pem} ~/certs/ - The private key must be converted to an old-styled PKCS #1 format due to an unimplemented feature1. Run the following command to convert the private key:
robot_acct@firewalled-controller:~$ openssl rsa \
    -in ~/certs/privkey.pem \
-out ~/certs/privkey.pkcs1.pem - Then, restart Jenkins with these updated options:
robot_acct@firewalled-controller:~$ docker run \
    --detach \
    --restart on-failure \
    -u $(id -u):$(id -g) \
    -v ~/jenkins_home:/var/jenkins_home \
    -v ~/certs:/certs:ro \
 -e JENKINS_OPTS="
 --httpsPort=443
 --httpsCertificate=/certs/fullchain.pem
 --httpsPrivateKey=/certs/privkey.pkcs1.pem" \
 -p 443:443 -p 50000:50000 \
    --name jenkins_controller \
    calvinpark/jenkins:2.263.1-lts
There are three changes:
-v ~/certs:/certs:ro
Bind mount the~/certshost directory to/certsinside the container so that the certificates are available to Jenkins. Mount as read-only because Jenkins doesn't need to modify it.-e JENKINS_OPTS="
--httpsPort=443
--httpsCertificate=/certs/fullchain.pem
--httpsPrivateKey=/certs/privkey.pkcs1.pem"
Configure Jenkins to run on HTTPS using the certificates for TLS termination. Take note that the lines don't end with backslashes – they are a multi-line string.-p 443:443
Bind HTTPS port443on the host to HTTPS port443inside the container so that Jenkins is accessible on HTTPS.
- We can now go to the controller host's IP (for example,
192.168.1.16) on HTTPS to see that Jenkins loads with a TLS certificate error. See Figure 2.10. - Create an A record alias on our domain for Jenkins (for example,
jenkins-firewalled.lvin.ca) and point it to the controller host's IP. Once the DNS cache refreshes, we can go to the Jenkins URL on HTTPS and see it load without an error. See Figure 2.11. - Loading Jenkins on HTTP will not work since we don't have the reverse proxy that redirects HTTP to HTTPS. See Figure 2.15:

Figure 2.15 – Accessing Jenkins using HTTP fails without a reverse proxy
Firewalled Jenkins without a reverse proxy is up and running using HTTPS.
Installing plugins and configuring Jenkins
Jenkins is now running – it's time to customize it to make it our own.
Installing more plugins
We will now learn how to install plugins. We can use the same technique to install additional plugins in other chapters. The following info box shows which plugins to install:
Required plugins
Active Directory
Click Manage Jenkins on the left | Manage Plugins | Available and then search for the plugin name. You can search for and check multiple plugins at once. There are many plugins with similar names – searching for docker shows over 10 different similarly named plugins. Be sure to pick the exact name from the info box:

Figure 2.16 – Plugin Manager search result for Active Directory
Most plugins can be installed without a restart, but an upgrade always requires a restart. Click Install without restart to install the Active Directory plugin. If you are planning on using OAuth, search for the OAuth provider plugin and install that instead. If you are planning on not using any authentication provider, you can skip the install.
Configure System
With the basic plugins installed, let's continue to configure the system.
Click Manage Jenkins on the left and then click Configure System. This is the main configuration page for Jenkins, which unfortunately doesn't have a name. We will refer to this page as System Configuration throughout the book:

Figure 2.17 – System Configuration page
There are several configuration items here. In fact, this is where almost all the configurations are. When we install a new plugin, its global configurations will most likely be here. Some plugins require additional configurations on the pipelines, and those will be made on each pipeline's configuration page.
Read through and configure as needed, and be sure to configure these four items:
- # of executors:
0. - Jenkins URL:
https://<Jenkins URL>/(for example, https://jenkins-firewalled.lvin.ca/). - Pipeline Default Speed/Durability Level: Performance-optimized.
- Global Build Discarders: Add a Specific Build Discarder that keeps a maximum of 100 builds.
# of executors configures the number of executors on the controller to run the build steps. This is useful when there are no other agents. Since we are attaching two dedicated agents and a Docker Cloud, set it to 0 so that the controller does not run build steps.
Jenkins URL is updated from the IP address with temporary HTTP on port 8080 to the Jenkins URL with HTTPS.
Reducing Pipeline Default Speed/Durability Level significantly speeds up Jenkins at the cost of a possible data loss in case of an unexpected shutdown. The Jenkins documentation suggests Performance-optimized as the global default2. This can be overridden to a higher durability setting per pipeline for the pipelines that need a guaranteed record of executions. You can find more information about this in Chapter 9, Reducing Bottlenecks.
Everything in Jenkins is a flat file on the controller. It's important that Global Build Discarders is configured to prune the build history so that the number of files on the controller doesn't grow indefinitely. This can be overridden to a higher number per pipeline, and important builds can further be pinned so that they don't get pruned:

Figure 2.18 – Global Build Discarders configured to keep a maximum of 100 builds by default
The basic Jenkins configuration is done. We can always come back to make additional changes. Let's now move on to the security configurations.
Configure Global Security
Go to the Global Security page to configure the security-related items by clicking Manage Jenkins on the left and then click Configure Global Security:
- Choose the Authentication Security Realm that you plan to use. In a corporate setting, Active Directory or LDAP works well. For others, Jenkins' own user database is often sufficient. There are also many OAuth provider plugins such as GitHub and Google that could be useful.
- In Authorization Strategy, choose Project-based Matrix Authorization Strategy:
- Give Job Discover permission to Anonymous Users. This redirects unauthenticated users to a login page rather than showing a 404 error page.
- Give the following permissions to Authenticated Users:
- Also, add the
adminuser and give Administrator permission, as shown in the following screenshot:Lockout alert!
You will be locked out if you don't add the
adminuser and give Administrator permission.

Figure 2.19 – Project-based Matrix Authorization Strategy configuration
We are deliberately not giving the users permission to see the projects or run a build, as those will be configured for each project.
- Change Markup Formatter to Safe HTML so that we can customize fonts or add links on the status messages.
- In CSRF Protection, check Enable proxy compatibility to prevent proxy compatibility issues.
Click Save to save and exit.
With basic authentication and authorization configured, let's continue to manage secrets.
Configure Global Credentials
Secrets are an important part of automation. Click Manage Jenkins on the left | Manage Credentials | (global). This is the Global Credentials page where we store secrets. Keep this page open on a tab because we will come back to Global Credentials very soon to create the secrets for authenticating with agents.
Let's continue to wrap up the controller configuration.
Installing even more plugins
In addition to the required plugins, here are some optional plugins that are useful:
- AnsiColor: Colorize the build log. This is so fundamental I wonder why it's not installed by default.
- Blue Ocean: Enable a new UI for Jenkins. Great for visualizing pipelines with multiple stages.
- build-metrics: Helps you gather the build frequency of each pipeline. Great for gathering the metrics for a presentation.
- GitLab: Integrate with GitLab for webhooks and link-backs. There are plugins for other popular VCS as well.
- Jira: Link a Jira issue ID from Jira to Jenkins and back, updating the issue with the builds associated with the issue. There are plugins for other popular bug trackers as well.
- Line Numbers: Puts line numbers and links to the build log. This is useful for collaboration by allowing us to link to a specific line of the logs.
- Read-only configurations: Allows a non-administrator user to see the configurations of a pipeline. This helps users to debug a failing pipeline by inspecting the configurations without needing permission to modify it.
- Rebuilder: Re-run a build with the same parameters. Useful for pipelines with many parameters.
- Slack Notification: Great for keeping an eye on failed nightly builds. It can get chatty, so create a dedicated Slack channel for it. There are plugins for other popular messengers as well.
The complete list of available plugins can be found on the Plugins Index page at https://plugins.jenkins.io/.
Our controller configuration is now complete. Let's move on to agent configuration.
Attaching SSH and inbound agents
We have two Jenkins agents, one on AWS and another inside the corporate firewall. Each agent will connect to both Jenkins controllers, one on AWS and another inside the firewall.
The AWS agent is accessible by both the AWS controller and the firewalled controller. We will connect the AWS agent as an SSH agent, which is simple and effective:

Figure 2.20 – Architecture of SSH and inbound agents
The firewalled agent, on the other hand, is not accessible by the AWS controller. The only way for them to communicate is by the agent initiating the connection, so we will connect the agent as an inbound agent. The firewalled controller can access the firewalled agent, therefore it will be connected as an SSH agent.
SSH agent
An SSH agent is the most widely used agent type for an agent running a Unix-based operating system. In our environment, there are three SSH agent connections, and the setup process is the same for all three:
- AWS controller → AWS agent
- Firewalled controller → AWS agent
- Firewalled controller → Firewalled agent
Let's begin:
- An SSH agent host is a VM running Ubuntu 20.04, just like the controllers. We have already installed Docker on it in Chapter 1, Jenkins Infrastructure with TLS/SSL and Reverse Proxy. SSH into the agent and install JDK 11:
agent:~$ sudo apt update
agent:~$ sudo apt install -y openjdk-11-jdk
- Still on the agent, use
ssh-keygento create an SSH public/private key pair, and have the current user (ubuntuon AWS agent androbot_accton the firewalled agent) accept the key. Don't forget to set the correct file permission on the~/.ssh/authorized_keysfile:agent:~$ ssh-keygen
agent:~$ cat ~/.ssh/id_rsa.pub >> ~/.ssh/authorized_keys
agent:~$ chmod 600 ~/.ssh/authorized_keys
agent:~$ ls -la ~/.ssh
total 20
drwx------ 2 ubuntu 4096 Dec 15 04:34 .
drwxr-xr-x 4 ubuntu 4096 Dec 15 04:31 ..
-rw------- 1 ubuntu  577 Dec 15 04:36 authorized_keys
-rw------- 1 ubuntu 2610 Dec 15 04:34 id_rsa
-rw-r--r-- 1 ubuntu 577 Dec 15 04:34 id_rsa.pub - We need to store the private key in the Jenkins credential store so that the controller can use it to connect to the agent. Output the content of the private key and keep it handy:
agent:~$ cat ~/.ssh/id_rsa
-----BEGIN OPENSSH PRIVATE KEY-----
b3BlbnNzaC1rZXktdjEAAAAABG5vbmUAAAAEbm9uZQAAAAAAAAABAAABl
[...]
WM1+k8b+6GZJMAAAAXdWJ1bnR1QGlwLTE3Mi0zMS0xNS0xOTEBAgME
-----END OPENSSH PRIVATE KEY----- - Go to Global Credentials and then click Add Credentials:
- Kind: SSH Username with private key
- Scope: System (Jenkins and nodes only)
- ID:
aws-agent-ubuntu-privorfirewalled-agent-robot_acct-priv - Description: Same as ID
- Username:
ubuntuorrobot_acct - Private Key: Check the radio button for Enter directly and click Add. The gray box turns into a textbox – copy and paste the private key into this box.
- Passphrase: Enter if you've created the SSH keys with a passphrase:

Figure 2.21 – Adding an SSH private key to the Jenkins credential store
- Click OK to save. The SSH user and the private key are now stored as a secret in the Jenkins credential store:

Figure 2.22 – SSH private key for the Ubuntu user in the AWS agent saved as a credential
- We also need to get the agent's SSH host key because SSHing to a host for the first time requires that you accept the host key. Print the host key from the agent and keep it handy as we will use it soon:
agent:~$ cat /etc/ssh/ssh_host_rsa_key.pub
ssh-rsa AAAAB3N[...]iQwaAqsEDN1e+c= root@ip-172-31-15-191
- Now, let's add the agent to the controller using the SSH keys. Go back to the Jenkins home page by clicking the Jenkins icon in the upper-left corner, and then click Manage Jenkins | Manage Nodes and Clouds | New Node.
- Enter Node name, choose the Permanent Agent radio button, and click OK. Populate the following fields:
- Name:
aws-aws-agent,firewalled-aws-agent, orfirewalled-firewalled-agent - # of executors:
10(this allows one agent to handle 10 concurrent builds. Since each build is isolated in a Docker container, there isn't a concern of concurrently running builds stepping on each other) - Remote root directory:
- AWS controller → AWS agent:
/home/ubuntu/aws-aws-agent - Firewalled controller → AWS agent:
/home/ubuntu/firewalled-aws-agent - Firewalled controller → Firewalled agent:
/home/robot_acct/firewalled-firewalled-agent
- AWS controller → AWS agent:
- Labels:
docker - Launch method: Launch agents via SSH
- Host: IP of the agent
- Credentials:
<user> (<env>-agent-<user>-priv) - Host Key Verification Strategy: Manually provided key Verification Strategy
- SSH Key: Copy and paste the host key into the box
This is what it should look like:

Figure 2.23 – SSH agent creation page
- Name:
- Save to create the agent. In a few seconds, the SSH agent will be connected. Click the agent name and then Log to see an output similar to this:
SSHLauncher{host='172.31.38.41', port=22, credentialsId='aws-agent-ubuntu-priv', jvmOptions='', javaPath='', prefixStartSlaveCmd='', suffixStartSlaveCmd='', launchTimeoutSeconds=60, maxNumRetries=10, retryWaitTime=15, sshHostKeyVerificationStrategy=hudson.plugins.sshslaves.verifiers.ManuallyProvidedKeyVerificationStrategy, tcpNoDelay=true, trackCredentials=true}
[01/18/21 04:12:03] [SSH] Opening SSH connection to 172.31.38.41:22.
[01/18/21 04:12:03] [SSH] SSH host key matched the key required for this connection. Connection will be allowed.
[01/18/21 04:12:03] [SSH] Authentication successful.
[...]
[01/18/21 04:12:04] [SSH] Starting agent process: cd "/home/ubuntu/aws-aws-agent" && java -jar remoting.jar -workDir /home/ubuntu/aws-aws-agent -jar-cache /home/ubuntu/aws-aws-agent/remoting/jarCache
[...]
<===[JENKINS REMOTING CAPACITY]===>channel started
Remoting version: 4.5
This is a Unix agent
Evacuated stdout
Agent successfully connected and online
Congratulations! We have an agent and we can run builds now!
Inbound agent
An inbound agent allows us to add an agent even when the controller can't reach the agent due to a network restriction such as a firewall, but the agent can reach the controller. As the name suggests, an inbound agent initiates the connection from the agent to the controller, which is the opposite of the SSH agent, where the controller initiates the connection.
An inbound agent host is a VM running Ubuntu 20.04, just like the controllers and the SSH agents. Let's configure it:
- We have already installed Docker on it in Chapter 1, Jenkins Infrastructure with TLS/SSL and Reverse Proxy. SSH into the agent and install JDK 11:
robot_acct@firewalled-agent:~$ sudo apt update
robot_acct@firewalled-agent:~$ sudo apt install -y openjdk-11-jdk
- Next, create the work directory and download
agent.jarfrom our Jenkins. The address foragent.jarishttps://<Jenkins URL>/jnlpJars/agent.jar:robot_acct@firewalled-agent:~$ mkdir inbound-agent
robot_acct@firewalled-agent:~$ cd inbound-agent/
robot_acct@firewalled-agent:~/inbound-agent$ wget https://jenkins-aws.lvin.ca/jnlpJars/agent.jar
- Go to Jenkins to create a placeholder for the inbound agent. Click Manage Jenkins | Manage Node and Clouds | New Node. Enter
inbound-agentin the Node name field, choose the Permanent Agent radio button, click OK, and then populate the following fields:- Name:
inbound-agent - Remote root directory:
/home/robot_acct/inbound-agent - # of executors:
10(this allows one agent to handle 10 concurrent builds. Since each build is isolated into a Docker container, there isn't the worry of concurrently running builds stepping on each other.) - Labels:
docker - Launch method: Launch agent by connecting it to the master
- Advanced | Tunnel connection through:
<public IP of the controller>:50000(In my case, it's 52.88.1.104:50000. Recall that in the AWS: FAQs, routing rules, EC2 instances, and EIPs section of Chapter 1, we opened the port 50000 on the EC2 instances directly, instead of on the ELB. Figure 1.6 and Figure 1.7 illustrate these configurations. In order for the inbound agent to connect to Jenkins on port 50000, we need to route the traffic through the controller.)
- Name:

Figure 2.24 – Inbound agent creation page
- Click Save and then click inbound-agent with the red x on the icon. The page shows us three different ways to connect:

Figure 2.25 – Inbound agent connection options
We will use the third method. Simply copy and paste the two commands into the CLI on the inbound agent. Here is the abridged output:
robot_acct@firewalled-agent:~/inbound-agent$ echo 2677db7766582989f1f2333bceb056d474a56e88c793f03a795b4192cf782db6 > secret-file
robot_acct@firewalled-agent:~/inbound-agent$ java -jar agent.jar -jnlpUrl https://jenkins-aws.lvin.ca/computer/inbound-agent/slave-agent.jnlp -secret @secret-file -workDir "/home/robot_acct/inbound-agent"
INFO: Using /home/robot_acct/inbound-agent/remoting as a remoting work directory
[...]
INFO: Remoting TCP connection tunneling is enabled. Skipping the TCP Agent Listener Port availability check
INFO: Agent discovery successful
  Agent address: 52.88.1.104
  Agent port:    50000
  Identity:      61:2a:ef:73:90:8d:40:ed:01:0d:c9:13:ee:76:f4
INFO: Handshaking
INFO: Connecting to 52.88.1.104:50000
INFO: Trying protocol: JNLP4-connect
INFO: Remote identity confirmed: 61:2a:ef:73:90:8d:40:ed:01:0d:c9:13:ee:76:f4:26
INFO: Connected
And that's all! Now you have a Jenkins instance that crosses the corporate firewall. You can refresh the Jenkins agent page to see that the agent is connected.
The agent connection is running in the foreground of the CLI. Stop the connection with Ctrl + C, and then run the command with the trailing ampersand (&) to send it to the background:
^Crobot_acct@firewalled-agent:~/inbound-agent$ java -jar agent.jar -jnlpUrl https://jenkins-aws.lvin.ca/computer/inbound-agent/slave-agent.jnlp -secret @secret-file -workDir "/home/robot_acct/inbound-agent" &
[1] 8110
robot_acct@firewalled-agent:~/inbound-agent$ Dec 28, 2020 7:48:53 PM org.jenkinsci.remoting.engine.WorkDirManager initializeWorkDir
INFO: Using /home/robot_acct/inbound-agent/remoting as a remoting work directory
[...]
INFO: Connected
robot_acct@firewalled-agent:~/inbound-agent$
You can now close the SSH connection to the agent and the agent will stay connected to the controller.
Let's now see how we can use the systemd service to make this process restart when the VM reboots.
Creating a systemd service to auto-connect the agent
When the inbound agent connection process dies, perhaps due to a network or a memory issue, it needs to be reconnected. We can have the agent reconnect automatically by creating a service.
Create a new file in /etc/systemd/system/jenkins-inbound-agent.service with the following content. You can download this file from the book's GitHub repository
/etc/systemd/system/jenkins-inbound-agent.service
[Unit]
Description=Jenkins Inbound Agent
Wants=network.target
After=network.target
[Service]
ExecStart=java -jar /home/robot_acct/inbound-agent/agent.jar -jnlpUrl https://jenkins-aws.lvin.ca/computer/inbound-agent/slave-agent.jnlp -secret @/home/robot_acct/inbound-agent/secret-file -workDir /home/robot_acct/inbound-agent
User=robot_acct
Restart=on-failure
RestartSec=10
[Install]
WantedBy=multi-user.target
Once the file is created, start the service to kick off the process, and then enable the service so that the service restarts upon a VM reboot. You can see the same console output in the logs using the journalctl command:
robot_acct@firewalled-agent:~$ sudo systemctl start jenkins-inbound-agent
robot_acct@firewalled-agent:~$ sudo systemctl enable jenkins-inbound-agent
robot_acct@firewalled-agent:~$ sudo journalctl -u jenkins-inbound-agent
The inbound agent is now configured to auto-reconnect upon a failure. Try rebooting the VM to see that the inbound agent reconnects automatically.
There are additional ways to connect an inbound agent. See the online docs (https://github.com/jenkinsci/remoting/blob/master/docs/inbound-agent.md) for the latest information.
Labels and Usage
Here is some more information about the Labels and Usage fields on the agent configuration page. Let's talk about Labels first.
Agent labels
In the Labels textbox, we can put multiple keywords delimited by a space to describe an agent. Suppose these four agents have the following labels:
centos8-agent:docker linux centos centos8ubuntu2004-agent:docker linux ubuntuubuntu2004windows-95-agent:windowswindows95windows-10-agent:docker windowswindows10
A Jenkinsfile can specify one or more labels in the agent label directive to specify the agent that it requires. Builds for a pipeline that specifies agent { label 'docker' } would run on centos8-agent, ubuntu2004-agent, or windows-10-agent because the three agents have the docker label. Builds for a pipeline that specifies agent { label 'windows' } would run on any of the two Windows agents. In a more advanced use case, builds for a pipeline that specifies agent { label 'windows && docker' } would run only on windows-10-agent because that is the only agent with both windows and docker labels. Similarly, builds for a pipeline that specifies agent { label 'centos || ubuntu' } would run on any of the two Linux agents.
The agent labels were more useful before Docker was invented – in those dark days, each agent would be a VM with a specific set of tools preinstalled, and labels were used to identify its operating system, tools, and configurations. With Docker available, nearly all agents can have just one docker label as we have configured, and each pipeline can specify its requirements in the Dockerfile. Labels are, of course, still useful if you are using bare-metal agents (rather than Docker or Dockerfile agent) with specific hardware characteristics such as GPU availability or a non-x86 CPU architecture – a pipeline can request an agent with specific hardware using a label.
One last thing about agent labels is that each agent's own name acts as a label. For example, builds for a pipeline that specifies agent { label 'ubuntu2004-agent' } would run only on ubuntu2004-agent, even if you didn't label the agent with its own name. If you need to pin a pipeline to a specific agent, simply use the agent's name as the label.
Next, let's look at Usage.
Agent usage
Usage configuration determines agent availability. In the previous section, we saw that a Jenkinsfile can request an agent with a specific set of labels. A Jenkinsfile can also request any available agent without any label specifications with agent any. In a Jenkins environment with a homogenous set of agents (such as all of them being Ubuntu 20.04), a simple operation such as a file copy doesn't really need a special capability that's noted by agent labels. Usage configuration of an agent determines whether the agent is eligible to be used by a pipeline that specifies agent any.
Choosing Use this node as much as possible makes the agent available to the builds for a pipeline with agent any.
Choosing Only build jobs with label expressions matching this node makes the agent unavailable to the builds for a pipeline with agent any. As the option message says, only build jobs with label expressions matching this node (as opposed to a build job requesting any agent) will run on this node. It's important to understand that this doesn't stop a build from running on this agent if a pipeline pins to this agent. Use the Job Restrictions plugin if you need to limit which pipelines can use an agent.
Also, take note that at least one agent must be configured with the Use this node as much as possible option for a pipeline with agent any to work. If you are setting up a Docker Cloud, a Docker Agent Template is usually a good choice for this configuration.
Let's continue to create a Docker Cloud.
Creating a secure Docker Cloud
Required plugins
Docker
In addition to the static agents, we will add a Docker Cloud in order to dynamically generate agents using Docker containers. We need to set up a Docker host where the containers will run. It's possible to reuse an existing agent to act as a Docker host; however, this is not recommended because the Docker engine is modified to require a certificate. Here is what the connection flow looks like:
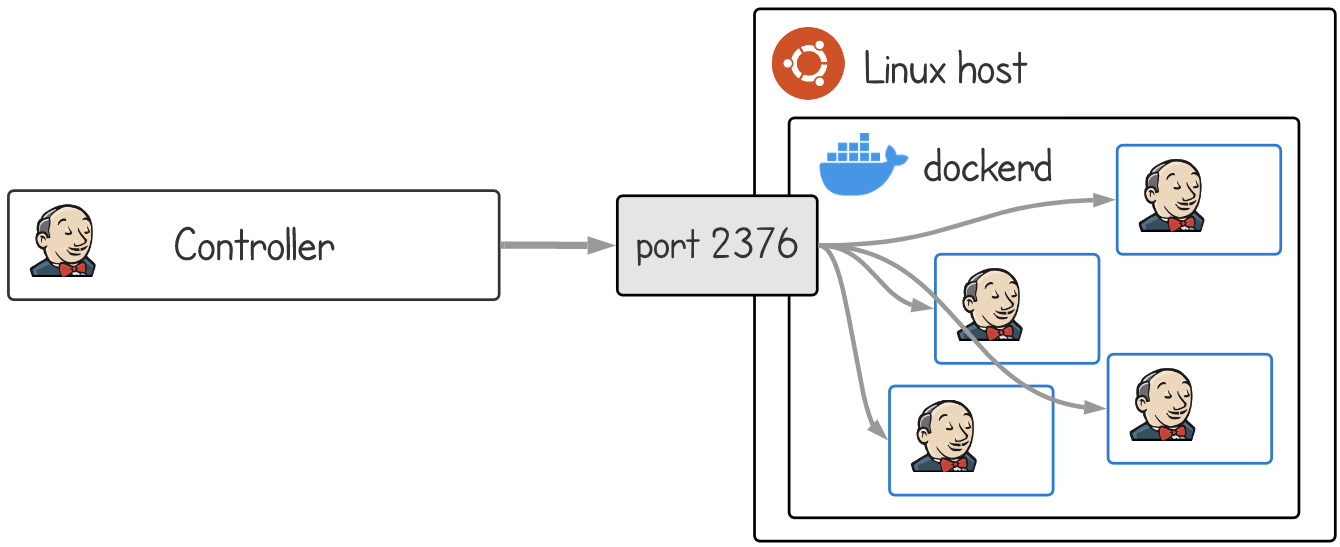
Figure 2.26 – Architecture of the Docker Cloud host
There are a few things to understand about the Docker Cloud. First, the Docker Cloud doesn't support an inbound setup. This means that a Docker host for the AWS controller must also be on AWS (or similar network locations where the controller can access). Second, setting up a secure connection is complex. It involves creating multiple self-signed SSL certificates and placing them in just the right places for both the host and the clients. Third, an insecure connection is very insecure. Not only is it unencrypted, but it also doesn't require authentication. In other words, it creates a server for anyone in the world to connect to freely. Finally, it can only run a specific set of images that we pre-populate. It can't run a random image that a pipeline needs, which means it's really only good for providing generic catch-all images.
Never create an insecure Docker host on AWS!
Anyone can connect without authentication and start mining bitcoin. Don't ask me how I know =(
Setting up a secure Docker Cloud is a four-step process that applies to both AWS and firewalled Jenkins:
- Create a certificate authority (CA). Create server and client certificates signed by the CA. Only the client who presents a certificate from this CA will be accepted by the server.
- Configure the Docker engine to use the host certificate and listen to TCP port
2376. - Configure Jenkins to use the client certificate.
- Connect Jenkins to the Docker host using the client certificate.
Here is what the certificate architecture looks like:
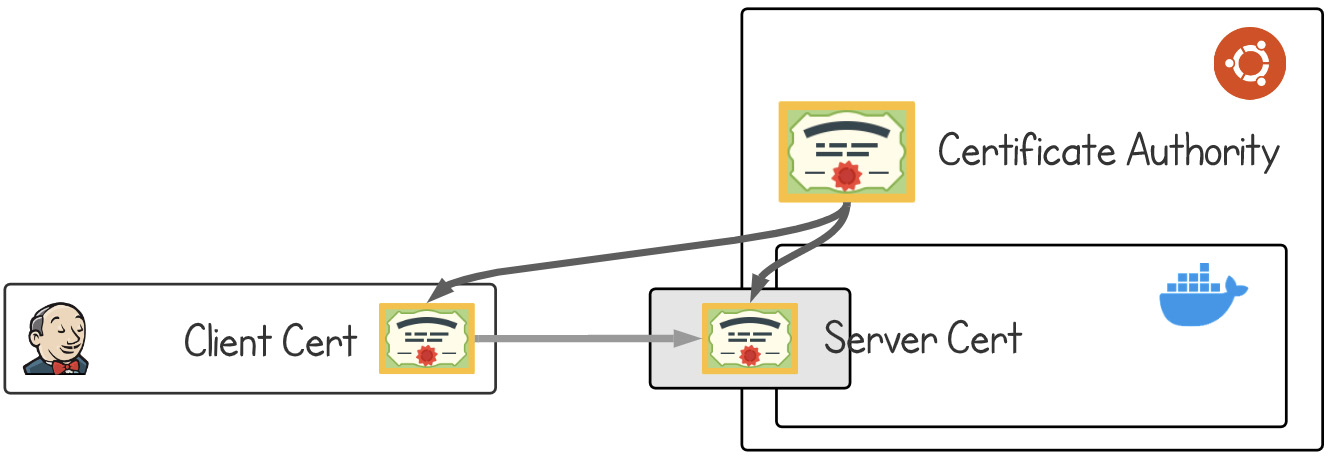
Figure 2.27 – Architecture of Docker certificates
Let's get started. SSH into the Docker host. It's a VM running Ubuntu 20.04 just like all other VMs. Docker was installed in Chapter 1, Jenkins Infrastructure with TLS/SSL and Reverse Proxy.
Generating a CA, server certificates, and client certificates
We'll start by generating the necessary certificates. First, we'll generate a CA, then, using the CA, we'll generate the certificates for the server and the client. Let's begin:
- Generate a CA. This is done by first creating a private key, and then creating a public certificate signed by the private key:
docker-host:~$ openssl genrsa -aes256 -out ca.key 4096
docker-host:~$ openssl req -new -x509 -days 3650 -key ca.key -sha256 -out ca.crt
- Next, create server certificates for the Docker host. First, create a private key and create a certificate signing request (CSR):
docker-host:~$ openssl genrsa -out server.key 4096
docker-host:~$ openssl req -sha256 -new -key server.key -out server.csr
- Enter the domain and/or the IP for the Docker host. It's possible to add multiple as follows:
docker-host:~$ echo 'subjectAltName = DNS:firewalled-docker-host.lvin.ca,IP:192.168.1.18,IP:127.0.0.1' > extfile.cnf
For the firewalled Docker host, enter just one IP. For the AWS Docker host, enter both the public and the private IPs, so that the controller can connect to the Docker host using either IP:
docker-host:~$ echo 'subjectAltName = IP:192.168.1.18' > extfile.cnf
- Set
extendedKeyUsagetoserverAuthso that the certificate can only be used for a server. Notice the>>characters for appending to the file rather than overwriting:docker-host:~$ echo 'extendedKeyUsage = serverAuth' >> extfile.cnf
- Finally, sign the CSR to create a server certificate for the Docker host using the newly created CA. The resulting certificate is valid for 1 year. We can run through the same steps again in about 300 days to generate a new certificate with an updated expiry date. Generating a new certificate doesn't invalidate the existing certificates:
docker-host:~$ openssl x509 -req -days 365 -sha256 -extfile extfile.cnf -CA ca.crt -CAkey ca.key -CAcreateserial -in server.csr -out server.crt
- Next, create client certificates for the Jenkins Docker client. Create a private key and a CSR:
docker-host:~$ openssl genrsa -out client.key 4096
docker-host:~$ openssl req -subj '/CN=client' -new -key client.key -out client.csr
- Set
extendedKeyUsagetoclientAuthso that the certificate can only be used for a client. Notice the>character for overwriting the file:docker-host:~$ echo 'extendedKeyUsage = clientAuth' > extfile.cnf
- Finally, sign the CSR to create a client certificate for the Jenkins Docker client using the newly created CA. This certificate is also valid for 1 year:
docker-host:~$ openssl x509 -req -days 365 -sha256 -extfile extfile.cnf -CA ca.crt -CAkey ca.key -CAcreateserial -in client.csr -out client.crt
Client certificates are passwords
Anyone with client certificates can connect and launch a container. Treat the certificates like a password and store them securely.
All the required keys are created. Delete the intermediary files to clean up. Verify that the permissions for the certificates and the keys are 644 and 600, respectively:
docker-host:~$ rm -v ca.srl client.csr server.csr extfile.cnf
removed 'ca.srl'
removed 'client.csr'
removed 'server.csr'
removed 'extfile.cnf'
robot_acct@firewalled-docker-host:~$ ls -l
total 24
-rw-r--r-- 1 robot_acct dip 2199 Dec 29 04:41 ca.crt
-rw------- 1 robot_acct dip 3326 Dec 29 04:35 ca.key
-rw-r--r-- 1 robot_acct dip 1919 Dec 29 05:08 client.crt
-rw------- 1 robot_acct dip 3243 Dec 29 05:02 client.key
-rw-r--r-- 1 robot_acct dip 2114 Dec 29 05:01 server.crt
-rw------- 1 robot_acct dip 3247 Dec 29 04:57 server.key
The certificates are ready. Let's distribute them to the right places.
Storing the certificates
Save the CA and server certificates in /etc/ssl/docker-host/:
docker-host:~$ sudo mkdir /etc/ssl/docker-host
docker-host:~$ sudo mv ca.crt ca.key server.crt server.key /etc/ssl/docker-host/
Save the client certificates in Jenkins. Go to the Global Credentials page, click Add Credentials, and then choose Kind as X.509 Client Certificate. Copy and paste the content of client.key, client.crt, and ca.crt into the three boxes. Enter docker-host-client for ID and Description, and then click OK to save:
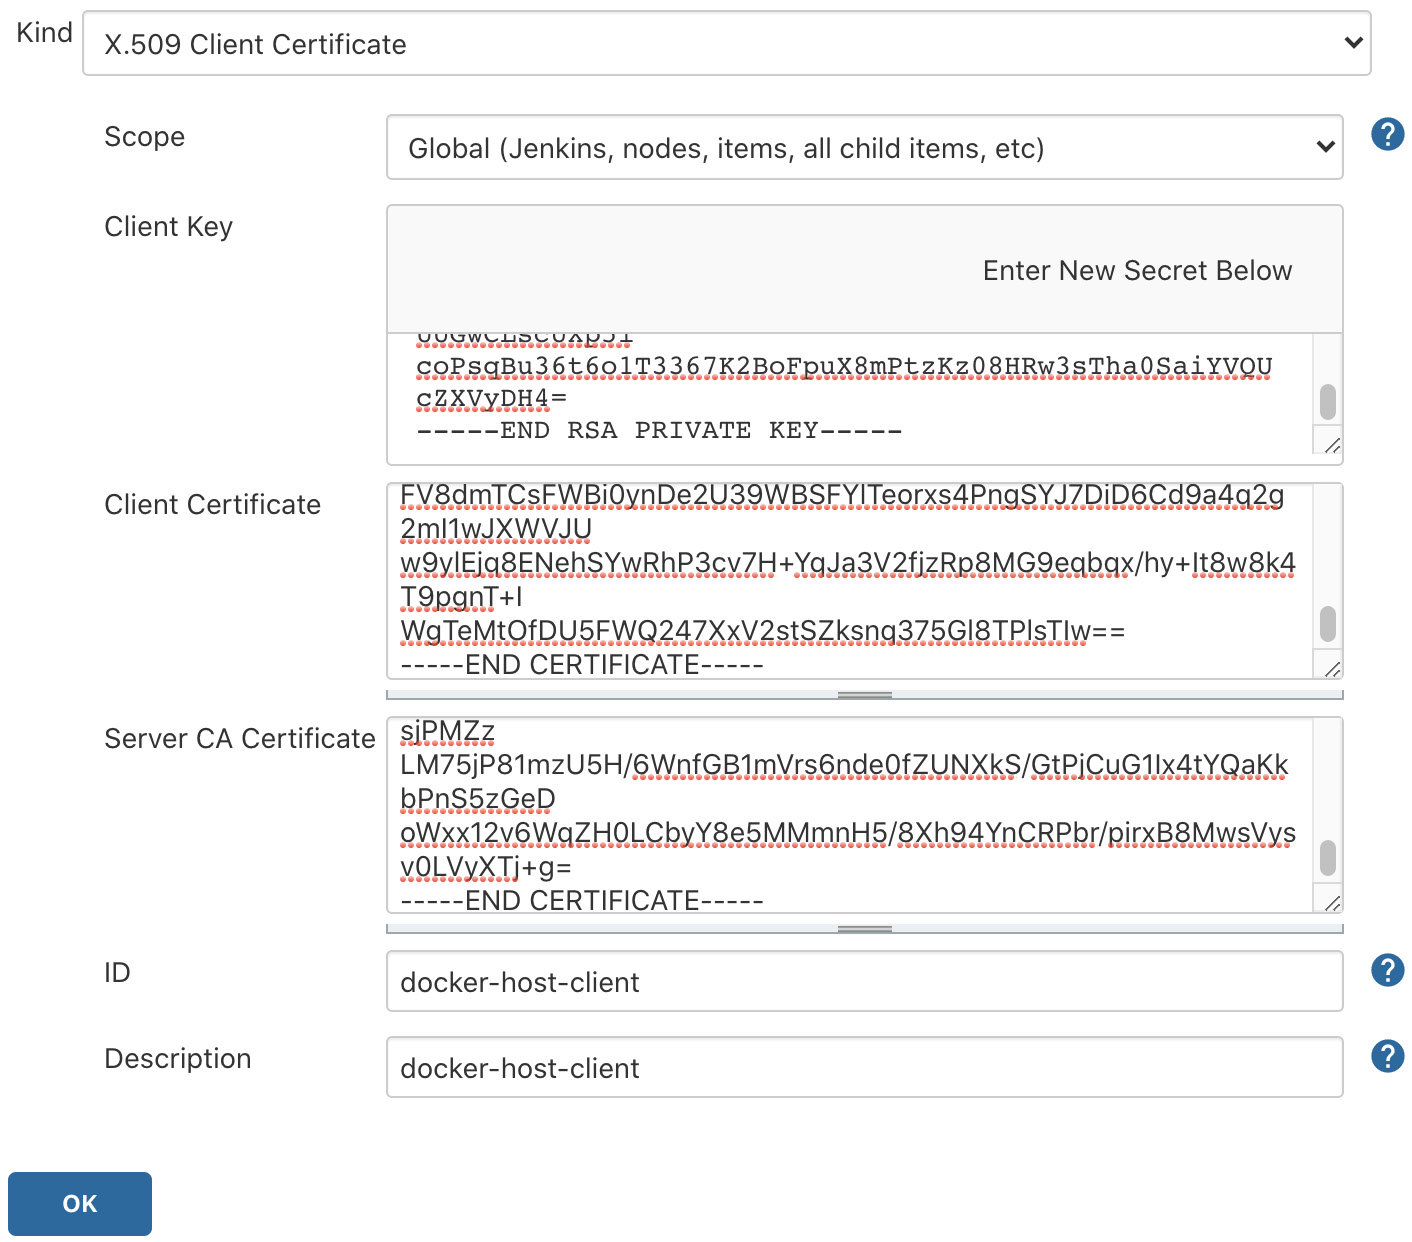
Figure 2.28 – Docker client keys stored in Jenkins
Both the server and client certificates are ready. Let's continue to configure the Docker service.
Configuring the Docker service
Configure docker.service on the Docker host to listen to TCP port 2376 while using the server certificates:
- Open an override file for
docker.serviceand paste in the following content. The syntax is a bit odd here. The line withExecStart=seems useless but is actually required. Also, the last line with/usr/bin/dockerdis one long line without a line break. It may be better if you just download this file from the book's GitHub repository because writing this out can be very error-prone:docker-host:~$ sudo systemctl edit docker.service
[Service]
ExecStart=
ExecStart=/usr/bin/dockerd -H tcp://0.0.0.0:2376 -H unix:///var/run/docker.sock --tlsverify --tlscacert=/etc/ssl/docker-host/ca.crt --tlscert=/etc/ssl/docker-host/server.crt --tlskey=/etc/ssl/docker-host/server.key
- Apply the changes: save, exit,
systemctl daemon-reload, and restart Docker. Check that it's listening on port2376:
docker-host:~$ sudo systemctl daemon-reload
docker-host:~$ sudo systemctl restart docker.service
docker-host:~$ sudo netstat -lntp | grep dockerd
tcp6 0 0 :::2376 ::: LISTEN 5351/dockerd
The Docker service is now ready to accept traffic on port 2376 using the server certificate. In order to update the certificates with a new expiry date, replace the certificate files and restart the Docker service.
Directions on docker-plugin documents are insecure!
Do not follow the directions on docker-plugin documents as they configure the Docker host to be open to everyone without authentication. This is equivalent to allowing SSH as root without requiring a password.
Configuring Jenkins
Let's put it all together by configuring the Docker Cloud on Jenkins:
- Click Manage Jenkins | Manage Nodes and Clouds | Configure Clouds | Add a new cloud, and then choose Docker. A Docker configuration panel is created.
- Click Docker Cloud details.
- Enter the IP of the Docker host into the Docker Host URI field in the format of
tcp://<IP>:2376and choosedocker-host-clientfor Server credentials. - Clicking Test Connection should show the version and the API version of the Docker host.
- Check Enabled and then click Apply to save the progress:

Figure 2.29 – Docker Cloud connection configured and tested
- Finally, add some agent templates that the builds can use. Click Docker Agent templates and Add Docker Template:
- Labels:
linux - Enabled: Check
- Name:
docker - Docker Image:
jenkins/agent - Remote File System Root
: /home/jenkins
We can leave everything else as is, as shown in the following screenshot, and then click Save:
- Labels:
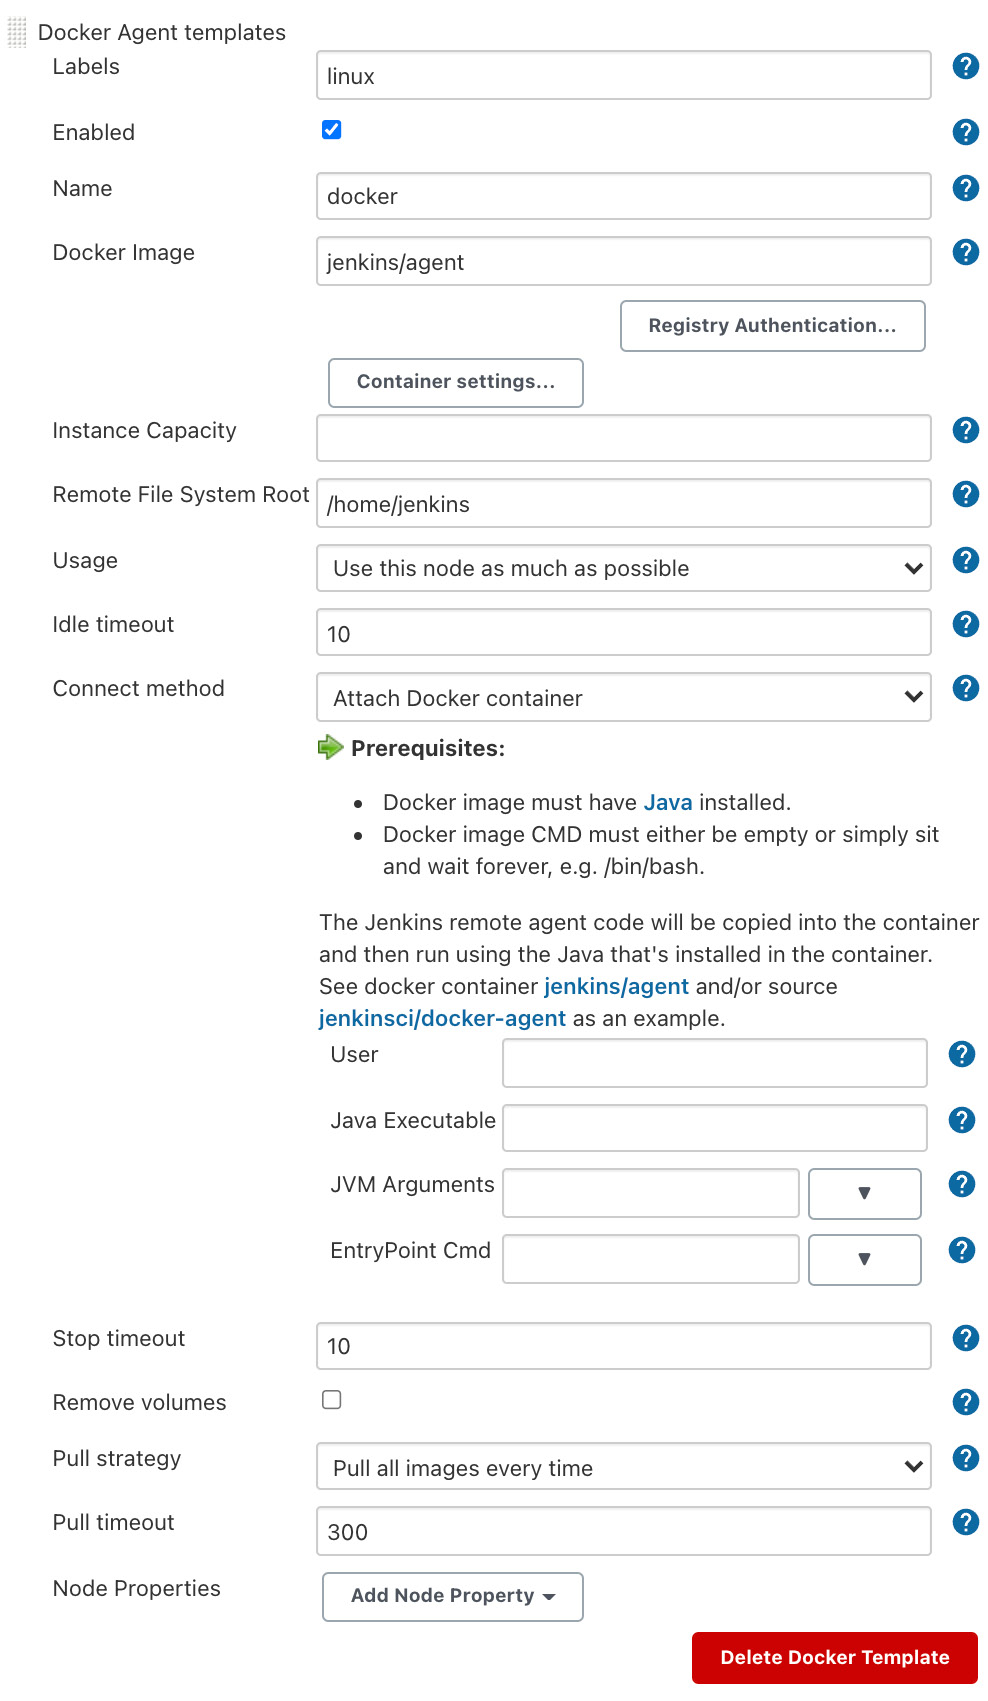
Figure 2.30 – Docker Agent template configuration
The Docker Cloud is now ready. When we build a pipeline that uses the linux agent label, a new agent will be created from the Docker Cloud on the fly. In addition, since we've set Usage to Use this node as much as possible, pipeline builds using agent any will also use an agent created from this template.
Summary
In this chapter, we have set up the complete Jenkins instance both on AWS and inside the firewall. For each Jenkins controller, we've set up a reverse proxy and configured TLS certificates for HTTPS support. Then we've added two agents, one as an SSH agent and another as an inbound agent, to handle various network requirements. Finally, we've added the Docker Cloud so that agents can be dynamically generated from a Docker container. The Jenkins instances are ready to take on production workloads.
In the coming chapters, we'll use the Jenkins instances to set up GitOps-driven CI/CD pipelines.