


 Download code from GitHub
Chapter 1: Getting Familiar with Xcode
Welcome to iOS 14 Programming for Beginners. I hope you will find this a useful introduction to writing and publishing iOS 14 apps on the App Store.
In this chapter, you'll learn how to download and install Xcode on your Mac. You'll familiarize yourself with the different parts of the Xcode user interface, and you'll create your first iOS app and run it in the iOS simulator. You will then learn how to connect an iOS device to Xcode via USB so that you can run the app on it, how to add an Apple ID to Xcode so that the necessary digital certificates can be created and installed on your device, and how to trust the certificate on your device. Finally, you will learn how to connect to your device over Wi-Fi, so you no longer need to plug and unplug your device every time you want to run an app.
By the end of this chapter, you will know how to create and run apps on the iOS simulator or a device, which you will need to do when you build your own apps.
The following topics will be covered:
- Downloading and installing Xcode from the App Store
- Understanding the Xcode user interface
- Running the app in the iOS simulator
- Using an iOS device for development
Technical requirements
To perform the exercises for this chapter, you will need the following:
- An Apple Mac computer running macOS 10.15 Catalina or macOS 11.0 Big Sur
- An Apple ID (if you don't have one, you will create one in this chapter)
- Optionally, an iOS device running iOS 14
The Xcode project for this chapter is located in the Chapter01 folder of the code bundle for this book, which can be downloaded here:
https://github.com/PacktPublishing/iOS-14-Programming-for-Beginner-Fifth-Edition
Check out the following video to see the Code in Action: https://bit.ly/3jvJ8hs
You'll start by downloading Xcode, Apple's integrated development environment for developing iOS apps, from the App Store in the next section.
Downloading and installing Xcode from the App Store
Before you begin writing iOS apps, you need to download and install Xcode from the App Store. Follow these steps:
- Choose App Store from the Apple menu.
- In the search field in the top-right corner, type
Xcodeand press the Return key. - You should see Xcode in the search results. Click Get and click Install.
- If you have an Apple ID, type it in the Apple ID textbox. If you don't have an Apple ID, click the Create Apple ID button and follow the step-by-step instructions to create one:

Figure 1.1 – Apple ID creation dialog box
Important information
You can see more information on how to create an Apple ID at this link: https://support.apple.com/en-us/HT204316#appstore
- Once Xcode has been installed, launch it. You should see the following Welcome to Xcode screen. Click Create a new Xcode project in the left-hand pane:

Figure 1.2 – Welcome to Xcode screen
- You will see the new project screen as follows. In the Choose a template for your new project: section, select iOS. Choose App and then click Next:

Figure 1.3 – Choose a template for your new project screen
- You will now see the Choose options for your new project: screen:

Figure 1.4 – Choose options for your new project screen
Configure this options screen as follows:
- Product Name: The name of your app. Enter
ExploringXcodein the text field. - Organization Identifier: Used to create a unique identifier for your app on the App Store. Normally, reverse DNS notation is used. Enter
com.yournamefor now. - Interface: The method used to create the user interface for your app. Set this to Storyboard.
- Language: The programming language to be used. Set this to Swift.
Leave the other settings at their default values. Make sure all the checkboxes are unticked. Click Next when done.
- Product Name: The name of your app. Enter
- You'll now see a Save dialog box. Choose a location to save your project, such as the
DesktoporDocumentsfolder, and then click Create:
Figure 1.5 – Save dialog box
- If you see a dialog box saying No author information was supplied by the version control system, click Fix.
Important information
The reason why you see this dialog box is because the Source Control checkbox is ticked. Apple recommends that Source Control be turned on. To learn more about version control and Git, refer to the following link: https://git-scm.com/video/what-is-version-control
- You will see the Source Control preference screen as follows:

Figure 1.6 – Source Control preference screen
Enter the following information:
- The Xcode main window will appear.
Fantastic! You have now successfully downloaded and installed Xcode and created your first project. In the next section, you will learn about the Xcode user interface.
Understanding the Xcode user interface
You've just created your first Xcode project! As you can see, the Xcode user interface is divided into several distinct parts, as shown:

Figure 1.7 – Xcode user interface
Let's look at each part in more detail. The following description corresponds to the numbers shown in the preceding screenshot:
- Toolbar: Used to build and run your apps, and view the progress of running tasks. The left side of the toolbar contains the Navigator button (1), the Play button (2), the Stop button (3), the Scheme menu (4), and the Activity View (5):

Figure 1.8 – Xcode toolbar (left side)
- The Navigator button toggles the Navigator area on and off.
- The Play button is used to build and run your app.
- The Stop button stops any currently running apps.
- The Scheme menu shows the specific target to be built (Exploring Xcode), and the destination (simulator or device) to run the target on (iOS simulator). Schemes and destinations are distinct. Schemes specify the settings for building, running, testing, profiling, analyzing, and archiving your project. Destinations specify installation locations for your app. Typically, a scheme exists for each target in your project. Destinations exist for physical devices and simulators.
- The Activity View displays the progress of running tasks.
The right side of the toolbar contains the Library button (1), the Code Review button (2), and the Inspector button (3):

Figure 1.9 – Xcode toolbar (right side)
- The Library button displays user interface elements, code snippets, and other resources.
- The Code Review button allows you to view past versions of the file you're currently editing.
- The Inspector button toggles the Inspector area on and off.
- Navigator area: Provides quick access to the various parts of your project. Project navigator is displayed by default.
- Editor area: Allows you to edit source code, user interfaces, and other resources.
- Inspector area: Allows you to view and edit information about items selected in Navigator area or the Editor area.
- Debug area: Toggled by typing Shift + Command + Y. Contains the debug bar, the variables view, and Console.
Don't be overwhelmed by all the different parts, as you'll learn about them in more detail in later chapters. Now that you are familiar with the Xcode interface, you will run the app you just created in the iOS simulator, which displays a representation of your iOS device.
Running the app in the iOS simulator
The iOS simulator is installed when you install Xcode. It provides a simulated iOS device so that you can see what your app looks like and how it behaves, without needing a physical iOS device. It can model all the screen sizes and resolutions for both the iPad and iPhone so you can test your app on multiple devices easily.
To run your app in the simulator, follow these steps:
- Click the Scheme menu in the toolbar and you will see a list of simulators. Choose iPhone SE (2nd generation) from this menu:

Figure 1.10 – Xcode Scheme menu with iPhone SE (2nd generation) selected
- Click the Play button to install and run your app on the currently selected simulator. You can also use the Command + R keyboard shortcut.
- If you see the Developer Tools Access dialog box, enter the
usernameandpasswordof the Mac's administrator account and click Continue. - The simulator will launch and show a representation of an iPhone SE (2nd generation). Your app displays a white screen, as you have not yet added anything to your project:

Figure 1.11 – iOS simulator
- Switch back to Xcode and click on the Stop button (or press Command + .) to stop the currently running project.
You have just created and run your first iOS app in the simulator! Great job!
If you look at the Scheme menu, you may wonder what the No Devices and Build sections are for. Let's take a look at them in the next section.
Understanding the No Devices and Build sections
You learned how to choose a simulator in the Scheme menu to run your app in the previous section. In addition to the list of simulators, the Scheme menu also has No Devices and Build sections. These allow you to run apps on actual iOS devices, and prepare apps for submission to the App Store.
Click the Scheme menu in the toolbar to see the No Devices and Build sections at the top of the menu:
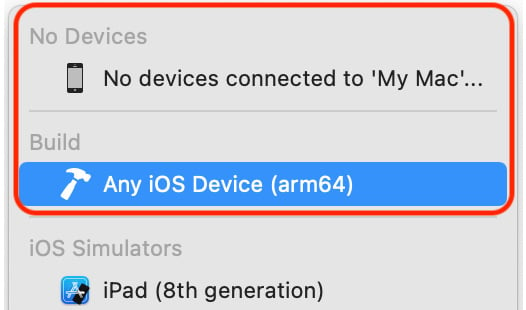
Figure 1.12 – Xcode Scheme menu with Any iOS Device (arm64) selected
The No Devices section currently displays text stating No devices connected to 'My Mac'... because you currently don't have any iOS devices connected to your computer. If you were to plug in an iOS device, it would appear in this section, and you would be able to run the apps you develop on it for testing. Running your apps on an actual device is recommended as the simulator will not accurately reflect the performance characteristics of an actual iOS device, and does not have some hardware features and software APIs that actual devices have.
The Build section has only one menu item, Any iOS Device (arm64). This is used when you need to archive your app prior to submitting it to the App Store. You'll learn how to do this in the final chapter of this book.
Now, let's see how to build and run your app on an actual iOS device. The vast majority of the instructions in this book do not require you to have an iOS device though, so if you don't have one, skip the next section and go straight to Chapter 2, Simple Values and Types.
Using an iOS device for development
Although you'll be able to go through most of the exercises in this book using the simulator, it is recommended to build and test your apps on an actual iOS device, as the simulator will not be able to simulate some hardware components and software APIs.
Important information
For a comprehensive look at all the differences between the simulator and an actual device, refer to this link:
https://help.apple.com/simulator/mac/current/#/devb0244142d
In addition to your device, you'll need an Apple ID or a paid Apple Developer account to build and run your app on your device. You'll use the same Apple ID that you used to download Xcode from the App Store for now:
- Use the cable that came with your iOS device to connect it to your Mac, and make sure it is unlocked.
Tip
You can view connected devices by choosing Window | Devices and Simulators in the Xcode menu bar.
- In the Scheme menu, choose your device (iPhone in this case) as the run destination:

Figure 1.13 – Xcode Scheme menu with actual iOS device selected
- Wait for Xcode to finish indexing and processing, which will take a while. Once complete, Ready will be displayed in the status window.
- Run the project by clicking the Play button (or use Command + R). You will get the following error: Signing for "Exploring Xcode" requires a development team.:

Figure 1.14 – Xcode Signing & Capabilities pane
This is because a digital certificate is required to run the app on an iOS device, and you need to add an Apple ID or paid Apple Developer account to Xcode so that the digital certificate can be generated.
Important note
Using an Apple ID will allow you to test your app on an iOS device, but you will need a paid Apple Developer account to distribute apps on the App Store. You'll learn more about this in Chapter 26, Testing and Submitting Your App to the App Store.
Important note
Certificates ensure that the only apps that run on your device are the ones you authorize. This helps to protect against malware. You can also learn more about them at this link:
- Click the Add Account... button:

Figure 1.15 – Xcode Signing & Capabilities pane with Add Account button selected
- The Xcode Preferences window appears with the Accounts pane selected. Enter your Apple ID and click Next. Note that you can create a different Apple ID if you wish by using the Create Apple ID button:

Figure 1.16 – Apple ID creation dialog box
Tip
You can also access Xcode preferences by choosing Preferences in the Xcode menu.
- Enter your password when prompted. After a few minutes, the Accounts pane will display your account settings:

Figure 1.17 – Accounts pane in Xcode preferences
- Close the Preferences window when you're done by clicking the red button in the top-left corner.
- In Xcode's editing area, click Signing & Capabilities. Make sure Automatically manage signing is ticked and that Personal Team is selected from the Team pop-up menu:

Figure 1.18 – Xcode Signing & Capabilities pane with account set
- If you still see errors on this screen, try changing your Bundle Identifier by typing some random characters into it, for example,
com.myname5109.ExploringXcode. - Everything should work now when you build and run, and your app will be installed on your iOS device. However, it will not launch and you will see the following message:

Figure 1.19 – Could not launch "ExploringXcode" dialog box
This means you need to trust the certificate that has been installed on your device. You'll learn how to do this in the next section.
Trusting the Developer App certificate on your iOS device
A Developer App certificate is a special file that gets installed on your iOS device along with your app. Before your app can run, you need to trust it. Let's do that now:
- On your iOS device, tap Settings.
- Tap General.
- Tap Device Management:

Figure 1.20 – Device Management setting in iOS Settings
- Tap Apple Development:

Figure 1.21 – Apple Development section in Device Management settings
- Tap Trust "Apple Development:":

Figure 1.22 – Trust button
- Tap Trust:

Figure 1.23 – Trust dialog box
- You should see the following text, which shows the app is now trusted:

Figure 1.24 – Apple Development section with trusted certificate
- Click the Play button in Xcode to build and run again. You'll see your app launch and run on your iOS device.
Congratulations! Note that you have to connect your iOS device to your Mac using the cable in order to build and run your app. You'll learn how to connect to your device over Wi-Fi in the next section.
Connecting an iOS device wirelessly
Unplugging and replugging your iOS device to your Mac gets pretty cumbersome after a while, so now you'll configure Xcode to connect to your iOS device over Wi-Fi. Follow these steps:
- Make sure your iOS device is plugged in to your Mac, and that both the Mac and iOS devices are on the same wireless network.
- Choose Window | Devices and Simulators from the Xcode menu bar:

Figure 1.25 – Xcode Window menu with Devices and Simulators selected
- Click on the checkbox marked Connect via network:
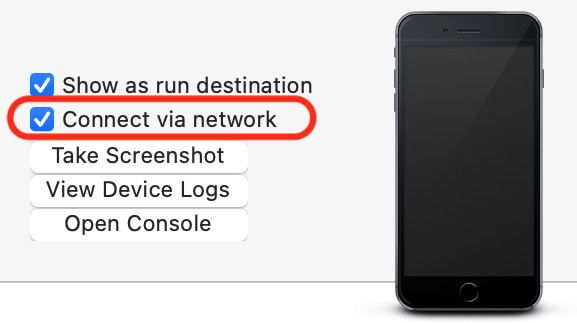
Figure 1.26 – Xcode Devices and Simulators window with "Connect via network" checked
Awesome! Your iOS device is now connected wirelessly to Xcode, and you no longer need the USB cable to be connected to it.
Summary
In this chapter, you learned how to download and install Xcode on your Mac. You familiarized yourself with the different parts of the Xcode user interface. You created your first iOS app, selected a simulator, and built and ran the app. You learned what the No Device and Generic iOS Device menu items are for. This enables you to create and run iOS apps on your Mac without requiring an iOS device.
You learned how to connect an iOS device to Xcode via USB so that you can run an app on it. You added an Apple ID to Xcode so the necessary digital certificates can be created and installed on your device, and trusted the certificate on your device. This gives you the ability to run your apps on an actual device, so you can more accurately determine their performance, and make use of features not available in the iOS simulator.
Finally, you learned how to connect to your device over Wi-Fi, so you no longer need to plug and unplug your device every time you want to run an app. This makes it much more convenient to build and test your apps on an iOS device as any new builds can be transferred immediately over the air.
In the next chapter, we'll start exploring the Swift language using Swift Playgrounds, and learn how simple values and types are implemented in Swift.


