


As an introduction to Ephesoft, we will first walk you through the user interface and then examine the installation folder. The locations of certain files and folders within the Ephesoft installation are important because an administrator must make changes here to enable some features.
In this chapter, we will examine the following aspects of Ephesoft:
The user interface
The installation folder
After logging in, users can access Ephesoft's features from an automatically hiding menu of navigation items that we will refer to as the side navigation. To display this menu, simply move your mouse cursor to the left-hand side of the browser window.
Ephesoft has organized this side navigation so that administrative features are separate from the common functions that operators use. Operators typically submit batches and review and validate Ephesoft's output, supplying additional information about the document images being processed.
Administrators enable these activities by defining the operations to be performed on each type of batch. Administrators also monitor and control the processing of the batches.

Ephesoft's navigation menu
The side navigation provides links to five areas of the system that are commonly used by administrators:
A batch class defines a set of operations that should be performed on the page images that are provided as input. A batch class consists of document types, document fields, batch class fields, e-mail configuration, and workflow/plugin configuration. The Batch Class Management interface allows administrators to create, modify, edit, and delete batch classes.
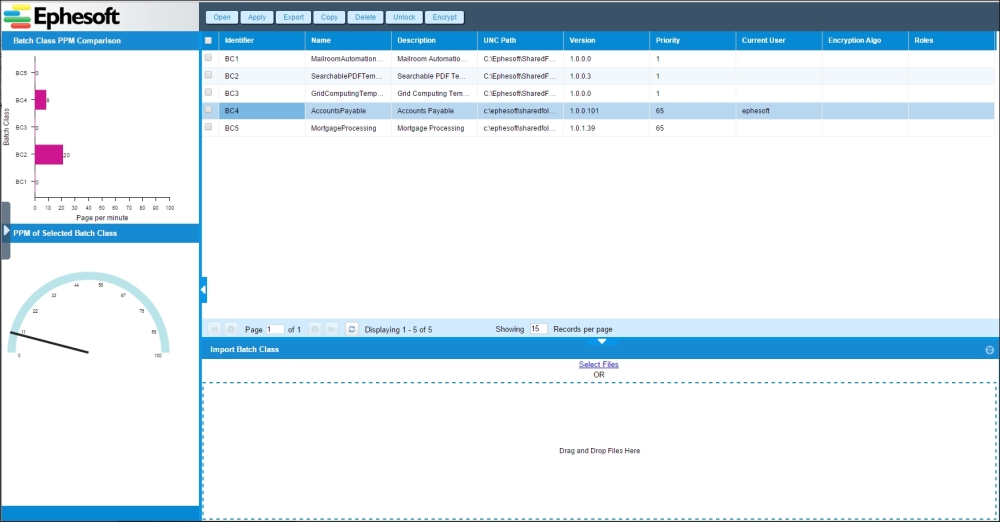
Ephesoft's batch class management user interface
The batch class management interface displays a list of batch classes. Administrators can open a batch class to configure the following:
Document types: The documents that will be processed in the batch class are configured here. Each document type is described by a distinct set of properties called fields. Rules can be configured to extract information from the document into the fields, thereby automating the process of indexing the document.
Modules: Modules are the major steps in the processing of documents. Each module is implemented by a series of plugins.
E-mail configuration: In this portion of the administrative interface, users can provide connection information for an e-mail account, and Ephesoft will process e-mails sent to this address. Ephesoft processes both the e-mail body and the attached documents.
Scanner profiles: This is where administrators can associate one or more scanner configurations with each batch class. These profiles are available in the web scanner.
CMIS import: CMIS is a standard protocol for communicating with document repositories. Ephesoft can use CMIS to monitor a standards-compliant document repository for input.
Batch class fields: Ephesoft can associate information with a batch (the group of page images that are processed together) as a whole. Each piece of information associated with a batch is called a batch class field. Batch class fields are applied to batches and should not be confused with document fields, which contain information that applies to individual documents.
A batch instance is a set of page images processed together. The terms batch and batch instance are usually interchangeable. This area within the administrative interface allows administrators to see the status of batches, reprioritize batches, and restart batches in a previous processing step.

Ephesoft's batch instance management user interface
The folder management interface allows the administrator to upload files for batch class configuration. These files are also accessible from the installation folder, but this is often a more convenient way to manipulate these files.

Ephesoft's folder management user interface
This administrative interface allows users to manage Ephesoft in ways that are not specific to a batch class or instance.

Ephesoft's system configuration user interface
System configuration allows the modification of the following features:
Regex pool: The regular expression pool is a library of regular expressions that administrators can access when creating extraction rules for a batch class.
Workflow management: Ephesoft's features are implemented in components called plugins. The workflow is the sequence in which these plugins are executed. This portion of the user interface allows an administrator to specify what plugins are available when configuring the workflow for a batch class.
Connection manager: The connection manager allows you to create and test database connections. These connections are used by plugins to access databases.
License details: This allows administrators to see the expiration date of the license and the features that are enabled.
Reporting can be enabled to provide administrators with statistics on the system and throughput. The administrator can filter reports by criteria such as batch class or start date. Advanced reports are also available, including correction reporting. Correction reporting identifies when operators made corrections to Ephesoft's automated processing. This information can be used to optimize the configuration over time.

Ephesoft's reporting user interface
The side navigation provides links to the following four areas of the system that are commonly used by operators:
Batch list
Review validate
Web scanner
Upload batch
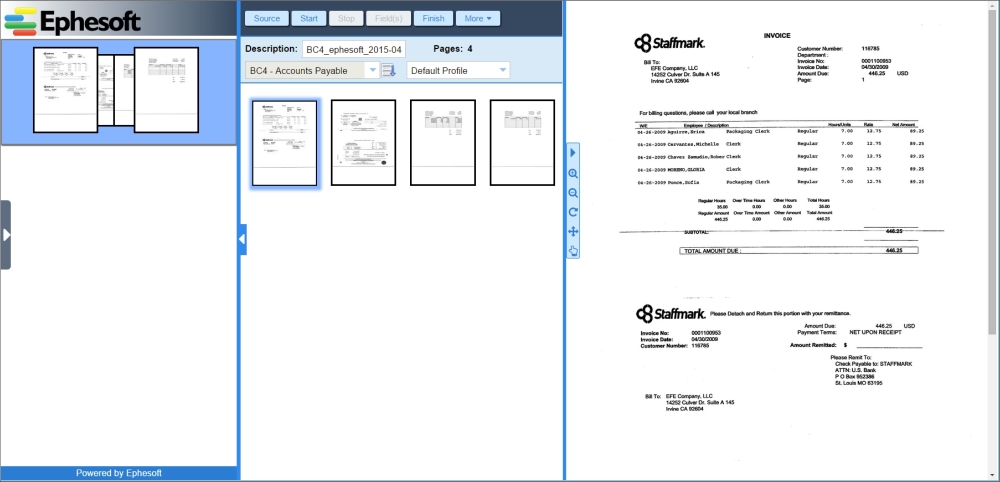
The batch list shows the batch instances that require review or validation.
The review process involves documents that could not be identified as being of a certain type. In Ephesoft, as with most image capture systems, we say that these documents could not be classified. The review interface allows operators to split and merge pages of documents and specify the document type.
The validation process involves fields for which data could not be extracted from the document, or fields where the extracted values do not comply with the previously specified rules.

Ephesoft's batch list user interface
The review validate screen will present the operator with the next available batch for processing according to priority and batch date.

Ephesoft's review validate user interface
Ephesoft is capable of capturing content from a scanner attached to the user's workstation. What is unique about the web scanner is that no software needs to be installed on the workstation; Ephesoft uses a Java applet to send content directly to the server from any TWAIN-enabled scanner.
Ephesoft's web scanner user interface
The first time a user logs into the operator interface and selects the Web Scanner link on the side navigation, the user will have to choose a scanner. When the user selects the Source button, the user will be shown all TWAIN devices that have been installed on the user's workstation. Once the scanner is selected, the user can select the batch class to be used for processing and start the scan job.

The following are some important folders that are created when Ephesoft is installed. These are subfolders beneath the Ephesoft installation folder:
Apache 2.2: Apache can be used in front of Ephesoft for load balancing and failover. It is included in the installation but not configured.
Application: The Ephesoft Java web application is installed in this folder.
Application/i18n, themes: These folders contain files to customize and localize the Ephesoft application.
Application/native/RecostarPlugin: This plugin provides the image OCR functionality.
Application/WEB-INF/classes/META-INF: System configuration property files are stored in this folder.
Dependencies/gs, ImageMagick: Applications that Ephesoft uses for image manipulation are installed here.
Dependencies/licence-util, licensing: These folders contain tools to collect the information needed to generate and install license keys.
Dependencies/luke: Luke is a tool that helps troubleshoot problems with Lucene indexes.
JavaAppServer: This folder contains the Tomcat configuration for Ephesoft.
JavaAppServer/conf: This is where the contexts are defined for Ephesoft; it is where URLs are bound to java code.
EphesoftReports: The configuration and binaries for reporting are stored here.
SharedFolders/BC99: The configuration for each batch class is stored here. The contents of the batch class folder can be modified through the Folder Management interface by a batch class or system administrator.
In this chapter, we looked at the administrative and the operator functionality of Ephesoft. We also looked at the installation folder on the filesystem. It's time to put Ephesoft to work.
In the next chapter, you'll learn how to train the system to recognize your documents, extract content from them, and test the configuration.