


This recipe will help you understand Passbook from the perspective of both, a user and a Pass creator.
With iOS, Apple introduced the Passbook app as a central digital wallet for all the store cards, coupons, boarding passes, and event tickets that have become a popular feature of apps.
A company wishing to take advantage of this digital wallet and the extra functionality it provides, can use Apple's developer platform to create a Pass for their users.
To understand Passbook, we need to see a Pass in action. Download the example Pass from:
If you open this link within Mobile Safari, on an iPhone or iPod Touch running iOS, you will be presented with the Pass and the option to add it to your Passbook:

Alternatively, you can download the Pass on a Mac or PC and e-mail it to yourself, and then open the e-mail within the Mail app on an iPhone or iPod Touch. Tapping the Pass attachment link will present the Pass.
If you choose to add the Pass to your Passbook app, the displayed Pass will disappear, having been filed away within your Passbook. Now, click on the home button to return to the home screen and launch the Passbook app. In the app you will now see the Pass that was just added. It contains information specified by the app creator and can be presented when interacting with the company providing the service. Additional information can be placed on the back of the Pass. Tap the i button in the top-right hand corner of the Pass, to reveal this information.
The following diagram describes how Passes are delivered to a Passbook, and how these can be updated:
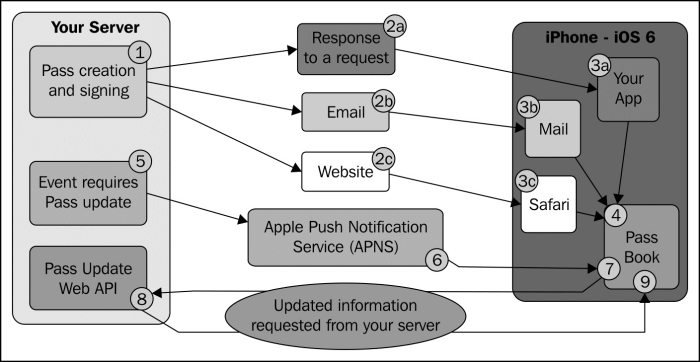
The process of creating a Pass involves cryptographically signing the Pass using a certificate and key generated from your iOS developer account. For this reason, the generation of the Pass needs to take place on a server, and then be delivered to Passbook either via your own app, as an e-mail attachment, or by embedding it in a website.
It's important to note that Apple does not provide any system for the Pass providers to authenticate, validate, or invalidate Passes. The Pass can contain barcode information, but it is up to the Pass provider to provide the infrastructure for reading and processing these barcodes.
Instead of just sitting in the Passbook app, waiting to be used, a Pass can contain location and time triggers, that proactively present the Pass to the user, serving as both a reminder and providing convenient access. For example, an event Pass could be set to appear 15 minutes before the start time, at the time when a user is likely to want to present their event Pass to an attendant. Alternatively, a coupon Pass could be presented as a user approaches their local store where the coupon can be redeemed.
Passes that have been added to Passbook can also be updated dynamically. For example, if the Pass is for a store card, a change to the card balance may require an update to the Pass. In the case of, for example an airline ticket Pass, a departure gate change should trigger a Pass update.
When a Pass needs to be updated, your server sends a push notification to the Passbook app on the user's device. This push notification is not displayed to the user.
Upon receiving this Push Notification, the Passbook app then makes a request to your server for the updated Pass information. Your server would then respond to the relevant request, and provide the updated information in the expected format.
When the Passbook App on the user's device receives the updated information, it silently updates the Pass. The next time the user looks at the Pass contained in the Passbook app, the updated information is displayed.
Support for Passbook is also built into OSX Mountain Lion (10.8.2). Pass files with the pkpass file extension will open in a preview window:
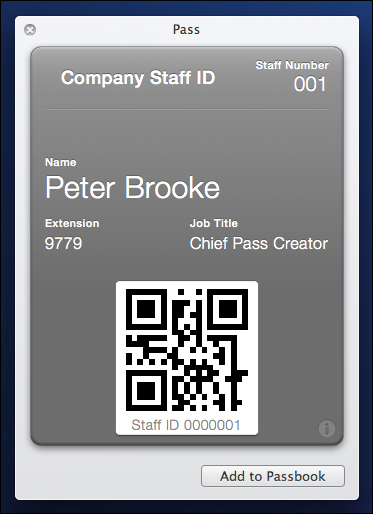
Clicking on the Add to Passbook button will place the Pass in the Passbook associated with the iCloud account set up in OSX system preferences.
The OSX Mail app and Safari also support embedded Passes.
When building a Pass, you can specify a relevant time and up to 10 relevant locations that will trigger a message to be displayed on the lock screen. The message looks similar to a push notification, however a Pass notification is less intrusive. When it is relevant to display, it doesn't vibrate the iPhone and it doesn't wake up the screen. The notification only becomes visible when the phone wakes up from sleep:

The option to specify relevant times and locations, and how far from the location the notification is triggered, is determined by the Pass type, as we will see later.
Some of the apps in the App Store using Passbook are as follows:
Hotels.com: This uses Passbook for room reservation details. It can be downloaded from http://appstore.com/hotelscom/hotelscom.
Starbucks: This uses Passbook for a store card. It can be downloaded from http://appstore.com/starbuckscoffeecompany.
Ticketmaster: This uses Passbook for event tickets. It can be downloaded from http://appstore.com/ticketmaster/ticketmaster.
United Airlines: This uses Passbook for boarding passes. It can be downloaded from http://appstore.com/unitedairlines.
For more details refer to Apple's Passbook documentation at https://developer.apple.com/passbook/.
This recipe shows how to set up your Pass type in Apple's provisioning Portal and generate the required files for code signing.
To get started with creating your own Pass, you will need a paid iOS developer account. If you intend to present the Passes within an existing iOS app, you will need access to the iOS developer account that publishes this existing app. In addition, many of these steps require apps and utilities only available on OSX, Keychain Access for example, which is used in the certificate creation process. Therefore, these steps should be undertaken using a Mac, running OSX.
If you intend to present Passes within an iOS App, but have not yet created the app, you will need to create an App ID within the Identifiers section of the iOS Developer Center.
Log in to the iOS Developer Center and navigate to Certificates | Identifiers & Profiles | Identifiers, or follow this link:
https://developer.apple.com/account/ios/identifiers/bundle/bundleList.action
Click the + button at the top-right hand corner.
Enter an app name in the App ID Description field:

Under Application Services, ensure that Passbook is enabled.
Under App ID Prefix, use Team ID unless you have a reason to explicitly specify this.
An App ID Suffix is a string identifier that is unique to your app. The provisioning portal will not allow you to specify a Bundle Identifier being used in another app. The suggestion is to use a reverse domain name style string. For example, throughout this book I have used the domain name http://passkit.pro, therefore the Bundle Identifier I have chosen is
pro.passkit.exampleas this will be the app ID for the example app.If you have a pre-existing app ID, you will need to enable Passbook for this app ID. From the app ID section of the provisioning portal, select the app ID, and note down the prefix, as we need it when specifying the Team Identifier of your Pass. Having done this, choose Settings:

Check the checkbox next to Passbook and click on Done. A warning will be displayed, informing that all new provisioning profiles created for this app ID will be enabled for Passes. This is presented as a reminder that pre-existing provisioning profiles will not be enabled for Passbook, until they are re-created. Therefore, if you have a pre-existing App published to the App Store, you will need to re-generate the App's distribution provisioning profile, re-build the App with this new provisioning profile, and submit an update of the App to the App Store. Until you do this, your App will not be able to add Passes into Passbook. When Passes have been correctly enabled for an app ID the Passes' indicator will turn green and be labeled as Enabled in the app ID summary screen:

Regardless of whether you intend to present your Pass in an app, you will now need to create a Pass Type ID. Follow the link on the left menu for Pass Type IDs or visit:
https://developer.apple.com/account/ios/identifiers/passTypeId/passTypeIdList.action
Click on the + button to create a new Pass Type ID. You will need to create a Pass Type ID for each type of Pass you intend to create. The types of Passes currently available to create are Boarding Pass, Coupon, Event Ticket, Store Card, and Generic. The Pass types are presented differently and have different functionality, as we will see. In our examples we will focus on building a Generic Pass. If you intend to create a Store Card type Pass and a Coupon type Pass, you will need to create a Pass Type ID for each:

For the description, choose a name that defines the type of Pass you are creating. For the main example later in the book, a Generic type Pass will be created, therefore in the example Pass Type ID above, the description Generic is used.
The Identifier has to start with
pass., then a reverse domain name string is suggested, with the type of Pass placed on the end. In the example above, I use the full app ID created earlier, with Pass Type of generic, giving the full Pass Type Identifier as follows:pass.pro.passkit.example.generic
With the Pass Type ID created, we will generate an associated cryptographic key and certificate, which is needed for authentication of the Pass. Select the Pass Type ID and note down the Pass Type ID, as this will be needed later when creating the Pass:

Click on the Settings button and follow the instructions to create a Certificate Signing Request. I will repeat the instructions below, with some suggestions to help avoid confusion later.
Launch the Keychain Access utility.
From the menu, select Keychain Access | Certificate Assistant | Request a Certificate from a Certificate Authority. In the Certificate Information window, enter the following:
User Email Address: Enter the e-mail address associated with your iOS developer account.
Common Name: Choose a name that relates to the Pass Type ID. This will be displayed next to the key in Keychain Access, so a common name that isn't specific enough can cause confusion. See the following screenshot, which is how this will be presented in Keychain Access after step 18.
CA Email Address: Leave this field blank
Request is: Choose Saved to Disk

Click on Continue and save your Certificate Signing Request. Then, in Safari (other browsers may have problems or incompatibilities that prevent you from choosing a file), click on Choose File and select the Certificate Signing Request that has just been generated. Click on Generate and wait for the pass Type certificate to be generated:

Once generated, click on Done and download your certificate. Open your downloaded certificate, which will launch Keychain Access and attach the certificate to the associated private key, which was created during the generation of the Certificate Signing Request:

The certificate and key pair should now be visible in Keychain Access. These now need to be converted into a format that can be used to correctly sign the Passes you will create. Select the certificate in Keychain Access, and from the menu choose File | Export Items, and choose an export location. You will be asked to provide a password to protect the exported items, you may also be asked for the administrator password as you are performing a task that requires administrator privileges.
You will need to use a command-line tool called OpenSSL to use the exported file to generate the key and certificate files that will be needed. This command line tool can be run from a built-in OSXutility called Terminal. To open Terminal, go to your Applications folder in Finder. Terminal is located in the Utilities folder.
Use the following Terminal commands to generate a
certificate.pemfile and akey.pemfile.openssl pkcs12 -in <Path to exported .p12> -clcerts -nokeys -out certificate.pem openssl pkcs12 -in <Path to exported .p12> -nocerts -out key.pem
On generating the
key.pem, you will be prompted to enter an import passport, which is the password that was set when exporting from Keychain Access. You will then be prompted for a pass phrase; this can be the same as the import password, but note that this pass phrase will need to provided when signing your Passes and so may form part of an automated script.In addition to the
certificate.pemfile andkey.pemfile generated above, the Apple WWDR intermediate certificate is also required. This can be found by going to the provisioning portal, in the Certificates section, click on the + button, or visit the following. The certificate is labeled Worldwide Developer Relations Certificate Authority under Intermediate Certificates.https://developer.apple.com/account/ios/certificate/certificateCreate.action
Once this has been downloaded, it also needs to be converted into a
.pemfile. Double-click on the WWDR certificate file, to load it into Keychain Access, and select the certificate in Keychain Access:
Then, from the menu choose File | Export Items, change the file format to Privacy Enhanced Mail
(.pem) and save as itwwdr.pem.
Apple's security model ensures that only registered iOS developers can create Passes and that Passes cannot be altered by a third party while being delivered to a user's device, without being detected, and rejected by Passbook.
The certificate creation process produces a Pass Type certificate that is tied to the Pass Type ID that it was created from, which in turn ties it to your developer account. This provides a method for verifying the contents of a Pass signed using this certificate, and therefore, a way of detecting any manipulation of the Pass by anyone other than the registered Pass creator.
Passes are built and customized by specifying the relevant information in JSON format. Certain graphical assets can also be provided to further customize the look and feel of the Pass.
As an example, we will build a Pass of a Generic type, to be used as an employee identification card. Once we understand the JSON structure of this type, we will see how other Pass types differ.
You can get the full JSON code, which we will use, from the following link:
http://passkit.pro/example-generic-json
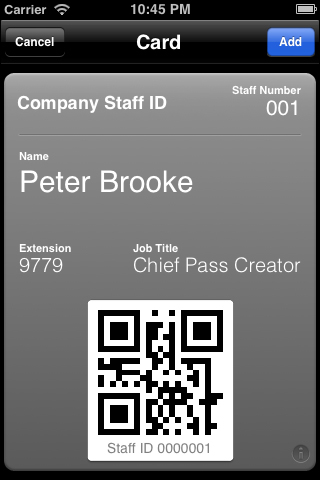
This will create a Pass that looks like the following two images.
The following screenshot shows the front of the Pass:
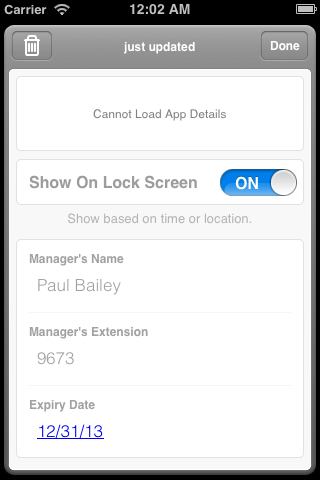
The back of the Pass is shown in the following screenshot:
Save the following JSON code to a file called
pass.json:{ "passTypeIdentifier" : "pass.pro.passkit.example.generic", "formatVersion" : 1, "teamIdentifier" : "YAXJZJ267E", "organizationName" : "Passbook Example Company", "serialNumber" : "0000001", "description" : "Staff Pass for Employee Number 001", "associatedStoreIdentifiers" : [ 375380948 ], "locations" : [ { "latitude" : 51.50506, "longitude" : -0.01960, "relevantText" : "Company Offices" } ], "foregroundColor" : "rgb(255, 255, 255)", "backgroundColor" : "rgb(90, 90, 90)", "labelColor" : "rgb(255, 255, 255)", "logoText" : "Company Staff ID", "barcode" : { "format" : "PKBarcodeFormatQR", "message" : "0000001", "messageEncoding" : "iso-8859-1", "altText" : "Staff ID 0000001" }, "generic" : { "headerFields" : [ { "key" : "staffNumber", "label" : "Staff Number", "value" : "001" } ], "primaryFields" : [ { "key" : "staffName", "label" : "Name", "value" : "Peter Brooke" } ], "secondaryFields" : [ { "key" : "telephoneExt", "label" : "Extension", "value" : "9779" }, { "key" : "jobTitle", "label" : "Job Title", "value" : "Chief Pass Creator" } ], "backFields" : [ { "key" : "managersName", "label" : "Manager's Name", "value" : "Paul Bailey" }, { "key" : "managersExt", "label" : "Manager's Extension", "value" : "9673" }, { "key" : "expiryDate", "dateStyle" : "PKDateStyleShort", "label" : "Expiry Date", "value" : "2013-12-31T00:00-23:59" } ] } }Replace the value for
passTypeIdentifier(currentlypass.pro.passkit.example.generic) with your own Pass Type Identifier created previously.Replace the value for
teamIdentifier(currentlyYAXJZJ267E) with your own Team Identifier, noted previously as the App ID Prefix.A number of graphical assets can be added to further customise the Pass. The only required graphical asset is an icon, which is used when displaying the Pass on the lock screen.
Create an icon for retina screens with dimensions of 58 px by 58 px, this should be named
icon@2x.png. Create a non-retina version with dimensions 29 px by 29 px, this should be namedicon.png. Example assets can downloaded from http://passkit.pro/example-generic-package.
The pass.json file we've just created contains the following top-level key/value pairs:
passTypeIdentifier: This ties the Pass to your developer account.formatVersion: Currently this is always 1, but it will allow Apple to vary the format in the future, while maintaining backwards compatibility.teamIdentifier: This identifier allows separate apps, by the same developer, to share data through the iOS keychain. For our purposes, this just needs to match the App ID Prefix specified when the Pass Type Identifier was created.organizationName: This is the name of your company or app, this should be how your users know and refer to you. It will be displayed as the title of the notification when a Pass is presented on the lock screen.serialNumber: This should contain a unique reference to the Pass, when updating a Pass, this serial number will be used to request the updated information from your server, and therefore this should uniquely identify only one Pass of this type. In the example of a staff identification Pass, this could be the employee reference number. While it's represented as a number in the example, it can be any text value.description: Used for accessibility features and so should briefly describe the Pass's use and should include enough information to distinguish it from other Passes of the same type.associatedStoreIdentifiers: An array of iTunes Store App Identifiers for Apps that are associated with this Pass. If you already have an app in the App Store, through which Passes will be provided, this should be included. An app's identifier can be found in iTunes Connect. If multiple identifiers are provided, the first one that is available for the device is used. This will present an App information banner on the back of the Pass. This banner will prompt the user to install your app or open the app if it is already installed.
The following two top-level key/value pairs determine under what circumstances the Pass is presented to the user on their lock screen.
locations: This is a list of locations that are relevant to the use of the Pass. This is represented as an array of dictionaries containing the location information. Only one location is provided in the example, however up to 10 may be specified. If the user is within a certain distance of this location, they may be presented with the Pass on their lock screen. The distance from the location that triggers this behavior varies depending on the Pass type, for a generic Pass type the distance is approximately 100 meters. Eachlocationsdictionary contains latitude, longitude, and relevant text that will be displayed on the lock screen when triggered. In thelocationsdictionary you can optionally specify altitude as well.relevantDate: Not included in the example above, as it didn't fit with the employer ID use case. This determines a time period within which the Pass is relevant. The value for this key should be text in the form of a W3C timestamp, for example, "2013-12-31T00:00-23:59", and can also include seconds if necessary. No timezone information should be included, as the timezone set in the device's settings is used.
The behavior of the two relevancy keys described above varies depending on the Pass type. The Pass type determines that for locations and relevantDate, which are required and which are options, it also determines the triggering criteria used in presenting a Pass on the user's lock screen.
An explanation of the differing behavior can be found in Apple's Passbook Programming Guide (Apple Developer account signin required) at:
foregroundColor: The foreground color of the Pass, value provided as an RGB triple.backgroundColor: The background color of the Pass, value provided as an RGB triple.labelColor: The color of the text displayed in the Pass, value provided as an RGB triple.logoText: The text shown in the top-left hand corner of the Pass. This will mostly likely be the name of your company, or an indication of the Pass's use.barcode: This dictionary contains the information to display in a barcode and how to display it. The Pass format supports automatic creation of 2D barcodes in one of the following formats:PKBarcodeFormatQRPKBarcodeFormatPDF417PKBarcodeFormatAztec
Message encoding will typically be
iso-8859-1, unless you know that another encoding format is supported by your barcode scanner.The value to be encoded into the barcode should be defined with the message key and the
altTextkey used to optionally display a more human readable description of the barcode information.generic: This top-level key determines the type of Pass that you will be creating. The types currently available are:
genericboardingPasscouponeventTicketstoreCard
Your choice of Pass type effects many things about the Pass, including overall style, text layout, available graphical asset options, and lock screen behavior. Apple has optimized the Pass types for their individual use cases, so try to pick a Pass type that most closely represents your Pass's use case. If none of the specific Pass types are appropriate, then the generic Pass type can be used.
The Passbook Programming Guide describes the different layout configurations for each Pass type:
Within the Pass type top-level key is a dictionary, containing arrays of various display groups, including headerFields, primaryFields, secondaryFields, and backFields, which are displayed according to Pass type. Each group contains an array of dictionaries, specifying key, label, and value. The label and value fields are displayed on the Pass, while the key field should be unique within your Pass format, and will be used when updating a Pass.
Graphical assets can be provided to further visually customize your Pass. The icon.png asset is required, but the following assets can optionally be included in the Pass package:
logo.pngbackground.pngthumbnail.pngfooter.pngstrip.png
All assets should include a retina version that is twice as wide and twice as high, with @2x at the end of the filename. Therefore, for the icon, you provide the following files:
icon.png: 29 px width x 29 px heighticon@2x.png: 58 px width x 58 px height
The following table provides the available size of each asset, and the space available for each Pass type. The sizes are provided as pixels width x pixels height:
|
Pass Type |
icon 29 x 29 |
logo 160 x 50 |
background 180 x 220 |
thumbnail 90 x 90* |
strip ** |
footer 286x15 |
|---|---|---|---|---|---|---|
|
Generic |
Required |
Optional |
Not used |
Optional |
Not used |
Not used |
|
Boarding pass |
Required |
Optional |
Not used |
Not used |
Not used |
Optional |
|
Coupon |
Required |
Optional |
Not used |
Not used |
Optional |
No |
|
Event ticket |
Required |
Optional |
Optional |
Optional |
Not used |
Not used |
|
(with strip) |
Not used |
Not used |
Optional | |||
|
Store card |
Required |
Optional |
Not used |
Not used |
Optional |
Not used |
* 90px x 90px is the space available, but the graphic must be either 60px x 90px, or 90px x 60px
** Allowed size for the strip asset is 312 x 84 for Event tickets, 312 x 110 when a square barcode is used and 312 x 123 otherwise.
Further details of Pass type layout structures can be found in the Apple Passbook Package Format Reference (Apple Developer account signin required) at:
Now that you have built and customized your Pass, you will need to digitally sign the Pass package contents, so that it will be accepted by the Passbook app.
We will make use of the certificate and keys generated previously. This will sign the Pass with your developer identity, allowing your Pass to be validated and used with the Passbook app:

The graphical assets for your Pass and the pass.json file should be in their own folder, with the .pem files created earlier, in a higher level folder.
Here is an example of the folder structure:
Save the following JSON code into a file called
manifest.json.{ "pass.json":"4f5cef0afe8171f736de367b202ca054abfb3663", "icon.png":"8c58c1fbf11f944c03b5cd5e41dc6d301263c1f7", "icon@2x.png":"ae3395b5e252610b02d51d52a534c700837ced2d" }
This file should contain a JSON dictionary, where each key is the filename of a contained in your Pass package, and the value is the SHA1 hash of that file. To determine the SHA1 value, open your Terminal App, and enter the following commands:
cd [Path to the folder containing the Pass package]
opensslsha1 *
Place the resulting hash values into the
manifest.jsonfile.The manifest file then needs to be digitally signed, to produce a signature file, which will verify that the contents of the Pass have not been modified. This can be done using the following Terminal command. (Note that this requires administrator privileges, so you will need to enter your administrator password.):
sudo open sslsmime -binary -sign -certfile ../signing/wwdr.pem -signer ../sgning/certificate.pem -inkey ../signing/key.pem -in manifest.json -out signature -outform DER -passin pass:[Pass phrase provided when creating the key.pem]If your folder differs from the preceding suggestion, you will need to alter the paths to the
.pemfiles accordingly.Your package folder should now include:
Graphical assets
pass.jsonmanifest.jsonThe
signaturefile
Place the files in your package folder into a ZIP file. This can be done by selecting all the files and navigating to File | Compress from the Finder menu.
Rename the resulting ZIP file to change the file extension to
.pkpass. If you have filenames set to be hidden, you may be changing the filename and not the extension. To show filename extensions, select Finder | Preferences from the menu and enable Show all filename extensions.
Congratulations! You now have a customized and signed Pass.
The goal of the signing process is to prevent the Pass from being modified by a third party between leaving your servers and being received by the user. When the manifest.json file is created, each file in the Pass package has its hash value calculated and stored. If the contents of any of the files were to change, its hash value would also change, therefore this manifest.json file represents an easy way of checking that the Pass package files have not been modified.
However, this on it's own is not enough, as a third party could modify the manifest.json file when they modify other files in the package. To guard against this, public/private key encryption is used to produce a signature file from the manifest.json. Your private key, to which only you have access, was used to generate the file, but anyone with access to the public key can use it to verify that the manifest file hasn't been tampered with.
Using this process, the user's device can be sure that the source of the Pass it receives is genuine and hasn't been altered in transit.
Because of this verification, it is important that only files specified in the manifest.json file are included in the zipped file. Individually selecting the files in Finder, and then choosing compress from the menu, is a good way to ensure this. Be careful if you choose to zip the entire contents of a folder, possibly through a Terminal command, as this can include additional hidden files like .DS_Store.
Changing the file extension tells the system that it should be treated as a Pass instead of a regular ZIP file.
It's important to understand the process and steps involved in signing a Pass, however it is unlikely that it will be feasible to manually perform these steps for every Pass that you create. Instead they should form part of an automated system for producing your user's Passes.
Pre-built Pass creation implementations are starting to emerge, including this PHPserver code:
Passes can be delivered as an e-mail attachment, allowing the recipient to view the Pass and add it to their Passbook app.
The Pass e-mail creation script, used below, can be downloaded from the following location:
Save the following code into a file named
send_pass_by_email.rb.require 'net/smtp' # This script accepts the following arguments: recipients name, recipients email address, path to Pass. # Example usage: # ruby send_pass_by_email.rb "Peter Brooke" pbrooke@passkit.pro ../Pass-Example-Generic/Pass-Example-Generic.pkpass # Retrieve command line arguments recipientName = ARGV[0] recipientEmail = ARGV[1] passFilePath = ARGV[2] # Setup template email values senderName = "Passbook Example Company" senderEmail = "info@passkit.pro" emailSubjectText = "New Employee Pass" emailBodyText = "Please find attached your new employee Pass" # Setup SMTP settings smtpDomain = "TO DEFINE. Eg. gmail.com" smtpLogin = "TO DEFINE. Eg. ......@gmail.com" smtpPassword = "TO DEFINE" # Read file and base64 encode fileContent = File.read(passFilePath) encodedContent = [fileContent].pack("m") # The is used to separate the MIME parts, it can be anything # as long as it does not appear elsewhere in the email text boundaryMarker = "SEPARATINGSTRINGNOTFOUNDELSEWHERE" # Setup the email headers. headers =<<EOF From: #{senderName} <#{senderEmail}> To: #{recipientName} <#{recipientEmail}> Subject: #{emailSubjectText} MIME-Version: 1.0 Content-Type: multipart/mixed; boundary=#{boundaryMarker} --#{boundaryMarker} EOF # Setup the email body body =<<EOF Content-Type: text/plain Content-Transfer-Encoding:8bit #{emailBodyText} --#{boundaryMarker} EOF # Setup the Pass attachment with the correct MIME Encoding attachment =<<EOF Content-Type: application/vnd.apple.pkpass; name=\"#{passFilePath}\" Content-Transfer-Encoding:base64 Content-Disposition: attachment; filename="#{passFilePath}" #{encodedContent} --#{boundaryMarker}-- EOF completeEmail = headers + body + attachment # Send email using your SMTP settings smtp = Net::SMTP.new 'smtp.gmail.com', 587 smtp.enable_starttls smtp.start(smtpDomain, smtpLogin, smtpPassword, :login) do smtp.send_message(completeEmail, senderEmail, recipientEmail) endUnder the section headed # Setup template email values, enter relevant values for the sender name, sender e-mail address, subject, and e-mail body.
Under the section header # Setup SMTP settings, enter the details of the SMTP e-mail server and account details that will be used to send the e-mail. These can be found from the setting of your e-mail client, or you can use a free e-mail service like Gmail.
This Ruby script accepts three arguments, the recipient's name, the recipient's e-mail address and the path to the Pass to be attached. Open the Terminal and send a Pass-enabled e-mail by calling the script with appropriate arguments, as shown in the following example:
ruby <Path to send_pass_by_email.rb> "Peter Brooke" pbrooke@passkit.pro <Path to Pass to attach .pkpass>
The following screenshot shows what the resulting e-mail will look like on iOS:
,

If you sent this e-mail to an e-mail account you have access to, open this e-mail in the Mail app on an iPhone running iOS 6 or Mail on OSX 10.8.2, and you will be given the option to open and view the Pass and add it to Passbook.
The script used above is written in Ruby, as the Ruby interpreter is installed by default on OSX.
Sending a Pass as an attachment that will be understood by iOS and OSX, and presented to the user, requires it to have a specific MIME Type specified in the attachment. This MIME type is the following:
application/vnd.apple.pkpass
This script, or something similar could be used to automate the delivery of Passes to a large number of users, through email.
You can deliver a Pass to your users by linking to it from your website, for instance, from a confirmation page.
You will need access to your own web server, or shared hosting space with FTP access. The following instructions are for an Apache web server. Mac OSX does come with an Apache web server built in, which can be used. This used to be available under the Sharing menu in System Preferences, however since OSX 10.8 it can only be activated by the command line. You can run the following command from the Terminal, to start the web server:
sudoapachectl start
The root for this server can be found at /Library/WebServer/Documents/.
The files we will create can be downloaded from the following location:
Save the following MIME type instruction into a file named
htaccess:AddType application/vnd.apple.pkpass pkpass
Create an HTML page linking to a Pass, shown as follows, and save it as
index.html:Get your employee pass <a href='Pass-Example-Generic.pkpass'>HERE</a>
Upload your
htaccessfile, theindex.htmlfile and the Pass file to a publicly accessible directory on your web sever. If you are running your web server locally, place these files within the web server's root folder.Rename the
htaccessfile to.htaccess. (The file may disappear, as files starting with a.are treated as hidden files.)With Mobile Safari on your iPhone, visit the URL for the
index.htmlfile on your web server.Follow the link to your Pass and Mobile Safari will display the Pass so it can be added to Passbook.
For the Safari or Mobile Safari browser to understand a Pass file and display it to the user, your Web server needs to present the files with the MIME type of application/vnd.apple.pkpass.
The .htaccess file tells the web server how to treat files in the folder in which resides. In this case it is instructing the web server to inform any visiting web browser that files with the file extension pkpass are to be treated as Passes. The .htaccess must be placed in each folder that contains a Pass.
Only users of a browser that supports this MIME type will be present with the Pass dialog, the rest will be prompted to download the Pass. While Safari and Mobile Safari support Passes, other third party browsers may not. However, the current versions of Chrome on iOS and the in-app browser from the Facebook app do support Pass display.
If you wish to add server-wide support of the Pass MIME type, you can add an entry to your Apache web server's mimes.type file, this is located in the conf directory. Open up the file in a text editor and add the following line in the correct alphabetical position:
application/vnd.apple.pkpass pkpass
You will need to restart the server for this to take effect.
Passes can be delivered through a companion iOS app. The app will provide a UI, using Apple's PassKit framework, allowing the user to view a Pass and choose to add it to their Passbook.
To follow these steps, it is assumed that you have some experience of Objective-C and creating iOS apps.
The example project, created as follows, can be downloaded from the following location:
http://passkit.pro/example-app
This app does not use Automatic Reference Counting (ARC), if you are using the code in an ARC environment, remove any calls to releasing objects.
Open Xcode and create a new, single view project. The setup options used for the example project are shown in the following screenshot:

In the Target settings, under Build Phases, expand the Link Binaries With Libraries section, and click on the + button. Search for the PassKit framework and add it. After this, the list of linked libraries should look like this:

Add your previously created Pass to the project by dragging the file to the project navigator, in the example, this Pass is called
Pass-Example-Generic.pkpass.In PKEViewController.h, replace the existing code with the following: #import <UIKit/UIKit.h> #import <PassKit/PassKit.h> @interface PKEViewController : UIViewController<PKAddPassesViewControllerDelegate> @property (nonatomic, retain) IBOutletUIButton *addPassButton; - (IBAction)addPassButtonPressed:(id)sender; @endIn PKEViewController.m replace the existing code with the following:
#import "PKEViewController.h"

@interface PKEViewController ()

@property (nonatomic, retain) PKPass *genericPass;

@end

@implementation PKEViewController

- (void)viewDidLoad
{
    [super viewDidLoad];
  // Do any additional setup after loading the view, typically from a nib.

    // Create the PKPass from the bundled file
    // In a real App this may be retrive from the network.

NSString *passFilePath = [[NSBundle mainBundle] pathForResource:@"Pass-Example-Generic" ofType:@"pkpass"];
NSData *passData = [[NSDataalloc] initWithContentsOfFile:passFilePath];
NSError *passError;
    _genericPass = [[PKPass alloc] initWithData:passData error:&passError];
    [passData release];

}

- (void)didReceiveMemoryWarning
{
    [super didReceiveMemoryWarning];
    // Dispose of any resources that can be recreated.
}

- (void)dealloc {

    [_addPassButton release];
    [_genericPass release];

    [super dealloc];
}

#pragma mark - IBAction Methods

- (IBAction)addPassButtonPressed:(id)sender {

    if (![PKPassLibrary isPassLibraryAvailable]) {

NSLog(@"Passbook not available on this device");
        return;

    }

PKAddPassesViewController *addPassViewController = [[PKAddPassesViewController alloc] initWithPass:self.genericPass];
addPassViewController.delegate = self;

    [self presentViewController:addPassViewController animated:YES completion:^{

  NSLog(@"Add Pass view controller presented");

    }];

    [addPassViewController release];
}

#pragma mark - PKAddPassesViewControllerDelegate Methods

- (void)addPassesViewControllerDidFinish:(PKAddPassesViewController *)controller {

    // Check if the Pass is now in the Pass Library

PKPassLibrary *passLibrary = [[PKPassLibrary alloc] init];

    if ([passLibrary containsPass:self.genericPass]) {

        // If the Pass is now in the Library, we can't re-add it, only view it.
        [self.addPassButton setTitle:@"View Pass in Passbook" forState:UIControlStateNormal];

    }

    [self dismissViewControllerAnimated:YES completion:^{

  NSLog(@"Add Pass view controller dismissed");

    }];

}

@end
Open PKEViewController.xib, place a
UIButtonwith the title Add Pass to Passbook on the view and connect it toIBOutletaddPassButton and IBActionaddPassButtonPressed for the sent event Touch Up Inside:
Run the project in the iPhone Simulator. Tapping on the Add Pass To Passbook button will launch the PassKit UI, which displays the Pass and would allow the user to add the Pass to the Passbook app. At this stage however, the Pass will not be successfully added to the Passbook app as we need to use the correct provisioning profile.
To build the app to an iPhone, we will need an appropriate provisioning profile. Therefore, you need to log in to the Apple Developer Center:
https://developer.apple.com/account/ios/profile/profileList.action
Under Provisioning, click on the New Profile button, and follow these steps:
Choose a name for the development profile.
Tick next to your certificate.
Select the App ID in which you enabled Passes and generated certificates for previously.
Choose the devices you will be using.
Click on Submit.
Once generated, download the provisioning profile and open it to load it into Xcode.
In Target settings, under Info, ensure that the Bundle Identifier matches the app ID that was previously created and chosen in the profile creation.
In Build Settings, under Code Signing Identity, ensure the profile created above is selected under Debug.
Build to the device, and test that the presented Pass is successfully added to Passbook.
The example app uses the PassKit framework to present a framework supplied view controller to the user, listen for a delegate callback when the user finishes interacting with the view controller and changes the button's title if the Pass was successfully added to Passbook.
Using the following code, the PKPass object is created from a NSData object:
NSString *passFilePath = [[NSBundle mainBundle] pathForResource:@"Pass-Example-Generic" ofType:@"pkpass"];
NSData *passData = [[NSDataalloc] initWithContentsOfFile:passFilePath];
NSError *passError;
_genericPass = [[PKPassalloc] initWithData:passData error:&passError];
[passData release];
For the sake of simplicity, in this example, the Pass is loaded from a file bundled with the app. It is much more likely in a real-world app that a Pass will be downloaded from a network resource.
PKPassLibrary provides access to the Passes contained in Passbook. It also provides a class method called isPassLibraryAvailable that will tell you if Passbook exists on that device, for example Passbook is not present on iPads. This method is used in the example app to decide whether to show the Pass view controller.
if (![PKPassLibrary isPassLibraryAvailable]) {
    NSLog(@"Passbook not available on this device");
    return;
}Further documentation of the PassKit framework can be found in the following location:
https://developer.apple.com/library/ios/#documentation/UserExperience/Reference/PassKit_Framework/
Apple provides a mechanism for updating a Pass that has been added to Passbook by a user. This process involves sending a push notification to the user's device, and implementing a REST API that will respond to the device's requests and provide the relevant updated Pass information.
The first stage in updating a Pass is to send a Push Notification to the user's device to prompt the Pass update process. The process for sending Apple Push Notifications (APNs) is outside the scope for this book, and the assumption will made that the facility to send the appropriate APN is available. Further information on APNs can be found in Apple's documentation:
In implementing the required REST API, we will be making use of the GIT source control management tool. If you don't already have GIT installed and setup, follow the GitHub tutorial:
Open Terminal and change the directory to the directory that is to contain the server code.
We will be using the open source example Passbook server built in Ruby on Rails by Mattt Thompson (https://github.com/mattt), so we first need to clone the server code from the repository, with the following command:
git clone https://github.com/keefmoon/passbook_rails_example.gitYou will need to install Xcode command-line tools, you can do this by opening Xcode and on the menu, going to Xcode | Preferences | Download and clicking on Install next to Command Line Tools.
Change to the directory containing the code and prepare the Ruby App:
cd passbook_rails_example
bundle
If you get an error related to Postgres, use the following command to install it separately and run the
bundlecommand again. (This command will require administrator access.)sudo env ARCHFLAGS="-arch x86_64" gem install pgDepending on the version of Ruby installed, you may have an extra command to enter. Mountain Lion comes bundled with Ruby 1.8.7 and will require the extra command, but if you have updated to version 1.9.2 or greater, then the following command is not required. (Administration access will be required.):
sudo gem installrdoc-data
sudo rdoc-data --install
Open
[path to server code]/db/seeds.rbin a text editor. The content in this file will be used to populate the database initially, therefore replace the example data with details that match your previously created Pass, ensure that the pass type identifier and serial number are correct, but change at least one part of the Pass data. In the following example, I have changed Peter Brooke's job title fromChief Pass Creator, toCTO.pass = Passbook::Pass.create(pass_type_identifier: "pass.pro.passkit.example.generic", serial_number: "0000001", authentication_token: "UniqueAuthTokenABCD1234") pass.data = { staffName: "Peter Brooke", telephoneExt: "9779", jobTitle: "CTO", managersName: "Paul Bailey", managersExt: "9673", expiryDate: "2013-12-31T00:00-23:59" } pass.save pass.registrations.create(device_library_identifier: "123456789", push_token: "00000000 00000000 00000000 00000000 00000000 00000000 00000000 00000000")In the
seeds.rbfile, specify a unique authentication token for each Pass you add. in the preceding example UniqueAuthTokenABCD1234 is used, although this would be automatically generated in a real-world use.Deploying this server code to the free Heroku service is the quickest and easiest way to make it available for testing. Visit http://www.heroku.com and sign up for an account.
Download and install the HerokuToolbelt for OSX:

Open Terminal and log in to Heroku. Then create a new Heroku App and push the server code to it. Heroku will generate a name for your App; for example http://frozen-bayou-9500.herokuapp.com/.
heroku create
git push heroku master
heroku run rake db:createdb:migratedb:seed
For the Passes we have previously created to update using the server, we need to include the relevant information in the Pass. (In the following code sample, note that the sample web server has the additional path component of
passbookin thewebServiceURL.) Open thepass.jsonpreviously created and add two top-level keys with the relevant values, reproduce themanifest.json, reproduce thesignaturefile, and re-zip the package files."authenticationToken" : "UniqueAuthTokenABCD1234", "webServiceURL" : "http://frozen-bayou-9500.herokuapp.com/passbook",
The server we have implemented above is to facilitate the Pass update process, which involves back and forth communication between the user's device and your server.
When a user adds a Pass to Passbook that contains webServiceURL and authenticationToken keys, the device registers with your server, passing a device library ID that is used to authenticate further communication, the authentication token to authenticate this initial communication, and a push token to be used when sending an APN.
When information contained in the Pass changes, in our example this may be Peter Brooke being promoted, your server sends an APN to the device, using the push token it received. (The sending of this push notification is outside the scope of this book.) This prompts the device to ask your server for a list of all the updated Passes since it last asked. From this list, the device asks for updated information for each of the Passes in turn. Finally, the server responds with the updated Pass information and the updated Pass is presented to the user.
Further information on the Pass update process can be found in the Apple documentation:
There is also a full specification for the REST API that the server above implements:
When testing the web service endpoints in a browser, it is necessary to include the following request header in addition to any authorization header described in the specification:
Accept: application/json
In a live production setting, the web service must use HTTPS, however you can allow Passbook on your device to use HTTP for development testing. If your device has been enabled for development using Xcode, you will have an additional Developer section under the app settings. In the Developer section, under PassKit Testing, switch on Allow HTTP Services: