Beef up your network security with Citrix!
With millions of devices being plugged in to the Internet, more and more computing tasks are now handled online, from providing secure payment gateways to downloading entertainment to personalized search engines. This book aims at going past antivirus patches and encrypted communication that earlier summed up a secure environment. It walks you through setting up an end-to-end Citrix solution, highlighting the security features that each has to offer.
Implementing a De-Militarized Zone (DMZ) within any network is a good measure to protect servers that are on an internal or trusted network. This recipe will show a step-by-step implementation of NetScaler in a single-hop DMZ environment and multi-hop DMZ setup.
The Citrix NetScaler and Access Gateway are one and the same device but with different licenses. The Access Gateway functionality can be enabled with the Access Gateway universal license. The universal license, by default, enables five users to connect concurrently. Additional concurrent user licenses can be obtained for the number required (for example, a 100-user license).
Before the task begins, please make sure you have configured NetScaler with the Netscaler IP address, that is for management purposes (it will prompt in the initial configuration), and without which you will not be able to access the device. Also, the latest NetScaler devices come with two management interfaces; take care to not plug them into the same virtual local area network (VLAN), which would cause loops and broadcast storms.
Inbound Internet traffic to your network should be avoided at all costs; hence it is always recommended to set up NetScaler in a DMZ zone that is isolated from the trusted network (your internal network) and the Internet. It acts as a buffer zone between two enemies and does not allow direct contact between them.
This can be achieved by physically locating the web servers that will be accessed by the public network in a different subnet and by blocking any traffic from going beyond the DMZ to the trust zone, or by configuring the internal and DMZ subnets in two different VLANs, or having NetScaler's legs in two boats—one in DMZ and the other in the trust network. We shall discuss each of these options in the following recipes:

LB-Basic_LB_Topology
We will now be configuring the DMZ and internal zone in different VLANs:
Configure the virtual server IPs that are accessible over the Internet. The client reaches out to this IP address and establishes a TCP connection in order to access the backend servers.
Configure the VIP and its corresponding services and the server object applicable.
Go to Load Balancing | Virtual Servers:

By default, NetScaler assigns monitors to each of the services configured; load balancing, by default, is the least connection.
Please note to configure Subnet-IPs (SNIPs) while creating multiple VLANs and bind them to the respective VLANs.
We will now configure SNIP/MIP.
Go to System | Networking | IP (here you can see all the types of configured and configurable IPs):

Note
SNIP/MIP should be configured in the same subnet as the backend servers that are being load balanced.
A multi-hop DMZ setup has several layers of firewall protection that provide extra security to the internal network. It divides the DMZ into two stages, hence two access gateways need to be deployed in this scenario, one for each stage:
The access gateway needs to be configured with a default gateway or static routes to reach the internal network, so that users can access resources in the network. When clients connect, they can access the resources using the Citrix XenApp online plugin and not the access gateway plugin. Only ICA traffic is supported in this setup.
A simple way to accomplish this is to run the access gateway wizard, which will help in creating the virtual server and binding the certificates. External servers need to be configured for authentication and authorization. A detailed working on access gateway integration will be discussed later in the access gateway integration for the Citrix XenApp and XenDesktop (Become an expert) recipe.
The first recipe is pretty straightforward and has NetScaler in the DMZ and the server farm in the internal network. The VIP will be configured with a public IP and we can further restrict its access to the Internet by applying ACLs and also making use of external authentication.
In the second option, the access gateway in the first DMZ receives the client connections and redirects these connections to the web interface in the second DMZ. The access gateway in the second DMZ is a proxy that allows ICA traffic to traverse the second DMZ, to reach the backend server farm.
This section dwells on a few miniscule must-know facts on the Citrix NetScaler and its deployment.
Whenever the load balancing method is selected as metric-based (for example, least connection), NetScaler initially starts with Round Robin for what is known as the slow start period. For each new server added, it will initially be round robin for the slow start period. At this time, the <show lb server> output will show round robin as the current method.
In the NetScaler Configuration Utility GUI under System | Licenses, there will be a tick mark for all the licenses that are activated in the box. Features that are not enabled but have licenses would be shown as Capture_notenabled:

Capture_notenabled.
The licenses can be downloaded from My Citrix (http://citrix.com/downloads).
The first thought that comes to mind when somebody says AAA? Batteries? Credit Ratings? No, it is the user authentication, authorization, and auditing feature, and it is all about having Netscaler/access gateway to manage access controls rather than an admin managing the access controls separately for each app. This recipe shows how NetScaler controls the access for the XenApp farms on your private network.
To configure AAA on NetScaler, you need to start by creating an SSL certificate-key pair and bind it to the AAA vserver (the certificate request and the key can be generated on NetScaler and submitted to the Certificate Authority, also knows as CA, to receive the cert-key pair). The AAA vserver should then be associated with any traffic-management vserver (load balancing [LB] or content switching [CS]). DNS needs to be configured to assign hostnames to both the AAA vserver and the traffic management vserver; please note that both the hostnames should be in the same domain, while creating the cert-key pair uses the appropriate domain in the subject name. (Self-signed certificates will not work for AAA, as they are used for testing purpose only.) The procedure of configuring a cert-key request and binding it to a vserver and the DNS configuration will be shown in detail in the following sections of this chapter.
The AAA functionality can be used for simple traffic management as well as for virtual private network (VPN) functionality!
Triple A comes across as an important feature of the Citrix Netscaler, as it can be used from a simple load balancing environment to VPN, coupled with a wide range of external authentication types. In this section, we shall see how to set up a AAA vserver from scratch that can be bound to a LB or Content Switching vserver:
Create a cert-key pair by configuring the certificate signing request on NetScaler. Go to SSL, click on Certificate Signing Request (CSR), and follow the instructions to generate a CSR. Similarly, you can create the RSA key. After generating the CSR and key, both need to be submitted to the CA, which in turn will produce the cert-key pair. The cert-key pair then needs to be loaded on the NetScaler box through SCP/FTP and so on.
Configure the AAA vserver and bind the cert-key pair to it. In the AAA vserver, the Authentication tab is where the external authentication profile and policy needs to be configured. We can use any flavor of LDAP or RADIUS. Further more, you can add a session policy to increase/decrease the timeouts and the Single sign-on (SSO) functionality to the web applications.
Note
With SSO, a user has to log in just once and he would have access to multiple different applications and systems. The user credentials will be internally stored and these credentials will be granted to the applications that request them.
To add the SSO functionality, run the following commands:
>add tm sessionAction <sso_act > -SSO ON -ssoCredential PRIMARY -ssoDomain aaa.test.com>add tm sessionPolicy <sson-act_pol> ns_true sson>bind authentication vserver AAA-vip -policy sson-pol -priority 1
Done
The AAA vserver is then bound to the LB or CS server. The LB/CS vserver should be on HTTP and on the Advanced tab of the traffic management server. The authentication vserver needs to be bound and the domain name of the AAA vserver should be specified. The following screenshot shows the CLI output of the LB vserver after the configuration and binding of the the AAA vservers:

A step-by-step working of the client to server authentication through Netscaler will be shown using HTTP headers (an HTTP header trace taken on the IE browser was used for the setup here):
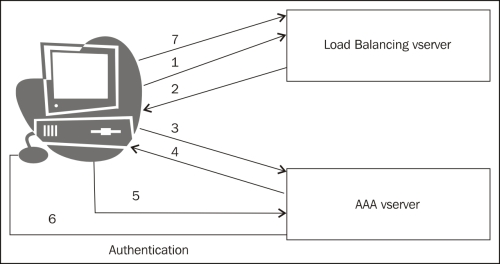
The client sends an HTTP request to the LB vserver, the LB vserver sends a 302 redirect to the AAA vserver.
In this case, we can see that
www.a.abc.comand www.abc.com belong to the same domain name.The following code is the output of an HTTP header trace taken during the authentication phase (a simple HTTP header trace or a Mozilla header tool that can be downloaded for capturing the HTTP headers):
GET / HTTP/1.1
Host: a.abc.com
User-Agent: Mozilla/5.0 (Windows NT 6.1; rv:14.0) Gecko/20100101 Firefox/14.0.1
Accept: text/html,application/xhtml+xml,application/xml;q=0.9,*/*;q=0.8
Accept-Language: en-gb,en;q=0.5
Accept-Encoding: gzip, deflate
Connection: keep-alive

HTTP/1.1 200 OK
Content-Length:681
Cache-control: no-cache, no-store
Pragma: no-cache
Content-Type: text/html
The AAA vserver then sends a page to the client for getting the authentication credentials:
HTTP Header trace:
POST /cgi/tm HTTP/1.1
Accept: image/jpeg,*/*
Accept-Language: en-US
User-Agent: Mozilla/4.0 (compatible; MSIE 8.0; Windows NT 6.1;
Content-Type: application/x-www-form-urlencoded
Accept-Encoding: gzip, deflate
Host: abc.com
Content-Length: 55
Connection: Keep-Alive
Cache-Control: no-cache
Referer:
HTTP/1.1 302 Object Moved
Location: /vpn/tmindex.html
Set-Cookie: NSC_TASS=03110d1ceac81fd1f5317e3415d75c58;Secure;HttpOnly;Path=/
Set-Cookie: NSC_TEMP=xyz;Path=/;expires=Wednesday, 09-Nov-1999 23:12:40
Set-Cookie: NSC_TEMP=xyz;Path=/;Domain=apac.lab;expires=Wednesday, 09-Nov
Connection: close
Content-Length: 536
Cache-control: no-cache, no-store
Pragma: no-cache
Content-Type: text/html

GET /vpn/tmindex.html HTTP/1.1
Accept: image/jpeg, application/x-ms-application, image/gif, application/xaml+xml, image/pjpeg, application/x-ms-xbap, application/x-shockwave-flash, application/vnd.ms-powerpoint, application/vnd.ms-excel, application/msword, */*
Accept-Language: en-AU
User-Agent: Mozilla/4.0 (compatible; MSIE 8.0; Windows NT 6.1;
Cookie: NSC_TMAA=802662f5eb2a319f29b9af61086313f3; NSC_TMAS=b8e51a409ec3c39541378edb91e80d50; NSC_TASS=03110d1ceac81fd1f5317e3415d75c58
Accept-Encoding: gzip, deflate
Host: abc.com
Connection: Keep-Alive
Cache-Control: no-cache
Referer:

HTTP/1.1 200 OK
Date: Sat, 22 Sep 2012 08:39:45 GMT
Server: Apache
Last-Modified: Tue, 11 Sep 2012 22:48:07 GMT
ETag: "40f8-16ae-4c974de21f7c0"
Accept-Ranges: bytes
Content-Length: 5806
Keep-Alive: timeout=15, max=100
Connection: Keep-Alive
Content-Type: text/html
Cache-Control: no-cache
After the authentication is successful, the client gets redirected back to the LB vserver. This time, the AAA sends a cookie to the client so that the subsequent requests from the client would contain the same cookie. NetScaler looks at the cookies and directs the request to the appropriate backend service (according to the LB method configured). At any point in time, the following screenshot shows the CLI command, which when entered will show the number of active users connected:

The following diagram is a pictorial representation of the authentication request between the LB and AAA vserver:
This section will throw some light on debugging the external authentication issue.
Note
The ns-server certificate present on NetScaler is used only for secure management access of NetScaler. The management access can be restricted to HTTPS (secure) only, or both HTTP and HTTPS. Similarly, you can add either MIP or SNIP for a GUI secure access.
There are a few common issues that could be listed for for AAA:
The certificate has to be trusted; if you are connecting with a security exception, AAA will not work. Another important note would be to check for certificate expiry.
The
NSC_TMAAcookie should be preserved by the browser for successive transactions by the client in either the same or different browsers. This can be verified by taking an ethereal or wireshark capture on the client machine.When there are multiple applications that need to be accessed in the same session and each of them open a new connection, the client might face an issue of authenticating multiple times. The same holds true if the browser is not able to preserve the cookie. In such conditions, there is an option on NetScaler to enable persistent cookies. This setting is available globally or can be restricted to only certain traffic policies that are be bound to the AAA vserver.
The following is a CLI command to enable persistent cookie setting on NetScaler for AAA traffic:
>set tm sessionParameter -SSO ON -httpOnlyCookie NO -persistentCookie ENABLED -persistentCookieValidity 30 [GLOBAL SETTING]
The following is a CLI command to enable a debug for AAA(CLI):
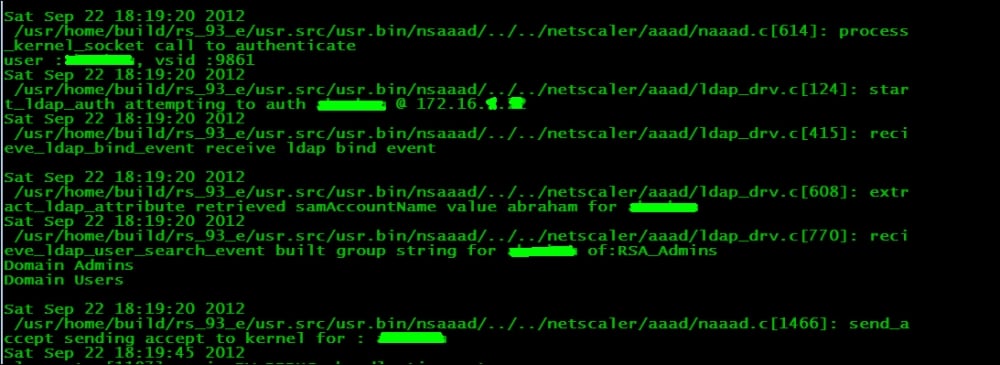
>shell
#cd /tmp
#cat aaad.debug [This command would enable aaad debug,to stop its press Ctrl+Z]
The following screenshot shows the debug logs for a successful authentication:
Handling massive surges in traffic is extremely important for organizations that do their business in websites. Even for others, sudden bursts in traffic do not come fully announced and need to be taken care of. This section deals with how the Citrix NetScaler controls and regulates traffic, thereby preventing outages.
The surge protection feature of NetScaler is enabled either globally or at service level. This feature controls the number of simultaneous connections made by NetScaler to the backend server farm. Surge protection is enabled by default and hence for scenarios where surge protection is not necessary it needs to be disabled. Surge protection should not be enabled when the Use Source IP (USIP) mode is enabled because with the USIP mode the number of backend connections will increase, as the original client IP will be shown as the source IP, and hence connection re-use is ruled out. Therefore, when more and more connections form, surge protection will get aggressive and not work as expected.
Setting up surge protection on NetScaler is a very simple procedure. As discussed before, it is enabled by default on the NetScaler GUI. It can be found under System | Settings | Global System Settings:

By default, two values are set:
Base Threshold is the maximum number of concurrent connections that NetScaler will forward to the backend servers before triggering the surge protection. For each Throttle value, a predefined numbered set that can be changed.
Throttle can be normal, aggressive, or relaxed, each having a predefined number of connections that can be changed.
At service level, we have the surge protection checkbox under Advanced | Settings | Surge Protection:

It is important to keep the server functioning at a normal capacity, as overloading it may result in undesirable results, such as application crashes and unavailability of resources for clients. NetScaler's basic functionality is connection multiplexing between the client and server (per request based). Hence, whenever a new connection is made and surge protection is enabled, it would check for any free existing connection to the servers; if not, then according to the max client and max request value set at the service level, the connection will be served or put in the surge queue.
The length of the surge queue will decrease if any existing connection in the backend becomes free.
This section deals with certain tidbits that will come in handy with respect to surge protection.
If the rate at which requests hit NetScaler increase exponentially, the surge queue will become longer, hence it will be necessary to flush the surge queue. The following are a few simple network management protocol OIDs that retrieve the length of surge queue at the vserver level:
vsvrSurgeCount,1.3.6.1.4.1.5951.4.1.3.1.1.10surgeCount,1.3.6.1.4.1.5951.1.4.1.1.1.7tcpSurgeQueueLen,1.3.6.1.4.1.5951.4.1.1.46.15svcSurgeCount,1.3.6.1.4.1.5951.4.1.2.1.1.10
When the surge queue length becomes long and affects the availability of resources to the users, you can flush the surge queue with the following CLI command:
root@ns> flush ns surgeQ [-name <name>] [-serverName <serverName> <port>]
CS is the ability to redirect traffic based on content file extensions and, going a step further, in redirecting based on geographical locations. Multiple hostnames can be mapped to the same CS VIP using the server name indication feature from NetScaler 9.2 onwards. Starting with the NetScaler version 10 software, the version of MySQL software can be set for content switching virtual servers (this is to avoid compatibility problems between the client and server). This section deals with the implementation of content switching.
We will start with the packet flow of NetScaler and where content switching comes into play. The following diagram is self-explanatory (it is not the entire packet flow to the receiver's endpoint; the focus here is only to CS and LB):

The content switching vserver can be used for HTTP/HTTPS/TCP and UDP protocols, and it can direct it only to another vserver, not to the backend service directly.
Note
The content switching vserver doesn't need an LB vserver to be bound to it for its status to be UP. Even with nothing bound to the CS vserver, the status would show UP (this comes in handy when you want to blackhole unwanted traffic).Hence, it is always recommended to check whether the load balancing vservers that are bound to the content switching vserver are up and running.
If you want to avoid the preceding condition, the following CLI command will help you achieve it (by default, the value is disabled):
root@ NetScaler> add cs vserver <name> <serviceType> (<IPAddress>) [-stateupdate ( ENABLED | DISABLED )]
Content switching can be done based on the following client attributes:
Mobile user/PC
Images/videos
Dynamic/static content
Client with/without cookies
Geographical locations.
Per VLAN
Similarly, server-side differentiations can also be made based on the following attributes:
Server speed and capacity
Source/destination port
Source/destination IP
SSL/HTTP
Citrix also has an additional feature (starting from NetScaler version 9.3) that dynamically selects the load balancing feature based on any criteria or condition provided in the CS action/policy:
>add cs action <name> -targetLBVserver <string-expression>
>add cs policy <policyName> -rule <RULEValue> -action <actionName>
The policy is then bound to the CS vserver
Tip
CS vservers can be configured to process URLs in a case-sensitive manner. By default, this option is ON:
>set cs vserver CSVserver -caseSensitive ON
The load balancing vserver bound to the CS vserver need not have any IP address configured unless it is used in a different access as well.
We shall focus on a few case studies that we commonly come across, and that can be solved with the help of content switching:
Case 1: Customer ABC accesses an online shopping portal and gets redirected to a secure connection at the payment gateway. For this scenario, an HTTP LB vserver is used and is bound to the CS vserver, which is on HTTPS:

The configuration in the preceding screenshot shows that a CS policy as well as a responder policy is bound to the CS vserver named testVserver.
The CS policy works on directing the traffic to the target LB vserver (if there are no CS policies bound at all, it goes to the default LB vserver; this default LB vserver should be configured on the CS Vserver). The responder policy, if bound to the CS vserver works on HTTP requests before matching any CS policy.
The configuration is verified by using show cs vserver <vserver name>. A packet capture taken on NetScaler will clearly show the redirect from HTTP to HTTPS as <HTTP 302>.
If there is any traffic that doesn't match any specific CS policies that are bound, then it uses the default policy. If there is no default policy, the user will get an error – HTTP 1.1 Service Unavailable error message.
Case 2: The customer Star Networks has a single web application that contains two domains, namely www.starnetworks.com and www.starnetworks.com.edu and has a content switching setup, which works fine when accessing www.starnetworks.com, but throws an error when accessing www.starnetworks.com.edu.
This happens because the peceding domains are not the same; they are different and the certificate that is bound to the CS vserver would be of type www.starnetworks.com only. To resolve this issue, we can bind multiple certificates to the CS vserver with the Server Name Indication (SNI) option enabled. The SNI option can be enabled in the SSL Parameters tab (this would pop up only if the SSL protocol is chosen while creating the vserver).
The CLI command to enable SNI is as follows:
>bind sslvserver star_cs_vserver -certkeyname    -SNICert
> bind sslvserver star_cs_vserver -certkeyname     -SNICert
For each domain added, NetScaler will establish a secure channel between itself and the client. With this solution, you can avoid configuring multiple CS vservers.
Case 3: A Customer has a large pool of IP subnets that needs categorizing, and it would be a next to impossible task to configure that number of content switching policies; how does he go about deploying this scenario?
The solution is as follows:
A database file should be created that includes the IP address range and the domain:
>shell
#cd /var/ NetScaler/locdb
# vi test.db
(Here, the
gslbentries are added, which will be discussed in detail in the Disaster recovery (Should know) recipe.)Run the following command to apply the changes made to the database file:
> add locationfile aol.dbBind the CS policy with an expression stating, for example, as follows:
"CLIENT.IP.SRC.MATCHES_LOCATION (\"star.*.*.*.*.*\")""
The working of NetScaler in all three preceding scenarios is that it analyzes the incoming traffic directed to the CS VIP and parses through the bound CS policies, if any. If a match is found, it goes to the target LB vserver. If there are any other policies that are bound (for example, a responder policy or a rewrite policy), then the responder policy gets executed even before the CS policy is executed (since responder policies are usually applied to the HTTP requests).However, rewrite policies can be bound either at the CS or LB level, depending on whether the request or response needs to be modified.
To recap what we have seen in the case studies mentioned before, the first case helps us to do a simple redirect from HTTP to HTTPS using a responder policy bound at the CS level. The second case shows us how multiple certificates with the SNI option are used to solve domain differences that would otherwise cause issues. The final case study shows us the basic but handy setting to map IP address ranges to target load balancing vservers. An important thing to note – there are scenarios where the vserver and the services that are bound to them may be different ports altogether (for example, HTTP LB VIP would be listening on port 80, but the services would be on port 8080). In such cases, the redirectPortRewrite feature should be enabled.
This section concentrates on tidbits and troubleshooting techniques:
We can start with checking the output of
show csandshow lb vservers, to see if the services bound to them are up and running:root@ns > show cs vserver cs_star_vserver 1) cs_star_vserver (IP_ADDRESS_HERE:80) - HTTP Type: CONTENT State: UPClient Idle Timeout: 180 sec Down state flush: ENABLED Port Rewrite : DISABLED Default: lb_vserver Content Precedence: RULEVserver IP and Port insertion: OFF Case Sensitivity: OFF
If there are responder and rewrite policies, then we can check whether the number of hits on that policy are incrementing or not.
Packet captures (using Wireshark) on the server and NetScaler. In some cases, the client would show us the packet flow in depth.
The Down state flush feature of the NetScaler is useful for admins planning their downtimes in advance. This feature is enabled, by default, on the vserver and service level. When the feature is enabled, the connections that are already open and established will be terminated and the users will have to retry their connections again. The requests that are already being processed alone would be honored. When the feature is disabled, the open and established connections are honored, and no new connections will be accepted at this time. If enabled at the vserver level, and if the state of the vserver is
DOWN, then the vserver will flush the client and server connections that are linked. Otherwise, it would terminate only the client facing connections. At the server level, if the service is marked asDOWN, then only the server facing connections would be flushed.There is another option on the Advanced tab of the CS/LB vserver to direct the excess traffic to a backup vserver. In cases where the backup server also overflows, there is an option to use the redirect URL, which is also found in the Advanced tab of the CS/LB vserver.
To avoid idle connections over an extended period of time, NetScaler used the zombie cleanup feature. Instead of immediately terminating the connections, this feature puts the idle connections into a collection pool. When consequent client requests are made, these requests are served with the idle connections that were in the re-use pool; therefore, TCP handshakes and terminations need not be done frequently with the backend servers, which in turn leads to minimizing CPU and resources on the NetScaler. The connection multiplexing happens only on the HTTP VIP and not just on any TCP VIP. Even though connection multiplexing is done at the TCP level, it is not supported for all types of traffic running over TCP. HTTP and SSL are the only two types that support connection multiplexing.
Connection multiplexing works as shown in the following screenshot:

NetScaler has a pool of active connections to the server called the re-use pool; the number of connections in the re-use pool can be seen by using the following nsconmsg command:
shell# nsconmsg -s ConLb=2 -d oldconmsg
The output will have values such as OE(xx), SQ(x), and RP(x), where OE is Open Established connections, SQ is Surge Queue, and RP is Re-use Pool.
A common query that crops up is whether re-use is supported with USIP enabled. Yes, it is supported (only for HTTP) as NetScaler still acts as a proxy, and using its own MAC address it only inserts the client's IP address. Hence, in conditions where the source IP is from a large proxy, we would still be able to re-use connections. However, care should be taken to see that the CPU does not spike.
The most common problems faced without zombie cleanup is a drop in traffic, and slow responses and requests (page timeouts). This also could lead to high CPU usage, since the idle and inactive connections that are not cleaned up would only lead to unwanted usage of the resources. DOS attacks can be saved for a different chapter altogether, but certain types of attacks can be prevented using the zombie cleanup feature of NetScaler.
The time interval to be set in the zombie process is as follows:
root@ns>set ns timeout -zombie 140 (By default zombie timeout is 120)
In the GUI interface, it is under System | Change timeout values. At each level of configuration (that is, at the vserver, service, and server level) a client timeout can be configured to notify the zombie process to kick in once the timeout has expired.
For example, at the vserver level this command sets the time up to which NetScaler leaves the connection in the re-use pool:
root@ns>set vserver PacktLB_vserver -cltTimeout 120
Once the connections are in the re-use pool, the zombie timer kicks in and cleans up the connections once the timer has expired. There is a knob to disable the zombie cleanup:
set service "PACKT_service" -maxreq 1
This setting disables connection multiplexing as well. There would be a one-to-one mapping between the client and server.
Therefore, this setting in NetScaler is enabled by default for an interval of 120 seconds; it can be customized to suit our requirement, though in most cases it is recommended to leave it at default.
Imagine load balancing a pair of NetScaler devices across geographical locations, so that traffic is always passing through, irrespective of whether it uses the main site or an alternate site (during major outages or if there is an excess load of traffic) based on the selected LB algorithms; that is GSLB for you. This section briefs about setting up the GSLB disaster recovery.
NetScaler can be set up in many different ways for GSLB, some of which are listed as follows:
NetScaler as the Authoritative DNS (ADNS) server (by configuring a service on DNS port number 53)
NetScaler as Authoritative subdomain name server (by assigning a part of the domain alone to NS)
NS as the DNS proxy (by configuring the LB vserver and binding DNS servers to it)
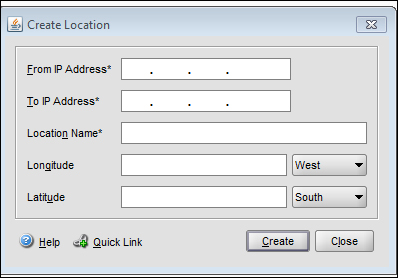
Starting from NetScaler version 10, even with static proximity configured, there is an option to override the static mapping of location database with a specific DNS policy, and action to direct the traffic coming from a specific Local DNS (LDNS) server, or network to specific gslb services. Follow the next screenshot to statically configure the IP address and location database on GUI.
On the Configuration Utility panel, go to GSLB | Location to create static location entries:
The setup entails a main site that processes traffic all the time and a disaster recovery site that comes up when the main site goes down. The entire GSLB algorithm is DNS-based. The GSLB configuration can be used for the following:
Disaster recovery
Load sharing
Proximity/performance
The Citrix NetScaler Metric Exchange Protocol (MEP) is a channel of communication between NetScaler devices across various geographical locations; it works on TCP port 3011 and, to be secure, port 3009. It is a NetScaler proprietary protocol and is used in GSLB to monitor the health of the sites. There are also the typical monitors that are bound to the load LB vserver.
With MEP and monitors enabled, the health of the remote sites can be measured from the monitors. But if monitors are not enabled, then the health of the site is measured with the help of MEP. The CLI command to enable MEP is as follows:
root@ns>set gslb site Packtsite -metricExchange  ?
 ENABLED
 DISABLED
The site metrics, the network metrics, and persistence information are shared between the GSLB sites only if the MEP is enabled. An important note is to check if the feature is enabled before you get started with the GSLB configuration. If you are going with the static proximity type of GSLB, then you would need to load the location database on the NetScaler device. To verify whether the database is properly loaded, issue the show locationparameter command and check the current static entries. If the incoming traffic does not match any entry in the location database, then the request is processed using the round robin method.
We will focus on a few case studies, most commonly seen in GSLB.
Case 1: The three critical aspects for GSLB are the Gslb site, Gslb vserver, and Gslb service. The site address references NetScaler at each location. These three aspects are interlinked to make it easier for the traffic to be sent to the right location.
For example, there are two sites in this recipe, main and DR. You will have to repeat the configuration on both the devices:
Domain:
www.packttest.comADNS servers:
172.16.1.6for the main and DR sitesVservers:
172.16.32.24for the main site and172.16.32.114for the DR siteSite addresses:
171.12.12.33for the main site and171.12.12.3for the DR site
Configure the gslb sites as follows:
add gslb site gslb_local 171.12.12.33 -publicIP 171.12.12.33
add gslb site gslb_remote 171.12.12.3-publicIP 171.12.12.3
Configure the gslb services: The gslb service might be a LB vserver or a direct third-party server:

Configure the gslb vserver and bind the services to the vserver:
add gslb vserver packtmain_gslb_vserver HTTP
add gslb vserver packtdr_gslb_vserver HTTP
bind gslb vserver packtmain_gslb_vserver -serviceName test
bind gslb vserver packtdr_gslb_vserver -serviceName test_dr
An important configuration is setting the backup vserver under the Advanced tab:
set gslb vserver packtmain_gslb_vserver -backupVServer packtdr_gslb_vserverBind the domain to the gslb vserver as follows:
bind gslb vserver packtmain_gslb_vserver -domainName www.packttest.com -TTL 5Last but not the least, the ADNS service should be configured in NetScaler in such a way that NS would become authoritative for the domain
www.packttest.com. The CLI command to configure NetScaler as an ADNS service is as follows:>add service main_site_adns_server 172.16.1.6 ADNS 53
The IP address that is used here can be a MIP or SNIP address.
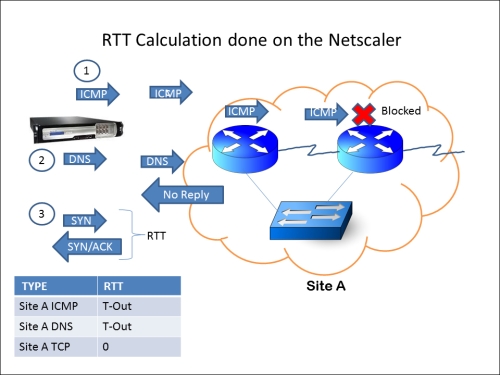
Case 2: The previous section shows the basic GSLB setup. In this case study, we will see the Dynamic proximity process, where NetScaler chooses the site that has the least Round trip time (RTT). For the first time alone, NetScaler chooses a site using the round robin method and then begins its RTT calculation using the following three steps in the same order sequentially:
ICMP
DNS
TCP
In the event that ICMP is blocked mid-way before reaching the site (anywhere on the Internet), it uses the second method listed (that is, DNS query), and finally a TCP handshake is used for the RTT calculation if the DNS query also does not give a response. This procedure is depicted in the next screenshot.
The RTT table can be viewed in the Configuration Utility tab under GSLB | LDNS Entries. If RTT shows as 0, then the time taken is less than one millisecond and if RTT shows as T-out then it indicates that the destination is unreachable. If all three preceding methods fail, it will take the backup LB method configured.
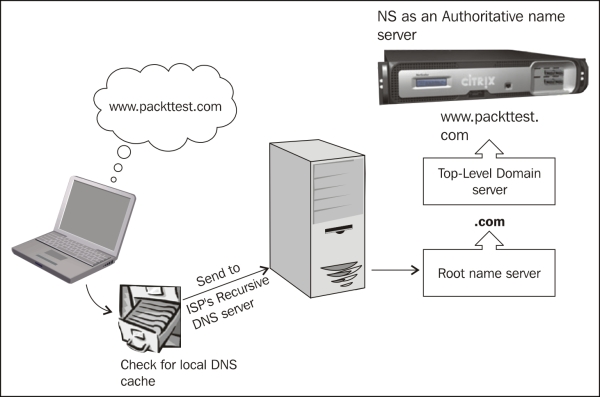
We can also use the static location database that maps the IP address range to the location area. This database is then loaded on the appliance. When the client's LDNS requests the site IP address from NetScaler, which acts as the ADNS, NetScaler parses through this location database to determine the location of the client's LDNS IP address, and then sends the nearest site IP address to the client. This method is called Static Proximity:
The CLI command to configure dynamic proximity is as follows:
>set gslb vserver packtGSLB -lbMethod MethodType
>set gslb vserver packtGSLB –lbMethod RTT
The RTT is calculated between the LDNS of the client and the site IP address.
In both the case studies, NetScaler first receives the DNS request in case it is acting as the ADNS for that particular domain, and according to the LB algorithm set, it directs the response either to itself or another NetScaler situated in a different geographical location. In this recipe, since we are only focusing on disaster recovery, the main site will continue to process traffic until it goes down.
The GSLB local and remote site is used for the Metric Exchange Protocol (MEP) communication to share the status and health of the sites. When configuring sites on NetScaler, there is an option for the public IP address. This can be left blank if there is no firewall in the picture that does any NAT translation.
To check if the configuration is accurate, run the following command:
root@ns# host www.packttest.com 172.16.1.6
The output will be similar to the following:
Using domain server:
Name: 172.16.1.6
Address: 172.16.1.6#53
The aliases are:
www.domain.com has address 171.12.12.33.
The following image shows the flow of GSLB at its basic level:
This section concentrates on tidbits and troubleshooting techniques:
Run the following CLI command to check the GSLB sites:
root@NS> show gslb site
         1)      packtsiteA (10.xx.xx.xx)        Site Type: REMOTE
            Metric exchange: ENABLED        Metric exchange status:         ACTIVE  Public IP: 10.xx.xx.xxNetwork metric exchange: ENABLED        Persistence session     exchange: ENABLEDTrigger Monitors: ALWAYS
         2)      packtsiteA (10.xx.xx.xx)  Site Type: LOCALMetric exchange: ENABLED        Public IP: 10.xx.xx.xx
------OUTPUT SNIPPED------
From the preceding output, we can see that NetScaler configured for GSLB will have one local and one or many remote sites (NetScalers in different data center locations).
Check for the GSLB vserver as follows:
root@NS> show gslb vservers
1)      packtvserver - HTTP        State: UP
        Last state change was at XXXXXXXXXXXXXXX (x ms)
        Time since last state change: 0 days, xx:xx:xx.xx
        Configured Method: LEASTCONNECTION
        Current Method: Round Robin, Reason:  Bound service's state changed to UP
        No. of Bound Services :  1 (Total)       1 (Active)
        Persistence: NONE
        Disable Primary Vserver on Down: DISABLED       Site Persistence: NONE
        Backup: packt_gslb_vserver Backup Session Timeout: 0
----OUTPUT SNIPPED----------
The preceding output shows the gslb vserver, where the domain name for the site is configured and the gslb services are bound.
Check for GSLB services as follows:
root@ns> show gslb service
1)      packtsvc (10.xx.xx.xx: 80)- HTTP     Server:    10.xx.xxx.xx          State: UP
        Effective State: UP
        Max Conn: 0                     Max Bandwidth: 0 kbits
        PublicIP: 10.xx.xxx.xx PublicPort: 80
        Type: REMOTE                    Site Name: packtsiteA
        Client IP: DISABLED
        Down state flush: ENABLED
        Site Persistence: NONE
        Threshold: BELOW
The preceding output shows the target LB or CS vserver and the LB method configured. NetScaler can be configured with a local and many remote GSLB services.
Zero window, SSL renegotiation attacks, and so on, can be prevented using NetScaler. Even with simple ACLs, Citrix NetScaler has the ability to use ACLs on the fly for every new ACL added and need not wait for new sessions to trigger the ACL.
NetScaler provides end-to-end web security along with the APP Firewall module; the module can be used as a standalone or be integrated with NetScaler, and be used along with all the other features.
Half-open TCP SYN connections are what constitute a DOS attack. A half-open TCP connection (as shown in next image) is a state wherein it is stuck before the three-way handshake is completed (SYN-SYN/ACK-ACK). NetScaler defends such attacks by not allocating any memory for all the SYN requests hitting NetScaler. Instead, it sends a cookie to each client that requests the connection and allocates memory only after the FINAL ACK message containing the same cookie is received. While NS uses this mechanism of inserting cookies into the new TCP connections, the old ones are not interrupted.
This DOS attack prevention does not need anything to be explicitly enabled:

Brute force, slow post, and zero window attacks can be stopped on NetScaler with the help of the rate-limiting feature. Priority queuing can also be used to defend against DOS attacks:

The preceding screenshot shows the zero-window packet in wireshark and legitimate clients in cases where the receive buffer is full and will send zero-window packets to the sender. How does NetScaler differentiate between a legit and an attack? This depends upon the number of concurrent small-window connections at a time and also on the MSS size (DDOS). The defense mechanism kicks in when the number of concurrent small-window connections are more than the number configured. If the attack has less than the number of simultaneous connections configured, then there is the zombie cleanup that kicks in when the connections move to the re-use pool.
TCP/UDP flood protection is enabled by default; however, the HTTP DOS protection feature has to be enabled and policies have to be defined if you need it customized. To enable the HTTP DOS feature, use the following:
root@ns>enable ns feature HttpDoSProtection
root@ns> add dos policy httpdospol -DoS  -qDepth 30
This policy can be bound to any HTTP services that need protection. While configuring the services, Max Client and Max Request should be set to confine the number of client connections to the Vserver and the number of requests on one persistent connection to the backend server.
Simple and Extended ACLs:
The packet flow would begin with simple ACL (if configured) and then move on to extended ACLs. The ACL action can be
ALLOW,DENY, andBRIDGE. The final action is bridging the packet without processing it. The implicit action of NetScaler, if it does not find any matching IP address, is to process the packet normally; when the ACL misses it, the counter would increment.Simple ACL:
add ns simpleacl packtacl DENY -srcIP 10.122.23.40 -destPort 1494 –protocol TCPExtended ACL:
add ns acl extpacktacl  DENY -srcport 80-1024 -destIP
192.168.1.1 -protocol TCP
root@ns>flush simpleacl -estSessions
The traffic that hits the ACLs can be logged with the
[–logState option ENABLED]command.There is also an option to flush existing established connections after new ACLs are configured:
root@ns>flush simpleacl -estSessionsRate-limiting can be done based on certain URL or client SRC IP addresses. Care must be taken to avoid mixing attacks with connections that come from behind a single IP address (that is, a proxy). To reduce any false positives, we can configure both
Client.IPandHTTP REQin the limit identifier.thresholdspecifies the number of requests before the defense mechanism kicks in.root@ns>add ns limitSelector httpdos_limit_sel client.ip.SRC root@ns>add ns limitIdentifier httpdos_limit_ident -threshold 1000 -timeSlice 120000 -mode REQUEST_RATE -limitType SMOOTH -selectorName httpdos_limit_sel
This configuration can be fine-tuned more by setting the action that NetScaler takes for the DOS attack:
root@ns> add responder policy httpdospol "HTTP.REQ.URL.CONTAINS("www.packttest.com") && SYS.CHECK_LIMIT(\"httpdos_limit_ident\")" RESET
This responder policy can be bound globally. According to this policy, NetScaler would reset all the connections that come within the time interval. This reset action can also be changed to log a message to the user that says the limit has been reached and try again later:
root@ns>add responder action dos_act respondwith "\"Exceeded the maximum number of retries\r\n\r\n\""
Priority queuing of NetScaler helps in defending against DOS attacks by prioritizing the traffic hitting NetScaler; this can be done by filtering the traffic according to certain criteria and then prioritizing it. At a maximum, three priority queuing policies can be bound to a load-balancing Vserver. While configuring priority queuing, the priority, threshold, and weight needs to be specified along with an implicit action.
Each priority queuing policy can be set based on priority and weight:
>add pq policy packtPQpol -rule HTTP.REQ.URL.CONTAINS("/networktest")
-priority 1 -weight 30 [-qDepth <positive_integer> | -polqDepth <positive_integer>]
This policy will filter traffic based on URLs that contain networktest, give it priority 1, and assign a weight of 30. Weight should be set for efficient functioning, because without weights only the higher priority requests will continue getting served and the lower priority requests will be kept on the back burner. To avoid this situation, we go for weighted queuing where, for example, the three important departments in an organization—Engineering, IT, and Finance—can be configured as follows for serving traffic with priority queuing:
Engineering: Priority 1-Weight 30
IT                 : Priority 2-Weight 20
Finance        : Priority 3-Weight 10
From this configuration, after 30 requests have been served in Engineering, the packet flow will move on to serve 20 requests of IT, and so on in a cycle. This way, the Finance department is not completely ignored until there is nothing to serve for Engineering and IT.
From the preceding CLI command, we see an option to specify either queue depth or policy queue depth; the difference between the two is that the first option specifies the value of the total number of requests waiting to hit a particular vserver to which the policy is bound, and the latter specifies the total number of waiting clients belonging to the policy.
The HTTP DOS policies are also configured with something called qdepth and client detect rate. The queue depth, as mentioned before, would be the maximum number of connections placed in the surge queue at a time and the client detect rate would be the percentage of traffic before which the HTTP DOS policy should be applied.
Note
While setting qDepth for HTTP DOS, care should be taken to see that the qdepth value is more than the window size.
Even for the client detect rate option, please note that an optimum percentage should be chosen for sending the JavaScript challenge responses. If the percentage is too high, it would flood the upstream routers or switches.
Distributed denial-of-service (DDOS) attack gets past the initial stages of defense, because it sends the complete HTTP header intact with all the information necessary to the server and then slows down, sending a few bytes per few seconds. Priority queuing can help in avoiding these attacks.
Before implementing any DOS protection, it is safe to monitor the traffic characteristics and so on. Also, instead of just enabling the DOS protection feature, and so on, and leaving it at default, it is recommended to fine-tune the setting according to your network topology.
The AppFw module checks the HTTP host and referrer headers that are present in the requests, and prevents any attacks to modify the content of forms sent to the server. It also maintains the state of each session with the help of its own session cookies. This section would help us dive into the possible features available in APPFw. Citrix NetScaler App Firewall is compliant with the PCI-DSS criteria; it also protects zero-day or custom-made attacks, which we will see in detail later in this chapter
We had a pre-sequel to the attack prevention in the previous recipe, touching only on the first line of defense; in this recipe we will discuss the app firewall module in a little more detail.
In the Configuration Utility, there is a checkbox for learning. Hence, before you set the box to production, you need to first gather a sample of the actual traffic hitting NetScaler and then enable blocking.
The HTTP referer headers are used to denote the previous page they were sourced from, and this can be exploited to get access to websites by masquerading as though coming from a valid website—it is similar to spoofing. In the App Firewall module, there is a feature called Start URL, where we can validate the referer header, if present. As shown in the following screenshot, Block, Learn, Log, and Stat are the actions that can be configured against each of the features.
There are two types of profiles that can be configured on the APP Firewall:
Basic
Advanced
The difference between the two of them is that the Learn checks will not be enabled by default in the basic profile. Since the security checks all operations on the HTTP responses, it requires resources to retain and compare the information it sent previously to the users:

Learned Violations can be seen and altered according to the organization's requirements as shown in the preceding screenshot. Starting with NetScaler version 10, using the CEF (Common Event Format) logs, one can decide whether to deploy by clicking on Logs... or not.
Also in a high-availability setup, the learned data can be propagated to the secondary device, so it would help in a seamless failover (only on NetScaler version 10).
In this section, we are going to see how Start URL and the Cross Site scripting prevention work with NetScaler App Firewall:
Configure App Firewall profile to be basic, and configure a policy with RULE (here we are going to use
HTTP.REQ.IS_VALID), which means anything and everything.Tick the Learning checkbox of Start URL before you enable blocking.
Go to the App Firewall profile, under the Settings tab. HTML Settings can be configured to redirect to another URL or load an html page:

Bind the App Firewall policy to the appropriate load balancing (LB Vserver, for the policy to take effect when the user tries to access the LB Vserver.
For example,
www.packttest.comresolves to the VIP of an LB Vserver. The following code snippet shows the config through CLI:>add appfw profile packtpro -startURLAction none -RefererHeaderCheck if_present -CSRFtagAction block log stats -crossSiteScriptingAction learn log stats -crossSiteScriptingCheckCompleteURLs ON -XMLSQLInjectionAction none -XMLXSSAction none -XMLWSIAction none -XMLValidationAction none -useHTMLErrorObject ON -HTMLErrorObject test >add appfw policy packtpol HTTP.REQ.IS_VALID packtpro >bind lb vserver packtlb packt_svc >bind lb vserver packtlb -policyName packtpol -priority 100 -gotoPriorityExpression END -type REQUEST
Under the Learning Tab of the App Firewall profile, clicking on Start URL will show us the list of scripts it has learned from the traffic hitting the NetScaler:

With this data, we can select what is needed to be deployed. Once deployed, it creates a white list of URLs, which are obtained from all the responses during the user session. This functionality is called the URL closure and can be enabled under the Start URL feature (Go to the Security Checks tab of the App Firewall profile):

A simple setup is used to demonstrate the Start URL protection as shown in the preceding screenshot.
This protection can be tested by creating a query in the URL, for example, http://www.packttest.com, which is an LB VIP created with Netscaler. This URL is listed in the white list with the Start URL feature; however, http://www.packttest.com/?<script>alert(hi)</script> is not, and should be blocked as this is injecting a script along with the URL. To test this feature, we need to enable the Block checkbox in the Security Checks tab of the profile.
We could see the protection happening from the ns.log, after accessing the preceding URL:

When there is a violation of the rules, it is logged in the NetScaler BSD shell under /var/log/ns.log:

Here, along with the timestamp, we can see the URL being accessed as well as the <blocked> action taken by the App Firewall.
After learning and deploying a certain rule, we can see the rule in the running config:
>show run | grep packtpro
bind appfw profile packtpro -startURL "^http://www\\.packttest\\.com/$"
The second part of the testing is to check whether the same profile works with a CSRF attack.
The CSRF (Cross-Site Request Forgery) attacks work on logged-in user sessions, modifying the HTTP request. NetScaler adds a unique token to the forms that are sent to the users and validate the token on subsequent requests and responses between client and server.
The same setup and configuration used in the preceding demo is used here. We are going to test the site by using any link or URL on the webpage and add a script or query to the link while accessing, for example, the same VIP as used before, http://www.packttest.com, which opens up the web page, clicking on a link or URL on the web page http://www.packttest.com/citrix_products_netscaler.html?<script>alert(hi)</script>.
As we can see in the following screenshot, the ns.log has a log message stating that the packet is blocked due to a tag validation failure:

As always, it also displays the URL that is being accessed (outlined in the preceding screenshot).
Here is a HTTP header trace to show the transactions between NetScaler and the client:
GET /Test.xml?<script>alert(hi)</script> HTTP/1.1
Accept: application/x-ms-application, image/jpeg, application/xaml+xml, image/gif, image/pjpeg, application/x-ms-xbap, application/x-shockwave-flash, application/vnd.ms-excel, application/vnd.ms-powerpoint, application/msword, */*
Accept-Language: en-US
User-Agent: Mozilla/4.0 (compatible; MSIE 8.0; Windows NT 6.1; WOW64; Trident/4.0; SLCC2; .NET CLR 2.0.50727; .NET CLR 3.5.30729; .NET CLR 3.0.30729; Media Center PC 6.0; InfoPath.3)
Accept-Encoding: gzip, deflate
Host: www.packttest.com
Connection: Keep-Alive
Cookie: citrix_ns_id=SQIoGifoC0oF+GaOVYl3cCJDKTQA000

HTTP/1.1 200 OK
Pragma: "no-cache"
Content-Length: 99
Connection: close
<html>
<head>
      <title>THIS PAGE IS BLOCKED BY CITRIX APPLICAITON FIREWALL
    </title>
  </head>
</html>
As we can see in the preceding header, the session is already established and hence we see the cookie in the GET request of the client containing citrix_ns_id=SQIoGifoC0oF+GaOVYl3cCJDKTQA000.
NetScaler gracefully terminates the connection with a 200 OK message, as can be seen from a wireshark capture taken on NetScaler (see the following screenshot). The FIN and PUSH flags are highlighted in the screenshot.
There are other functionalities, such as masking the credit card numbers and other safe objects while sending responses to the users. The safe objects are configurable on NetScaler, such that when traffic hits the NetScaler, the App Firewall module checks for any safe object pattern in the requests and responses:

Role-based access control is a feature that is used to control the admin access rights to NetScaler. We can configure the command policy to add/remove commands, show commands or restrict commands, to users. A predefined command policy is shown in the following screenshot:

The CLI command to configure a test user:
CLI>add system cmdPolicy test ALLOW "(^\\S+\\s+serviceGroup.*)|(^\\S+\\s+vserver.*)"
The Citrix App Firewall module comes in at both the request- and response-side processing of traffic. After the content switching or LB vserver (whichever is configured as client facing), the App Firewall module parses through the packets to check for anomalies. Similarly at the response side after SSL decryption, rewrite (if any) content filtering and then App Firewall before sending the response to the client.
In the How to do it... section of this recipe, we saw the configuration setting for defense against Start URL and CSRF attacks. The AppFw first learns the URLs passing through it using the Learning module before we deploy the rules according to our requirement. We would be able to see the rules learnt by the AppFw in the Managed Learned Rules.
In the Role-based access control section, we saw how to control the management access of NetScaler for different users at different levels. We would be able to restrict them based on read-only commands, read/write commands, superuser commands, and so on.
App Firewall needs to be used with utmost planning as it is resource intensive. In sites where Integrated Caching and App firewall is used, CPU usage will tend to be on the higher side. All NetScaler MPX series that have 4 GB of RAM are capable of handling both caching and App Firewall implementation. Typically, the Application Firewall sits in front of the caching module and the best part about this is it does not require remodeling one's network; instead it is similar to adding on the existing network, making it more secure.
In this section, we will see the new features available in NetScaler's latest versions and also a few known issues.
A few commands that will help us in troubleshooting the App Firewall issues are as follows:
show appfw stats: This output shows the request and response rate per second, the violation stats, and the number of server-side response error pages (for example, starting with4xxand5xx).show appfw settings:DefaultProfile: APPFW_BYPASS UndefAction: APPFW_BLOCK SessionTimeout: 900 SessionLifetime: 0 SessionCookieName: citrix_ns_id ImportSizeLimit: 134217728 CookiePostEncryptPrefix: ENC Done
As the output denotes, this displays the default profile and action. The default session timeout (in seconds), beyond which the App Firewall module will terminate the idle user session, the cookie name, and so on, are all configurable.
/var/log/ns.logandmessages.gz: These commands will show the App Firewall logs in addition to the packet captures, and so on.
Starting with NetScaler version 10, the Common Event Format logging is enabled on NetScaler. In fact, the logs contain the source port in addition with the IP address and the HTTP method used by the client/users, which is very useful for debugging purposes.
Importing and exporting the App Firewall profile configuration across NetScaler devices makes it easier for the administrator to configure on many NetScaler appliances in one go.
Sessionless URL closure has the same functionality as session URL closure, with the only difference being that instead of tracking a session based on a cookie, the App Firewall module now inserts token into the responses that are being sent to the client.
Note
Once deployed in the main production site, it is no longer required to enable Learning for each of the subfeatures in an AppFw profile, since that would only cause more and more resources to get depleted.
The Application Firewall, though deployed in a Layer 3/Layer 4 setup, works mainly on Layer 7 HTTP. It is recommended to test this feature in your labs before making it sit directly on your production environment, even though the configuration is as simple as ticking a checkbox and enabling a few options. The results should be optimal for your organization's standpoint.
This section guides you through implementing Access Gateway with XenApp or XenDesktop. The AGEE appliance is used to establish SSL VPN in many modes, such as clientless and full-client VPN.
Note
The Access Gateway Enterprise VPX Edition is a stripped-down version of NetScaler that will help provide VPN access to XA/XD.
ICA is a Citrix proprietary protocol for application server systems; it works at Layer 6 (presentation layer). It uses TCP port 1494 to establish connections, and the server responds with a dynamically allocated port (in the case of a session reliability being used, the port would change to 2598.)
Session reliability is for keeping the session alive when there is loss of connectivity. ICA has keepalives that work exactly like TCP keepalives, except that they work on Layer 6 and are not enabled by default. ICA keepalives are used when session reliability is not enabled.
Basic versus smart access: these are the two modes provided by Access Gateway to the users. The difference between the two modes is that basic has unlimited ICA connections and only a platform license is required; for smart access, both Platform and universal licenses are needed. The smart access mode allows full VPN connectivity, EPA, clientless VPN, and so on, while using Citrix Receiver to access the applications through the VPN.
AGEE acts as an ICA proxy for XenApp and XenDesktop; it seals the traffic with HTTPS before it is sent to the client. Only full SSL certificates signed by a trusted certificate authority (CA) are required by the AGEE Vserver for the VPN to work; self-signed certificates cannot be used.
EPA (endpoint analyses) scans can be configured on the Access Gateway to implement security on hosted desktops and applications, and user access can be controlled based on this.
Consider the cases discussed in this section:
First we are going to set up the VPN in basic mode access:
Set up an AGEE Vserver, bind the appropriate SSL certificate to it, and select the access mode as basic.
SSL is the only protocol available while configuring the AGEE Vserver.

If there is a root and intermediate certificate for the server certificate obtained, they also need to be loaded onto the box and linked to each other.
The following screenshot shows the server certificate linked with the intermediate root CA, which in turn is linked to the root CA certificate:

Configure bookmarks and FTP share links to local intranet sites and applications.
Under Access Gateway, go to Global Settings.
There will be four tabs namely Network Configuration, Security, Client Experience, and Published Applications.
Under Network Configurations, there is an option to set the DNS IP, which enables you to use any internal FQDN, and advanced options on the same tab let you configure how to use IIPs (Intranet IPs), and so on.
The Security tab has a default operation, ALLOW/DENY, that can be set, and advanced options where we can restrict the users based on EPA scans and policies.
Under the Client Experience tab, options such as SplitTunnel (which has two options, ON or OFF, that define whether the traffic from the client should completely go through the tunnel or use both the VPN tunnel and local inter-network), Session, and Client idle timeout, and an option to specify a homepage (optional) are available. Single sign-on to web applications and client cleanup prompt (prompts when logging out of VPN) are also available.
Published Applications are also available to set ICA proxy to ON or OFF and to set the web interface link address. The ICA proxy settings come into the picture, when deciding between full, clientless, and full-client VPN.
Access the fully qualified doman name (FQDN) specified in the certificate, using HTTPS, and make sure you do not get the security warning. If you do get, please check if the certificates are loaded in your local machine along with the intermediate certificate, if any (Go to Start | Run and type
mmc). After loading the certificates, please verify that the certificates can be seen under Tools | Internet Options | Content | Certificates.
An intranet IP (IIP) pool can be configured, if you require the client connecting with only the range of IP addresses specified:
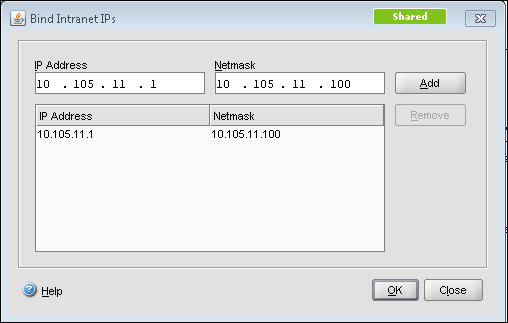
This IIP pool can be set in Global Settings or under AGEE Vserver | Intranet IPs. The preceding screenshot shows the Intranet IP configuration and the following screenshot shows the Global Settings page. The Intranet IP is used to assign IP address to the users connecting to the VPN. If the range of IP addresses is exhausted by the users, either an IP address can be reclaimed from a user who is in a logged off state or there is a setting that allows MIP to be used as IIP when no other address is available:

So, instead of global settings, if customized per user or per application, we can configure session profile and policy under Access Gateway | Policies | Session.
In this case study, the focus will be on customizing the VPN configuration per user group, in turn making it more secure.
First we will set up the VPN in smart mode access. Smart Access is used for advanced VPN configurations such as EPA scans, access to XenApp using web interface, and pre-authentication and post-authentication scans.
We will be seeing how to configure each in this section.
Smart Access provides Full VPN connectivity and to enable that we need to set the ICA proxy and Clientless Access options to OFF for full VPN. There is also the possibility of setting the VPN to full for certain users and clientless for the rest or vice versa, using session policies.
Session policies can be configured by using regular expressions, as you would configure any other policies on NetScaler. Session policies can be configured based on the users:
Network subnet (network based)
The version of the antivirus software running on the client machine
The set of processes that is required to be running/existing for the VPN to work (client security)
Client's connection type/speed (client security)
Client certificate scan (general)
Hard disk encryption and even date and time
The session policy configuration can be anywhere between simple expressions such as URL = ="/*.asp" or HTTP.REQ.URL.CONTAINS"/mycompany" and compound expressions such as "CLIENT.APPLICATION.PROCESS (notepad.exe).EXISTS".
Session policies can be bound globally, at the vserver level or the user level, and the preference works from the user level to groups to the vserver and finally to the global level. These policies are evaluated after the client is authenticated as it is more towards the client connection settings and so on.
The next step towards setting up smart access is traffic policy. Traffic policy is used to configure the file type associations for hosted applications on XenApp or XenDesktop.
File type associations help users in editing any document on the server itself instead of downloading it to the client and changing it. Traffic policies can be created for this, however, only with HTTP as protocol.
The session and traffic policies, after their creation, are bound at the vserver level:
add vpn url test test "http://10.105.225.201"
add vpn intranetApplication Remote-Desktop TCP 10.105.225.216 -destPort 3389 -interception PROXY -srcIP 127.0.0.1 -srcPort 3389
add vpn intranetApplication Test-1.1.1.1 ANY 1.1.1.1 -destPort 1-65535 -interception TRANSPARENT
add vpn vserver packtAGvserver SSL 10.105.225.206 443 -appflowLog DISABLED
add vpn sessionAction testpro -splitTunnel ON -defaultAuthorizationAction ALLOW -SSO ON -clientlessVpnMode OFF -clientlessModeUrlEncoding TRANSPARENT -clientlessPersistentCookie ALLOW
EPA scans can also be configured as a part of the pre-authentication policy and bound to the vserver, thereby letting the CAG scan the client before sending the authentication request.
In the case of configuring pre-authentication policy, checks related to the client's registry values, and so on, can be done. A sample config is as follows:
CLIENT.REG(HKEY_LOCAL_MACHINE\\Software\\Symantec\\Norton\
AntiVirus_Version).EXISTS
Whenever an EPA scan takes place, an EPA plugin is downloaded to the client to scan according to the policy set on the CAG.
The benefit of EPA, as we can see, is that users can connect from anywhere while still maintaining the internal network risk free.
Traffic policies as discussed earlier are used to configure the file type associations, and for implementing that we require the Citrix XenApp plugin. Once the traffic policy is bound to the AGEE Vserver, each of the file extensions in the published application's (that is, on the presentation server) content redirection properties should be enabled.
Another point to be noted is, if there are any routes that need to be loaded onto the client who is connecting to the VPN for accessing any intranet network, the intranet applications are configured for that particular network/subnet.
Moving onto the web interface part of the configuration, the web interface link address can be specified under Global Settings or in the Session profile, and it can be bound to the vserver. The latter is preferred if a customized config is required. To integrate Access Gateway with the web interface, we will begin by configuring a default site PNAgent. The site should be configured for the Gateway Direct mode. You would also need to enter the FQDN of the URL that you want the users to hit.
For example, for http://www.webpackt.com, the FQDN would be www.webpackt.com.
While accessing through mobile devices, it is recommended not to enable session reliability (if unsure whether the mobile device has support for the feature or not). The last action item is to add the STA (Secure Ticketing Authority). The STA's main function is to generate a ticket for a session as well as to validate that ticket.
Now, let's discuss how to specify STA:
When the ticket is generated and sent to the web interface (WI), the WI includes the STA ticket in the ICA file that is sent to the client. When this ICA session is launched, the STA validates the ticket. Refer to the following screenshot of applications and other options present in a full VPN client or XenApp plugin:

This is used, if the server name is on a different port that should also be specified.
The following screenshot shows the STA config screen. As we can see in the following screenshot, the textbox where we add the URL has the format clearly given:

Once the STA is configured on web interface, it needs to be configured on the Access Gateway under Vserver | Published Applications | Secure Ticket Authority-Add.
The following diagram shows the working of CAG in smart access mode:
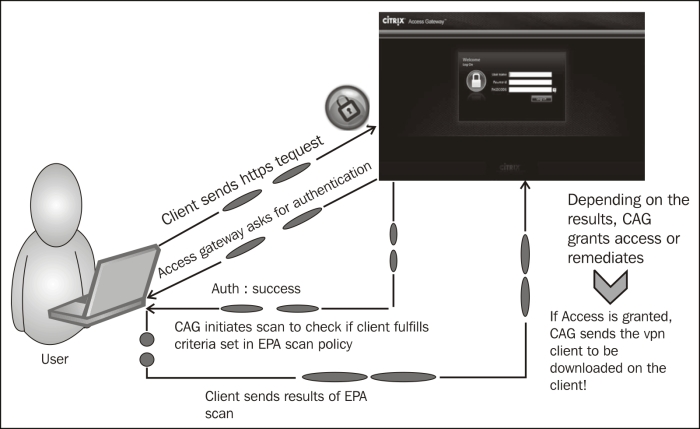
In smart access mode, after the authentication of the client, the Access Gateway will forward the authentication to the web interface (this is configurable during the site creating process, where you require the authentication to take place at the CAG or WI). The XenApp services' site that is created will appear to the user when he/she is met with all the eligibility criteria (scan).
How this works is briefly explained in the following steps:
Client sends the HTTPS request to the FQDN of the AGEE Vserver.
Authentication credentials are obtained from the user (either two-factor authentication or simple AD or OTP).
Once the client is authenticated, the CAG scans for the necessary processes or antivirus updates and so on that are available.
The results of the scans are sent to the CAG. After that, depending on what is configured as the action, the user is dropped or redirected to another site, during which the user can check what went wrong and rectify it (that is, if it is a valid user).
Once the access is granted, the VPN client is downloaded if full VPN is configured, or else the clientless VPN session gets established.
While launching any applications from the Citrix XenApp plugin or online plugin, the applications should always be in the
.icaformat.
In this section, we will see a few tips and important points to remember while deploying Access Gateway Enterprise Edition.
Primarily, a lot of issues are based on the certificates that are bound to the AGEE Vserver.
No self-signed certificate will work with AGEE.
If there is more than one root CA certificate, the intermediates should be linked on both the NetScaler as well as the client machines.
The STA URL configured on Access Gateway and the web interface should match, otherwise the STA servers will not come up.
If STA URL is configured with FQDN, make sure the FQDN is resolvable on NetScaler before going ahead with the configuration; this is yet another cause for the STA servers not coming up.
Whenever we configure bookmarks to be bound to the AGEE Vserver with clientless access configuration, there is a checkbox that says Use Access Gateway as a reverse proxy. When this checkbox is enabled, users go through the CAG to reach the website; however, if it is disabled, the connections go directly from client to the website.
Check if the domain CA certificates are present in the web interface, if not, we would need to install them in the WI as well.
The same STA servers can be configured across the XenApp farms.
Do not forget to check Trust requests sent to the XML service and make sure only trusted services are used.
Mobile users that use Citrix Receiver to connect can segregate the policies based on HTTP user-agent header.
Many improvisations such as multiple STA servers for load balancing, web interface being configured as an LB Vserver, and the LB Vserver being pointed at the AGEE Published Application tab are available. The AGEE login page is also customized to suit the needs of the organization; however, care should be taken to keep a backup of the files that are modified, and too much of customizations can also break the VPN connection.
Managing a network is equally as compelling as security; Citrix provides its own command center (CC) as a monitoring and manageability solution. This recipe shows what monitoring can be done on the NetScaler alone as well as how CC helps with the (simple network management protocol) SNMP polling.
Note
The CC is used to smartly manage the network when there are multiple NetScaler devices.
It is used to manage the Citrix NetScaler, Access Gateway and App Firewall devices. It is a software solution that sits on the Linux or Windows systems. It has its own database or can be pointed to any external database.
Listed here are the functions of the Citrix CC:
Fault management
SSL certificate
Planned upgrade/downgrade of devices
Collecting events and faults of devices on a regular basis can be done with the help of the CC, although NetScaler also has a basic level monitoring applet from which we can view the connections per second under load balancing, content switching, and so on.
The ports that are needed to be open between the CC server and NetScaler are as follows:
SNMP ports 161 and 162
SSH and SFTP (that is, 22)
If the GUI configuration utility and dashboard need to be accessed from the CC client, port 80 and 3010 need to be allowed
When the CC server is installed, HTTPS is enabled by default
HTTP communication between CC client and NetScaler is 9090
The discovery process of the CC as well as the event logs of a device is automatic.
In this section, we will start with monitoring done on NetScaler and continue further with how to enable discovery automatically in the command center.
On the Netscaler Configuration Utility, there are three tabs: Configuration, Monitoring, and Reporting Dashboards.
The SNMP part of the config on NetScaler is simple and straightforward:
Go to System | SNMP. The first step in SNMP is to configure a community name on NetScaler. The default community name is "public". The version of SNMP configured should be the same on NetScaler and the SNMP manager.
The SNMP manager needs to be configured on NetScaler.
Necessary traps it is required to send can also be configured in the Config utility under System | SNMP | Traps:

We can also classify traps by enabling the alarms to send logs with different severity such as Critical, Warnings, Information, and so on. The source IP address for sending these traps is by default the NetScaler IP, though it can be changed to MIP/SNIP (as per your configuration and firewall rules). NetScaler sends the trap messages to the configured trap destination and also to the logged-in
/var/ns.log:
The MIBs for SNMP polling can be obtained from the Downloads tab of NetScaler Configuration Utility.
The SNMP OIDs of the vserver, services, or service groups that have been configured on the box can be found under SNMP | SNMP OIDs.
Now let's discuss the Citrix CC—an alternate Citrix solution provided at a much higher level and a Citrix standard for easily managing multiple devices. One can run the CC as a Windows discovery process. How you go about configuring it to automatically discover NetScaler, other Access Gateway and App firewall devices is discussed in the following steps:
Create a map by using name or network address. By creating a blank map, we can add devices to it at any point of time. For that, under the Citrix Network tab, navigate to Maps | Add Name and Description.
Configure NS pool by adding all the VIPs that belong to the NetScaler. This is used when implementing a common config across devices that change SSL certificates or upgrading, and so on. Under Maps, click on Create a Netscaler pool and add required devices to this pool.
The discovery process starts after adding the devices to the map. The discovery works based on hostname or IP address set in the map.
We can view the status of the discovery process in the CC under the Citrix Network tab. Click on the name of the map configured, and under the map, click on the Discovery status.
The NetScaler MPX devices, such as 10500, 12500, and 15500, are rate limited per the license purchased, meaning there is a limit on the number of packets per seconds. SNMP traps can be configured to send a trap message when the threshold is exceeded.
The Monitoring tab of the NetScaler shows the number of connections, the number of TCP Est server connections, resource utilizations, and so on.
The following screenshot shows a sample screen showing the number of connections established for an LB vserver:
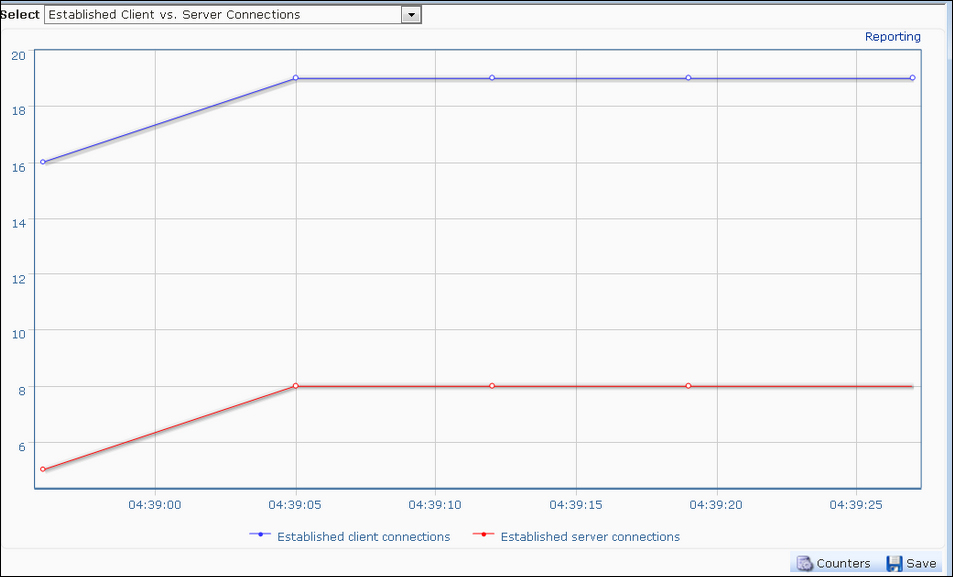
Similarly, CPU and memory utilizations on the device can also be seen on the Monitoring and Reporting pages. The difference between the Monitoring and Reporting pages is that the Monitoring page provides runtime statistics whereas the Reporting page helps collect data for a particular period that can be set to start from the previous hour to the previous year.
The discovery process in the CC is as follows:
After adding the maps with the name and other credentials, the CC sends an SNMP
Getrequest for one of the system OIDs:For CPU utilization:
1.3.6.1.4.1.5951.1.1.0.3For memory utilization:
1.3.6.1.4.1.5951.1.1.0.13
The CC then establishes an SSH connection to these devices with the username credentials provided while adding a map
Once the SSH connection is successful, it will execute a command on the Citrix device to check whether it is a Citrix or a non-Citrix device
The CC will then execute a command to configure the community on the discovered device
Also, the CC will add its own IP address to the list of trap destinations on the Citrix device; thereby receiving all the traps generated by the device
This section will deal with a few tidbits on SNMP and the Citrix CC:
All the seven PDUs of SNMP, namely
GET,GET_NEXT,GET_BULK,INFORM,TRAP, RESPONSE, andSET,can be performed to retrieve data from NetScalerWhenever the CC is configured, please make sure of the connectivity between NetScaler and the CC
It is always recommended not to run the CC in tandem with any other SNMP manager, as it might work incorrectly or not work at all