In this chapter, we will cover:
Creating and editing 2D geometric shapes
Creating freehand and straight lines
Editing paths with the Node tool
Creating paths using the Pen (Bezier) tool
Creating smooth paths with Spiro Spline
Creating calligraphic shapes
Using the Eraser tool
Creating and editing 3D boxes
Creating and editing text
Clipping
Masking
Path operations
In this first chapter we will start with the basics of vector graphics design, by creating and manipulating simple geometric objects. Several important techniques used daily by graphics artists, such as shape editing, clipping, and masking, will help us greatly when building more complex objects later on.
Inkscape is a full-featured software package that provides us with a powerful and flexible set of tools. These tools can build beautiful drawings out of fundamental geometric objects (primitives), such as straight or curved lines, simple or complex polygons, or curved shapes.
Before we start drawing, let's take a quick look at the user interface and the facilities it provides:
The Commands bar: Normally displayed under the Menu, it contains buttons of common application commands, such as file opening and saving, history browsing (undo and redo), zooming, and some common operations related to objects and groups.

The Snapping bar: Snapping facilitates the placement of objects in the Canvas and is often a valuable timesaver, although in some cases it might get in the way, such as when you need the freedom to position an object in a particular spot. Using this tool bar, you can enable or disable snapping to the page border, grids, and other objects, in order to get the exact behaviour you need.

The Canvas: This is the large central area where all the drawing is done. You will find rulers on the top and on the left of the Canvas, which provide information on scaling, dimensioning, and positioning.
The Toolbox: Normally found on the left of the Canvas, it contains all the buttons related to drawing tools used to create primitives.

The Tools Controls bar: The content of this bar changes according to the tool you have selected in the Toolbox, exposing its specific functionality. In the following picture we can see what the Tool Controls bar would show us if we were using the Selector tool.

The Palette: This tool contains a swatch line with all the colors associated with the currently chosen palette.

The Status bar: This bar is normally located beneath the Canvas and provides a wealth of miscellaneous information, such as the style of the currently selected object, the name of the layer we are editing, some help messages on the function of the selected tool, and the current mouse pointer coordinates.

We will begin with a couple of four sided polygons that we are all very familiar with:
Rectangles and squares
2. Click and drag on the Canvas holding the Ctrl key to create a golden ratio rectangle. While dragging with the mouse, you will see more information on the shape you are creating in the help message area of the Status bar.
3. Let go of the mouse button when you are happy with the dimensions of your rectangle. You will now notice two little white square handles and one circle handle at the corners. The Status bar will provide some useful tips if you hover the mouse pointer over them.
4. Click on the circle handle while holding the Ctrl key and drag downwards to make the corners evenly rounded.
5. Move one of the square handles to resize the rectangle without changing the corner's radii, keeping the horizontal and vertical radii the same. Notice that if you reduce the width or height more than the corner radius, it will change to accommodate the lack of space.
6. Switch to the Selector tool
 (Space or F1 or S). Several arrow shaped handles will now be visible on the sides of the rectangle.
7. Grab the right-hand middle arrow handle and make the rectangle narrower. Notice how the horizontal corner radius now scales proportionally, adapting to change in width, so the horizontal and vertical radii are no longer the same.
8. Select the Rectangle tool (Space or F4 or R) again and click the Make corners sharp button on the rectangle toolbar or click on one of the circular handles while holding Shift. This option cancels all the changes made to round the corners. You can also specify precisely the values of the horizontal (Rx) and vertical (Ry) radii in the rectangle toolbar.
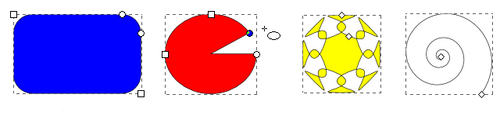
Ellipses, circles, and arcs
1. Select the Ellipse tool
 (F5 or E).
2. Click and drag on the canvas to create an ellipse. Notice two little white square handles and one circle handle. As we did before, hover over the handles with your mouse pointer and read the tips that appear in the Status bar.
3. Move one of the square handles to resize the ellipse.
4. Click on the circle handle and drag to the right and down to delimit a circular segment. Notice there are now two circle handles that control the span of the arc.
5. Continue dragging one of the circle handles around the ellipse always keeping it outside of the ellipse area to create a "pacman" like shape.
6. Click on one of the circle handles and drag inside the ellipse area to change the segment into a circular arc. Drag the cursor inside and outside the ellipse area to see how the shape changes.
7. Click on the Make the shape a whole ellipse, not arc or segment
 button on the ellipse toolbar to get the full ellipse shape back.
8. Create a circle by holding Ctrl while dragging with the selected Ellipse tool.
9. Create another ellipse by holding the Shift key while dragging. This time the mouse click determines the position of the ellipse center, instead of the top-left corner of the bounding box as before.
10. Create another ellipse by holding the Alt key while dragging. This time the first click and the release point will be on the ellipse edge and not the object bounding box.
11. Create a circle by determining its center with the first click and its radius upon release by holding Shift + Ctrl + Alt while dragging.
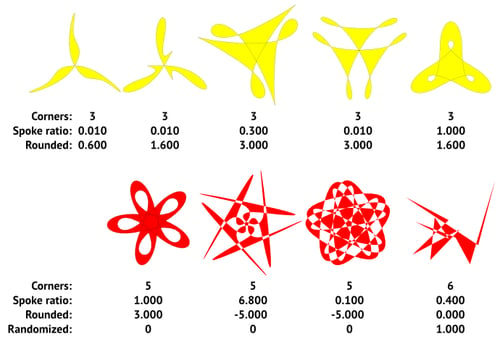
Polygons and stars:
2. Click and drag towards the top while holding Ctrl to create an "upright" star.
3. Hover over the star handles and read the Status bar tips to see which one is the tip radius and which one is the base radius. Drag the base radius outwards evenly by holding Ctrl so it's longer than the tip radius.
4. Increase the number of corners to 8 by editing the Corners: option on the Star toolbar.
5. Drag the tip radius while holding Shift to round it. The Rounded: number on the toolbar will be negative.
6. Drag the base radius while holding Shift to round it in the other direction. The Rounded: number on the toolbar will be positive.
7. Turn the star into a polygon by clicking on the Regular polygon
 button on the toolbar. Notice how the corners are still rounded.
8. Hover over the polygon tip radius handle and notice what the Status bar has to say about it. Then, drag the handle while holding the Alt key to apply randomization to the position of the corners and create an irregular shape.
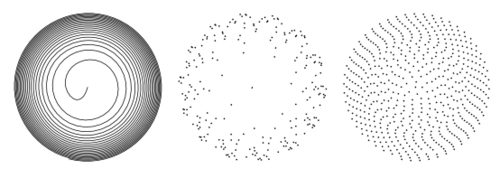
Spirals:
2. Click and drag on the canvas to create an Archimedean spiral.
3. Hover over the spiral's inside and outside handles and read the Status bar tips.
4. Drag the inside handle to unwind it one turn, then drag the outside handle to create one more turn.
5. Drag the inside handle upwards while holding Alt to decrease the divergence and then downwards to increase it.


Here's what some of the preceding steps look like:
As we have seen, Inkscape's 2D shape tools create special kinds of objects because they have additional editing parameters for their geometric qualities. By converting them to regular path objects by using the Object to Path  (Shift + Ctrl + C) option, these special parameters will be lost in the process. This is a tradeoff we will sometimes need to make in order to make use of some extensions and effects that can only be applied to regular paths.
Now that we know how to create simple shapes, we can advance to more interesting objects.
Users trying Inkscape for the first time are sometimes confused when they don't find a special tool that creates lines. Such a tool isn't necessary because every object in Inkscape can be made to look like a line: remove the fill, adjust the stroke to your desired look and you've got a line. This means that all tools in Inkscape can be used to create lines, although some of them are more straightforward and better suited for what most users expect in that area.
In this recipe we will explore how to create freehand and straight lines.
Follow these steps to draw freehand and straight lines:
1. Select the Pencil tool
 (F6 or P) and draw the letter "O", dragging with your mouse on the Canvas as if you were using a pencil on a sheet of paper.
2. Switch to the Selector tool (Space, F1 or S).The information in the Status bar notification area will tell you how many nodes are present in the object.
3. Switch back to the Pencil tool (Space, F6 or P), set Smoothing: slider on the Pencil toolbar to 50 and create another "O".
4. Switch to the Selector tool (Space, F1 or S) again and read the information in the Status bar notification area. Notice that there are fewer nodes this time and the line is smoother.
5. Select the Pen (Bezier) tool
 (Shift + F6 or B) and change its mode on the toolbar to Create a sequence of straight line segments
  so we can create a shape similar to the musical instrument, the triangle.
6. Click on the Canvas to draw the starting point of a line. Move the mouse to the right and you will see a red helper line. Hold Ctrl to keep the angle 0° and look at the Status bar to adjust the line width. Click when the distance is roughly 500 px.
7. Move the mouse to the top-left holding Ctrl to set the angle to 120° and, when you reach approximately a distance of 500 px, click to create the top triangle corner.
8. Release the Ctrl key and move your mouse downwards and to the left. Click to create a point when you reach roughly -123° and a distance of 480 px. The Status bar will report the current values as you move your mouse pointer.
9. Right-click anywhere or press Enter to finish the object.

With the Pencil tool it is important to adjust the Smoothing: slider in order to obtain the desired smoothness in our curved lines, as it determines how sensitive the line is to our mouse movements.
The easiest way to create straight lines is to use one of the modes of the Pen (Bezier) tool (named after the French mathematician Pierre Étienne Bézier) that disables the feature to draw curved segments and creates a sequence of straight line segments.
The objects we created have default styles applied to make them look like lines, but they can also take fill color.
Stroke styles can affect the look of our "lines," and can be set in the Fill and Stroke dialogue (Shift + Ctrl + F) under the Stroke style tab. Joins can be Miter, Round, and Bevel, and Caps can be Butt, Round, and Square. Individual nodes (control points) of the path can be styled with a custom marker. The marker can be different for start, end, and middle nodes:
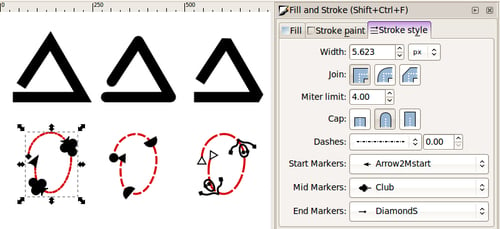
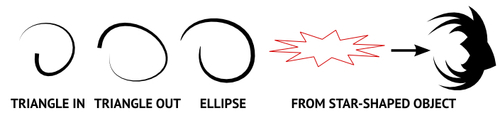
Both Pencil and Pen tools come with the option to automatically draw tapered lines. This can make creating lines more interesting, especially when using a graphics tablet. Before drawing a line we simply select a shape from the toolbar and the shape gets applied to the line when we finish drawing. Readymade shapes are Triangle in, Triangle out, Ellipse, and a custom shape that can be used by copying it and using the From clipboard option.
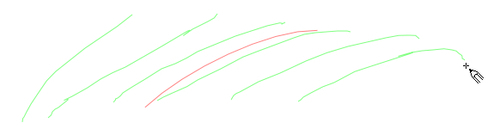
The following are some examples (they can be found in the Lines.svg file accompanying this chapter) where we used the Pencil with Smoothing: set to 50 and drew the letter "O":
In Inkscape, lines created by the Calligraphy tool  are actually objects with a fill and no stroke. Although we can't bend them easily like we would with lines, they still are quite valuable in a lot of situations, especially when created with a graphics tablet — a highly recommended purchase for any artist interested in creating freehand computer graphics.
Sketch mode is a special mode provided by the Pencil tool when holding the Alt key. This will treat all strokes as an attempt to draw one line, by computing the average and rendering the final result. Our various attempts are displayed in green as we keep drawing and a red line displays the current average, so we can keep tweaking the path until we are satisfied. The following example has been exaggerated to clarify the process; usually strokes are drawn closer together:
You might have guessed that the Pencil and modes of the Pen tool we used in this recipe can't create dots by simply clicking on canvas. However, there is a shortcut that simulates dots by drawing circles of a certain size, by holding Ctrl and clicking with Pencil and straight line modes of the Pen tool. Dot size can be adjusted in Inkscape Preferences (Shift + Ctrl + P). Using Shift + Ctrl will double the dot size and Ctrl + Alt will make it random.
For more information, refer to the recipes Creating calligraphic shapes and Creating smooth paths with Spiro Spline in this chapter, also refer to Chapter 5, Live Path Effects.
Nodes are control points that control the path shape. Nodes can also have tangent control handles that also contribute to the overall result. In this recipe we will use some of the most common node editing facilities.
The following steps will show you how to edit paths:
1. Create an ellipse and convert it to a path (Shift + Ctrl + C) so we can edit it using Node tool. Remove the fill and make the stroke thick (16 worked in my case).
2. Select Node tool
 (F2 or N), and you will see that our ellipse now has four nodes.
3. Select the top and right node by using a rubber band selection box around them or by clicking on them while holding Shift.
4. Make the path open by deleting the segment. Use the Delete segment between two non-endpoint nodes
 button, from the toolbar.
5. Select the bottom node by clicking on it and convert it to a cusp (corner) node by clicking on the Make selected nodes corner
 button (Shift + C).
6. Hover over the right node handle and read the tip in the Status bar. Hold Ctrl + Alt to constrain angles to certain values and to lock handle length while moving, then drag upwards until you reach 90°.
7. Do the same for the left handle, but this time move upwards until it reaches the same point as the right handle.
8. Click and drag the bottom node downwards while holding Ctrl to constrain movement to the vertical Y axis.
9. Select the left and top nodes using a rubber band box.
10. On the toolbar select the Show transformation handles for selected nodes
 button. The transformation handles will now appear around the selected nodes.
11. Click on one of the nodes to change handles to skew/rotate, and position the rotation center over the left node by dragging it there.
12. Drag the top right rotate handle counter-clockwise and release when you reach an angle of roughly 200°.
13. Add another node between the two selected ones by pressing Insert key or by using the Insert new nodes into selected segments toolbar
 button.
14. Select the inserted and the two left-most nodes and convert the segment between them into a straight line by using the Make selected segments lines
 toolbar button (Shift + L).
There are many shortcuts available for editing nodes and this recipe only uses some of them, so you are encouraged to go through the complete list. You can find them under Help | Keys and Mouse Reference (it will open a page in your default Web browser).
Once you learn the most common keyboard shortcuts for each editing mode, you will create graphics in a faster, more productive, and enjoyable way.
Pencil and Pen tools only create cusp nodes and smooth nodes, but symmetric nodes and auto-smooth nodes are also available. As we would expect, symmetric nodes have both handles of equal length and are collinear. To convert a node to symmetric, use Shift + Y or the Make selected nodes symmetric button  on the toolbar. Auto-smooth nodes make sure that the segments they touch always remain smooth. If we move a handle of an auto-smooth node it will automatically become a smooth node. Use the Make selected nodes auto-smooth button
  (Shift + A) to convert any node into an auto-smooth node.
When we use the Delete key to delete selected nodes Inkscape will try to preserve the path shape as much as possible by changing the adjacent node types and handles angles and lengths. There are some cases where this kind of behavior is undesirable; for example, in an object that consists only of straight segments, we expect to get a straight line when we delete a node, and to get that kind of behavior we can use Ctrl + Del. There is an option to toggle this behavior in Inkscape preferences (Shift + Ctrl + P) under Tools | Node | Editing preferences.
In the previous recipe we saw that the Smoothing option in Pencil tool can affect the overall number of nodes created while drawing the path. If we need to smoothen or reduce the number of nodes in an existing path we can use the Simplify option  (Ctrl + L). Inkscape preferences (Shift + Ctrl + P) under Misc hold an option where we can set the strength of the Simplify command; the larger the number, the more nodes are removed and the more distorted the path will be. It might be better to just start with the default value and, if needed, quickly use the Simplify option several times in succession for a better effect.
By holding the Alt key while moving nodes, we will move them in a non-uniform way. The nodes closer to the one that is actually clicked on to move the selection will move with an incremented step. Some fine examples of node sculpting can be viewed in the screenshots gallery of the Inkscape website:
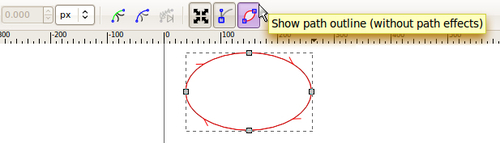
Path direction is important when putting text on paths or when using markers on strokes. It also affects the order in which nodes are selected using the Tab key. Visual indicators for path direction can be enabled in Inkscape preferences (Shift + Ctrl + P) under Tools | Node | Path outline. They only appear when path outline is enabled which can be done by toggling the Show path outline (without path effects) button  on the Node toolbar:
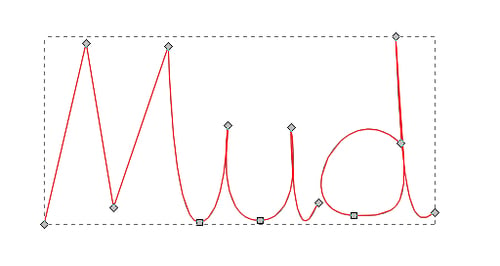
The Pen (Bezier) tool is generally considered somewhat difficult to master but after some practice it can become a valuable tool when we need precision while drawing or tracing something along the edges. In this recipe we will write out the word "Mud" using the Pen tool. Our object will be composed of 2 sub-paths, one for the letters "Mu" and the other for the letter "d".
The following steps will show how to write words using the Pen tool:
1. Select the Pen (Bezier) tool (Shift + F6 or B) and make sure the selected mode on the toolbar is Create regular Bezier path

2. Clicking without dragging creates a cusp (corner) node, so click four times to create the first four points of the letter "M" (at this point it will look like an "N").
3. The fifth and final point of the letter "M" will be a smooth transition into the letter "u". Choose a place where we want the "M" to finish, click, and slightly drag the pointer horizontally without releasing the mouse button to create a smooth node.
4. Click where you want the first point of the letter "u" to be.
5. Click and drag horizontally, where you want the bottom of the letter "u" to be, to create a smooth node. If you're not satisfied with the result, press Del to delete the last node and try again.
6. Click to create the third, top right "u" node.
7. Create the last "u" node by moving to the bottom right, clicking and dragging slightly towards top right until the red helper line partially fits over the previous segment.
8. Right-click or press Enter to finish the first path.
9. Hold Shift while creating the first node of "d", to add the path we are about to create to the first one. Click and drag upwards and to the left.
10. Click and drag downwards and to the right to create the second node of "d" (consult with the screenshot that follows).
11. Click where you want the highest point of "d" to be and drag upwards to adjust the ascenders as you see fit. Don't release the mouse yet.
12. Press Shift while still holding down the mouse button. Move the pointer downwards until you almost reach the baseline of the text; release both the Shift key and the mouse button to create the handle.
13. Click where you want the "d" terminal to end and drag upwards and to the right to adjust the last segment.
14. Right-click or press Enter to complete the path.

A simple click on the canvas will create a cusp (corner) node, while clicking and dragging will create handles of smooth nodes that control the path curvature. When we are creating a cusp node that comes after a curved segment that needs adjusting, we need to use Shift so we can reposition the second handle to create a cusp node. This procedure isn't very intuitive so some users don't think cusp nodes can even be created in such a case, as we have seen, the "d" ascender example proved differently.
We only used some of the keyboard shortcuts and options available for the Pen (Bezier) tool. Look for more under Help | Keys and Mouse Reference. For example, if you want to fine-tune the position of the last node you've drawn, you can move it using the arrow keys. If you don't like the last node you've created, you can quickly delete it using the Backspace or Del keys. Esc or Ctrl + Z will undo the entire path we are drawing, and holding down Ctrl will conveniently snap the rotation handles.
Finally, use the Node tool to make any extra adjustments to the path you've just created.
Spiro Spline is implemented in Inkscape as a live path effect (LPE), but it is conveniently added to the Pencil and Pen tools. Although Spiro Spline was developed for creating fonts, we can use it to quickly and easily create smooth paths.
We will see what the Spiro modes in those tools have to offer in this recipe.
The following steps show how to create a smooth path using Spiro Spline:
1. Select the Pencil tool (F6 or P). On the toolbar, select the Create Spiro path button
 and set Smoothing: to 50.
2. Create a curved shape by writing out the letter "S" as if we were drawing on a sheet of paper.
3. Switch to Node tool (F2 or N) and turn on the path outline by clicking on the Show path outline (without path effects) toolbar button. You will now see both the Spiro shape and the red outline (also called skeleton) of the regular path. The outline shows what the shape would look like without Spiro effect applied.
4. Make the handles visible by using the Show Bezier handles of selected nodes button
 and selecting all the nodes (Ctrl + A).
5. Try moving one of the handles. Notice how the red outline changes but the end result (the Spiro path) remains intact.
6. Move the nodes around and observe how the movements that affect the Spiro path shape always remain smooth.
7. Create a new node at the bottom of the shape by double-clicking on the outline. Notice that you can't do this by clicking on the Spiro path. The more nodes you add to the path the more the outline and Spiro shape look alike.
8. Select the node we just created and convert it to a cusp (corner) node by using the Make selected nodes corner (Shift + C) on the toolbar.
9. Move one of the handles so they aren't collinear any more. If the Spiro path doesn't change, also move the node so the Spiro path has a clear corner point at that node.
10. Create two more nodes that are adjacent to each other by double-clicking on the outline.
11. Select both nodes and convert the segment into a line by using the Make selected segments lines button
 (Shift + L). Notice how this segment is also a straight line in Spiro shape but it smoothly transitions into adjacent segments.
12. Select one of the nodes from the straight line and add its adjacent smooth node to the selection.
13. Convert them to cusp (corner) nodes by using the toolbar button or Shift + C, then use the same option to retract the handles. Since the handles were changed they were no longer collinear so the segment became a straight line even in the Spiro path.
14. Convert the Spiro path to a regular path using the Object to Path option (Shift + Ctrl + C). We now have the shape we desired but without the Spiro editing ability.

As we can see from this example, Spiro paths are affected by the node handles only as far as determining the node type. Collinear handles determine smoothness of the nodes by the curve points in Spiro path. If the handles aren't collinear the Spiro point will be a corner point. The overall shape of a Spiro path is determined by the node types and its positions.
For more information, refer to the recipes on Creating freehand and straight lines, Editing paths with the Node tool, and Creating paths using the Pen (Bezier) tool in this chapter, as well as Chapter 5, Live Path Effects.
The Calligraphy tool comes with a lot of options to change the resulting shape as if we are changing how we use the calligraphic pen or we are using a different brush to create our objects. This recipe will introduce us to those options.
The following steps will show how to use the Calligraphy tool:
1. Select the Calligraphy tool (Ctrl + F6 or C) and create a wavy calligraphic object. Notice how the options from the toolbar affected the shape.
2. Increase the Width: to 70 and Thinning: to 85 and create another wavy object with a similar hand stroke like in step one.
3. Set Width: to 30 and Thinning: to 0 and create another similar shape but this time change the pen width by pressing the Left Arrow and Right Arrow in turns. Draw slowly to enhance the effect.
4. Create another wavy object but this time alternate between Home and End keys while drawing. This will abruptly change the pen width from minimum to maximum.
5. Set the Width: to 40 and alternate between the Up Arrow and Down Arrow keys while drawing. This will change the pen angle as we draw.
6. Set the Angle: back to 30, set Fixation: to 0, and Caps: to 3, and create another wavy object. Notice how the ends are capped.
7. Set the Tremor: to 40 and create another wavy object. Notice the irregular edges.
8. Set the Tremor: to 0 and Wiggle: to 80 and create another wavy object. Notice how the object shape doesn't strictly comply to our mouse movement.
9. Set Wiggle: to 0 and Mass: to 45 and create another object. Notice how drawing it feels slow. We have enough time to move the mouse in the desired direction creating smooth transitions.

The Calligraphy tool can't be experienced fully without a hardware graphics tablet. If you have one, plug it in, configure it using the Input Devices... option under the File menu and have fun creating new and elaborate calligraphic shapes.
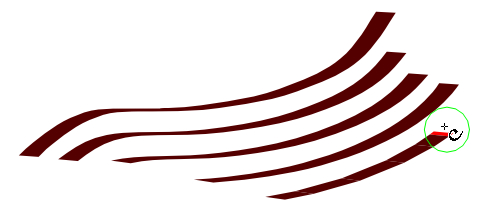
Holding Alt while creating calligraphic paths will work as an eraser on selected objects. This can be convenient when we need to quickly edit objects by trimming parts away because we can use all the calligraphy options or presets. Here is a very quick drawing of a star with the edges and insides treated with Wiggly preset while holding Alt to delete:

Calligraphy tool comes with a set of presets we can use to achieve different calligraphy effects out of the box. Try them out and examine the toolbar settings to get an even better idea of how different settings can be combined.
The Calligraphy tool can also be used to create hatchings; these are parallel, equidistant lines used to create patterns like those found in engravings. Select the path you want to track and hold the Ctrl key while tracking and moving to the next line to keep the path distances equal:
By default when a calligraphy object is created it remains selected, so if we want to change the color of the next object we first need to deselect the one we just created (Esc). If the workflow you like to use with the Calligraphy tool includes changing the object colors before the object is created, then deselect the option Select new path under Tools | Calligraphy in the Inkscape Preferences (Shift + Ctrl + P).
Many users who come to Inkscape from other graphics applications look for an eraser tool when they want to remove something out from an object or do some other similar operations. Although the native way to operate on vector objects is with Boolean path operations. The Eraser tool  can also come in handy.
The following steps will demonstrate how to properly use the Eraser tool:
1. Create a lot of objects by drawing a rectangle and repeatedly pressing Space while dragging the rectangle across the screen.
2. Select the Eraser tool (Shift + E) and make sure the Delete objects touched by the eraser button
 is selected.
3. Drag across the objects that you wish get deleted, they will be completely removed from the drawing.
4. Select the Cut out from objects button
 and increase the Width: to 30.
5. Drag over the objects, and the eraser trail will make holes in the objects. Shapes will automatically be converted into paths. If you want to restrict erasing to particular objects instead of using the whole drawing, select the objects before using the Eraser tool.
In Inkscape, 3D boxes are actually two-dimensional objects arranged according to a defined perspective, in order to provide the illusion of an additional dimension. This recipe shows us the basic options available to manipulate boxes in our fake but very convincing 3D space.
The default positions of the perspective vanishing points are the center of the vertical page edges. That is why it is recommended to start creating a box somewhere inside the page area. To prepare for this recipe open Inkscape and zoom to page size using the Zoom to fit page in window toolbar button (or the 5 key), Zoom to fit page width in window (Ctrl + E or 6) on the Zoom (F3 or Z) toolbar.
The following steps will show you how to create 3D boxes:
1. Select the 3D box tool
 (Shift + F4 or X) and click and drag in the page center area to create the left-hand side of the box. Notice that the other box sides will be created automatically, some of them will be hidden from view. The vanishing points are located on vertical page edges.
2. There is a small cross at the box center that can be dragged to change the box position with respect to the current perspective. Move the box by dragging that cross in all directions and see how the box changes, then return it to the center.
3. Switch to the Selector tool (Space) and move the box object upwards.
4. Switch to the 3D box tool (Space, Shift + F4, or X) again and notice how the vanishing points moved with the box preserving the box shape.
5. Grab the top box corner handle that is closest to the viewer and drag it downwards while holding Ctrl to make the movement vertical.
6. Grab the bottom box corner handle that is closest to the viewer and drag it upwards while holding Ctrl to make the movement vertical. The top and bottom sides of the box shouldn't be visible:

7. Grab the left corner handle of the left box side and drag it towards the right while holding Ctrl to constrain the movement along the converging line.
8. Grab the right corner handle of the right box side and drag it towards left while holding Ctrl to constrain the movement along the converging line. The box should become narrower.
9. Duplicate the box (Ctrl + D) and move it left while holding Shift to constrain the movement to the Z direction. Release when the two boxes stop overlapping.
10. Duplicate the box (Ctrl + D) and move it behind all the others by using End or Page Down keys, or the Lower selection to bottom button
 on the toolbar. Move it right by dragging the cross handle while holding Shift to constrain the movement to the Z direction. Release when it appears next to our original box.
12. Duplicate the box (Ctrl + D) and move it behind all the other ones by using End or Page Down keys. Move it towards the top while holding Ctrl to constrain the movement to the Y direction. Release when you can see its bottom side appear behind the middle box.
13. Duplicate the box (Ctrl + D) and move it behind all the others by using End or Page Down keys. Move it downwards while holding Ctrl to constrain the movement to the Y direction. Release when you can see its top side appear behind the middle box.

14. Move the left vanishing point towards the box, and move the right vanishing point away from the box (outside of the page area) to change the perspective. Notice how all the boxes change together because they all share the same perspective.
15. Move both of the vanishing points downwards and notice how the bottom box doesn't seem in the correct position with respect to the rest of them. Select that box and bring it to the front by using the Home or Page Up keys, or by clicking on the Raise selection to front button
 on the toolbar.
3D boxes are actually groups of six quadrilaterals (shapes with four corners) assembled together for a three dimensional effect. The box sides can change some of its attributes independently while being parts of the box (color for example). However, if we need to perform some other functions on the box we need to convert it to a path (Shift + Ctrl + C). With that conversion we will lose the ability to edit it using the 3D Box tool.
We can enter the 3D box so we can select the individual sides using the Selector tool by using the Ctrl + Enter shortcut. The Node tool can select individual sides even without entering the group.
When there's more than one box sharing the perspective, holding Shift while clicking and dragging a vanishing point can change that box's perspective without affecting the other objects.
The examples we used in this recipe all use 2-point perspective (two vanishing points), but 1-point and 3-point perspectives are also possible. To create a 1-point perspective we need to set X and Y vanishing points to infinity by using their respective parallel buttons on the 3D Box toolbar. Set Angle X: to 180 and Angle Y: to 90. Make sure that the Z parallel button is off and drag the Z vanishing point to the drawing center. Toggling the parallel buttons can be done using the keyboard shortcuts: Shift + X, Shift + Y, and Shift + Z.
To create a 3-point perspective toggle off all three parallel buttons and drag the vanishing points where you like them (usually X and Z vanishing points are at the same level on opposite sides of the object).
An Isometric projection can also be achieved with the 3D box tool. To create it all the parallel buttons must be on and the angles set to X: 150, Y: 90, Z: 30.
For more information, refer to the recipe on Assembling a modern chair using the 3D Box tool in Chapter 8.
Inkscape is often used to produce leaflets, brochures, and User Interface themes, so a tool for creating text objects is obviously necessary. In this recipe we will explore what the Text tool has to offer.
The following steps will show you how to use the Text tool:
1. Select the Text tool
 (F8 or T) and create a text object by clicking on canvas (without dragging). Type "FUNstack" but place the "stack" on the next line.
2. Select your favorite font family from the drop-down list in the Text toolbar. The example in this book uses 'Doulos SIL'.
3. Increase the text size to 144 by selecting it from the Font size (px) drop-down box.
4. Make the text bold by clicking on the Bold
 button. This will work only if the bold variant of the font exists.
5. Center the text using the center toolbar button.
6. Reduce the spacing between lines (line-height or leading) by using the toolbar button or Alt + Up Arrow when the text cursor is positioned before the letter "s".
7. Select the letters "FUN" dragging with the Text tool across them and increase the spacing between letters by using Alt +> or the toolbar box.
8. Select the "t" letter and shift it upwards by using the vertical shift box or Alt + Up Arrow.
9. Rotate the "t" letter by using Alt + [ or by using the toolbar button.
10. Select the letter "a" and move it to the left by using the Alt + Left Arrow or the toolbar button.

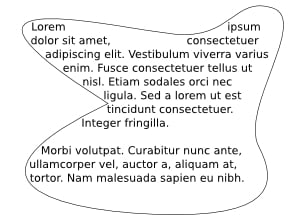
Clicking on the Canvas with the Text tool creates a normal text object. The alternative is to click and drag to create a frame into which text will be written (a flowed text frame). Not all formatting options are available in flowed text frames (kerning for example) so we might use it to enter text into a predefined rectangle area and then convert it to a normal text object using the Convert to text option  from the Text menu.
The Text and Font dialogue (Shift + Ctrl + T) can be used to preview any font changes before applying them, and it is also possible to choose the default settings for some of the text editing options.
A flowed text frame can be used when we need to have our text fit a rectangle shape, but if we need it to fill something more exotic we need to use the Flow into Frame option (Alt + W). Both the text object and the shape need to be selected before calling this option.
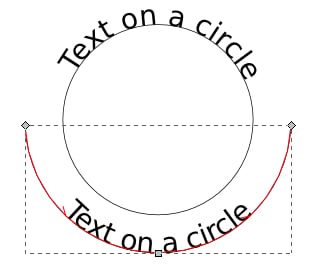
Putting text on paths is commonly used when we need to put text on a circle or some other shape. The direction of the path is important because it determines the text direction. Shift + R changes the path direction. You can visualize the path direction by enabling it in Inkscape Preferences  (Shift + Ctrl + P) under Tools | Node and turning on the path outline using the button on the Node toolbar. To place the text on the shape, select both objects and then choose Text | Put on Path
  from the menu.
In this recipe we will see how to completely hide parts of a drawing in a non-destructive manner.
The following steps will show you how to clip an object:
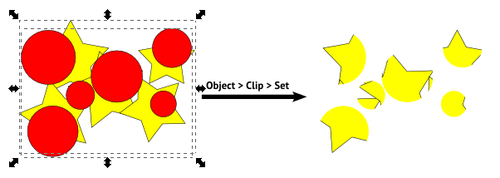
1. Select the Star tool (Shift + F9 or *) and create an upright star by dragging upwards while holding Ctrl key. This is the object we want to clip.
2. Select the Ellipse tool (F5 or E) and create a circle by holding Ctrl while dragging. Make the circle a bit smaller than the star and position it above the star. The circle will be our clipping object.
3. Select both of our objects (Ctrl + A) and clip them by using the Object | Clip | Set command. Notice how the circle disappears from the drawing and parts of the star previously not covered by the circle are hidden. Check the Status bar notification area tips and you will see the star is labeled as clipped.

4. Select the Star tool (Shift + F9 or *) and move the star handles to change the shape of the object. Notice how the same circle area remains visible while the rest is hidden no matter how we edit the star.
5. Select the Node tool (F2 or N) and enable the Show clipping path(s) of selected object(s) toolbar
 button You will now see the outline of the clipping object in green.
6. Edit the clipping circle by using the ellipse handles. Notice how this reveals or hides different parts of the star object.
Although the clipped object looks like some of its parts have been cut off, they are actually only hidden and can be edited even while being clipped. To "unclip" an object use the Object | Clip | Release option.
Note
Clipping object color
The clipping object color isn't relevant, as only the shape determines what is hidden or revealed, but it is helpful to color it differently from the rest of the drawing so it's easier for us to predict what the final result might look like.
Clipping is handy in many situations. For example, it can be used to rapidly produce galleries of banners or portraits using a common, irregularly shaped frame as the clipping object.
We only used simple one object clippings in this recipe but clipping also works with groups, either as clipped or clipping objects. The following is an example where we clipped a group of stars with a group of circles:
Note
Clipping and automatic grouping
There is a very useful option in Inkscape Preferences (Shift + Ctrl + P) under Clippaths and masks to automatically group the object(s) we want to clip. If we set it to Enclose every clipped/masked object in its own group all objects will get their own independent clipping objects; if you edit one object's clipping path, the others will remain unchanged. If we choose Put all clipped/masked objects into one group, editing the clipping path will affect the whole group of objects as if it was a single object.
Grouping a single object before clipping can be very useful when we need to position the object differently with respect to its clipping object, as we can enter the group and move the object around without moving the clipping object or unclipping.
In this recipe we will see how to make certain areas of a drawing transparent without applying permanent changes to the elements of the drawing itself, thanks to the use of masking objects.
The following steps show you how to create an object masking:
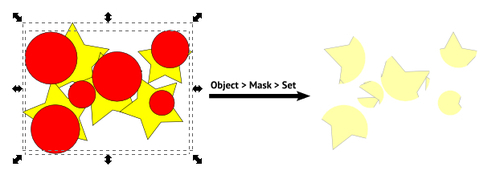
1. Select the Star tool (Shift + F9 or *) and create an upright star by dragging upwards while holding Ctrl key. This is the object we want to mask.
2. Select the Ellipse tool (F5 or E) and create a circle by holding Ctrl while dragging. Make the circle a bit smaller than the star and position it above the star. The circle will be our masking object.
3. Make the circle fill color White by clicking on the white colored chip in the color swatch under the canvas.
4. Create a radial gradient by selecting the Gradient tool
 choosing the radial gradient, clicking in the center of our circle, and then dragging outwards. Increase the stroke width (10 worked in my case) and set its color to White.
5. Select both of our objects (Ctrl + A) and apply the masking by using the Object | Mask | Set command. The star will appear to be clipped, but if we read the Status bar notification area tip, we will see that the star is actually labeled as masked.

6. Select the Star tool (Shift + F9 or *) and move the star handles to change the star shape.
7. Select the Node tool (F2 or N) and enable the Show mask(s) of selected object(s) toolbar button. You will now see the outline of the masking object in blue.
8. Edit the masking circle by using the ellipse handles.
The masking object, in addition to acting as a clip path, will use its colors to make parts of an object opaque or transparent. In parts where the masking object is white, the masked object will be visible, and in parts where the masking object is black or transparent, the masked object will be transparent. Mask colors aren't limited to black and white though, any color can be used and the masking will be determined by the color lightness and opacity.
The masked object can be edited while being masked or it can be released from the mask by using the Object | Mask | Release option.
As with clipping, masking can also be performed on groups and by groups. The following are the two groups from the clipping recipe, only now we have used masking:
For more information, refer to the Making objects partially transparent and Creating linear gradients in Chapter 2.
Inkscape comes with several useful path operations that enable us to assemble complex objects from simpler ones, thus speeding up the process of creating elaborate drawings.
The following steps outline some useful path operations:
1. Create a rectangle using the Rectangle tool (F4 or R) and a star using the Star tool (Shift + F9 or *). Position the star over the top rectangle edge so it partially overlaps the rectangle.
2. Select both objects (Ctrl + A) and perform a union on them using the Path | Union option
 or Ctrl + +. Notice how we now have only one object with the same outline as the previous objects combined:
3. Create a circle with the Ellipse tool (F5 or E) and position it over the object we got in the previous step.
4. Select both objects (Ctrl + A) and perform a difference using the Path | Difference option
 or Ctrl + -. Notice that we now have only one object that was made by subtracting the top from the bottom one:
5. Create an ellipse using the Ellipse tool (F5 or E) that is a bit wider than the object from the previous step and position it over the upper half of that object (I also lowered the opacity a bit so it's easier to see what we're doing.)
6. Select both objects (Ctrl + A) and perform an intersection using the Path | Intersection option
 or Ctrl + *. This option is the same as Clipping, only destructive, since we can't get the original shape back:
 7. Create a rectangle using the Rectangle tool (F4 or R) that is larger than the object from the previous step, and center it over that object (I also lowered the opacity a bit so it's easier to see what we're doing.)

8. Select both objects (Ctrl + A) and perform an exclusion using the Path | Exclusion option
 or Ctrl + ^. This operation is like a reverse Difference:
9. Create a rectangle using the Rectangle tool (F4 or R) that is approximately half the size of the object from the previous step, and position it over the bottom area of that object (I also lowered the opacity a bit so it's easier to see what we're doing.)
10. Select both objects (Ctrl + A), duplicate them (Ctrl + D), and move away the selection (duplicated objects). We will use them in a later step.
11. Select the original two objects using a rubber band selection or by clicking on one and using Shift while clicking on the other to add it to the selection. Then perform a division using the Path | Division
 option or Ctrl + /.
12. Deselect using the Esc key and then select each of the resulting objects and move them away so that each subpath of the original object is divided separately.

13. Select the objects we had previously duplicated and set aside, and cut the paths using the Path | Cut Path option
 or Ctrl + Alt + /.
14. Deselect using the Esc key and then select each of the resulting objects and move them away to see how all the sub-paths of the original object were cut independently. Paths that are generated with the Cut Path operation are open so their fill is removed to make it more clear.

We only used two objects at a time to demonstrate different path operations but more than two paths can be used to perform Union, Intersection, and Exclusion.
If we use Open Paths with path operations they will be closed in the process by connecting its end points with a straight line. If we use shape objects (rectangle, ellipse, or stars) they will automatically be converted to paths.
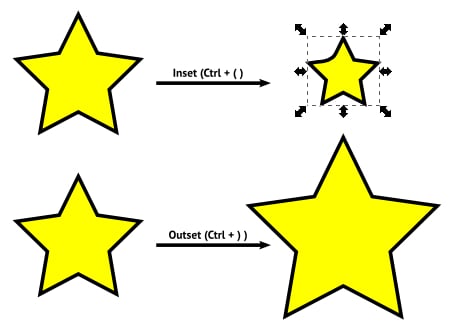
Inset and Outset aren't path operations but what they do is similar enough to include them in this recipe. Inset (Ctrl + ( ) and Outset (Ctrl + ) ) moves the path edge towards the center or away from the object center by an equal amount. Here are some examples:
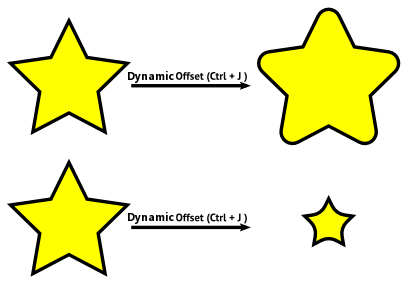
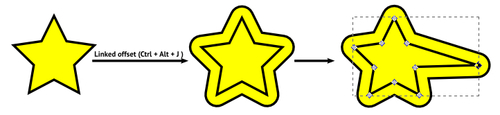
Dynamic Offset moves the path edge towards or away from the object center using a square handle that appears when this option is selected. The end result is not an editable path, and if we want to edit it further we have to convert it to a path (Shift + Ctrl + C). This effect isn't destructive like the Inset and Offset options. Here are some examples: