


 Download code from GitHub
Setting Up a Development Environment
Blynk is known as the most user-friendly IoT platform consisting of an app builder that can be run on iOS and Android operating systems, and a set of libraries to build amazing IoT applications in minutes with your favorite hardware platform. It allows you to quickly build interfaces by simply dragging and dropping widgets to control and monitor your hardware projects from your iOS and Android device.
In this chapter, you will learn about:
- Hardware platforms, connection types, architecture, ecosystem, and online resources
- Installing Blynk app builder on Android
- Creating a user account with the Blynk app builder to log in to Blynk Cloud
- Creating a new project with Blynk
- Preparing Raspberry Pi by adding SD card, Ethernet cable, Wi-Fi dongle, and power supply
- Writing Raspbian Stretch Lite on Raspberry Pi by flashing image to SD card with Etcher
- Configuring SSH on Raspberry Pi
- Installing prerequisite packages such as git-core and WiringPi on Raspberry Pi
- Using PuTTY to connect with Raspberry Pi with SSH protocol
- Configuring wireless connection on Raspberry Pi for Raspbian Stretch Lite
- Connecting Raspberry Pi with Blynk Cloud by running the sample C++ source file
What is Blynk?
Blynk was born as a Kickstarter project created by Pasha Baiborodin, and backed by 2,321 supporters who pledged $49,235 to help bring it to life. This is more than the finally announced stretched goal that is $26,000. Blynk is one of the successfully completed projects listed on Kickstarter (https://www.kickstarter.com/):

Hardware platforms
Blynk supports hardware platforms such as Arduino, Raspberry Pi, and similar microcontroller boards to build hardware for your projects. The following is a list of some microcontroller boards that can be coupled with Blynk:
- Espressif (ESP8266, ESP32, NodeMCU, WeMos D1, Adafruit HUZZAH, SparkFun Blynk Board, SparkFun ESP8266 Thing)
- Linux (C++) (Raspberry Pi, Ubuntu)
- Arduino (Arduino UNO, Arduino MKR1000, Arduino MKRZero, Arduino Yun, Arduino 101, Arduino Zero, Arduino M0, Arduino M0 Pro, Arduino Nano, Arduino Leonardo, Arduino Due, Arduino Mega 2560, Arduino Mega 1280, Arduino Mega ADK, Arduino Micro, Arduino Pro Micro, Arduino Mini, Arduino Pro Mini, Arduino Fio, Arduino Decimilia, Arduino Duemilanove, Arduino Pro, Arduino Ethernet, Arduino Leonardo ETH, Arduino Industrial 101)
- Particle (particle core, particle photon, particle electron)
You can read the list of up-to-date hardware that you can use with Blynk at https://github.com/blynkkk/blynkkk.github.io/blob/master/SupportedHardware.md.
Connection types
Blynk supports the following connection types to connect your microcontroller board (hardware) with the Blynk Cloud and Blynk's personal server:
- Ethernet
- Wi-Fi
- Bluetooth
- Cellular
- Serial
However, throughout this book, you will only focus on Wi-Fi and Ethernet connection types to connect with Blynk Cloud and Blynk's personal server.
Blynk architecture
The Blynk platform includes the following components:
- Blynk app builder: Allows to you build apps for your projects using various widgets. It is available for Android and iOS platforms.
- Blynk server: Responsible for all the communications between your mobile device that's running the Blynk app and the hardware. You can use the Blynk Cloud or run your private Blynk server locally. It's open source, could easily handle thousands of devices, and can even be launched on a Raspberry Pi.
- Blynk libraries: Enables communication with the server and processes all the incoming and outcoming commands from your Blynk app and the hardware. They are available for all the popular hardware platforms.
All the aforementioned components communicate with each other to build a fully functional IoT application that can be controlled from anywhere through a preconfigured connectivity type. You can control your hardware from the Blynk app running on your mobile device through the Blynk Cloud or Blynk's personal server. It works the same in the opposite direction by sending rows of processed data from hardware to your Blynk app.
Blynk ecosystem
The Blynk ecosystem consists of the following partners. They can cover anything from electronic components, to manufacturing and data plans:
- Intel IoT Solutions Alliance
- SparkFun Electronics
- Espressif
- Arduino
- Texas Instruments
- Proximus
- Deutshe Telekom
- Particle
- Samsung
- littleBits
- Hologram
- ThingSpeak.com
- Electric Imp
- Punch Through
- Codebender
- RedBearLab
- Wicked device
- TinyCircuits
Online resources
Blynk provides the following online resources through their website:
- Getting started: Guides you how to connect your Arduino with Blynk Cloud by writing sketch with Arduino's Integrated Development Environment (IDE) (http://www.blynk.cc/getting-started).
- Documentation: Provides a comprehensive documentation about how to work with the Blynk app builder, Blynk libraries, Blynk Cloud, and Blynk's personal server. This guide mainly focuses on the Arduino development environment (http://docs.blynk.cc/).
- Forum: There are thousands of people around the globe who are willing to help your Blynk projects through this conversation board. You can register with the Blynk forum by creating a new account with it, posting your questions, discussing with experts, helping others, and sharing your work with others (http://community.blynk.cc/).
The Blynk app builder
The Blynk app builder provides an easy way to build IoT apps that can be run on smartphones and tablets. It provides a predefined set of draggable and droppable modules known as widgets, and allows the users to make further configuration on widgets with an easy-to-use user interface. Using the app builder, you can build apps for your personal use or business purposes, as shown in the following screenshot.
If you want to build an app with Blynk for business purposes, visit http://www.blynk.io/business/ for more information:
Installing the Blynk app builder
The Blynk app builder is currently available for Android and iOS platforms. The following steps explain how to install the Blynk app builder on your Android smartphone or tablet:
- Tap the apps icon in the lower-right corner of the home screen (consider that this is the default location).
- Swipe left and right until you find the Play Store icon.
- Tap the Play Store icon.
- The first time you open the Play Store, you may be prompted to sign in with your Google credentials. If you still don't have a Google account, you can create a free account with Google.
- Once you sign in with Google Play Store, you can search for a specific app.
- Tap the magnifying glass in the upper-right corner, type in the name blynk, and tap the magnifying glass on the keyboard to execute the search. You will get a result on the screen as follows:

- Tap INSTALL to start the installation process. Also, you can find more information about the app by tapping the MORE INFO button:

- Tap ACCEPT to allow the Blynk app to access some resources on your mobile device:

- The installation process will take some time depending on the bandwidth of your internet connection.
- After completing the installation, you can open the Blynk app by tapping on the OPEN button with Google Play. This will help you to open the Blynk app builder for the first time without moving to the home screen of your smartphone or tablet:

- After installation, an application icon associated with the Blynk app builder can be found on the home screen of your smartphone or tablet:

Creating a Blynk account
Before you start to create applications with the Blynk app builder, you should create a user account with Blynk Cloud. The following steps will guide you through how to do that:
- Open the Blynk app builder on your mobile device by tapping on the application icon labeled Blynk.
- Tap Create New Account.
- Alternatively, you can log into the Blynk app builder with your Facebook account by tapping on the Log In with Facebook button:

- On the Create New Account page, type your email address for the username, and a password.
- Then, tap the Sign Up button:

- A user account will be created, and you will automatically be logged in to the Blynk app builder (Blynk Cloud).
- First, you will be notified on how energy works. Tap on the Cool! Got it. button:

- At any time, you can log out from the app builder by tapping the log out icon in the toolbar. When prompted, tap LOG OUT, or tap CANCEL if you want to stay logged in.
- When you log into the Blynk app builder again, type in your email address associated with the Blynk account and the password, then tap Log In.
- You can reset your password by tapping Reset Password at any time.
Creating a new project
Now that you have created a new account with Blynk Cloud and logged in to your Blynk app builder running on your smartphone or tablet, you can follow the following steps to create a new project with the Blynk app builder:
- To start building a project, tap New Project. This will bring you to the create New Project wizard:

- Type in demo in the Project Name textbox:

- Tap the CHOOSE DEVICE dropdown box to see the available hardware models (the default is ESP8266). Then, tap Raspberry Pi3 B from the Select your hardware list. You may find other versions of the Raspberry Pi as well. Following are the available options for Raspberry Pi versions:
- Raspberry Pi 2/A+/B+
- Raspberry Pi 3 B
- Raspberry Pi A/B (Rev2)
- Raspberry Pi B (Rev 1)
- After choosing the hardware model, tap OK:

- Tap on the CONNECTION TYPE dropdown list to see the available connection types. Then select WiFi from the CONNECTION TYPE list, followed by OK.
- Tap the Create button to create the project workspace:

- After successfully creating the project, the app builder will send an auth
token to confirm your project. Every new project you create will have its
own auth token. The auth token is a unique identifier that consists of alphanumeric characters, and authorizes you to access the Blynk Cloud,
located at https://www.blynk.cc/:

- At the same time, you'll have an auth token automatically sent to the email address you provided.
- Tap the nut icon in the toolbar to get to the Project Settings page. Then, scroll down to find the DEVICES section. Tap demo Raspberry Pi 3 B (WiFi).
- Alternatively, you can tap Email all under AUTH TOKENS to get all the Auth tokens on your email provided for each project in your Blynk account. You can also tap Copy all to copy all the Auth tokens to your mobile device's clipboard:

- On the My Devices page, tap demo Raspberry Pi 3 B(WiFi) under My Devices:

- You can find the Auth token under the AUTH TOKEN section, but it only shows the last four alphanumeric characters. You can tap the E-mail button to send it to the email account again:

You will learn how to use the Auth token with your C++ code later in this chapter.
Getting parts
Blynk supports over 400 hardware platforms and major connectivity types such as Ethernet, Wi-Fi, Bluetooth, Bluetooth Low Energy, and USB; however, it is very difficult to explain how to build devices for Blynk using all the supporting hardware platforms in a single book. Therefore, this book will be using Raspberry Pi as the hardware platform to demonstrate the ability and power of Blynk.
Raspberry Pi
Raspberry Pi is a small, programmable device. It is a mixture between a very small computer and a programmable embedded board. You can connect the Raspberry Pi to the internet through Wi-Fi or Ethernet. You will be using Raspberry Pi 3, the latest model of the Raspberry Pi family, as the hardware platform; however, you can use other versions of Raspberry Pi, such as Raspberry Pi 2/A+/B+ and Raspberry Pi A/B (revision 2) to work with projects that we will be discussing throughout the book.
Here is a list of the Raspberry Pi boards available in reverse chronological order:
- Raspberry Pi 3 Model B (third-generation single-board computer)
- Raspberry Pi 2 Model B (the Raspberry Pi 2 Model B is the second-generation Raspberry Pi)
- Raspberry Pi 1 Model B+ (the model B+ is the final revision of the original Raspberry Pi)
- Raspberry Pi 1 Model A+ (the model A+ is the low-cost variant of Raspberry Pi)
- Raspberry Pi Zero W (single-board computer with wireless and Bluetooth connectivity)
- Raspberry Pi Zero (lowest-cost single-board computer)
Refer to the following screenshot:
Following is the list of important specifications of Raspberry Pi Model 3:
- Quad Core 1.2 GHz Broadcom BCM2837 64-bit CPU
- 1 GB RAM
- BCM43438 wireless LAN and Bluetooth Low Energy (BLE) on board
- 40 extended GPIO pins
- 4 USB 2 ports
- 4 Pole stereo output and composite video port
- Full-size HDMI
- CSI camera port for connecting a Raspberry Pi camera
- DSI display port for connecting a Raspberry Pi touchscreen display
- Micro SD port for loading your operating system and storing data
- Upgraded switched Micro USB power source up to 2.5 A
You will learn more technical details about Raspberry Pi in Chapter 2, Building Your First Blynk Application.
Raspberry Pi can be plugged in to a computer monitor or TV, and uses a standard keyboard and mouse. If you want, you can use the Raspberry Pi without attaching a monitor/TV, keyboard, or mouse.
You will need the following things to prepare your Raspberry Pi before installing Raspbian:
- SD card: 8 GB class 4 SD card is recommended; however, you can use one with higher capacity like 16 GB, 32 GB, or 64 GB. But having a class 10 micro SD card in your Raspberry Pi is very much recommended. Don't use SD cards lower than class 4, because they provide very low writing speed. The following screenshot shows an 8 GB Kingston class 4 micro SD card. The SD card works as the hard drive of your Raspberry Pi:
- Power supply: Raspberry Pi is powered by a micro USB power supply. You'll need a good-quality power supply that can supply at least 2 A at 5V for the Raspberry Pi 3 Model B, or 700 mA at 5V for the earlier, lower-powered models. The following screenshot shows a micro USB power supply for Raspberry Pi:
- A Wi-Fi dongle (required for earlier, lower-powered models): Allows you to connect your Raspberry Pi to a wireless network. The following screenshot shows the official and recommended universal USB Wi-Fi dongle for Raspberry Pi.
- Ethernet (network) cable [Model B/B+/2/3 only]: An Ethernet cable is used to connect your Pi to a local network and the internet. The following screenshot shows an Ethernet cable:
Setting up Raspberry Pi
Let's see how to set up Raspberry Pi:
- Place your SD card into the SD card slot on the Raspberry Pi. It will only fit one way
- Plug your keyboard and mouse in to the USB ports on the Raspberry Pi
- Connect your HDMI cable from your Raspberry Pi to your monitor or TV
- Connect a Wi-Fi dongle to one of the USB ports (unless you have a Raspberry Pi 3)
- The Raspberry Pi is powered by the micro USB power supply
Setting up software on Raspberry Pi
The SD card works as the hard drive of your Raspberry Pi. As you know, every computer should have an operating system to manage.
The official operating system for Raspberry Pi is known as Raspbian. The Raspbian OS can be installed on the SD card.
Installing Raspbian
Raspbian is the officially supported operating system for Raspberry Pi by the Raspberry Pi Foundation. Raspbian can be installed on Raspberry Pi through NOOBS, or as a standalone image:
- Browse the page https://www.raspberrypi.org/downloads/ on the Raspberry Pi website. You can find two options at the top of the page:
- New Out Of Box Software (NOOBS): An easy operating system installer for beginners
- Raspbian: The officially supported Raspberry Pi operating system based on Debian
- Click Raspbian:

- You will navigate to the https://www.raspberrypi.org/downloads/raspbian/ page. Click on RASPBIAN STRETCH LITE, which is a minimal image based on Debian Stretch:

- You can directly download the image file as a Zip file, or you can download it through the torrent. I found that downloading through the torrent is the fastest and most convenient way, but you will need a torrent client installed on your computer. uTorrent and BitTorrent are a couple of the popular clients. You can find plenty of resources on the internet on how to install and use torrent software.
- Extract the downloaded compressed image file using 7-Zip (Windows), or the Unarchiver (macOS). You will get an image file like 2017-11-29-raspbian-stretch-lite.img. The first part of the filename indicates the date on which you downloaded the file.
Writing Raspbian Stretch Lite image on SD card
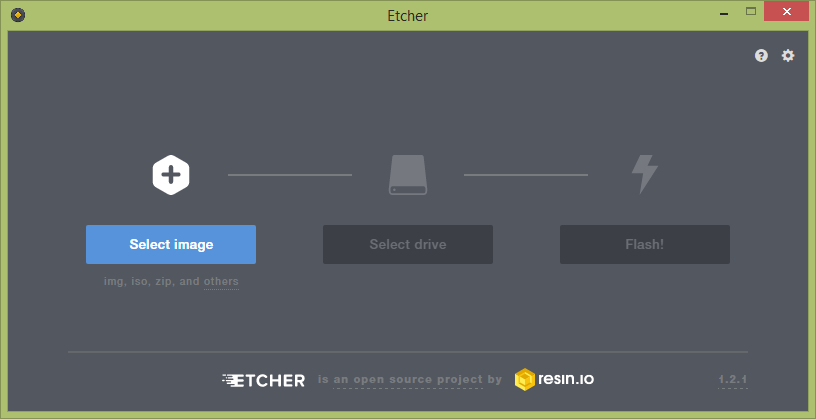
You will need to use an image writing tool to install the image you have downloaded on your SD card.
Etcher is a graphical SD card writing tool that works on macOS, Linux,
and Windows, and is the easiest option for most users. Etcher also supports
writing images directly from the ZIP file, without any unzipping required.
You can download Etcher at https://etcher.io/:
- From the drop down-list, choose the operating system you are going to use to run Etcher (I chose Etcher for Windows x64):

- The executable file will start downloading, and will be saved to your computer's Downloads folder. You can use Etcher on your computer without installing it. Just run the executable file (Etcher-Portable-1.2.1-x64.exe) to launch the application:

- Connect the micro SD card to your computer. You can use an SD card reader to connect it to your computer. Once connected, Windows will recognize it as a removable drive.
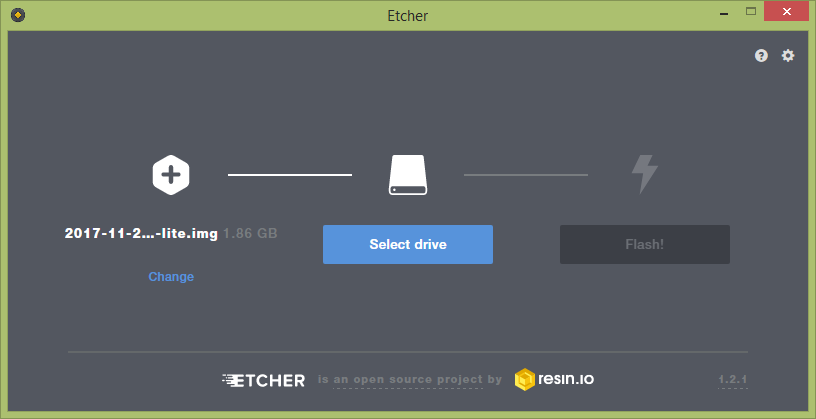
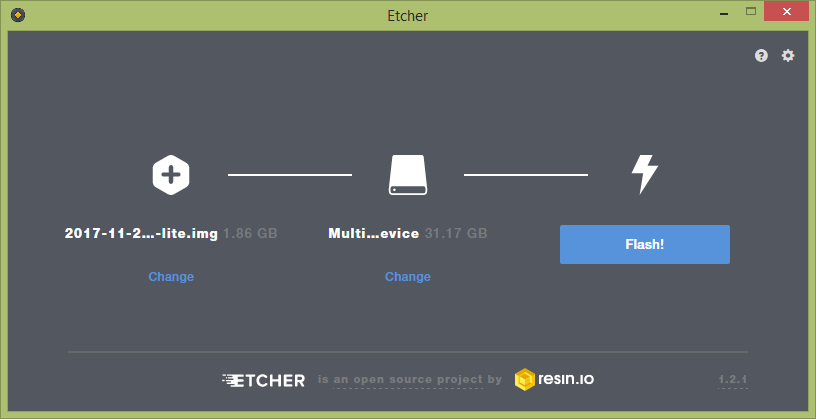
- Click the Select Image button, browse the Raspbian image file (2017-11-29-raspbian-stretch-lite.img), and click the Open button. The following screenshot shows the resultant window after selecting the image file:

- Click the Select Drive button and choose the SD card. The following screenshot shows the resultant window after selecting the drive for the SD card:

- Click the Flash! button to write the image on your micro SD card. The following screenshot shows the window during flashing. When you get a message from Windows User Account Control, click the Yes button to proceed:

Creating a configuration file for SSH
The Raspbian Stretch Lite doesn't have any configuration settings enabled to work with the SSH protocol for secure remote login from another computer. Therefore, first you should create a configuration file to enable the use of the SSH protocol:
- With the SD card connected to your computer, open Command Prompt and change to your Pi's boot partition (let's assume the boot partition of the SD card is i):
C:>i
- Then type the following command to create an empty file named .ssh on the root of the boot partition of the SD card:
i:>echo .ssh
- Remove the SD card from your computer, and place it into the SD card slot on the Raspberry Pi. It will only fit one way.
- Connect the USB Wi-Fi dongle to one of the USB ports (unless you have a Raspberry Pi 3).
- Connect the Ethernet cable between your Raspberry Pi and the router.
- Finally, connect the power supply to the micro USB port of the Raspberry Pi, and apply power. You will see a steady red LED and intermittently flashing green LED. Wait until the green LED turns off.
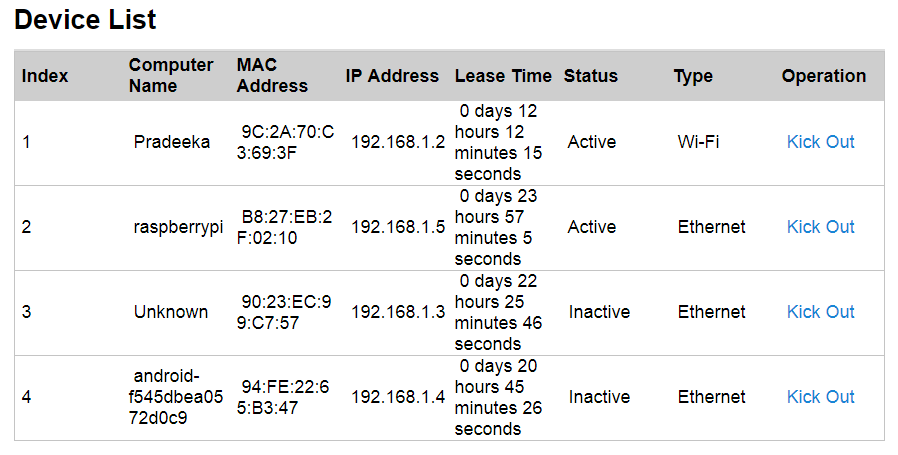
- Log into your router's portal and find the dynamic IP address assigned with your Raspberry Pi:

- You will notice that the allocated IP address for my Raspberry Pi is 192.168.1.5. You may get a different IP address based on your network topology.
Connecting with Raspberry Pi with SSH
SSH allows you to secularly log into the Raspberry Pi from your computer. PuTTY can be used to establish the connection between your computer and Raspberry Pi, and provides a terminal to run commands on Raspberry Pi. You can download PuTTY at http://www.chiark.greenend.org.uk/~sgtatham/putty/download.html.
The following steps will show you how to use PuTTY on Windows:
- Open PuTTY by running the downloaded executable file (putty.exe).
- In the PuTTY Configuration window, type in your connection settings:
- Host Name (or IP address): IP address assigned by your router like 192.18.1.5
- Port: 22
- Connection type: SSH
- Then click the Open button to start the SSH session:

- If this is your first time connecting to Raspberry Pi from your computer, you will see the PuTTY security alert. Accept the connection by clicking the Yes button:

- Once the SSH connection is open, you should see a terminal. Type in the following default credentials to log into your Raspberry Pi. Press Enter following each input:
login as: pi
pi@192.168.1.5's password: raspberry
- You are now logged in to your Raspberry Pi with SSH.
- When typing your password, you will not see the cursor moving, or any characters typed on your terminal screen:

- Log into Raspberry Pi using your default username and password.
Configuring a wireless connection on Raspberry Pi
Now you can configure the wireless connection to allow your Raspberry Pi to connect with your home or school Wi-Fi network. The following steps will guide you through how to configure the connection settings:
- Open the wpa_supplicant configuration file in nano using the following command:
pi@raspberrypi:~ $sudonano /etc/wpa_supplicant/wpa_supplicant.conf
- Go to the bottom of the file and add the following:
network={
ssid="testing"
psk="testingPassword"
}
- If the network you are connecting to does not use a password, the wpa_supplicant entry for the network will need to include the correct key_mgmt entry:
network={
ssid="testing"
key_mgmt=NONE
}
- Alternatively, you can use the wpa_passphrase utility to generate an encrypted PSK:
network={
ssid="testing"
#psk="testingPassword"
psk=131e1e221f6e06e3911a2d11ff2fac9182665c004de85300f9cac208a6a80531
}
- If you are using a hidden network, an extra option in the wpa_supplicant file, scan_ssid, may help connection:
network={
ssid="yourHiddenSSID"
scan_ssid=1
psk="Your_wifi_password"
}
- Now save the file by pressing Ctrl + X, then Y, then finally press Enter.
- Reboot your Raspberry Pi for the new configurations to take effect by issuing the following command:
pi@raspberrypi:~ $sudo reboot
- You can verify if it has successfully connected by using ifconfig wlan0. If the inetaddr field has an address beside it, the Raspberry Pi has connected to the network. If not, check that your ssid and psk are correct:

- Otherwise, you can verify the wireless connection between your Raspberry Pi and router by logging into your router's configuration page.
Refer to the following screenshot:

- Now you have successfully connected your Raspberry Pi to the home router's wireless network.
Installing prerequisite software on Raspbian
Now you're ready to install all the required software on your Raspberry Pi to prepare it to work with Blynk Cloud:
- Update and upgrade packages
- git core
- WiringPi
- Blynk libraries
Updating and upgrading Raspbian
Let's see how to update and upgrade Raspbian:
- First, update your system's package list by entering the following command:
pi@raspberrypi:~ $sudo apt-get update
Refer to the following screenshot:

- Then, upgrade all your installed packages to their latest versions with the following command:
pi@raspberrypi:~ $sudo apt-get dist-upgrade
- When prompted, press Y to continue:

Installing git
You will need to install git-core on your Raspberry Pi to work with git repositories for cloning packages like WiringPi, and Blynk libraries.
- With the SSH to your Raspberry Pi with PuTTY, run the following command:
pi@raspberrypi:~ $sudo apt-get install git-core

- This will install git on your Raspberry Pi. After installation is complete, verify the version of git by using the following command:
pi@raspberrypi:~ $ git -version
Refer to the following screenshot:

Installing WiringPi
WiringPi is a PIN-based GPIO access library that can be used with all versions of Raspberry Pi:
- First, run the following command to clone the WiringPi repository:
pi@raspberrypi:~ $ git clone git://git.drogon.net/wiringPi
Refer to the following screenshot:

- Then move to the wiringPi directory:
pi@raspberrypi:~ $ cd wiringPi
- Run the following command to build the WiringPi:
pi@raspberrypi:~/wiringPi $ ./build
Refer to the following screenshot:

Deploying Blynk libraries
Let's look at how to deploy Blynk libraries:
- You can deploy the Blynk libraries on Raspberry Pi by running the following commands:
pi@raspberrypi:~/wiringPi $ cd
pi@raspberrypi:~ $ git clone https://github.com/blynkkk/blynk-library.git
Refer to the following screenshot:

- After cloning the git repository, move to the linux directory:
pi@raspberrypi:~ $ cd blynk-library/linux
- Then build the library from source by targeting Raspberry Pi:
pi@raspberrypi:~/blynk-library/linux $make clean all target=raspberry
- This command will output the Blynk file that will be used to connect to the Blynk server:

Connecting Raspberry Pi with Blynk Cloud
After completing the building process, you can run the sample C++ code to connect your Raspberry Pi with the Blynk Cloud through Wi-Fi:
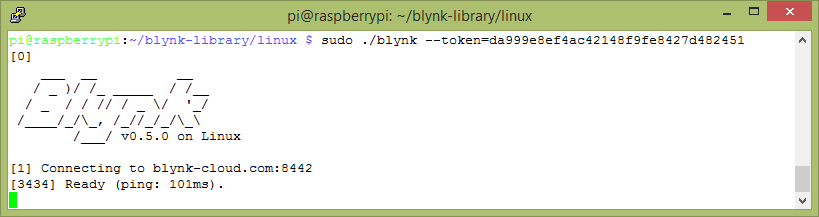
- Run the default source code file, which is main.cpp, with the following command:
pi@raspberrypi:~/blynk-library/linux $sudo ./blynk --token=da999e8ef4ac42148f9f e8427d482451
- When you run the command sudo ./blynk --token=da999e8ef4ac42148f9fe8427d482451, the main.cpp file residing in the blynk-library/linux directory gets executed. The sample code only connects to the Blynk server at https://www.blynk.cc/. The output should look something like this:
- You can find the sample code for main.cpp in the blynk-library/linux directory. You can read the content of the file with the following command:
pi@raspberrypi:~/blynk-library/linux $ cat main.cpp
- The output should look something similar to what is on this link: https://github.com/PacktPublishing/Hands-On-Internet-of-Things-with-Blynk/blob/master/Chapter%201/Listing%201-1/main.cpp.
- Go through the code and see whether you can understand the key functions. Don't worry, you will learn how to write C++ code for the Blynk application in Chapter 3, Using Controller Widgets.
- Now exit from the nano editor by pressing Ctrl + X with your keyboard. The editor will prompt you asking if you want to save the file; type Y in response.
Summary
Now you have to prepared your Raspberry Pi by equipping it with hardware and installing Raspbian OS and required software like git-core, WiringPi, and Blynk libraries. Finally, you ran the default C++ source file to connect your Raspberry Pi to the Blynk Cloud server.
Chapter 2, Building Your First Blynk Application, will present how to build your first application with Blynk. You will learn how to use the Blynk app builder to build an app to turn an LED on and off, and write C++ source code to allow your Raspberry Pi to connect, transfer, and manipulate data with Blynk Cloud.

