


 Download code from GitHub
If you were born in the 80s or 90s, without doubt, you were a witness to the internet evolution. The first web pages were composed only of black text in a white screen; everything they wrote was in pure HTML format, and really, really static. After some years, the first CSS was adding some color to the web, and, after some unsuccessful attempts, JavaScript did appear.
From its first appearance, JavaScript has improved over the years and adapted to build the next generation of web pages. Many companies such as Microsoft were involved in the evolution of this language, adding features and increasing its popularity. This new scripting language allowed the developers to improve the customer experience and application performance and, in a short time, there began to appear the first JavaScript frameworks that made JavaScript the new rock star of web development.
All this sounds great, but, was it always as awesome as the strong language we have today? Uhmm, no it was not. The first JavaScript version was created by Brendan Eich in 1995 for the Netscape Navigator, named in those times as Mocha, then LiveScript, and finally, JavaScript.
Let's explore more about the features of this powerful language and how it becomes one of the most used for application development.
In this chapter, we will walk through the following topics:
- JavaScript fundamentals
- The ECMAScript standard
- Setting up our environment
- The Aurelia framework
- The Aurelia command line
- Overview of the example app
JavaScript is a programming language used to add custom behavior to your web page by executing code in your web browser side (commonly named client side). So, this allows us to create rich dynamic projects such as games, execute custom code in response to events when the user presses some button, apply dynamic effects to our web page elements, form data validation, and so on.
JavaScript as a single language is very flexible, and there is a big community of developers writing and unlocking additional functionality, big companies working on new libraries and of course, we as empowered developers ready to get all these features and make the web awesome.
There are a few basic characteristics of JavaScript:
- Dynamic typing
- Object oriented
- Functional
- Prototyped
- Event handling
In most of the scripting languages, the type is associated with the value, not with the variable itself. What it means? JavaScript and other languages such as Python, called weakly typed, does not need to specify which kind of data we will use to store in the variable. JavaScript has many ways to ensure the correct type of an object, including duck typing.
Note
Why duck?Well, James Whitcomb did a humorous inference explaining the deductive thinking about it—"If it looks like a duck, swims like a duck, and quacks like a duck, then it probably is a duck"
Let’s look at an example:
1.  var age = 26;
2.  age = "twenty-six";
3.  age = false;
In the preceding code, the defined variables accept any data type, because data types will be evaluated at runtime, so, for example, the age variable in line 1 will be an integer, will become a string in line 2 and, finally, Boolean. Sounds tricky? Don't worry, think of the variable as an empty vial without a label. You can put anything you want, cookies, milk, or salt. What you will store in the vial? Depending of your needs, if you want to make a breakfast, milk should be the better option. The only thing you must keep in mind, is remember what is containing this vial! We would hate to confuse salt with sweet.
If we need to ensure that the value belongs to some specific type, we can use the typeof operator to retrieve the data type of a given variable. Let's have a look at them:
typeof"Diego": This will returnstringtypeoffalse: This will returnbooleantypeof "Diego" == boolean: This will returnfalse
JavaScript objects are based on associative arrays, improved with the prototyping inclusion. The properties and values can be changed at runtime. Another common way to create objects is using the JavaScript Object Notation (JSON) or using functions.
Let's see how an object created by JavaScript code looks, and its JSON representation:
// Let's create the person object
function Person(first, last, age) {
this.firstName = first;
this.lastName = last;
this.age = age;
}
var diego = new Person("Diego", "Arguelles", 27);

//JSON representation of the same object
{
    firstName: "Diego",
    lastName: "Arguelles",
    age: 27
}A function is an object inside itself. They have properties, methods, and can include inner functions. It's a way to encapsulate a functionality you want to reuse in more than one place in your application; you just need to write the function name instead of all the code inside that, just like the following example:
function sum(numberA, numberB){
return numberA + numberB
}
sum(4,5) //9
sum(5,2) //7
sum(sum(5,1),9) //15
JavaScript uses prototypes instead of classes for inheritance. It is possible to emulate all OOP characteristics using just prototypes:
function Person(first, last, age) {
this.firstName = first;
this.lastName = last;
this.age = age;
}

var diego = new Person('Diego', 'Arguelles', 26)
diego.nationality = 'Peruvian'
console.log(diego)
// Person {firstName: "Diego", lastName: "Arguelles", age: 26, nationality: "Peruvian"}

Person.prototype.career = 'Engineering'
console.log(diego.career) // Engineering
That being said, what is exactly a prototype? Different from objects, one prototype does not have a closed structure. In objects, we define standard properties and we just have these properties for work, since JavaScript is not completely an object-oriented language, we have the advantage to add, remove, or change properties and values of our prototypes depending on our needs.
We can modify prototype attributes at runtime. Note that even if you can modify any prototype, you should only modify yours. If you modify standard prototypes (for example, the array prototype) you will encounter very weird bugs in your application.
Events allow you to add the real interaction on your web page. JavaScript allows you to attach event handlers on your HTML pages and execute custom code when they are triggered. For example, the given code will display an alert when the user clicks on your web page body:
document.querySelector('body').onclick = function() {
alert('You clicked the page body!!!');
}In the beginning, some companies such as Microsoft were trying to develop their own JavaScript implementation, in this case, JScript for Internet Explorer 3.0, in the year 1996.To define a standard, Netscape delivered JavaScript to the European Computer Manufacturers Association (ECMA), a standards organization for information and communication systems.
The first edition of ECMA-262 was adopted by the ECMA General Assembly in June 1997. Several editions of the language standard have been published since then. The name ECMAScript was a compromise between the organizations involved in standardizing the language, especially Netscape and Microsoft, whose disputes dominated the early standards sessions.
So, after all these standardization processes and paperwork, what are we using? ECMAScript, JScript, ActionScript, or JavaScript? Are they the same? Well, basically no. After the standardization, ECMAScript was defined as the main language, and JavaScript, JScript, and ActionScript are dialects of this language, of course, JavaScript being the most known and used.
The ECMAScript Version 5 is supported by most browsers nowadays, released in 2011. Some of the features managed for this version are as listed:
- Support for new Array methods
- Support for manage dates
- Support for JSON
At this point, we’ve seen pure ES5 syntax, very verbose, sometimes highly coupled with other functionality, and if we are planning to develop a big application, it can become difficult to maintain.
Thank God we won’t have to deal with this syntax anymore. The ECMAScript 6 (ES6) version came with a lot of changes that simplify the development and understanding of our code.
This version arrives with significant changes in the language syntax. Let's review the new features and compare with the ES5 syntax.
In ES5, to make a near representation of an object in JavaScript, we commonly type something like this:
function Person(name, age) {
this.name = name;
this.age   = age;
}
Person.prototype.sayHi = function() {
return 'Hi, my name is ' + this.name + ' and i have ' + this.age + ' years old';
}

var Erikson = new Person('Erikson', 26);
Erikson.sayHi(); // 'Hi, my name is Erikson and i have 26 years old'
If we want to improve our code, maybe we can do some refactoring, as follows:
function Person(name, age) {
this.name = name;
this.age   = age;

this.sayHi = function () {
return 'Hi, my name is ' + this.name + ' and i have ' + this.age + ' years old';
    }
}
That's how Object-Oriented Programming (OOP) is done on JavaScript these days, but for programmers with previous experience on Java or PHP, that syntax result is a little difficult to understand, because they are not dealing with real objects, they are dealing directly with the prototypes. ES6 introduces a new syntax to declare objects:
class Person {

// Contructor define properties for our object representartion
constructor(name, age) {
this.name = name;
this.age = age;
    }
// Class method
sayHi() {
return 'Hi, my name is ' + this.name + ' and i have ' + this.age + ' years old';
    }
}
var Erikson = new Person('Erikson', 26);
Erikson.sayHi() // Hi , my name is Erikson and I have 26 years old
As you can see, now, the syntax is more readable and understandable, and we can extend from another class, just like other languages, such as Java:
class Developer extends Person {

constructor(name, age, role){
super(name, age)
this.role = role;
    }
sayHi(){
return super.sayHi() + ' and i am a ' + this.role
    }
}
var Erikson = new Person('Erikson', 26, 'Javascript developer');
Erikson.sayHi() // 'Hi, my name is Erikson and i have 26 years old and i am a Javascript developer'
Also, of course, we can use encapsulation principles to manipulate our object properties. Similar to Java, we can define mutator methods to get the property value or set some value to a property:
class Person {

constructor(name, age) {
this.name = name;
this.age = age;
    }
get checkName() {
return this.name;
    }
set giveName(newName) {
this.name = newName;
    }
}
var Erikson = new Person('Erikson', 26);
Erikson.checkName() // returns Erikson
Erikson.giveName('Hazis')
Erikson.checkName() // returns Hazis
Having these kind of methods does not avoid the fact that you can still be using the JavaScript native syntax to change the values or add properties at runtime. You will still be able to do the following:
Erikson.name = 'Diego'
Erikson.name // Returns Diego
Like other languages, ES6 allows static methods using the static modifier:
class Example {
    static returnMessage(){
return 'From static method'
}
}
let staticMessage = Example.returnMessage() // From static method
Do you note something? In the last example, we used let instead of var to declare a variable. ES6 has two new ways of defining a variable: let is the direct replacement of var, and const will be used if we are declaring a constant. Can we still use var instead of the new ES6 declaration syntax? Yes, but let's imagine that you are an experienced developer and have two trainees under your supervision. In your code, you can define something like this:
var PI = 3.1416
Also, of course, we do not want this value changed, for any reason. As this is still a var, any trainee developer is able to change the value, directly or indirectly (from a method call, assignation error, bad comparison syntax, and so on), so we are exposed to get errors on our application. To prevent these kind of scenarios, const would be a more accurate modifier for this variable.
Does ES6 only improve syntax for objects' declaration? No. At this moment, we only focused on our class definition syntax, because it will be the core of all applications, just like OOP. Now, we will check other improvements that we are pretty sure you will find very useful in your day-to-day work.
Note
A very important note: You must know that different to other code languages, in Javascript you can define const MY_ARRAY = [] and you will still being able to do MY_ARRAY.push(3). The const prefix will only avoid the overwriting, so you cannot do MY_ARRAY = [1,2]
You need to iterate over the elements of an array; normally, you would write something like this:
var data = ['Ronaldo', 'Messi', 'Maradona'];
data.forEach(function (elem) {
console.log(elem)
});
With the arrow functions, you can refactor your code and write something as follows:
var data = ['Ronaldo', 'Messi', 'Maradona'];
data.forEach(elem => {
console.log(elem);
});
The arrow (=>) operator defines a function in one line, making our code readable and ordered. First, you need to declare the inputs; the arrow will send these params to the function body defined by the operator:
// We could transform this
let sum = function(num) {
return num + num;
};
// Into just this
let sum = (num) => num + num;Do you remember those times when you needed to concatenate a string using the + operator? It won’t be necessary anymore. For example, the following code concatenates string1 and string2 using the + operator:
let string1 = "JavaScript";
let string2 = "awesome";
let string3 = string1 + " " + string2
Now, let's look at how interpolation helps us write simpler code:
let string1 = "JavaScript";
let string2 = "awesome";
let string3 = `${string1} ${string2}`
We have a new way to assign values to objects and arrays. Let’s look at some examples:
var [a, b] = ["hello", "world"];
console.log(a); // "hello"
console.log(b); // "world"

var obj = { name: "Diego", lastName: "Arguelles" };
var { name, lastName } = obj;
console.log(name); // "Diego"

var foo = function() {
return ["175", "75"];
};
var [height, weight] = foo();
console.log(height); //175
console.log(weight); //75At this point, we are ready to start writing our first functions and methods in JavaScript language. We know how to deal with the new ES6 syntax and how we can use all these new features to improve our application. Let's set up our environment and install Node.js.
The first thing you need to do to start using NPM is download Node.js. Node is an asynchronous event-driven JavaScript runtime. It is not a new language or a new syntax; it's just the platform where you can write JavaScript code outside the browser and Node.js will use the power of Google's V8 JavaScript Engine to execute it.
If you're using OS X or Windows, the best way to install Node.js is to use one of the installers from theNode.js download page.
If you're using Linux, you can use your package manager or check the download page to see whether there's a more recent version that works with your system.
To check whether you have a previous version installed, run the following command:
$ node –vThe Node Package Manager (NPM) is a complete tool created to help developers share, maintain, and reuse JavaScript code bundled in packages with other developers to reuse it on their own applications. NPM is made up of three distinct components:
- The NPM website
- The NPM registry
- The NPM command-line tool
This website serves as the primary tool for users to discover packages; you’ll find something like this:
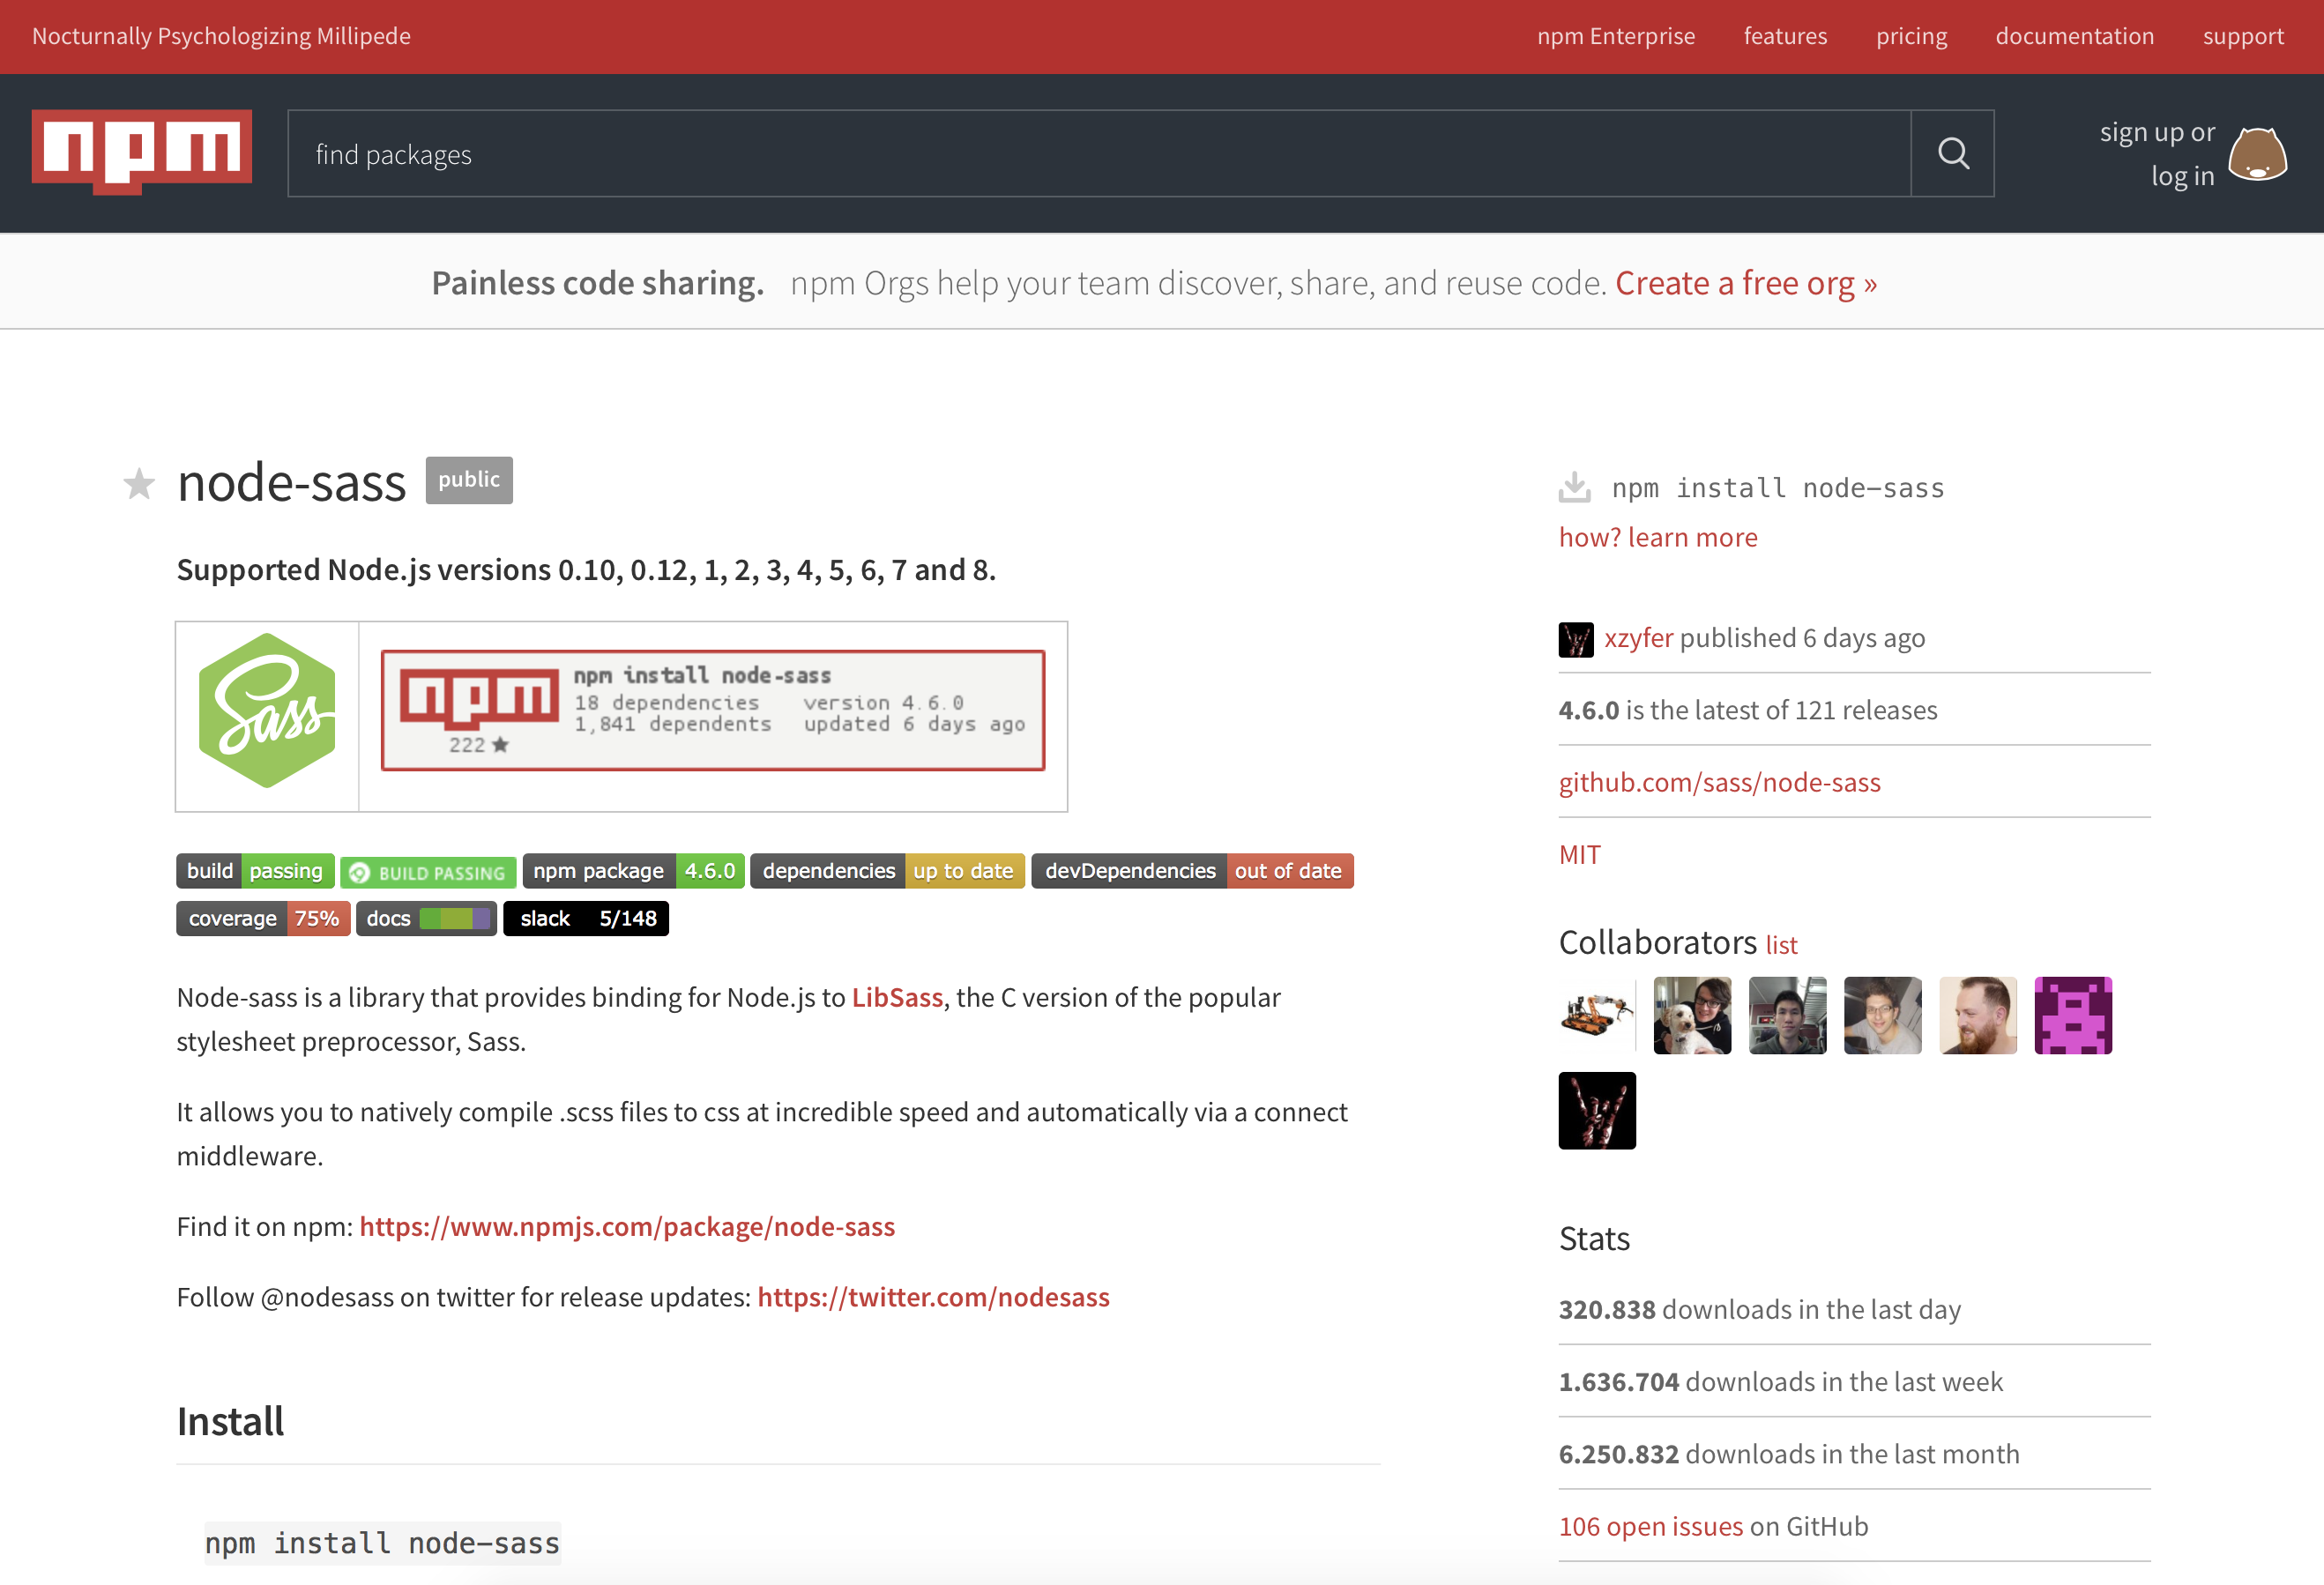
This page describes all the features of the package you want to download, a brief documentation about it, the GitHub URL, and instructions to import them into your project.
It is a large database of information about each package.The official public NPM registry is athttps://registry.npmjs.org/. It is powered by a CouchDB database, of which there is a public mirror athttps://skimdb.npmjs.com/registry.
A command-line tool for interacting with the registry and allowing the developers to publish or download packages.
Once you have the code downloaded on your machine, NPM will make it very easy to check whether there is an update available and download those changes when they’re made. More than two bits of reusable code is called a package. That’s just a directory with one or more files in it, along with a file calledpackage.json, which contains all the metadata about that package.
Like all the command-line tools, it is important to understand the options provided by NPM. The NPM CLI is a powerful tool that will help us in the development cycle of our project.
The first step is complete! We have the Node runtime on our machine ready to execute our .js files, so the last thing we need to start working on is the NPM. Node comes with NPM installed by default, but NPM gets updated more frequently than Node, so we can check the updation of our NPM CLI by executing the following command:
$ npm install npm@latest -gNPM is installed and configured; now it's time to start working. There are two ways to install NPM packages. Our choice will depend on how we want to use the package. The options are as listed:
- Globally: Install the given package globally as part of our command-line tools
- Locally: Install the given package to be available only in our application context
With this in mind, type the following command to install a new package:
$ npm install <package-name>This instruction will create a folder called node_modules, where we will download all the packages we need.We can ensure that we have the package downloaded, entering the folder and checking the existence of a folder with a name similar to our package name. Run the following command to list all the packages installed in your project:
$ ls node_modulesWe know how to download a package and how to import it into our project. However, we will commonly need more than one package, with some specific versions. Should we memorize them to download manually each time we set up the project? No, now is the moment to create apackage.jsonfile.
This file is not only to map our dependencies; it must contain all the metadata about our project, and it serves as a quick documentation for which packages your project depends on.As minimal, thepackage.jsonshould contain the following:
- Name: Project name, all lowercase with no blank spaces (you can use underscores if needed)
- Version: In the form of x.x.x
We can create this file manually, but NPM allows us to create it automatically by executing the following command:
$ npm initThe preceding command will prompt you with a bunch of questions that will be present in your package.json file. If you don't want to accept the defaults without being prompted any question, run the same command, adding a --yes flag at the end:
$ npm init --yesThen, you will get apackage.jsonfile, as follows:
{
"name": "my_package",
"version": "1.0.0",
"description": "",
"main": "index.js",
"scripts": {
"test": "echo \"Error: no test specified\" && exit 1"
},
"repository": {
"type": "git",
"url": "https://github.com/package_owner/my_package.git"
},
"keywords": [],
"author": "",
"license": "ISC",
"bugs": {
"url": "https://github.com/package_owner/my_package/issues"
},
"homepage": "https://github.com/package_owner/my_package"
}You have all your dependencies installed now. You start working and during the development process, you may need some other dependencies to improve your code. You just need to run the NPM CLI to get the new dependency, but this will not be present in your package.json file! It can be very dangerous, because if you don't have the list of libraries or dependencies you need for your project, when you want to run it in a different machine, your code will fail, because the dependency is not installed in that machine.
We can ensure that the new package name will be added to our dependencies' list, adding the –-save or –-save-dev flag. The first will add the package name to the dependencies' section of thepackage.jsonfile. This means that the dependency is mandatory for the application itself and should be installed before running or deploying the application. On the other hand, we have the devDependencies' part, where there will be only the dependencies used for our development process:
$ npm install <package_name> --saveNow, we are ready to start developing JavaScript applications. In the next section, you will make use of NPM to install the Aurelia command-line tool required to create new Aurelia projects, but let's continue exploring the Aurelia framework.
Before we start working with Aurelia and learning this amazing framework, it is important to have it clear why you should choose Aurelia over other popular frameworks. For that reason, let's explore in detail what a JavaScript framework is and the key differentiator present in Aurelia.
In the last section, we were reviewing all concerns about JavaScript and how we can organize our packages using NPM and Yarn. Now, it's time to review some tools that will improve our development experience; it's time to talk about frameworks.
A framework can be described as a group of tools and methodologies organized to solve common problems in the project development. Those solutions are generic; each one was tested in different environments and allows you to reuse that functionality to save time and cost.
So, based on the previous explanation, we can define a JavaScript framework as a collection of components and libraries (in most cases, interdependent) to fill the needs of the application in browser clients. What are these needs? Let's check some of the most generic ones:
- Routing
- Data sending features and retrieval (XMLHttpRequest)
- Correct DOM management
- Managing and organizing your code in separated functionality
- Defining standard data flows for the application
- Defining lifecycle for some functionality
In general, a JavaScript framework will help us do the following:
- Organizing your code
- Structuring it in a maintainable and ordered way
- Making separation of concerns
- Implementing tested solutions to the most common problems
- Working on a base structure that any developer can follow
More specifically, a JavaScript framework is particularly helpful for applications where much of the business logic will take place on the client side—routing, templating, first-pass model validation, table building and pagination—pretty much whatever you might have used the server for in the past, but now without the latency and overhead that additional HTTP calls would have incurred.
One problem always has more than just one solution, and JavaScript developers know that. Before 2010, developers had very limited options to implement their functionality in their day-to-day work. The most popular option in these times was jQuery, used a lot nowadays too. Although jQuery was not a bad choice, but it has a great weakness. For example, if your project growth and your business code become more complex, jQuery will be really difficult to maintain, your concerns will be mixed, and you will be involved in one of the most common anti-patron—Spaghetti code.
In 2010, Google released one of the most popular JavaScript frameworks—Angular. Different from jQuery, Angular comes with a complete set of tools and a new way to organize the JavaScript code, introducing new concepts such as modules, components, routes, and templates.After Angular, many JavaScript frameworks were appearing; some of them became very popular for the company sponsoring them, such as Facebook with React.js, others gained fame by the adoption of the community, such as Meteor and Vue, and others are really new in the neighborhood.
As innovation is the essence of technology, one of the main engineers of Angular 2 project developed a new awesome framework called Aurelia, which, in just three years in the market, is becoming the new rock star in the neighborhood.
Over the last years in our current day-to-day work, we were getting involved with a vast variety of JavaScript frameworks; the most popular was always Angular, but we learned that popularity is not synonymous with quality. For understanding purposes, we will check some of the most used frameworks nowadays and then make a little comparison with our battle horse, Aurelia.
The component-based framework uses Typescript as the main (and unique) JavaScript platform. Angular is a complete superset of libraries designed for all purposes of Single Page Applications (SPA), very useful for developing applications from scratch. You can link your templates and your Typescript code so you HTML is updated with values from your code and ready to react on user actions . You need to learn three basic concepts about this framework—directives, modules, and components. Each one involves another, and you need to register each component with one Module to make it available. JavaScript also has its own module system for managing collections of JavaScript objects. It's completely different and unrelated to Angular's module system. Angular has its own implementation to define service classes, routes, double data binding, HTTP requests, and so on, making this framework very heavyweight.
- Size: 698 Kb
- Standard compliance: ES 2016 (TypeScript)
- Non-compliant: NG2 Markup and Dart
- Interoperability: Average
The dependency injection framework requires more configuration. In contrast to Aurelia, Angular requires you to specify the HTML selector and template, increasing the file complexity. Aurelia will detect the template based on a name strategy:
@Injectable()
classTicket { /* */ }

@Component({
  selector: 'ticket',
  providers: [Ticket],
  template: `...`
}) //Configuration code mixed with business class
exportclassSale {
    constructor(privateticket:Ticket) {}

    public activate() {
        // do something...this.ticket.toast("Sale processed!");
    }
}
Angular components need more explicit configuration and some (in some cases confusing) characters in the template. You can put the template in a separate file, or for simpler components, you can include the template inline:
/* product-list.component.ts */
@Component({
    selector: 'product-list',
    template: `<div><product-detail *ngFor="let thing of things" [product]="product" /></div>`
})
exportclassProductList {
    public products:Product[];
}
Different from Angular, React.js is a library that can be integrated with any JavaScript project. It is used for handling the view layer for the web applications and build reusable UI components. React is component based too, but it mixes the HTML code inside the JavaScript files, in JSX format. JSX is a React syntax very similar to XML format since you can manage your view layer and add some behavior defining some attributes as the state or properties of your component. Sounds a little confusing? Yes, you will need to learn how JSX works and read about some of the new concepts about the tool.
React.js has a great feature—server-side rendering. What does that mean? Common JavaScript frameworks let the render work to the client side, so the browser needs to interpret your JavaScript files and transform it to plain HTML files. It can take time depending on how much data will be displayed on the page. With React.js, you can configure your server to have all those pages processed in the server side, so the browser just needs to call the correct HTML file and of course, the loading time will be less.
Similar to Angular, React.js offers you a complete set of libraries to implement dynamic routing, data binding, HTTP requests, and other React implementations libraries such as Inferno.js, with a rendering algorithm more powerful and optimized.
Note
One very important note! Aurelia now has its own server side rendering plugin. You can find more info there: https://aurelia.io/docs/ssr/introduction/
- Size: 156 KB or 167 KB with plugins
- Standard compliance: ES 2015
- Non-compliant: JSX
- Interoperability: High friction
A component isoneJS class. Do you want to include another component in your component? Just import it:
import {ProductDetail} from"./ProductDetail";

interfaceProps {
    products:Product[];
}
exportclassProductListextendsReact.Component<Props, undefined> {
    render() {
        return <div>
            {this.props.products.map(th=> <ProductDetailkey={th.id} product={th} />)}
        </div>
    }
}
Aurelia is a new JavaScript framework created by one of the team members of Angular 2 project. Different from Angular, Aurelia is composed of a collection of libraries that work together using well-defined interfaces so that it’s completely modular. This means that a web application only needs to include the dependencies that it needs, not the complete bundle.
Aurelia's APIs are carefully designed to be consumed naturally by both today's and tomorrow's most useful web programming languages. Aurelia supports ES5, ES2015, ES2016, and Typescript, which are very helpful and give you high flexibility.
Furthermore, writing web applications using ES6 is not a new thing. In fact, there are many solutions out there that can allow you to write Angular apps using ES6 (you need to configure it manually and it's not included in the default Angular configuration).
You don't need to worry about special framework concepts or syntax; Aurelia is a convention over configuration framework, encouraging you to use good practices when developing applications, and it allows the developers to focus only on business code.
- Size: 252 kb minimum, 302 kb with standard plugin
- Standard compliance: HTML, ES 2016, Web Components (including the Shadow DOM)
- Interoperability: Very interoperable
All you need is the@autoinjectannotation. The JS/HTML mapping is performed automatically by the framework:
classTicket { /* class code, properties, methods... */ }

@injectexportclassSale {
constructor( ticket ) {}

    public activate() {
        // do something...this.ticket.toast("Sale processed!");
    }
}
Component encapsulation uses a separate template file that looks more or less like every other web templating language you've ever used. By convention, if your component class is inhello.ts, then its template is inhello.htmland your component will be<hello/>:
<!-- product-list.html -->
<template>
    <requirefrom="product-detail"/>
    <div>
        <product-detailrepeat.for="product of products"product.bind="product"/>
    </div>
</template>
/* producty-list.js */exportclassProductList {
    public products[];
}
Each JavaScript framework has its own way of working, and we can explore more features about each one, but Aurelia has something special—you don't need to go far away from learning how the framework works, and in extreme cases, in their own way/syntax for developing. With Aurelia, you will feel like writing plain JavaScript and HTML code, highly maintainable, scalable, and focusing only on your business purposes.
Now it's time to start working with Aurelia. So, let's explore the Aurelia command line to start our trip. Keep reading!
There are many ways to create an Aurelia project. For this book, we will use the official Aurelia command-line tool, which is supported by the Aurelia team. Although there are other options to configure your Aurelia application, such as Webpack and JSPM, we consider that the CLI is powerful and will help us save valuable time configuring our application skeleton and build tools.
In this section, we will explore in detail the CLI capabilities, and you will convince yourself that this is the best option for our adventure. After this section, you will be a master in using the Aurelia CLI.
Installing the CLI is not a big deal if you have installed Node.js in the previous section. We just need to open your favorite Terminal and execute the following command, and if you are using a Unix-based operating system, remember to add sudo before the command if you have permission issues:
npm install -g aurelia-cliThe preceding command will install the Aurelia CLI as a global executable command-line tool. This allows us to use the CLI with the au command as any other command of our operative system Terminal, for example, the dir command.
After the installation is complete, execute the following command:
au helpThis should return the following output that displays the CLI help. As you can see, this command has two main options:
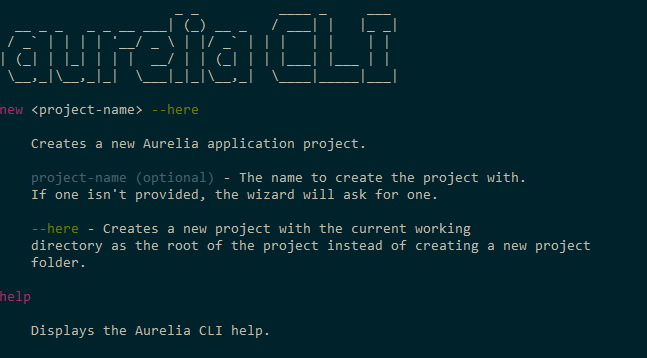
Now that we are sure that it is working as we expected, let's learn how to get the most out of it.
This is one of the most important options. As its name says, it will create a new Aurelia application with a well-defined application folder structure and all the initial configuration files in just three steps.
Execute the following command and replace my-app with your application's name:
au new my-appWhen the Aurelia CLI wizard is running, we will select the following options to create our application:
- Select
1for ECMAScript next generation language - Select
1to create the project - Select
1to install the dependencies
Once you answer the last question, the CLI will install all the dependencies and once everything is complete, you will see the following output in your Terminal window:

Next, we will look into the run option. This option allows us to run our application, and it provides us with an option to create a productive development environment by specifying the --watch option, which configures a watcher to detect changes in our source code and update our browser automatically. This cool feature is known as browser-sync or auto-refresh.
The run command also allows us to specify the environment where we want to execute our application; these are the default environments: dev, stage, and prod. By default, the CLI will run our application using the dev environment. Use the --env flag to change it.
Note
What means exactly each environment? Well, in software development, commonly when you are writing your application you test your code on you local development environment (dev). Once you think its complete, you send it to a Quality Assurance area to test your application, this tests won't be performed on your machine so you need to export your application and deploy it on another server, it will be called the test environment. Finally, once the QA people gives his approval, you code will be deployed in the real world environment (prod). Of course, this is a very basic scope, you will find many more environments in other companies such UAT (User Acceptance Test).
For example, let's get into our application (cd command) and execute the following command:
cd my-app
au run --watch --env prod
The following is the output that has two URLs where we can see our application up and running:

Open the http://localhost:9000 URL in your favorite web browser, and you should see the following:

Note
Pay attention to the last two lines in the console. Those tell you in which port is running your application, it could be different depending on your operating system and which port you have available.
Now, let's test how auto-refresh works, remember that this feature is enabled by adding the --watch option in the au run command.
Open the app.js file located in the src folder and change the 'Hello World!' string to 'Hola Mundo!':
export class App {
  constructor() {
    this.message = 'Hola Mundo!';
  }
}
Save it and go back to your browser; the CLI will detect the change you made in the app.js file and will refresh your browser automatically.
To be more productive, you can use two displays—the first with your application running in the browser and the second with your source code editor.
Of course, testing is an important skill all developers need to have. We have a complete chapter to talk about testing and discuss TDD, unit testing, and end-to-end testing.
The test command comes with the --watch and the --env flags. Use the watch option to tell the CLI to detect changes in the test folder and execute the tests again.
In order to run tests, the CLI uses Karma, which is a test runner technology that is configured to use Jasmine testing framework to write all our testing files that should be saved into thetestfolder.
For example, the preceding command will run theapp.sec.jsfile located in thetest/unitfolder:
au test --watch --env stageThe following is the output that has executed one test successfully:

Now is the time to deploy our application, but before we do this, we need to compress and minify our Aurelia code. Aurelia CLI provides us with the build option to generate these ready-to-deploy files that contain all our application code.
As you might want to build your application for different environments (dev, stage, or prod), this build option comes along with the --env flag. For example, execute the following command in your project:
au build --env prodThe following is a sample output of my-app project:

As the output shows, there are two main files generated: app-bundle.js, which contains our application logic and vendor-bundle.js, which contains third-party dependencies. These two files are generated into the scripts folder in our root application folder.
If you want to run your application and check whether everything is okay with the bundles you recently created, let's install the http-server module using npm. Run the following command in your Terminal:
npm install -g http-serverNow, create a dist folder in your application root folder and copy the index.html page and the scripts folder that contain our bundles.

For the last step, get into the dist folder in your Terminal and run the following command:
cd dist
http-server
This command will expose some four URLs where the web server is running; copy the first URL and open it on your web browser, and you should see your application up and running:

Aurelia, like many JavaScript frameworks, allows you to create reusable components that help you avoid writing duplicated code, reuse your component in multiple parts of your app, and also export them as plugins to reuse them in other projects.
Aurelia allows you to generate the reusable pieces of code utilizing the following templates:
- Components
- Custom elements
- Custom attributes
- Binding-behaviors
- Value-converters
These templates are all located in our project root folder in the aurelia_project/generators folder. For example, the following command generates a custom Aurelia element:
au generate element my-reusable-elementThe source code will be generated in the src/resources/{type} folder depending on the type you selected.
Each type will be discussed in the following chapters, so don't feel bad if you don't understand the differences between them. Keep reading my friend! :)
Now it is time to talk about our application we will build together. Apart from our web application written, of course, in Aurelia, we also need a backend service to persist our data. For the backend service, we will be using Node.js with the Express framework to build a robust API and MongoDB as our non-relational data storage. The following diagram explains our World Cup project architecture:

This a very simple architecture; the Aurelia app talks to the Node API directly, and the Node API talks to the database, which is a MongoDB database, using a very popular open source library called Mongoose. This is getting better; keep reading!
The app we will develop is the Football World Cup app. We will use an awesome UI framework called Materialize, which, by default, will help us create a responsive web application, so our users can open this app in their mobile and desktop browser with an adaptable user interface.
Although this is a simple application, we will cover the most important concepts of Aurelia that you will find in a real production application. We will improve this app along with the book. Listed are the features we will develop for this app:
- Matches explorer
- Teams explorer
- News
- Admin portal
- Social authentication
So, let's start exploring the features that this application delivers to our users.
This feature is related to the matches in the entire competition. The users will be able to perform the following actions:
- List the
Matchesactivity - Create a new
Match, which requires admin


This feature is related to the matches in the entire competition. The users will be able to perform the following actions:
- List the
Teams - Create a new
Team, which requires admin


Let's start creating our application. If you remember our last section about the Aurelia CLI, we need to use it again to create a new application, so open your favorite Terminal tool and execute the following command:
au new worldcup-appEnter the following input in the Terminal:
- Select
3to define our custom options for this project First option:
Which module loader / bundler would you like to use? RequireJS (Default)Second option:
What transpiler would you like to use? : Babel (Default)Third option:
How would you like to setup your template? : Default(No markup processing.)Fourth option:
What CSS processor would you like to use?In this case, we will chooseSass(3)Fifth option:
Would you like to configure unit testing?Of course, we will markYes (Default)- Sixth option:
What is your default code editor?We use WebStorm, but you can choose the most familiar to you.
Now, you will see the main structure of your application on the console:
Project Configuration
    Name: worldcup-app
    Platform: Web
    Bundler: Aurelia-CLI
    Loader: RequireJS
    Transpiler: Babel
    Markup Processor: None
    CSS Processor: Sass
    Unit Test Runner: Karma
Editor: WebStorm- Finally, select
1to create the project and then install the project dependencies
This is a custom setup. Our project will be composed with the following features:
- RequireJS: Well known file and module loader, with a good browser support. Another option could be SystemJS and Webpack.
- Babel: Babel is one of the most used transpilation tools nowadays. A
transpileris a tool that transforms code written in JavaScript ES6 syntax or later into ES5 code. Why? Because most of the browsers does not have well supported yet the last JavaScript version. - Markup processing: It loads our modules and create the final files which will be interpreted by the browser. We won't use a custom markup processing in this stage.
- SASS: A nice preprocessor CSS library, we will review it at more detail in the next chapter.
- Karma: A JavaScript test library. We will talk about it in more detail in the Chapter 3, Testing and Debugging.
- WebStorm: A very nice IDE for JavaScript developers. It is not free but if you have an educational email account from your university or institute, you can get a student license for one year.
Once everything is done, open the worldcup-app folder with your favorite editor.
The Aurelia CLI will generate the source code with its base structure, which has everything configured and ready to start writing our application's source code.
The following screenshot shows the root application folder:

Let's start talking about the aurelia_project folder, which contains the main aurelia.json configuration file with all the settings about the dependencies, blunder, build target, loaders, testing run-time tool such as Karma, testing framework, and more. You will modify this file frequently to specify new dependencies our application needs to use.
The next element in the aurelia_folder is the environments folder, which contains three files: dev.json, stage.json, and prod.json. These files contain values depending on the environment you are running on. Do you remember the --env flag in the run option? The CLI will use one of these files to configure our app's environmental values.
The remaining two folders are generators and tasks. They are used to generate Aurelia custom reusable components and to declare gulp tasks, respectively.
The scripts folder contains the bundles generated after we execute the au build command.
As you might guess, the src folder contains our application source code, followed by the test folder, which contains our source code to test our project.
Like many JavaScript frameworks such as Angular and React, Aurelia needs a place in the index.html page to mount the application. This place is known as the entry point. Open the index.html file, and you should see something similar to the following code:
<!DOCTYPE html>
<html>
<head>
<meta charset="utf-8">
<title>Aurelia</title>
<meta name="viewport" content="width=device-width, initial-scale=1">
</head>

<body aurelia-app="main">
<script src="scripts/vendor-bundle.js" data-main="aurelia-bootstrapper"></script>
</body>
</html>
Aurelia requires an HTML element to load our application. By default, the application is loaded in the body element; we know this because this element uses the aurelia-app attribute, which is used to specify the main JavaScript script file that contains all the configuration for our application, and as you note, by default, Aurelia is configured to use the main file. The following is the content of themain.jsfile:
import environment from './environment';

export function configure(aurelia) {
aurelia.use
.standardConfiguration()
    .feature('resources');

if (environment.debug) {
    aurelia.use.developmentLogging();
  }

if (environment.testing) {
    aurelia.use.plugin('aurelia-testing');
  }

aurelia.start().then(() => aurelia.setRoot());
}
Let's analyze this file; the first line imports the environment variables from the environment.js file located in the root folder. When you specify the --flag{env} option, the CLI looks for the {env}.json file in the aurelia_project folder and copies its content into the environment.js file.
This file also exports a single configure function, which receives as a parameter the aurelia object that you use to override default configurations and add any code you wish before the app is launched. For example, you can tell Aurelia that you want to declare components as global (features), configure internationalization to manage different languages, and so on.
Once the aurelia object is configured, the last line of code will render our application into the root HTML element, which has the aurelia-app attribute in the index.html page. By default, it renders the app.js component into the root element. Of course, we can override the default values by passing the element you wish to render as the first parameter and the HTML element where you wish to render the app as a second parameter:
aurelia.start().then(() => aurelia.setRoot('my-component', document.getElementById('my-div')));
We will be modifying this file along the way; the most important thing to remember is that this file is processed before the app is rendered and apart from the Aurelia.json file, this is the second most important file. The following diagram explains the bootstrapping process:

Now you know how the bootstrapping process works. Let's understand how you can create reusable components.
In the last section, we saw that Aurelia requires a component to mount as the root of our entire application and by default, it was the app component. Now let's explore this component.
A component is composed of two files, the first written in JavaScript that contains the component's view model and the second one is the markup template written in HTML. They must have the same filename to help the view model resolve its view template. The component's view model is a JavaScript file, which exports a class that contains the component's attributes and functions. For example, this is the content of the app.js component:
export class App {
constructor() {
this.message = 'Hello World!';
  }
}
The App class declares a constructor that initializes the message property. Properties can be declared into the constructor or can be defined outside of it. Consider this example:
export class App {
  message = 'Hello World!';
}
Note
Use the outside property declaration style when you are declaring simple classes such as Plain Old CLR Objects (POCO), which now implements more logic than simply get and set its property values.
To use the properties defined in our app.js view model, we need an HTML template with the same filename. Open the app.html file to see its content:
<template>
<h1>${message}</h1>
</template>
The first thing to note is that the message property declared in the view model is present, but in order to bind the value, we have to use the ${}string interpolation operator. Finally, when Aurelia renders the component in the web page, the ${message} declaration will be replaced by 'Hello World!'.
We can extend our components by adding functions that can be called from the template. For example, let's declare the changeMessage() function:
export class App {

constructor() {
this.message = 'Hello World!';
  }

changeMessage() {
    this.message = 'World-Cup App';
  }

}
From the preceding code, you can see how declaring a function is a simple; we use the same syntax of the contructor declaration. If you want to use the properties declared in the App class, you have to use the this reserved word to access any property or function.
Now it is time to invoke our changeMessage function. First, we will create a button in our template in the app.html file and declare a trigger to the click event of the button. Open the app.html file and apply the following changes:
<template>
<h1>${message}</h1>
<button click.trigger="changeMessage()">Change</button>
</template>
The first thing to note here is that we don't use the default HTML onclick event; instead, we use the click event with no on at the start of the event name. This convention is used only for the Aurelia templating engine. So, we say that we want to invoke the changeMessage() functions by binding this function to the click event using the trigger binding mechanism.
Launch your app by executing the au run command in your Terminal, and test this out. When you click on the Change button, you should see how the message is changed from 'Hello World!' to 'World-Cup' App. The h1 HTML element is changed because we have previously declared and bound the ${message} property into its content.
Binding is a big concept we will cover in next chapters in a more detailed way. So, keep reading my friend, it just starting.
In this chapter, you learned how Aurelia is different from other popular frameworks; we compared Aurelia to ReactJS and Angular. We saw that Aurelia is more lightweight and has better performance, but the most important thing is that Aurelia is based on the ECMAScript 6 standard. So, instead of learning a framework, with Aurelia, you are learning an International Standard.
Also, we installed NodeJS and the NPM; these two open source technologies are extremely important, because Aurelia requires them in order to set our development environment and install our dependencies.
We explored the Aurelia command-line tool in detail, dived into its capabilities, and now you are familiar with it and are able to create, launch, test, and build your apps.
Finally, we talked about the example application we will build—an awesome FIFA World Cup single-page application. You also learned what an Aurelia component is and understood the way they split the view model and the template into two separate files that have to use the same filename with the .js and .html extensions, respectively.
In the next chapter, you will learn how to apply style and color to our application by installing and configuring the Google Material Design plugin in our app. Enjoy the next chapter!
