Home Programming Hands-On Automation Testing with Java for Beginners

Hands-On Automation Testing with Java for Beginners

books-svg-icon Book
eBook $25.99 $17.99
Print $32.99
Subscription $15.99 $10 p/m for three months
$10 p/m for first 3 months. $15.99 p/m after that. Cancel Anytime!
What do you get with a Packt Subscription?
This book & 7000+ ebooks & video courses on 1000+ technologies
60+ curated reading lists for various learning paths
50+ new titles added every month on new and emerging tech
Early Access to eBooks as they are being written
Personalised content suggestions
Customised display settings for better reading experience
50+ new titles added every month on new and emerging tech
Playlists, Notes and Bookmarks to easily manage your learning
Mobile App with offline access
What do you get with a Packt Subscription?
This book & 6500+ ebooks & video courses on 1000+ technologies
60+ curated reading lists for various learning paths
50+ new titles added every month on new and emerging tech
Early Access to eBooks as they are being written
Personalised content suggestions
Customised display settings for better reading experience
50+ new titles added every month on new and emerging tech
Playlists, Notes and Bookmarks to easily manage your learning
Mobile App with offline access
What do you get with eBook + Subscription?
Download this book in EPUB and PDF formats, plus a monthly download credit
This book & 6500+ ebooks & video courses on 1000+ technologies
60+ curated reading lists for various learning paths
50+ new titles added every month on new and emerging tech
Early Access to eBooks as they are being written
Personalised content suggestions
Customised display settings for better reading experience
50+ new titles added every month on new and emerging tech
Playlists, Notes and Bookmarks to easily manage your learning
Mobile App with offline access
What do you get with a Packt Subscription?
This book & 6500+ ebooks & video courses on 1000+ technologies
60+ curated reading lists for various learning paths
50+ new titles added every month on new and emerging tech
Early Access to eBooks as they are being written
Personalised content suggestions
Customised display settings for better reading experience
50+ new titles added every month on new and emerging tech
Playlists, Notes and Bookmarks to easily manage your learning
Mobile App with offline access
What do you get with eBook?
Download this book in EPUB and PDF formats
Access this title in our online reader
DRM FREE - Read whenever, wherever and however you want
Online reader with customised display settings for better reading experience
What do you get with video?
Download this video in MP4 format
Access this title in our online reader
DRM FREE - Watch whenever, wherever and however you want
Online reader with customised display settings for better learning experience
What do you get with video?
Stream this video
Access this title in our online reader
DRM FREE - Watch whenever, wherever and however you want
Online reader with customised display settings for better learning experience
What do you get with Audiobook?
Download a zip folder consisting of audio files (in MP3 Format) along with supplementary PDF
What do you get with Exam Trainer?
Flashcards, Mock exams, Exam Tips, Practice Questions
Access these resources with our interactive certification platform
Mobile compatible-Practice whenever, wherever, however you want
BUY NOW $10 p/m for first 3 months. $15.99 p/m after that. Cancel Anytime!
eBook $25.99 $17.99
Print $32.99
Subscription $15.99 $10 p/m for three months
What do you get with a Packt Subscription?
This book & 7000+ ebooks & video courses on 1000+ technologies
60+ curated reading lists for various learning paths
50+ new titles added every month on new and emerging tech
Early Access to eBooks as they are being written
Personalised content suggestions
Customised display settings for better reading experience
50+ new titles added every month on new and emerging tech
Playlists, Notes and Bookmarks to easily manage your learning
Mobile App with offline access
What do you get with a Packt Subscription?
This book & 6500+ ebooks & video courses on 1000+ technologies
60+ curated reading lists for various learning paths
50+ new titles added every month on new and emerging tech
Early Access to eBooks as they are being written
Personalised content suggestions
Customised display settings for better reading experience
50+ new titles added every month on new and emerging tech
Playlists, Notes and Bookmarks to easily manage your learning
Mobile App with offline access
What do you get with eBook + Subscription?
Download this book in EPUB and PDF formats, plus a monthly download credit
This book & 6500+ ebooks & video courses on 1000+ technologies
60+ curated reading lists for various learning paths
50+ new titles added every month on new and emerging tech
Early Access to eBooks as they are being written
Personalised content suggestions
Customised display settings for better reading experience
50+ new titles added every month on new and emerging tech
Playlists, Notes and Bookmarks to easily manage your learning
Mobile App with offline access
What do you get with a Packt Subscription?
This book & 6500+ ebooks & video courses on 1000+ technologies
60+ curated reading lists for various learning paths
50+ new titles added every month on new and emerging tech
Early Access to eBooks as they are being written
Personalised content suggestions
Customised display settings for better reading experience
50+ new titles added every month on new and emerging tech
Playlists, Notes and Bookmarks to easily manage your learning
Mobile App with offline access
What do you get with eBook?
Download this book in EPUB and PDF formats
Access this title in our online reader
DRM FREE - Read whenever, wherever and however you want
Online reader with customised display settings for better reading experience
What do you get with video?
Download this video in MP4 format
Access this title in our online reader
DRM FREE - Watch whenever, wherever and however you want
Online reader with customised display settings for better learning experience
What do you get with video?
Stream this video
Access this title in our online reader
DRM FREE - Watch whenever, wherever and however you want
Online reader with customised display settings for better learning experience
What do you get with Audiobook?
Download a zip folder consisting of audio files (in MP3 Format) along with supplementary PDF
What do you get with Exam Trainer?
Flashcards, Mock exams, Exam Tips, Practice Questions
Access these resources with our interactive certification platform
Mobile compatible-Practice whenever, wherever, however you want
  1. Free Chapter
    First Programming Steps in Java
About this book
Java is one of the most commonly-used software languages by programmers and developers. Are you from a non-technical background and looking to master Java for your automation needs? Then Hands-On Automation Testing with Java for Beginners is for you. This book provides you with efficient techniques to effectively handle Java-related automation projects. You will learn how to handle strings and their functions in Java. As you make your way through the book, you will get to grips with classes and objects, along with their uses. In the concluding chapters, you will learn about the importance of inheritance and exceptions with practical examples. By the end of this book, you will have gained comprehensive knowledge of Java.
Publication date:
September 2018
Publisher
Packt
Pages
156
ISBN
9781789534603


Chapter 1. First Programming Steps in Java

Welcome to Hands-On Automation Testing with Java for Beginners. This is the only book you will find on the internet that teaches every topic needed to emerge as a strong Java automation tester. It contains easy teaching and simple techniques to effectively handle Java-related automation/projects. Considering that we will cover each and every topic of core Java, with detailed explanations, this will really help us develop and grade our own Java automation projects.

All the core Java concepts are explained from scratch. We do not assume that readers have any prerequisite knowledge, so we consider all readers to be from a non-coding background, and we teach each and also support them with examples that we will use in real time. Hence, we will not stick to only theories.

When you check for courses in the market, you should try to learn one new concept. You just see three lines of definition followed by examples; that's all. But here, we will understand why, when, and where we are using the object-oriented programming systems (OOPS) concept in Java. There will also be proper programming examples, showing a particular OOPS concept in real-time usage. In this way, our book will drive through real-time projects; it's all about practical learning. This will come into play when we start with Java collections, such as core Java, which is one of the main concepts in our book since it is definitely required for you to start your basics and to develop an automation framework in your workplace. Also, since Java collections is one of the core parts, throughout the entire book we will take utmost care in providing all the necessary practical scenarios for each Java collection that we will discuss.

We will be working on tricky Java programs, looking at printouts, prime numbers, Fibonacci series, and pyramids. We will sort out print in descending order, looking at array matrices, and printing the maximum column numbers. This book will provide you with detailed strategies and tips that you will need to use when approaching and designing a logic for these programs. This will help you to think beyond the boundaries and get the logic that you will need to write difficult Java programs.

Programs discussed in this book derive from commonly asked questions during interviews in many companies. You will receive help with those questions, with detailed solutions, and the methodology to approach that logic. So, this book is mainly focused on core Java. We are not dealing with swings and buttons, which are out of scope for Java learning in this book.

In this book, we will be learning core Java, collections, and other concepts such as loops, classes, and arrays . These are more than enough for you to start and develop a Java project. Whichever field you are put in, the knowledge gained from this book will help you start testing in the automation projects right away.

This chapter will cover the following concepts:

  • An introduction to Java and its installation
  • Working with the Java editor tools
  • Writing your first executable program in Java
 

An introduction to Java and its installation


The first thing that comes to mind when we speak about Java is that it is platform-independent. This feature has made Java a hot programming tool in the market. So what exactly does platform-independent mean?

The code that we write is independent of the environment; be it Windows, Unix, Linux, or Solaris. Basically, when we write a Java program, the Java compiler converts the program to bytecode. When we run the Java code, the Java compiler converts the entire programming code to bytecode. For example, we are working on a Windows machine. When we run the program and the Java compiler runs and creates bytecode for us, this bytecode can be taken and executed on any other platform, such as Linux, macOS, and Unix. So this means we are developing a bytecode in Windows, and that bytecode is runnable on any other platform. So this is what we mean by platform-independent.

This is a really cool feature that we have in Java programming. Whenever you ask someone to download Java, the first question you will be asked is, is it JDK or JRE? People tend to get confused between these two terminologies. We need to be clear about this before we start downloading and configuring Java in our machines. Let's have a look at both JRE and JDK:

  • JRE stands for Java Runtime Environment: It is responsible for running our Java program. If our aim is to just run a plain Java core code then JRE is sufficient.
  • JDK stands for Java Development Kit: It is used to debug our Java code, or if we want to have the Java documents or something similar.

JDK contains JRE, Java documentation, and debugging tools, and other cool things. It's an entire Java kit from which we will get all of its components. So it's up to us what we download, but I would recommend we only have JDK to be on the safe side. If we want to just practice and run our program, JRE is also sufficient, but let's stick to JDK.

So now let's go back and download Java from the internet and try to configure it in our machines. To download Java, navigate to the following page: https://java.com/en/download/. When you click on the Free Java Download button, as shown in the following screenshot, the JRE version will be downloaded:

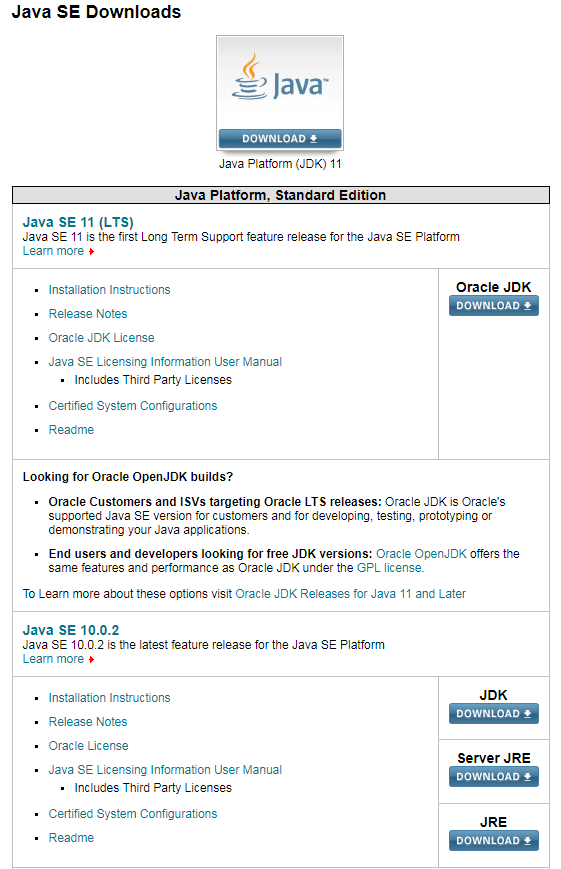
But we intend to use JDK for our program, so navigate to the following site: https://www.oracle.com/technetwork/java/javase/downloads/index.html. Here, there are multiple versions of JDK. The latest version out in the market right now is Java SE 10.0.2. Click on DOWNLOAD, as shown in the following screenshot, so that all the components are downloaded and configured in our machine:

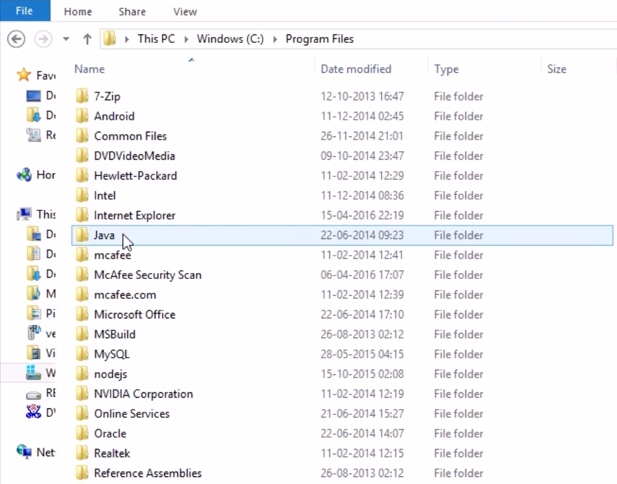
It takes a while because there are quite a few steps to configure it. Keep clicking on Next so that Java is successfully configured in our machine. To check whether Java is installed in our machine, navigate to C:\Program Files. If we find the folder named Java there, it means that Java has been successfully installed in our machine. The Java folder is shown in the following screenshot:

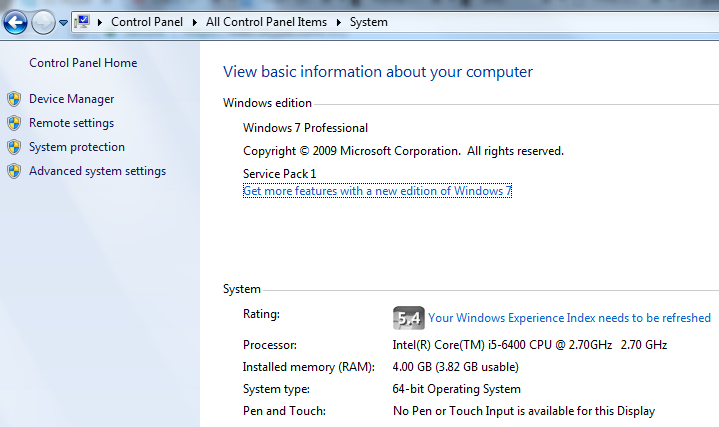
An important point to remember here is that if we are on 64-bit, only then will we see this Java folder in Program Files. If our machine is on 32-bit, then we need to go back to Program Files (x86) to get the Java folder.

We can check our system type by going to Control Panel and clicking on System. The system I am working on is 64-bit, as displayed in the following screenshot:

After it is successfully downloaded, we enter the Java folder and observe that both JDK and JRE have been downloaded. We enter the JDK folder and copy the entire file path. We are doing this because we need to set environment variables. Setting environment variables means that we are letting our system know where the Java folder is located.

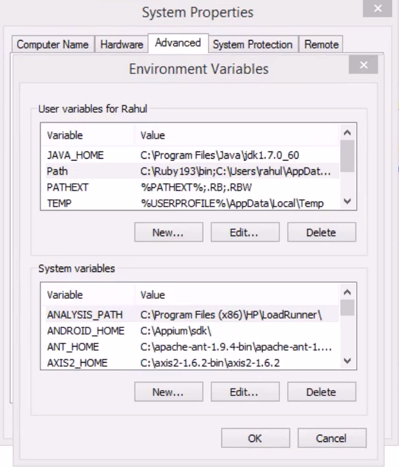
In our case, the Java folder is in C:/Program Files/Java/JDK, but Windows doesn't know where exactly it is. So to make our system aware of the location, we will place the JDK home path in our system variables. This will help our machine know where the Java folder is located, so that whenever we run our program, it will identify the exact JDK version and run our program. To update this in system environment variables, we copy the entire JDK path. Go to Control Panel, selectSystem and Security, selectSystem, and click on Advanced System Settings. In Advanced System Settings, select Environment Variables. When we click on Environment Variables, the following window appears:

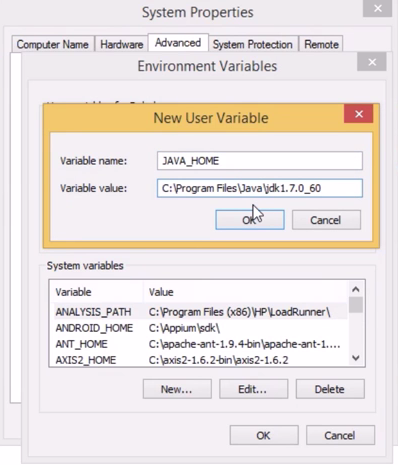
When we click on New in the User variables for Rahul section, we will get a prompt to add a New User Variable. We put in the name as JAVA_HOME, paste the JDK path in the variable value text box, and click on OK, as shown in the following screenshot:

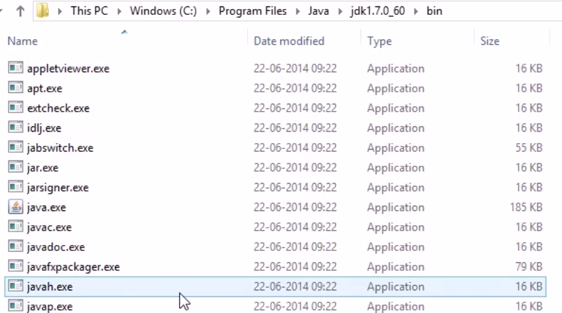
This is how we let our system know where exactly the Java folder is present. We will need to update another variable too. To do that, we go back to the JDK folder and enter the bin folder. We will see multiple .exe files, as shown in the following screenshot:

We copy the bin folder location path and return to our System Properties window. In System Variables, we will see a variable named Path. Double-clicking on it will show us a prompt to Edit System Variable, as shown in the following screenshot:

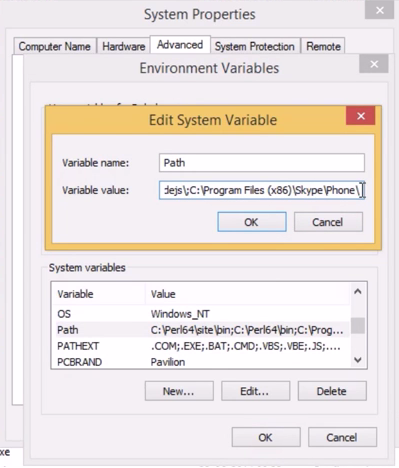
In the variable value, we go to the end, add a semicolon, and paste the bin folder path. This means we are setting the Path variable to the bin folder. We also create a new variable called JAVA_HOME, pointing to the Java folder. We need to set these two variables before we start working on Java. Once we set both the variables and click on OK, we will successfully set Environment Variables.

If we want to cross-check if the environment variables are properly configured or not, we use Command Prompt. In Command Prompt, we enter java -version and hit Enter. If we get an output as shown in the following screenshot, it means that Java has been successfully configured on our system:

Note

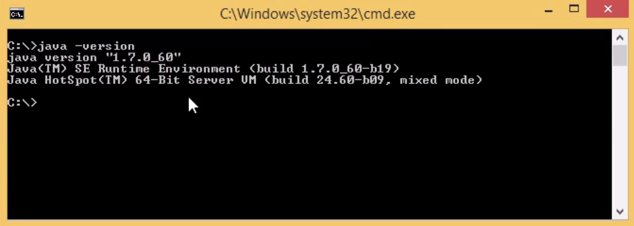
If we run the command before adding the variables, we will see that Java is not recognized. Only after setting the system environment variables will we be able to successfully configure Java.

The previous instructions take care of installing and configuring the system from our end. Next, we will try to download Eclipse, which is a Java editor tool where we write, run, and debug our code. As a pre-requisite to downloading Eclipse, we have to make sure that Java is properly configured in our machine. If any of the installation or configuration steps haven't been done correctly, Eclipse will not install properly.


Working with the Java editor tools


Here, we are going to look at the editor tool that we will be using to write our Java code. There are many tools available in the market that can act as a new Java editor, but I personally prefer using Eclipse. It comes with lot of in-built features and syntax additions. We will see other advantages of Eclipse as we progress. Some of the advantages cannot be discussed theoretically, so once we progress and start coding practically, we will understand how it prompts us to write a correct syntax. So, throughout the course of book, we will write all our Java code in the Eclipse IDE editor.

First, we download the Eclipse IDE editor and take a look at the interface that it has to offer. The following link will take us to the official website of Eclipse: https://www.eclipse.org/downloads/. The website will look like the one shown in the following screenshot:

When we click on Download Packages below the Download 64 bit button, it takes us to the following page:

We will be using Eclipse IDE for Java EE Developers. We can select between 32-bit or 64-bit, depending on the system we are working on. We already know how to check if our system is 32-bit or 64-bit, by accessing Control Panel and following the instruction given during the installation stage.

An important thing we need to ensure is that our Java version is compatible with the IDE we are downloading. If our system is 32-bit and we download 64-bit Java, then Eclipse will not open. So ensure that our system, Java, and Eclipse versions are all on the same line.

The file will be downloaded in a ZIP folder form and we can extract it. The following screenshot shows folders that will be present in the eclipse folder:


If we double-click on the eclipse.exe file, the Eclipse UI will open.

If we want to write our Java code, we need to create a Java project. Right-click on the white pane window, which is on the left side, and click on New | Project. This is shown in the following screenshot:

We get a prompt to tell to Eclipse what kind of project we are working on, as shown in the following screenshot:

As we can see, a lot of different frameworks are available, such as Java Project, C/C++, and Android, but we are interested only in the Java project, so we select Java Project, and click on Next. We will get a New Java Project window where we will fill in all the information for our new project, as shown in the following screenshot:

We select a project name for our Java project that we will be creating. We'll name our first project coreJavaTraining. Click on Next and then Finish. We will get a prompt asking us if we want to Open Associated Perspective?; select No:

This will successfully create coreJavaTraining. Within the project, there is a source folder that is automatically created. This means we need to write our classes inside this source folder. What exactly are the classes? Basically, all Java code is written inside a class. When we write Java in Notepad, we open Notepad, write the Java code, and save that particular Notepad file with the .java extension. But in Eclipse, all that work is done by this tool itself. So all we need to do is create a class and that will give us a proper template. We right-click on the source (src) file and click on New | Class. We will get a Java Class prompt where we will be entering the class name. We will name this class Firstclass and ensure that we select the public static void main (String[] args) check box; we will discuss the importance of this later. And, finally, we click on Finish. This is shown in the following screenshot:

We see that the in-built hierarchy is already created for us, as Eclipse creates an outer template. We can see in the editor that a class and public static void main is present. All this is created by the Eclipse tool. If we were writing normally on Notepad without using any tool, we would need to create the template. But in Eclipse, all we need to do is give the class name. The code we will be typing will be encapsulated in the class; that is, inside the brackets of the class. Whatever name we use while creating the file will be the class name.

All the execution of the code will be placed in public static void main because whenever we run this file, Java control will go directly to this block. It will not touch any of the code written outside public static void main. In short, we write the code outside the public static void main block, but ultimately we need to call that code inside the block. This is because only the main block is responsible for the execution of our Java code. That is why we write public static void main. We will learn about the public and void keywords as we move further in this book because it is too early to get into the details of these now. We can see the template in the following screenshot:

The class created by the Eclipse tool


Writing your first executable program in Java


Let's start with our basic coding in this section. If we want to print something in our output, there is a command in Java called System.out.println(). This command will print the output in the console. Let's say we would like to print hello world, and when we run the following code, hello world will be printed in our output console:

Firstclass.java

So let's run the code. There are two methods to run the code:

  • Right-click on the filename in the Project Explorer, click on Run As, and select Java Application.
  • Or, we could click on the run icon given in the toolbar and click on OK on the Save and Launch window. The icon looks like this:

This will run our code and print our output. The following screenshot shows the hello world message on our editor:

Output displaying hello world as per the code

In short, System.out.println() is used to print in our console. We will be using this in almost all our examples for our demonstration of practical examples. If we remove ln from the statement, it will not print the output in the next line.

Let's try printing a statement that will display the output of two print commands on the same line. Here, we add a System.out.println("hi") statement before the hello world statement. If we run the code, the output will be as follows:

Output is displayed on two separate lines

Observe how hi is displayed on one line and then hello world is displayed on the next line. Here, ln displays the output in the next line. If we remove ln from both the statements and run the code, the message will be displayed as follows:

Output is displayed on the same lines

We see, hihello world printed on the same line.

If we write our code, and then we want to check the output partially, we don't need to remove the line of code; all we need to do is just comment it out. We can comment it out by simply putting double slashes (//) at the beginning so that Java will not pick the line. This is shown in the following screenshot:

Commenting using double slashes

If you remove the slashes and the statement is just some random words, then it will throw an error. We will see a red underlined code. This means there is an error at the line with a cross mark. This is shown in the following screenshot:

Error is flagged with a cross mark besides the line number

Add the backslashes again to comment out the error.

Remember, here we are writing our actual code in the main block only. What if we want to print an integer?

Let's say we want to print the number 4. To print it, we first need to store it in a variable and then we will print the variable. So when we print the variable, the value presenting that variable will be printed automatically. For this example, we pick the number 4, and we assign the number in a variable called a. The problem here is that a does not know what data type is being assigned to it. So, we have to explicitly mention that a is an integer. If we do not mention that a is an integer, it throws an error.

In short, we are first creating a variable called a which only acts an integer and then places an integer value 4 into this. The following screenshot illustrates the example we are talking about:

Value 4 is assigned to the variable a

So, with this type of code, we can type it outside, but if we want to print it, we will have to type it in the main block. In this example, we want to print the value of a so we add another System.out.println(a) statement. The editor will throw an error for the variable a in the print statement. To know what the error is, we hover our mouse over the error and a pop up is displayed showing the error with a possible fix, as shown in the following screenshot:

Error details is displayed when the mouse is hovered over it

There will be an option to click on in the error detail. This will automatically resolve the error by adding the required content. This is an amazing feature that the editor has and it is very helpful as we move onto more complex examples.

In our example, when we click on Change 'a' to 'static' in the error detail pop up, static is added to the variable a and we are able to run the code. On running the code, the console will look like this:

Output displaying the value of a as per code

We will be getting into the details of what exactly static is in the later chapters


Summary


In this chapter, we had a short introduction to Java. We then installed and configured the various tools required to work with Java. Moving ahead, we took a look at the editor we will be using to write our own Java code.

Finally, we executed our first example and saw how the editor works and how errors are handled by it. 

In the next chapter, we will learn about some basic concepts, such as strings, variables and methods, and how are they different from each other using code.

Latest Reviews (1 reviews total)
Able to quickly get access to materials and start working with it
Hands-On Automation Testing with Java for Beginners
Unlock this book and the full library FREE for 7 days
Start now