


Getting Started with Creating Projects
In this chapter, you'll learn about JIRA—what it is, and how it can be used to manage all of the work that you need to do. We'll take a look at how projects can help to keep our work organized in JIRA, and we'll cover some of the options that we have when setting the projects up. Let's get started.
In this chapter, you will learn about the following topics:
- An introduction to JIRA
- Creating an account with Atlassian
- Project creation and management
- How to set up a project using a scheme, screens, workflows, and permissions
Introduction to JIRA
This section will cover the JIRA software essentials. In this section, you will learn about what JIRA is, how to get started with creating projects, and how JIRA organizes the work items within the software.
What is JIRA?
JIRA has been around for a while; originally, it was an issue ticketing system (a bug tracking kind of software). Project management has evolved over the years, and agile processes have become increasingly more popular, so JIRA has evolved into a very effective agile project management tool for both Scrum and Kanban. It is now very powerful in that regard.
JIRA currently offers three different packages, as follows:
- JIRA Core
- JIRA Software
- JIRA Service Desk
JIRA has a huge community, with lots of add-ons that allow for planning, tracking, releasing, and reporting; this gives us even more functionality than what we'd get out of the box. You can learn more about JIRA at https://www.atlassian.com/software/jira.
Creating an account with Atlassian
In this section, you'll learn how to create an account, and how to set up your JIRA software so that you can begin to use it for project management:
- Open the Atlassian website. You'll see that there's plenty of information about the company, some of the different software products that they have, and more. We'll go to the Try free button at the top of the page:

- You'll see that there are some options. We're going to use Jira Software. There is a server version and a cloud version:

- We're going to be using the cloud version, so let's select that. We can try it for free for seven days, and there will be some different options for it once it becomes a paid subscription. Since we're just a small team, we'll go ahead and take the first option, which is $10/month, and we will Try it free:

- On the following screen, we will be asked to go ahead and set up our URL. We'll choose digitalcoffeetest, and put in our Full name and Email, then add a Password:

Once we've done that, the website will go ahead and send us an email to validate the data that we just gave them. Once we check our email and validate that the information is correct, we can then go back to the site and log in.
All set! Creating an account is that easy.
How JIRA uses projects to keep work organized
Follow these steps to create projects in JIRA:
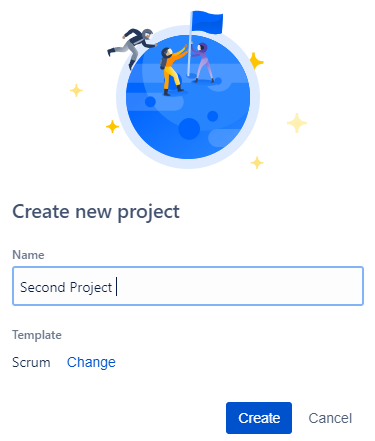
- Log in using our JIRA credentials. Click on Create project:
- I have already created a First Project, so in our example, let's name the project Second Project. In the following screenshot, you can see that we have a Scrum template, and we can change that to something else if we want to; for now, we'll leave it as it is and click on the Create button:
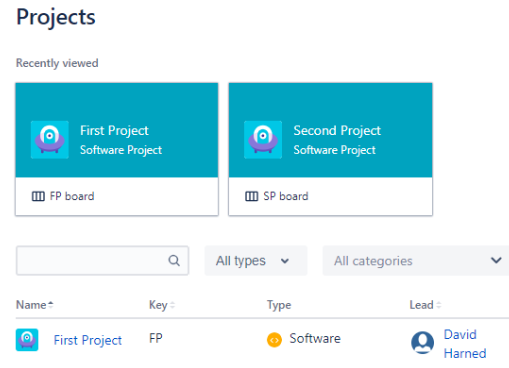
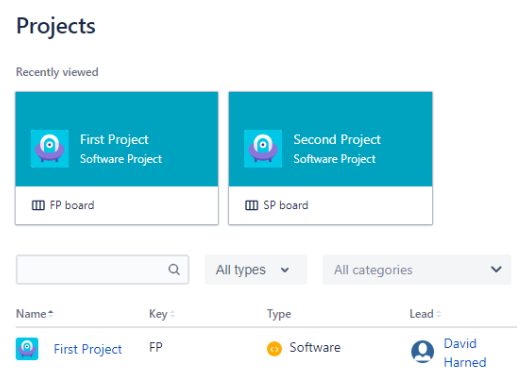
- Now, as you can see in the following screenshot, we have a First Project, as well as our new Second Project:

- Go to View all projects, where you will be able to see all of the projects, as follows:
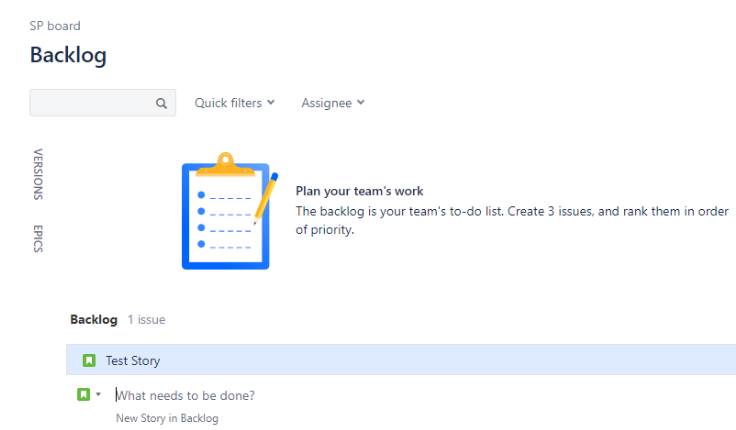
- Click on Second Project. In the following screenshot, you can see what the Backlog view looks like. This is where we can create a test story and put items into our backlog:
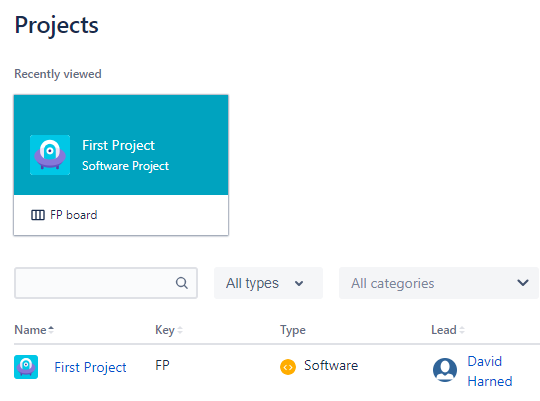
JIRA uses projects to help us organize our work and create a holding place for everything. Each project has a unique key, which is a three- or four-digit ID that we can reference, as well. You'll see those more as we move forward in this book.
We'll go into more detail about what all of these different things are in the UI, but for now, it's important to note that projects are what JIRA uses in order to organize our work.
Project management
In this section, we'll discuss managing projects in JIRA.
The steps for managing projects in JIRA are as follows:
- Select Projects in the left-hand menu. You will see a First Project and a Second Project:
- Select the First Project. This will bring you to the Backlog view of the project. The backlog is where we will store all of the stories, bugs, and different work item issue types that we want inside of this project:
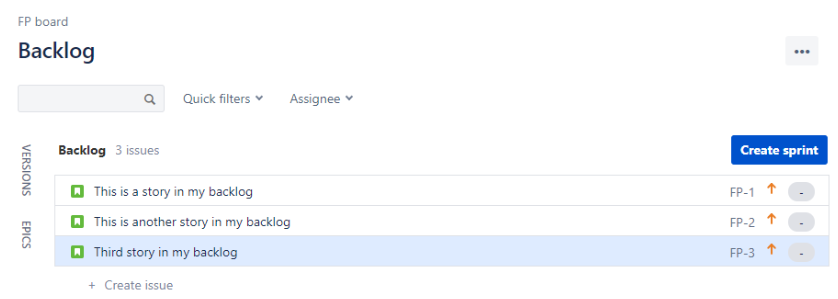
In the Backlog view, you'll see some options. First, there is a search option. To start a search, we just start to type in the box, and the backlog will filter itself to match what is typed. There are also some drop-down options, named Quick filters and Assignee. These allow us to filter the contents of the backlog, to quickly refine it to whatever we choose.
In the left-hand column, you will also see the following options:
-
- Active sprints: We can select this and get the board view for the current sprint.
- Reports: These are all of the reports that we can look at for this project.
- Releases: This is where we batch up a large amount of value into a version and release it; this lets us look at all of the details of each release, including what's in it and where we are in the process of building it.
- Issues and filters: This lets us write queries to search for work items, and then save them as filters.
- Components: These are groups of work items that we can customize and use to manage the work items.
- Go down to Project settings. This will take you to the following screen:
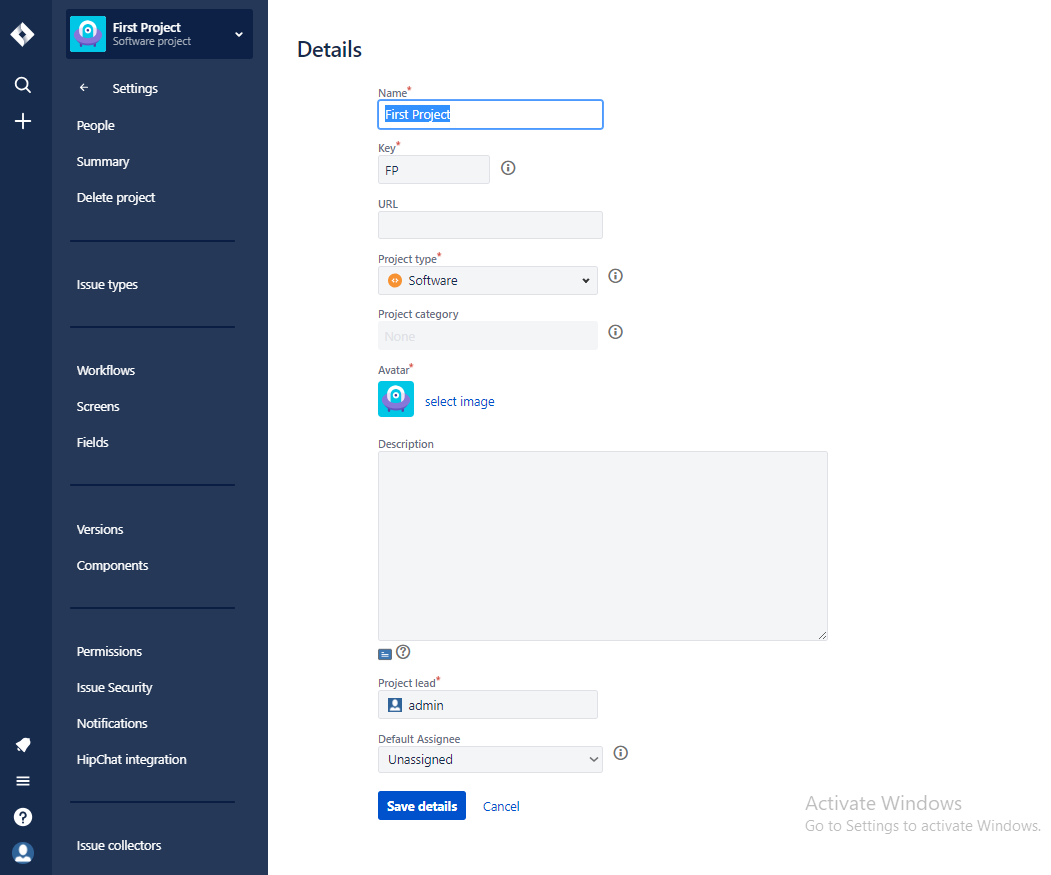
As you can see, we have our project Name, a unique Key, a URL, and the Project type; we're going to stick with the Software type, so that we can use agile processes, like Scrum. We can categorize this project, we can select an Avatar image, and we can write a Description. We can also decide who the Project lead will be on this project (admin), and we can decide whether a new item created in the backlog will get assigned to the Project lead (Default Assignee), which in this case, would be the admin; or, we can even leave it Unassigned.
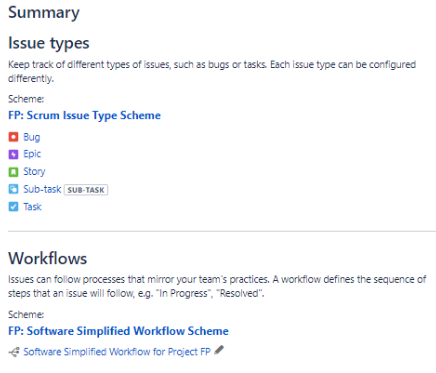
There are a lot of options on the left-hand side of this Project settings page, but we're going to take a look at the Summary view, because the summary is going to give us a look at all of those different options in one view. Issue types and Workflows are shown in the following screenshot:
Summary of project settings
Before we dive deeper into all of the project settings, let's take a high-level look. First, let's take a look at Workflows so that we can understand how workflows operate. We'll go into more detail in the next section, but what you really need to understand is that this will control the way that the issues move from To Do, to In Progress, to Done, and that we can customize the way that they work:

If we take a look at the Screens for this project, we can see that we're using a Scrum Issue Type Screen Scheme. The Screens allow us to select the attributes that appear on the different issue types, such as the story points, assignee, and acceptance criteria:

Now, look at the Fields. This allows you to control the fields that are available:

You can also do things like set up and create components. Components are similar to the concept of a tag, which allows us to search or filter work items.
If you'd like to try to create one, you can click on Components on the left-hand side, and call this component Test:

You can also do things such as setting permissions for software projects, as shown in the following screenshot:

You can even set a scheme for Notifications, as follows:

As you can see, when an issue is created, we will notify—All Watchers, the Current Assignee, and the Reporter. We can also customize this. If you're one of those people that receive way too many emails already, you might want to slim this down a little bit, so that you will only be notified about the most important actions.
That concludes our quick look at projects and their settings in JIRA. Now, let's go into some more detail.
How to set up a project using a scheme, screens, workflows, and permissions
In the last section, you learned how to configure schemes in JIRA; we introduced screens, workflows, permissions, and even notifications.
In this section, you will learn about the following topics in detail:
- Screens
- Workflows
- Permissions
- Notifications
Screens
Let's flip over to the JIRA account and look at our project view, as follows:
- Select the First Project, and, once you have the project loaded up, choose the settings for the project. Go over to the left-hand menu and select Settings.
- In the previous section, you saw a little bit about screens, but now, you're going to learn about them more deeply. We use what's called a Scrum Issue Type Screen Scheme. We have a Scrum Default Screen Scheme that will cover the different work item issue types of Story, Epic, Task, and Sub-task; then, we have a Scrum Bug Screen Scheme that will cover the issue type Bug, as shown in the following screenshot:

- Click on the edit icon on the right. We can then take a look at the default Issues screen, as follows:

- This will give us control over all of the different fields that appear in an issue type. There may be some that we don't need to use, because our organization doesn't use them, or we don't find value in them. In that case, removing them from the interface will make things faster and/or cleaner. We can also drag and move the fields into different orders. Suppose that, for instance, we didn't want Components. We could easily just remove that by clicking on Remove. The Components would then no longer appear on any of our issue types, with the exception of bugs. We haven't configured the bug type yet.
- At the bottom of the screen, we have the ability to select a field to add, as well; so, we can actually use that to add Components back, as follows:

We can just type components and add it back that way; we can drag it back up to right above Description, where we had it before.
That concludes our discussion of how to use screens in JIRA. Next, let's take a look at workflows.
Workflows
In the options on the left-hand side of the screen, click on Workflows.
Adjustments to workflows allow us to see the different ways that a status can interact with another status, and how items can move from one status to the next:
- Click on FP: Software Simplified Workflow Scheme, as shown in the following screenshot:

This will take us to the following screen, which gives us a flow diagram of the workflow:

- Any type of work item can be moved to TO DO from all other states in the workflow. The same is true for DONE and IN PROGRESS. This is, by default, a highly accommodating workflow.
- We can add a new status, such as CLOSED, by clicking on Add status.
- Drag the new CLOSED status to the bottom, beneath IN PROGRESS; now, we have a new status, as follows:

Then, we can create different actions that will happen when work items are moved in and out of this new closed status. For example, if our team is burning down hours as a metric instead of story points in our sprints, we may want to have the remaining hours item update itself to zero when the work item is moved into the CLOSED state. Another option would be to set the Resolution value of the work item behind the scenes, when we transition the item to closed. These are just a few examples of things that we can do in a workflow.
Permissions
Next, we want to take a look at permissions, so we'll bring up the Permissions options for our default software scheme, which is what we're using for our Scrum project, as shown in the following screenshot:

Since we have access to everything, this isn't really critical right now, but if we'd had more people assigned to this project, then we might have wanted to assign who could do what, from both a project-permissions perspective and an issue-permissions perspective.
Notifications
There is also a Notifications option under our First Project. You learned a little bit about this in the last section, but you'll learn more about it now:

Suppose that you were the person that reported an issue, and, when that issue was created, as the reporter, you would be notified. You would also want the current assignee to be notified, since they have had something assigned to them. You'd also want any of the watchers of that item to be notified. Then, suppose that the issue gets updated. It may be that you (the reporter) don't want to be notified about that. Here, you can configure the notifications and set them up the way you would like.
You can execute the preceding scenario by clicking on Delete for the Reporter, under the Issue Updated section. This will take you to the following screen:

The reporter will now be notified when an item is created, but not when it's updated. The reporter is again notified when the item is assigned.
Summary
We've now reached the end of our first chapter. In this chapter, we discussed what JIRA is, what it's used for in today's project management world, and why we should use it with agile. You learned how to create an account with Atlassian so that you can start to use JIRA. We then discussed projects, and how JIRA organizes its work into projects as containers. We covered creating and managing different projects in JIRA, and how to handle their settings. Finally, you learned more about the specifics in the configuration of projects, such as screens, workflows, permissions, and notifications.
In the next chapter, we'll discuss managing all of the work items in more detail, since there are lots of them involved. JIRA will help us to achieve these goals.