GlassFish Server has many exciting features which have all contributed to its rapid adoption. In this chapter, we provide a very high level overview of these features without going into a lot of technical detail. We will then describe how to install and update the GlassFish Server. The goal of this chapter is to help you gain a good understanding of the capabilities of GlassFish, install a working server instance, and most importantly, quickly get ready to explore the technical essence of the GlassFish Server in the subsequent chapters.
As a major step in Sun Microsystems' open source movement, the GlassFish project (https://glassfish.dev.java.net) was launched in June 2005, during the Java One conference. The goal of the GlassFish project was to create an open source and production-ready Java EE application server. The Sun Java System Application Server ( SJSAS) 8.x provided the bulk of code base for GlassFish. Oracle also contributed to GlassFish by donating the code of EclipseLink (originally called TopLink Essentials), a high quality implementation of the Java Persistence API ( JPA).
GlassFish was originally licensed under the Common Development and Distribution License ( CDDL). It was later updated to allow dual license: CDDL and the GNU Public License ( GPL) v2 with the Class Path Exception ( CPE). This dual license structure allows GlassFish to be both friendly for commercial development (CDDL), and to enjoy the consistence of the Java SE's open source license (GPL).
Three main versions of GlassFish Server have been released to date. The first version, GlassFish v1 and its commercially supported version, SJSAS 9.0 Platform Edition were announced at Java One in May 2006. The main goal of the GlassFish v1 was to showcase the improved productivity of developing enterprise applications using the Java Enterprise Edition (Java EE ) 5 technology. GlassFish v1 also implemented several features geared towards application administration and monitoring. Examples of these features included web service monitoring, call flow analysis, and management rule definitions. However, GlassFish v1 did not support clustering and session failover features that are essential for hosting large-scale, mission-critical applications. Due to this, GlassFish v1 was mostly suitable for department-level deployment and application prototyping. In fact, the release of GlassFish v2 effectively ren dered GlassFish v1 obsolete.
GlassFish v2, and the commercially supported SJSAS 9.1 (later renamed to Sun GlassFish Enterprise Server v2) were released in September 2007. The main goals of GlassFish v2 were to improve the performance, add enterprise class features, and further promote ease of development and use of GlassFish.
GlassFish v2 uses the new web service stack implemented in the Metro project (https://metro.dev.java.net). GlassFish v2 supports the Web Service Interoperability Technologies (WSIT), a joint effort between Sun and Microsoft to improve the interoperation of web services developed in Java and Microsoft .NET technologies.
GlassFish v2 supports the Java Business Integration (JBI) specification, JSR-208. The GlassFish v2 distribution includes a JBI implementation developed in the OpenESB project (https://open-esb.dev.java.net). This integration provides a unified installation, administration, and monitoring environment. With excellent support provided by tools such as the NetBeans IDE (http://www.netbeans.org), it is very easy to create and deploy composite applications that take advantage of both Java EE and JBI based services and components.
GlassFish v2 also introduced the concept of server usage profiles. A usage profile is characterized by the expected capabilities of an application installation. For each usage profile, the GlassFish Server provides a baseline configuration. The open source GlassFish v2 release supported two profiles. The developer profile is comparable to the Platform Edition of the SJSAS 9, which consumes the least amount of computing resources, and is suitable for development, prototyping, and small-scale deployment. The cluster profile supports the clustering of multiple application server instances and load balancing. The cluster profile also supports in-memory session replication, a light-weight yet very effective approach to improve the availability of the deployment. A third profile, enterprise is also supported in the commercially supported enterprise edition of GlassFish. The enterprise profile supports session replication using the High Availability Database (HADB), which further improves the availability of the application server deployment.
To date, the latest production release of the GlassFish Server is version 2.1.1. It is fully capable of hosting mission-critical enterprise applications. This book focuses on the administration and configuration of this version of GlassFish.
The development of GlassFish v3 started back in June 2008. One of the main goals of GlassFish v3 was to produce a production strength reference implementation of Java EE 6. Currently, the Java EE 6 standard is still being finalized. Because of this, there is no feature complete release of GlassFish v3 available yet. However, the GlassFish project has released the prelude and preview distributions of GlassFish v3 to showcase some exciting new features implemented. In this book, we dedicate the last chapter, a pretty long one, to GlassFish v3.
Since the project's launch, the GlassFish Server has enjoyed continuous improvement and significant growth. Many factors and features—both technical and non-technical—have contributed to the growing adoption of GlassFish. Let's examine some of them in the following sections.
The GlassFish project provides an open and structured community for building and improving the GlassFish Server. The functional specifications, design documentation, software builds, and most recent production documentation of GlassFish are all made available through the project website. This allows the design and implementation of GlassFish to be reviewed and tested early and often. Also, the Aquarium Blog at http://blogs.sun.com/theaquarium provides up-to-date information about GlassFish. The information includes release announcements, technical meeting and event announcements, and the availability of new resources related to GlassFish.
Over time, the GlassFish community was expanded to cover more than just the GlassFish Server. The GlassFish project now includes a variety of sub-projects. Many of these sub-projects produce the core components for the GlassFish Server such as the Metro web service stack. Also, several sub-projects were launched to develop new products and components that reflect the current state of the enterprise computing.
An example of such a project is Jersey (https://jersey.dev.java.net), which provides an implementation of JSR-311: Java API for RESTful Services (JAX-RS). These projects form a strong foundation that assures the continuous improvement of GlassFish.
Judging from the amount of communication that has occurred on the GlassFish forum, e-mail lists, and the large number of times the GlassFish software has been downloaded and installed; the GlassFish project has been very active since its inception. You can find the download tracking and adoption information about GlassFish from sites such as http://blogs.sun.com/pelegri and http://maps.glassfish.org/server. For example, in May 2009, GlassFish was downloaded more than 680,000 times, including all the distributions (The standalone distribution of the GlassFish Server runtime was downloaded more than 170,000 times). The download count was much higher than that of other popular open source application server products.
Here, we would like to make some brief comments on participating in an open source community. It is a common misconception that the only people contributing to an open source community are those who commit code changes. Actually, posting on discussion forums, sending e-mails to mailing lists, or writing about GlassFish have all helped form a great knowledge base. Such a knowledge base not only allows the GlassFish implementation quality to improve, but also allows more people to get familiar with the product and start using it more quickly.
As the reference implementation of the Java EE technologies, the GlassFish Server drives home the main goal of Java EE 5 and 6—ease of development. In addition to implementing the Java EE specifications, GlassFish provides many value-added features that help developers improve their productivity.
For example, GlassFish provides the built-in JAX-WS web service testing capability, which allows developers to quickly test their web service implementation. GlassFish allows applications to be automatically deployed in a development environment, and starting from GlassFish v3, new versions of an application can be deployed without destroying the client session.
GlassFish Server instances can be easily integrated into popular Integrated Development Environments (IDEs), such as NetBeans (http://www.netbeans.org)and Eclipse (http://www.eclipse.org). When you develop Java EE applications, the IDE not only provides excellent support for creating and building components such as EJBs, it also allows developers to define necessary resources such as JDBC connection pools and data sources, and deploy them directly to the GlassFish Server. This feature allows a developer to stay in the development mindset without having to toggle between developing applications and configuring the application server.
Starting from version 3, GlassFish is expanded to provide first-class support for running a variety of popular programming languages and frameworks, such as Ruby on Rails, Groovy and Grails, and PHP. The NetBeans IDE was also updated to provide excellent support for developing applications using these technologies. Together, this allows developers with different technical backgrounds to build applications in the NetBeans IDE, and deploy them to the runtime environment that GlassFish delivers.
The implementation of GlassFish has been constantly taking advantage of the latest developments in Java technology. Besides always being the first application server to supoprt the latest Java Development Kit (JDK) software, GlassFish also incorporates new developments in other related technologies. The development of GlassFish has produced some great components and frameworks that not only form the foundation of the GlassFish Server; they are also used in other products with great success. For example, the Metro project implements the web service stack of GlassFish, because of its excellent performance and interoperability with the Microsoft .NET technology, it is now used as the web service stack implementation in several other leading application server products. Another example is the Grizzly project (https://grizzly.dev.java.net). Grizzly imple ments a highly scalable NIO framework that is used to implement the HTTP connectors in GlassFish. Nowadays, Grizzly is also used to build scalable server applications.
The GlassFish Server provides a highly user friendly and complete administration infrastructure that is very rare in open source products. The administration capabilities of the GlassFish Server can be accessed through an intuitive web console, the command line interface (CLI), and Management Bean (MBeans) programmatically. These administration utilities are used to deploy applications, configure resources, manage the server, and monitor different aspects of the environment.
GlassFish can be configured to use different components and frameworks. For example, instead of using TopLink Essentials as the Java Persistence API (JPA) provider, GlassFish can be configured to use Hibernate. The modular approach of GlassFish v3 further improves the flexibility of GlassFish. You can pick and choose only the modules necessary in your environment, thus, getting a custom-made server platform.
The journey the GlassFish Server has taken to get to its current stage almost mirrors the progress of the enterprise application development. GlassFish started as a proprietary application server that implements the J2EE standards in a monolithic architecture, and evolved into an open source, modular server that is very flexible for customization. While GlassFish continues to deliver a high performance Java EE application server platform, it also supports many new programming languages, frameworks, and technologies that can boost the development productivity significantly. For example, GlassFish can be used with a very lightweight configuration to host database-driven Rails applications; it can also be used with an enterprise-class configuration that provides services such as distributed transaction management.
Due to the quality of the core components, the performance of GlassFish Server is more than impressive. As the only open source application server that publishes the results of running the popular SPECjAppServer2004 benchmark for Java EE applications, GlassFish produces results that are comparable to or better than leading commercial products. You can get more information about the SPECjAppServer2004 benchmark and published results from the website http://www.spec.org/jAppServer2004.
By now, we hope you are very excited about GlassFish, and cannot wait to work with it. In this section, we present the very first thing you need to do hands on—installing the GlassFish Server.
Probably the hardest part of installing GlassFish is to prepare for it. For newcomers, this can be quite confusing as there are different distributions of GlassFish available, and the installation instructions can be quite different for each distribution.
We mentioned two distributions of the GlassFish Server: The open source distribution that is supported by the GlassFish community, and the GlassFish Enterprise Server distribution that is commercially supported by Sun Microsystems, Inc. These two distributions essentially contain the same software binaries. However, there are several subtle differences you need to keep in mind, as identified here:
The sources of the distribution are different. The open source distribution of the GlassFish Server is an executable JAR file we can download from the GlassFish community website (https://glassfish.dev.java.net/downloads), while the commercially supported version is either an executable installer file, or a package-based distribution for Solaris and Linux operating systems, and it is available at the Sun download site (http://www.sun.com/software/products/appsrvr/index.xml).
The open source distribution does not support the HADB-based high availability configuration yet. Because of this, if we need this feature, we must install the commercially supported version.
While the community distribution of the GlassFish Server is our primary focus, most, if not all the topics in this book also apply to the GlassFish Enterprise Server in the other distributions. We will also discuss relevant features that are currently available only in the Sun GlassFish Enterprise Server distribution, such as the HADB-based high availability configuration.
The system requirements for GlassFish cover the hardware configuration, operating systems, and JDK 5 or JDK 6.
Hardware wise, GlassFish does not mandate a top-of-line computer system. We have successfully deployed some reasonably sized web applications to GlassFish running on some fairly low-end hardware, with the lowest being a desktop with an 800MHz Pentium IV CPU and 512 MB memory. In order to get a good user experience with GlassFish, your computer should be at least this powerful.
In terms of operating system support, GlassFish is officially supported on the following families:
This list is ever growing. In our experience, GlassFish can run on most operating systems that support the JDK 5 and JDK 6, such as FreeBSD. Even though there is no official support for this type of installation, you should be able to find enough community information to either install the binary release, or build GlassFish from source.
Both JDK 5 and JDK 6 are supported for installing and running the GlassFish Server. Based on our experience, we recommend JDK 6 because of the performance improvement and additional tools available in JDK 6. Furthermore, we recommend you set the JAVA_HOME environment variable, and add the path to the Java interpreter command java (typically $JAVA_HOME/bin) to the PATH environment variable.
The next two sections explain the installation process of the GlassFish Server v2.1.
Note
This chapter describes how to install GlassFish v2.1. The installation process of GlassFish v3 is quite different; you can refer to Chapter 11, Working with GlassFish 3 for more information.
Installing the open source distribution of GlassFish v2.1 is very straight-forward, as described in the following steps:
1. Download the JAR file distribution of GlassFish v2.1 from https://glassfish.dev.java.net/public/downloadsindex.html for your target platform. For example, if you wish to install it on a Solaris x86 platform, you need
glassfish-installer-v2.1-b60e-sunos_x86-ml.jar.Note
In case you are curious, the
mlin the filename stands for "Multiple Language", indicating that the GlassFish distribution has been localized with multiple languages. The GlassFish community does make the English-only non-localized GlassFish releases available, particularly pre-production releases. If you so desire, you can install that version.2. Enter the following command in a command-line terminal to extract the files:
# ./java -Xmx256m -jar installer-v2.1-b60e-windows-ml.jarThe -Xmx256m option in the command is used to inform the Java Virtual Machine (JVM) to allocate up to 256 MB heap memory. This option is necessary; without it the command throws an "Out of memory" error.
3. Once the Java command starts, a License Agreement window appears. You will need to accept the license to continue the installation.
Notice the checkbox in the window. This option allows the GlassFish Server to automatically check for new updates in the GlassFish update center. We will discuss this feature later in this chapter.
4. Accept the license agreement, and the installation process extracts the content to a directory named
glassfish, which serves as the root directory of the server installation. You can rename this directory or copy it to a different location. This is helpful if you want to install several instances of the GlassFish Server for testing purposes.You should find two XML files,
setup.xmlandsetup-cluster.xmlin the glassfish directory. They are two ANT build script files that allow us to initialize the GlassFish Server instance. Thesetup.xmlfile provides a developer profile configuration, which uses the minimum amount of system resources but lacks certain capabilities such as server clustering. Thesetup-cluster.xmlfile provides a cluster profile configuration that supports the clustering services.If you want to customize the server installation, you can make changes to these ANT scripts. For example, you may want to change the admin user's password. To do that, you can modify the
valueattribute of followingpropertyelement:<property name="admin.password" value="adminadmin"/>As another example, if you want to change the default server port numbers, you can change the value attribute of properties named
admin.port,instance.port,https.port, and so on.5. From the command line, enter the following commands to initialize the GlassFish Server installation:
# cd glassfish
# chmod +x lib/ant/bin/ant
# lib/ant/bin/ant -f setup.xml
Note that in this case, we are initializing the GlassFish Server using the developer profile. Later in the book, we will learn how GlassFish allows us to upgrade the server profile easily.
You now have the JAR file-based GlassFish distribution installed. Now, let's see how to install the installer-based distribution, and why it is sometimes worthwhile to follow the seemingly longer and more complicated process to install the installer-based distribution.Installing the installer-based distribution
To install the installer distribution of GlassFish, complete the following steps:
1. Download the installer-based distribution of GlassFish v2.1 from http://www.sun.com/software/products/appsrvr/index.xml for your target platform. For example, if you wish to install it on Solaris x86 platform, you need
sges-2_1-solaris-i586-ml.bin.2. On Windows, double-click the file to start the GUI-based installer. If you are using a UNIX-like system, enter the following commands to start the installer:
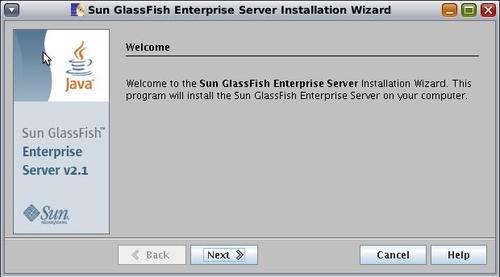
# chmod +x sges-2_1-solaris-i586-ml.bin
# ./sges-2_1-solaris-i586-ml.bin -savestate install.state
3. Once the installer starts, the welcome screen of the GlassFish installer appears, as shown in the following screenshot.
4. Click Next. The installer now displays the GlassFish license agreement, as shown in the following screenshot.

5. Accept the terms in the license agreement, and click Next.
Now the installer displays the installation directory screen, as shown in the following screenshot. The default installation directory for GlassFish is
C:/SUNWappserve, on Windows, or$HOME/SUNWappserver, where$HOMEis the home directory of the user running the installer.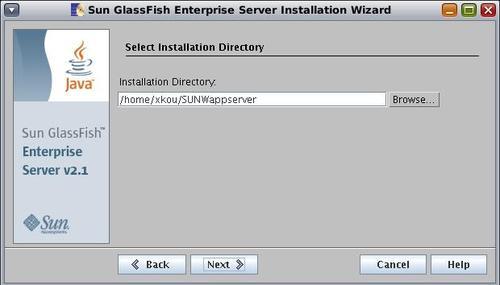
6. Enter the appropriate installation directory, such as
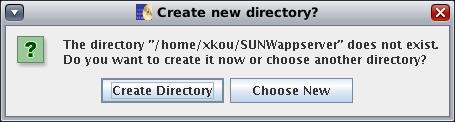
/opt/glassfishin the Input Directory field, and click Next.7. If the directory does not exist, a new dialog appears and asks you whether to create the directory, as shown in the following screenshot. In this case, click Create Directory.
The installer now displays the Java configuration window as shown in the following screenshot:
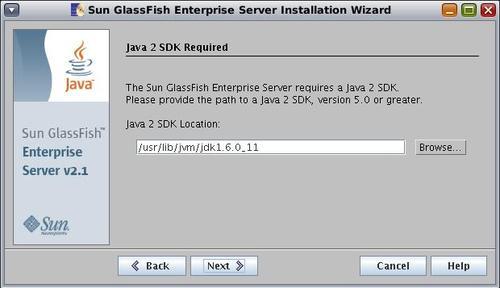
8. Enter the correct information for the JDK location, in our case, the value is
/usr/lib/jvm/jdk1.6.0_11. After entering the information, click Next.The installer now displays the administration settings of the GlassFish, as shown in the following screenshot. This screen allows you to configure the credentials of the GlassFish administrator. It also allows you to select the port numbers for HTTP and administration traffic. The default access to the GlassFish administration console is through port 4848, and the default HTTP port for GlassFish is 8080.
9. Enter a password for the admin user, and select Don't Prompt for Admin User Name and Password. Keep the default settings for the port numbers, and click Next.
Note
If you opt not to be prompted for the admin username and password, then the encrypted credentials of the admin user will be stored on the filesystem. Make sure you protect this file, so that no one else can read it. Later in the book, we will explain the security implication of this file.
Now the installer should display the update configuration screen, as shown in the following screenshot. This screen allows you to decide if you want to enable the update tool bundled in the distribution, and enable automatic update checking.

10. Check Enable Updatecenter Client, and click Next. The Ready to Install screen appears, as shown in the following screenshot.

11. Click Install Now to start the installation.
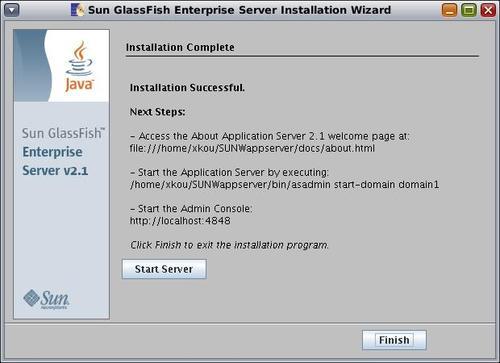
The installation of GlassFish does not take a long time. Once the installation is complete, you should see the registration screen appear, as shown in the following screenshot.
12. Select Skip Registration, and click Next.
The Installation Complete screen should appear, as shown in the following screenshot. You can click Finish to complete the installation.
The installer-based GlassFish distribution supports several command-line options that can be used to customize the installation process for different purposes. For example, you can force the installer to save all the user input during the installation into a "state" file, and later use this state file as a template to initiate silent installations without user interference. It also allows you to run the installer in console mode so that a graphical terminal is not needed.
To check the available command-line options, simply do the following:
1. Open a command line terminal, and change to the directory where the GlassFish installer is located.
2. Enter the following command:
# ./sges-2_1-solaris-x86-ml.bin -h
On Windows, you should see a dialog window with the help information for the installer. On UNIX-like operating systems, the same information is displayed in the terminal window where the command was started.
For example, if you used the -savestate option to run the installer as follows:
# ./sges-2_1-solaris-x86-ml.bin -savestate install.state
After the installation, you can modify the install.state file to provide some different installation parameters. Following is an example of the state file. As you can see, this property-based text file captures essential information required for installing GlassFish.
[STATE_BEGIN Sun GlassFish Enterprise Server f99a6]
defaultInstallDirectory = /home/xkou/SUNWappserver
currentInstallDirectory = /opt/sges
JDK_LOCATION = /usr/jdk/instances/jdk1.6.0
INST_ASADMIN_USERNAME = admin
INST_ASADMIN_PASSWORD = nqbfxnkdghabkygbdpqzvanqzva
INST_MASTER_PASSWORD = plvrdlcijaefpjlodfgiunatrvg
INST_ASADMIN_PORT = 14848
INST_ASWEB_PORT = 18080
INST_HTTPS_PORT = 18181
STORE_ADMIN_AUTH = TRUE
ADMIN_PASSWORD_ENCRYPTED = TRUE
INST_JMS_PORT = 17676
INST_ORB_PORT = 13700
INST_ORB_SSL_PORT = 3820
INST_ORB_MUTUALAUTH_PORT = 13920
INST_JMX_PORT = 18686
CREATE_DESKTOP_SHORTCUT = FALSE
UPDATE_PATH = FALSE
CREATE_UPDATE_ICON =
CREATE_WINDOWS_SERVICE = FALSE
[STATE_DONE Sun GlassFish Enterprise Server f99a]
If necessary, you can change the values captured in this state file before kicking off a silent installation. For example, if you want to change the port numbers, simply modify the port number values in the file. Once you have made the necessary changes to this file, you can quickly install another GlassFish Server instance by entering the following command:
# ./sges-2_1-solaris-x86-ml.bin -console -silent install.state
Once the installation is complete, you can verify the GlassFish installation with the following steps:
1. From a command-line terminal, enter the following commands to start the GlassFish Server:
# cd glassfish/bin
# ./asadmin start-domain
The command-line terminal will display some status information of the server startup. At the end, it should display the following information, indicating the GlassFish Server has started successfully:
Domain listens on at least the following ports for connections:
[8080 8181 4848 3700 3820 3920 8686 ]
Domain does not support application server clusters and other standalone instances.
2. Open a web browser and point it at
http://localhost:8080.Port 8080 is the default HTTP port used by GlassFish to serve normal web applications and content. If the installation is successful, you should see the default page of the GlassFish Server, as shown in the following screenshot.

3. Now try to access the GlassFish administration console by pointing the browser at
http://localhost:4848.By default, port 4848 is used to serve the GlassFish Admin Console web application, which is bundled with the GlassFish Server distribution. Once the Administration Console is loaded, you should see the login page, as shown in the following screenshot.

4. Enter the authentication credentials you have specified during installation, and click Login.
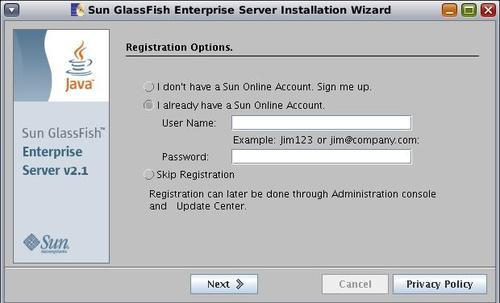
5. You should be able to successfully log in to the Admin Console. Its user interface is displayed in the browser window. If you followed the installation steps described earlier in the book, you should also see a dialog that asks you to register your GlassFish installation, as shown in the following screenshot.
6. Click Register, and you should see the registration page, as shown in the following screenshot. Registration is free; all you need is an Sun Online account. If you don't have one yet, the registration page allows you to create the account and register in one step.

7. If you have a Sun Online account, enter the information. Otherwise, click the I don't have a Sun Online Account. Sign me up radio button, and enter the necessary information to create an account.
8. Click the Register button at the bottom-right corner of the page to register. Once the registration is complete, the Admin Console application is updated and displayed in the browser, as shown in the following screenshot.

This concludes a detailed walk-through of installing GlassFish and verifying the installation. Next, let's try to explore the directory structure of a GlassFish installation.
This chapter provides a high-level introduction to GlassFish. It also provides a detailed recipe for installing the GlassFish Server, and briefly introduces the Admin Console of GlassFish. At this point, you should have a clear understanding of the GlassFish Server and its essential features. You should also know how to start the GlassFish Server, and use the GlassFish update tool to manage the modules you need for the GlassFish Server.
With the GlassFish Server installed, the next chapter will dive deep into the administrative infrastructure of GlassFish Server, and explain the most important tools you will use to manage the GlassFish Server.