Welcome! In this book, you will learn about tmux, a command-line program that can help maximize your productivity. It will do this by allowing you to control many virtual windows and processes from a single window, reducing your need to use your mouse and allowing you to detach and restore sessions later in the same state you left them. For more on why tmux rocks, see the Why tmux? section in Appendix.
We will eventually go over many of the concepts mentioned in this chapter in greater detail, but the best way to start getting familiar with everything is to jump right in.
So, in this chapter, we'll do just that: go on a little tour, simulate an everyday use of tmux, and point out some key concepts along the way. Fear not, if everything is not clear after the chapter, it will be covered later; this is just meant to be the first exposure.
For now, let's jump right in and start playing with it. Open up your favorite terminal application and let's get started. Just run the following command:
$ tmux
You'll probably see a screen flash, and it'll seem like not much else has happened; it looks like you're right where you were previously, with a command prompt. The word tmux is gone, but not much else appears to have changed.
However, you should notice that now there is a bar along the bottom of your terminal window. This can be seen in the following screenshot of the terminal window:
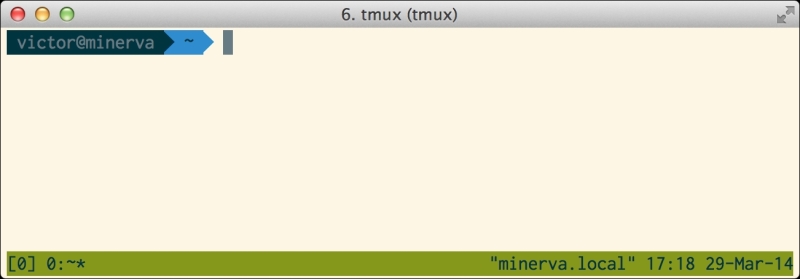
Congratulations! You're now running tmux.
That bar along the bottom is provided by tmux. We call this bar the status line. The status line gives you information about the session and window you are currently viewing, which other windows are available in this session, and more.
Some of what's on that line may look like gibberish now, but we'll learn more about what things mean as we progress through this book. We'll also learn how to customize the status bar to ensure it always shows the most useful items for your workflow. These customizations include things that are a part of tmux (such as the time, date, server you are connected to, and so on) or things that are in third-party libraries (such as the battery level of your laptop, current weather, or number of unread mail messages).
By running tmux with no arguments, you create a brand new session. In tmux, the base unit is called a session. A session can have one or more windows. A window can be broken into one or more panes. We'll revisit this topic in its own whole chapter (for more information, refer to Chapter 3, Sessions, Windows, and Panes); however, as a sneak preview, what we have here on the current screen is a single pane taking up the whole window in a single session. Imagine that it could be split into two or more different terminals, all running different programs, and each visible split of the terminal is a pane. More on this will be covered in the later chapters.
Tip
What is a session in tmux?
It may be useful to think of a tmux session as a login on your computer.
You can log on to your computer, which initiates a new session. After you log on by entering your username and password, you arrive at an empty desktop. This is similar to a fresh tmux session. You can run one or more programs in this session, where each program has its own window or windows and each window has its own state.
In most operating systems, there is a way for you to log out, log back in, and arrive back at the same session, with the windows just as you left them. Often, some of the programs that you had opened will continue to run in the background when you log out, even though their windows are no longer visible.
A session in tmux works in much the same way. So, it may be useful to think of tmux as a mini operating system that manages running programs, windows, and more, all within a session.
You can have multiple sessions running at the same time. This is convenient if you want to have a session for each task you might be working on. You might have one for an application you are developing by yourself and another that you could use for pair programming. Alternatively, you might have one to develop an application and one to develop another. This way everything can be neat and clean and separate.
Each session has a name that you can set or change.
Notice the [0] at the very left of the status bar? This is the name of the session in brackets. Here, since you just started tmux without any arguments, it was given the name 0. However, this is not a very useful name, so let's change it.
In the prompt, just run the following command:
$ tmux rename-session tutorial
This tells tmux that you want to rename the current session and tutorial is the name you'd like it to have. Of course, you can name it anything you'd like. You should see that your status bar has now been updated, so now instead of [0] on the left-hand side, it should now say [tutorial]. Here's a screenshot of my screen:

Of course, it's nice that the status bar now has a pretty name we defined rather than 0, but it provides many more utilities than this, as we'll see in a bit!
It's worth noting that here we were giving a session a name, but this same command can also be used to rename an existing session.
The status bar has a string that represents each window to inform us about the things that are currently running. The following steps will help us to explore this a bit more:
Let's fire up a text editor to pretend we're doing some coding:
$ nano test
Now type some stuff in there to simulate working very hard on some code:

First notice how the text blob in our status bar just to the right of our session name ([tutorial]) has changed. It used to be 0:~* and now it's 0:nano*. Depending on the version of tmux and your chosen shell, yours may be slightly different (for example, 0:bash*). Let's decode this string a bit.
This little string encodes a lot of information, some of which is provided in the following bullet points:
The zero in the front represents the number of the window. As we'll shortly see, each window is given a number that we can use to identify and switch to it.
The colon separates the window number from the name of the program running in that window.
The symbols ~ or nano in the previous screenshot are loosely names of the running program. We say "loosely" because you'll notice that ~ is not the name of a program, but was the directory we were visiting. tmux is pretty slick about this; it knows some state of the program you're using and changes the default name of the window accordingly. Note that the name given is the default; it's possible to explicitly set one for the window, as we'll see later.
The symbol * indicates that this is the currently viewed window. We only have one at the moment, so it's not too exciting; however, once we get more than one, it'll be very helpful.
OK! Now that we know a bit about a part of the status line, let's create a second window so we can run a terminal command. Just press Ctrl + b, then c, and you will be presented with a new window!

A few things to note are as follows:
Now there is a new window with the label 1:~*. It is given the number 1 because the last one was 0. The next will be 2, then 3, 4, and so on.
The asterisk that denoted the currently active window has been moved to 1 since it is now the active one.
The
nanoapplication is still running in window 0.The asterisk on window 0 has been replaced by a hyphen (-). The - symbol denotes the previously opened window. This is very helpful when you have a bunch of windows.
Let's run a command here just to illustrate how it works. Run the following commands:
$ echo "test" > test
$ cat test
The output of these commands can be seen in the following screenshot:
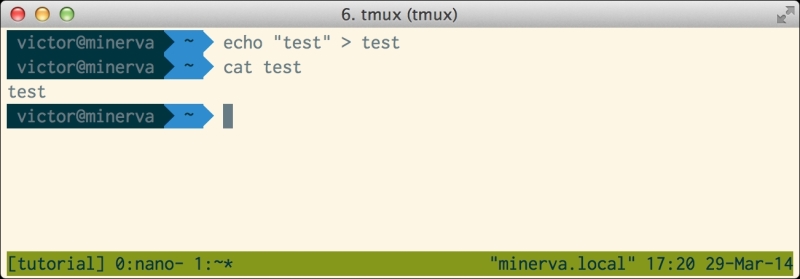
This is just some stuff so we can help identify this window. Imagine in the real world though you are moving a file, performing operations with Git, viewing log files, running top, or anything else.
Let's jump back to window 0 so we can see nano still running. Simply press Ctrl + b and l to switch back to the previously opened window (the one with the hyphen; l stands for the last). As shown in the following screenshot, you'll see that nano is alive, and well, it looks exactly as we left it:

There is a special key in tmux called the prefix key that is used to perform most of the keyboard shortcuts. We have even used it already quite a bit! In this section, we will learn more about it and run through some examples of its usage.
You will notice that in the preceding exercise, we pressed Ctrl + b before creating a window, then Ctrl + b again before switching back, and Ctrl + b before a number to jump to that window.
When using tmux, we'll be pressing this key a lot. It's even got a name! We call it the prefix key. Its default binding in tmux is Ctrl + b, but you can change that if you prefer something else or if it conflicts with a key in a program you often use within tmux. You can send the Ctrl + b key combination through to the program by pressing Ctrl + b twice in a row; however, if it's a keyboard command you use often, you'll most likely want to change it. This key is used before almost every command we'll use in tmux, so we'll be seeing it a lot.
From here on, if we need to reference the prefix key, we'll do it like <Prefix>. This way if you rebind it, the text will still make sense. If you don't rebound it or see <Prefix>, just type Ctrl + b.
Let's create another window for another task. Just run <Prefix>, c again. Now we've got three windows: 0, 1, and 2. We've got one running nano and two running shells, as shown in the following screenshot:

Some more things to note are as follows:
Now we have window 2, which is active. See the asterisk?
Window 0 now has a hyphen because it was the last window we viewed.
This is a clear, blank shell because the one we typed stuff into is over in Window 1.
Let's switch back to window 1 to see our test commands above still active. The last time we switched windows, we used <Prefix>, l to jump to the last window, but that will not work to get us to window 1 at this point because the hyphen is on window 0. So, going to the last selected window will not get us to 1.
Thankfully, it is very easy to switch to a window directly by its number. Just press <Prefix>, then the window number to jump to that window. So <Prefix>, 1 will jump to window 1 even though it wasn't the last one we opened, as shown in the following screenshot:

Sure enough, now window 1 is active and everything is present, just as we left it. Now we typed some silly commands here, but it could just as well have been an active running process here, such as unit tests, code linting, or top. Any such process would run in the background in tmux without an issue.
Tip
This is one of the most powerful features of tmux.
In the traditional world, to have a long-running process in a terminal window and get some stuff done in a terminal, you would need two different terminal windows open; if you accidentally close one, the work done in that window will be gone.
tmux allows you to keep just one terminal window open, and this window can have a multitude of different windows within it, closing all the different running processes. Closing this terminal window won't terminate the running processes; tmux will continue humming along in the background with all of the programs running behind the scenes.
Now a keen observer may notice that the trick of entering the window number will only work for the first 10 windows. This is because once you get into double digits, tmux won't be able to tell when you're done entering the number. If this trick of using the prefix key plus the number only works for the first 10 windows (windows 0 to 9), how will we select a window beyond 10?
Thankfully, tmux gives us many powerful ways to move between windows. One of my favorites is the choose window interface.
However, oh gee! This is embarrassing. Your author seems to have entirely forgotten the key combination to access the choose window interface. Don't fear though; tmux has a nice built-in way to access all of the key bindings. So let's use it!
Press <Prefix>, ? to see your screen change to show a list with bind-key to the left, the key binding in the middle, and the command it runs to the right. You can use your arrow keys to scroll up and down, but there are a lot of entries there!
Thankfully, there is a quicker way to get to the item you want without scrolling forever.
Press Ctrl + s and you'll see a prompt appear that says Search Down:, where you can type a string and it will search the help document for that string.
Note
Emacs or vi mode
tmux tries hard to play nicely with developer defaults, so it actually includes two different modes for many key combinations tailored for the two most popular terminal editors: Emacs and vi. These are referred to in tmux parlance as status-keys and mode-keys that can be either Emacs or vi.
The tmux default mode is Emacs for all the key combinations, but it can be changed to vi via configuration, something we'll cover in Chapter 2, Configuring tmux. It may also be set to vi automatically based on the global $EDITOR setting in your shell.
If you are used to Emacs, Ctrl + s should feel very natural since it's the command Emacs uses to search.
So, if you try Ctrl + s and it has no effect, your keys are probably in the vi mode. We'll try to provide guidance when there is a mode-specific key like this by including the vi mode's counterpart in parentheses after the default key.
For example, in this case, the command would look like Ctrl + s (/) since the default is Ctrl + s and / is the command in the vi mode.
Type in choose-window and hit Enter to search down and find the choose-window key binding. Oh look! There it is; it's w:

However, what exactly does that mean?
Well, all that means is that we can type our prefix key (<Prefix>), followed by the key in that help document to run the mentioned command. First, let's get out of these help docs. To get out of these or any screens like them, generated by tmux, simply press q for quit and you should be back in the shell prompt for window 2.
If you ever forget any key bindings, this should be your first step.
Tip
A nice feature of this key binding help page is that it is dynamically updated as you change your key bindings.
Later, when we get to Configuration, you may want to change bindings or bind new shortcuts. They'll all show up in this interface with the configuration you provide them with.
Can't do that with manpages!
Now, to open the choose window interface, simply type <Prefix>, w since w was the key shown in the help bound to choose-window and voilà:
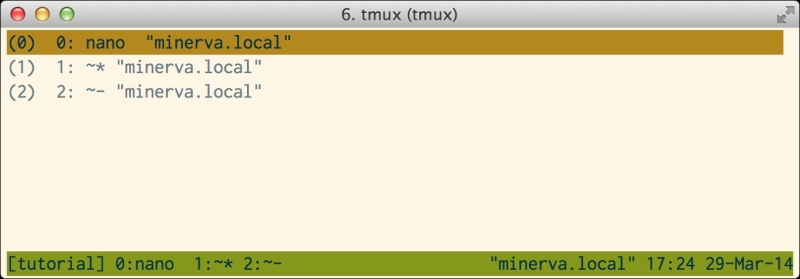
Notice how it nicely lays out all of the currently open windows in a task-manager-like interface.
It's interactive too. You can use the arrow keys to move up and down to highlight whichever window you like and then just hit Enter to open it. Let's open the window with nano running. Move up to highlight window 0 and hit Enter.
You may notice a few more convenient and intuitive ways to switch between the currently active windows when browsing through the key bindings help. For example, <Prefix>, p will switch to the previous window and <Prefix>, n will switch to the next window. Whether refreshing your recollection on a key binding you've already learnt or seeking to discover a new one, the key bindings help is an excellent resource.
Now we only have three windows so it's pretty easy to remember what's where, but what if we had 30 or 300? With tmux, that's totally possible. (Though, this is not terribly likely or useful! What would you do with 300 active windows?)
One other convenient way to switch between windows is to use the find-window feature. This will prompt us for some text, and it will search all the active windows and open the window that has the text in it.
If you've been following along, you should have the window with nano currently open (window 0). Remember we had a shell in window 1 where we had typed some silly commands? Let's try to switch to that one using the find-window feature.
Type <Prefix>, f and you'll see a find-window prompt as shown in the following screenshot:

Here, type in cat test and hit Enter.
You'll see you've switched to window 1 because it had the cat test command in it.
However, what if you search for some text that is ambiguous? For example, if you've followed along, you will see the word test appear multiple times on both windows 0 and 1. So, if you try find-window with just the word test, it couldn't magically switch right away because it wouldn't know which window you mean.
Thankfully, tmux is smart enough to handle this. It will give you a prompt, similar to the choose-window interface shown earlier, but with only the windows that match the query (in our case, windows 0 and 1; window 2 did not have the word test in it). It also includes the first line in each window (for context) that had the text.

Pick window 0 to open it.
Now press <Prefix>, d.
Uh oh! Looks like tmux is gone! The familiar status bar is no more available. The <Prefix> key set does nothing anymore.
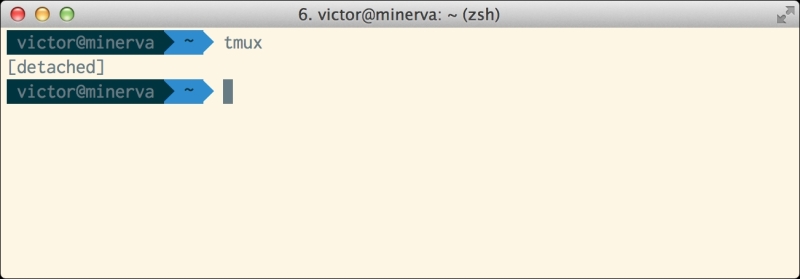
You may think we the authors have led you astray, causing you to lose your work. What will you do without that detailed document you were writing in nano?
Fear not explorer, we are simply demonstrating another very powerful feature of tmux. <Prefix>, d will simply detach the currently active session, but it will keep running happily in the background!
Yes, although it looks like it's gone, our session is alive and well.
How can we get back to it? First, let's view the active sessions. In your terminal, run the following command:
$ tmux list-sessions
You should see a nice list that has your session name, number of windows, and date of creation and dimensions. If you had more than one session, you'd see them here too.
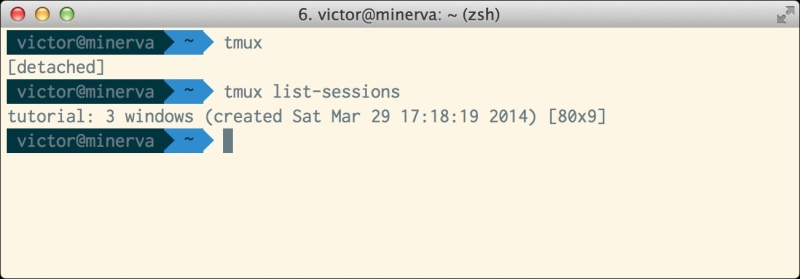
To re attach the detached session to your session, simply run the following command:
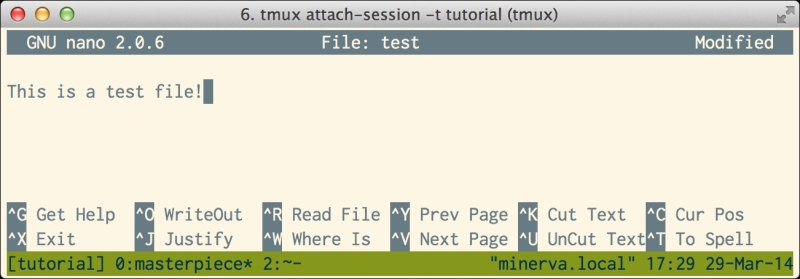
$ tmux attach-session –t tutorial
This tells tmux to attach a session and the session to attach it to as the target (hence -t). In this case, we want to attach the session named tutorial. Sure enough, you should be back in your tmux session, with the now familiar status bar along the bottom and your nano masterpiece back in view.
Note that this is the most verbose version of this command. You can actually omit the target if there is only one running session, as is in our scenario. This shortens the command to tmux attach-session. It can be further shortened because attach-session has a shorter alias, attach. So, we could accomplish the same thing with just tmux attach.
Throughout this text, we will generally use the more verbose version, as they tend to be more descriptive, and leave shorter analogues as exercises for the reader.
Now you may notice that attach-session sounds like a pretty long command. It's the same as list-sessions, and there are many others in the lexicon of tmux commands that seem rather verbose.
There is less complexity to the long commands than it may seem because most of them can be tab-completed. Try going to your command prompt and typing the following:
$ tmux list-se
Next, hit the Tab key. You should see it fill out to this:
$ tmux list-sessions
So thankfully, due to tab completion, there is little need to remember these long commands.
Note that tab completion will only work in certain shells with certain configurations, so if the tab completion trick doesn't work, you may want to search the Web and find a way to enable tab completion for tmux.
Most of the commands have an alias, which is a shorter form of each command that can be used. For example, the alias of list-sessions is ls. The alias of new-session is new.
You can see them all readily by running the tmux command list-commands (alias lscm), as used in the following code snippet:
$ tmux list-commands
This will show you a list of all the tmux commands along with their aliases in parenthesis after the full name.
Throughout this text, we will always use the full form for clarity, but you could just as easily use the alias (or just tab complete of course).
One thing you'll most likely notice is that only the last few lines are visible in your terminal. If you go for your mouse and try to scroll up, that won't work either! How can you view the text that is placed above? We will need to move into something called the Copy mode that has its own chapter later in this text (See Chapter 4, Manipulating Text).
Let's say you want to give a more descriptive name to a window. If you had three different windows, each with the nano editor open, seeing nano for each window wouldn't be all that helpful.
Thankfully, it's very easy to rename a window. Just switch to the window you'd like to rename. Then <Prefix>, , will prompt you for a new name. Let's rename the nano window to masterpiece
.
See how the status line has been updated and now shows window 0 with the masterpiece title as shown in the following screenshot. Thankfully, tmux is not smart enough to check the contents of your window; otherwise, we're not sure whether the masterpiece title would make it through.

As the last stop on our virtual tour, let's kill a window we no longer need. Switch to window 1 with our find-window trick by entering <Prefix>, f, cat test, Enter or of course we could use the less exciting <Prefix>, l command to move to the last opened window.
Now let's say goodbye to this window. Press <Prefix>, & to kill it. You will receive a prompt to which you have to confirm that you want to kill it.
This is a destructive process, unlike detaching, so be sure anything you care about has been saved.
Once you confirm it, window 1 will be gone. Poor window 1! You will see that now there are only window 0 and window 2 left:
You will also see that now <Prefix>, f, cat test, Enter no longer loads window 1 but rather says No windows matching: cat test. So, window 1 is really no longer with us.
Whenever we create a new window, it will take the lowest available index, which in this case will be 1. So window 1 can rise again, but this time as a new and different window with little memory of its past. We can also renumber windows as we'll see later, so if window 1 being missing is offensive to your sense of aesthetics, fear not, it can be remedied!
In this chapter, we got to jump right in and get a whirlwind tour of some of the coolest features in tmux.
Here is a quick summary of the features we covered in this chapter:
Starting tmux
Naming and renaming sessions
The window string and what each chunk means
Creating new windows
The prefix key
Multiple ways to switch back and forth between windows
Accessing the help documents for available key bindings
Detaching and attaching sessions
Renaming and killing windows
In the next chapter, we will look into configuration and many of the ways tmux can be customized to fit your tastes and workflow.
For a reference of all the commands learned in this chapter and every following chapter, you can refer to the Key binding and command reference section in Appendix.


