


Under the hood, Meteor is really just a bunch of files and scripts, designed to make the building of a web application easier. That's a terrible way to describe something so elegant, but it helps us better understand what we're using.
After all, Mila Kunis is really just a bunch of tissue wrapped around bone, with some vital organs inside. I know you hate me now for that description, but you get the point. She's beautiful. So is Meteor. But it doesn't do us any good to just leave it at that. If we want to reproduce that type of beauty on our own, we have to understand what's really going on.
So, files and scripts… We're going to walk through how to get the Meteor package properly installed on your Linux or Mac OS X system, and then see that package of files and scripts in action. Note that Windows support is coming, but as of the time of this writing, only the Linux and Mac versions are available.
In this chapter, you will learn:
Downloading and installing Meteor via curl
Loading an example application
Making changes and watching Meteor in action
There are several ways to install a package of files and scripts. You can manually download and transfer files, you can use a pretty installation wizard/package with lots of "next" buttons, or you can do what real developers do, and use the command line. It puts hair on your chest. Which, now that I think about it, may not be a very desirable thing. Okay, no hair; I lied. But still, you want to use the command line, trust me. Trust the person that just lied to you.
curl (or cURL if you want to get fancy) is a command-line tool used to transfer files and run scripts, using standard URL locations. You probably already knew that, or you probably don't care. Either way, we've described it and we're now moving on to using it.
Open a terminal window or the command line, and enter the following:
$ curl https://install.meteor.com | /bin/sh
Tip
Downloading the example code
You can download the example code files for all Packt books you have purchased from your account at http://www.PacktPub.com. If you purchased this book elsewhere, you can visit http://www.PacktPub.com/support and register to have the files e-mailed directly to you.
This will install Meteor on your system. curl is the command to go and fetch the script. https://install.meteor.com is the URL/location of the script, and /bin/sh is, of course, the location of the script interpreter "Shell", which will run the script.
Once you've run this script, assuming you have an Internet connection and the proper permissions, you will see the Meteor package download and install:

The key thing we're looking for in the preceding installation text is the location of Meteor:
Installing Meteor to /usr/local/meteor
This location will vary depending on if you're running this in Linux or Mac OS X, but it puts Meteor into a location where you can then access the Meteor script from anywhere else. This will become important in a minute. For now, let's see what kind of friendly message we get when the Meteor installation is finished:
Meteor installed! To get started fast:

  $ meteor create ~/my_cool_app
  $ cd ~/my_cool_app
  $ meteor

Or see the docs at:

  docs.meteor.com
Great! You've successfully installed Meteor, and you're on your way to creating your first Meteor web application!
Tip
You should bookmark http://docs.meteor.com as an invaluable reference moving forward.
The wonderful people at Meteor have included several example applications, which you can quickly create and play with, helping you get a better idea of what Meteor is capable of.
For the application we will build, the todos example is the closest fit, so we'll go ahead and build off of that example. We'll be using the command line again, so awesome news if you still have it open! If not, open a terminal window, and follow these steps.
So we can remember where they are later, we'll put all the files for this book in the ~/Documents/Meteor folder. We need to create that folder:
$ mkdir ~/Documents/Meteor
Now, we want to be in that directory:
$ cd ~/Documents/Meteor
We can now use the Meteor
create command with the --example parameter to create a local copy of the
todos example application:
$ meteor create –-example todos
As with the Meteor installation itself, the
create command script has a friendly success message:
todos: created.
To run your new app:
   cd todos
   meteor
How handy, there are even instructions on what to do next! Let's go ahead and do what our good command-line friend is telling us.
To start up a Meteor application, we need to be in the application directory itself. This is because Meteor is looking for the startup files, HTML, and JavaScript needed to run the application. Those are all found in the application folder, so let's go there:
$ cd todos
This puts us in the ~/Documents/Meteor/todos folder, and we're ready to run the application:
$ meteor
Yes, that's it. Meteor takes care of everything for us, reading all the files and scripts, and setting up the HTTP listener:
[[[[[ ~/Documents/Meteor/todos ]]]]]

Running on: http://localhost:3000/
We can now take the URL we've been given (http://localhost:3000/), and check out the example application in a web browser.
Open your favorite web browser (we'll be using Chrome, but any modern, updated browser will work) and navigate to http://localhost:3000/.
You should see the following screen, with a few todo lists already added:
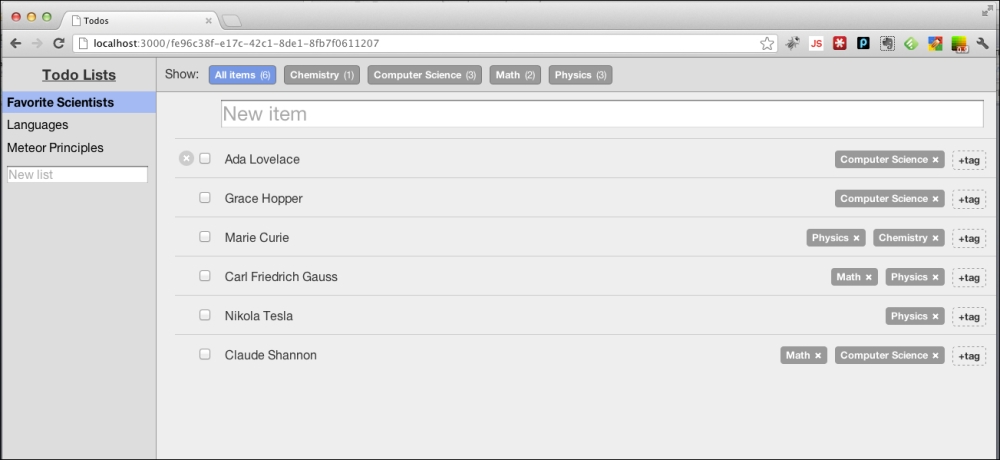
You can go ahead and poke around the application if you'd like. Add a new item to a list, change lists, add a new tag, or mark items as complete. Go nuts, friend! Any changes we make in the future won't match exactly what you will have on your screen if you make a lot of changes, but you'll be able to follow along just fine.
Do you fear change, and want your screens to look exactly like our sample screens? No problem, just start with a clean instance.
At the command line:
Ctrl + CThis stops the running application. Now go up one directory:
$ cd ..Remove the
todosapplication:$ rm –R todosCreate the todos example application again:
$ meteor create --example todosChange to the new directory, start Meteor, and you're good to go:
$ cd todos
$ meteor
Okay, we've got our application up and running in the browser, and we now want to see what happens when we make some code changes.
One of the best features of Meteor is reactive programming and hot code pushes.
The following is from http://docs.meteor.com/#reactivity:
Note
Meteor embraces the concept of reactive programming. This means that you can write your code in a simple imperative style, and the result will be automatically recalculated whenever data changes that your code depends on.
Put even more simply, this means that any changes you make to the HTML, JavaScript, or database are automatically picked up and propagated.
You don't have to restart the application or even refresh your browser. All changes are incorporated in real time, and the application reactively accepts those changes.
Let's see an example.
As we learn the ins and outs of Meteor, we want to build a working application: something useful, and complex enough so that we can experience all the major features of Meteor. We will be building a Lending Library, where we can keep track of what items we have (for example, Mad Men Season 1), organize these items into categories (for example, DVDs), and keep track of the people to whom we have lent the items.
To see the beginnings of this, let's change the lists of todos to lists of items, and let's change the word list to category, because that sounds much more awesome.
First, make sure the application is up and running. You can do this by having an open browser window, pointing to http://localhost:3000/. If the app is running, you'll see your todos application. If your application isn't up and running, make sure to follow the steps previously given in the section Starting the example application.
Now, we need to open and edit the todos.html file. With your favorite text/code editor, open
~/Documents/Meteor/todos/client/todos.html.
Change
titlein theheadsection:<head> <title>Items</title> </head>Go ahead and save the file, and look at your web browser. The page will automatically refresh, and you'll see the title change from Todos:

The title will now display the word Items:

This is Meteor in action! It's monitoring any changes to files, and when it sees that a file has changed, it's telling your browser that a change has been made, and that it should refresh itself to get the latest version.
Moving forward, we're going to build an application from scratch, so we don't want to make too many changes to this example application. However, we still want to at least clean up the other visible references to todo and list.
Back in your text editor, make the following change to the
<h3>tag (located approximately around line 20):<template name="lists"> <h3>Item Categories</h3>Save this change, and you'll see the change reflected in your browser. The left header originally displayed the following text:

It will now have changed to the following:

We need to deal with one more area, and we've successfully turned our
todosapplication into anitemsapplication.If you noticed, in the bottom of the Categories list, the open box currently says New list:

We need to change this to say New category instead. Make the following code change on line 39:
<div id="createList">
  <input type="text" id="new-list" placeholder="New category" />
</div>
Save your changes, and check your work:

Great success! In this chapter, you've successfully installed the Meteor framework, loaded an example application, and made changes to that application, becoming familiar with file changes and the reactive nature of Meteor. You are now ready to start building your very own Meteor application, and learn more of the elegant features and advantages that come from developing with Meteor.

