1. Quick Start: An Introduction to FCP
Welcome. In this book, you’ll learn how to use Apple’s flagship non-linear editing application, Final Cut Pro, from a standing start — and it’s going to be fun. As I won’t be assuming that you already know how to edit, this chapter will guide you through a few of the fundamentals of editing, give you a broad overview of the interface, show you how the editing workflow functions, and give you a few tips on what kind of hardware will help you down the track.
Video editing is a huge field, and there are many, many ways to proceed, either on your own or as part of the wider industry. You’ll hear many opinions on best practices, and, indeed, not all of those opinions will agree with the advice I’ll give you here. And that’s fine! Wherever there are conflicting opinions, I’ll do my best to explain why I’m making my specific recommendations, and you can feel free to go a different way if you have different needs. It’s all good.
Before I get into the details of Final Cut Pro — frequently abbreviated to FCP — I’d like to take you on a quick tour of video editing more broadly. You can tell a story with any software, but the technical details do matter, and a lot has changed. This book has been completely updated for the 10.5 release, where Final Cut Pro X became Final Cut Pro. All the recently introduced features will be pointed out throughout the book so that existing users can easily discover them.
This chapter will cover the following main topics:
- A brief history of editing
- Interface basics
- An editing workflow overview
- Hardware recommendations
By the end of this chapter, you’ll have a great understanding of what the app is about, what this book’s about, the editing process that you’ll learn, and the gear you’ll need to put it into practice.
A brief history of editing
Cinema has been around for a little over 100 years, and for a long time, the editing process was straightforward. Each frame of film was a single image on a continuous strip of celluloid, and, to combine multiple shots in a sequence, the film was physically cut and then taped to another piece of film. Every cut took real physical effort and time, and revisiting your earlier edits could be difficult, expensive, or impossible, depending on when the decision was made. And then, the arrival of video in the 1980s made it more accessible, but also worse.
Tape-based editing meant that an editor didn’t have to physically cut film, and because it made the process much cheaper, an entire generation of teenagers could explore movie making on a budget. However, images recorded on magnetic tape cannot be easily reordered. To rearrange shots A-B-C to B-A-C means offloading the whole sequence to a second tape, then placing them back on the original tape in a different order, and often with a degree of quality loss. Linear editing surely democratized the industry, but it came at a cost.
Computer-based non-linear editing changed it all for the better, giving editors the low cost of tapes, the ability to change the image without chemicals, far easier access to special effects, and, thankfully, the return of easy clip reordering. Today, this is normal and natural, and a new video editor need not consider how things used to be done. Still, most Non-Linear Editing applications (NLEs) work in a way that’s driven by the tape-based metaphors of the past. For example, the common Overwrite and Insert operations come straight from video tape decks.
While there’s nothing inherently wrong with these operations (and, indeed, they exist in FCP), they come from a paradigm with a heavy emphasis on tracks, and a linear timeline structure. Just as with tape, nothing moves unless you explicitly tell it to. These linear methods make sense if you grew up with them, but there are better ways today. While many other NLEs have incorporated concepts such as ripple edits while retaining a default linear timeline, FCP defaults to a non-linear Magnetic Timeline.
If you’re new to editing, you’ll be totally fine: it makes sense. But if you’ve edited with another NLE, you might struggle as you try to mash the square peg of your existing knowledge into the round hole of the Magnetic Timeline. While you can make it work, it’s going to be much easier to pretend you know nothing, and start afresh.
This is easier said than done, and in the wider professional video world, the traditional paradigm is still dominant for many reasons. Firstly, most high-end productions still use the first computer-based editing app their editors learned: Avid Media Composer. It’s deeply embedded into many expensive workflows, it works, and change would cost money. Secondly, there’s a large pool of people who already know how to edit, and many of them would rather not relearn the basics; fair enough. Thirdly, FCP X (back when it had an X) was missing key features at a poorly received launch, and public perception takes a long, long time to change.
Does it matter if you use the same software as most production companies? Well, if your goal is to get a job at a production house, maybe. But if your goal is to make great videos for yourself or for your clients, not at all. Apple aimed for the non-traditional video editor, and while I’m sure they’d love more professionals to take another look, they’ve made many FCP users happy so far.
If you’d like to learn more about the launch of FCP X, please watch the excellent film Off The Tracks by Brad Olsen. There’s a free version and a longer paid version on offer at offthetracksmovie.com, and it’s absolutely worth your time. (Not just because I’m in it!)
But enough background: that’s how we got here. Let’s take a bird’s-eye view of FCP and see how things tick.
Interface basics
Here’s a quick screenshot of the main window in FCP. On the left, I have several libraries open in the Browser, where a few media clips can be seen. The Timeline is showing a music video I worked on, and you can see a drone shot visible in the Viewer. The Effects pane and Audio Meters are open in the bottom right, and the Inspector is showing Color Wheels in the top right, as you can see here:
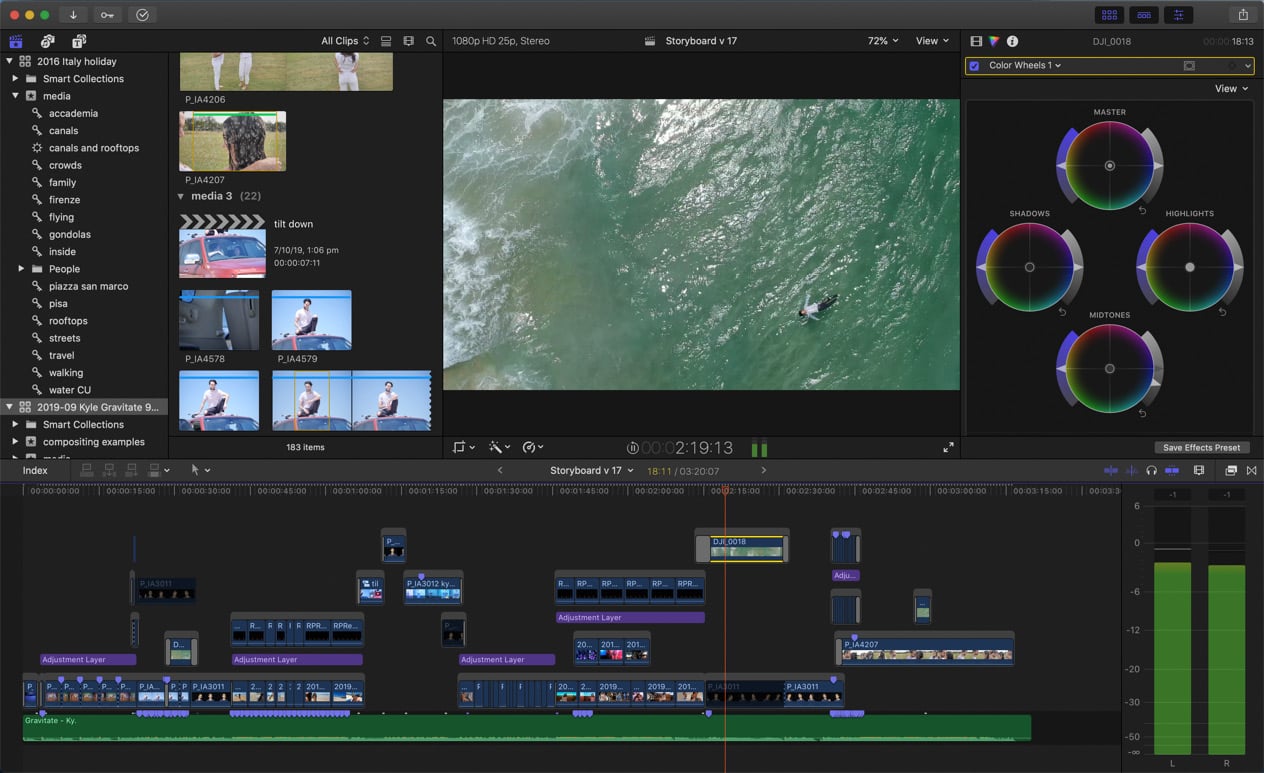
Figure 1.1: The main window, with several panes open
The interface is quite changeable. You can choose which panes you want to see, and how much space they each take up. There are several floating windows too, but let’s go over the basics first.
Overview
Most of the time you spend in FCP will be working in a single window. While additional windows will be shown to adjust preferences, import media, and export, the editing process is largely a single-window experience. Within this single window there are several panes, each of which can be resized by dragging its edges and can have its contents adjusted, by using menus and dropdowns. (If your workspace looks very different from these images, press ⌘0 to reset it to Default).
First, look to the top left of the screenshot here:
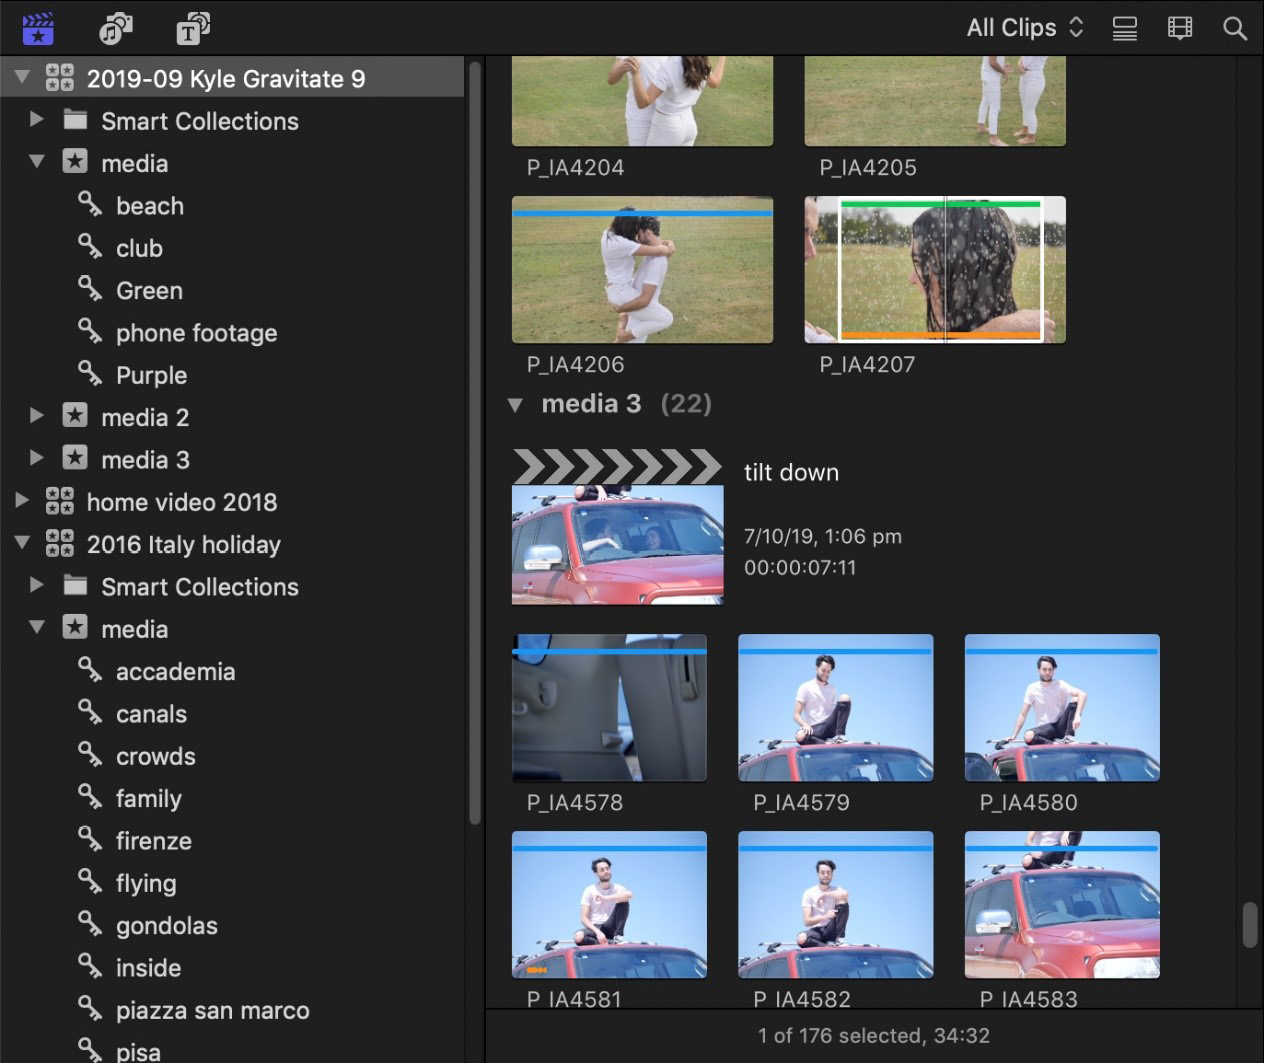
Figure 1.2: The Browser, including a sidebar to the left and the main area to the right
This area is called the Browser, and it’s where you locate, organize, tag, and choose your footage. It’s where you locate photos, music, and sound effects, and where you look through pre-designed title and background templates. All up, it’s where you find things you want to include in your edit, and it’s where we’ll spend the first part of this book, Importing and Organizing.
Central to all operations is the Viewer, a place to view video, which is shown in the following screenshot:
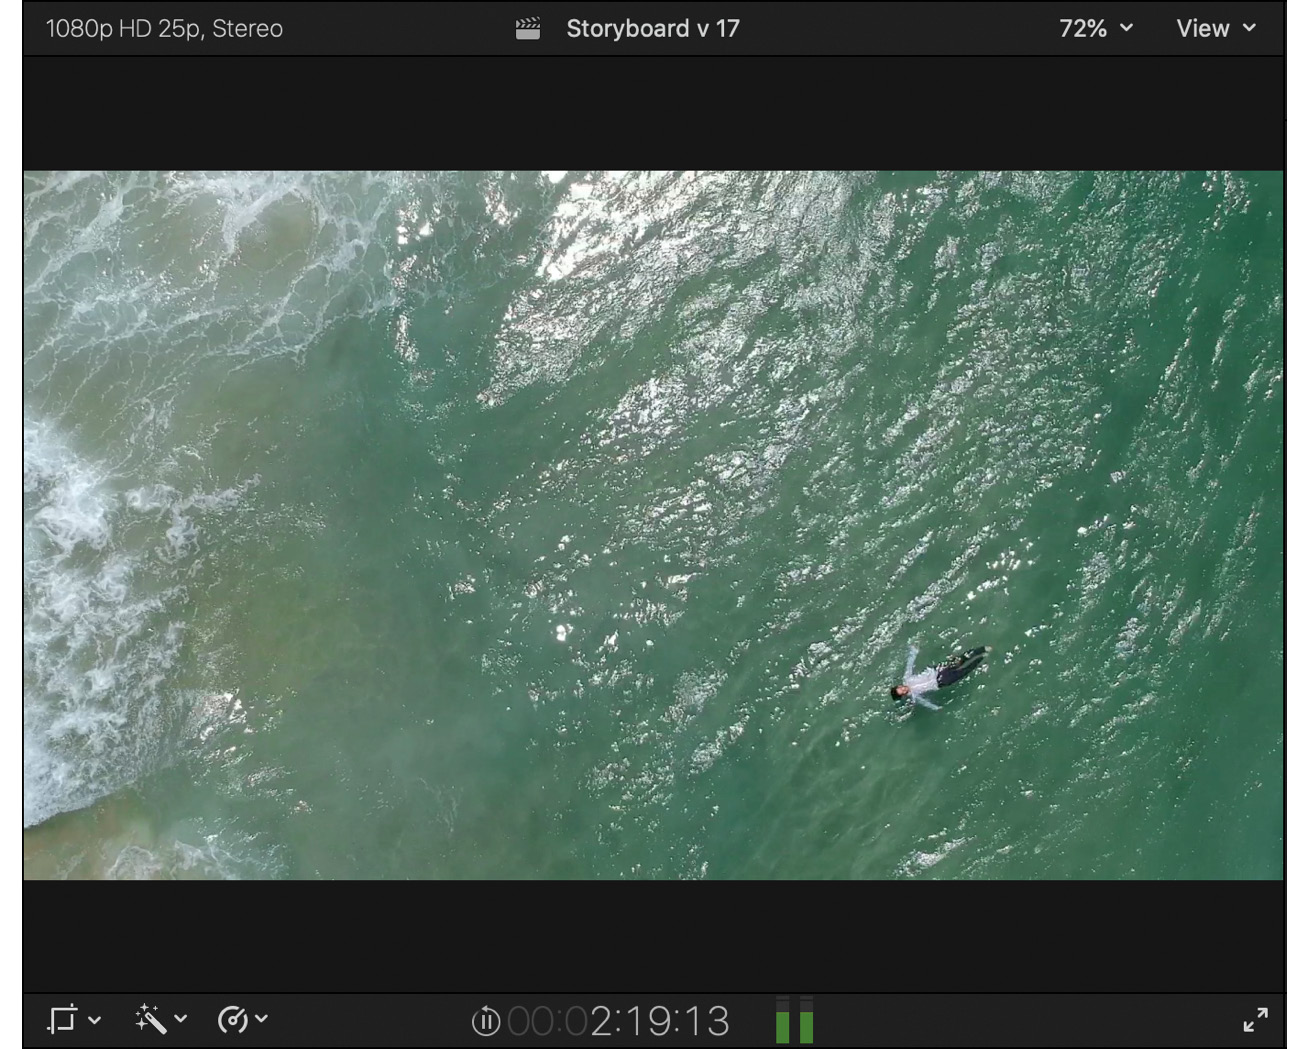
Figure 1.3: The Viewer, surrounded by properties, details, menu, buttons, and a timecode display
This could be a clip from the browser that you’re considering, a frame from your current timeline, or it could show more: video scopes to judge color, angles in a multicam clip, or additional controls for effects or titles. You’ll use the Viewer in just about every part of this book.
To the bottom of the screen is the Timeline — your current edit, as can be seen in the following screenshot:
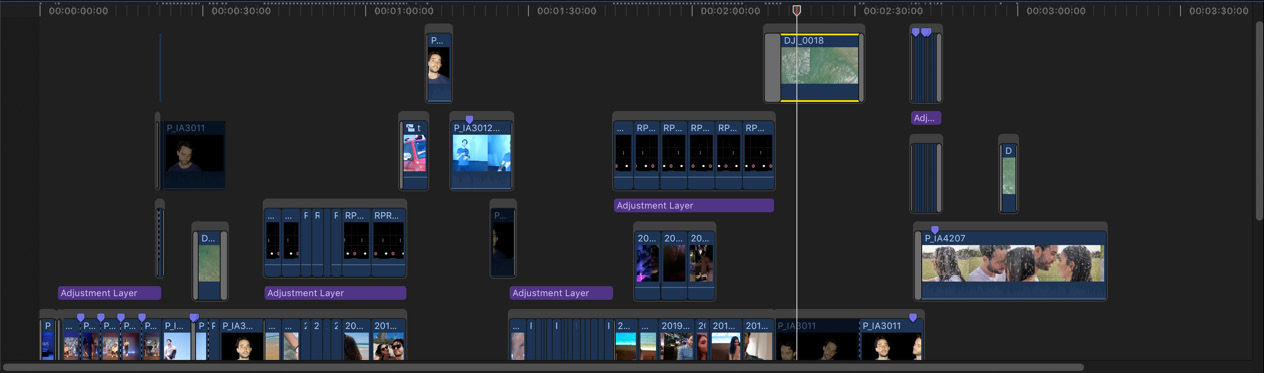
Figure 1.4: Part of the timeline for a music video; your timelines might be simpler, or more complex
This is where clips are arranged in sequence, reordered, and placed above or below other clips. It’s where you trim, roll, slip, and slide your edits; where clips are replaced; where speeds are changed; where markers are set; and much more. It’s where the “magic” happens, and it’s where we’ll spend Part 2 of this book, Rough Cut to Fine Cut.
To the right of the screen is the Inspector — a place to change all kinds of properties, as illustrated in the following screenshot:
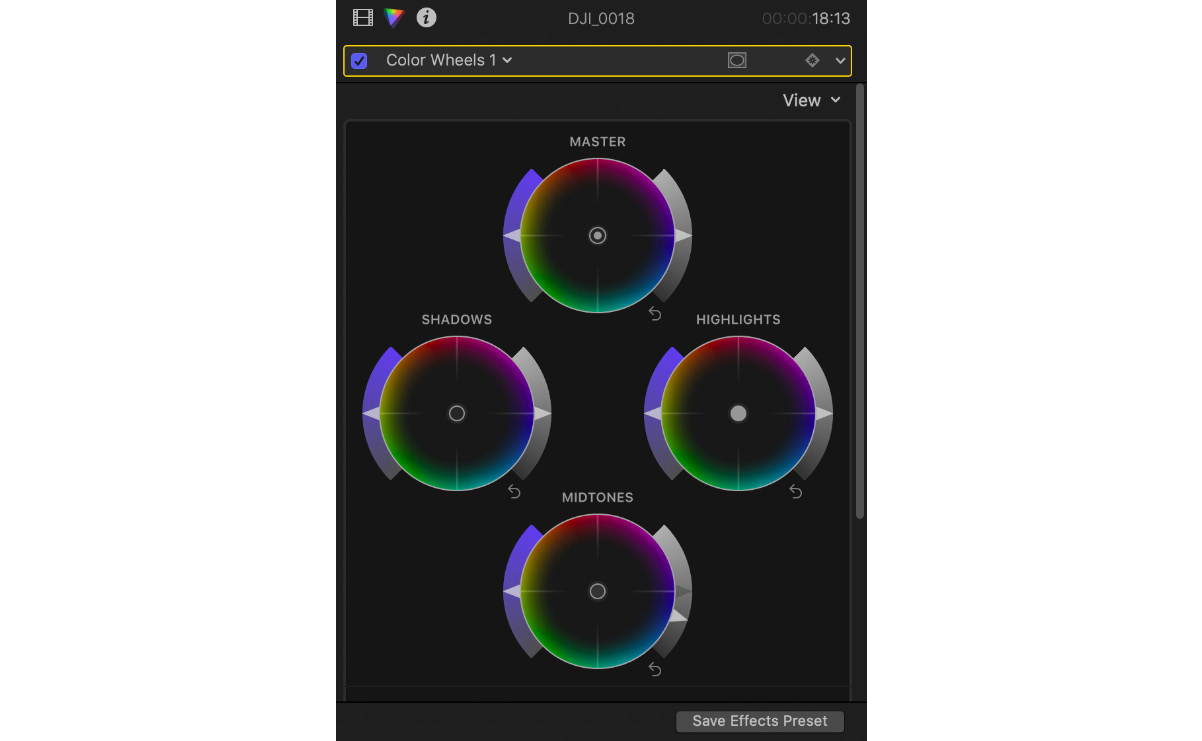
Figure 1.5: The Inspector has many faces; these are the Color Wheels in the Color tab
Usually, you’d use this to adjust one or more clips in the timeline, changing color, or size, or volume, or the video effects you’ve applied. However, you’ll probably use this earlier in the process too, to inspect or modify the properties of a clip in the browser, and for other operations too. We’ll spend a lot of time here in Part 3 of this book, Finishing and Exporting.
With the basics covered, let’s take a slightly deeper look at some of the specific areas in the interface. (While you can simply follow along with the screenshots here, if you’d like to click on your own copy of FCP, you’ll need to have some footage already imported and a timeline open.)
In the central bar
In the center of the screen, at the top of the Timeline panel, is a bar with several icons and a few words, as illustrated in the following screenshot:

Figure 1.6: These buttons and menus live on the left of the main gray central bar
From left to right, you’ll first see the word Index, which opens the Timeline Index and lets you navigate and refine the display of your timeline. More on that in Chapter 10, Explore a Little: Compound Clips and Timeline Tricks.
Next are four editing buttons that let you copy footage from the browser above to the timeline below. When you hover over these buttons, each shows a shortcut key that you could press instead of clicking on the button, and that’s often a better way. To the right of these buttons, there’s a Tools pop-up menu, currently showing an arrow. Yes — these tools are helpful, and we’ll explore them in Chapter 6, Build the Spine of the Story: Quick Assembly, Chapter 7, Cover it Up: Connections, Cutaways, and Storylines, and Chapter 8, Neaten the Edges: Trimming Techniques of this book.
In the center of the screen, there’s a title and a menu next to a duration or a timecode, surrounded by two arrows, as can be seen in the following screenshot:

Figure 1.7: There’s an arrow to go back to the previous timeline, a name, a menu, a timecode display, and an arrow to go forward
The name and time code tell you which Project you’re currently working on and where you’ve parked the playhead within it, while the arrows allow you to jump to other recent Projects or to step back out of nested items, such as Compound Clips.
New in 10.4.9, the menu lets you duplicate your current Project, change its properties, and more.
Moving to the right, several toggle switches are lit in blue if they’re on and white if they’re off, as can be seen in the following screenshot:

Figure 1.8: These buttons, to the right of the main gray bar, provide toggle switches and display options
The first four are Skimming, Audio Skimming, Solo, and Snapping. These let you control some of the finer points of timeline editing.
Next along is a filmstrip icon — the Clip Appearance menu — which lets you change how the timeline appears: how far you have zoomed in, how much space audio and video are allocated, how tall clips are, and so forth:
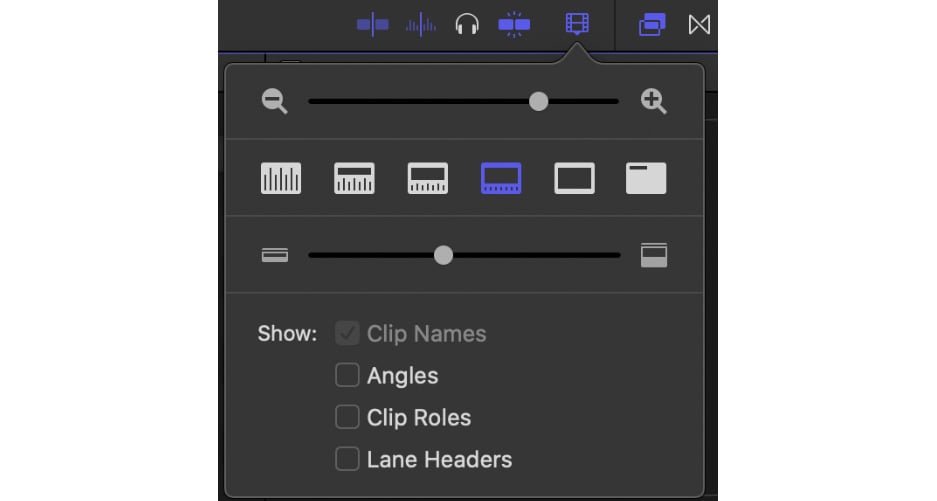
Figure 1.9: This popup lets you control the appearance of clips on your timeline — use ⌘minus and ⌘plus for zoom, and ⇧⌘minus and ⇧⌘plus for clip height
You’ll see a similar clip appearance icon to the right of the Browser, and a slightly different icon when you bring up Video Scopes. They’ll always give you display options for that part of the interface.
Finally, the Effects and Transitions buttons to the far right of the main gray bar will show or hide an additional browser when clicked, letting you access a range of ways to change how a clip looks, sounds, or changes over the course of an edit. And that’s the central bar.
In the Browser
Back up in the Browser, you’ll see buttons and menus on the left and right, as follows:

Figure 1.10: The toggles, menus, and buttons in the Browser will change what you see here
On the left, the first icon represents Libraries, where you’ll find your footage; the second icon takes you to Photos and Audio, and the third icon displays Titles (for showing text) and Generators (for creating backgrounds and filler content). In each of these areas, you’ll see higher-level categories in a sidebar to the left and actual content on the right, but you can hide or show the sidebar with an extra click on the currently selected icon.
Moving across, you’ll see a different selection of icons and menus that are different for each of the Libraries, Photos and Audio, and Titles and Generators areas. In general, these allow you to search and control your current view, and we’ll look at them in more detail throughout the book.
In the Viewer pane
The Viewer pane includes several pieces of information and important controls, and is shown in the following screenshot:

Figure 1.11: The top of the Viewer shows information above and to the left, and menus to the right
At the top left, you’ll see the resolution and frame rate of whatever thing you’re playing back, and at the top center, you’ll see its name. To the top right, you’ll see two menus, the first of which controls how big the video appears on screen (usually set to Fit to the space available), and the View menu to the far right lets you show additional panes and overlays, and adjust playback settings.
At the bottom left of the Viewer, three drop-down menus give you access to onscreen controls that you can adjust in the Viewer, as shown in the following screenshot:

Figure 1.12: Menus on the left; buttons and display controls below and to the right
The first offers Transform, Crop, and Distort: to resize, rotate, crop, and stretch the video directly — though we’ll see in Part 3, Finishing and Exporting that you can also find these controls in the Inspector. Next along is a drop-down menu with a selection of color-correction and audio enhancements, and the third icon lets you retime video in a variety of ways: speeding up, slowing down, freezing time, and changing speed over time.
In the bottom center of the Viewer, on the left of a small group of numbers and icons, you’ll see a play/pause button; it also indicates if looping is active. Next is a timecode readout, showing the current hour, minute, second, and frame of the clip or timeline playing back. To the right of the timecode you’ll see mini Audio Meters, but this small icon can be clicked to show a much larger version, down to the right of the timeline. Finally, in the bottom right of the Viewer, you’ll see an icon to enter fullscreen video playback. (Press Escape to leave this mode).
Other important windows and controls
At the very top of the main window, just below the standard Mac menu bar to the left, you’ll see the standard circular “traffic light” window controls, as illustrated in the following screenshot:

Figure 1.13: Close, minimize, resize/fullscreen; Import, Keywords, Background Tasks, and Extensions
Pressing the green button enters fullscreen mode, which is helpful if you prefer to focus on a single app at a time, but is less helpful if you want to see multiple apps at once. It also hides the traffic light controls, but you can hover at the top of the screen to show them, or simply press Escape to leave.
Next to the traffic lights you’ll see three (or perhaps four) buttons, each of which spawns an additional window. They handle importing footage, creating and assigning keywords, and displaying the progress of background tasks, and the fourth (optional) button shows workflow extensions — if you have any installed. These allow third-party developers to integrate with FCP for more advanced workflows.
The menu bar gives quick access to some additional important windows. Choose Final Cut Pro > Preferences to bring up the Preferences window, where you can change a few important settings regarding warnings, background rendering, and more, as illustrated in the following screenshot:
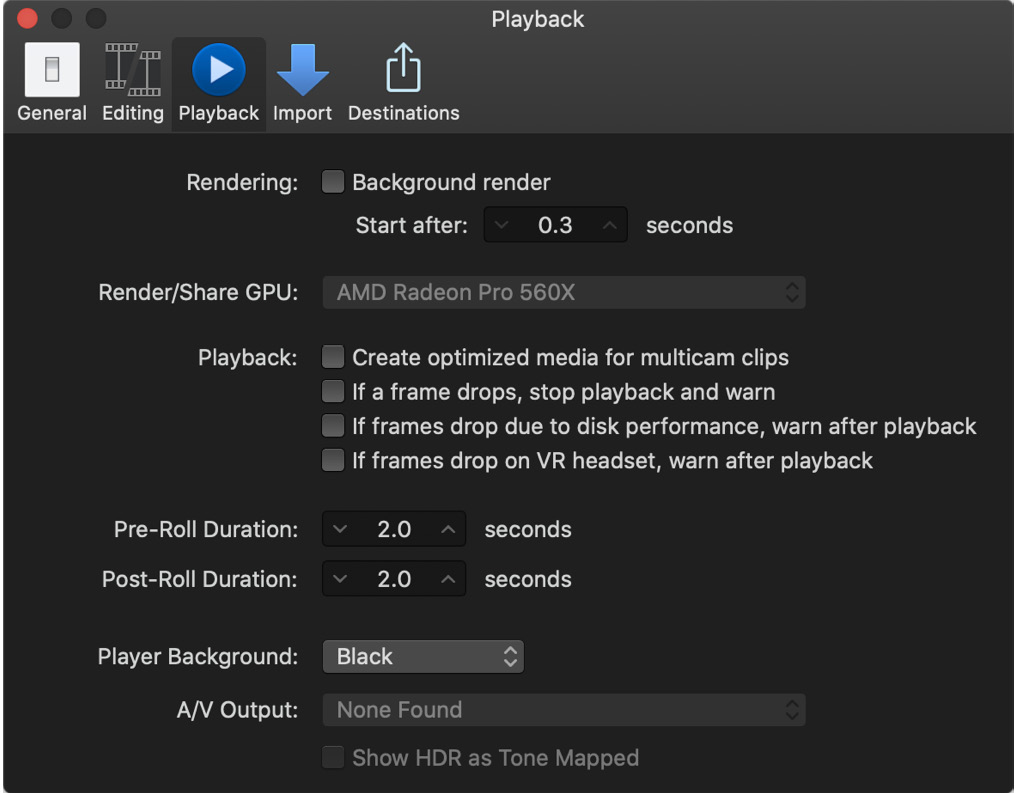
Figure 1.14: The surprisingly spartan Preferences window, with just five sections along the top
Choose Final Cut Pro > Commands > Customize to bring up the Command Editor, where you can discover and assign keyboard shortcuts, as illustrated in the following screenshot:
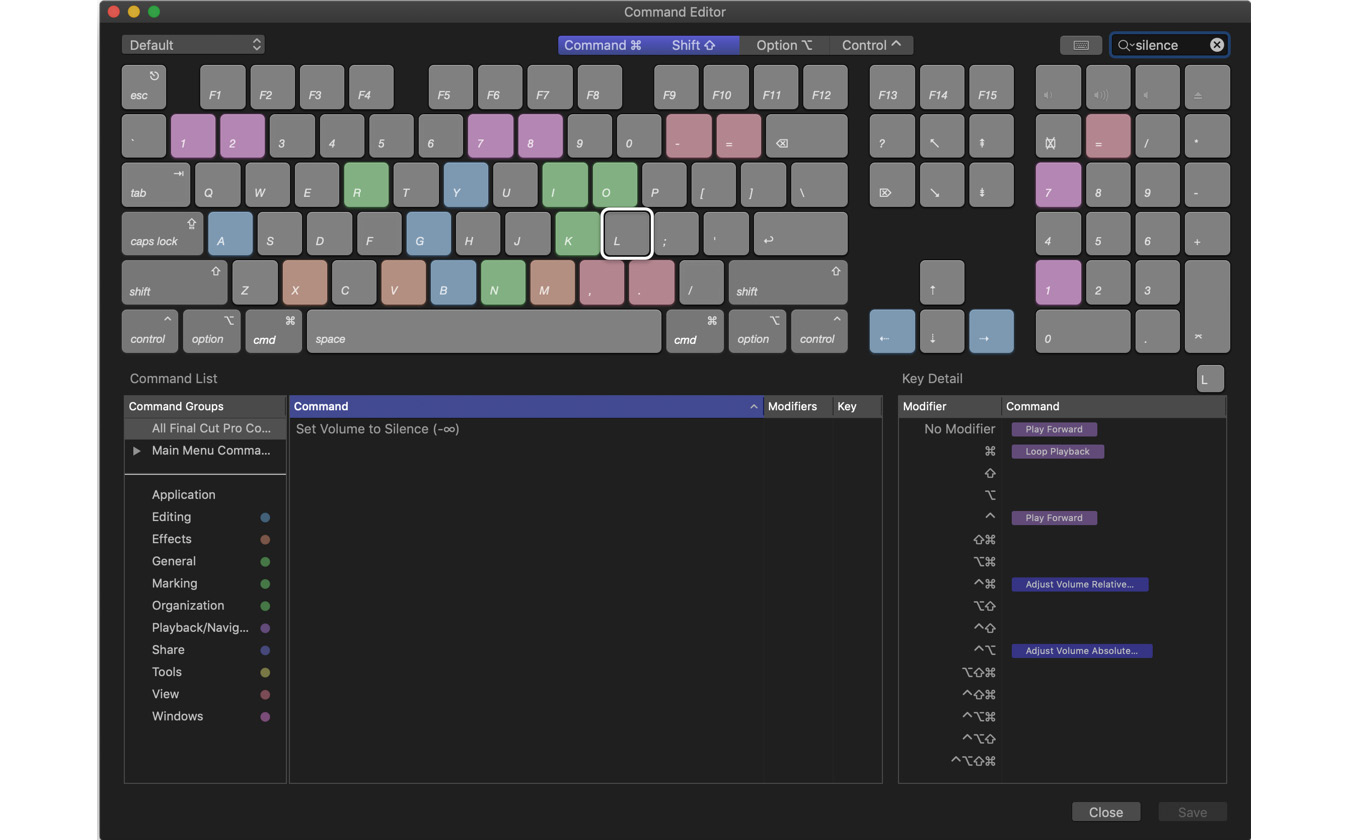
Figure 1.15: The Command Editor provides an excellent way to create your own shortcuts
Importantly, modifier keys such as Command (⌘), Option (⌥), Control (⌃), and Shift (⇧) are not required when creating shortcuts, though they can of course be used. This means that the 0 key alone could be assigned to a command just as easily as ⇧0 or ⌥0.
Throughout this book, symbols are used for the modifier keys instead of names. While keyboards vary in different regions, no matter what your keyboard looks like, the symbols are what you’ll see in the menus, so you’ll need to learn them. To recap, these are the modifier keys:
- Command: ⌘
- Option: ⌥
- Control: ⌃
- Shift: ⇧
With the modifier keys in mind, you can use the Command Editor window to discover shortcuts, as follows:
- To discover a shortcut, simply click a key in the onscreen keyboard, and you’ll see which commands that key maps to — when using any combination of modifier keys — in the bottom-right part of the window.
This is useful when you’re exploring the program, and want to find the function attached to a recently-pressed key. To make new shortcuts, there are a few more steps, as follows:
- To create a shortcut, first search for the command in the top-right search field to see matching commands at the bottom of the window.
For example, you could search for silence, and you’ll see the single command Set Volume to Silence (-∞) in the lower part of the window.
- Next, click your desired modifier keys above the keyboard, then drag the command to the key you want to assign it to. (Alternatively, you can type the shortcut key instead. Zero is a perfect key for the Silence command above.)
- If this is the first shortcut you’ve made, make a copy of the command set, and give it a new name.
- Finally, verify that the command has been assigned, by checking below or below left.
Command sets (collections of shortcuts) can be chosen, imported, exported, and managed with the menu at the top left of this floating window.
- When you’re done, press Save and Close.
Controlling the main window
While any additional windows can be opened, closed, resized, and positioned freely, you’ll have to use a slightly different technique to resize, show, or hide the panes in the main window.
To resize two panes, you need to hover over the thin line between them, as seen between the Browser and the Viewer, or at the top of the gray bar above the Timeline, until you see a resize cursor, as illustrated in the following screenshot:

Figure 1.16: The resize cursor appears when your cursor is in just the right spot
You can then click and drag to resize multiple panes together. The panes themselves can also be toggled on or off with the buttons shown in the following screenshot:

Figure 1.17: These controls appear in the top-right and toggle parts of the interface on or off, except for the rightmost Share button
To show or hide an entire pane, click one of the icons at the top right of the interface. There are three buttons here that control the visibility of the Browser, Timeline, and Inspector respectively, and they’re visible when the icons show blue. Note that one of the Browser and Timeline panes must remain visible, and that the Viewer cannot be hidden.
If you have an independent external display connected, you’ll see an additional button and drop-down menu to the left of these three buttons. Push the button, and the external display will show just one pane: the Timeline, Viewer, or Browser.
Happily, you won’t have to manage all these panes manually, because you can store and recall as many layouts as you wish. Here’s how:
- Choose Window > Workspaces > Color & Effects to see this in action.
The browser is hidden, four scopes are shown with the Viewer, and the Inspector and Effects pane are visible.
- Choose Window > Workspaces > Organize to hide the Timeline and scopes, leaving you with a big Browser pane ideal for organization.
- After applying your own tweaks, use Window > Workspaces > Save Workspace as to store your own layout.
- Choose Window > Workspaces > Default to return to the standard set of interface panes.
Custom layouts can be recalled from the same Window > Workspaces submenu. This will be revisited later in the book.
Under Window > Show in Workspace, you’ll see commands and shortcuts to show or hide any part of the interface, including two I haven’t mentioned yet: the Event Viewer and the Comparison Viewer. These are both optional and will be discussed later in the book.
Finally — because it’s the only button left — is Share. Located in the very top-right corner of the main window, this lets you export your finished Project. But that’s a little way off! Before we move on, if you’re using a laptop, you might also have a Touch Bar, and that’s worth a look too.
The Touch Bar
Apple’s current Pro laptops all include a Touch Bar at the top of the keyboard, as have most of their Pro laptops since 2016. It replaces the F1-F12 keys normally found above the number keys with a touchscreen offering custom buttons and sliders for the current app, and Final Cut Pro takes great advantage of this. The options available also change as you move between different parts of the app:

Figure 1.18: Click on the Timeline pane to see these general-purpose buttons
While you browse, you can switch between views and clear selections. While you edit, you can switch tools, use trim commands, play around with the edit, or even show an overview of your entire timeline:

Figure 1.19: This timeline view is a great way to move around and zoom in on part of your edit
When you tap the audio button, you can also change volume, add fades, or silence a clip:

Figure 1.20: Audio controls in the Touch Bar, including volume changes and fades
While none of these are essential, they’re all really nice to have. If you don’t have a Touch Bar on your Mac, you can still assign keyboard shortcuts for quick access to these features, and if you want to push your Touch Bar to do even more, then you’ll want to explore the third-party app Command Post (commandpost.io).
Where to next? A quick overview of the editing workflow.
An editing workflow overview
At the very highest level, every editing job is the same. You shoot — or somebody else shoots — some footage, which is then copied to your system and backed up for safety. You choose the best parts of the best clips, and then arrange them in sequence. You trim and re-arrange, tweak color and audio, and then add titles. You gain approval from the client (who could be you), and then you make further changes. When everyone’s happy, you export the final file. The file is uploaded, or otherwise sent to its destination. The original files are then archived to make room for future jobs or kept for further editing. Sounds simple, right? It can be, but often isn’t. There are several complicating factors, but it’s easy to keep it simple — and that’s what I’d recommend for many first-time editors.
Terminology
FCP uses some unique terms, but here is a quick summary:
- A Library holds all the data for a job.
- Each Library contains one or more Events.
- Each Event contains Clips and/or Projects.
Importantly, a Project is an edited sequence of clips that forms the final output — a timeline, if you prefer. I like to use the term job when talking about a high-level task, such as a collection of finished videos for a client.
Clips and Projects live in Events, and Events live in a Library. You can open multiple Libraries at the same time, but to recap, here’s a handy diagram of just one:
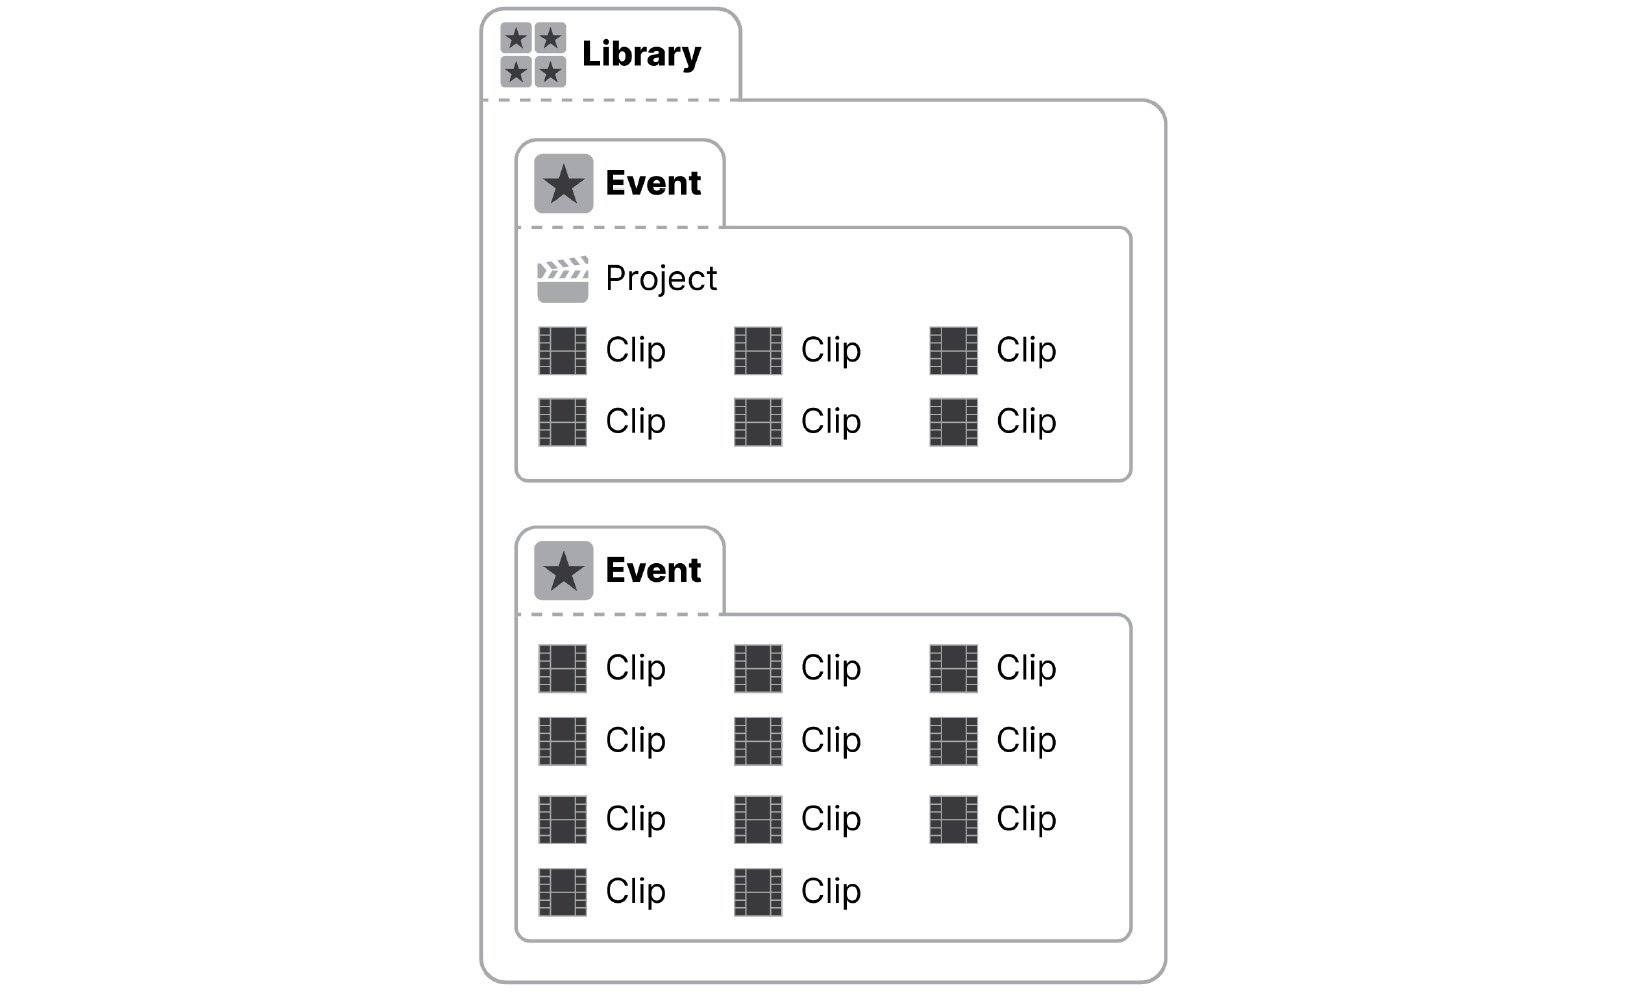
Figure 1.21: A simplified diagram that shows Clips and Projects inside Events, inside a Library
If you’ve edited before, you might be expecting some other terminology, such as bin or sequence, and those concepts do carry across. A sequence is a Project, and a bin is a collection of clips that can be exactly re-created with a Keyword Collection.
Depending on your personal preferences, there are many ways to work with the Library/Event structure. My following recommendation is simple:
While it’s possible to keep everything in a single Library, it will soon become very large indeed — slow, and hard to back up. Ongoing jobs such as home video can be controlled by creating a new dedicated Library every year, or every month.
When you create a new Library, you’ll be immediately asked where you want to save it, and the answer is: on a fast drive with plenty of space. (More on this in Chapter 3, Bring It In: Importing your Footage.)
And Events? When a Library is created, a new Event is automatically created inside the Library, named with today’s date in your system’s date format. You can simply use this Event to hold everything, but for more complex jobs, you might create additional Events, to hold different groups of clips or different Projects (timelines). One way I like to work is to create a new Event for each day in a multi-day shoot, and I like to keep my Projects (timelines) together in another Event. Short jobs just need one Event, while bigger jobs benefit from more. But there are many ways to work, and you can change your mind down the track.
Workflow
This book is structured the same way as most edits, and you can use your own footage alongside it if you wish. Not every edit will go in exactly this order, but many will be pretty close, and this is a great way to explore the program if you’re not sure how to get going. Use this outline as a starting point, and change it up as needed. We’ll start the process (and the book) with:
Part 1: Importing and Organizing
Chapter 1. Quick Start: An Introduction to FCP
You’re reading this now!
Chapter 2. Before the Edit: Production Tips
You need to make sure you shoot in the right formats, with the right cameras, and shoot the right things to make an edit work. This is the only chapter in the book that’s not strictly about FCP, but it’s still important.
Chapter 3. Bring It In: Importing your Footage
No matter how many Events you decide to use, you’ll want to import your footage. This should be easy but there are a few different ways to work, and you’ll hear strong opinions about which way is best.
Next, you’ll sync up clips shot with multiple devices that recorded the same scene at the same time, such as two or three cameras, or an audio recorder and video camera. If you used good practices on set (Chapter 2, Before the Edit: Production Tips) then this will be straightforward.
Chapter 4. Sort It Out: Reviewing and Keywording
First, you’ll watch what you’ve shot, or have been given, and there are a number of good ways to do that. After or during that process, you’ll organize your footage using Keywords, putting them in “virtual buckets” for easier retrieval later on.
Chapter 5. Choose Your Favorites: Selecting, Rating, and Searching
After keywords come Favorites, which mark the best parts, and possibly Rejecting, to mark the parts you won’t use. Marking up your clips here is a far more useful method than the traditional technique of making timeline-based collections of clips you like, because your choices are permanently recorded and searchable, and you can instantly refer back to them way down the track. This is a trick that only FCP can really offer, and it’s a fantastic way of working.
The next part of of the process (and, again, the book) is editing:
Part 2: Rough Cut to Fine Cut
Chapter 6. Build the Spine of the Story: Quick Assembly
With all the clips organized, you finally make a Project, matching the technical requirements (frame rate and resolution) of what you want to deliver. Those may be the same settings you shot with, though if they’re different it’s not the end of the world.
With a view on the organized footage, you’ll build up a rough cut, getting the best parts of the best clips in order on a timeline, until it all sounds good. Maybe you’ll drag and drop; maybe you’ll use keyboard shortcuts; but you’ll definitely use a few basic edits to trim, cut, rearrange, and delete your clips.
Chapter 7. Cover It Up: Connections, Cutaways, and Storylines
Now, you’ll get a little fancier, disguising edits, adding clips above or below other clips, using the B-roll you shot to make your edit feel more complete, moving clips around, and fleshing it all out. You might use Storylines to group connected clips together, and you might use three-point editing if you want to be precise.
Chapter 8. Neaten the Edges: Trimming Techniques
Further finesse your edit, to make sure every frame is needed and is in exactly the right place. Slip, slide, and roll your edits, and use the precision editor if you wish. Soften any audio edits that need it, expand and collapse audio, and use plenty of shortcuts.
Chapter 9. Consider Your Options: Multicam, Replacing, and Auditions
This chapter discusses how to deal with Multicam media in the most efficient way. With or without Multicam, you’ll learn how to revisit your earlier choices, switch clips out for other clips, swap one music track for another, and generally try to make the edit even better.
Chapter 10. Explore a Little: Compound Clips and Timeline Tricks
If you’re wanting to try something fancier, such as treating a group of clips as a single clip, or you’re becoming frustrated with the magnetic timeline for some reason, this is where you discover how the Timeline Index works, how to lift and merge, and how to use the Position tool. With luck and good planning, you won’t need to relink media, but this chapter has some tips on that too.
With the edit locked (or nearly locked?) it’s time for:
Part 3: Finishing and Exporting
Chapter 11. Play with Light: Color Correction and Grading
First, you’ll fix basic color issues such as white balance and exposure, and then perform shot-to-shot matching. Next, you’ll add curves if you want to change contrast, and use color or shape masks to selectively brighten, darken, or change the color of part of the frame. You might also use adjustment layers to quickly change many clips at once.
Chapter 12. Refine and Smooth: Video Properties and Effects
If some of your clips need a further tweak, you’ll adjust their properties to move, scale, crop and apply effects now, and maybe even animate those properties. If a shot is too shaky, you can stabilize; if it's too soft, you can sharpen, and if there’s something else you’d like to fix, there’s an effect for that too.
Chapter 13. Blend and Warp: Video Transitions and Retiming
Transitions help to soften the transition between two clips, and here, you’ll learn all about how to apply and adjust them. Simplicity is often a good idea with transitions, but maybe subtlety isn’t your thing and you’d like to go crazy — it’s all good. Perhaps you’re also experimenting with high-speed footage and you want to add some speed ramping, or even just pause it? Now’s the time.
Chapter 14. Boost the Signal: Audio Sweetening
Video sorted? Don’t forget audio. Adjust the volume for each clip to get things roughly in the right spot, apply automatic enhancements if you need to, and then add whatever audio effects are going to improve the overall sound. Viewers don’t forgive bad sound, so don’t skip this step.
Chapter 15. A Few Words: Titles and Generators
Adding titles to introduce an entire video or your speakers, or simply to deliver a message, can fill in gaps that your subjects didn’t, and can also give your work a cohesive overall look that helps it to stand out. Generators are a good idea if you need custom backgrounds. With the edit nearly complete, this is also the time to add captions, to make your videos more accessible and searchable.
Chapter 16. You’re done: Exporting Your Edit and Finishing Up
Export your video in a few different ways, then send it to your client or direct to a video-sharing service. Or, maybe you might need to send an editable Project to someone else — that’s fine too. When you’re really, finally done with this job, archive its Library to some other storage medium.
That really is just about it. Anything this book doesn’t cover in detail can be found in Apple’s official user guide, and many other links will be provided along the way.
Hardware recommendations
As a final note for this introductory chapter, it’s worth looking at your computer: what do you need? Technology will continue to advance, so I’ll keep this broad, but FCP can work on anything from a low-end laptop to a fully upgraded Mac Pro worth more than most cars. What do you need?
A Mac
This one is obvious, since FCP doesn’t run on Windows, but what kind? There are many options, but the most obvious question is laptop or desktop?, and the answer is simple. Laptop if you need portability, or desktop for better speed, easier expansion, and a bigger screen.
An important factor for video editing is the graphics power on offer, and while only larger laptop and higher-end desktops currently offer high-powered graphics, the transition to Apple silicon may change this. Any Mac can deal with almost any job, but the higher the resolution you want to work with, and the more effects that you want to be able to add, the more money you should spend. A good mid-range desktop is the 27” iMac, and the best laptop is a 16” MacBook Pro, but you can spend more money or less, and still be happy.
Active media storage
You’ll need enough fast storage to hold as many jobs as possible, because you’ll be shooting and storing a lot of footage. There are several options, as follows:
- Solid-State Drives (SSDs) are very fast, can be moved or dropped while in use, but are still somewhat expensive. The fastest Thunderbolt drives are more expensive than slightly slower Universal Serial Bus (USB) drives. If you can afford them, and you don’t need to store a lot of jobs at once, get a few of these. They might be your only choice if you work with really demanding media.
- Spinning hard disks are big and cheap, but not hugely fast, and somewhat fragile. Available in portable and desktop versions, a desktop hard drive is larger and requires independent power, but is faster, usually cheaper, and potentially much larger. Get a few of these if you’re on a budget.
- Between these two options is a RAID (Redundant Array of Independent Disks) in which multiple drives (usually spinning disks) are combined to make a larger storage volume. A RAID usually includes redundancy, to partly protect against drive failure. RAID enclosures aren’t cheap, but they’re cheaper than SSDs, faster and more reliable than a single disk, and potentially larger than either. Get this if you regularly need to access a lot of jobs.
But hang on a second. Your Mac has a very fast SSD inside — can’t you just use that? Yes — you can. Many experienced editors will tell you no, but that’s partly because it used to be a very bad idea. Back when computers were slow, using the system disk could mean that an import or export operation failed when the operating system suddenly needed to access the same drive as your media. Modern SSDs are much, much faster and the same rules don’t apply. The only concern is that of space, and for that reason alone, an external SSD is often a better idea.
Backup storage
Backup is critical, because any device can fail at any moment. Losing a hard drive is an inevitability, but losing the files on that drive is not — if you have a backup. (I’ve seen people knock over hard drives and lose thousands of photos in an instant; don’t let this happen to you.) So, how do you back things up? Here are a few suggestions:
- Time Machine is a built-in feature on macOS that takes a copy of your entire system hard drive every hour, keeping past versions accessible. All you need is a regular spinning hard drive, and to say “Yes” when you first plug it in. (You might also need to use the built-in Disk Utility app to format it as “HFS+ (Journaled)” first.)
- Online backup (such as Backblaze) is an excellent option if you have fast upload speed because every direct-connected drive can be copied without you having to lift a finger, and at a reasonable price. Depending on the provider, you may need to plug in all your media drives regularly, but this is a good solution for current work at least.
Displays
An external display will give you a much better editing experience, giving you more space for all your work and potentially a big screen to view your final edit. Ideally, a 4K (UHD) monitor will let you see every pixel in 4K footage, and you’ll find a range of cheaper and more expensive options. Choose an In-Plane Switching (IPS) screen for color consistency and wider viewing angles, and a High Dynamic Range (HDR) and/or wide gamut screen if you plan to work with those kinds of footage. (If you’re not sure what they are, I’ll talk about it in Chapter 11, Play with Light: Color Correction and Grading.)
Audio
Self-powered monitor speakers are an excellent idea, allowing you to hear the details in the sound you’re mixing. PreSonus Eris and KRK Rokit are popular choices. Remember, though, that many people will be listening on regular computer speakers, and you’ll want to make sure your work sounds good on them too.
If you’re planning on recording your own voiceovers, you’ll want a USB-connected microphone of some kind, and there’s a huge variety of microphones and audio interfaces available. One tip is that some audio recorders (including some from Zoom and RØDE) can also function as USB microphones — two devices for the price of one.
Media card reader
If you’re shooting on a “real” camera, you’ll need to be able to import footage from its media cards, which could be Secure Digital (SD), CompactFlash (CF), or something more exotic. While iMacs have SD readers built in, no other Macs do, so pick up a fast card reader if you need one. Note that some brands perform better than others when paired with matching readers — check the fine print.
Miscellaneous USB gear
If you want to get fancy, you can use additional hardware (such as Musical Instrument Digital Interface (MIDI) controllers) with additional free software (such as CommandPost) to augment your editing experience. I really like using a MIDI controller for color grading, but this is definitely an optional extra.
Anything else?
The world of camera gear is endless, but after the shoot, your footage and a Mac are all you really need. Edit at a desk, in the field, or on a couch if you like — but stretch regularly, and make sure to keep your body comfortable and healthy by following ergonomic guidelines. You’ll appreciate a good desk and a good chair every day.
Summary
FCP really tries to make things look simple — and for many editors, it can be. There’s a ton of power hidden behind the scenes but you don’t have to use every feature available, and the editing process can be pretty straightforward if you follow a few rules.
Now that you know what the editing process involves and how this application can help you achieve it, you’re well on your way. You should understand the basics of the interface now, and though it might appear simple, there’s a lot of complexity behind the scenes. You know what hardware you want in an ideal world, but just about any Mac will do while you’re learning. Ready to go? Almost!
To keep everything running smoothly, a little planning and prior knowledge is needed to make sure the right content is captured in the right format. And that’s in Chapter 2, Before the Edit: Production Tips.
Review questions
- What’s the name of the area where you collect and organize your media?
- What’s bigger, a Library or a Project?
- What do you put in a Project?
- Where do you change most settings about a clip?
- What’s the name of the area where you play back video?
- Where do you find buttons to show or hide part of the interface?
- Can you store media files on your internal hard drive?
- Which chapter covers color correction?
- Where can you change or add shortcut keys?
- What kind of timeline does Final Cut Pro use?
Review answers
- The Browser.
- A Library. Libraries contain Events, and Events can contain clips and/or Projects.
- A Project contains your finished edit — it’s a sequence, or a timeline.
- The Inspector.
- The Viewer.
- In the top right corner, just to the left of the Share button.
- Yes, you can, but you might run out of space.
- Chapter 11, Play with Light: Color Correction and Grading.
- The Command Editor, found at Final Cut Pro > Commands > Customize.
- A magnetic timeline (no tracks).