


 Download code from GitHub
In this chapter, we will show you how to take advantage of some of the features within SharePoint, to help you add value to Dynamics AX through My Sites and Document Repositories. This chapter will cover:
Configuring a My Site host site
Using note boards to microblog from the Role Centers
Adding My Site profile links to the Role Centers
Creating shared document libraries
Linking document libraries to Dynamics AX records
SharePoint is one of the core Microsoft technology platforms which allows you to organize your files with shared document libraries, collaborate with others through shared task lists and calendars, communicate with others with blogs, and much more, all through a web portal. Something that makes SharePoint even more useful is that you don’t have to be a developer to configure these features.
If you have Dynamics AX up and running, then chances are you should already have SharePoint installed and configured, since it is also the foundation for all of the Role Centers and enterprise portals that are delivered with Dynamics AX. Although the Role Centers and portals are preconfigured and use a lot of the features of SharePoint, there are still more features that you can take advantage of in conjunction with Dynamics AX that will make your system even better.
First we will show how to configure the My Sites feature so that the users are able to microblog and maintain their personal information within SharePoint. Once you have this configured, then you are able to add content from your personal My Site, or links to other My Sites into the Role Centers in Dynamics AX. This provides a better collaboration system for the business, and also adds a social element to the application.
We will also show how you can create your own document libraries within SharePoint to allow users to store documents, such as scanned invoices, and then index and link them back to Dynamics AX. This is an alternative to the standard document attachments feature within Dynamics AX. SharePoint document libraries allow multiple records to be linked to the same document list, and also give you document management features, such as file check-in and out to control who updates the documents.
None of these examples are hard to set up or configure, but since they require you to add to your existing SharePoint sites, you will need to have administrator rights to SharePoint. Also, for the last two examples, there is some X++ coding required. Each has only about 10 lines of simple code, so even novices should be able to work through the examples.
SharePoint My Sites give your users the chance to have their very own part of SharePoint that they can use to store documents, to update their own personal profile and description, to make notes and blog entries and also to connect with other people within the organization. In a socially connected workplace, My Sites are great tools to allow the users to post and capture knowledge.
If you do not have My Sites configured, then the first step is to create a My Sites site within SharePoint and link it to your Role Centers so that the users will then be able to access their personal profile and content.
Before you start on this example, you will need to make sure that you have access to the SharePoint Central Administration console. To check this:
Access your server that has SharePoint installed on it.
From the program menu, you should be able to find the SharePoint Central Administration Console in the Microsoft SharePoint Products group.
When you open the application, you should see a screen similar to this:

To create and link your own My Sites site, follow these steps:
From your SharePoint Central Administration console, navigate to the Application Management group.
Select the Create Site Collection from the Site Collections group.
Name your application
My Sites.Set the website address to be in the
my/personalfolder, and name the subfolderMy Sites.From the Enterprise tab on the Template selection choose My Site Host.
Don’t forget to assign the Primary and Secondary administrators to the site that you are creating:

From the Application Management option in Central Administration, select the site that we added the My Sites host site to.
Click on the Define button in the ribbon bar, and then select the Managed Paths option:

Here we will add our new My Site link. You don’t need to type in the full URL, so you can skip the host prefix.
Also, you may just want to check the Self-Service Site Creation option, to make sure that the feature is turned On:

Finally, we need to configure the User Profile Service application.
When you select the application, you will be able to see all of the My Site and user profile configuration options. From here you need to choose the Setup My Site menu option.
We just need to configure the site parameters, the administrator users, and so on.

Once you have My Sites configured, you will see a My Site option when you select the drop-down menu under the user name within SharePoint, as follows:
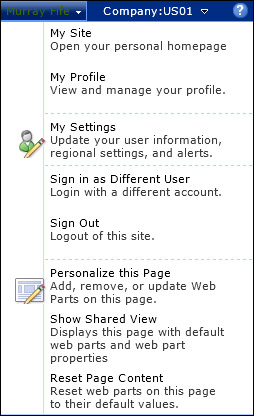
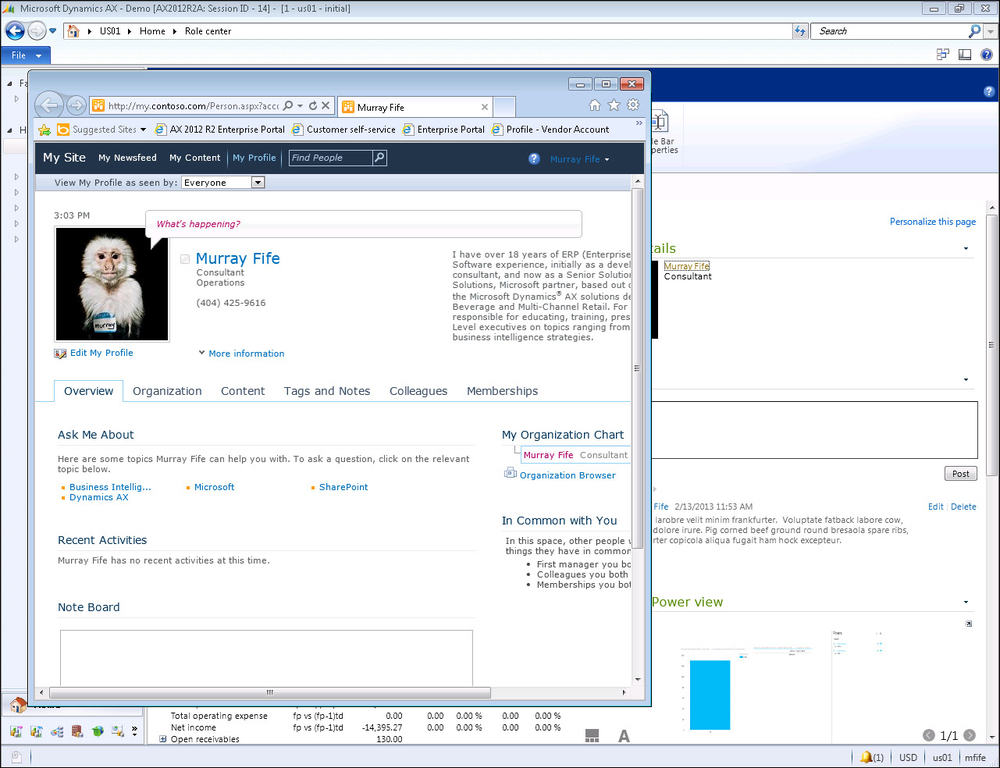
Opening up your My Site will take you to your personal site within SharePoint. Initially it will be a little dull, but since you will be the administrator of this little slice of SharePoint, you can add information and pictures to your profile, create your own blogs, and browse through the organization to see other’s My Sites to see what they are up to. You also have your own personal documents area that you are able to save files to, that you can then share with other users in the organization.
A part of your My Site is a personal note board. If you don’t want to create a full-fledged blog, then you can use this to take quick notes for yourself or others within the organization, such as reminders that you will be on vacation, alerts about upcoming events, and much more that you can publish to the entire organization.
In this recipe, we will show you how to make this even more useful by adding the note board directly into the Dynamics AX Role Center. This will allow your users to view your posts quickly and get back to work, without having to open another window.
To add a note board panel to the Role Center, follow these steps:
From within the Role Center, click on the Personalize this page link in the top-right hand corner to enter into the edit mode.
Click on the Add a Web Part link where you would like to add the note board.
This will open up the web part explorer. From the categories, select the Social Collaboration group and this will filter the available web parts to the My Site controls.
Select the Note Board control and click on the Add button:

Now click on the Stop Editing button to return to the view mode for the Role Center.
Since the Note Board is a direct link to the user’s personal My Site Notes, they are able to post directly from Dynamics AX without opening up another browser window:

The notes that are posted on the Note Board on the Role Center will show up on the Tags and Notes panel within the user’s My Site page. Additionally, if the user makes notes from their My Site, then these will show up on the wall of the Role Center.

Another feature of My Sites is the ability for users to personalize their own profile with descriptions, contact details, profile pictures, and also personal notes and interests. Users configure and update their profiles, and then these can be used as a company directory, and an easy way to get to know the people you work with.
In this recipe, we will show how you can add your profile link to the Dynamics AX Role Center to give you quick access to your own My Site, and also how to add people that you frequently contact on your Role Center for quick access. Getting ready
Before you start on this example, you will need to make sure that you have configured your own personal profile within your My Site. To do this carry out the following steps:
Access your My Site by selecting the My Site option on the drop-down menu under your name in SharePoint.
Once you are in your My Site, click on the My Profile link in the top-left hand corner to access your profile page.
Click on the Edit My Profile link under your profile picture.
This will open up the Profile Maintenance page allowing you to add descriptions, avatars, and any other information that you may want to include on your profile:

To add a Contact Details panel to the Role Center, follow these steps:
From within the Role Center, click on the Personalize this page link in the top-right hand corner to enter into the edit mode.
Click on the Add a Web Part link where you would like to add your contact information.
This will open up the web part explorer. From the categories, select the Social Collaboration group and this will filter the available web parts to the My Site controls.
Navigate to the Contact Details control, and then click on the Add button:

This will add the Contact Details web part to the Role Center, but you need to configure it with a contact. To do that, navigate to Click here to add or modify a contact link.
This will open up the Web Part properties panel, and you will be able to select a contact from the address book:

Click on the Stop Editing button and you are done.

One of the strengths of SharePoint is that it is a great document management system. Although you can attach documents to records directly within Dynamics AX, you may want to use SharePoint as a store, so that people without access to Dynamics AX can still have access to the documents. SharePoint also allows you to index documents a number of different ways, allowing them to link to more than one record within Dynamics AX.
For this recipe, we will show how you can create an Accounts Payable document library to store all of your vendor invoices and scanned documents.
Before we show you how to access these documents from within Dynamics AX, you need to create a library to store the documents.
Before you start on this example, you will need to make sure that you have administrator privileges on your document management site. To check this carry out the following step:
Access the site, and open up the Site Actions menu. You need to make sure that you have the ability to create a New Document Library:

To create a new document library for your Accounts Payable scans and images, follow these steps:
From your SharePoint site that you want to store your documents in, access the Site Actions menu, and then select the New Document Library menu item:

This will open up the Document Library creation form. Give the library a name for the area of the business that will be using the documents, and then click on the Create button:

Now you should have a generic document library. We want to be able to index and search through our documents though. So we will add a few index fields to the document library. To do this, click on the Create Column button in the Library/Manage Views section of the ribbon bar:

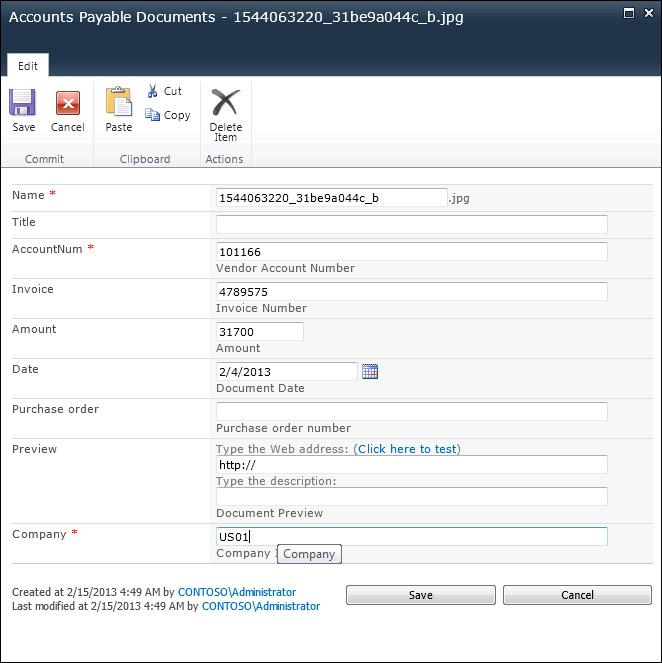
This will open up the Create Column dialog box, and we will create a column for Vendor Account Number:

After doing that, create non-required columns for Invoice Number (AccountNum), Document Amount (Amount), Document Date (Date), Purchase Order Number (PurchaseOrder), and Company ID (Company).
From the Library/Manage Views tab on the ribbon bar, you may also want to rearrange and hide the columns to make the library tidier.
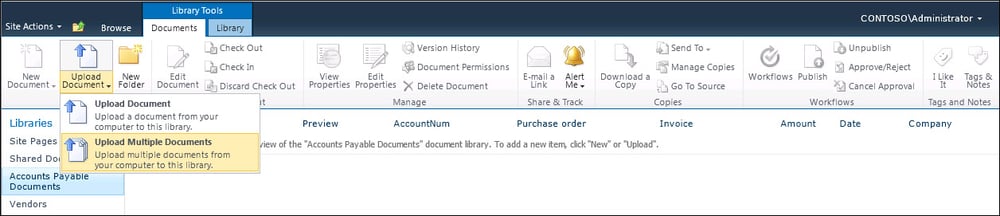
From the document library, we can now upload our scanned documents and images to SharePoint through the Upload Documents button.
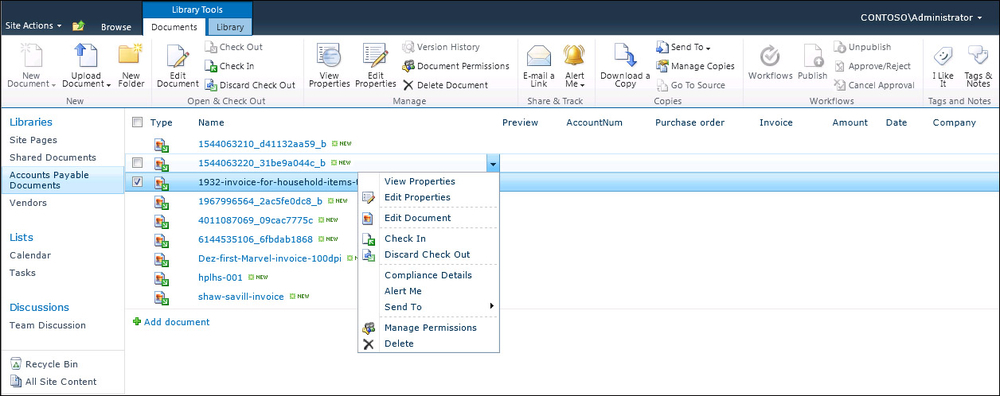
Once you have your documents uploaded, you can the open up the Properties panel for the document through the drop-down box beside the document name.
The column properties allow you to add additional index information to documents, so that later on we are able to search and find documents that relate to specific data in the database.
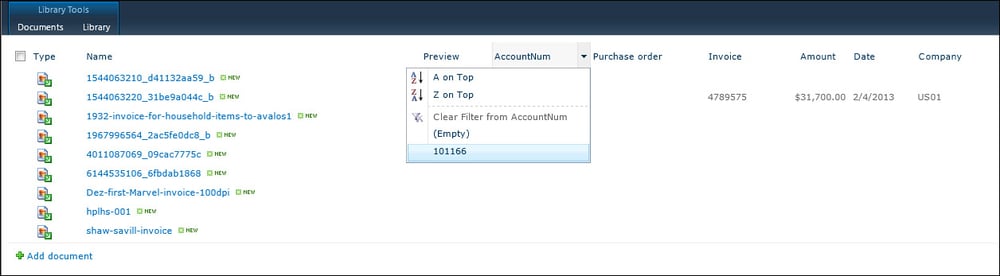
As we index these documents we are able to see the indexed column values in the main view of the document library.
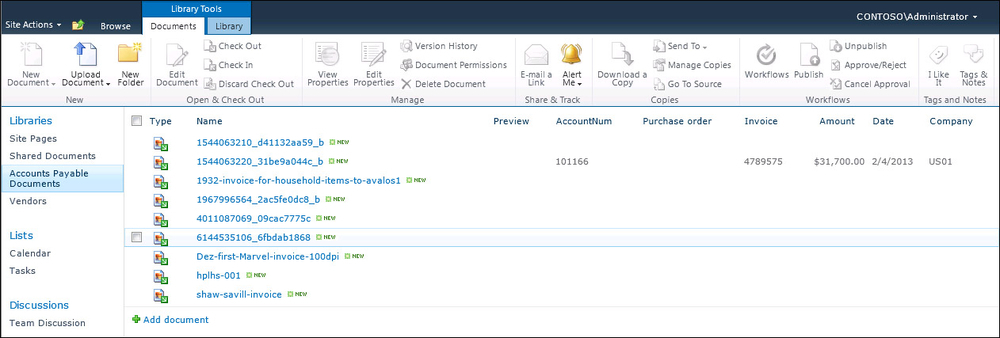
Additionally, if you have a number of documents in your library, you can use the filter button to just find the documents that you are looking for.
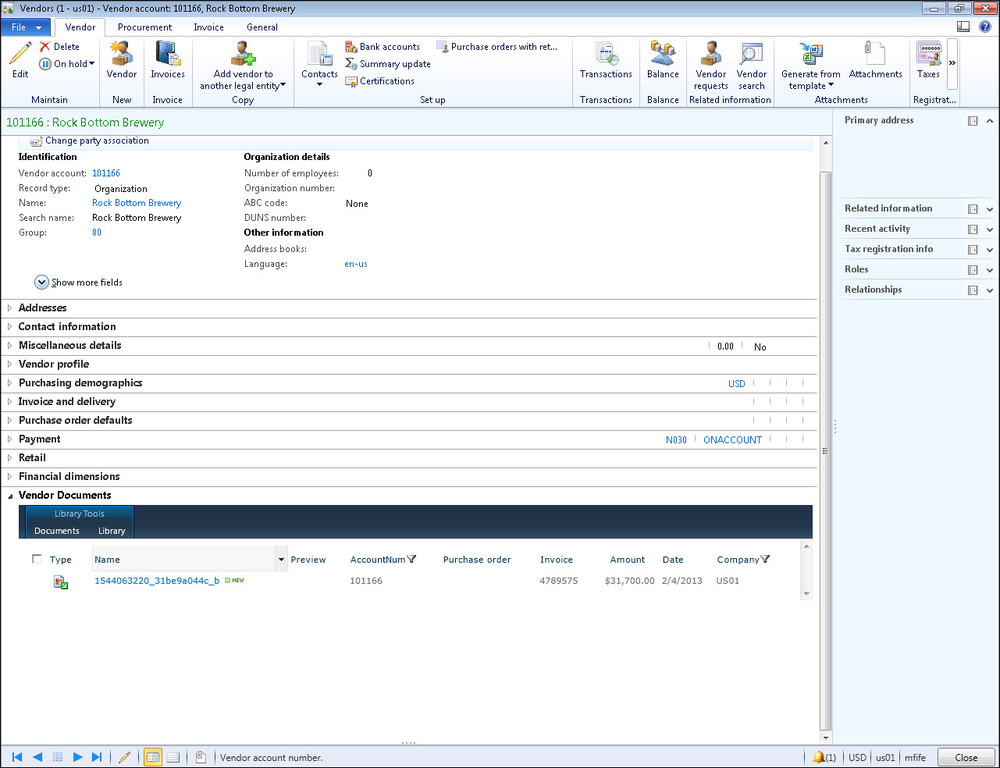
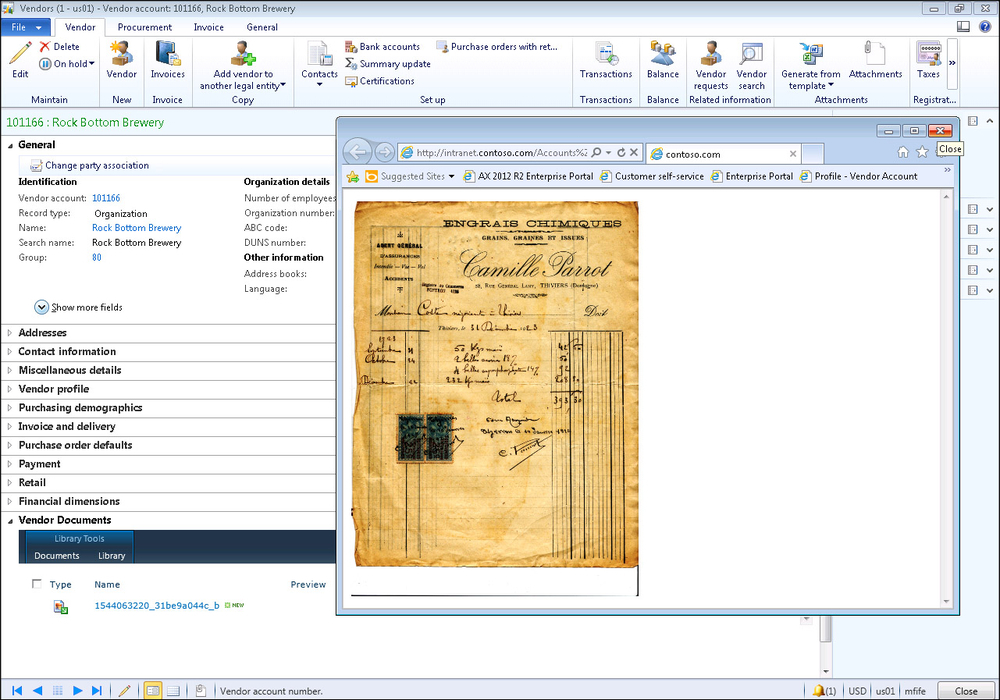
Now that you have a document library configured, you can make it accessible directly from the Dynamics AX forms, and have it automatically filtered so that you just see the documents that are associated to the information that you are looking for.
In this recipe, we will show how you can link the document library that we just created to the Vendor form, and do just that.
This example requires that you access the development environment and make changes to forms. Before you start on this example, make sure that you have developer rights on your installation of Dynamics AX. To check this carry out the following steps:
Open up the form that you are going to modify.
Right-click on the form and navigate to the Personalize option.
Click on the Information tab and you should be able to see the system form name:

Click on the Edit button to the right of the form name and you should be taken into the AOT development environment.
To add a link to a SharePoint document library within a form, follow these steps:
Create a new development project in AOT, AccountsPayableSharePointDocs. Add the VendorTable form to the project:

We are going to add a new tab group to the VendorTable form to show the documents that relate to the Vendor record. To do that expand the Designs group and find the Design form definition. Expand MainTab and TabPageDetails, and then right-click on the Tabs group, navigate to New Control, and then TabPage:

Rename TabPage to AccountsPayableDocuments and also add a caption for TabPage in the properties box of Vendor Documents.
We need to add a browser to the form so that we can display the SharePoint documents window. To do this, right-click on the new tab that we created, navigate to the New Control menu, and then select the ActiveX control.
When the ActiveX control browser shows up, navigate to the Microsoft Web Browser control, and add it to the tab.
In the properties panel for the Web Browser control, set the Name property to
Documents, set the Width property toColumn width, and the Height property toColumn height, so that the control will fill the space that is available in the tab control:
Now that we have a control to show the SharePoint site with the documents, we just need to initialize it when entering the vendor form. To do this, right-click on the Methods group in the VendTable form, select the Override method menu, and then activate:

Code Snippet 1: VendTable Form activate method
This will open up the code editor for the activate method. We will change this by creating a URL string that references the Accounts Payable document library in SharePoint, and then navigate the browser control to the URL, as follows:
public void activate(boolean _active)
{
    String255 url = “http://intranet.contoso.com/
      Accounts%20Payable%20Documents/Forms/
        AllItems.aspx?IsDlg=1”;

    url = url + “&FilterField1=AccountNum&
      FilterValue1=” + VendTable.AccountNum;
    url = url + “&FilterField2=Company&
      FilterValue2=” + VendTable.dataAreaId;
    Documents.Navigate(url);

    super(_active);
}
Two items to note, we added the
IsDlg=1qualifier to the URL which removes all of the navigation and gutter options on the page, and also the Filter qualifiers will automatically add a filter on theAccountNumfield, and the Company indexes.
SharePoint is a great tool for sharing and collaborating, and is even more useful because you don’t need to be a developer in order to set it up. In this chapter we looked at just a couple of the features that you can use with Dynamics AX, but there are a lot more that you can take advantage of.
Some other ways that you can use SharePoint include:
Creating knowledge bases with Wiki’s, allowing the users to collaboratively update information related to products, customers, vendors, or other records in the system
Enabling blogging within SharePoint so that users can share business insights with everyone else in the organization
Adding document workflows to manage the approval of documents such as Invoices
Since you probably have SharePoint up and running, then it would be a shame not to take advantage of it.