Download code from GitHub
Chapter 1: Introducing Azure Basics
With all the initial formalities now behind us, let's start our journey in Azure. Our journey starts here: https://azure.microsoft.com.
Azure is one of the most important cloud platform providers in the market today. It provides several cloud, hybrid, and on-premises services such as VMs, networks, compute, databases, messaging, machine learning (ML), artificial intelligence, Internet of Things (IoT), and many more services while focusing on security and compliance. You could use these services to build anything from web pages to mobile apps, from data analytics solutions to IoT solutions and more.
In Azure, users have the flexibility to choose from completely hosted no-code solutions to completely build-your-own solutions ground up using the basic building blocks like VMs and VNets, where the users have full control over each and every aspect of the system. And most of these technologies come prebaked with the cloud advantages, such as geo-replication, high availability, data redundancy, scalability, and elasticity.
Let's quickly review the basics of Azure. The following sections will focus on brushing up on the fundamentals of Azure. If you already have a working knowledge of Azure and know how to spin up resources in Azure, then you can safely skip this chapter and go directly to the next one.
In this first chapter, we'll provide an overview of Azure, including introducing some common Azure services. We'll get a good grounding in the basics, such as accounts, virtual machines (VMs), storage, compute, and networking. We'll also walk through how to spin up services using both the Azure portal and the CLI.
In this chapter, we will cover the following topics:
- Introducing the Azure portal
- Exploring Azure accounts, subscriptions, and resource groups
- Introducing Azure services
- Exploring Azure VMs
- Exploring Azure storage
- Exploring Azure networking (VNet)
- Exploring Azure compute
Let's get started!
Introducing the Azure portal
The Azure portal is the starting page for all Azure developers. You can think of it as an index page that contains links to all the services provided by Azure. The following screenshot shows what the Azure portal looks like:

Figure 1.1 – The Azure portal home page
You can browse through all the services available in Azure or quickly search for them using the search box. Once you click on a service, the corresponding service web page will appear (also known as blades in Azure). Azure maintains strong consistency in terms of blade design. All the service blades will look very similar. So, if you are familiar with one, you should be able to easily navigate the others. We will be exploring a few of the service blades in this chapter.
Exploring Azure accounts, subscriptions, and resource groups
You can explore Azure with or without an account. If you are just exploring Azure and are planning to run a few Sandbox experiments, you don't need to create an Azure account. But if you are planning on investing more time in Azure, then it is recommended to create an account. Azure provides USD 200 worth of free credits for the first 30 days for you to play around. This USD 200 should get you fairly good mileage for the practice exercises for this certification. You can enroll for a free account here: https://azure.microsoft.com/free.
Note
Azure requires a valid credit card number to create the account, but it doesn't charge the credit card for free accounts. Once the USD 200 credit is exhausted, it will notify you and then delete the resources.
Let us start with Azure accounts.
Azure account
An Azure account refers to the Azure Billing account. It is mapped to the email id that you used to sign up for Azure. An account can contain multiple subscriptions; each of these subscriptions can have multiple resource groups and the resource groups, in turn, can have multiple resources. The billing is done at the level of subscriptions. So, one account could have multiple invoices raised per subscription.
Next, let us look at Azure subscription.
Azure subscription
Every resource (VMs, VNets, databases, and so on) that you create in Azure is tied to a subscription. A subscription is a container for all the resources that are created for applications and solutions under that subscription. A subscription contains the details of all the VMs, networks, storage, and other services that were used during that month that will be used for billing purposes. Azure creates a default subscription when you create an account. But you could choose to have multiple subscriptions based on your teams (dev, test, sales, marketing, finance, and so on), regions (North America, EMEA, Asia Pacific, and so on), or other logical divisions that you feel are appropriate for your use case.
Next, let us look at Resource groups.
Resource groups
Resource groups are logical groups of resources belonging to an application or a team. You can think of them as tags associated with the resources so that you can easily query, monitor, and manage the collection of resources as one. For example, you could create a resource group called Sandbox for the Azure practice sessions. At the end of the day, you can delete all the resources that were created under that resource group in one go, instead of going through every resource and deleting them. You can have multiple resource groups under a Subscription.
Resources
Resources refer to all the VMs, stores, databases, functions, and so on that can be created in Azure.
Before we move on to the next topic, let us set up an example use case of an imaginary company. We will use this imaginary company as a real-world use case across all the chapters and will try to build our data solutions for it.
Establishing a use case
Let's pretend that there is a company called Imaginary Airport Cabs (IAC). IAC wants to build a cab booking portal. They have an engineering team and a marketing team that needs applications to be hosted on Azure. The engineering team is planning to build a scalable web server with an Azure SQL backend. The frontend and the backend are segregated using two different virtual networks for isolation and security reasons. The marketing team, on the other hand, has a simpler requirement of just an Azure SQL database to store their customer information.
If we plot this requirement against the accounts, subscriptions, resource groups, and resources, it might look something like this:

Figure 1.2 – Relationship between accounts, subscriptions, resource groups, and resources
We'll be returning to IAC and using Azure to solve their IT needs throughout this book. We will solve more complicated use cases for IAC in the following chapters so that you can understand the Azure concepts with real examples for your certification exam. Azure offers a variety of services that might be useful to IAC. We'll look at some of them in the following section.
Introducing Azure Services
Azure provides a wide array of services and technologies that can easily fulfill most real-world use cases. The services provided by Azure can be categorized like so.
Infrastructure as a Service (IaaS)
In IaaS, you get the bare infrastructure such as VMs, VNets, and storage, and you need to build the rest of the application stack yourself. This option gives the most flexibility for the developers in terms of OS versions, library versions, custom patches, and so on.
Platform as a Service (PaaS)
In PaaS, the software platforms are pre-installed and pre-configured. These are managed services in the sense that Azure manages the life cycle of this software for you. Examples include Azure SQL Server, Azure Databricks, and Azure Kubernetes Service. You will still be able to tune the software to some level, but you might not have the flexibility of choosing particular versions, patches, and so on.
Software as a Service (SaaS), also known as Function as a Service (FaaS)
What other platforms call Software as a Service (SaaS), Azure refers to as Function as a Service (FaaS). In SaaS or FaaS, you don't get to see any of the software installation details. You usually have a notebook-like user interface or an API interface for directly submitting your jobs; the cloud service provider takes care of instantiating the service, scaling the service and running the jobs for you. This is the easiest and quickest way to get started but the most restrictive in terms of software setup. Examples include Azure Functions, Azure Synapse SQL Serverless, and so on.
For those of you who are not very familiar with the IaaS, PaaS, and SaaS services, here is a diagram that explains these concepts:

Figure 1.3 – Breakdown of Azure services
Let us next look at Azure VMs.
Exploring Azure VMs
Virtual machines (VMs) are software abstractions of the physical hardware. They can emulate the computer hardware for the applications running on it. We can have multiple VMs running on a single machine. Each VM will have a portion of the host machine's CPU, memory, and storage allocated to it.
Azure VMs are the most common resources that are spun up in Azure. You can use VMs to set up virtually any application that you want. They are like plain vanilla servers that can be used to install any software that you need, except the OS upgrades and security patches, which are taken care of by Azure. Azure VMs provide the advantage of faster deployments, scalability, security isolation, and elasticity. Azure provides both Windows and Linux VMs. There is a huge collection of OS flavors and versions available in the Azure Marketplace that can be used to spin up the VMs. Here are some of the VM types available at the time of writing this book. You can look for more up-to-date information at https://docs.microsoft.com/en-us/azure/virtual-machines/sizes:
- General-purpose
- Compute-optimized
- Memory-optimized
- Storage-optimized
- GPU
- High performance
In the following subsections, we'll walk through the process of creating a VM.
Creating a VM using the Azure portal
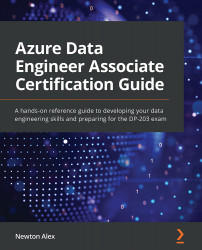
First, let's learn how to create a virtual machine using the Azure portal and then using the CLI. The following is a screenshot of the Create a virtual machine page:
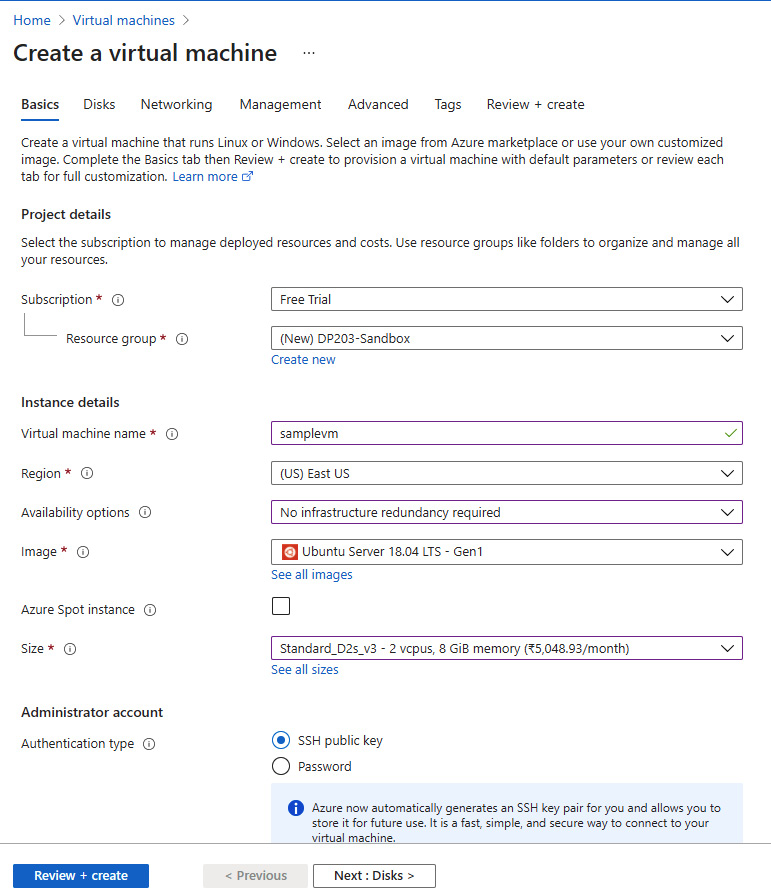
Figure 1.4 – Creating VMs using the Azure portal
Here are the steps to create the VM using the portal:
- From the portal, choose Virtual Machines (using the search bar or Explorer).
- Click on the + Create sign and select Virtual Machines.
- Enter a Virtual machine name, select a Resource group, select a VM image, select the Size of VM property, and an Authentication type.
- Click Review + Create and then Submit.
- You should see a pop-up with the option to Download private key and create resource. Click on the Download button and save the private key in a safe location. You will need this key to log in to your VM.
- You can also configure Advanced options such as Disks, Networking, Management, and Tags, as shown in the preceding screenshot.
Now, let's learn how to create a VM using the Azure CLI.
Creating a VM using the Azure CLI
Since this is the first time we are using the CLI, we'll learn how to get started.
Installing the CLI
There are two ways to use the CLI. First, you can use the Azure CLI option directly from the Azure portal, as shown here:
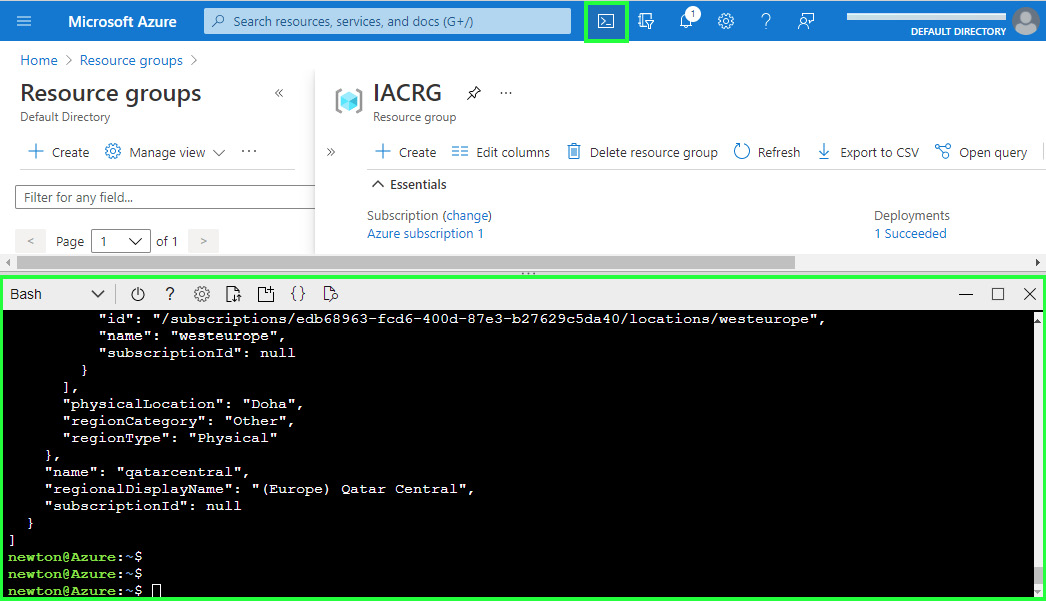
Figure 1.5 – Using the CLI directly from the Azure portal
Alternatively, you can choose to install the Azure CLI client on your local machine and run the commands from there. You can learn how to download and install the Azure CLI client here: https://docs.microsoft.com/en-us/cli/azure/install-azure-cli-windows.
Now, let's look at an example of creating a VM using the Azure CLI.
Note:
All these commands and scripts are available in the GitHub link that is provided along with this book, so that you can easily copy paste and try the commands.
To create a VM using the CLI, we will have to follow a sequence of steps. For this example, we'll create an Ubuntu VM:
- First, we have to find all the Ubuntu images that are available using the
vm image listoption:az vm image list --all --offer Ubuntu
- Next, we need to find the Azure regions where we want to deploy. We can use
account list-locationsfor this. You can choose a region that is closest to you:az account list-locations --output table
- Once we've done this, we can either create a new resource group or use an existing one to associate this VM with. Let us create a new resource group called
IACRGusing thegroup createoption, as shown here:az group create --name 'IACRG' --location 'eastus'
- Finally, let us create a VM using the information from the preceding commands. In this example, I've chosen the
eastuslocation to deploy this VM to. All the non-mandatory fields will default to the Azure default values:az vm create --resource-group 'IACRG' --name 'sampleVM' --image 'UbuntuLTS' --admin-username '<your username>' --admin-password '<your password>' --location 'eastus'
The previous command will create a VM named sampleVM under the resource group named IACRG.
That should have given you a good idea of how the CLI works in Azure. You can learn more about Azure VMs here: https://azure.microsoft.com/en-in/services/virtual-machines/.
Next, let's check out the storage options that are available in Azure.
Exploring Azure Storage
Azure has multiple storage options that can suit a wide range of applications and domains. We will explore the most common ones here.
Azure Blob storage
Blob storage is the most common storage type in Azure. It can be used to store unstructured data such as videos, audio, metadata, log files, text, and binary. It is a highly scalable and a very cost-effective storage solution. It provides support for tiered storage, so the data can be stored at different tiers based on their access pattern and usage frequency. Highly used data can be kept at hot tiers, the not-so-used data in cold tiers, and historical data can be archived. The data in Blob storage can be easily accessed via REST endpoints, as well as client libraries available in a wide set of languages, such as .NET, Java, Python, Ruby, PHP, Node.js, and more.
Blob Storage
You can access your Blob Storage at https://<storage-account>.blob.core.windows.net.
The following screenshot shows the creation of a storage account from the Azure portal:
Figure 1.6 – Creating a storage account using the Azure portal
Go ahead and create a storage account now, if you don't already have one. You will need this storage account throughout this book to store all the sample data, scripts, and more.
Now, let's look at another important storage option provided by Azure that will be used extensively for data lakes: Azure Data Lake Gen2.
Azure Data Lake Gen 2
Azure Data Lake Gen2 or Azure Data Lake Storage Gen 2 (ADLS Gen2) is a superset of Blob storage that is optimized for big data analytics. ADLS Gen2 is the preferred option for data lake solutions in Azure. It provides hierarchical namespace support on top of Blob storage. Hierarchical namespace support just means that directories are supported. Unlike Blob storage, which provides pseudo directory operations via namespaces, ADLS Gen2 provides real support for directories with POSIX compliance and Access Control List (ACL) support. This makes operations such as renaming and deleting directories atomic and quick. For example, if you have 100 files under a directory in Blob storage, renaming that directory would require hundred metadata operations. But, in ADLS Gen2, just one metadata operation will need to be performed at the directory level. ADLS Gen2 also supports role-based access controls (RBACs), just like Blob storage does.
Another important feature of ADL Gen2 is that it is a Hadoop-compatible filesystem. So, building any open source analytics pipeline on top of ADL Gen2 is a breeze.
Since we are talking about ADL Gen2, you might be curious to learn about what happened to ADL Gen1.
ADL Gen1, as its name suggests, was the first generation of highly scalable and high-performing data lake storage that was built for data analytics. It is still available but will be deprecated in February 2024. ADLS Gen1 is optimized for large files, so it works best for file sizes of 256 MB and above. The features of Gen1 are available in Gen2 now. Gen2 also has some additional advantages, such as better regional availability, meaning that it is available in all Azure regions, compared to a select few regions where Gen1 is available. Gen2 also supports Locally Redundant Storage (LRS), Zone Redundant Storage (ZRD), and Geo Redundant Storage (GRS) for data redundancy and recovery, while Gen1 only supports LRS.
ADLS Gen2
You can access ADLS Gen2 at https://<storage-account>.dfs.core.windows.net.
To create an ADLS Gen2 account, you need to select the Enable hierarchical namespace checkbox on the Create a storage account screen:
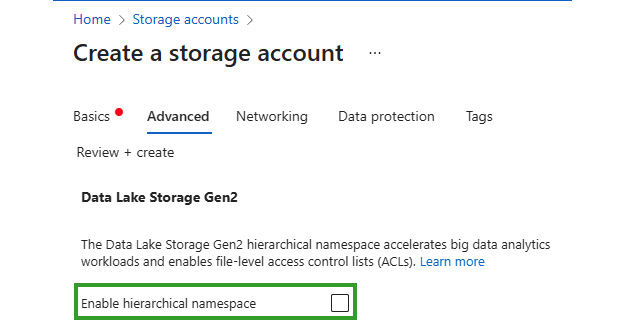
Figure 1.7 – Selecting Data Lake Storage Gen2 (Enable hierarchical namespace) while creating an Azure Storage instance
Next, let's learn about another Azure storage technology called Azure Files.
Azure Files
Azure Files provides remote file shares that can be mounted using Server Message Block (SMB) or Network File Share (NFS) protocols. These are great storage options for anyone planning to migrate on-premises workloads to the cloud with a lift and shift model, for instance, without having to invest in redevelopment for the cloud-based model. Azure files can easily be mounted both from cloud servers and on-premises servers. Azure Files is particularly useful for cases that need shared data, shared configurations, shared applications, and more across multiple users, teams, or regions. Let's look at some example commands for how to create file shares in Azure.
Creating Azure file shares with the Azure CLI
As we have already seen a few prior examples of using the Azure portal, let's explore this one using the Azure CLI so that we become familiar with the command-line options too. We will continue to use the IAC example here so that you get a good understanding of how to use the CLI with real examples. You can just glance through these examples to get an idea of how the Azure File commands are structured.
For the following examples, we will need a resource group and a storage account to be created. We can reuse the resource group IACRG, that we created in the "Creating a VM using CLI" section. For storage account, we can easily create one as shown here.
az storage account create --resource-group IACRG --name iacstorage --location eastus --kind StorageV2 --sku Standard_LRS.
This will create a storage account named iacstorage. The storage account names have to be unique, so you might have to find a name that is not already used. Once we have the storage account created, you can visit the storage account page in Azure portal. From under the Access Keys tab, you can copy the Primary Key (Key1), which will be required to perform any activity on this storage account. Once copied, export the following two variables from your CLI screen as shown:
export AZURE_STORAGE_ACCOUNT=<your storage account name>
export AZURE_STORAGE_KEY=<your storage primary key>
If you are using a Windows machine, please refer to this book's GitHub link to find examples of exporting variables in Windows.
Note:
Using the primary key is an easy way to access the storage but not a recommended option to use in production systems. The book will discuss more secure options later in the chapters.
Let's get started:
- You can create a new Azure file share for IAC using the
share-rm createoption. The following command will create a file share namediacfileshareunder theiacstorage.az storage share-rm create --resource-group IACRG --storage-account iacstorage --name iacfileshare
- You can list the file shares using the
share listoption:az storage share list --account-name iacstorage
- You can put a file into our file share using the
file uploadoption:az storage file upload --share-name iacfileshare --source ./testfile.txt
- You can view the files in your file share using
file list:az storage file list --share-name iacfileshare
- Finally, you can download the file that we previously uploaded using the
file downloadoption:az storage file download --share-name iacfileshare -p testfile.txt --dest ./testfile.txt
As you can see, Azure provides a very easy and intuitive set of commands for interfacing with the various Azure services that are available.
Let us next look at Azure Queues.
Azure Queues
Azure queues are used to store a large number of messages that can be accessed asynchronously between the source and the destination. This helps in decoupling applications so that they can scale independently. Azure queues can be used across applications that are running in the cloud, on-premises, on mobile devices, and more. There are two types of queues: Storage queues and Service Bus.
Storage queues can be used for simple asynchronous message processing. They can store up to 500 TB of data (per storage account) and each message can be up to 64 KB in size. If your application needs more than a simple async queue and needs advanced features such as pub-sub models, strict ordering of messages, and blocking and non-blocking APIs, then Service Bus is a better option. With Service Bus, the message sizes can be up to 1 MB but the overall size is capped at 80 GB.
Azure Queues
Azure queues URL: https://<storage account>.queue.core.windows.net/<queue>.
Now, let's look at some example commands for creating queues in Azure.
Creating Azure Queues using the CLI
Let's look at some sample CLI commands for creating and using an Azure Queue. Again, we will assume that the AZURE_STORAGE_ACCOUNT and AZURE_STORAGE_KEY environment variables have already been set:
- You can create a new Azure queue using the
storage queue createcommand. The following command will create a queue namediacqueueunder theiacstorage.az storage queue create --name iacqueue --account-name iacstorage
- You can easily list the queues under a storage account using the
storage queue listterm:az storage queue list --account-name iacstorage
- You can add a new message to the newly created queue using the
storage message putoption:az storage message put --queue-name iacqueue --content "test"
- Finally, use the
storage message peekcommand to view the message. This command retrieves one or more messages from the front of the queue but does not alter the visibility of the message:az storage message peek --queue-name iacqueue
Now that you understand the basics of Azure queues, let's look at Azure tables.
Azure tables
Azure tables are key-value stores provided by Azure. They are good for storing structured non-relational data. There are two solutions available in Azure for Table stores: Azure Table Storage and Cosmos DB.
Both these features provide the same table model and Create, Read, Update, and Delete (CRUD) features, but the difference lies in their scale, SLAs, and availability. Cosmos DB is the premium version of Table store and can provide more than 10 million operations per second, whereas Azure Table storage has a scaling limit of 20K operations per second.
Cosmos DB also provides several additional advantages, such as five flexible levels of consistency, up to 99.999% read availability on multi-region databases, serverless mode, global presence, and more. CosmosDB deserves a complete chapter on its own. We will explore CosmosDB in more detail later in this book.
Azure Table
Azure Table URL: http://<storage account>.table.core.windows.net/<table>.
Like the other storage options we looked at, let's look at some example CLI commands to become familiar with this technology. You can just glance through these examples for now. We will provide detailed steps for implementing the examples required for the certification later in this book.
Creating Azure tables using the CLI
Let's learn how to use the Azure CLI to create and use an Azure Table:
- We can create a new Azure Table for our example company, IAC, by using the
storage table createoption. The following command will create a table namediactableunder theiacstoragestorage account. Here again, we will have to export the two env variables (AZURE_STORAGE_ACCOUNTandAZURE_STORAGE_KEY), before running the following commands..az storage table create --name iactable --account-name iacstorage
- We can easily list the Tables under a storage account using the
storage table listoption:az storage table list --account-name iacstorage
- We can insert an entity into the newly created Table using the
storage entity insertoption:az storage entity insert --table-name iactable --entity PartitionKey=testPartKey RowKey=testRowKey Content=testContent
- Finally, we can use the
storage entity showcommand to view the entry:az storage entity show --table-name iactable --partition-key testPartKey --row-key testRowKey
With that, we have covered the core storage options provided by Azure. Next, we'll look at Azure Managed Disks, which are required for managing disk/SSD storage for VMs.
Azure Managed disks
Azure managed disks are the virtual hard disks that are mounted to an Azure VM. As the name suggests, these disks are completely managed by Azure. So, you don't need to worry about OS upgrades, security patches, and so on. Unlike physical disks, Azure Managed Disks offer 99.999% availability. They achieve such a high availability score by storing three different replicas of the data on different servers. Managed VMs can also be allocated to availability sets and availability zones (distributed across racks and data centers) to increase their survivability in cases of server, rack (stamp), or data center outages. The managed disks also provide options for data encryption at rest and disk-level encryptions. There are different types of managed disks available, such as standard HDD, standard SSD, premium SSD, and ultra disks.
Creating and attaching Managed Disks to a VM using the CLI
Let's learn how to use the CLI to create and attach Managed Disks to sampleVM, which we created earlier:
az vm disk attach --resource-group IACRG --vm-name sampleVM --name IACmgdisk --size-gb 64 –new
This is a simple one-line command for creating a new disk and attaching it to an existing VM. Please do remember that you also have the option to specify more advanced configuration parameters as part of the CLI command itself that, when not specified, would assume default values.
You can learn more about Azure storage technologies here: https://docs.microsoft.com/en-us/azure/storage/common/storage-introduction.
Now, let's explore another core Azure technology, known as Azure Networking.
Exploring Azure Networking (VNet)
Like Azure VMs, Azure VNet is another core component of Azure that we should be aware of. A VNet ties all resources, such as VMs, stores, and databases, together securely in a private network. It is used to encapsulate the cloud or on-premises services together within a secure boundary by controlling who can access these services and from which endpoints.
Azure Networking provides the following four main services:
- Secure connectivity within Azure resources using the basic VNet, VNet Peering, and Service Endpoints.
- Networking beyond the Azure Cloud and into the internet and hybrid clouds using Express Routers, Private Endpoints, and Point-to-Site and Site-to-Site VPNs.
- Network filtering or, in other words, Firewall Rules that can be implemented either via the Network or App Security Groups. There are options to implement the same using network appliances, which are ready-made servers available for specialized networking scenarios.
- Network routing abilities that allow you to configure network routes using Route Tables and Border Gateway Protocols.
Now, let's learn how to create a VNet using the Azure CLI.
Creating an Azure VNet using the CLI
Let's look at a simple example of how to create a VNet and assign a VM to it. We will reuse the IACRG resource group that we used in the examples earlier in this chapter:
- First, we need to create a VNET by specifying the necessary IP ranges and subnet prefixes. The following command creates a VNET named
iacvnetunder theIACRGresource group.az network vnet create --address-prefixes 10.20.0.0/16 --name iacvnet --resource-group IACRG --subnet-name iacsubnet --subnet-prefixes 10.20.0.0/24
- Then, we need to create a public IP so that we can access our VM from the internet:
az network public-ip create --resource-group IACRG --name iacpubip --allocation-method dynamic
- Next, we must create a network interface card (NIC), which will be the network interface between the VM and the outside world, with the previously created VNet and public IP:
az network nic create --resource-group IACRG --vnet-name iacvnet --subnet iacsubnet --name iacnic --public-ip-address iacpubip
- We now have all the components required to create a VM within our new VNet,
iacvnet. We can reuse theUbuntuLTSimage that we used in the earlier virtual machine creation example to create a new VM within the new VNet:az vm create --resource-group IACRG --name sampleVMwithinVNET --nics iacnic --image UbuntuLTS --generate-ssh-keys
We hope that has given you a good understanding of how to create networking components such as VNets, public IPs, and more.
You can learn more about Azure networking here: https://azure.microsoft.com/en-in/product-categories/networking/.
Next, we'll look at Azure Compute.
Exploring Azure Compute
Azure Compute is a generic term for all the compute-focused technologies in Azure. Let's explore some of the common Compute Services provided by Azure. Each of these technologies is worthy of a book, so we will just be focusing on introducing these technologies in this chapter. We will dive deeper into some of the technologies that are required for the certification later in this book.
VM Scale Sets
VM Scale Sets is a collection of load-balanced VMs that can be used to build highly scalable services. For example, we can have a set of web servers that can scale horizontally based on the load. The advantage of using VM Scale Sets as opposed to manually setting up VMs is that VM Scale Sets can be launched and managed using centralized templates. It comes with a load balancer by default, so we don't have to set it up manually. It also takes care of automatic scale out and scale in based on the load. In addition, VM Scale Sets have higher reliability as the workload is spread across multiple servers. Even if a few nodes fail, VM Scale Sets can quickly bring up additional nodes to replace the capacity. VM Scale Sets can be configured across availability zones to improve the availability even more.
You can learn more about VM Scale Sets here: https://azure.microsoft.com/en-in/services/virtual-machine-scale-sets/.
Azure App Service
Azure App Service allows you to develop and host web apps, mobile apps, and APIs using a wide selection of languages such as .NET, Java, Node.js, Python, ASP.NET, and more. These are fully managed services that provide support for the entire life cycle of apps such as development, CI/CD, releases, maintenance, debugging, and scaling. Azure App Service is backed by enterprise-grade security and compliance. There are very detailed examples, tutorials, and support available in Azure for building complete web and mobile solutions using Azure App Service.
You can learn more about Azure App Service here: https://azure.microsoft.com/en-in/services/app-service/.
Azure Kubernetes Service
Kubernetes is an open source container orchestration software. Azure Kubernetes Service (AKS) is a PaaS version of Kubernetes that's hosted on Azure. AKS provides a complete life cycle management for containerized apps, starting from development (using Visual Studio, code, and other Kubernetes tools), through to CI/CD (integration with GitHub), deployment, scaling, telemetry, logging, monitoring, and more. AKS also supports Docker images, which are widely used for containerization.
You can learn more about AKS here: https://azure.microsoft.com/en-in/services/kubernetes-service/.
Azure Functions
Azure Functions is a perfect example of a serverless technology and is a SaaS. Serverless doesn't mean that there are no servers, it just means that you don't have to deploy, maintain, or upgrade your servers (VMs); someone else is doing it for you in the background and abstracting the details from you. You can use functions to write your processing logic based on event triggers and bindings such as a transaction in a database, an IoT event, and a REST call. The blocks of code you write are called functions (no points for guessing that). All you need to do is open the Azure Functions Notebook Interface and write your logic (code) directly in it. There are function extensions available in the many languages that support integration with Development, CI/CD, and DevOps tools.
You can learn more about Azure Functions here: https://azure.microsoft.com/en-in/services/functions/.
Azure Service Fabric
Service Fabric is a very powerful cluster technology that takes care of app deployment, scaling, upgrades, and maintenance for microservice-based applications. It can take care of the entire life cycle management process for applications. This is similar to AKS but for non-containerized applications. Many of the core Azure services themselves run on top of Service Fabric. Service Fabric is an open source project and has very high reliability and availability.
You can learn more about Azure Service Fabric here: https://azure.microsoft.com/en-in/services/service-fabric/.
Azure Batch
Azure Batch is used to run large parallel processing applications or high-performance computing applications. Batch provides the necessary resource management, scheduling, and scaling support to run any traditional MPP programs. It spins up the VMs and deploys and runs your programs in a parallel manner. It can dynamically scale up and down as required to optimize the cost. Azure Batch can be used for high volume batch processing, financial modeling, video rendering, weather prediction model generation, and so on.
You can learn more about Azure Batch here: https://azure.microsoft.com/en-in/services/batch/.
Summary
With that, we have completed our first chapter. If it was too overwhelming for you, don't worry – this chapter was just meant to provide an overview of Azure. By the time you complete the next few chapters, your confidence will increase. On the other hand, if this chapter was easy for you, then you are probably already aware of some level of cloud technologies, and the next set of chapters should also be easy for you.
Now that you have completed this chapter, you should know how to navigate the Azure portal. You now understand the relationship between Azure accounts, subscriptions, resource groups, and resources. You also know how to create new VMs, Storage instances, VNets, and so on using both the Azure portal and the CLI. You are also aware of the major compute services that are available in Azure. With this foundational knowledge in place, we can move on to more interesting and certification-oriented topics.
We will be exploring Azure storage technologies in the next chapter.
Exploring Azure accounts, subscriptions, and resource groups