Download code from GitHub
Chapter 1: Kickstarting CMake
If you're developing software using C++ or C, you have probably heard about CMake before. Over the last 20 years, CMake has evolved into something that's an industry standard when it comes to building C++ applications. But CMake is more than just a build system – it is a build system generator, which means it produces instructions for other build systems such as Makefile, Ninja, Visual Studio, Qt Creator, Android Studio, and Xcode. And it does not stop at building software – CMake also includes features that support installing, packaging, and testing software.
As a de facto industry standard, CMake is a must-know technology for any C++ programmer.
In this chapter, you will get a high-level overview of what CMake is and learn about the necessary basics to build your first program. We will have a look at CMake's build process and provide an overview of how to use the CMake language to configure build processes.
In this chapter, we will cover the following topics:
- CMake in a nutshell
- Installing CMake
- The CMake build process
- Writing CMake files
- Different toolchains and build configurations
Let's begin!
Technical requirements
To run the examples in this chapter, you will need a recent C++ compiler that understands C++17. Although the examples are not complex enough to require the functionality of the new standard, the examples have been set up accordingly.
We recommend using any of the compilers listed here to run the examples:
- Linux: GCC 9 or newer, Clang 10 or newer
- Windows: MSVC 19 or newer or MinGW 9.0.0 or newer
- macOS: Apple Clang 10 or newer
Note
To try out any examples in this book, we have provided a ready-made Docker container that contains all the requirements.
You can find it at https://github.com/PacktPublishing/CMake-Best-Practices.
CMake in a nutshell
CMake is open source and available on many platforms. It is also compiler-independent, making it a very strong tool when it comes to building and distributing cross-platform software. All these features make it a valuable tool for building software in a modern way – that is, by relying heavily on build automation and built-in quality gates.
CMake consists of three command-line tools:
cmake: CMake itself, which is used to generate build instructionsctest: CMake's test utility, which is used to detect and run testscpack: CMake's packaging tool, which is used to pack software into convenient installers, such as deb, RPM, and self-extracting installers
There are also two interactive tools:
cmake-gui: A GUI frontend to help with configuring projectsccmake: An interactive terminal UI for configuring CMake
cmake-gui can be used to conveniently configure a CMake build and select the compiler to be used:

Figure 1.1 – cmake-gui after configuring a project
If you're working on the console but still want to have an interactive configuration of CMake, then ccmake is the right tool. While not as convenient as cmake-gui, it offers the same functionality. This is especially useful when you must configure CMake remotely over an ssh shell or similar:

Figure 1.2 – Configuring a project using ccmake
The advantage of CMake over a regular build system is manyfold. First, there is the cross-platform aspect. With CMake, it is much easier to create build instructions for a variety of compilers and platforms without the need to know the specifics of the respective build system in depth.
Then, there is CMake's ability to discover system libraries and dependencies, which lessens the pain of locating the correct libraries for building a piece of software considerably. An additional bonus is that CMake integrates nicely with package managers such as Conan and vcpkg.
It is not just the ability to build software for multiple platforms, but also its native support for testing, installing, and packaging software that makes CMake a much better candidate for building software than just a single build system. Being able to define everything from building and over-testing to packaging at a single point helps tremendously with maintaining projects in the long run.
The fact that CMake itself has very few dependencies on the system and can run on the command line without user interaction makes it very suitable for build system automatization in CI/CD pipelines.
Now that we've covered briefly what CMake can do, let's learn how to install CMake.
Installing CMake
CMake is freely available to download from https://cmake.org/download/. It is available as either a precompiled binary or as source code. For most use cases, the precompiled binary is fully sufficient, but since CMake itself has very few dependencies, building a version is also possible.
Any major Linux distribution offers CMake over its package repositories. Although the pre-packaged versions of CMake are not usually the latest releases, these installations are often sufficient to use if the system is regularly updated.
Note
The minimum version of CMake to use with the examples in this book is 3.21. We recommend that you download the appropriate version of CMake manually to ensure that you get the correct version.
Building CMake from source
CMake is written in C++ and uses Make to build itself. Building CMake from scratch is possible, but for most use cases, using the binary downloads will do just fine.
After downloading the source package from https://cmake.org/download/, extract it to a folder and run the following command:
./configure make
If you want to build cmake-gui as well, configure it with the --qt-gui option. This requires Qt to be installed. Configuring will take a while, but once it's succeeded, CMake can be installed using the following command:
make install
To test whether the installation was successful, you can execute the following command:
cmake --version
This will print out the version of CMake, like this:
cmake version 3.21.2
CMake suite maintained and supported by Kitware (kitware.com/
cmake).
Building your first project
Now, it's time to get your hands dirty and see whether your installation worked. We have provided an example of a simple hello world project that you can download and build right away. Open a console, type in the following, and you'll be ready to go:
git clone https://github.com/PacktPublishing/CMake-Best-
Practices.git
cd CMake-Best-Practices/chapter_1
mkdir build
cd build
cmake ..
cmake -–build .
This will result in an executable called Chapter_1 that prints out Welcome to CMake Best Practices on the console.
Let's have a detailed look at what happened here:
- First, the example repository is checked out using Git and then the
buildfolder is created. The file structure of the example CMake project will look like this before the build:. ├── CMakeLists.txt └── build └── src └── main.cpp
Apart from the folder containing the source code, there is a file called CMakeLists.txt. This file contains the instructions for CMake on how to create build instructions for the project and how to build it. Every CMake project has a CMakeLists.txt file at the root of the project, but there might be many files with that name in various subfolders.
- After cloning the repository, the build process is started with
cmake. CMake's build process is a two-stage process. The first step, which is usually called configuration, reads theCMakeLists.txtfile and generates an instruction for the native build toolchain of the system. In the second step, these build instructions are executed and the executables or libraries are built.
During the configuration step, the build requirements are checked, the dependencies are resolved, and the build instructions are generated.
- Configuring a project also creates a file called
CMakeCache.txtthat contains all the information that's needed to create the build instructions. The next call tocmake --build .executes the build by internally calling CMake; if you are on Windows, it does so by invoking the Visual Studio compiler. This is the actual step for compiling the binaries. If everything went well, there should be an executable namedChapter1in thebuildfolder.
For brevity, we cd'd into the build directory in the previous examples and used relative paths to find the source folders. This is often convenient, but if you want to call CMake from somewhere else, you can use the --S option to select the source file and the --B option to select the build folder:
cmake -S /path/to/source -B /path/to/build
cmake -build /path/to/build
Explicitly passing the build and source directories often comes in handy when using CMake in a continuous integration environment since being explicit helps with maintainability. It is also helpful if you want to create different build directories for different configurations, such as when you're building cross-platform software.
A minimal CMakeLists.txt file
For a very simple hello world example, the CMakeLists.txt file only consists of a few lines of instructions:
cmake_minimum_required(VERSION 3.21)
project(
  "chapter1"
  VERSION 1.0
  DESCRIPTION "A simple project to demonstrate basic CMake
    usage" LANGUAGES CXX)
add_executable(Chapter1)
target_sources(Chapter1 PRIVATE src/main.cpp)
Let's understand these instructions in a bit more detail:
- The first line defines the minimum version of CMake that's required to build this project. Every
CMakeLists.txtfile starts with this directive. This is used to warn the user if the project uses features of CMake that are only available from a certain version upward. Generally, we recommend setting the version to the lowest version that supports the features that are used in the project. - The next directive is the name, version, and description of the project to be built, followed by the programming languages that are used in the project. Here, we use
CXXto mark this as a C++ project. - The
add_executabledirective tells CMake that we want to build an executable (as opposed to a library or a custom artifact, which we will cover later in this book). - The
target_sourcesstatement tells CMake where to look for the sources for the executable calledChapter1and that the visibility of the sources is limited to the executable. We will go into the specifics of the single commands later in this book.
Congratulations – you are now able to create software programs with CMake. But to understand what is going on behind the commands, let's look at the CMake build process in detail.
Understanding the CMake build process
CMake's build process works in two steps, as shown in the following diagram. First, if it's invoked without any special flags, CMake scans the system for any usable toolchains during the configuration process and then decides what its output should be. The second step, which is when cmake --build is invoked, is the actual compilation and building process:
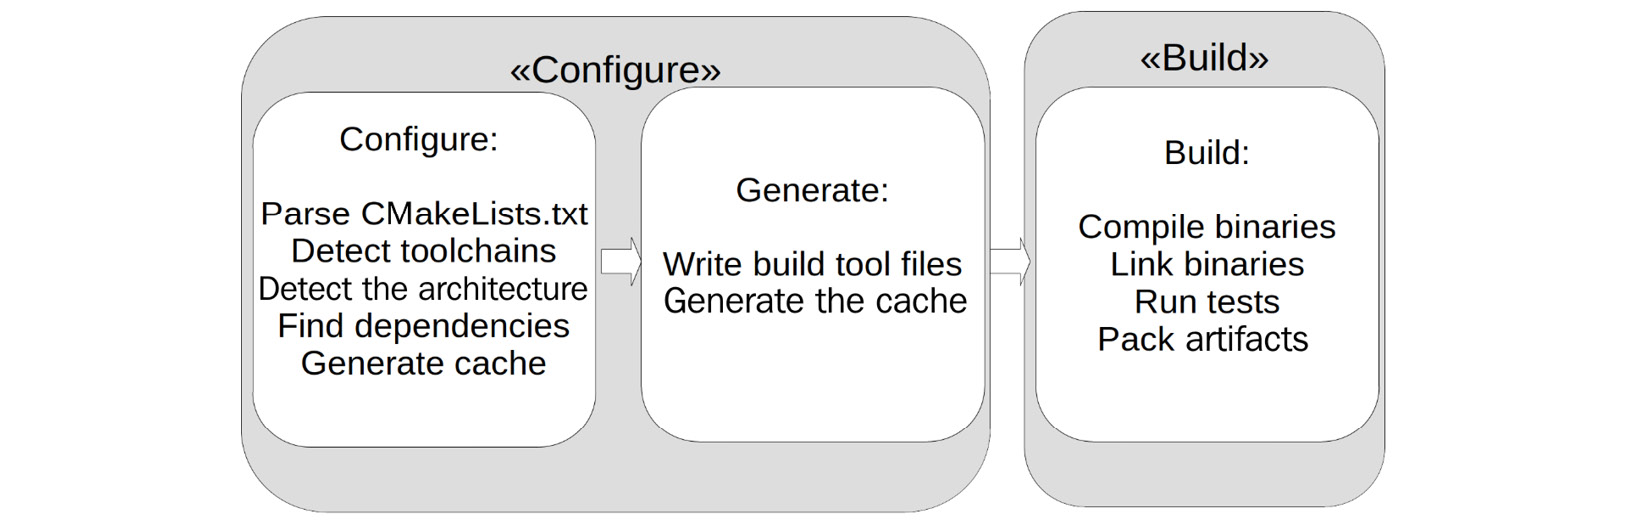
Figure 1.3 – CMake's two-stage build process
The standard output is Unix Makefiles unless the only detected compiler is Microsoft Visual Studio, in which case a Visual Studio solution (.sln) will be created.
To change the generator, you can pass the -G option to CMake, like this:
cmake .. -G Ninja
This will generate files to be used with Ninja (https://ninja-build.org/), an alternative build generator. Many generators are available for CMake. A list of the ones that are supported natively can be found on CMake's website: https://cmake.org/cmake/help/latest/manual/cmake-generators.7.html.
There are two main types of generators – the ones where there are many Makefile flavors and Ninja generators, which are generally used from the command line, and the ones that create build files for an IDE such as Visual Studio or Xcode.
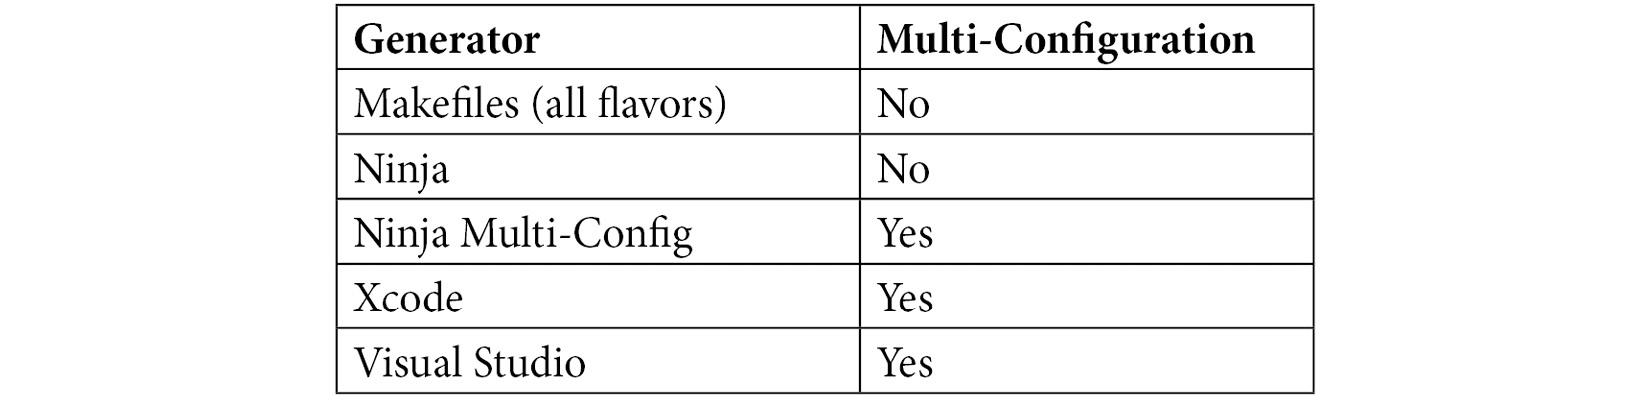
CMake addition differentiates between single-configuration generators and multi-configuration generators. For single-configuration generators, the build files have to be rewritten each time the configuration is changed; multi-configuration build systems can manage different configurations without the need to regenerate. Although the examples in this book use single-configuration generators, they would also work on multi-configuration generators. For most of the examples, the chosen generator is irrelevant; otherwise, it will be mentioned:
In addition, there are extra generators that use a normal generator but also produce project information for an editor or IDE, such as Sublime Text 2, Kate Editor, Code::Blocks, and Eclipse. For each, you can select whether the editor should use Make or Ninja to internally build the application.
After the call, CMake will create a lot of files in the build folder, with the most notable being the CMakeCache.txt file. This is where all the detected configurations are stored. Note that when you're using cmake-gui, the first step is split into configuring the project and generating the build file. However, when it's run from the command line, the steps are merged into one. Once configured, all the build commands are executed from the build folder.
Source folders and build folders
In CMake, two logical folders exist. One is the source folder, which contains a hierarchical set of projects, while the other is a build folder, which contains the build instructions, cache, and all the generated binaries and artifacts.
The root of the source folder is wherever the top CMakeLists.txt file is located. The build folder can be placed inside the source folder, but some people prefer to have it in another location. Both are fine; note that for the examples in this book, we decided to keep the build folder inside the source folder. The build folder is often called just build, but it can take any name, including prefixes and suffixes for different platforms. When using a build folder inside the source tree, it is a good idea to add it to .gitignore so that it does not get checked in accidentally.
When configuring a CMake project, the project and folder structure of the source folder is recreated inside the build folder so that all the build artifacts are in the same position. In each mapped folder, there is a subfolder called CMakeFiles that contains all the information that's generated by CMake's configuration step.
The following code shows an example structure for a CMake project:
├── chapter_1
│   ├── CMakeLists.txt
│   └── src
│       └── main.cpp
├── CMakeLists.txt
When you execute the CMake configuration, the file structure of the CMake project is mapped into the build folder. Each folder containing a CMakeLists.txt file will be mapped and a subfolder called CMakeFiles will be created, which contains the information that's used by CMake for building:
├── build
│   ├── chapter_1
│   │   └── CMakeFiles
│   └── CMakeFiles
So far, we have used existing projects to learn about the CMake build process. We learned about the configuration and the build step, as well as generators, and that we need CMakeLists.txt files to pass the necessary information to CMake. So, let's go a step further and see what the CMakeLists.txt files look like and how the CMake language works.
Writing CMake files
When you're writing CMake files, there are a few core concepts and language features that you need to know about. We won't cover every detail of the language here as CMake's documentation does a pretty good job at this – especially when it comes to being comprehensive. In the following sections, we will provide an overview of the core concepts and language features. Further chapters will dive into the details of different aspects.
The full documentation for the language can be found at https://cmake.org/cmake/help/latest/manual/cmake-language.7.html.
The CMake language – a 10,000-feet overview
CMake uses configuration files called CMakeLists.txt files to determine build specifications. These files are written in a scripting language, often called CMake as well. The language itself is simple and supports variables, string functions, macros, function definitions, and importing other CMake files.
Apart from lists, there is no support for data structures such as structs or classes. But it is this relative simplicity that makes the CMake project inherently maintainable if done properly.
The syntax is based on keywords and whitespace-separated arguments. For example, the following command tells CMake which files are to be added to a library:
target_sources(MyLibrary
                PUBLIC include/api.h
                PRIVATE src/internals.cpp src/foo.cpp)
The PUBLIC and PRIVATE keywords denote the visibility of the files when they're linked against this library and serve as delimiters between the lists of files.
Additionally, the CMake language supports so-called "generator expressions," which are evaluated during build system generation. These are commonly used to specify special information for each build configuration. They will be covered extensively in Chapter 3, Creating a CMake Project.
Projects
CMake organizes the various build artifacts such as libraries, executables, tests, and documentation into projects. There is always exactly one root project, although projects can be encapsulated into each other. As a rule, there should only be one project per CMakeLists.txt file, which means that each project has to have a separate folder in the source directory.
Projects are described like this:
 project(
"chapter1"
VERSION 1.0
DESCRIPTION "A simple C++ project to demonstrate basic CMake
  usage" LANGUAGES CXX
)
The current project that's being parsed is stored in the PROJECT_NAME variable. For the root project, this is also stored in CMAKE_PROJECT_NAME, which is useful for determining whether a project is standalone or encapsulated in another. Since version 3.21, there's also a PROJECT_IS_TOP_LEVEL variable to directly determine whether the current project is the top-level project. Additionally, with <PROJECT-NAME>_IS_TOP_LEVEL, you can detect whether a specific project is a top-level project.
The following are some additional variables regarding the projects. All of them can be prefixed with CMAKE_ to the value for the root project. If they're not defined in the project() directive, the strings are empty:
PROJECT_DESCRIPTION: The description string of the projectPROJECT_HOMEPAGE_URL: The URL string for the projectPROJECT_VERSION: The full version that's given to the projectPROJECT_VERSION_MAJOR: The first number of the version stringPROJECT_VERSION_MINOR: The second number of the version stringPROJECT_VERSION_PATCH: The third number of the version stringPROJECT_VERSION_TWEAK: The fourth number of the version string
Each project has a source and binary directory, and they may be encapsulated in each other. Let's assume that each of the CMakeFiles.txt files in the following example defines a project:
.
├── CMakeLists.txt #defines project("CMakeBestPractices"...)
├── chapter_1
│   ├── CMakeLists.txt # defines project("Chapter 1"...)
When parsing the CMakeLists.txt file in the root folder, PROJECT_NAME and CMAKE_PROJECT_NAME will both be CMakeBestPractices. When you're parsing chapter_1/CMakeLists.txt, the PROJECT_NAME variable will change to "Chapter_1" but CMAKE_PROJECT_NAME will stay as CMakeBestPractices, as set in the file in the root folder.
Although projects can be nested, it is good practice to write them in a way that they can work standalone. While they may depend on other projects that are lower in the file hierarchy, there should be no need for a project to live as a child of another. It is possible to put multiple calls to project() in the same CMakeLists.txt file, but we discourage this practice as it tends to make projects confusing and hard to maintain. In general, it is better to create a CMakeLists.txt file for each project and organize the structure with subfolders.
This book's GitHub repository, which contains the examples in this book, is organized in a hierarchical way, where each chapter is a separate project that may contain even more projects for different sections and examples.
While each example can be built on its own, you can also build this whole book from the root of the repository.
Variables
Variables are a core part of the CMake language. Variables can be set using the set command and deleted using unset. Variable names are case-sensitive. The following example shows how to set a variable named MYVAR and assign a value of 1234 to it:
set(MYVAR "1234")
To delete the MYVAR variable, we can use unset:
unset(MYVAR)
The general code convention is to write variables in all caps. Internally, variables are always represented as strings.
You can access the value of a variable with the $ sign and curly brackets:
message(STATUS "The content of MYVAR are ${MYVAR}")
Variable references can even be nested and are evaluated inside out:
${outer_${inner_variable}_variable}
Variables might be scoped in the following way:
- Function scope: Variables that are set inside a function are only visible inside the function.
- Directory scope: Each of the subdirectories in a source tree binds variables and includes any variable bindings from the parent directory.
- Persistent cache: Cached variables can be either system- or user-defined. These persist their values over multiple runs.
Passing the PARENT_SCOPE option to set() makes the variable visible in the parent scope.
CMake comes with a wide variety of predefined variables. These are prefixed with CMAKE_. A full list is available at https://cmake.org/cmake/help/latest/manual/cmake-variables.7.html.
Lists
Even though CMake stores variables as strings internally, it is possible to work with lists in CMake by splitting values with a semicolon. Lists can be created by either passing multiple unquoted variables to set() or directly as a semicolon-separated string:
set(MYLIST abc def ghi)
 set(MYLIST "abc;def;ghi")
Manipulating lists by modifying their contents, reordering, or finding things can be done using the list command. The following code will query MYLIST for the index of the abc value and then retrieve the value and store it in the variable called ABC:
list(FIND MYLIST abc ABC_INDEX)
list(GET MYLIST ${ABC_INDEX} ABC)
To append a value to a list, we can use the APPEND keyword. Here, the xyz value is appended to MYLIST:
list(APPEND MYLIST "xyz")
Cached variables and options
CMake caches some variables so that they run faster in subsequent builds. The variables are stored in CMakeCache.txt files. Usually, you don't have to edit them manually, but they are great for debugging builds that do not behave as expected.
All the variables that are used to configure the build are cached. To cache a custom variable called ch1_MYVAR with the foo value, you can use the set command, like this:
 set(ch1_MYVAR foo CACHE STRING "Variable foo that configures
    bar")
Note that cached variables must have a type and a documentation string that provides a quick summary of them.
Most of the cached variables that are automatically generated are marked as advanced, which means they are hidden from the user in cmake-gui and ccmake by default. To make them visible, they have to be toggled explicitly. If additional cache variables are generated by a CMakeLists.txt file, they can also be hidden by calling the mark_as_advanced(MYVAR) command:
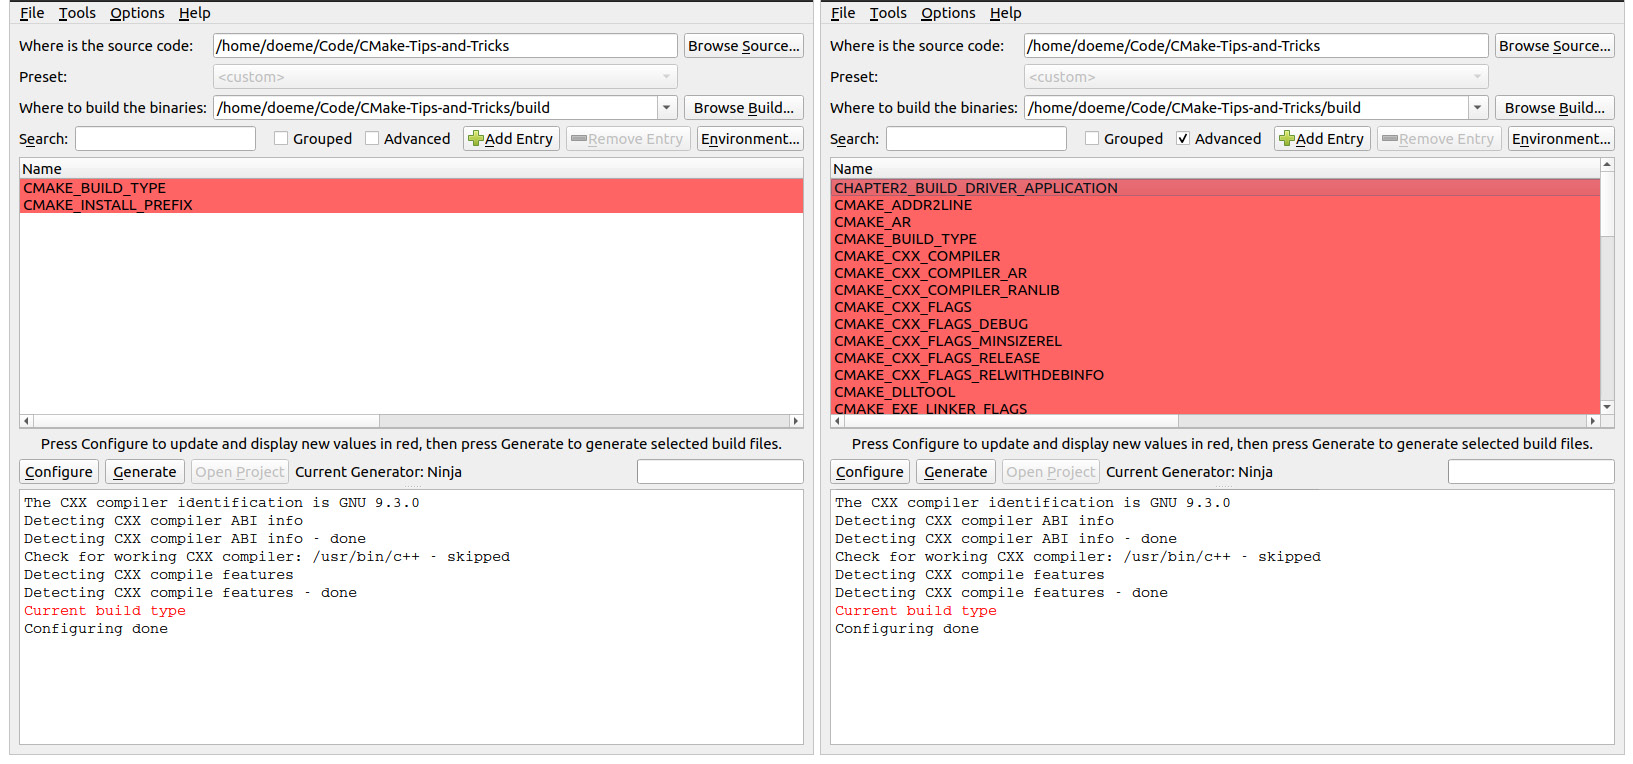
Figure 1.4 – Left – cmake-gui does not show variables marked as advanced. Right – Marking the "Advanced" checkbox displays all the variables marked as advanced
As a rule of thumb, any option or variable that the user should change should be marked as advanced. This should happen rarely.
For simple Boolean cache variables, CMake also provides the option keyword. option has a default value of OFF unless specified otherwise. They can also depend on each other via the CMakeDependentOption module:
option(CHAPTER1_PRINT_LANGUAGE_EXAMPLES "Print examples for
  each language" OFF)
include(CMakeDependentOption)
cmake_dependent_option(CHAPTER1_PRINT_HELLO_WORLD "print a
  greeting from chapter1 " ON CHAPTER1_PRINT_LANGUAGE_EXAMPLES
    ON)
Options are often a convenient way to specify simple project configuration. They are cache variables of the bool type. If a variable with the same name as the option already exists, a call to option does nothing.
Properties
Properties in CMake are values that are attached to a specific object or scope of CMake, such as a file, target, directory, or test case. Properties can be set or changed by using the set_property function. To read the value of a property, you can use the get_property function, which follows a similar pattern. By default, set_property overwrites the values that are already stored inside a property. Values can be added to the current value by passing APPEND or APPEND_STRING to set_property.
The full signature is as follows:
set_property(<Scope> <EntityName>[APPEND] [APPEND_STRING]PROPERTY <propertyName> [<values>])
The scope specifier may have the following values:
GLOBAL: Global properties that affect the whole build process.DIRECTORY <dir>: Properties that are bound to the current directory or the directories specified in<dir>. These can also be set directly using theset_directory_propertiescommand.TARGET <targets>: Properties of specific targets. They can also be set using theset_target_propertiesfunction.SOURCE <files>: Applies a property to a list of source files. They can also be set directly usingset_source_files_properties. Additionally, there are theSOURCE DIRECTORYandSOURCE TARGET_DIRECTORYextended options:DIRECTORY <dirs>: This sets the property for the source files in the directory's scope. The directory must already be parsed by CMake by either being the current directory or by being added withadd_subdirectory.TARGET_DIRECTORY <targets>: This sets the property to the directory where the specified targets are created. Again, the targets must already exist at the point where the property is set.
INSTALL <files>: This sets the properties for installed files. These can be used to control the behavior ofcpack.TEST <tests>: This sets the properties for tests. They can also be set directly usingset_test_properties.CACHE <entry>: This sets the properties for cached variables. The most common ones include setting variables as advanced or adding documentation strings to them.
The full list of supported properties, sorted by their different entities, can be found at https://cmake.org/cmake/help/latest/manual/cmake-properties.7.html.
It is good practice to use direct functions such as set_target_properties and set_test_properties when modifying properties instead of the more general set_property command. Using explicit commands avoids making mistakes and confusion between the property names and is generally more readable. There's also the define_property function, which creates a property without setting the value. We advise that you don't use this as properties should always have a sane default value.
Loops and conditions
Like any programming language, CMake supports conditional and loop blocks. Conditional blocks are in-between if(), elseif(), else(), and endif() statements. Conditions are expressed using various keywords.
Unary keywords are prefixed before the value, as shown here:
if(DEFINED MY_VAR)
The unary keywords to be used in conditions are as follows:
COMMAND: True if the supplied value is a commandEXISTS: Checks whether a file or a path existsDEFINED: True if the value is a defined variable
Additionally, there are unary filesystem conditions:
EXISTS: True if the passed file or directory exitsIS_DIRECTORY: Checks whether the supplied path is a directoryIS_SYMLINK: True if the supplied path is a symbolic linkIS_ABSOULTE: Checks whether a supplied path is an absolute path
Binary tests compare two values and are placed between the values to be compared, like this:
if(MYVAR STREQUAL "FOO")
The binary operators are as follows:
LESS,GREATER,EQUAL,LESS_EQUAL, andGREATER_EQUAL: These compare numeric values.STRLESS,STREQUAL,STRGREATER,STRLESS_EQUAL, andSTRGREATER_EQUAL: These lexicographically compare strings.VERSION_LESS,VERSION_EQUAL,VERSION_GREATER,VERSION_LESS_EQUAL, andVERSION_GREATER_EQUAL: These compare version strings.MATCHES: This compares against a regular expression.IS_NEWER_THAN: Checks which of the two files that passed has been modified recently.IS_NEWER_THAN: Unfortunately, this is not very precise because if both files have the same timestamp, it also returnstrue. There is also more confusion because if either of the files is missing, the result is alsotrue.
Finally, there's the Boolean OR, AND, and NOT operators.
Loops are either achieved by while() and endwhile() or foreach() and endforeach(). Loops can be terminated using break(); continue() aborts the current iteration and starts the next one immediately.
while loops take the same conditions as an if statement. The following example loops as long as MYVAR is less than 5. Note that to increase the variable, we are using the math() function:
 set(MYVAR 0)
while(MYVAR LESS "5")
  message(STATUS "Chapter1: MYVAR is '${MYVAR}'")
  math(EXPR MYVAR "${MYVAR}+1")
endwhile()
In addition to while loops, CMake also knows loops for iterating over lists or ranges:
foreach(ITEM IN LISTS MYLIST)
# do something with ${ITEM}
endforeach()
for loops over a specific range can be created by using the RANGE keyword:
foreach(ITEM RANGE 0 10)
# do something with ${ITEM}
endforeach()
Although the RANGE version of foreach() could work with only a stop variable, it is good practice to always specify both the start and end values.
Functions
Functions are defined by function()/endfunction(). Functions open a new scope for variables, so all the variables that are defined inside are not accessible from the outside unless the PARENT_SCOPE option is passed to set().
Functions are case-insensitive and are invoked by calling function, followed by parentheses:
function(foo ARG1)
# do something
endfunction()
# invoke foo with parameter bar
foo("bar")
Functions are a great way to make parts of your CMake reusable and often come in handy when you're working on larger projects.
Macros
CMake macros are defined using the macro()/endmacro() commands. They are a bit like functions, with the difference that in functions, the arguments are true variables, whereas in macros, they are string replacements. This means that all the arguments of a macro must be accessed using curly brackets.
Another difference is that by calling a function, control is transferred to the functions. Macros are executed as if the body of the macro had been pasted into the place of the calling state. This means that macros are not creating scopes regarding variables and control flow. Consequently, it is highly recommended to avoid calling return() in macros as this would stop the scope from executing where the macro is called.
Targets
The build system of CMake is organized as a set of logical targets that correspond to an executable, library, or custom command or artifact, such as documentation or similar.
There are three major ways to create a target in CMake – add_executable, add_library, and add_custom_target. The first two are used to create executables and static or shared libraries, while the third can contain almost any custom command to be executed.
Targets can be made dependent on each other so that one target has to be built before another.
It is good practice to work with targets instead of global variables when you're setting properties for build configurations or compiler options. Some of the target properties have visibility modifiers such as PRIVATE, PUBLIC, or INTERFACE to denote which requirements are transitive – that is, which properties have to be "inherited" by a dependent target.
Generator expressions
Generator expressions are small statements that are evaluated during the configuration phase of the build. Most functions allow generator expressions to be used, with a few exceptions. They take the form of $<OPERATOR:VALUE>, where OPERATOR is applied or compared to VALUE. You can think of generator expressions as small inline if-statements.
In the following example, a generator expression is being used to enable the –Wall compiler flag for my_target if the compiler is either GCC, Clang, or Apple Clang. Note that GCC is identified as COMPILER_ID "GNU":
target_compile_options(my_target PRIVATE
  "$<$<CXX_COMPILER_ID:GNU,Clang,AppleClang>:-Wall>")
This example tells CMake to evaluate the CXX_COMPILER_ID variable to the comma-separated GNU, Clang, AppleClang list and that if it matches either, append the -Wall option to the target – that is, my_target. Generator expressions come in very handy for writing platform- and compiler-independent CMake files.
In addition to querying values, generator expressions can be used to transform strings and lists:
$<LOWER_CASE:CMake>
This will output cmake.
You can learn more about generator expressions at https://cmake.org/cmake/help/latest/manual/cmake-generator-expressions.7.html.
Since CMake supports a variety of build systems, compilers, and linkers, it is often used to build software for different platforms. In the next section, we will learn how CMake can be told which toolchain to use and how to configure the different build types, such as debug or release.
CMake policies
For the top-level CMakeLists.txt file, cmake_minimum_required must be called before any call to the project as it also sets which internal policies for CMake are used to build the project.
Policies are used to maintain backward compatibility across multiple CMake releases. They can be configured to use the OLD behavior, which means that cmake behaves backward compatible, or as NEW, which means the new policy is in effect. As each new version will introduce new rules and features, policies will be used to warn you of backward-compatibility issues. Policies can be disabled or enabled using the cmake_policy call.
In the following example, the CMP0121 policy has been set to a backward-compatible value. CMP0121 was introduced in CMake version 3.21 and checks whether index variables for the list() commands are in a valid format – that is, whether they are integers:
cmake_minimum_required(VERSION 3.21)
cmake_policy(SET CMP0121 OLD)
list(APPEND MYLIST "abc;def;ghi")
list(GET MYLIST "any" OUT_VAR)
By setting cmake_policy(SET CMP0121 OLD), backward compatibility is enabled and the preceding code will not produce a warning, despite the access to MYLIST with the "any" index, which is not an integer.
Setting the policy to NEW will throw an error – [build] list index: any is not a valid index – during the configuration step of CMake.
Avoid Setting Single Policies Except When You're Including Legacy Projects
Generally, policies should be controlled by setting the cmake_minimum_required command and not by changing individual policies. The most common use case for changing single policies is when you're including legacy projects as subfolders.
So far, we have covered the basic concepts behind the CMake language, which is used to configure build systems. CMake is used to generate build instructions for different kinds of builds and languages. In the next section, we will learn how to specify the compiler to use and how builds can be configured.
Different toolchains and build types
The power of CMake comes from the fact that you can use the same build specification – that is, CMakeLists.txt – for various compiler toolchains without the need to rewrite anything. A toolchain typically consists of a series of programs that can compile and link binaries, as well as creating archives and similar.
CMake supports a variety of languages that the toolchains can be configured for. In this book, we will focus on C++. Configuring the toolchain for different programming languages is done by replacing the CXX part of the following variables with the respective language tag:
- C
- CXX – C++
- CUDA
- OBJC – Objective C
- OBJCXX – Objective C++
- Fortran
- HIP – HIP C++ runtime API for NVIDIA and AMD GPUs
- ISPC – C-based SPMD programming language
- ASM – Assembler
If a project does not specify its language, it's assumed that C and CXX are being used.
CMake will automatically detect the toolchain to use by inspecting the system, but if needed, this can be configured by environment variables or, in the case of cross-compiling, by providing a toolchain file. This toolchain is stored in the cache, so if the toolchain changes, the cache must be deleted and rebuilt. If multiple compilers are installed, you can specify a non-default compiler by either setting the environment variables as CC for C or CXX for a C++ compiler before calling CMake. Here, we're using the CXX environment variable to overwrite the default compiler to be used in CMake:
CXX=g++-7 cmake /path/to/the/source
Alternatively, you can overwrite the C++ compiler to use by passing the respective cmake variable using -D, as shown here:
cmake -D CMAKE_CXX_COMPILER=g++-7 /path/to/source
Both methods ensure that CMake is using GCC version 7 to build instead of whatever default compiler is available in the system. Avoid setting the compiler toolchain inside the CMakeLists.txt files as this clashes with the paradigm that states that CMake files should be platform- and compiler-agnostic.
By default, the linker is automatically selected by the chosen compiler, but it is possible to select a different one by passing the path to the linker executable with the CMAKE_CXX_LINKER variable.
Build types
When you're building C++ applications, it is quite common to have various build types, such as a debug build that contains all debug symbols and release builds that are optimized.
CMake natively provides four build types:
Debug: This is non-optimized and contains all the debug symbols. Here, all the asserts are enabled. This is the same as setting-O0 -gfor GCC and Clang.Release: This is optimized for speed without debugging symbols and asserts disabled. Usually, this is the build type that is shipped. This is the same as-O3 -DNDEBUG.RelWithDebInfo: This provides optimized code and includes debug symbols but disabled asserts, which is the same as-O2 -g -DNDEBUG.MinSizeRel: This is the same asReleasebut optimized for a small binary size instead of speed, which would be-Os -DNDEBUG. Note that this configuration is not supported for all generators on all platforms.
Note that the build types must be passed during the configuration state and are only relevant for single-target generators such as CMake or Ninja. For multi-target generators such as MSVC, they are not used, as the build-system itself can build all build types. It is possible to create custom build types, but since they do not work for every generator, this is usually not encouraged.
Since CMake supports such a wide variety of toolchains, generators, and languages, a frequent question is how to find and maintain working combinations of these options. Here, presets can help.
Maintaining good build configurations with presets
A common problem when building software with CMake is how to share good or working configurations to build a project. Often, people and teams have a preferred way of where the build artifacts should go, which generator to use on which platform, or just the desire that the CI environment should use the same settings to build as it does locally. Since CMake 3.19 came out in December 2020, this information can be stored in CMakePresets.json files, which are placed in the root directory of a project. Additionally, each user can superimpose their configuration with a CMakeUserPresets.json file. The basic presets are usually placed under version control, but the user presets are not checked into the version system. Both files follow the same JSON format, with the top-level outline being as follows:
{
"version": 3,
"cmakeMinimumRequired": {
"major": 3,
"minor": 21,
"patch": 0
},
"configurePresets": [...],
"buildPresets": [...],
"testPresets": [...]
}
- The first line,
"version": 3, denotes the schema version of the JSON file. CMake 3.21 supports up to version 3, but it is expected that new releases will bring new versions of the schema. - Next,
cmakeMinimumRequired{...}specifies which version of CMake to use. Although this is optional, it is good practice to put this in here and match the version with the one specified in theCMakeLists.txtfile. - After that, the various presets for the different build stages can be added with
configurePresets,buildPresets, andtestPresets. As the name suggests,configurePresetsapplies to the configure stage of CMake's build process, while the other two are used for the build and test stages. The build and test presets may inherit one or more configure presets. If no inheritance is specified, they apply to all the previous steps.
To see what presets have been configured in a project, run cmake --list-presets to see a list of available presets. To build using a preset, run cmake --build --preset name.
To see the full specification of the JSON schema, go to https://cmake.org/cmake/help/v3.21/manual/cmake-presets.7.html.
Presets are a good way to share knowledge about how to build a project in a very explicit way. At the time of writing, more and more IDEs and editors are adding support for CMake presets natively, especially for handling cross-compilation with toolchains. Here, we're only giving you the briefest overview of CMake presets; they will be covered in more depth in Chapter 12, Cross-Platform Compiling and Custom Toolchains.
Summary
In this chapter, you were provided with a brief overview of CMake. First, you learned how to install and run a simple build. Then, you learned about the two-stage build process of CMake before touching on the most important language features for writing CMake files.
By now, you should be able to build the examples provided in this book's GitHub repository: https://github.com/PacktPublishing/CMake-Best-Practices. You learned about the core features of the CMake language such as variables, targets, and policies. We briefly covered functions and macros, as well as conditional statements and loops for flow control. As you continue reading this book, you will use what you have learned so far to discover further good practices and techniques to move from simple one-target projects to complex software projects that keep being maintainable through a good CMake setup.
In the next chapter, we will learn how some of the most common tasks in CMake can be performed and how CMake works together with various IDEs.
Further reading
To learn more about the topics that were covered in this chapter, take a look at the following resources:
- The official CMake documentation: https://cmake.org/cmake/help/latest/
- The official CMake tutorial: https://cmake.org/cmake/help/latest/guide/tutorial/index.html
Questions
Answer the following questions to test your knowledge of this chapter:
- How do you start the configure step of CMake?
- How do you start the build step of CMake?
- Which executable from CMake can be used to run tests?
- Which executable from CMake is used for packaging?
- What are targets in CMake?
- What is the difference between properties and variables?
- What are CMake presets used for?