


In this chapter, we will cover:
Downloading and installing ChronoForms
Creating a simple form with the Form Wizard
Sending the form results by e-mail
Formatting your e-mail
Showing a "Thank You" page
Editing your form with the Wizard Edit
Redirecting the user to another page
Backing up and restoring your forms
Let's say that we want to add a very simple form to our Joomla! site. Probably the simplest is a newsletter sign-up. We will just collect the user's e-mail address and send the result to the site administrator. Later, in the book we'll be able to extend this form to do much more, but this simple version is a great place to start.
ChronoForms is a Joomla! extension that has been developed by Max (also known as ChronoMan) to allow you to add forms to a Joomla! site. Getting the extension and installing it is the first step.
You'll need a working Joomla! installation. We recommend that you use the latest version of Joomla! and keep your installation up to date with security releases. At the time of writing, the latest release is Joomla! 1.5.20.
Note
If you have an old Joomla! 1.0.x site, then there is an old version of ChronoForms that you can use; it has much less functionality than the current version described here. Both Joomla! .1.0.x and that old version of ChronoForms are deprecated, and little or no support is available. We strongly recommend that you upgrade to Joomla! 1.5.
1. Go to the ChronoEngine website (http://chronoengine.com/) and click the Downloads link. Follow the folder tree ChronoForms | ChronoForms J1.5 Files | Component and download the current release. Right now this is
ChronoForms_V3.1_RC5.5.zip.Note
Although this is an RC (Release Candidate) version, it is the latest and most stable ChronoForms release.

2. Download the file to your computer. Now open your browser and go to the administrator page for your Joomla! site, for example http://www.example.com/administrator, and log in.
Note
Caution: Before installing any new extension it is sensible to back up your site and the site database. You should also check the Joomla! Vulnerable Extensions List at http://docs.joomla.org/Vulnerable_Extensions_List to make sure that there are no adverse reports about the extension.
3. Once the Administration page is open go to Extensions | Install/Uninstall and open the Joomla! Extension Manager.
4. Click the Browse... button and navigate to the downloaded ChronoForms ZIP file.
5. Click Upload File & Install and the installation process will begin. ChronoForms is quite a large extension and it may take a little while to upload.
Note
The standard Joomla! installation process usually works perfectly with ChronoForms. ChronoForms has been designed to work with this process, however occasionally it doesn't work as expected. If this happens then usually it is for one of these reasons:
1. The server settings are too restrictive and the installation "times out". Increasing the PHP
memory_limitormax_execution_timesettings may resolve this.2. There are some permission restrictions on the site; speak to your ISP about these.
3. A previous installation attempt has left some files in place — you need to remove both the
administrator/components/com_chronocontactandcomponents/com_chronocontactfolders and all the files in them.
Note
Often a "manual installation" will get you past these; see the Joomla! Documentation site at http://docs.Joomla!.org/How_do_you_install_an_extension%3F or a simple video here: http://www.solarenergyhost.com/content/view/182/205/.
6. Once the installation completes you will see the following screen:

7. Congratulations, ChronoForms is successfully installed.
Note
You can install the ChronoForms Plugin/Mambot (used to show forms in Joomla! articles) , and/or the ChronoForms Module (used to show forms in Joomla! template modules) at the same time, if you know you are going to need them. The process is exactly the same. We will meet these add-ons again in Chapter 6, Showing your Form in your Site.
8. While we are in the Extension Manager window, click on the Components link and look for the Chrono Contact entry. It tells you that this version — 3.1 RC5.5 — was created on 04 Aug 2009 by Chronoman (also known as Max). This version information is important when you want to upgrade ChronoForms in the future.

9. Before we finish, click the Components | ChronoForms | Forms Management menu to go to the Forms Manager.

10. The Forms Manager is the "Control Panel" for ChronoForms and we'll be working with it more in other recipes later on.

Note
The Forms Manager has a "Tip of the Day" feature. If you feel this gets in the way, you can turn it off by clicking the Parameters icon at the top right.
The pink validation bar can't be turned off, but it will turn green if you pay a small subscription to validate your copy of ChronoForms. The only difference between the validated and invalidated versions is this bar and a strap line, Powered By ChronoForms - ChronoEngine.com, which appears under all forms in the invalidated version. All the other features are identical.
Max is constantly reviewing ChronoForms, and a few times a year there is a new release. If your forms are working as you want them, there is no need to upgrade unless there is a security release. If there are new features that you want to use, you can upgrade by downloading the new release installation file and installing it as explained earlier in this recipe. You can install an upgrade over the existing version without uninstalling it.
To be safe, you should back up your database tables and all of your forms before you upgrade.
ChronoForms is all about creating forms so this is where all the proper action starts.
Forms in Joomla! can do many things, from the very simple example that we will create here, to complex multi-page forms that change depending on the entries that are made, do calculations, send e-mails, and update databases. However, the basic building blocks are just the same.
In this recipe, we're going to create just about the simplest form possible. It's a newsletter signup with just one field for an e-mail address and a submit button:
1. Go to the ChronoForms Forms Manager and click on Form Wizard, or choose Components | ChronoForms | Form Wizard from the Administrator Menus.
The Form Wizard tab opens up looking like this:

2. There are four steps that the Wizard can help with, though we're only going to use Step 1 Design your form here. There's an empty work area with Preview and Save icons to the top left and a Toolbox to the right with a Properties box below it that is currently empty. To the top right of the image is a Cancel button in case you change your mind.
3. For our form we want a textbox for the e-mail address. Use your mouse to drag the Textbox entry from the Toolbox into the empty workspace.

4. Once you drop the textbox into the workspace, you can see a new form element. When that is clicked, the Properties box for the form element opens up under the Toolbox.

This isn't the world's easiest screen layout but it will be fine once you get used to it.
5. There are a whole row of properties that you can set, but we're only going to change one right now. Click the form element so that the Properties box is open, then go to the input marked Label and delete the Click Me to Edit text; instead type
Email. Then click Apply at the bottom of the Properties box.Although you can type into the input box in the workspace at the left, that has no effect. So, just leave it empty. You should only make changes in the Property box.
6. When you've relabeled the element, drag a Button into the workspace.

The button is automatically labelled as a Submit button. You can change this in the (much smaller) Properties box, but we'll leave it just as it is for now.
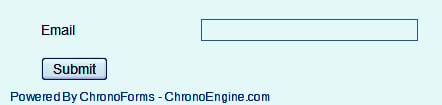
7. Now click the "blue screen" icon at the top left of the workspace to see a preview of our form.
The preview opens in a "modal" window over the working area. While this is open you will not be able to access the administrator menus or tools. The preview is shown in the following screenshot:

8. Perfect, now we just need to save it. Close the Form Preview window from the close link at the top right-hand corner, and then click the "floppy disk" icon to save the form.

9. Type a name in the box. Let's use "newsletter_signup" and click Save.
Note
Warning: The text box here will accept almost anything but some choices of name will cause problems later. The rule to follow is: Only use
a-z 0-9and underscore (no capital letters, no spaces, no dashes, or any other special or accented characters). We'll see these same rules applied later to names and IDs, and it's useful to be consistent here.10. When you click Save, you'll be taken back to the Forms Manager, where there should now be a form in the list.

Reading across the form row, the entries are :
#
(form number):This is just the place in the list and may changeForm ID: The unique ID of the form
Checkbox: A check box is used for selecting the form when we want to work with some ChronoForms features
Name: This is a link, if you click it the Form will open for editing
Link: We'll come back to this in a minute
Emails and Tables Connected: We'll save this for later
Publish: The red icon shows the form is not available in the site front end and an error message will be displayed if the link is clicked
11. Click the publish icon now to make this form available and, after a moment, the icon should change to a green tick to show that the form is now published.
12. Go back to the Link column and click on the form link there. This will open the form in a new browser window or tab showing the form as it will appear on your website.
13. And there we have it, our first fully-functioning ChronoForms form.
You can submit it, but nothing will happen yet. We have to set up a little more code to tell ChronoForms what to do when the submit button is pressed.
There's been quite a lot going on behind the scenes here. The ChronoForms Form Wizard builds a set of Form HTML for your form. It also applies some CSS styling and sets up the framework for a lot more features and functionality that we will come to shortly.
Here's the Form HTML that's been generated for this form, copied from inside the Form Editor, as we'll see later:
<div class="form_item"> <div class="form_element cf_textbox"> <label class="cf_label" style="width: 150px;"> Email</label> <input class="cf_inputbox" maxlength="150" size="30" title="" id="text_0" name="text_0" type="text" /> </div> <div class="cfclear"> </div> </div> <div class="form_item"> <div class="form_element cf_button"> <input value="Submit" name="button_1" type="submit" /> </div> <div class="cfclear"> </div> </div>
We have a newsletter sign up form that works, but doesn't do anything. The simplest action to take when the form is submitted is to send an e-mail to the site administrator to say that a new form submission has been made.
You need the simple form that we created in the previous recipe, and to navigate to the ChronoForms Forms Manager view in the Site Administration area.
To actually send an e-mail successfully, your site must have access to a working mail server configured in Site | Global Configuration | Server | Mail Settings (see the Joomla! documentation at http://docs.Joomla.org/Screen.config.15#Mail_Settings).
1. We're going to use the Wizard Edit to add more to the existing form. Click the check box next to newsletter_signup in the Forms Manager, then click the Wizard Edit icon in the toolbar above:

2. When you open your form with Wizard Edit there's a warning message that says, Please note that any changes you made to the form HTML code in the Form edit page will be lost once you save new changes in the wizard! We've made no changes to the Form HTML so we can click the x at the top right to close the warning window.
Note
ChronoForms saves the "source" code for the Wizard completely separately from the Form HTML that you will see in the Form Editor. And it isn't clever enough to re-interpret all the possible manual changes that could be made. One way to work is to use Wizard and Wizard edit to rough out a form, then add the finer details by manually editing the Form HTML, but then we can't use the Wizard on that form again.
3. Once the Wizard is open, click Step2 Choose Email(s) Settings and you will see a similar workspace, though with different entries in the Toolbox. There is also an "envelope" icon instead of the screen and an extra "garbage can" icon to delete an unwanted e-mail setup.

Notice that the Toolbox entries all relate to e-mail headers — To, From Name, Subject, Reply to, and so on. But at the moment we can't drag them into the workspace.
4. First, click the envelope icon to create a new e-mail setup. An Email Setup is a set of instructions to tell ChronoForms to send an e-mail using this particular set of headers.
Note
You can have more than one e-mail set up in this space by clicking the envelope icon again. So, for example, you could send one e-mail to the site admin and another, quite different one to the person who completed the form.

Now we have an e-mail setup workspace coloured red.
5. Drag the following elements from the Toolbox into the red box in the workspace:
To
Subject
From Name
From Email

Two things have happened here. The Email Setup workspace box is no longer red, it's a yellow-green, and the Email Properties box now has some content.
Note
We've added the elements in the order To, Subject, and so on, but in practice the order doesn't matter. You can also use other elements but we'll come to them later.
If the workspace stays red, then you do not have the correct four elements in the workspace! Also notice that when the workspace is red the Enabled? option in the Email Properties box is greyed out.
6. We now need to add entries to each of these four boxes. Unlike the Form Design workspace where the boxes are left empty, in Email Setup they must be completed.

The preceding screenshot shows a completed Email Setup. Notice that the To and From Email boxes have valid e-mail addresses in them. If they are not valid the e-mail will fail — ChronoForms does not check these, it's up to you to get them right.
Note
We will use
example.comas a generic domain throughout this book. You will need to replace this with the domain of your site as appropriate.In the Subject and From Name boxes you can add any text string that you like, provided that it's not too long (the box will accept 150 characters, but a practical limit is around 50).
While you can put any valid e-mail address that you like in the From Email box, we strongly recommend that you use an address that has the same domain as your website. Many ISPs check e-mails being sent to make sure that the domains match. If they do not then the e-mail may be flagged as spam, or just dropped.
7. To finalize the Email Setup there are a few more small things to do.

Set the Enabled? drop-down to Yes, and then click Apply to save the Email Setup.
Then click the "floppy disk" icon above the workspace to save the form again.
When you click the "save" icon you will be asked the name of the form that you want to save. This field defaults to the name of the form that you were currently editing, but if you wanted to save a new form, you could change the name of the form in the input box. We will just leave the form name that we are editing and update this form.
8. Back in the Forms Manager you can see that the Emails column has changed and now has an entry that says Enabled:0 / Disabled:1.

9. So we have our e-mail setup but it is still disabled. To enable e-mails we need to open the form for editing not in the Wizard Editor but in the standard ChronoForms Editor. To do this click the newsletter_signup link (over to the left in the image):

10. There are a lot of tabs here and many settings options, but we only need to change one. On the General tab find Email the Results? and change the setting to Yes.
11. Now click the Save icon (the floppy disk) to the top right of the screen to save the Forms configuration.
Note
This option turns "all" e-mails on or off, while the setting in the Email Setup | Properties box turns just that single Email Setup on or off. Of course, if you only have one Email Setup these are the same but it's useful with more complex forms.
Back in the Forms Manager view you can see that the Emails column now reads Enabled:1 / Disabled:0. Perfect!
12. We just need to test our form to check that the e-mail works correctly. Click the form "link" entry to open the form in a new browser window or tab; enter an e-mail address in the Email box and click Submit.
Note
If you still have the form open in your browser that's fine, but please click the Re-Load button in your browser to refresh the code before you test.
When you click Submit the form is submitted and you are left looking at an empty Joomla! page, that is unless you get an error message. We'll put a "Thank You" message on here in the next recipe.

And here's the e-mail I received after submitting. Notice that ChronoForms has built the email using the information we put into the Email Setup (I've blanked out the real e-mail address I used to send it to).
And it has taken the information submitted from the form and included that in the e-mail body. That's clever!
There's also the IP address of the submitter; you can turn this off in the Email Setup | Properties if you don't want it.
13. Congratulations! Now you have a working form that carries out an action when it is submitted. My guess is that around half of all web forms work just like this, though maybe with a few more fields.
ChronoForms has taken the information we input in the Email Setup and taken the form HTML to create a default body template for the e-mail, and combined all these together behind the scenes to create a rather basic but completely functional e-mail.
Chapter 2, Emailing Form Results for more advanced e-mail features and functionality. The Getting your emails delivered safely recipe has some useful hints for trouble-shooting problems with e-mails and Email Setups.
Chapter 8, Uploading Files from your Forms has recipes on Attaching files to e-mails and Displaying images in e-mails and articles.
Chapter 7, Adding Features to your Form includes the recipe Adding a barcode to an e-mail.
Chapter 12, Adding Advanced Features has an advanced recipe on Controlling e-mails from from inputs.
When you submit a ChronoForms form, the default is to show you a blank page like the following screenshot:
This isn't too friendly or helpful. There are a couple of ways of dealing with this — you can redirect the user to another page (see the Redirect the user to another page section a little further on) or you can show a "Thank You" message on this page. That's what we'll do here.
1. From the ChronoForms Forms Manager select the newsletter_signup checkbox and click the Wizard Edit icon in the toolbar, close the warning message, and click Step 4 After Form Submission.

Again we have a different workspace. There's a new icon we'll come to later — a ReDirect URL box, a rich text editor and, down in the bottom left, some links to turn the editor on and off.
We are just going to enter a little thank you message in the rich text editor:

Put in what you like but here's the message I've used. You can also use the editor functions to make the message prettier if you like.
2. When you are done click the floppy disk icon to save the form again, then click Save on the modal window to save the form with the same name.
3. Back in the Forms Manager, click the form link to open it and submit the form. Here's what I see:

4. Mission accomplished!
ChronoForms saves the text you enter and shows that as the content in the page it displayed after the form is submitted.
We just added some plain text here; in practice the text can be formatted and styled, you can show images, or links, and more, much more.
Let's look at one more really useful feature here. ChronoForms can display the information entered in the form on the "Thank You" page. Let's show the e-mail address that they entered.
Go back to Step 4 in the Wizard Edit and alter the first sentence to read Thank you very much for subscribing to our newsletter with the email. Leave your cursor right before the full-stop and click the new Add field icon (the pen and paper) to the right of the floppy disk icon.
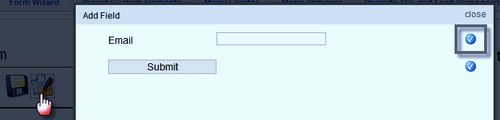
After you click the icon a window opens showing you a Form preview, except that this time there are some blue icons over to the right, one for each element. Click the top icon to select the Email element.
When you click the icon the window closes and there is a new text snippet in the editor where your cursor is. My first sentence now reads Thank you very much for subscribing to our newsletter with the email
{text_0}. The new snippet {text_0} is the name of the element I chose inside curly brackets {field_name}.
Save the form again, open the Form window, submit the form, and you should then see something like this:
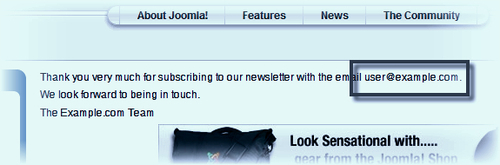
Where we had {text_0} in the template ChronoForms has placed the value user@example.com, which was entered into the form input.
It's unusual for me (or my clients) to get form specifications right the first time. I often need to go back and add something that was forgotten.
In this case we decide that we want to collect the user's name as well as their e-mail address. For this we need to add a new text input.
1. From the ChronoForms Forms Manager select the newsletter_signup checkbox and click the Wizard Edit icon in the toolbar, close the warning message, and click Step 1 Design your form.
2. Drag a new TextBox element over from the Toolbox into the workspace and drop it near the top of the workspace. We want it before the e-mail element.
3. Click the element to open the Properties box and change the Label field to
Name.4. Apply the changes to the properties, save the form again, and open the form window.
You should now see that we have two fields in the form:

Just like that we've successfully added a second field to the form.
5. Unfortunately, when we submit it, the Email template has not been updated for us, it only shows the value of the e-mail input.
We can update this easily enough though. By now the process is familiar. Use Wizard Edit and this time go to Step 3: Design your Email(s).

Here you can see the template that ChronoForms has created for your e-mail. It has similar syntax to the "Thank You" page with
{text_0}as a place-holder for the input value.We have the same Add Field icon too.
6. Put your cursor in the text editor field and use the Add Field icon to get the place-holder for the name field; it will probably be
{text_1}.Note
ChronoForms gives the input elements serial numbers by type. So, the next test input will be
text_2, and the first 'select' input will be 'select_0'. If you like, you can change these to something more user-friendly either in the element Properties box, or manually in the Form HTML, as we shall see later.Let's make this e-mail a bit more meaningful though and enter the following text:
Dear Admin,
Just to let you know that
{text_1}whose email address is{text_0}has subscribed to the newsletter.Regards
The Example.com Website team
7. Save the Form again, submit it, and check the e-mail that is sent. Here's what I received:

Beyond this the world is your oyster; you can construct a fully customized e-mail with as much HTML as you like.
Note
There's a note in red on the e-mail template workspace that says If you left your Email template empty, a template will be automaticly generated similar to your form layout! [sic]. To make this work you need to delete everything from the Email template including any HTML that does not display, such as
<p> </p>. Click the HTML button in the editor toolbar to see the underlying source code and delete everything that is there.
ChronoForms keeps a special copy of the form layout in a Joomla! database table. When you use Wizard Edit it fetches this copy and recreates the form workspace for you to edit. Completely separately it also keeps the Form HTML created when you save. Any later changes you make in the Form HTML will be lost if you use Wizard Edit again. Hence the warning message when you start Wizard Edit.
For the Email Template, ChronoForms stores the HTML and before it uses it, it searches for values like {field_name} and substitutes the field values for these placeholders.
In an earlier recipe we created a "Thank You" page to display after the form is submitted. Sometimes though you may want to take the user to some other page on your site. We can do this too.
In this example we'll redirect to the site home page for simplicity. You can do exactly the same using any other URL on the site.
1. From the ChronoForms Forms Manager select the newsletter_signup checkbox and click the Wizard Edit icon in the toolbar, then close the warning message. This time go to Step 4 - After form Submission.

2. In the Redirect URL box, just type
index.phpor, if you prefer, http://example.com/index.php (but using your domain name in place ofexample.com).3. Save the Form here, go back to view the form in the browser, and submit it. Now, instead of the "Thank You" page we are redirected to the site home page. You could choose to write a "Thank You" page as an article on your site, or take the user to some other page that you think might be relevant or interesting to them.
There is nothing to stop you from using any URL in there; you can redirect your user to any other page on the internet. And, as we shall see later, you can create redirect URLs dynamically to send the user to different pages depending on the information they submit in their form.
Chapter 6 has a recipe Redirecting users to other Joomla! pages after submission that looks at other ways to redirect
Chapter 11 has a recipe Creating a PayPal purchase form with the ReDirect plug-in that looks at redirecting the user with some of the form data
We're going to complete this first chapter with a little security recipe and back up the form on which we worked so hard.
ChronoForms stores the Form information in the Joomla! database so it will get backed up whenever your database is backed up, but it's still often useful to take a backup copy.
This is also the best way of transferring a form from one site to another or to send it to someone else for help in debugging problems.
1. Open the ChronoForms Forms Manager in your browser. Notice that towards the right of the Toolbar there is a group of three icons labeled Backup Form, Backup Forms, and Restore.

2. Next to the name of each form in the Forms Manager list is a checkbox that we use to select forms for actions like Backup. Check the box by newsletter_signup, and then click the Backup Form icon in the toolbar.

3. The Save File dialogue from your browser will open and you can save the form backup file in a convenient local folder.
4. Now let's restore the form back into ChronoForms again. This will create a second form with the same name which is a potential problem, but we'll sort that out.
Click the Restore Form icon in the toolbar and you'll see a new screen:

5. Click the Browse... button, navigate to the
newsletter_signup.cfbakfile that you just saved, and click the submit file button to restore the form.6. When the form is restored you are returned to the Forms Manager; there is a System Message saying Restored Successfully and there is a new entry in the Forms list. However, the new entry is almost identical to the previous one.

ChronoForms can tell the difference between these two forms here because they have different Form IDs (here it is 1 and 3; yours may be 1 and 2). However, when the forms are in use on your site the names are used to distinguish them, not the IDs; so having two forms with the same name can be a real problem.
7. You can change the name by using Wizard Edit and resaving with a different name, or you can click the Form name link to open the Form Editor, change the name in the first box in the General tab, and resave the form.

You'll remember that there's also a Backup Forms icon. You can use this to backup several forms (or all of your forms) at the same time. Just select the forms using the checkboxes by the Form names and then click the Backup Forms icon. All of your forms will be backed up into a single .cfxbak file. This can be restored in just the same way as a .cfbak file for a single form.
Using Backup and Restore is a complicated way to make a copy of a form. You can use the Copy Form icon in the toolbar instead. Again, you must change the name of one of the two forms before trying to use them.
Lastly, if you end up with copies that you don't need, the Delete icon in the toolbar will delete one or more forms. There is no confirmation request and no undelete; so use with care!


