


 Download code from GitHub
In this chapter, we will cover the following recipes with regard to the new features of C# 6.0:
Creating your Visual Studio project
String interpolation
Null-conditional operator
Initializers for auto-implemented properties and getter-only auto properties
Index initializers
The
nameofexpressionsExpression-bodied functions and properties
Using
staticException filters
Using
awaitoperator incatchandfinallyblocks
C# as a programming language first appeared in 2000. Its development team is led by the prominent Danish software engineer Anders Hejlsberg. He is the lead architect of C# and core developer of TypeScript. The C# programming language is simple to use, and this book will deal with C# 6.0, which was released on 20 July, 2015.
Knowing what new language features are available in C# 6.0 will not only make you a more effective developer, but will also allow you to implement the latest and best practices in the software that you create. A little-known fact is that C# was actually called C-like Object Oriented Language (Cool) before its release at Microsoft's Professional Developers Conference in July 2000, but was changed to C# at the time of its release.
The name might have changed, but C# remains a very cool language to learn and use. This chapter will take you through the new features of C# 6.0 and illustrate how to effectively use these features in you daily programming tasks.
The Visual Studio project that you will create will be used to add the classes that contain the code samples in each recipe of this book. The project will be a simple console application that will call into static classes that do the work of illustrating the recipe code and outputting the results (if any) to the console window.
To step through the recipes in this book, you will need a copy of Visual Studio 2015. If you do not have a copy of Visual Studio 2015, you can download a free copy of Visual Studio 2015 Community from https://www.visualstudio.com/en-us/products/visual-studio-community-vs.aspx.
You can also compare editions of Visual Studio 2015 by navigating to https://www.visualstudio.com/en-us/products/compare-visual-studio-2015-products-vs.aspx.
After you have downloaded and installed Visual Studio 2015, create a new console application that will contain the recipes illustrated in this book.
Start Visual Studio 2015 and click on the File menu. Then, click on New and then select Project. You can also use the Ctrl + Shift + N keyboard shortcut:

From the New Project dialog screen, select Console Application, which can be found by going to Installed | Templates | Visual C# | Windows | Classic Desktop in the tree view to the left. You can call your console application
CodeSamples: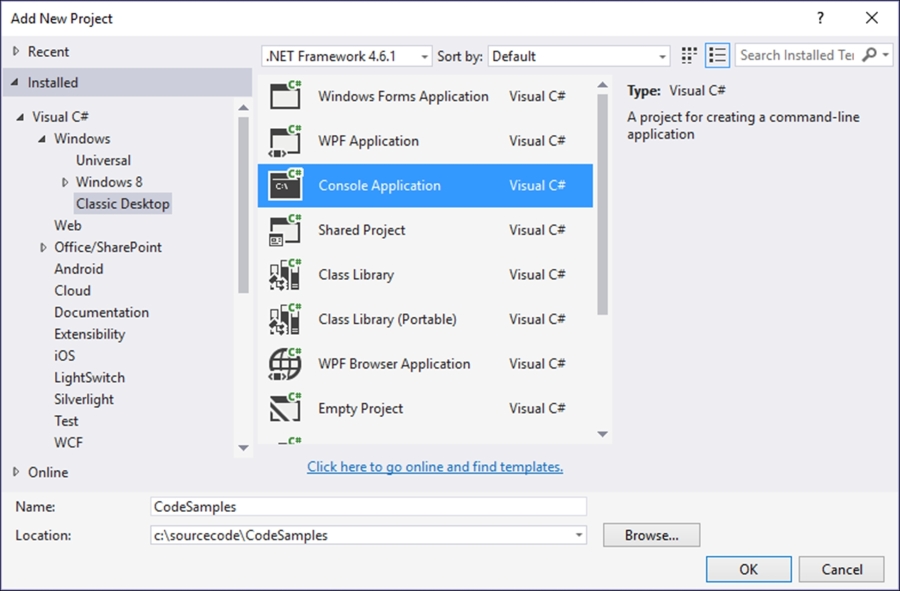
Visual Studio now creates your console application, which we will use to create all the code samples needed for this book.
This console application will form the base of the recipes in this book. Each recipe can be individually added to this console application. A recipe, therefore, can function on its own without the need to create a previous recipe. You can also easily separate any custom code you might want to add and experiment with. It is also recommended that you play around with the code by adding classes of your own.
String interpolation is a very easy and precise way to inject variable values into a string. An interpolated string expression looks at contained expressions. It then replaces those expressions with the ToString representations of the expressions' results.
Create a new class to test your code. We will use the example of reading the current exchange rate for a specific currency to illustrate how string interpolation can be used to output strings to the user interface.
Create a new class by right-clicking on your solution, selecting Add, and then selecting New Project from the context menu:

From the Add New Project dialog screen, select Class Library from the installed templates and call your class
Chapter1: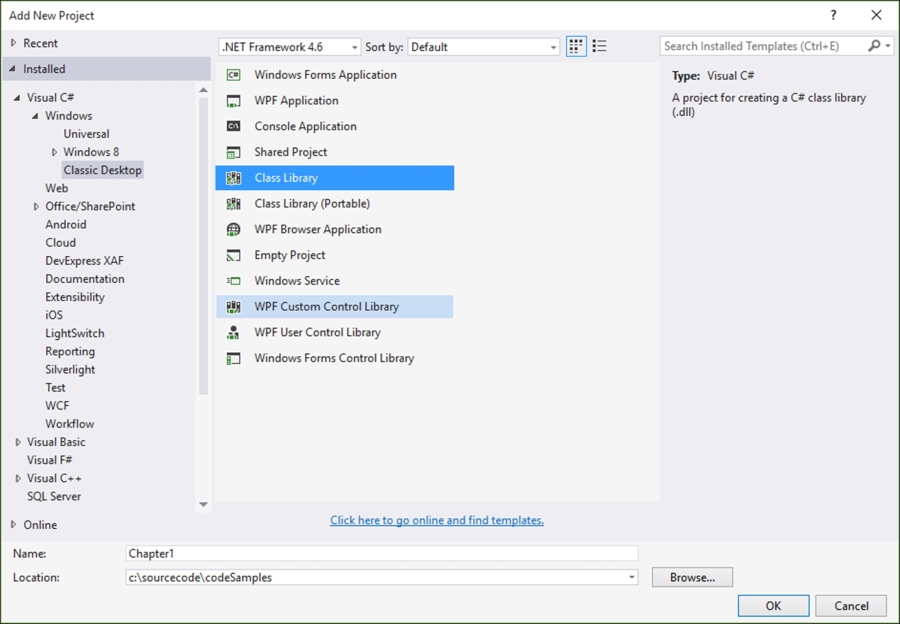
Your new class library will be added to your solution with a default name of
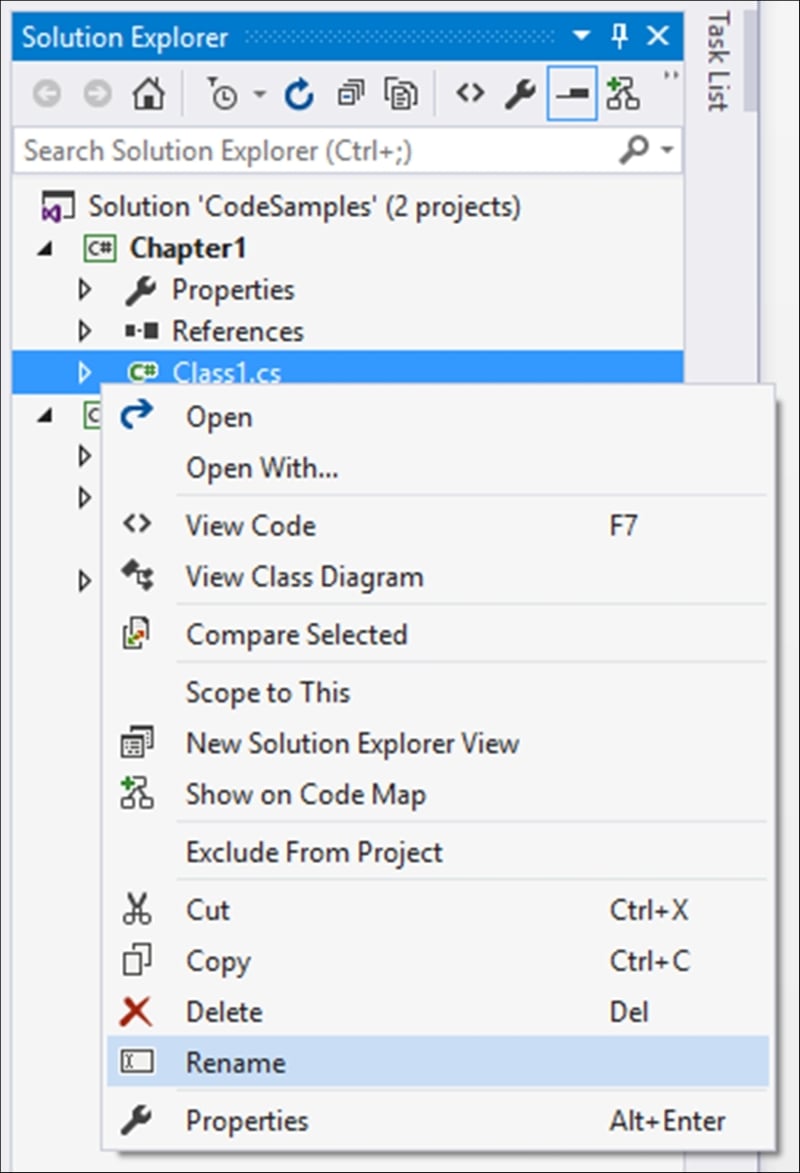
Class1.cs, which I renamed toRecipes.csin order to distinguish the code properly. You can, however, rename your class to whatever you like if that makes more sense to you.To rename your class, simply click on the class name in Solution Explorer and select Rename from the context menu:
Visual Studio will ask you to confirm a rename of all references to the Class1 code element in the project. Just click on Yes:

The class that is created now needs to be made static using the
statickeyword. Also, rename the class name in code toRecipe1StringInterpolation:namespace Chapter1 { public static class Recipe1StringInterpolation { } }Note
Note that static classes, therefore, do not need to be instantiated and will be sealed classes by default. This means that they cannot be inherited further. In practice, you would normally define helper or utility classes as static. These are classes that will be used often by your application to, for example, parse dates or perform calculations. The use of the
statickeyword here is simply to illustrate the specific new features of C# 6.0 within a class that can easily and quickly be called from the console application. The static class in reality would most likely not be a good fit for all the examples illustrated.Inside your class, add a property to contain the base currency:
public static string BaseCurrency { get; private set; }Next, include a dummy method to return the exchange rate:
private static decimal PreformConversion(string toCurrency)
{
    decimal rate = 0.0m;

    if (BaseCurrency.Equals("ZAR"))
    {
        switch (toCurrency)
        {
            case "USD":
                rate = 16.3040m;
                break;
            default:
                rate = 1.0m;
                break;
        }
    }

    return rate;
}
The last method to add is the method that will return the interpolated string expression:
public static string ReadExchangeRate(string fromCurrencyCode, string toCurrencyCode)
{
    BaseCurrency = fromCurrencyCode;
    decimal conversion = PreformConversion(toCurrencyCode);
    return $"1 {toCurrencyCode} = {conversion} {fromCurrencyCode} ";
}
You now need to hook up the class you created to your console application. You therefore need to add a reference to the class from the console application. Right-click on References in your
CodeSamplesproject and select Add Reference…: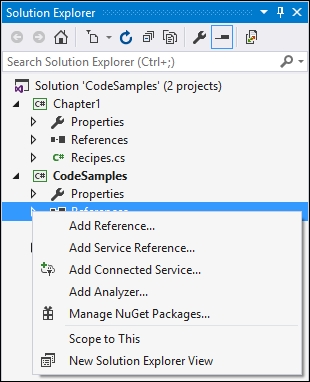
From the Reference Manager dialog that pops up, select the
Chapter1solution to add it as a reference. Then, click on the OK button:
In your
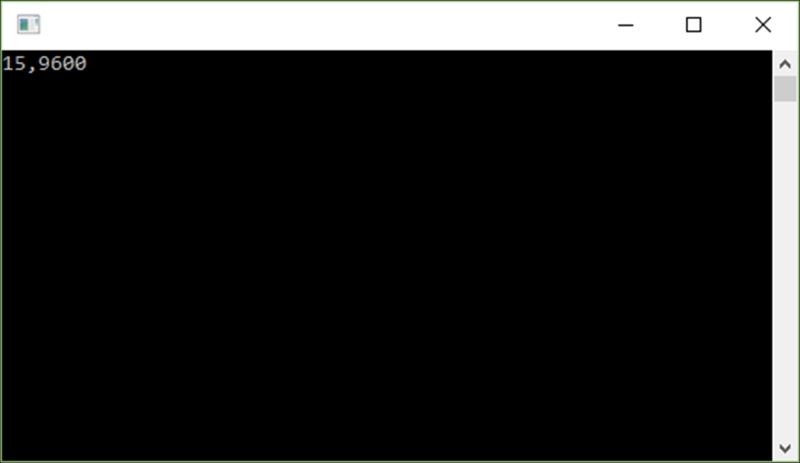
CodeSamplesproject, double-click on theProgram.csfile and add the following code to theMainmethod:string RandDollarExchangeRate = Chapter1.Recipe1StringInterpolation.ReadExchangeRate("ZAR", "USD"); Console.WriteLine("The current Rand / Dollar exchange rate is:"); Console.WriteLine(RandDollarExchangeRate); Console.Read();To see the result, run your application and see the output in the console application:

The interpolated string expression is output as
1 USD = 16,3040 ZAR.
The console application passes the currency codes for South African Rand and US Dollar to the static class by calling the following line of code: Chapter1.Recipe1StringInterpolation.ReadExchangeRate("ZAR", "USD");
This class is static and, as mentioned previously, does not need to be instantiated. The ReadExchangeRate method then reads the exchange rate and formats it into a suitable string using string interpolation. You will notice that the interpolated string expression is written as $"1 {toCurrencyCode} = {conversion} {fromCurrencyCode} ";.
The toCurrencyCode, conversion, and fromCurrencyCode variables are expressed directly inside the string expression. This is a much easier way of formatting strings because you can do away with String.Format, used in the previous versions of C#. Previously, the same expression would have been written as String.Format("1 {0} = {1} {2} ", toCurrencyCode, conversion, fromCurrencyCode);.
As you can see, the interpolated string expression is much easier to read and write. In reality though, string interpolation is merely syntactical sugar because the compiler treats the expression like String.Format anyway. You might be wondering how you would express a curly bracket when using string interpolation. To do this, you can simply use a double curly bracket in your expression. If you need to express the exchange rate as {16,3040}, you would need to express it as $"{{{conversion}}}";.
You can also format your string right there inside the interpolated string expression. If you returned the $"The date is {DateTime.Now}"; expression, the output would be The date is 2016/01/10 3:04:48 PM. You can go ahead and modify the expression to format the date using a colon, followed by the format to use. Change the code to $"The date is {DateTime.Now : MMMM dd, yyyy}";. The output will be formatted and result in The date is January 5, 2016.
Another great tip is that you can express a condition in the string expression. Consider the following line of code that determines whether a year is a leap year or not:
$"The year {DateTime.Now.Year} {(DateTime.IsLeapYear(DateTime.Now.Year) ? " is " : " is not ")} a leap year.";We can use the ternary ? operator one step further. Consider the following line of code:
$"There {(StudentCount > 1 ? "are " : "is ")}{StudentCount} student{(StudentCount > 1 ? "s" : "")} in the list."As the colon is used to denote formatting, we have to wrap the conditional part of the expression in parenthesis. String interpolation is a very nice way to express strings in code that is easy to read and understand.
The worst thing that a developer can do is not check for null in code. This means that there is no reference to an object, in other words, there is a null. Reference-type variables have a default value of null. Value types, on the other hand, cannot be null. In C# 2, developers were introduced to the nullable type. To effectively make sure that objects are not null, developers usually write sometimes elaborate if statements to check whether objects are null or not. C# 6.0 made this process very easy with the introduction of the null-conditional operator.
It is expressed by writing ?. and is called the question-dot operator. The question is written after the instance, right before calling the property via the dot. An easy way to think of the null-conditional operator is to remember that if the left-hand side of the operator is null, the whole expression is null. If the left-hand side is not null, the property is invoked and becomes the result of the operation. To really see the power of the null-conditional operator is to see it in action.
We will create another class that will illustrate the use of the null-conditional operator. The method will call a Student class to return a count of students in the resulting list. We will check to see whether the Student class is valid before returning the student count.
Create another class called
Recipe2NullConditionalOperatorbeneath the last class you wrote in the Creating your Visual Studio project recipe:public static class Recipe2NullConditionalOperator { }Add a method called
GetStudentsto the class and add the following code to it:public static int GetStudents() { List<Student> students = new List<Student>(); Student st = new Student(); st.FirstName = "Dirk"; st.LastName = "Strauss"; st.JobTitle = ""; st.Age = 19; st.StudentNumber = "20323742"; students.Add(st); st.FirstName = "Bob"; st.LastName = "Healey"; st.JobTitle = "Lab Assistant"; st.Age = 21; st.StudentNumber = "21457896"; students.Add(st); return students?.Count() ?? 0; }Next, add a third class to your code called
Studentwith the following properties:public class Student { public string StudentNumber { get; set; } public string FirstName { get; set; } public string LastName { get; set; } public int Age { get; set; } public string JobTitle { get; set; } }Our
Studentclass will be the object we will call from ourGetStudentsmethod. In theProgram.csfile, add the following code:int StudentCount = Chapter1.Recipe2NullConditionalOperator.GetStudents(); if (StudentCount >= 1) Console.WriteLine($"There {(StudentCount > 1 ? "are " : "is ")}{StudentCount} student{(StudentCount > 1 ? "s" : "")} in the list."); else Console.WriteLine($"There were {StudentCount} students contained in the list."); Console.Read();Running the console application will result in the application telling us that there are two students contained in the list. This is expected, because we added two
Studentobjects to ourList<Student>class: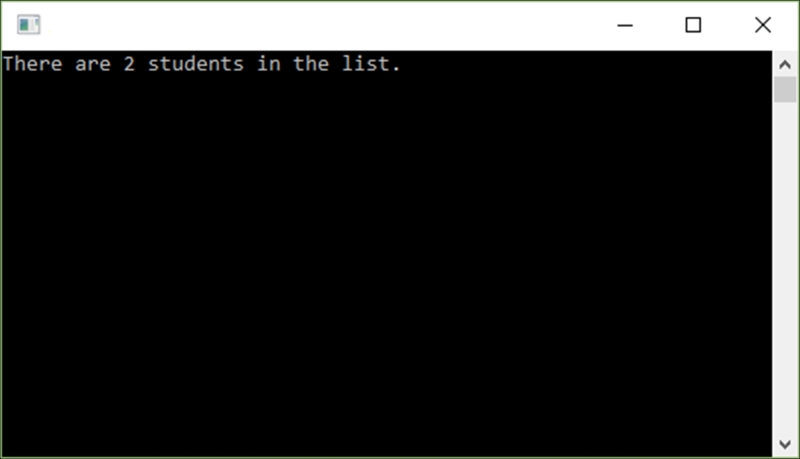
To see the null-conditional operator in action, modify the code in your
GetStudentsmethod to set thestudentsvariable to null. Your code should look like this:public static int GetStudents() { List<Student> students = new List<Student>(); Student st = new Student(); st.FirstName = "Dirk"; st.LastName = "Strauss"; st.JobTitle = ""; st.Age = 19; st.StudentNumber = "20323742"; students.Add(st); st.FirstName = "Bob"; st.LastName = "Healey"; st.JobTitle = "Lab Assistant"; st.Age = 21; st.StudentNumber = "21457896"; students.Add(st); students = null; return students?.Count() ?? 0; }Run the console application again, and see how the output has changed:

Consider the code we used in the return statement:
return students?.Count() ?? 0;
We told the compiler to check whether the List<Student> class' variable students is null. We did this by adding ? after the students object. If the students object is not null, we use the dot operator, and the Count() property becomes the result of the statement.
If the students object however is null, then we return zero. This way of checking for null makes all that if(students != null) code unnecessary. The null check sort of fades into the background and makes it much easier to express and read null checks (not to mention less code).
If we had to change the return statement to a regular Count() method without the null-conditional operator, we would see an ArgumentNullException was unhandled error:
return students.Count();
Calling Count() on the students object without using the null-conditional operator breaks the code. The null-conditional operator is an exciting addition to the C# language because it makes writing code to check for null a lot easier. Less code is better code.
The release of C# 6.0 saw two enhancements made to auto-implemented properties. You can now initialize auto-implemented properties inline, and you can also define them without a setter.
To illustrate how to implement these two new enhancements to auto-implemented properties, we will create another class that calculates the sales price after discount for a given barcode and discount type.
Start off by creating a static class called
Recipe3AutoImplementedPropertiesand add theDiscountTypeenumerator to the class, along with the auto-implemented properties. You will then initialize those auto-implemented properties with default values:public static class Recipe3AutoImplementedProperties { public enum DiscountType { Sale, Clearout, None } private static int SaleDiscountPercent { get; } = 20; private static int ClearoutDiscountPercent { get; } = 35; public static decimal ShelfPrice { get; set; } = 100; public static decimal SalePrice { get; set; } = 100; }The next step is to add the method to calculate the sales price of an item linked to the barcode supplied to the method:
public static void CalculateSalePrice(string barCode, DiscountType discount)
{
  decimal shelfPrice = GetPriceFromBarcode(barCode);

  if (discount == DiscountType.Sale)
    SalePrice = (shelfPrice == 0 ? ShelfPrice.CalculateSalePrice(SaleDiscountPercent) : shelfPrice.CalculateSalePrice(SaleDiscountPercent));

  if (discount == DiscountType.Clearout)
   SalePrice = (shelfPrice == 0 ? ShelfPrice.CalculateSalePrice(ClearoutDiscountPercent): shelfPrice.CalculateSalePrice(ClearoutDiscountPercent));

  if (discount == DiscountType.None)
    SalePrice = (shelfPrice == 0 ? ShelfPrice :shelfPrice);
}
In order to simulate a database lookup to find the selling price of a barcode, create another method to return a price for a given barcode:
private static decimal GetPriceFromBarcode(string barCode)
{
    switch (barCode)
    {
        case "123450":
            return 19.95m;
        case "123451":
            return 7.55m;
        case "123452":
            return 59.99m;
        case "123453":
            return 93.99m;
        default:
            return 0;
    }
}
Finally, we will create an extension method class to calculate the sale price after the discount has been applied:
public static class ExtensionMethods
{
    public static decimal CalculateSalePrice(this decimal shelfPrice, int discountPercent)
    {
        decimal discountValue = (shelfPrice / 100) * discountPercent;
        return shelfPrice - discountValue;
    }
}
Note
Extension methods are static methods by default and allow you to extend your code's functionality (extend existing types) without having to modify the original type. You can now have an extension methods class in your solution where you add helpful code. A nice example of using an extension method is to calculate the financial year for a given date. Extension methods are differentiated from other static methods using the
thiskeyword in the method signature. In the preceding example, the compiler knows that this is an extension method for the decimal class by looking at the type it extends.Replace the code of your
Progam.csfile and run the program:string BarCode = String.Empty; BarCode = "123450"; Chapter1.Recipe3AutoImplementedProperties.CalculateSalePric e(BarCode, Chapter1.Recipe3AutoImplementedProperties.DiscountType.Sale ); Console.WriteLine(Chapter1.Recipe3AutoImplementedProperties .SalePrice);
The sales price is calculated after applying the sale discount and returned to the console application:
If you look at the auto-implemented properties again, you would notice that we have two getter-only auto-implemented properties. All four auto-implemented properties have been initialized with default values. The SaleDiscountPercent and ClearoutDiscountPercent properties are read-only. This ensures that the discount values can't be modified in any way.
You will also notice that if the shelf price returned from the GetPriceFromBarcode method is zero, then the default ShelfPrice property value is used in determining the discount price. If no discount is applied, the CalculateSalePrice method simply returns the barcode price. If no price is determined from the barcode, the default ShelfPrice property value is returned.
Auto-implemented property initializers and getter-only auto-implemented properties are great to cut down on unnecessary if else statements. It also makes the code implementing the properties more readable because the intent can be contained in the property itself by initializing it.
Look at what happens if we try to set the SaleDiscountPercent or ClearoutDiscountPercent property to a different value:
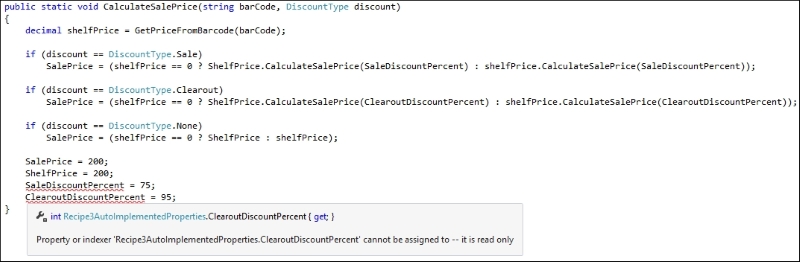
Visual Studio will emit an error for the getter-only properties because using the get keyword, we can only read from this property, not assign a value to it.
You need to remember that C# 6.0 does not introduce big new concepts, but small features designed to make your code cleaner and easier to read and understand. With index initializers, this is not an exception. You can now initialize the indices of newly created objects. This means you do not have to use separate statements to initialize the indexes.
The change here is subtle. We will create a method to return the day of the week based on an integer. We will also create a method to return the start of the financial year and salary increase month, and then set the salary increase month to a different value than the default. Finally we will use properties to return a specific type of species to the console window.
Start off by creating a new class called
Recipe4IndexInitializersand add a second class calledMonthto your code. TheMonthclass simply contains two auto-implemented properties that have been initialized.StartFinancialYearMonthhas been set to month two (February), andSalaryIncreaseMonthhas been set to month three (March):public static class Recipe4IndexInitializers { } public class Month { public int StartFinancialYearMonth { get; set; } = 2; public int SalaryIncreaseMonth { get; set; } = 3; }Go ahead and add a method called
ReturnWeekDaythat takes an integer for the day number as a parameter, to theRecipe4IndexInitializersclass:public static string ReturnWeekDay(int dayNumber) { Dictionary<int, string> day = new Dictionary<int, string> { [1] = "Monday", [2] = "Tuesday", [3] = "Wednesday", [4] = "Thursday", [5] = "Friday", [6] = "Saturday", [7] = "Sunday" }; return day[dayNumber]; }For the second example, add a method called
ReturnFinancialAndBonusMonthto theRecipe4IndexInitializersclass:public static List<int> ReturnFinancialAndBonusMonth() { Month currentMonth = new Month(); int[] array = new[] { currentMonth.StartFinancialYearMonth, currentMonth.SalaryIncreaseMonth }; return new List<int>(array) { [1] = 2 }; }Finally, add several auto-implemented properties to the class to contain species and a method called
DetermineSpeciesto theRecipe4IndexInitializersclass. Your code should look like this:public static string Human { get; set; } = "Homo sapiens"; public static string Sloth { get; set; } = "Choloepus hoffmanni"; public static string Rabbit { get; set; } = "Oryctolagus cuniculus"; public static string Mouse { get; set; } = "Mus musculus"; public static string Hedgehog { get; set; } = "Erinaceus europaeus"; public static string Dolphin { get; set; } = "Tursiops truncatus"; public static string Dog { get; set; } = "Canis lupus familiaris"; public static void DetermineSpecies() { Dictionary<string, string> Species = new Dictionary<string, string> { [Human] = Human + " : Additional species information", [Rabbit] = Rabbit + " : Additional species information", [Sloth] = Sloth + " : Additional species information", [Mouse] = Mouse + " : Additional species information", [Hedgehog] = Hedgehog + " : Additional species information", [Dolphin] = Dolphin + " : Additional species information", [Dog] = Dog + " : Additional species information" }; Console.WriteLine(Species[Human]); }In your console application, add the following code to call the code in the
Recipe4IndexInitializersclass:int DayNumber = 3; string DayOfWeek = Chapter1.Recipe4IndexInitializers.ReturnWeekDay(DayNumber); Console.WriteLine($"Day {DayNumber} is {DayOfWeek}"); List<int> FinancialAndBonusMonth = Chapter1.Recipe4IndexInitializers.ReturnFinancialAndBonusMo nth(); Console.WriteLine("Financial Year Start month and Salary Increase Months are:"); for (int i = 0; i < FinancialAndBonusMonth.Count(); i++) { Console.Write(i == 0 ? FinancialAndBonusMonth[i].ToString() + " and " : FinancialAndBonusMonth[i].ToString()); } Console.WriteLine(); Chapter1.Recipe4IndexInitializers.DetermineSpecies(); Console.Read();Once you have added all your code, run your application. The output will look like this:

The first method ReturnWeekDay created a Dictionary<int, string> object. You can see how the indices are initialized with the day names. If we now pass the day integer to the method, we can return the day name by referencing the index.
Note
The reason for not using a zero-based index in ReturnWeekDay is because the first day of the week is associated to the numerical value 1.
In the second example, we called a method called ReturnFinancialAndBonusMonth that creates an array to hold the financial year start month and the salary increase month. Both properties of the Month class are initialized to 2 and 3, respectively. You can see that we are overriding the value of the SalaryIncreaseMonth property and setting it to 2. It is done in the following line of code:
return new List<int>(array) { [1] = 2 };The last example uses the Human, Rabbit, Sloth, Mouse, Hedgehog, Dolphin, and Dog properties to return the correct index value of the Species object.
The nameof expressions are particularly nice. You can now provide a string that names an object in code. This is especially handy if you are throwing exceptions. You can now see which variable caused the exception. In the past, developers had to rely on messy string literals in their code. This was particularly error prone and vulnerable to spelling errors. Another problem was that any code refactoring might miss a string literal, and then that code becomes obsolete and broken.
The nameof expressions have come to save the day. The compiler will see that you are referencing the name of a specific variable and correctly convert it to a string. nameof expressions, therefore, also stay in sync with any refactoring you may do.
We will use the same code example that we wrote in the String interpolation recipe from this chapter, with a few small changes. We will create a Student object and add students to it. We will then return that object to the console and output the student count.
Create a class called
Recipe5NameofExpression. Add an auto-implemented property to this class calledStudentCount:public static class Recipe5NameofExpression { public static int StudentCount { get; set; } = 0; }Next, we need to add the
GetStudentsmethod, which returns aList<Student>object. The method contains atry/catchstatement and will throwArgumentNullException():public static List<Student> GetStudents() { List<Student> students = new List<Student>(); try { Student st = new Student(); st.FirstName = "Dirk"; st.LastName = "Strauss"; st.JobTitle = ""; st.Age = 19; st.StudentNumber = "20323742"; students.Add(st); st.FirstName = "Bob"; st.LastName = "Healey"; st.JobTitle = "Lab Assistant"; st.Age = 21; st.StudentNumber = "21457896"; students.Add(st); //students = null; StudentCount = students.Count(); return students; } catch (Exception ex) { throw new ArgumentNullException(nameof(students)); } }In the console application, we will add code that returns the
List<Student>object and reports how many students were contained in the list by outputting theStudentCountproperty value to the console window:try { List<Chapter1.Student> StudentList = Chapter1.Recipe5NameofExpression.GetStudents(); Console.WriteLine($"There are {Chapter1.Recipe5NameofExpression.StudentCount} students"); } catch (Exception ex) { Console.WriteLine(ex.Message); } finally { Console.Read(); }
Running the console application with the code as is will call the GetStudents() method. This will then create the List<Student> object and add two Student objects to it. The StudentCount property is set equal to the count of the List<Student> object. The GetStudents() method then returns the result to the console application, which then reads the StudentCount property and displays it in the console output:

If we now went ahead and modified the code in the GetStudents() method to set the students variable to null right before we called students.Count(), an exception would be thrown. The exception is caught in catch, and this is where we use the nameof expression to display a string literal of the students variable:

Using the nameof expression, we can ensure that the expression stays in sync with refactoring actions such as renaming the students variable:

If we had written the code in the catch statement using a string literal, we would not have had the code updated automatically when we renamed the students variable. The nameof expression effectively allowed developers to stop writing throw new ArgumentNullException("students");, which will not be affected by refactoring actions.
Another benefit of using a nameof expression in your code is that it involves no runtime cost, because the code containing the string literal is generated at compile time.
Modify the code in the console application slightly to make it look like this:
List<Chapter1.Student> StudentList = Chapter1.Recipe5NameofExpression.GetStudents();

int iStudentCount = Chapter1.Recipe5NameofExpression.StudentCount;
Console.WriteLine($"The value of the { nameof(Chapter1.Recipe5NameofExpression.StudentCount)} property is {iStudentCount}");
When you run your console application now, you can see that the nameof expression has been used to create the string literal of the StudentCount property:

Note
Ensure that you have commented out the students = null; line of code in the GetStudents() method; otherwise, you will still receive the null exception.
You can also use the nameof expression with enumerators. Add the following code to your class. We are basically creating an enumerator called Course. In the SetCourse() method, we set a course based on a course ID:
public enum Course { InformationTechnology = 1, Statistics = 2, AppliedSciences = 3 }
public static string SelectedCourse { get; set; }
public static void SetCourse(int iCourseID)
{
    Course course = (Course)iCourseID;
    switch (course)
    {
        case Course.InformationTechnology:
            SelectedCourse = nameof(Course.InformationTechnology);
            break;
        case Course.Statistics:
            SelectedCourse = nameof(Course.InformationTechnology);
            break;
        case Course.AppliedSciences:
            SelectedCourse = nameof(Course.InformationTechnology);
            break;
        default:
            SelectedCourse = "InvalidCourse";
           break;
   }
}
We then use a switch statement to select the course defined by the course ID parameter and set the SelectedCourse property equal to the nameof expression of the enumerator. Add the following code to your console application:
Chapter1.Recipe5NameofExpression.SetCourse(1);
Console.WriteLine($"The selected course is { Chapter1.Recipe5NameofExpression.SelectedCourse}");
Running the console application will result in the string representation of the selected enumerator value:

The nameof expression is a very good way of keeping your code in sync when dealing with the string literals of objects in C# 6.0.
As the name suggests, expression-bodied functions and properties allow methods and properties to have a body that is an expression instead of a statement. You will notice that expression-bodied members look a lot like lambda expressions, because they are inspired by lambda expressions.
To truly appreciate expression-bodied functions and properties, we need to look at the way code had to be written previously. We will create a class to calculate the sale price of an item, and the class will contain two public methods. One will set a shelf price, and the other will return a message displaying the calculated sale price.
Create a class called
Recipe6ExpressionBodiedFunctionMembersand add two private auto-implemented properties to hold the sale discount percent and the shelf price:public static class Recipe6ExpressionBodiedFunctionMembers { private static int SaleDiscountPercent { get; } = 20; private static decimal ShelfPrice { get; set; } = 100; }If you haven't done so in an earlier recipe, add the extension method class to calculate the sale price of an item:
public static class ExtensionMethods
{
    public static decimal CalculateSalePrice(this decimal shelfPrice, int discountPercent)
    {
        decimal discountValue = (shelfPrice / 100) * discountPercent;
        return shelfPrice - discountValue;
    }
}
We will now add a calculated property to the class. This calculated property uses the extension method on the
ShelfPriceproperty to get the sale price:private static decimal GetCalculatedSalePrice { get { return Math.Round(ShelfPrice.CalculateSalePrice(SaleDiscountPercen t) ,2); } }Finally, add two methods to your class to set the shelf price and another to return a message with the sale price:
public static void SetShelfPrice(decimal shelfPrice)
{
    ShelfPrice = shelfPrice;
}

public static string ReturnMessage(string barCode)
{
    return $"The sale price for barcode {barCode} is {GetCalculatedSalePrice}";
}
To see the result of the code, add the following code to your console application:
string BarCode = "12345113";
decimal ShelfPrice = 56.99m;
Chapter1.Recipe6ExpressionBodiedFunctionMembers.SetShelfPri ce(ShelfPrice);            Console.WriteLine(Chapter1.Recipe6ExpressionBodiedFunctionM embers.ReturnMessage(BarCode));
Console.Read();
Running your application produces the message displaying the calculated sale price:

Note
Here, we are just supplying the bar code in the output message. However, in a live system, the shelf price would be looked up from a data store for the specific bar code.
Looking back at our class, we can see that it is somewhat bulky. We have a calculated property that returns a sale price and two methods with a single return statement. One sets the shelf price, while the other gets a message containing the sale price. This is where expression-bodied function members come into play. Modify your code in the Recipe6ExpressionBodiedFunctionMembers class to make it look like this:
public static class Recipe6ExpressionBodiedFunctionMembers
{
    private static int SaleDiscountPercent { get; } = 20;
    private static decimal ShelfPrice { get; set; } = 100;

    private static decimal GetCalculatedSalePrice => Math.Round(ShelfPrice.CalculateSalePrice(SaleDiscountPercent));

    public static void SetShelfPrice(decimal shelfPrice) => ShelfPrice = shelfPrice;

    public static string ReturnMessage(string barCode) => $"The sale price for barcode {barCode} is {GetCalculatedSalePrice}";
}
What we are left with is a terse class that does exactly the same as the code we wrote before. There is less code, it is easier to read, and it looks much cleaner. You will notice the use of the lambda => operator. For the GetCalculatedSalePrice computed property, the get keyword is missing. This became implied when we changed the computed property body to an expression.
One point to remember though is that expression-bodied function members do not work with constructors.
C# 6.0 introduces a new kind of using statement that now refers to types instead of namespaces. This means that the static members of the type are then directly put into scope. What this means for your code is evident in the condensed result of this recipe.
We will create a class called Recipe7UsingStatic that will determine the sale price of an item depending on the day of the week. If it is Friday, we want to apply the sale discount to the item. On any other day, we will sell the item at the shelf price.
Start by creating a
Recipe7UsingStaticclass that contains two auto-implemented properties and an enumerator for the day of the week:public static class Recipe7UsingStatic { public enum TheDayOfWeek { Monday, Tuesday, Wednesday, Thursday, Friday, Saturday, Sunday } private static int SaleDiscountPercent { get; } = 20; private static decimal ShelfPrice { get; set; } = 100; }We will now add a computed property and two methods to our
Recipe7UsingStaticclass. One method will set the shelf price and the other will get the sale price:private static decimal GetCalculatedSalePrice { get { return Math.Round(ShelfPrice.CalculateSalePrice (SaleDiscountPercen t), 2); } } public static void SetShelfPrice(decimal shelfPrice) { ShelfPrice = shelfPrice; } public static decimal GetSalePrice(TheDayOfWeek dayOfWeek) { return dayOfWeek == TheDayOfWeek.Friday ? GetCalculatedSalePrice : ShelfPrice; }In the console application, we will add the code to define the day of the week, set the shelf price, and then get the sale price. The sale price is then written out to the console application:
decimal ShelfPrice = 56.99m;

Chapter1.Recipe7UsingStatic.TheDayOfWeek weekday = Chapter1.Recipe7UsingStatic.TheDayOfWeek.Friday;
Chapter1.Recipe7UsingStatic.SetShelfPrice(ShelfPrice);
Console.WriteLine(Chapter1.Recipe7UsingStatic.GetSalePrice( weekday));
Console.Read();
Run your console application and see that the sale price is calculated correctly and output to the console application:

Now, let's have a closer look at the code. In particular, look at the GetCalculatedSalePrice computed property. It uses the Math.Round function to round the sale price to two decimals:
private static decimal GetCalculatedSalePrice
{
    get { return Math.Round(ShelfPrice.CalculateSalePrice (SaleDiscountPercent), 2); }
}
The Math class is in reality a static class that contains a collection of functions that you can use throughout your code to perform different mathematical calculations. So, go ahead and add the following using statement at the top of your Recipes.cs file:
using static System.Math;
We can now change our computed GetCalculatedSalePrice property to omit the Math class name:
private static decimal GetCalculatedSalePrice
{
    get { return Round(ShelfPrice.CalculateSalePrice(SaleDiscountPercent), 2); }
}
This is really a fantastic enhancement. Look at the following lines of code:
Math.Sqrt(64);
Math.Tan(64);
Math.Pow(8, 2);
Because of this enhancement, the preceding lines of code can simply be written as follows:
Sqrt(64);
Tan(64);
Pow(8, 2);
There is, however, more to using the static keyword's functionality. We are using static classes for all the recipes in this chapter. We can, therefore, also implement the using static statement for our own custom static classes. Add the following using statements to the top of the console application's Program class:
using static Chapter1.Recipe7UsingStatic;
using static Chapter1.Recipe7UsingStatic.TheDayOfWeek;
using static System.Console;
You will notice that we have included the enumerator in the using static statements. This is equally fantastic, because Friday is clearly a day of the week, and the enumerator doesn't need to be called fully, as in the old console application code. By adding the using static statements, the code in our console application can be changed as follows:
TheDayOfWeek weekday = Friday;
SetShelfPrice(ShelfPrice);
WriteLine(GetSalePrice(weekday));
Read();
This is where the real benefit of the using static statements become evident. It means less code and makes your code more readable. To recap the idea behind C# 6.0, it didn't introduce big new concepts but many small features to make your code cleaner and your intent easier to understand. The using static feature does exactly this.
Exception filters have been around for some time. Visual Basic.NET (VB.NET) and F# devs have had this functionality for a while. Luckily for us, it has now been introduced in C# 6.0. Exception filters do more than what meets the eye. At first glance, it looks as if exception filters merely specify a condition when an exception needs to be caught. This is, after all, what the name "exception filter" implies. Upon closer inspection, however, we see that exception filters act as more than just syntactical sugar.
We will create a new class called Recipe8ExceptionFilters and call a method that reads an XML file. The file read logic is determined by a Boolean flag being set to true. Imagine here that there is some other database flag that when set, also sets our Boolean flag to true, and thus, our application knows to read the given XML file.
Create a class called
Recipe8ExceptionFiltersthat contains two methods. One method reads the XML file, and the second method logs any exception errors:public static class Recipe8ExceptionFilters { public static void ReadXMLFile(string fileName) { try { bool blnReadFileFlag = true; if (blnReadFileFlag) { File.ReadAllLines(fileName); } } catch (Exception ex) { Log(ex); throw; } } private static void Log(Exception e) { /* Log the error */ } }In the console application, add the following code to call the
ReadXMLFilemethod, passing it the file name to read:string File = @"c:\temp\XmlFile.xml"; Chapter1.Recipe8ExceptionFilters.ReadXMLFile(File);
If we had to run our application now, we would obviously receive an error (this is assuming that you actually don't have a file called XMLFile.xml in your temp folder). Visual Studio will break on the throw statement:

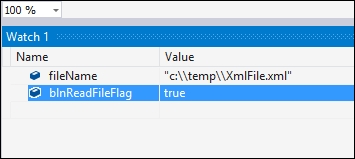
The Log(ex) method has logged the exception, but have a look at the Watch1 window. We have no idea what the value of blnReadFileFlag is. When an exception is caught, the stack is unwound (adding overhead to your code) to whatever the actual catch block is. Therefore, the state of the stack before the exception happened is lost. Modify your ReadXMLFile and Log methods as follows to include an exception filter:
public static void ReadXMLFile(string fileName)
{
    try
    {
        bool blnReadFileFlag = true;
        if (blnReadFileFlag)
        {
            File.ReadAllLines(fileName);
        }
    }
    catch (Exception ex) when (Log(ex))
    {

    }
}

private static bool Log(Exception e)
{
    /* Log the error */
    return false;
}
When you run your console application again, Visual Studio will break on the actual line of code that caused the exception:

More importantly, the value of blnReadFileFlag is still in scope. This is because exception filters can see the state of the stack at the point where the exception occurred instead of where the exception was handled. Looking at the Locals window in Visual Studio, you will see that the variables are still in scope at the point where the exception occurred:
Imagine being able to view the exception information in a log file with all the local variable values available. Another interesting point to note is the return false statement in the Log(ex) method. Using this method to log the error and return false will allow the application to continue and have the exception handled elsewhere. As you know, catching Exception ex will catch everything. By returning false, the exception filter doesn't run into the catch statement, and more specific catch exceptions (for example, catch (FileNotFoundException ex) after our catch (Exception ex) statement) can be used to handle specific errors. Normally, when catching exceptions, FileNotFoundException will never be caught in the following code example:
catch (Exception ex)
{

}
catch (FileNotFoundException ex)
{

}
This is because the order of the exceptions being caught is wrong. Traditionally, developers must catch exceptions in their order of specificity, which means that FileNotFoundException is more specific than Exception and must therefore be placed before catch (Exception ex). With exception filters that call a false returning method, we can inspect and log an exception accurately:
catch (Exception ex) when (Log(ex))
{

}
catch (FileNotFoundException ex)
{

}
The preceding code will catch all exceptions, and in doing so log the exception accurately but not step into the exception handler because the Log(ex) method returns false.
Another implementation of exception filters is that they can allow developers to retry code in the event of a failure. You might not specifically want to catch the first exception, but implement a type of timeout element to your method. When the error counter has reached the maximum iterations, you can catch and handle the exception. You can see an example of catching an exception based on a try clauses' count here:
public static void TryReadXMLFile(string fileName)
{
    bool blnFileRead = false;
    do
    {
        int iTryCount = 0;
        try
        {
            bool blnReadFileFlag = true;
            if (blnReadFileFlag)
                File.ReadAllLines(fileName);
        }
        catch (Exception ex) when (RetryRead(ex, iTryCount++) == true)
        {

        }
    } while (!blnFileRead);
}

private static bool RetryRead(Exception e, int tryCount)
{
    bool blnThrowEx = tryCount <= 10 ? blnThrowEx = false : blnThrowEx = true;
    /* Log the error if blnThrowEx = false */
    return blnThrowEx;
}
Exception filtering is a very useful and extremely powerful way to handle exceptions in your code. The behind-the-scenes workings of exception filters are not as immediately obvious as one might imagine, but here lies the actual power of exception filters.
Finally, in C# 6.0, you can now use the await keyword in the catch and finally blocks. Previously, developers had to resort to all sorts of strange workarounds to achieve what is now easily achievable in C# 6.0. There really is not much more to it than the following.
We will create another class that will simulate the deletion of a file. An exception is thrown, and the catch block is then executed along with the finally statement. In both the catch and finally clauses, we will delay and await a task for 3 seconds. Then, we will output this delay to the console application window.
Create a class called
Recipe9AwaitInCatchFinallyand add a method calledFileRunAsync()to the class with the following code. Make sure that the file does not exist in the path given to thefilePathvariable:public static class Recipe9AwaitInCatchFinally { public static void FileRunAsync() { string filePath = @"c:\temp\XmlFile.xml"; RemoveFileAcync(filePath); ReadLine(); } }Then, add another method called
RemoveFileAcync()to the class that takes a file path as a parameter. Includetrycatchin this method and add the code that will attempt to read the file at the path supplied:public static async void RemoveFileAcync(string filepath) { try { WriteLine("Read file"); File.ReadAllLines(filepath); } catch (Exception ex) { } finally { } }In the
catchclause, add the following code to simulate a process that takes a few seconds to complete:WriteLine($"Exception - wait 3 seconds {DateTime.Now.ToString("hh:MM:ss tt")}"); await Task.Delay(3000); WriteLine($"Exception - Print {DateTime.Now.ToString("hh:MM:ss tt")}"); WriteLine(ex.Message);In the
finallyclause, add another delay that simulates a task which also takes a few seconds to complete:WriteLine($"Finally - wait 3 seconds {DateTime.Now.ToString("hh:MM:ss tt")}"); await Task.Delay(3000); WriteLine($"Finally - completed {DateTime.Now.ToString("hh:MM:ss tt")}");In the console application, simply add a call to the
FileRunAsync()method in theRecipe9AwaitInCatchFinallyclass:Chapter1.Recipe9AwaitInCatchFinally.FileRunAsync();
After adding the code, run the console application and have a look at the output:

You will notice that the exception thrown was a "file not found" exception. In catch, the code stopped for 3 seconds while the task was delayed. The same is evident for the code in the finally clause. It too was delayed for 3 seconds while the task was delayed.
This means that now, in your C# 6.0 applications, you can, for example, await in the catch clause while an exception log message is written to the log. You can do the same thing in the finally clause while closing database connections to dispose of other objects.
The process of how the compiler does this is rather complicated. You, however, don't need to worry about how this functionality is achieved. All you need to do is know that the await keyword is now available to you as a developer for use in the catch and finally blocks.
Tip
Detailed steps to download the code bundle are mentioned in the Preface of this book. Please have a look. The code bundle for the book is also hosted on GitHub at https://github.com/PacktPublishing/CSharp-Programming-Cookbook. We also have other code bundles from our rich catalog of books and videos available at https://github.com/PacktPublishing/. Check them out!