


New Features in C# 7.0
In this first chapter, we will take a look at the C# 7.0 features by covering them in the following recipes:
- Working with Tuples - getting started
- Working with Tuples - going deeper
- Pattern matching
- Out variables
- Deconstruction
- Local functions
- Improvements to literals
- Ref returns and locals
- Generalized async return types
- Expression bodies for accessors, constructors, and finalizers
- throw expressions
Introduction
C# 7.0 brings a lot of new functionality to the C# language. If you were left wanting more after the release of C# 6.0, then C# 7.0 will not disappoint you at all. It focuses on consuming data, simplifying code, and improving performance. Mads Torgersen who is the C# Program Manager noted that C# 7.0's biggest feature by far is Tuples. The other is pattern matching. These two features (as well as the others) were met with enthusiasm from C# developers worldwide. It is, therefore, no guess that developers will immediately start implementing these new features introduced in C# 7.0. It will, therefore, be very beneficial to get to grips with what C# 7.0 has to offer and implement the new language features in your development projects as soon as possible.
Throughout this book, I will be using the release candidate of Visual Studio 2017. Some features and methods of doing things might change between the time of writing and the final release of Visual Studio 2017.
Working with Tuples - getting started
I have come across many instances where I wanted to return more than one value from a method. As Mads Torgersen pointed out, the existing options available to developers are not optimal. C# 7.0 has, therefore, introduced Tuple types and Tuple literals to allow developers an easy way of returning multiple values from methods. Developers can also rest easy when creating Tuples. Tuples are structs, which are value types. This means that they are created locally and are passed by copying the contents. Tuples are also mutable and Tuple elements are public mutable fields. I am personally very excited about using Tuples. Let's explore Tuples in closer detail in the following recipe.
Getting ready
Start off by creating a regular console application in Visual Studio 2017. Simply call the project you create cookbook. Before I can jump into using Tuples in C# 7.0, I need to add in a NuGet package. Bear in mind that I am using the release candidate of Visual Studio. This process might change between now and the final release of the product.
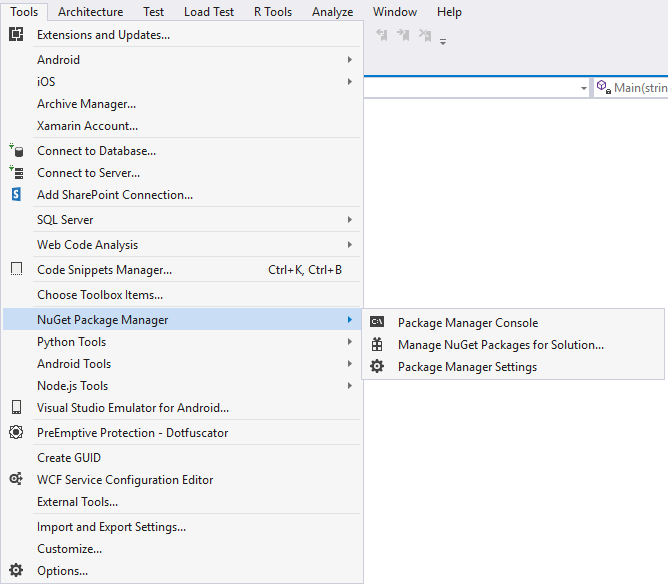
- To do this, head on over to Tools, NuGet Package Manager and then, click on Manage NuGet Packages for Solution....
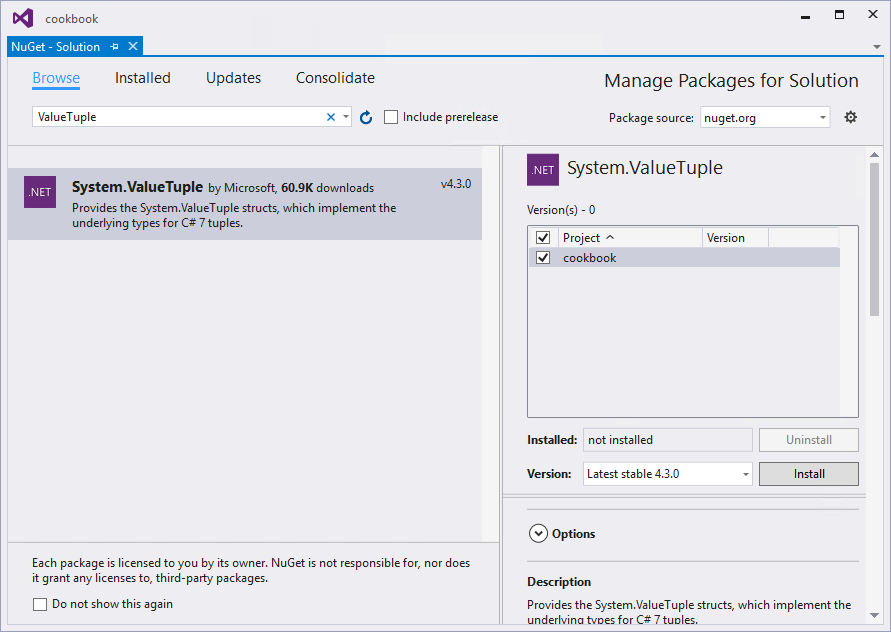
- Select the Browse tab and type in ValueTuple in the search box. The System.ValueTuple by Microsoft NuGet package should be displayed. Select the cookbook project under Manage Packages for Solution and click on the Install button.
- Visual Studio will now show you a prompt to review the changes you are about to make to your project. Just click on the OK button. Lastly, you will need to provide the License Agreement required by Microsoft. Just click on the I Accept button. Visual Studio will now start the NuGet package installation. It will show you its progress in the Output window.
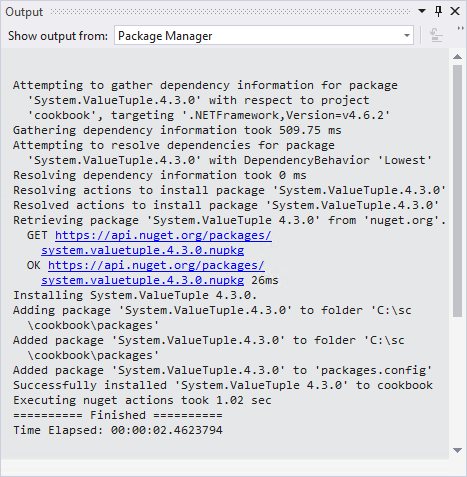
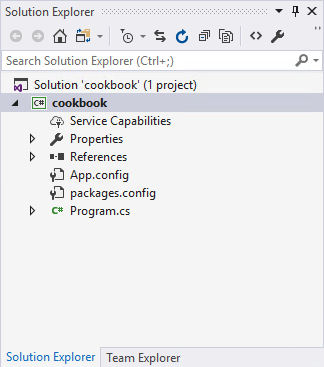
After all this is complete, my Visual Studio solution looks as follows:
You will now be ready to create your first method that works with Tuples. Let's see how to do that next.
How to do it...
- Start off by creating a new class in the Program.cs file of your Visual Studio console application. You can call your class anything, but for the purposes of this book I will simply be calling my class Chapter1. Your code should now look as follows:
        namespace cookbook
        {
          class Program
          {
            static void Main(string[] args)
            {

            }
          }

          public class Chapter1
          {

          }
        }
- This is the format we will be using throughout this chapter. Let's assume that we want to write a method that needs to calculate the average score for a variable number of students. No grade has the same number of students in each class. Therefore, we want our method to return the number of students in the class for the calculated average score. Change the static void main method to contain a list of scores. We are also creating a new instance of the Chapter1 class and calling the method GetAverageAndCount(), which will be used to return the two values we need.
        static void Main(string[] args)
        {
          int[] scores = { 17, 46, 39, 62, 81, 79, 52, 24 };
          Chapter1 ch1 = new Chapter1();
          var s = ch1.GetAverageAndCount(scores);
        }
- It is here that we can use the power of Tuples to declare the GetAverageAndCount() method in the Chapter1 class. It accepts an array of integer scores and looks as follows:
        public (int, int) GetAverageAndCount(int[] scores)
        {

        }
- Pay close attention to the return Tuple type (int, int). We are only returning two values from the GetAverageAndCount() method, but in reality you can return several values if needed. In order to run your code sample, we will create a dummy implementation of this method. To do this, just include a Tuple literal that returns two zeros.
        public (int, int) GetAverageAndCount(int[] scores)
        {
          var returnTuple = (0, 0);
          return returnTuple;
        }
- Go back to the static void Main method where the Tuple returning method is called and write code to consume the return values. Every Tuple you create will expose members called Item1, Item2, Item3, and so on. These are used to get the values returned from a Tuple returning method.
        static void Main(string[] args)
        {
          int[] scores = { 17, 46, 39, 62, 81, 79, 52, 24 };
          Chapter1 ch1 = new Chapter1();
          var s = ch1.GetAverageAndCount(scores);
          WriteLine($"Average was {s.Item1} across {s.Item2} students");
          ReadLine();
        }
- Be sure to add the following using the directive before the namespace.
using static System.Console;
- You will notice that we used s.Item1 and s.Item2 to reference the return values returned from our GetAverageAndCount() method. While this is totally legal, it isn't very descriptive and makes it difficult to infer the usage of the variable returned. It basically means that you would have to remember that Item1 is the average value and Item2 is the count value. Perhaps, it is the other way around? Is Item1 the count and Item2 the average? It really depends on what you are doing inside the GetAverageAndCount() method (which can change over time). Our Tuple returning method can therefore be enhanced as follows:
        public (int average, int studentCount)
          GetAverageAndCount(int[] scores)
        {
          var returnTuple = (0, 0);
          return returnTuple;
        }
- The Tuple return type can now declare variable names for its elements. This makes it easy for the caller of the GetAverageAndCount() method to know which value is which. You can still keep on using s.Item1 and s.Item2, but it is now much easier to change the calling code in the static void Main method accordingly:
        static void Main(string[] args)
        {
          int[] scores = { 17, 46, 39, 62, 81, 79, 52, 24 };
          Chapter1 ch1 = new Chapter1();
          var s = ch1.GetAverageAndCount(scores);
          WriteLine($"Average was {s.average} across {
            s.studentCount} students");
          ReadLine();
        }
- Changing the interpolated string in WriteLine, we see that the usage of the values returned by the Tuple is much clearer. You now know that the first value is the average and that the second value is the count of the students used to calculate the average. Tuples, however, allow developers more flexibility. Remember the Tuple literal in the GetAverageAndCount() method? We simply added this in the dummy implementation as follows:
var returnTuple = (0, 0);
- C# 7.0 also allows developers to add names to Tuple literals. Inside the GetAverageAndCount() method, change your Tuple literal as follows:
var returnTuple = (ave:0, sCount:0);
- I have just named the first value a name of ave (for average) and the second sCount (for student count). This is some really exciting stuff! After you have modified your Tuple literal, your dummy implementation of the GetAverageAndCount() method should look as follows:
        public (int average, int studentCount)
          GetAverageAndCount(int[] scores)
        {
          var returnTuple = (ave:0, sCount:0);
          return returnTuple;
        }
How it works...
So far in this recipe, we have seen that Tuples give developers a lot of flexibility when you need to return several values from a method. While the dummy implementation of GetAverageAndCount() simply returns the zero-valued Tuple literal, it gives you some idea how Tuples are wired up. This recipe is the foundation for the next recipe. I encourage you to go through both recipes thoroughly in order to gain the full benefit from understanding Tuples and how to use them.
Working with Tuples - going deeper
I will now start adding more meat to the dummy implementation of the GetAverageAndCount() method we created in the previous recipe. If you are new to Tuples, and have not worked through the previous recipe, I encourage you to do so first before starting to work through this recipe.
Getting ready
You need to have completed the code steps in the recipe Working with Tuples - getting started, in order to work through this recipe. Ensure that you have added the required NuGet package as specified in the previous recipe.
How to do it...
- Let's take a look at the calling code again. We can further simplify the code in the static void Main method by getting rid of the var s. When we called the GetAverageAndCount() method, we returned the Tuple into var s.
var s = ch1.GetAverageAndCount(scores);
- We do not have to do this. C# 7.0 allows us to immediately split the Tuple into its respective parts as follows:
var (average, studentCount) = ch1.GetAverageAndCount(scores);
- We can now consume the values returned by the Tuple directly as follows:
WriteLine($"Average was {average} across {studentCount} students");
- Before we implement the GetAverageAndCount() method, make sure that your static void Main method looks as follows:
        static void Main(string[] args)
        {
          int[] scores = { 17, 46, 39, 62, 81, 79, 52, 24 };
          Chapter1 ch1 = new Chapter1();
          var (average, studentCount) = ch1.GetAverageAndCount(scores);
          WriteLine($"Average was {average} across {
            studentCount} students");
          ReadLine();
        }
- Secondly, ensure that the GetAverageAndCount() method's dummy implementation looks as follows:
        public (int average, int studentCount)
          GetAverageAndCount(int[] scores)
        {
          var returnTuple = (ave:0, sCount:0);
          return returnTuple;
        }
- Go ahead and run your console application. You will see that the two values, average and studentCount are returned from our dummy implementation of GetAverageAndCount().

- The values are obviously still zero because we have not defined any logic inside the method. We will do this next. Before we write the implementation, make sure that you have added the following using statement:
using System.Linq;
- Because we are using an array of integers for the variable scores, we can easily return the results we need. LINQ allows us to get the sum of the student scores contained in the scores array, simply by writing scores.Sum(). We can also easily get the count of the student scores from the scores array by writing scores.Count(). The average, therefore, would logically be the sum of the scores divided by the count of the student scores (scores.Sum()/scores.Count()). We then put the values into our returnTuple literal as follows:
        public (int average, int studentCount)
          GetAverageAndCount(int[] scores)
        {
          var returnTuple = (ave:0, sCount:0);
          returnTuple = (returnTuple.ave = scores.Sum()/scores.Count(),
                         returnTuple.sCount = scores.Count());
          return returnTuple;
        }
- Run your console application to see the result displayed as follows:

- We can see that the class average isn't too great, but that is of little importance to our code. Another piece of code that isn't too great is this line:
        returnTuple = (returnTuple.ave = scores.Sum()/scores.Count(),
                       returnTuple.sCount = scores.Count());
- It is clunky and doesn't read very nicely. Let's simplify this a bit. Remember that I mentioned previously that Tuples play nicely together as long as their types match? This means that we can do this:
        public (int average, int studentCount)
          GetAverageAndCount(int[] scores)
        {
          var returnTuple = (ave:0, sCount:0);
          returnTuple = (scores.Sum()/scores.Count(), scores.Count());
          return returnTuple;
        }
- Run your console application again and notice that the result stays the same:
- So why did we give the Tuple literal names to begin with? Well, it allows you to reference them easily within your GetAverageAndCount() method. It is also really very useful when using a foreach loop in your method. Consider the following scenario. In addition to returning the count and average of the student scores, we need to return an additional Boolean value if the class average is below a certain threshold. For this example, we will be making use of an extension method called CheckIfBelowAverage() and it will take a threshold value as an integer parameter. Start off by creating a new static class called ExtensionMethods.
        public static class ExtensionMethods
        {

        }
- Inside the static class, create a new method called CheckIfBelowAverage() and pass it an integer value called threshold. The implementation of this extension method is pretty straightforward, so I will not go into much detail here.
        public static bool CheckIfBelowAverage(
          this int classAverage, int threshold)
        {
          if (classAverage < threshold)
          {
            // Notify head of department
            return true;
          }
          else
            return false;
        }
- In the Chapter1 class, overload the GetAverageAndCount() method by changing its signature and passing a value for the threshold that needs to be applied. You will remember that I mentioned that a Tuple return type method can return several values, not just two. In this example, we are returning a third value called belowAverage that will indicate if the calculated class average is below the threshold value we pass to it.
        public (int average, int studentCount, bool belowAverage)
          GetAverageAndCount(int[] scores, int threshold)
        {

        }
- Modify the Tuple literal, adding it to subAve ,and default it to true, because a class average of zero will logically be below any threshold value we pass to it.
var returnTuple = (ave: 0, sCount: 0, subAve: true);
- We can now call the extension method CheckIfBelowAverage() on the returnTuple.ave value we defined in our Tuple literal and pass through it the threshold variable. Just how useful giving the Tuple literal logical names becomes evident when we use it to call the extension method.
        returnTuple = (scores.Sum() / scores.Count(), scores.Count(),
                       returnTuple.ave.CheckIfBelowAverage(threshold));
- Your completed GetAverageAndCount() method will now look as follows:
        public (int average, int studentCount, bool belowAverage)
          GetAverageAndCount(int[] scores, int threshold)
        {
          var returnTuple = (ave: 0, sCount: 0, subAve: true);
          returnTuple = (scores.Sum() / scores.Count(), scores.Count(),
          returnTuple.ave.CheckIfBelowAverage(threshold));
          return returnTuple;
        }
- Modify your calling code to make use of the overloaded GetAverageAndCount() method as follows:
        int threshold = 51;
        var (average, studentCount, belowAverage) = ch1.GetAverageAndCount(
                                                   scores, threshold);
- Lastly, modify the interpolated string to read as follows:
        WriteLine($"Average was {average} across {studentCount}
                  students. {(average < threshold ?
                  " Class score below average." :
                  " Class score above average.")}");
- The completed code in your static void Main method should now look as follows:
        static void Main(string[] args)
        {
          int[] scores = { 17, 46, 39, 62, 81, 79, 52, 24 };
          Chapter1 ch1 = new Chapter1();
          int threshold = 51;
          var (average, studentCount, belowAverage) =
               ch1.GetAverageAndCount(scores, threshold);
          WriteLine($"Average was {average} across {studentCount}
                    students. {(average < threshold ?
                    " Class score below average." :
                    " Class score above average.")}");
          ReadLine();
        }
- Run your console application to view the result.

- To test that the ternary operator ? is working correctly inside the interpolated string, modify your threshold value to be lower than the average returned.
int threshold = 40;
- Running your console application a second time will result in a passing average class score.

- Finally, there is one glaring problem that I need to highlight with this recipe. It is one that I am sure you have picked up on already. If not, don't worry. It is a bit of a sneaky one. This is the gotcha I was referring to at the start of this recipe and I intentionally wanted to include it to illustrate the bug in the code. Our array of student scores is defined as follows:
int[] scores = { 17, 46, 39, 62, 81, 79, 52, 24 };
- The sum of these equals to 400 and because there are only 8 scores, the value will work out correctly because it divides up to a whole number (400 / 8 = 50). But what would happen if we had another student score in there? Let's take a look. Modify your scores array as follows:
int[] scores = { 17, 46, 39, 62, 81, 79, 52, 24, 49 };
- Run your console application again and look at the result.

- The problem here is that the average is incorrect. It should be 49.89. We know that we want a double (unless your application of this is intended to return an integer). We, therefore, need to pay attention to casting the values correctly in the return type and the Tuple literal. We also need to handle this in the extension method CheckIfBelowAverage(). Start off by changing the extension method signature as follows to act on a double.
        public static bool CheckIfBelowAverage(
          this double classAverage, int threshold)
        {

        }
- Then we need to change the data type of the average variable in the Tuple method return type as follows:
        public (double average, int studentCount, bool belowAverage)
               GetAverageAndCount(int[] scores, int threshold)
        {

        }
- Then, modify the Tuple literal so ave is a double by using ave: 0D.
var returnTuple = (ave: 0D, sCount: 0, subAve: true);
- Cast the average calculation to a double.
        returnTuple = ((double)scores.Sum() / scores.Count(),
          scores.Count(),
        returnTuple.ave.CheckIfBelowAverage(threshold));
- Add the following using statement to your application:
using static System.Math;
- Lastly, use the Round method to format the average variable in the interpolated string to two decimals.
        WriteLine($"Average was {Round(average,2)} across {studentCount}
                  students. {(average < threshold ?
                             " Class score below average." :
                             " Class score above average.")}");
- If everything is done correctly, your GetAverageAndCount() method should look as follows:
        public (double average, int studentCount, bool belowAverage)
               GetAverageAndCount(int[] scores, int threshold)
        {
          var returnTuple = (ave: 0D, sCount: 0, subAve: true);
          returnTuple = ((double)scores.Sum() / scores.Count(),
                          scores.Count(),
                          returnTuple.ave.CheckIfBelowAverage(
                          threshold));
          return returnTuple;
        }
- Your calling code should also look as follows:
        static void Main(string[] args)
        {
          int[] scores = { 17, 46, 39, 62, 81, 79, 52, 24, 49 };
          Chapter1 ch1 = new Chapter1();
          int threshold = 40;
          var (average, studentCount, belowAverage) =
               ch1.GetAverageAndCount(scores, threshold);
          WriteLine($"Average was {Round(average,2)} across
                    {studentCount} students. {(average < threshold ?
                    " Class score below average." :
                    " Class score above average.")}");
          ReadLine();
        }
- Run the console application to see the correctly rounded average for the student scores.

How it works...
Tuples are structs, and therefore value types that are created locally. You, therefore, do not have to worry about using and assigning Tuples on-the-fly or that it creating a lot of allocations. Their contents are merely copied when passed. Tuples are mutable and the elements are publicly scoped mutable fields. Using the code example in this recipe, I can, therefore, do the following:
returnTuple = (returnTuple.ave + 15, returnTuple.sCount - 1);
C# 7.0 is allowing me to first update the average value (shifting the average up) and then decrementing the count field. Tuples are a very powerful feature of C# 7.0, and it will be of great benefit to many developers when implemented it correctly.
Pattern matching
C# 7.0 introduces an aspect common to functional programming languages with pattern matching. This new kind of construct can test values in different ways. To accomplish this, two language constructs in C# 7.0 have been enhanced to take advantage of patterns. These are as follows:
- The is expression
- The case clause in switch statements
With regard to the is expression, developers can now have a pattern on the right instead of just a type. When it comes to switch statements, the case clause can now match on patterns. The switch statement is no longer limited to primitive types and can switch on anything. Let's start by looking at the is expression.
Getting ready
To illustrate the concept of pattern matching, assume the following scenario. We have two object types called Student and Professor. We want to minimize code, so we want to create a single method to output the data from the object passed to it. This object can be a Student or a Professor object. The method needs to figure out which object it is working with and act accordingly. But first, we need to do a few things inside our console application to set things up:
- Ensure that you have added the following using statement.
using System.Collections.Generic;
- You now need to create two new classes called Student and Professor. The code for the Student class needs to look as follows:
        public class Student
        {
          public string Name { get; set; }
          public string LastName { get; set; }
          public List<int> CourseCodes { get; set; }
        }
- Next, the code for the Professor class needs to look as follows:
        public class Professor
        {
          public string Name { get; set; }
          public string LastName { get; set; }
          public List<string> TeachesSubjects { get; set; }
        }
To understand where we are going with pattern matching, we first need to understand where we have come from. I will start the next section off by showing you how developers might have written this code before C# 7.0.
How to do it...
- In the Chapter1 class, create a new method called OutputInformation() that takes a person object as parameter.
        public void OutputInformation(object person)
        {

        }
- Inside this method, we would need to check what type of object is passed to it. Traditionally, we would need to do the following:
        if (person is Student)
        {
          Student student = (Student)person;
          WriteLine($"Student {student.Name} {student.LastName}
                    is enrolled for courses {String.Join<int>(
                    ", ", student.CourseCodes)}");
        }

        if (person is Professor)
        {
          Professor prof = (Professor)person;
          WriteLine($"Professor {prof.Name} {prof.LastName}
                    teaches {String.Join<string>(",", prof.TeachesSubjects)}");
        }
- We have two if statements. We are expecting either a Student object or a Professor object. The complete OutputInformation() method should look as follows:
        public void OutputInformation(object person)
        {
          if (person is Student)
          {
            Student student = (Student)person;
            WriteLine($"Student {student.Name} {student.LastName}
                      is enrolled for courses {String.Join<int>
                      (", ", student.CourseCodes)}");
          }
          if (person is Professor)
          {
            Professor prof = (Professor)person;
            WriteLine($"Professor {prof.Name} {prof.LastName}
                      teaches {String.Join<string>
                      (",", prof.TeachesSubjects)}");
            }
          }
- Calling this method from the static void Main is easy enough. The objects are similar, but differ in the list they contain. A Student object exposes a list of course codes, while a Professor exposes a list of subjects taught to students.
        static void Main(string[] args)
        {
          Chapter1 ch1 = new Chapter1();

          Student student = new Student();
          student.Name = "Dirk";
          student.LastName = "Strauss";
          student.CourseCodes = new List<int> { 203, 202, 101 };

          ch1.OutputInformation(student);

          Professor prof = new Professor();
          prof.Name = "Reinhardt";
          prof.LastName = "Botha";
          prof.TeachesSubjects = new List<string> {
               "Mobile Development", "Cryptography" };

          ch1.OutputInformation(prof);
        }
- Run the console application and see the OutputInformation() method in action.

- While the information we see in the console application is what we expect, we can simplify the code in the OutputInformation() method much more with pattern matching. To do this, modify the code as follows:
        if (person is Student student)
        {

        }
        if (person is Professor prof)
        {

        }
- The first if expression checks to see if the object person is of type Student. If so, it stores that value in the student variable. The same logic is true for the second if expression. If true, the value of person is stored inside the variable prof. For code execution to reach the code between the curly braces of each if expression, the condition had to evaluate to true. We can, therefore, dispense with the cast of the person object to a Student or Professor type, and just use the student or prof variable directly, like so:
        if (person is Student student)
        {
          WriteLine($"Student {student.Name} {student.LastName}
                    is enrolled for courses {String.Join<int>
                    (", ", student.CourseCodes)}");
        }
        if (person is Professor prof)
        {
          WriteLine($"Professor {prof.Name} {prof.LastName}
                    teaches {String.Join<string>
                    (",", prof.TeachesSubjects)}");
        }
- Running the console application again, you will see that the output is exactly the same as before. We have, however, written better code that uses type pattern matching to determine the correct output to display.
- Patterns, however, don't stop there. You can also use them in constant patterns, which are the simplest type of pattern to use. Let's take a look at the check for the constant null. With pattern matching we can enhance our OutputInformation() method as follows:
        public void OutputInformation(object person)
        {
          if (person is null)
          {
            WriteLine($"Object {nameof(person)} is null");
          }
        }
- Change the code that is calling the OutputInformation() method and set it to null.
Student student = null;
- Run your console application and see the message displayed.

- Lastly, switch statements in C# 7.0 have been improved to make use of pattern matching. C# 7.0 allows us to switch on anything, not just primitive types and strings. The case clauses now make use of patterns, which is really exciting. Let's have a look at how to implement this in the following code examples. We will keep using the Student and Professor types to illustrate the concept of pattern matching in switch statements. Modify the OutputInformation() method and include the boilerplate switch statement as follows. The switch statement still has defaults, but it can now do so much more.
        public void OutputInformation(object person)
        {
          switch (person)
          {
            default:
              WriteLine("Unknown object detected");
            break;
          }
        }
- We can expand the case statement to check for the Professor type. If it matches an object to the Professor type, it can act on that object and use it as a Professor type in the body of the case statement. This means we can call the Professor-specific TeachesSubjects property. We do it like this:
        switch (person)
        {
          case Professor prof:
            WriteLine($"Professor {prof.Name} {prof.LastName}
                      teaches {String.Join<string>
                      (",", prof.TeachesSubjects)}");
          break;
          default:
            WriteLine("Unknown object detected");
          break;
        }
- We can also do the same for Student types. Change the code of the switch as follows:
        switch (person)
        {
          case Student student:
            WriteLine($"Student {student.Name} {student.LastName}
                      is enrolled for courses {String.Join<int>
                      (", ", student.CourseCodes)}");
          break;
          case Professor prof:
            WriteLine($"Professor {prof.Name} {prof.LastName}
                      teaches {String.Join<string>
                      (",", prof.TeachesSubjects)}");
          break;
          default:
            WriteLine("Unknown object detected");
          break;
        }
- One final (and great) feature of case statements remains to be illustrated. We can also implement a when condition, similar to what we saw in C# 6.0 with exception filters. The when condition simply evaluates to a Boolean and further filters the input that it triggers on. To see this in action, change the switch accordingly:
        switch (person)
        {
          case Student student when (student.CourseCodes.Contains(203)):
          WriteLine($"Student {student.Name} {student.LastName}
                    is enrolled for course 203.");
          break;
          case Student student:
          WriteLine($"Student {student.Name} {student.LastName}
                    is enrolled for courses {String.Join<int>
                    (", ", student.CourseCodes)}");
          break;
          case Professor prof:
          WriteLine($"Professor {prof.Name} {prof.LastName}
                    teaches {String.Join<string>(",",
                    prof.TeachesSubjects)}");
          break;
          default:
            WriteLine("Unknown object detected");
          break;
        }
- Lastly, to come full circle and check for null values, we can modify our switch statement to cater for those too. The completed switch statement is, therefore, as follows:
        switch (person)
       {
          case Student student when (student.CourseCodes.Contains(203)):
            WriteLine($"Student {student.Name} {student.LastName}
                      is enrolled for course 203.");
          break;
          case Student student:
          WriteLine($"Student {student.Name} {student.LastName}
                    is enrolled for courses {String.Join<int>
                    (", ", student.CourseCodes)}");
          break;
          case Professor prof:
          WriteLine($"Professor {prof.Name} {prof.LastName}
                    teaches {String.Join<string>
                    (",", prof.TeachesSubjects)}");
          break;
          case null:
            WriteLine($"Object {nameof(person)} is null");
          break;
          default:
            WriteLine("Unknown object detected");
          break;
        }
- Running the console application again, you will see that the first case statement containing the when condition is triggered for the Student type.

How it works...
With pattern matching, we saw that patterns are used to test whether a value is of a certain type.
When we find a match we can get to the information specific to that type (or shape). We saw this in the code where we accessed the CourseCodes property, which was specific to the Student type and the TeachesSubjects property, which was specific to the Professor type.
Lastly, you now need to pay careful attention to the order of your case statements, which now matters. The case statement that uses the when clause is more specific than the statement that simply checks for a Student type. This means that the when case needs to happen before the Student case because both of these cases are of type Student. If the Student case happens before the when clause, it will never trigger the switch for Students that have course code 203.
Another important thing to remember is that the default clause will always be evaluated last, irrespective of where it appears in the switch statement. It is, therefore, good practice to write it as the last clause in a switch statement.
Out variables
C# 7.0 has taken a fresh look at out variables. This is a small change, but really one that improves the readability and flow of the code. Previously, we first had to declare a variable to use as an out parameter in a method. In C# 7.0 we no longer need to do that.
Getting ready
We will be using an often used method to test if a value is of a specific type. Yes, you guessed it, we're going to be using TryParse. I can already hear some of you groan (or is it just me?). Using TryParse is (for me anyway) such a bittersweet thing to do. It's great being able to try and parse something to test if it is valid, but the use of the out variable was never as neat and tidy as I would have liked. If you are not familiar with the TryParse method, it is a method that tests to see if a value parses to a specific type. If it does, TryParse will return a Boolean value of true ; otherwise, it will return false.
How to do it...
- The following code example will illustrate how we used to have to use TryParse to check if a string value is a valid integer. You will notice that we had to declare the integer variable intVal, which was used as the out variable. The intVal variable would just sort of hang there in mid air, usually not initialized and waiting to be used in TryParse.
        string sValue = "500";

        int intVal;
        if (int.TryParse(sValue, out intVal))
        {
          WriteLine($"{intVal} is a valid integer");
          // Do something with intVal
        }
- In C# 7.0 this has been simplified, as can be seen in the following code example. We can now declare the out variable at the point where it is passed as an out parameter, like so:
        if (int.TryParse(sValue, out int intVal))
        {
          WriteLine($"{intVal} is a valid integer");
          // Do something with intVal
        }
- This is a small change, but a very nice one. Run the console application and check the output displayed.

- As we are declaring the out variable as an argument to the out parameter, the compiler will be able to infer what the type should be. This means that we can also use the var keyword, like this:
        if (int.TryParse(sValue, out var intVal))
        {
          WriteLine($"{intVal} is a valid integer");
          // Do something with intVal
        }
How it works...
The changes that C# 7.0 has made to out variables are not major. They are, however, a major convenience to those developers who use it often. So far in this chapter, we have seen the use of Tuples, pattern matching, and out variables. We can easily combine some of what we have learned to create something truly unique. Consider the use of extension methods, Tuples, and out variables. We can easily create an extension method called ToInt() that has the following implementation:
public static (string originalValue, int integerValue, bool isInteger) ToInt(this string stringValue)
{
  var t = (original: stringValue, toIntegerValue: 0, isInt: false);
  if (int.TryParse(stringValue, out var iValue))
  {
    t.toIntegerValue = iValue; t.isInt = true;
  }
  return t;
}
We create a Tuple literal that will be returned in the event of the TryParse returning false. If the TryParse is true, I set the t.toIntegerValue and t.isInt values. The code that calls the extension method looks as follows:
var (original, intVal, isInteger) = sValue.ToInt();
if (isInteger)
{
  WriteLine($"{original} is a valid integer");
  // Do something with intVal
}
When you run your console application, you will see that the output is exactly the same as before. This just illustrates the power of the new features in C# 7.0 when combined with each other. Throw some pattern matching into the mix, and we will have a very potent extension method. I'll leave you folks to play around with this some more. There is a lot to discover.
Deconstruction
Tuples can be consumed using a deconstruction declaration. This simply splits a Tuple into its individual parts and assigns these parts to new variables. This is called deconstruction, and it is not only reserved for Tuples.
Getting ready
Remember when we used Tuples at the beginning of this chapter? Well we were using code similar to the following to get the values returned by the Tuple literal.
var (average, studentCount) = ch1.GetAverageAndCount(scores);
This was deconstructing the parts of the Tuple into the new variables average and studentCount. I do not, however, want to take a look at Tuples again. What I want to do is show how you can implement a deconstruction declaration on any type. To do this, all that we need to do is ensure that the type has a deconstructor method. We will modify our existing Student class to add a deconstructor.
How to do it...
- If you created the Student class earlier, you should have something similar to this in your code:
        public class Student
        {
          public string Name { get; set; }
          public string LastName { get; set; }
          public List<int> CourseCodes { get; set; }
        }
- To create a deconstructor, add a Deconstruct method to your Student class. You will notice that this is a void method that takes two out parameters (in this instance). We then just assign the values of Name and LastName to the out parameters.
        public void Deconstruct(out string name, out string lastName)
        {
          name = Name;
          lastName = LastName;
        }
- Your modified Student class should now look as follows:
        public class Student
        {
          public string Name { get; set; }
          public string LastName { get; set; }
          public List<int> CourseCodes { get; set; }

          public void Deconstruct(out string name, out string lastName)
          {
            name = Name;
            lastName = LastName;
          }
        }
- Consuming our Student class (just like we did with Tuples) can now be accomplished as follows:
Student student = new Student();
student.Name = "Dirk";
student.LastName = "Strauss";
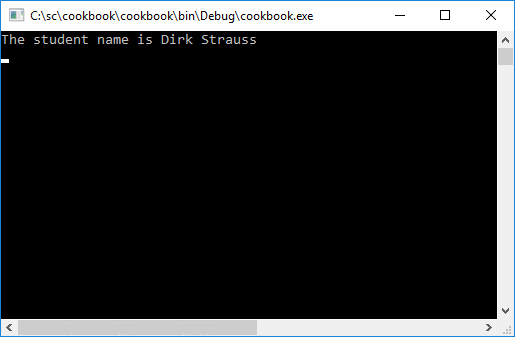
var (FirstName, Surname) = student;
WriteLine($"The student name is {FirstName} {Surname}");
- Running the Console Application will display the deconstructed values returned from the Student class.
- Deconstructors can just as easily be used in extension methods. This is quite a nice way to extend the existing type to include a deconstruction declaration. To implement this, we need to remove the deconstructor from our Student class. You can just comment it out for now, but essentially this is what we are after:
        public class Student
        {
          public string Name { get; set; }
          public string LastName { get; set; }
          public List<int> CourseCodes { get; set; }
        }
- The Student class now does not contain a deconstructor. Head on over to the extension methods class and add the following extension method:
        public static void Deconstruct(this Student student,
                 out string firstItem, out string secondItem)
        {
          firstItem = student.Name;
          secondItem = student.LastName;
        }
- The extension method acts on a Student type only. It follows the same basic implementation of the deconstructor created earlier in the Student class itself. Running the console application again, you will see the same result as before. The only difference is that the code is now using the extension method to deconstruct values in the Student class.
How it works...
In the code example, we set the student name and last name to specific values. This was just to illustrate the use of deconstruction. A more likely scenario would be to pass a student number to the Student class (in the constructor perhaps), as follows:
Student student = new Student(studentNumber);
The implementation within the Student class would then perform a database lookup using the student number passed through in the constructor. This will then return the student details. A more likely implementation of the Student class would probably look as follows:
public class Student
{
  public Student(string studentNumber)
  {
    (Name, LastName) = GetStudentDetails(studentNumber);
  }
  public string Name { get; private set; }
  public string LastName { get; private set; }
  public List<int> CourseCodes { get; private set; }

  public void Deconstruct(out string name, out string lastName)
  {
    name = Name;
    lastName = LastName;
  }

  private (string name, string surname) GetStudentDetails(string studentNumber)
  {
    var detail = (n: "Dirk", s: "Strauss");
    // Do something with student number to return the student details
    return detail;
  }
}
You will notice that the GetStudentDetails() method is just a dummy implementation. This is where the database lookup will start and the values will be returned from here. The code that calls the Student class now makes more sense. We call the Student class, pass it a student number, and deconstruct it to find the student's first name and surname.
Student student = new Student("S20323742");
var (FirstName, Surname) = student;
WriteLine($"The student name is {FirstName} {Surname}");
Local functions
The use of local functions might seem a little strange at first. They are in fact quite often used in most functional languages. C# 7.0 now allows us to do the same. So what exactly is a local function? Well, think of it as a helper method for a specific method. This helper method only really makes sense when used from the specific method and will not be useful for other methods in your application. It, therefore, makes sense to use it inside your existing method. Some might think that an extension method might be just as well suited, but extension methods should really be used to extend the functionality of many other methods. The usefulness of local functions will become evident in the following code example.
Getting ready
There is nothing you need to specifically get ready or set up beforehand to be able to use local functions. To illustrate the use of local functions, I will create a method that calculates the floor space of a building after the common area space has been subtracted from the total floor space.
How to do it...
- Create a method called GetShopfloorSpace() that takes three parameters: for the common area space, the building width, and the building length.
        public Building GetShopfloorSpace(int floorCommonArea,
                         int buildingWidth, int buildingLength)
        {

        }
- We are returning a Building type, so create a class called Building that has a single property called TotalShopFloorSpace.
        public class Building
        {
          public int TotalShopFloorSpace { get; set; }
        }
- Our local function will simply take the width and length of the building to calculate the total floor area and then subtract the common area from that to get the usable floor space for shops. The local function will look as follows:
        int CalculateShopFloorSpace(int common, int width, int length)
        {
          return (width * length) - common;
        }
- This is where it gets interesting. Add the local function inside the GetShopfloorSpace() method and add the rest of the code in the following code example:
        public Building GetShopfloorSpace(int floorCommonArea,
                         int buildingWidth, int buildingLength)
        {
          Building building = new Building();

          building.TotalShopFloorSpace = CalculateShopFloorSpace(
                   floorCommonArea, buildingWidth, buildingLength);

          int CalculateShopFloorSpace(int common, int width, int length)
          {
            return (width * length) - common;
          }

          return building;
        }
- In the calling code, inside the static void Main method, call the method as follows:
        Chapter1 ch1 = new Chapter1();
        Building bldng = ch1.GetShopfloorSpace(200, 35, 100);
        WriteLine($"The total space for shops is
                  {bldng.TotalShopFloorSpace} square meters");
- Run your console application and see the output displayed as follows:

How it works...
The beauty of local functions is that you can call them from anywhere inside your method. To illustrate this, add the following line of code just before the return statement of the GetShopfloorSpace() method. This essentially overrides whatever we passed to the method initially.
building.TotalShopFloorSpace = CalculateShopFloorSpace(10, 9, 17);
The modified method will now look like this:
public Building GetShopfloorSpace(int floorCommonArea, int buildingWidth, int buildingLength)
{
  Building building = new Building();

  building.TotalShopFloorSpace = CalculateShopFloorSpace(
           floorCommonArea, buildingWidth, buildingLength);

  int CalculateShopFloorSpace(int common, int width, int length)
  {
    return (width * length) - common;
  }

  building.TotalShopFloorSpace = CalculateShopFloorSpace(10, 9, 17);

  return building;
}
Run your console application again. This time you will see that the values are totally different. The second call to the local function overrode the first call and illustrates that the local function can be called throughout the method containing it.

I can think of a few instances where I might have been able to use this in the past. It isn't something I think that I'll use often. It is however a very nice addition to the C# language and great that it is available to developers.
Improvements to literals
This is another minor improvement to the C# language, but one that I'm sure will often be used by developers. One of my first jobs as a young man was working for a logistics company. These folks used to supply parts to Volkswagen, and the most critical parts were flown in by air freight from Germany or elsewhere. I will never forget the 9- and 12-digit shipping numbers the logistics people used to throw around in casual conversation. I wondered how they were able to remember literally hundreds of varying shipping numbers during the course of a year. After listening to them for a while, I noticed that they were saying these numbers with slight pauses after every third number. Even just looking at the 12-digit number 395024102833 is visually taxing. Imagine doing this several times a day, including memorizing the fast movers on the next shipment (I'm not even going to go into the printed shipment manifest, which was a nightmare). It is, therefore, easier to think of the number as 395-024-102-833 and this makes it easier to spot patterns. This is essentially exactly what C# 7.0 now allows developers to do with literals.
Getting ready
Number literals can sometimes be difficult to read. This is why C# 7.0 introduces the underscore (_) to act as a digit separator inside of number literals. C# 7.0 also introduces binary literals, which allow you to specify bit patterns directly without needing to know hexadecimal.
How to do it...
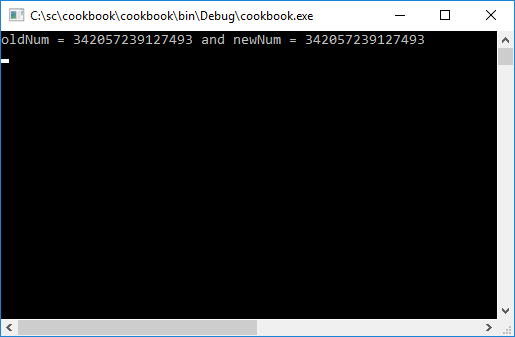
- Add the following lines of code to your project. It is clear that the newNum literal is easier to read, especially if you read it in groups of three.
        var oldNum = 342057239127493;
        var newNum = 342_057_239_127_493;
        WriteLine($"oldNum = {oldNum} and newNum = {newNum}");
- If you run the console application, you will see that the values of the two number literals are exactly the same:
- The same logic is true for binary literals. You can now express them as follows:
var binLit = 0b1010_1100_0011_0010_0001_0000;
How it works...
This is merely syntactical sugar for literals. I'm sure that there is much more to it going on in the background, but the implementation of this in your code is really straightforward.
Ref returns and locals
Passing objects by reference in C# is nothing new. This is done using the ref keyword. In C# 7.0, however, you can now return objects by reference and store these objects in a local variable by reference.
Getting ready
It is important to understand the concept of the ref keyword. When you pass a ref parameter, you are working with the variable itself, not just the value of the variable. This means that, if the value is changed, the original place in memory is updated, not only the value which would be a copy of the parameter. This becomes clearer in the following example.
How to do it...
- Inside the Chapter1 class, create a new method called GetLargest(). The method is nothing special. It only gets the largest of two values and returns it to the calling code.
        public int GetLargest(int valueA, int valueB)
        {
          if (valueA > valueB)
            return valueA;
          else
            return valueB;
        }
- Create a second method with the same name. Only this time, add the ref keyword.
        public ref int GetLargest(ref int valueA, ref int valueB)
        {
          if (valueA > valueB)
            return ref valueA;
          else
            return ref valueB;
        }
- In the static void Main method, create an instance to the Chapter1 class and call the GetLargest() method. Increment the variable val and write the variable values to the console window.
        int a = 10;
        int b = 20;
        Chapter1 ch1 = new Chapter1();
        int val = ch1.GetLargest(a, b);
        val += 25;

        WriteLine($"val = {val} a = {a} b = {b} ");
- Then, write the following code just after the previous calling code, but call the ref ch1.GetLargest() method. Increment the refVal variable and write the variable values to the console window.
        ref int refVal = ref ch1.GetLargest(ref a, ref b);
        refVal += 25;

        WriteLine($"refVal = {refVal} a = {a} b = {b} ");
- Run your console application and consider the output displayed.

How it works...
In the console window, you will see two very different results. Simply put, in the first line, the variable a is the variable a, the variable b is the variable b, and the variable val is the variable val.
In the second line, the variablea is the variable a, the variable b is the variable b, and the variable refVal is the variable b. This is the whole crux of the ref keyword. In the first GetLargest() method, we returned the largest value into the variable val. This value was 20. The variable val and the variable b had no relation to one another as they were allocated different spaces in memory.
In the second GetLargest() method, we returned the largest variable itself (which was b) into the variable refVal. The variable refVal therefore becomes an alias of the variable b because they both point to the same space allocated in memory. To illustrate this even more clearly, let us have a look at the memory addresses for the variables.
From the Project menu, go to the Properties of the current project. In the Build tab, check the option to Allow unsafe code and save the properties.

Add the following code to your console application:
unsafe
{
  IntPtr a_var_memoryAddress = (IntPtr)(&a);
  IntPtr b_var_memoryAddress = (IntPtr)(&b);
  IntPtr val_var_memoryAddress = (IntPtr)(&val);

  fixed (int* refVal_var = &refVal)
  {
    IntPtr refVal_var_memoryAddress = (IntPtr)(refVal_var);
    WriteLine($"The memory address of a is {a_var_memoryAddress}");
    WriteLine($"The memory address of b is {b_var_memoryAddress}");
    WriteLine($"The memory address of val is {val_var_memoryAddress}");
    WriteLine($"The memory address of refVal is
              {refVal_var_memoryAddress}");
  }
}
Run your console application and take a look at the memory addresses listed:

You will notice straightaway that variable b and variable refVal have the same memory address of 11531252, while variable b and variable val have different memory addresses.
So now for the million dollar question: Why is this feature in C# 7.0 even useful? Well, simply put, it can improve performance. Many developers mention that it will be quite useful for game programmers, who can now pass these aliases around to reference large data structures. This means that they don't have to make a copy of a large array (for example) in order to work with it. Using ref, they can create an alias that points to the original memory location of the array and read or modify it directly. Thinking of it this way suddenly brings the usefulness of this C# 7.0 feature into perspective.
Will I ever use it? I don't really know. Perhaps not often but, as with local functions, this feature of C# 7.0 is really a great addition to the developer's toolkit. It solves some really tricky problems when you want to get away from copying around large structures in your code.
Generalized async return types
If you use async/await (if not, check it out) the following feature of C# 7.0 will come in really handy. The only supported return types used to be Task<T>, Task, and void. Even then, void was also only used with event handlers such as a button click. The challenge, however, was that a Task<T> was allocated in situations where the result of the async operation was available at the time of awaiting. But, what does this even mean? Well consider an async method that returns a Task<T> : and that value has a time to live of n amount of seconds. If the async method is called within the time to live period, why go to the trouble of allocating another Task<T> object? This is where the ValueTask<T> comes into play; it will allow other types to be defined so that you can return them from an async method. This, therefore, reduces the Task<T> allocations, which in turn will lead to performance gains.
Getting ready
Start off by creating a new WinForms application and performing the following steps:
- Add a button, label, timer, and textbox to the Windows form.

- We need to add the System.Threading.Tasks.Extensions package from NuGet to implement the ValueTask<T> struct. This process should be familiar to you if you completed the Tuples recipe. Select the winform project and click on the Install button.

- A confirmation screen will be displayed to allow you to review the changes that are about to be made. Just click on OK. Accept the license agreement. Also make sure that you have added this using statement to your project.
using System.Threading.Tasks;
We are now ready to write our code. The Windows app will call an async Task<T> method if the time to live has passed. Once it does that, the method will read a value and cache it. This cached value will be valid for 10 seconds (which is the time to live). If the method is run within the time to live period, then the cached value will be used and returned to the form. If the time to live has passed, the process repeats and the Task<T> method is called. The implementation will become clearer when you review the following code samples.
How to do it...
- Start by adding the following variables to your form.
        double timerTtl = 10.0D;
        private DateTime timeToLive;
        private int cacheValue;
- In the form load event, set the label with the timer text.
        private void Form1_Load(object sender, EventArgs e)
        {
          lblTimer.Text = $"Timer TTL {timerTtl} sec (Stopped)";
        }
- Set the timer interval on the designer to 1000 ms and add the following code to the timer1_Tick event.
        private void timer1_Tick(object sender, EventArgs e)
        {
          if (timerTtl == 0)
          {
            timerTtl = 5;
          }
          else
          {
            timerTtl -= 1;
          }
          lblTimer.Text = $"Timer TTL {timerTtl} sec (Running)";
        }
- Now create a method that simulates some sort of longer running task. Delay this for a second. Use the Random keyword to generate a random number and assign it to the cacheValue variable. Set the time to live, start the timer, and return the cached value to the calling code.
        public async Task<int> GetValue()
        {
          await Task.Delay(1000);

          Random r = new Random();
          cacheValue = r.Next();
          timeToLive = DateTime.Now.AddSeconds(timerTtl);
          timer1.Start();
          return cacheValue;
        }
- In the calling code, check to see if the time to live is still valid for the current cached value. If the time to live has expired, run the code that allocates and returns a Task<T> to get and set the cached value. If the time to live is still valid, just return the cached integer value.
        public ValueTask<int> LoadReadCache(out bool blnCached)
        {
          if (timeToLive < DateTime.Now)
          {
            blnCached = false;
            return new ValueTask<int>(GetValue());
          }
          else
          {
            blnCached = true;
            return new ValueTask<int>(cacheValue);
          }
        }
- The code for the button click uses the out variable isCachedValue and sets the text in the textbox accordingly.
        private async void btnTestAsync_Click(object sender, EventArgs e)
        {
          int iVal = await LoadReadCache(out bool isCachedValue);
          if (isCachedValue)
            txtOutput.Text = $"Cached value {iVal} read";
          else
            txtOutput.Text = $"New value {iVal} read";
        }
- When you finish adding all the code, run your application and click on the Test async button. This will read a new value from the GetValue() method, cache it, and start the time to live count down.

- If you click on the button again before the time to live has expired, the cached value is returned.

- When the time to live expires, clicking on the Test async button will call the GetValue() method again and the process repeats.

How it works...
ValueTask<T> is a very nice addition to C# 7.0. Microsoft, however, does suggest that you benchmark the performance of Task<T> versus ValueTask<T> when doing additional optimizing of your methods. A simple optimization however would be to simply replace the instances of Task<T> with ValueTask<T>.
Expression bodies for accessors, constructors, and finalizers
Expression-bodied members have been a big hit with the C# developer community, so much so that Microsoft has expanded the allowed members that can be implemented as expressions. You can now use this feature with:
- Constructors
- Finalizers (used when you need to release unmanaged code)
- get and set accessors on properties and indexers
Getting ready
There is nothing you specifically need to get ready in order to use this recipe. The following code will make use of an old-versus-new approach to demonstrate the differences and implementation of each.
How to do it...
- Consider the class SomeClass. It contains a constructor, finalizer, and a property.
        public class SomeClass
        {
          private int _initialValue;

          // Property
          public int InitialValue
          {
            get
            {
              return _initialValue;
            }

            set
            {
              _initialValue = value;
            }
          }

          // Constructor
          public SomeClass(int initialValue)
          {
            InitialValue = initialValue;
          }

          // Finalizer
          ~SomeClass()
          {
            WriteLine("Release unmanaged code");
          }
        }
- With expression-bodied members, the class SomeClass can be simplified and the number of lines of code reduced.
        public class SomeClass
        {
          private int _initialValue;

          public int InitialValue
          {
            get => _initialValue;
            set => _initialValue = value;
          }

          public SomeClass(int initialValue) =>
                 InitialValue = initialValue;

          ~SomeClass() => WriteLine("Release unmanaged code");
        }
How it works...
If you have used expression-bodied members before in C# 6.0, you will undoubtedly be excited to use the expanded functionality. Personally, I'm really glad that constructors can now be implemented as an expression.
throw expressions
Traditionally, throw has been a statement in C#. As we know, because it is a statement and not an expression, we could not use it in certain places. Thanks to expression-bodied members, C# 7.0 introduced throw expressions. There isn't any difference in how an exception is thrown, only in where you can throw them from.
Getting ready
Throwing exceptions is nothing new. You have been doing it ever since you have been writing code. I will admit that throw expressions are a very welcome addition to C# and it's all thanks to expression-bodied members.
How to do it...
- To illustrate the use of a throw expression, create a method called GetNameLength() in the Chapter1 class. All it does is check to see if the length of a name is not zero. If it is, then the method will throw an exception right there in the expression.
        public int GetNameLength(string firstName, string lastName)
        {
          return (firstName.Length + lastName.Length) > 0 ?
            firstName.Length + lastName.Length : throw new
            Exception("First name and last name is empty");
        }
- To see the throw expression in action, create an instance of the Chapter1 class and call the GetNameLength() method. Pass it two blank strings as parameters.
        try
        {
          Chapter1 ch1 = new Chapter1();
          int nameLength = ch1.GetNameLength("", "");
        }
        catch (Exception ex)
        {
          WriteLine(ex.Message);
        }
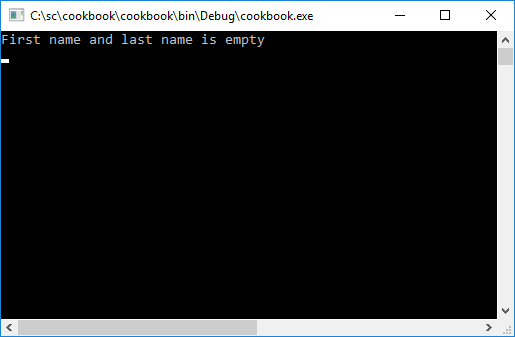
- Running your console application will then return the exception message as the output.
How it works...
Being able to use throw expressions makes your code easier to write and easier to read. The new features in C# 7.0 build on top of the fantastic foundation laid down by C# 6.0.