


The Web has proved to be the most resilient technology ever since its invention. New technologies have risen and died down against the rapid pace of technology advancement and the user adaptation. However, the Web remains the most used technology due to its open standard and accessibility. The idea of having a thin browser that can consume content over a network from a remote server seems to be the most intelligent and intuitive design ever created. The client is completely isolated from the gimmicks of the server: what version, references, dependencies of the software, operating system, and so on. All the browser has to support is HTTP. Not only that, the web applications can also reflect on business budget, as it eliminates expensive hardware budget, software licenses, and it can even extend the number of users.
Note
Hypertext Transfer Protocol (HTTP) is a standard protocol for transferring structured text information between client and server.
Seeing its formidability, companies looking to reach a wider client base with the least cost started adopting the Web into their enterprises. Desktop applications started moving to the Web. I can still remember the days when I used to search for applications to convert an image to an icon file so that I can use it in my projects. I had to make sure that I had the right operating system to install the software and install any dependencies if needed. Now, with the ICO
converter website www.icoconverter.com, I simply upload my image, and the website returns the icon file. Similarly, to create a ringtone for my phone, I can edit and cut my favorite part of the mp3 music file by uploading it to www.mp3cut.net, then specifying where to cut, and then download the new mp3 file.
Among the companies that started to adopt the Web is Esri, the top geographic information system software provider with its ArcGIS flagship software. Esri's main successful software is ArcGIS for Desktop, hereafter known as Desktop (uppercase). This rich software was built for Microsoft Windows and it has had a lot of success. However, to view the geographic data created by ArcGIS for Desktop, one should have this software installed on his or her PC. This takes resources, time, and more licenses, making users frown upon using it, especially those who don't use Windows as their primary operating system. Also, companies adopting the ArcGIS technology have to pay extra for licensing for each user on the desktop.
That is why Esri designed a new solution which enables users to consume geographic and mapping data from a browser. This software is called ArcGIS for Server. It allows the user to publish geographic content as a web service that can be used from different terminals. It also enables mobile devices to consume GIS data, something that traditionally was limited to desktop application only. The Online Audio Cutter website, for instance, has a web service that is being called from the main page to execute the file cutting process and returns the new modified file.
ArcGIS for Server is an integrated solution, which is becoming the backbone for the ArcGIS technology. The solution is scalable, meaning that you can add more machines to increase the performance. The installation of ArcGIS for Server is outside the scope of this book. You can learn how to install, configure, tune, and administer ArcGIS for Server from my other book, Administering ArcGIS for Server, published by Packt Publishing.
Note
ArcGIS for Server: This is a solution that allows users to publish geographic content as a web service and use it from any client that supports HTTP. You can read more about ArcGIS for Server here:
http://webhelp.esri.com/arcgisserver/9.2/dotnet/manager/concepts/whats_server.htm
Web service: This is a method that can be called by a client to perform a particular task and return some results.
In this book, you will work on a fictional business project named Bestaurants, where you will learn how to design and develop a completely functional ArcGIS web application that allows you to view Bestaurants's database of restaurants. This chapter will focus on setting up the basics and the fundamentals that will help you get started. We will read and understand the project mission requirements, design an interface and architecture, set up the Web server, and develop the template for our web application.
To start working with this chapter, there are some prerequisites that need to be in place. Make sure you have a Windows machine with a minimum of 6 GB of RAM with the following software installed on it:
Microsoft .NET Framework 3.5 SP1: If you are using Windows 7 or higher, this framework can be found and downloaded from http://www.microsoft.com/en-us/download/details.aspx?id=25150. If you are using Windows Server, it can be installed from the application roles.
ArcGIS for Desktop 10.1 media or higher: You can download the latest version of ArcGIS for Desktop for free with a 60-day trial period from the Esri website: http://www.esri.com/software/arcgis/arcgis-for-desktop/free-trial. At the time of writing, Esri was on Version 10.2.2. You will need at least a standard or an advanced license, which will allow you to view and publish services.
ArcGIS for Server 10.1 media installer or higher: This will host the service that we will publish and that we will eventually use to write our application. You can request a trial from your local Esri distributor, and take a look at my other book Administering ArcGIS for Server, published by Packt Publishing, to install it. This can be hosted on the same machine.
I will be using Windows Server 2008 R2 SP1 as the operating system, ArcGIS for Desktop 10.2, and ArcGIS for Server 10.2. We will install all the software on a single machine called ARCGISMACHINE.
Note
If you already have ArcGIS for Server installed in another location, that is fine; just make sure to update your code to the correct server accordingly whenever we mention ArcGIS for Server.
In Appendix, Bestaurants on ArcGIS Online, we will learn how to replace ArcGIS for Server with ArcGIS Online as our GIS data store.
It has been proven that it's easy to learn a new concept by actually implementing that concept in a real-life project scenario. That is why we created this fictional project. Reading the project statement and requirements will teleport you in to the context of a developer who has to analyze, design, and implement instead of just being a reader. This helps you guess how you will be able to do things instead of being spoon-fed and bombarded by information. We will start small, from concepts you will probably be familiar with, which will give you the confidence to progress through the book. We will slowly develop and plug in the components into the main website until the whole website is completed. At the end of each chapter, I will provide a support file with the last chapter on the website, just in case you decided to skip through a chapter, you can pick up things from the previous chapter.
Note
This project is an example that will be used and it will keep on reappearing in the following chapters. This is not an actual project and not related to the country whatsoever.
Belize is thriving in tourism. Lots of tourists go there on holidays to enjoy its beautiful beaches and a wide range of restaurants. The government of Belize is trying to enrich tourists' experience in finding their favorite restaurants in the country more effectively. To accomplish that, a new project titled Bestaurants has been proposed to design a website to feature the best restaurants in Belize. For that, they asked for the website to be able to run on both desktop browsers and mobile devices.
The website will contain a map that shows the city of Belize and the restaurants with key icons based on the restaurant type. For example, a café will be shown as a coffee mug and a restaurant will be displayed as a fork and knife. Tourists should be able to search for restaurants by name, category, or rating. The results should show the ratings, reviews, and pictures of that restaurant if available. The user will only be able to upload photos and write reviews. When the user opens the website from his mobile phone or a tablet, they should get the exact same functionalities that are available in the web version. Finally, the website will identify and show the user location on the map using the Global Positioning System (GPS) receiver on the device. The user can then highlight all restaurants near them by clicking on a button.
Before we start the development, we need to get a picture of what the website would look like after it is completed. That is what is called the Interface Design; we can do it on a piece of paper or using sophisticated software such as Microsoft Visio. What is important is to capture what the website should look like.
Note
Interface Design: This is the heart of any web application, which defines how the website will look like and function. The general rule of thumb is to keep the interface simple.
Let's start designing our canvas; we will start with the most important element of the website: the map. I know that there will be a map because the project statement says:
The website will contain a map that shows the city of Belize and the restaurants with key icons based on the restaurant type.
The map will display the restaurants, and the user will be interacting with it. The map should be the biggest object on the site as it will be the focus point for the user. The map will need zoom functionality, so we will add a small slider to the top to help the user zoom in or zoom out. Moreover, the user will require a legend to show the key objects on the map; so we will reserve a space for that as well. Reserving 25 percent of the left side of the website will suffice for the legend. The following figure illustrates what the application page design will look like. Remember that the design can be changed as we progress through the chapters.

The website looks simple and zen, but unfortunately, we cannot keep it this simple. We need to add more elements to the design. Read the following quote from the project statement:
Tourists should be able to search for restaurants by name, category, or rating. The results should show the rating of the restaurant, reviews, and pictures of that restaurant if available.
This quote implies that we should have a search box and probably a drop-down list for the category and rating. The bottom line is that there will be some input controls that the user will interact with; so we need to reserve a space for it. Let's reserve the upper 10 percent of the web page for input controls. We also need some space to display the search result where we can display the restaurant name, rating, reviews, and photos. For this, we can use the left area, below the legend. The new Interface Design is illustrated in the following figure:

As the user searches and interacts with the map, it will be nice to display some status and loading messages for them. Let's save the bottom five percent of the page for status messages.
Of course, this design is not written on stone, so you might want to move things around as you progress through the book. Take a look at our initial Interface Design:

Before rushing in to the developing process, it is always good practice to create the architecture of your components. This helps show how the entire solution is tied together. The architecture describes the software, hardware components, the relations between them and assess in viewing the solution as a whole. With the architecture, the developer can see the big picture before diving into the details of implementation, which may save them a lot of time and make them consider exterior elements. You can read more about system architecture at:
http://www.esri.com/library/whitepapers/pdfs/sysdesig.pdf
The first part of the architecture is to make a decision on what programming language is suitable for the web application. This can only be determined by reading the requirements. Let's take a look at the following quote from the project statement:
The Client asked for the site to run on both desktop browsers and mobile devices.
The best option to make a web application able to run on both mobile and desktop is to use a language that will run on both. ArcGIS provides APIs for Silverlight, Flex, and JavaScript. Silverlight and Flex are good and simple programming languages and provide rich interface and logic; however, they both require browser plugins to run, and no smart phone supports it, so they are out of the question. This leaves us with the ArcGIS JavaScript API to develop our web application. The reason we chose JavaScript is that this scripting language is open standard and can run in modern browsers including mobile devices. JavaScript is a client-side scripting language, which means all the code executes on the client. Keep that in mind while we design the architecture. Note that JavaScript API is a volatile SDK and a continually evolving API. Esri continually releases updates for this library at least twice a year, adding new functionally in each update. It is crucial to mind which version you are developing on, use one, stick to it, and upgrade as you see new functionalities that you would like to use. Fortunately, this API can work with services shared and published on ArcGIS Online, which makes it a really good choice.
Note
API: Application Programming Interface is a set of functionalities that are exposed for the developers to extend and customize particular software; in our case, this software is ArcGIS.
Silverlight: Silverlight was created by Microsoft. This is a rich structured language that runs on the client, but requires a special plugin to be translated in the browser.
Flex: Flex was created by Adobe. This is a rich programming language that provides rich content on the web and requires a special plugin to run on a browser.
ArcGIS JavaScript API: This is an application programming interface exposed as a JavaScript library that is used with ArcGIS for Server services. This API can run on modern browsers and mobile devices without a plugin.
Now that we have selected our programming language, there are four main components we can look at in our Bestaurants project. The components are listed as follows:
The database that contains the restaurant's data.
The ArcGIS for Server site that connects to the database.
The web server where our web application will be hosted and where the clients will connect to browse the website.
The client browser, which will connect to the web server to retrieve the website. Take a look at the following figure for more details:
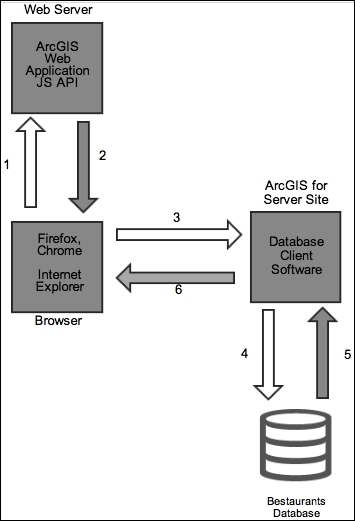
Let's explain this design, from the moment a user opens the web application up until the moment they are served the map, in the following steps:
The user opens the browser and types the address of the web server hosting the web application that we will be writing. This will send an HTTP request to the web server.
The web server receives the user HTTP request and returns the content of the website back to the user.
Since the scripting language is JavaScript, the browser starts executing the code locally on the browser side. The ArcGIS JavaScript code that you will write in Chapter 2, Setting Up the Basic Web Application, will create an HTTP request to the ArcGIS for Server site for the Bestaurants web service.
ArcGIS for Server site receives the HTTP request from the client, and converts the HTTP request into a Structured Query Language (SQL) query to be sent to the database.
The database executes the query and returns the result to ArcGIS for Server.
ArcGIS for Server wraps the results into an HTTP request and returns it back to the client.
Note
SQL: Structured query language, is a language designed to retrieve data from a database. The syntax of this language depends on the type of the database.
In our case, the web server, ArcGIS for Server and the database components are located on a single machine named
ARCGISMACHINE. You can choose to put each component in a separate server, which is a good practice for scaling each component independently later.
In this section, we will quickly install and configure both ArcGIS for Desktop and ArcGIS for Server on your new machine so that we can carry on with the exercise. You will need the ArcGIS for Desktop and ArcGIS for Server media CD-ROM. We will start by installing ArcGIS for Desktop, which uses the default installation configurations, and then we will install and configure ArcGIS for Server.
Before we start, we need to install Microsoft .NET Framework 3.5 SP1, which can be found in the installation media. Follow these steps to start the installation:
Log in to the machine as the administrator user or any user who has administrative privileges on this machine. I will be using the
Administratoruser.Install Microsoft .NET Framework 3.5 SP1 and wait for the installation to finish. If you are using Windows Server, the framework can be installed from Server Manager by adding the Application Server role (see the following screenshot for more details). If the application server role is already installed, it will be marked as (Installed), as shown in the following screenshot:

After you install the framework, go ahead and run the ArcGIS for Desktop installation file. Make sure you don't have any previous ArcGIS installations on this machine. You can read the following online guide to install ArcGIS for Desktop:
http://resources.esri.com/help/9.3/arcgisdesktop/installGuides/ArcGIS_Desktop/whnjs.htm
After the installation is complete, authorize the product by providing it with the proper license. You can get a 60-day trial version from the product website (www.esri.com).
ArcGIS for Desktop installs two main applications, ArcMap and ArcCatalog both of which we will be using in this book. ArcMap will be the software, which views and authors the map, and ArcCatalog will be used to manage the GIS database.
Now we need to install and configure ArcGIS for Server. We need to work with Version 10.1 and above since prior to that, ArcGIS for Server had a different architecture. Follow these steps to install ArcGIS for Server:
Log in to the machine as the administrator user or any user who has administrative privilege on this machine. I will be using the
Administratoruser.Run the installation file for ArcGIS for Server and choose ArcGIS for Server.
Accept and approve the license agreement and click on Next.
In the Select Features dialog box, make sure all features are selected to be installed and click on Next.
Keep the default path for Python and click on Next.
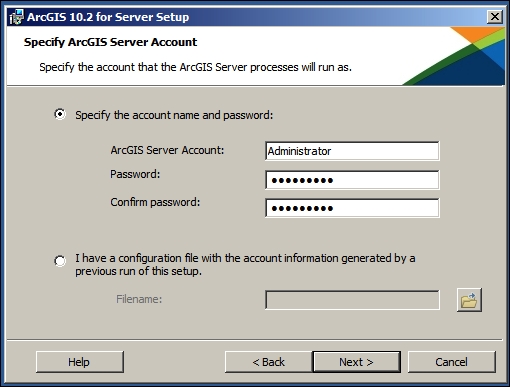
In the Specify ArcGIS Server account, type in the Windows username and password you have used. Remember, it should have administrator privileges. In my case, it is the Administrator user. Click on Next to continue, as shown in the following screenshot:
Choose to not export the configuration file and click on Next.
Click on Install to start the installation process.
When the installation is complete, the installer will ask you to authorize your ArcGIS for Server. Use the license provided by your Esri distributor and click on Finish.
A browser with a new website will be opened. This will ask you to create a new server site or join an existing one. Choose to Create New Site and click on Next.
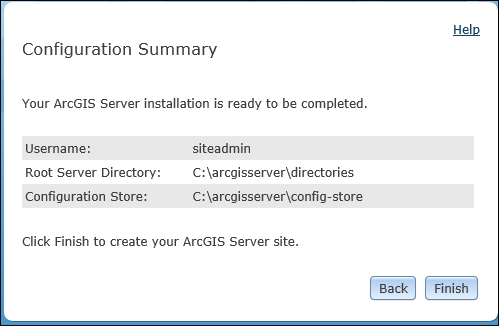
In the Primary Site Administrator account page, type
siteadminin the Username section, enter a password, and click on Next. This is the account we will use to publish the Bestaurant service to ArcGIS for Server. Make sure to remember these credentials.Keep the default configuration directories and click on Next.
In the Configuration Summary, click on Finish. You should see a similar summary page as shown in the following screenshot:
Close the browser and restart your machine.
You just finished installing ArcGIS for Desktop and Server. Next we will look at to publishing the service.
Note
Note that this is a very basic installation manual and should not be followed for production environment. For advanced configurations and production setup, read my other book Administering ArcGIS for Server, published by Packt Publishing. You can also read more about this in the Esri online documentation (http://resources.esri.com/).
We have our interface and architecture, now we need to publish our Bestaurants database in ArcGIS for Server. We just completed setting up ArcGIS for Server and Desktop. You must have ArcGIS for Desktop and ArcGIS for Server installed, configured, and ready for use to be able to perform this exercise.
Tip
Downloading the example code
You can download the example code files for all Packt books you have purchased from your account at http://www.packtpub.com. If you purchased this book elsewhere, you can visit http://www.packtpub.com/ and register to have the files e-mailed directly to you.
We need to get the supporting files for this chapter: 2955OT_01_Files. This file can be downloaded from www.packtpub.com. Copy this folder to the ARCGISMACHINE machine. Follow these steps to publish the service on ArcGIS for Server.
Log in to the machine with the administrator account.
Go to the root
C:drive and create a new folder named2955OT. Copy the folder named2955OT_01_Filesfrom the code bundle to the2955OTfolder.Open the
2955OT_01_Filesfolder and double-click on theMXDfileBelize.mxd. This will open ArcMap, which will allow us to view the Bestaurants restaurants data on ArcGIS for Desktop.When ArcMap opens, you should see the data as shown in the following screenshot:

From the File menu, point to Share As and then click on Service ….
Select Publish a Service and click on Next.
From the Choose a connection drop-down list, click on Create New Connection icon as shown in the following screenshot:

From the Add ArcGIS Server dialog box, select Publish GIS Services and click on Next.
In the General dialog box, enter
http://ARCGISMACHINE:6080/arcgisin the Server URL textbox. Remember,ARCGISMACHINEis where you have installed ArcGIS for Server. In the Server Type textbox, select ArcGIS Server and type in yoursiteadmincredentials in the authentication box and click on Finish. This is all shown in the following screenshot:
In the Publish a Service dialog box, enter
Bestaurantsas the Service Name and click on Next.Keep the option Use existing folder enabled and click on Continue to start the Service Editor.
If you were prompted with the Copying data to Server message, simply click OK. This will copy the Bestaurants data to a cached location. You can read more about caching at http://webhelp.esri.com/arcgisserver/9.3/dotNet/what_is_map_caching.htm.
After a while, you should get the following message prompting that the service has been published:

Now that we have published our Bestaurants service, it is time for us to test whether it is working. Luckily, ArcGIS provides a nice way for testing our services; however, you will be requiring an Internet connection to test them. Go ahead and follow these steps for testing our services:
Open your browser and type in the following address:
http://ARCGISMACHINE:6080/arcgis/rest.Click on Bestaurants (MapServer).
Click on ArcGIS JavaScript to view the map service.
You should see the restaurants of Belize on the web now, which means that your service works perfectly and it is ready to be used for our web application. Take a look at the following screenshot that shows the Bestaurants service data:

Congratulations! You just completed your first basic GIS web application. But we still have a long run to tackle all the client's requirements.
In this chapter, you were introduced to Bestaurants, a web application project for the tourists in Belize to view and search for Belize's best restaurants. We designed the interface of the Bestaurants web application and created a software architecture that will help us in the development process. We learned how a request is executed from the point it is initiated on the browser up until it gets executed in the database and returned. We have installed and configured both ArcGIS for Desktop and ArcGIS for Server from scratch. Finally, we have published the Bestaurants data to ArcGIS for Server as a service and tested that it is working.
In the next chapter, we will build the web application template in HTML and use basic ArcGIS JavaScript API command to connect to the service we published.


