Download code from GitHub
Chapter 1: An Overview of Modern JavaScript
In this chapter, we will talk about some core JavaScript concepts. If you are new to JavaScript and need an introduction, check out Chapter 13, Appendix: Essential JavaScript Concepts.
Understanding some of the modern concepts of JavaScript is not a prerequisite to using Danfo.js, but we recommend going through this chapter if you're new to JavaScript or coming from a Python background, the reason being that we'll be using most of the concepts introduced here when building applications with Danfo.js. Also, it is worth mentioning that many of the concepts introduced here will, in general, help you to write better JavaScript.
This chapter introduces you to some modern JavaScript concepts, and by the end, you will have learned and understand the following concepts:
- Understanding the difference between let and var
- Destructuring
- Spread syntax
- Overview of scopes and closures
- Understanding Array and Object methods
- Understanding the this property
- Arrow functions
- Promises and async/await
- Object-oriented programming and JavaScript classes
- Setting up a modern JavaScript environment with transpilers
- Unit testing with Mocha and Chai
Technical requirements
The major requirement is to have Node.js and NPM installed. You can follow the official installation guide available at https://nodejs.org/en/download/ to install Node for your operating system. The code for this chapter can be found in the GitHub repo here: https://github.com/PacktPublishing/Building-Data-Driven-Applications-with-Danfo.js/tree/main/Chapter01.
We will start this section by understanding the difference between let and var, and why you should use let more often.
Understanding the difference between let and var
Before ECMA 6, the common way of creating a variable was with the use of var. However, using var sometimes introduces bugs that mostly show up at runtime and others that are not revealed at runtime but may affect the way your code works.
Some of the properties of var that introduce bugs as mentioned in the previous paragraph are as follows:
varallows the redeclaration of variables.varis not blocked scope; hence, it is either attached to the global scope or to a function scope.
Let's discuss the two properties listed above in detail.
var allows the redeclaration of variables
var gives users access to redeclare variables along the line, hence overriding the previous variable of the same name. This feature might not show an error if not caught, but will certainly affect the behavior of the code:
var population_count = 490;
var new_count = 10;

//along the line; you mistakenly re-declare the variable
var population_count = "490"

//do some arithmetic operation with the variable
var total_count = population_count + new_count

//output: "49010"
In the preceding code snippet, there won't be any error, but the main objective of the code is altered just because var did not alert us that such a variable has been declared already.
Let's say we replace var with let, as shown in the following code:
let population_count = 490;
// ...some other code goes here
let population_count = "490"

//output: Error: Identifier population count as already being declared
You can see from the preceding error output that let, unlike var, will not allow you to declare a variable in the same namespace twice.
Next, let's look at the scope property of variables declared with var.
var is not a blocked scope
Variables declared with var have the following properties:
- They are readily available in the scope to which they are defined.
- They are available to scope within the range they are being declared.
In the following code, we will check how the estimate variable declared with var is accessible across all the scope within the variable declaration scope:
var estimate = 6000;
function calculate_estimate() {
  console.log(estimate);
}
calculate_estimate() // output 6000

if(true){
 console.log(estimate);
}
Now, for a blocked scope such as if, while loop, and for loop, the code within the blocked scope is meant to be run when the scope is available. Likewise, the variable is meant to exist only when the scope is available, and once the scope is not available again, the variable should not be accessible.
Declaring variables with var makes the preceding statement not possible. In the following code, we declare a variable using var and investigate its availability across all possible scopes:
if(true){
 var estimate = 6000;
}
console.log(estimate)
This will output the estimate as 6000. The variable is not meant to exist outside the if block. Using let helps to solve this:
if(true){
 let estimate = 6000;
}
console.log(estimate)
//output: ReferenceError: estimate is not defined
This shows that using let to declare variables helps reduce unprecedented bugs in your code. In the next section, we'll discuss another important concept called destructuring.
Destructuring
Destructuring is an assignment syntax in JavaScript that makes it easy to unpack values from arrays, or properties from objects, into distinct variables. For example, in the following code snippet, we can easily unpack the values 20, John, Doe, and 2019 into specified variables:
let data2 = [20, "John", "Doe", "2019"];
let [ age1, firstName1, lastName1, year1] = data2
Destructuring makes it possible to assign the element of an array to a variable, unlike the old conventional method of accessing an array element as shown in the following code:
//Old method of accessing an array
let data = [20, "John", "Doe", "2019"];

let firstName = data[1];
let age = data[0];
let lastName = data[2];
let year = data[3];
Destructuring also works on objects, as shown in the following code:
let data3 = {
    age: 20,
    firstName: "john",
    lastName: "Doe",
    year: 2019
}
let { age2, firstName2, lastName2, year2 } = data3
In object destructuring, notice that we use {} instead of [], as used for arrays. This is because the type on the left-hand side must be the same as the type on the right-hand side.
Important note
If we are to use [] while destructuring for an object, we receive an error, showing TypeError, while as a result of using {} for array destructuring, you might not obtain any error, but the variables will be undefined.
In the next section, we take a look at spread syntax.
Spread syntax
Spread syntax is another form of destructuring for iterable elements such as strings and arrays. The spread syntax can be used in many situations involving arrays and objects. In this section, we'll quickly look at some of the use cases of spread syntax.
Spreading or unpacking an iterable into an array
An iterable can be expanded/unpacked into an array. In the following example, we will show how to use the spread operator to unpack a string variable:
let name = "stephen"
let name_array = [...name];
The code expands the name string into name_array, hence, name_array will have the following values: ['s', 't', 'e','p', 'h', 'e','n'].
While expanding the string element into the array, we can add other values alongside, as shown in the following code:
let name = "stephen"
let name_array = [...name, 1,2,3]
console.log(name_array)
// output ['s', 't', 'e','p', 'h', 'e','n',1,2,3]
Remember that any iterable can be spread into an array. This shows that we can also spread one array into another, as demonstrated in the following code:
let series = [1,2,3,4,5,6,7,8]
let new_array = [...series, 100, 200]
console.log(new_array)
// output [1, 2, 3, 4, 5,6, 7, 8, 100, 200]
Next, we'll apply the spread operator to objects.
Creating new objects from existing ones
Creating new objects from existing ones follows the same pattern as the Spread operator:
Let data = {
  age: 20,
  firstName: "john",
  lastName: "Doe",
  year:  2019
}
let  new_data = {...data}
This creates a new object having the same property as the former object. While expanding the former object into the new one, new properties can be added alongside:
let data = {
    age: 20,
    firstName: "john",
    lastName: "Doe",
    year: 2019
}

let new_data = { ...data, degree: "Bsc", level: "expert" }
console.log(new_data)
//output
// {
//     age: 20,
//     Degree: "Bsc",
//     FirstName: "John",
//     lastName: "Doe",
//     Level: "expert",
//     Year: 2019
// }
Function arguments
For functions requiring a lot of arguments, the spread syntax can help pass in a lot of arguments at once into the function, thereby reducing the stress of filling in the function's arguments one after the other.
In the following code, we will see how an array of arguments can be passed into a function:
function data_func(age, firstName, lastName, year) {
    console.log(`Age: ${age}, FirstName: ${firstName}, LastName: ${lastName}, Year: ${year}`);
}
let data = [30, "John", "Neumann", '1948']
data_func(...data)
//output Age: 30, FirstName: John, LastName: Neumann, Year: 1984
Age: 30, FirstName: John, LastName: Neumann, Year: 1984
In the preceding code, first, we created a function called data_func and defined a set of arguments to be passed in. We then created an array containing a list of parameters to pass to data_func.
By using spread syntax, we were able to pass the data array and assign each of the values in the array as an argument value – data_func(...data). This becomes handy whenever a function takes many arguments.
In the next section, we will look at scope and closures, and how to use them to understand your JavaScript code better.
Overview of scopes and closures
In the Understanding the difference between let and var section, we discussed scope and talked about how var is available in the global scope, as well as in the function scope. In this section, we will be moving into scope and closures in a little more depth.
Scope
To understand scope, let's start with the following code:
let food = "sandwich"
function data() {
}
The food variables and data function are both assigned to the global scope; hence, they are termed a global variable and global function. These global variables and functions are always accessible to every other scope and program in the JavaScript file.
The local scope can further be grouped as follows:
- Function scope
- Block scope
Function scope is only available within a function. That is, all variables and functions created within a function scope are not accessible outside the function, and only exist when the function scope is available, for example:
function func_scope(){
// function scope exist here
}
The block scope exists in specific contexts only. For instance, it can exist within a curly brace, { }, along with the if statement, for loop, and while loop. Two more examples are presented in the following code snippets:
if(true){
// if block scope
}
In the preceding if statement, you can see that the block scope only exists inside the curly braces, and all variables declared inside the if statement are local to it. Another example is a for loop, as shown in the following code snippet:
for(let i=0; i< 5; i++){
//for loop's block scope
}
The block scope also exists inside the curly braces of a for...loop. Here, you have access to the i counter, and any variables declared inside cannot be accessed outside the block.
Next, let's understand the concept of closures.
Closure
Closure makes use of the idea of scope within functions. Remember we agreed that the variables declared within a function scope are not accessible outside the function scope. Closure gives us the ability to make use of these private properties (or variables).
Let's say we want to create a program that will always add the values 2 and 1 to an estimate variable representing a population estimate. One way to do this is shown in the following code:
let estimate = 6000;
function add_1() {
    return estimate + 1
}
function add_2() {
    return estimate + 2;
}
console.log(add_1()) // 60001
console.log(add_2()) // 60002
There's nothing wrong with the preceding code, but as the code base becomes very big, we might lose track of the estimate value, perhaps a function along the line to update the value, and we may also want to make the global scope clean by making the global estimate variable a local variable.
Hence, we can create a function scope to do this for us and ultimately, clean the global scope. Here is an example in the following code snippet:
function calc_estimate(value) {
  let estimate = value;
  function add_2() {
    console.log('add two', estimate + 2);
  }
  function add_1() {
    console.log('add one', estimate + 1)
  }
  add_2();
  add_1();
}
calc_estimate(6000) //output: add two 60002 , add one 60001
The preceding code snippet is similar to the first one we defined, with just a tiny difference, that is, the function accepts the estimate value and then creates the add_2 and add_1 functions inside the calc_estimate function.
A better way to showcase closure using the preceding code is to have the ability to update the estimate value whenever we want and not at the instance where the function is called. Let's see an example of this:
function calc_estimate(value) {
  let estimate = value;
  function add_2() {
    estimate += 2
    console.log('add 2 to estimate', estimate);
  }
  return add_2;
}
let add_2 = calc_estimate(50);
// we have the choice to add two to the value at any time in our code
add_2() // add 2 to estimate 52
add_2() // add 2 to estimate 54
add_2() // add 2 to estimate 56
In the preceding code snippet, the inner function, add_2, will add the value 2 to the estimate variable, thereby changing the value. calc_estimate is called and assigned to a variable, add_2. With this, whenever we call add_2, we update the estimated value by 2.
We update the add_2 function inside calc_estimate to accept a value that can be used to update the estimate value:
function calc_estimate(value){
  let estimate = value;
  function add_2(value2){
    estimate +=value2
    console.log('add 2 to estimate', estimate);
  }
  return add_2;
}
let add_2 = calc_estimate(50);
// we have the choice to add two to the value at any time in our code

add_2(2) // add 2 to estimate 52
add_2(4) // add 2 to estimate 56
add_2(1) // add 2 to estimate 5
Now that you've learned about scopes and closures, we will move to arrays, objects, and string methods in the following section.
Further reading
To go into closures in greater detail, check out the book Mastering JavaScript, by Ved Antani.
Understanding Array and Object methods
Arrays and Objects are the two most important data types in JavaScript. As such, we have dedicated a section to talking about some of their methods. We will start with the Array methods.
Array methods
We can't discuss how to build a data-driven product without discussing Array methods. Knowing different Array methods gives us the privilege of accessing our data and creating tools to manipulate/handle our data.
An array can be created in two different forms:
let data = []
// or
let data = new Array()
The [ ] method is mostly used for initializing arrays, while the new Array() method is used mostly to create an empty array of an n size, as shown in the following code snippet:
let data = new Array(5)
console.log(data.length) // 5
console.log(data) //  [empty × 5]
The empty array created can later be filled with values as shown in the following code:
data[0] = "20"
data[1] = "John"
data[2] = "Doe"
data[3] = "1948"
console.log(data) // ["20", "John","Doe","1948", empty]
// try access index 4
console.log(data[4]) //  undefined
Creating such an empty array is not limited to using the new Array() method. It can also be created with the [ ] method, as shown in the following code snippet:
let data = []
data.length = 5; // create an empty array of size 5
console.log(data)  // [empty × 5]
You can see that we explicitly set the length after creation, and as such, the new Array() method is more convenient.
Let's now look at some of the common array methods that will be used in building some of our data-driven tools.
Array.splice
Deleting and updating array values will always be one of the essential things in a data-driven product. JavaScript has a delete keyword to delete a value at a particular index in an array. This method does not actually delete the value, but replaces it with an empty or undefined value, as shown in the following code:
let data = [1,2,3,4,5,6];
delete data[4];
console.log(data) // [1,2,3,4 empty, 6]
In the data variable, if we try to access the value at index 4, we will see that it returns undefined:
console.log(data[4]) // undefined
But whenever we use splice to delete a value in an array, the index of the array is re-arranged, as demonstrated in the following code snippet:
let data = [1,2,3,4,5,6]
data.splice(4,1) // delete index 4
console.log(data) // [1,2,3,4,6]
Array.splice takes in the following argument, start,[deleteCount, value-1,......N-values]. In the preceding code snippet, since we are only deleting, we make use of start and deleteCount.
The data.splice(4,1) command deletes the value starting at index 4, with only one count, hence it deletes the value at index 5.
If we replace the value 1 in data.splice(4,1) with 2, resulting in data.splice(4,2), two values (5 and 6) from the data array will be deleted, starting from index 4, as shown in the following code block:
let data = [1,2,3,4,5,6]
data.splice(4,0,10,20) // add values between 5 and 6
console.log(data) // [1,2,3,4,5,10,20,6]
data.splice(4,0,10, 20); specifies starting at index 4, and 0 specifies that no values should be deleted, while adding the new values (10 and 20) between 5 and 6.
Array.includes
This method is used for checking whether an array contains a particular value. We show an example in the following code snippet:
let data = [1,2,3,4,5,6]
data.includes(6) // true
Array.slice
Array.slice is used to obtain an array element by specifying the range; Array.slice(start-index, end-index). Let's see an example of using this method in the following code:
let data = [1,2,3,4,5,6]
data.slice(2,4)
//output [3,4]
The preceding code extracts elements, starting from index 2 (having element 3) to index 5. Note that the array did not output [3,4,5], but [3,4]. Array.splice always excludes the end index value, and so it uses a close end range.
Array.map
The Array.map method iterates through all the elements of an array, applies some operations to each iteration, and then returns the result as an array. The following code snippet is an example:
let data = [1,2,3,4,5,6]
let data2 = data.map((value, index)=>{
return value + index;
});
console.log(data2) // [1,3,5,7,9,11]
The data2 variable is created by iterating over each data element by using a map method. In the map method, we are adding each element (value) of the array to its index.
Array.filter
The Array.filter method is used to filter out some elements in an array. Let's see this in action:
let data = [1,2,3,4,5,6]
let data2 = data.filter((elem, index)=>{
return (index %2 == 0)
})
console.log(data2) // [1,3,5]
In the preceding code snippet, the array element of data at every even index is filtered out using the modulus (%) of 2.
There are lots of Array methods, but we covered these few methods because they are always handy during data handling, and we will not be able to cover all of them.
However, if any new method is used in later chapters of this book, we will certainly provide an explanation. In the next section, we'll discuss Object methods.
Objects
Objects are the most powerful and important data type in JavaScript, and in this section, we'll introduce some important properties and methods of objects that make working with them easier.
Accessing object elements
Accessing keys/values in an object is important, so there exists a special for...in loop for doing that:
for (key in object) {
  // run some action with keys
}
The for...in loop returns all the keys in an object, and this can be used to access Object values, as demonstrated in the following code:
let user_profile = {
  name: 'Mary',
  sex: 'Female',
  age: 25,
  img_link: 'https://some-image-link.png',
}
for (key in user_profile) {
    console.log(key, user_profile[key]);
}
//output:
// name Mary
// sex Female
// age 25
// img_link https://some-image-link.png
In the next section, we will show how to test the existence of properties.
Testing for the existence of property
To check whether a property exists, you can use the "key" in object syntax, as demonstrated in the following code snippet:
let user_profile = {
  name: 'Mary',
  sex: 'Female',
  age: 25,
  img_link: 'https://some-image-link.png',
}
console.log("age" in user_profile)
//outputs: true

if ("rank" in user_profile) {
    console.log("Your rank is", user_profile.rank)
} else {
    console.log("rank is not a key")
}
//outputs: rank is not a key
Deleting properties
The delete keyword used before an object property will remove a specified property from an object. Look at the following example:
let user_profile = {
    name: 'Mary',
    sex: 'Female',
    age: 25,
    img_link: 'https://some-image-link.png',
}
delete user_profile.age
console.log(user_profile)
//output:
// {
//     img_link: "https://some-image-link.png",
//     name: "Mary",
//     sex: "Female"
// }
You can see that the age property has been successfully removed from the user_profile object. Next, let's look at how to copy and clone objects.
Copying and cloning objects
Assigning an old object to a new one simply creates a reference to the old object. That is, any modification made to the new object also affects the old one. For instance, in the following example, we assign the user_profile object to a new variable, new_user_profile, and then proceed to delete the age property:
let user_profile = {
    name: 'Mary',
    sex: 'Female',
    age: 25,
    img_link: 'https://some-image-link.png',
}
let new_user_profile = user_profile
delete new_user_profile.age

console.log("new_user_profile", new_user_profile)
console.log("user_profile", user_profile)
//output:
// "new_user_profile" Object {
//     img_link: "https://some-image-link.png",
//     name: "Mary",
//     sex: "Female"
// }

// "user_profile" Object {
//     img_link: "https://some-image-link.png",
//     name: "Mary",
//     sex: "Female"
// }
You will notice that deleting the age property from the user_profile object also deletes it from new_user_profile. This is because the copy is simply a reference to the old object.
In order to copy/clone objects as new and independent ones, you can use the Object.assign method, as shown in the following code:
let new_user_profile = {}
Object.assign(new_user_profile, user_profile)

delete new_user_profile.age

console.log("new_user_profile", new_user_profile)
console.log("user_profile", user_profile)

//output
"new_user_profile" Object {
  img_link: "https://some-image-lik.png",
  name: "Mary",
  sex: "Female"
}
"user_profile" Object {
  age: 25,
  img_link: "https://some-image-lik.png",
  name: "Mary",
  sex: "Female"
}
The Object.assign method can also be used to copy properties from more than one object at the same time. We present an example in the following code snippet:
let user_profile = {
  name: 'Mary',
  sex: 'Female',
  age: 25,
  img_link: 'https://some-image-lik.png',
}
let education = { graduated: true, degree: 'BSc' }
let permissions = { isAdmin: true }

Object.assign(user_profile, education, permissions);
console.log(user_profile)
//output:
// {
//     name: 'Mary',
//     sex: 'Female',
//     img_link: 'https://some-image-link.png',
//     graduated: true,
//     degree: 'BSc',
//     isAdmin: true
//   }
You can see that we were able to copy properties from two objects (education and permissions) into our original object, user_profile. In this way, we can copy any number of objects into another one by simply listing all the objects when you call the Object.assign method.
Tip
You can also perform a deep copy with a spread operator. This is actually quicker and easier to write, as demonstrated in the following example:
let user_profile = {
name: 'Mary',
sex: 'Female'
}
let education = { graduated: true, degree: 'BSc' }
let permissions = { isAdmin: true }
const allObjects = {...user_profile, ...education, ...permissions}
Spreading each object, as shown in the preceding code snippet, performs a deep copy of all properties in allObjects. This syntax is easier and quicker than the object.assign method and is largely used today.
In the next section, we will talk about another important concept relating to JavaScript objects called the this property.
Understanding the this property
The this keyword is an object property. When used within a function, it takes the form of the object to which the function is bound at invocation.
In every JavaScript environment, we have a global object. In Node.js, the global object is named global and, in the browser, the global object is named window.
By global object, we mean that all the variable declarations and functions are represented as a property and method of this global object. For example, in a browser script file, we can access the global objects, as shown in the following code snippet:
name = "Dale"
function print() {
    console.log("global")
}
// using the browser as our environment
console.log(window.name) // Dale
window.print() // global
In the preceding code block, the name variable and print function are declared at the global scope, hence they can be accessed as an attribute (window.name) and method (window.print()) of the window global object.
The statement made in the previous sentence can be summarized as the global name and function are binded (or assigned) by default to the global object window.
This also means that we can always bind this variable to any object having the same name variable and the same function, called print.
To get this concept, first, let's re-write window.print() as print.call(window). This new method is called de-sugaring in JavaScript; it is like seeing an implementation of a method in its real form.
The .call method simply takes in the object we want to bind a function call to.
Let's see how print.call() and how this property works. We'll rewrite the print function to access the name variable, as shown in the following code snippet:
name  = "Dale"
object_name = "window"
function print(){
  console.log(`${this.name} is accessed from      ${this.object_name}`)
}
console.log(print.call(window)) // Dale is accessed from window
Now, let's create a custom object and also give it the same property as the window object, as shown in the following code snippet:
let custom_object = {
name: Dale,
Object_name: "custom_object"
}

print.call(custom_object) // Dale is accessed from custom_object
This concept can be applied to all Object methods, as shown in the following code:
data = {
            name: 'Dale',
            obj_name: 'data',
            print: function () {
                console.log(`${this.name} is accessed from ${this.obj_name}`);
            }
        }
data.print() // Dale is accessed from data
// don't forget we can also call print like this
data.print.call(data) // Dale is accessed from data
With this, we can also bind the print() method from data to another object, as shown in the following code snippet:
let data2 = {
 name: "Dale D"
 Object_name: "data2"
}
data.print.call(data2) // Dale D is accessed from data2
This method shows how this property depends on the function invocation runtime. This concept also affects how some event operations work in JavaScript.
Further reading
To get a deeper understanding of this concept, Yehuda Katz, one of the creators of Emberjs and Members of TC39, sheds more light on this in his article, Understanding JavaScript Function Invocation and "this".
Arrow functions
Arrow functions are just unnamed or anonymous functions. The general syntax of arrow functions is shown in the following expression:
( args ) => { // function body }
Arrow functions provide a means of creating concise callable functions. By this, we mean arrow functions are not constructible, that is, they can't be instantiated with the new keyword.
The following are different ways of how and when to use arrow functions:
- The arrow function can be assigned to a variable:
const unnamed = (x) => { console.log(x) } unnamed(10) // 10 - Arrow functions can be used as an IIFE (Immediately Invoked Function Expression). IIFEs are functions that once encountered by the JavaScript compiler are called immediately:
((x) => { console.log(x) })("unnamed function as IIFE") // output: unnamed function as IIFE - Arrow functions can be used as callbacks:
function processed(arg, callback) {
    let x = arg * 2;
    return callback(x);
}
processed(2, (x) => {
    console.log(x + 2)
});   // output:  6
While arrow functions are great in some situations, there is a downside to using them. For example, arrow functions do not have their own this scope, hence its scope is always bound to the general scope, thereby changing our whole idea of function invocation.
In the Understanding the this property section, we talked about how functions are bounded to their invocation scope and using this ability to support closure, but using the arrow function denies us this feature by default:
const Obj = {
     name: "just an object",
     func: function(){
          console.log(this.name);
     }
}
Obj.func() // just an object
Even though in the object, as shown in the code snippet, we make use of the anonymous function (but not the arrow function), we have access to the object's Obj properties:
const Obj = {
     name: "just an object",
     func:  () => {
          console.log(this.name);
     }
}
Obj.func() // undefined
The arrow function used makes the Obj.func output undefined. Let's see how it works if we have a variable called name in the global scope:
let name = "in the global scope"
const Obj = {
     name: "just an object",
     func:  () => {
          console.log(this.name);
     }
}

Obj.func() // in the global
As we can see, Obj.func makes a call to the variable in the global scope. Hence, we must know when and where to use the arrow functions.
In the next section, we will talk about Promises and async/await concepts. This will give us the power to easily manage long-running tasks and avoid callback hell (callbacks having callbacks).
Promises and async/await
Let's dive a bit into the world of Asynchronous functions, functions that we call now but finish later. In this section, we will see why we need Promise and async/await.
Let's start with a simple problem as shown in the following code snippet. We are given a task to update an array with a function, after 1 second of calling the function:
let syncarray = ["1", "2", "3", "4", "5"]
function addB() {
    setTimeout(() => {
        syncarray.forEach((value, index)=>{
            syncarray[index] = value + "+B"
        })
        console.log("done running")
    }, 1000)
}
addB()
console.log(syncarray);
// output
// ["1", "2", "3", "4", "5"]
// "done running"
console.log(syncarray) is executed before the addB() function, hence we see the syncarray output before it is being updated. This is an Asynchronous behavior. One of the ways to solve this is to use a callback:
let syncarray = ["1", "2", "3", "4", "5"]
function addB(callback) {
    setTimeout(() => {
        syncarray.forEach((value, index)=>{
            syncarray[index] = value + "+B"
        })
        callback() //call the callback function here
    }, 1000)
}
addB(()=>{
  // here we can do anything with the updated syncarray
  console.log(syncarray);
})
// output
// [ '1+B', '2+B', '2+B', '4+B', '5+B' ]
Using the preceding callback approach means that we always pass in callbacks in order to perform other operations on the updated syncarray function. Let's update the code a little, and this time we'll also add the string "A" to syncarray and then print out the updated array:
let syncarray = ["1", "2", "3", "4", "5"]
function addB(callback) {
    setTimeout(() => {
        syncarray.forEach((value, index) => {
            syncarray[index] = value + "+B"
        })
        callback() //call the callback function here
    }, 1000)
}
addB(() => {
    setTimeout(() => {
        syncarray.forEach((value, index) => {
            syncarray[index] = value + "+A";
        })
        console.log(syncarray);
    }, 1000)
})
// output
// [ '1+B+A', '2+B+A', '3+B+A', '4+B+A', '5+B+A' ]
The preceding code block shows a quick way of passing callback. Based on the arrow function we discussed, it can be more organized by creating a named function.
Cleaning callbacks with promises
Using callbacks quickly becomes unwieldy and can quickly descend into callback hell. One method of freeing ourselves from this is to make use of Promises. Promises makes our callbacks more organized. It gives a chainable mechanism to unify and orchestrate code that is dependent on previous functions, as you'll see in the following code block:
let syncarray = ["1", "2", "3", "4", "5"]
function addA(callback) {
    return new Promise((resolve, reject) => {
        setTimeout(() => {
            syncarray.forEach((value, index) => {
                syncarray[index] = value + "+A";
            })
            resolve()
        }, 1000);
    })
}
addA().then(() => console.log(syncarray));
//output
//[ '1+A', '2+A', '2+A', '4+A', '5+A' ]
In the preceding code snippet, setTimeout is wrapped inside the Promise function. A Promise is always instantiated using the following expression:
New Promise((resolve, rejection) => {
})
A Promise is either resolved or rejected. When it is resolved, then we are free to do other things, and when it is rejected, we need to handle the error.
For example, let's ensure that the following Promise is rejected:
let syncarray = ["1", "2", "3", "4", "5"]
function addA(callback) {
    return new Promise((resolve, reject) => {
        setTimeout(() => {
            syncarray.forEach((value, index) => {
                syncarray[index] = value + "+A";
            })
            let error = true;
            if (error) {
                reject("just testing promise rejection")
            }
        }, 1000);
    })
}
addA().catch(e => console.log(e)) // just testing promise rejection
And whenever we have multiple promises, we can use the .then() method to handle each one:
addA.then(doB)
     .then(doC)
     .then(doD)
     .then(doF)
     .catch(e= > console.log(e));
The use of multiple .then() methods to handle numerous promises can quickly become unwieldy. To prevent this, we can use methods such as Promise.all(), Promise.any(), and Promise.race().
The Promise.all() method takes in an array of promises to be executed, and will only resolve when all promises are fulfilled. In the following code snippet, we add another Asynchronous function to our previous example and use Promise.all() to handle them:
let syncarray = ["1", "2", "2", "4", "5"]
function addA() {
    return new Promise((resolve, reject) => {
        setTimeout(() => {
            syncarray.forEach((value, index) => {
                syncarray[index] = value + "+A";
            })
            resolve()
        }, 1000);
    })
}
function addB() {
    return new Promise((resolve, reject) => {
        setTimeout(() => {
            syncarray.forEach((value, index) => {
                syncarray[index] = value + "+B";
            })
            resolve()
        }, 2000);
    })
}
Promise.all([addA(), addB()])
.then(() => console.log(syncarray)); // [ '1+A+B', '2+A+B', '2+A+B', '4+A+B', '5+A+B' ]
From the output in the preceding section, you can see that each Asynchronous function gets executed in the order it was added, and the final result is the effect of both functions on the syncarray variable.
The promise.race method, on the other hand, will return as soon as any promise in the array is resolved or rejected. You can think of this as a race where each promise tries to resolve or reject first, and as soon as this happens, the race is over. To see an in-depth explanation as well as code examples, you can visit the MDN docs here: https://developer.mozilla.org/en-US/docs/Web/JavaScript/Reference/Global_Objects/Promise/any.
And finally, the promise.any method will return on the first fulfilled promise irrespective of any other rejected promise function. If all promises are rejected, then Promise.any rejects promises by providing errors for all of them. To see an in-depth explanation as well as code examples, you can visit the MDN docs here: https://developer.mozilla.org/en-US/docs/Web/JavaScript/Reference/Global_Objects/Promise/race.
While using promises to work with callback solves a lot of issues, there is an even better way of implementing or using them. These are called async/await functions. We'll introduce these functions and show you how to use them in the following section.
async/await
As said earlier, async/await provides a more elegant way of working with promises. It gives us the power to control how and when each promise function gets called inside a function, instead of using .then() and Promise.all().
The following code snippet shows how you can use async/await in your code:
Async function anyName() {
    await anyPromiseFunction()
         await anyPromiseFunction()
}
The preceding async function can contain as many promise functions as possible, each waiting for the other to execute before being executed. Also, note that an async function is resolved as a Promise. that is, you can only obtain the return variable of the preceding anyName function (or resolve the function) using .then() or by calling it in another async/await function:
Async function someFunction() {
    await anyPromiseFunction()
         await anotherPromiseFunction()
    return "done"
}
// To get the returned value, we can use .then()
anyName().then(value => console.log(value)) // "done"
// we can also call the function inside another Async/await function
Async function resolveAnyName() {
   const result = await anyName()
   console.log(result)
}
resolveAnyName() // "done"
With this knowledge, here is how we can rewrite the promise execution from the previous section instead of using Promise.all([addA(), addB()]):
let syncarray = ["1", "2", "2", "4", "5"]
function addA(callback) {
    return new Promise((resolve, reject) => {
        setTimeout(() => {
            syncarray.forEach((value, index) => {
                syncarray[index] = value + "+A";
            })
            resolve()
        }, 1000);
    })
}
function addB(callback) {
    return new Promise((resolve, reject) => {
        setTimeout(() => {
            syncarray.forEach((value, index) => {
                syncarray[index] = value + "+B";
            })
            resolve()
        }, 2000);
    })
}
Async function runPromises(){
    await addA()
    await  addB()
    console.log(syncarray);
  }
runPromises()
//output: [ '1+A+B', '2+A+B', '2+A+B', '4+A+B', '5+A+B' ]
You can see from the preceding output that we have the same output as when using the Promise.all syntax, but are adopting a minimal and cleaner approach.
Note
One drawback of using multiple awaits as opposed to promise.all is efficiency. Though minor, promise.all is the preferred and recommended way to handle multiple independent promises.
This thread (https://stackoverflow.com/questions/45285129/any-difference-between-await-promise-all-and-multiple-await) on Stack Overflow clearly explains why this is the recommended way to handle multiple promises.
In the next section, we'll discuss object-oriented programming (OOP) in JavaScript, and how to use ES6 classes.
Object-oriented programming and JavaScript classes
OOP is a common programming paradigm supported by most high-level languages. In OOP, you typically program an application using the concept of objects, which can be a combination of data and code.
Data represents information about the object, while code represents attributes, properties, and behaviors that can be carried out on objects.
OOP opens up a whole new world of possibilities as many problems can be simulated or designed as the interaction between different objects, thereby making it easier to design complex programs, as well as maintain and scale them.
JavaScript, like other high-level languages, provides support for OOP concepts, although not fully (https://developer.mozilla.org/en-US/docs/Web/JavaScript/Reference/Classes), but in essence, most of the important concepts of OOP, such as objects, classes, and inheritance, are supported, and these are mostly enough to solve many problems you wish to model using OOP. In the following section, we will briefly look at classes and how these are related to OOP in JavaScript.
Classes
Classes in OOP act like a blueprint for an object. That is, they define a template of an abstract object in such a way that multiple copies can be made by following that blueprint. Copies here are officially called instances. So, in essence, if we define a class, then we can easily create multiple instances of that class.
In ECMA 2015, the class keyword was introduced to JavaScript, and this greatly simplified the creation of classes in the language. The following code snippet shows how to model a User object using the ES16 class keyword:
class User {
    constructor(firstName, lastName, email) {
        this.firstName = firstName;
        this.lastName = lastName;
        this.email = email;
    }
    getFirstName() {
        return this.firstName;
    }
    getLastName() {
        return this.lastName;
    }
    getFullName() {
        return `${this.firstName} ${this.lastName}`;
    }
    getEmail() {
        return this.email;
    }
    setEmail(email) {
        this.email = email;
    }
}
let Person1 = new User("John", "Benjamin", "john@some-email.com")
console.log(Person1.getFullName());
console.log(Person1.getEmail());
// outputs
// "John Benjamin"
// "john@someemail.com"
By using the class keyword, you can wrap both data (names and email) with functionality (functions/methods) in a cleaner way that aids easy maintenance as well as understanding.
Before we move on, let's break down the class template in more detail for a better understanding.
The first line starts with the class keyword and is usually followed by a class name. A class name, by convention, is written in camel case, for instance, UserModel or DatabaseModel.
An optional constructor can be added inside a class definition. A constructor class is an initialization function that runs every time a new instance is created from a class. Here, you'll normally add code that initializes each instance with specific properties. For instance, in the following code snippet, we create two instances from the User class, and initialize them with specific properties:
let Person2 = new User("John", "Benjamin", "john@some-email.com")
let Person3 = new User("Hannah", "Joe", "hannah@some-email.com")
console.log(Person2.getFullName());
console.log(Person3.getFullName());
//outputs
// "John Benjamin"
// "Hannah Montanna"
The next important part of a class is the addition of functions. Functions act as class methods and generally add a specific behavior to the class. Functions are also available to every instance created from the class. In our User class, methods such as getFirstName, getLastName, getEmail, and setEmail are added to perform different functions based on their implementation. To call functions on class instances, you typically use a dot notation, as you would when accessing an object's property. For example, in the following code, we return the full name of the Person1 instance:
Person1.getFullName()
With classes out of the way, we now move to the next concept in OOP, called inheritance.
Inheritance
Inheritance in OOP is the ability of one class to use properties/methods of another class. It is an easy way of extending the characteristics of one class (subclass/child class) using another class (superclass/parent class). In that way, the child class inherits all the characteristics of the parent class and can either extend or change these properties. Let's use an example to better understand this concept.
In our application, let's assume we already have the User class defined in the previous section, but we want to create a new set of users called Teachers. Teachers are also a class of users, and they will also require basic properties, such as the name and email that the User class already has. So, instead of creating a new class with these existing properties and methods, we can simply extend it, as shown in the following code snippet:
class Teacher extends User {
}
Note that we use the extends keyword. This keyword simply makes all the properties in the parent class (User) available to the child class (Teacher). With just the basic setup, the Teacher class automatically has access to all the properties and methods of the User class. For instance, we can instantiate and create a new Teacher in the same way we created a User value:
let teacher1 = new Teacher("John", "Benjamin", "john@someemail.com")
console.log(teacher1.getFullName());
//outputs
// "John Benjamin"
After extending a class, we basically want to add new features. We can do this by simply adding new functions or properties inside the child class template, as shown in the following code:
class Teacher extends User {
  getUserType(){
    return "Teacher"
  }
}
In the preceding code snippet, we added a new method, getUserType, which returns a string of the user type. In this way, we can add more features that were not originally in the parent class.
It is worth mentioning that you can replace parent functions in the child class by creating a new function in the child class with the same name. This process is called method overriding. For instance, to override the getFullName function in the Teacher class, we can do the following:
class User {
    constructor(firstName, lastName, email) {
        this.firstName = firstName;
        this.lastName = lastName;
        this.email = email;
    }
    getFirstName() {
        return this.firstName;
    }
    getLastName() {
        return this.lastName;
    }
    getFullName() {
        return `${this.firstName} ${this.lastName}`;
    }
    getEmail() {
        return this.email;
    }
    setEmail(email) {
        this.email = email;
    }
}
class Teacher extends User {
    getFullName(){
      return `Teacher: ${this.firstName} ${this.lastName}`;
    }
    getUserType(){
      return "Teacher"
    }
  }
let teacher1 = new Teacher("John", "Benjamin", "john@someemail.com")
console.log(teacher1.getFullName());
//output
// "Teacher: John Benjamin"
A question may arise here: What if we want to initialize the Teacher class with additional instances besides firstname, lastname, and email? This is achievable, and we can easily extend the constructor function by using a new keyword, super. We demonstrate how to do this in the following code:
// class User{
// previous User class goes here
//     ...
// }

class Teacher extends User {
    constructor(firstName, lastName, email, userType, subject) {
        super(firstName, lastName, email) //calls parent class constructor
        this.userType = userType
        this.subject = subject
    }
    getFullName() {
        return `Teacher: ${this.firstName} ${this.lastName}`;
    }
    getUserType() {
        return "Teacher"
    }
}
let teacher1 = new Teacher("Johnny", "Benjamin", "john@someemail.com", "Teacher", "Mathematics")
console.log(teacher1.getFullName());
console.log(teacher1.userType);
console.log(teacher1.subject);
//outputs
// "Teacher: Johnny Benjamin"
// "Teacher"
// "Mathematics"
In the preceding code, we are performing two new things. First, we add two new instance properties (userType and subject) to the Teacher class, and then we are calling the super function. The super function simply calls the parent class (User), and performs the instantiation, and immediately after, we initialize the new properties of the Teacher class.
In this way, we are able to first initialize the parent properties before initializing the class properties.
Classes are very useful in OOP and the class keyword provided in JavaScript makes working with OOP easy. It is worth mentioning that under the hood, JavaScript converts the classes template to an object, as it does not have first-class support for classes. This is because JavaScript, by default, is a prototype-based, object-oriented language. Hence, the class interface provided is called syntactic sugar over the underlying prototype-based model, which JavaScript calls under the hood. You can read more about this at the following link: http://es6-features.org/#ClassDefinition.
Now that we have a basic understanding of OOP in JavaScript, we are ready to create complex applications that can be easily maintained. In the next section, we will discuss another important aspect of JavaScript development, which is setting up a development environment with modern JavaScript support.
Setting up a modern JavaScript environment with transpilers
One of the unique features of JavaScript, and the reason why it is very popular, is its cross-platform support. JavaScript runs almost everywhere, from browsers and desktops to even on the server side. While this is a unique feature, getting JavaScript to run optimally in these environments requires some setup and configuration using third-party tools/libraries. Another reason why you need to set up tooling is that you can write JavaScript in different flavors, and because these modern/newer flavors may not be supported by older browsers. This means that the code you write in newer syntax, typically post-ES15, will need to be transpiled into pre-ES16 format for it to run properly in most browsers.
In this section, you will learn how to set up and configure a JavaScript project to support cross-platform and modern JavaScript code. You will use two popular tools – Babel and webpack – to achieve this.
Babel
Babel is a tool for converting JavaScript code written in ES15 code into a backward-compatible version of JavaScript in modern or older browsers. Babel can help you to do the following:
- Transform/transpile syntax.
- Polyfill features that are missing in your target environment. Some modern features that are not available in older environments are automatically added by Babel.
- Transform source code.
In the following code, we show an example of a Babel-transformed code snippet:
// Babel Input: ES2015 arrow function
["Lion", "Tiger", "Shark"].map((animal) => console.log(animal));

// Babel Output: ES5 equivalent
["Lion", "Tiger", "Shark"].map(function(animal) {
  console.log(animal)
});
You will notice that in the preceding code snippet, the modern arrow function is automatically transpiled to the function keyword that is supported by all browsers. This is what Babel does under the hood to your source code.
Next, let's understand where webpack comes in.
Webpack
webpack is also a transpiler, and can perform the same function as Babel, and even more. webpack can package and bundle just about anything, including images, HTML, CSS, and JavaScript, into a single optimized script that can easily be used in the browser.
In this section, we'll leverage both Babel and webpack to show you how to set up a cross-platform JavaScript project. Let's dive right in.
Example project using Babel and webpack
In this section, we're going to create a simple JavaScript project using npm. As such, you should have Node.js installed locally in order to follow along. Perform the following steps to achieve this:
- Open a terminal in your preferred directory and create a folder with the following commands:
$ mkdir cross-env-js
$ cd cross-env-js
This will create a folder,
cross-env-js, in your directory, and then change the directory as well. - Create a
package.jsonfile. While you can do this manually, it is easier to create one usingnpm. Run the following command in your terminal:$ npm init -y
The preceding code will create a
package.jsonfile and accept all default options. Ideally, this should output the following:
Figure 1.1 – Output from running the npm init –y command
- Next, install all the relevant packages that will help us to perform bundling and transpilation:
$ npm install --save-dev @babel/core @babel/cli @babel/preset-env babel-loader webpack webpack-cli
$ npm install --save @babel/polyfill
Note that you install most packages as development dependencies. This is important so that your final code is not bundled with packages you only need during development. After installing these packages, your
package.jsonfile should look like this:{ "name": "cross-env-js", "version": "1.0.0", "description": "", "main": "index.js", "scripts": { "test": "echo \"Error: no test specified\" && exit 1" }, "keywords": [], "author": "", "license": "ISC", "devDependencies": { "@babel/cli": "^7.12.8", "@babel/core": "^7.12.9", "@babel/preset-env": "^7.12.7", "babel-loader": "^8.2.2", "webpack": "^5.9.0", "webpack-cli": "^4.2.0" }, "dependencies": { "@babel/polyfill": "^7.12.1" } } - Add some code, which we'll transpile and test. For this section, you can either create files and folders from the terminal or use a code editor. I'll use the Visual Studio Code editor here.
In your code editor, open the
cross-env-jsproject folder and then create the files and folders as follows:├── dist │ └── index.html ├── src │ ├── index.js │ ├── utils.js
That is, you will create two folders called
distandsrc.distwill contain an HTML file (index.html), which will be used to test our bundled application, andsrcwill contain our modern JavaScript code that we want to transpile.After creating these files and folders, your entire directory structure should look like this:
├── dist
│   └── index.html
├── node_modules
├── package-lock.json
├── package.json
└── src
    ├── index.js
    └── utils.js
Note
If you're using version control such as Git, you will typically add a
.gitignorefile to specify thatnode_modulescan be ignored. - Create a
distfolder, and in that folder, create anindex.htmlfile with the following code:<!DOCTYPE html> <html lang="en"> <head> <meta charset="UTF-8"> <meta name="viewport" content="width=device-width, initial-scale=1.0"> <script src="bundle.js"></script> <title>Cross Environment Support</title> </head> <body> </body> </html>
The HTML file should be familiar to you, but notice that we added a
scripttag pointing to abundle.jsfile. This file does not yet exist and will be generated by webpack using Babel under the hood. - Write some modern JavaScript in the
srcfolder. Starting withutils.js, we'll create and export some functions, and then import them to be used inindex.js.Starting with
utils.js, add the following code:const subjects = { John: "English Language", Mabel: "Mathematics", Mary: "History", Joe: "Geography" } export const names = ["John", "Mabel", "Mary", "Joe"] export const getSubject = (name) =>{ return subjects[name] }The
utils.jsscript uses some modern JS syntax, such asexportand arrow functions, and these will only be compatible with older browsers after transpilation.Next, in the
index.jsscript, you'll import these functions and use them. Add the following code to yourindex.jsscript:import { names, getSubject } from "./utils"; names.forEach((name) =>{ console.log(`Teacher Name: ${name}, Teacher Subject: ${getSubject(name)}`) })You'll notice that we are also using arrow functions and the destructuring import in the
index.jsfile. Here, we're importing the exported array (names) and thegetSubjectfunction from theutils.jsscript. We are also using a combination of the arrow function and template literals (` `) to retrieve and log the details of eachTeacher. - Now that our modern JS files are ready, we'll create a configuration file that tells webpack where to find our source code to bundle as well as which transpiler to use, in our case, Babel.
In your root directory, create a
webpack.config.jsfile and add the following code:const path = require('path'); module.exports = { entry: './src/index.js', output: { filename: 'bundle.js', path: path.resolve(__dirname, 'dist'), publicPath: '/dist' }, module: { rules: [ { test: /\.js$/, exclude: /(node_modules)/, use: { loader: 'babel-loader', } } ] } };Let's understand what is going on in this file:
a) The first part of the config file requires the
pathmodule, which will help resolve all path-related functions.b) Next, you will notice the
entryfield. This field simply tells webpack where to find the starting/main script. webpack will use this file as a starting point, and then recursively walk through each import dependency to link all files relating to the entry file.c) The next field is
output, and this tells webpack where to save the bundled file. In our example, we are saving bundled files to thedistfolder under the namebundle.js(remember we referencedbundle.jsin our HTML file).d) Finally, in the
modulefield, we specify that we want to transpile each script using Babel, and we also exclude transpilingnode_modules. With this webpack configuration file, you're ready to transpile and bundle your source code. - In your
package.jsonfile, you'll add a script command that will callwebpack, as shown in the following code block:{ ... "scripts": { "build": "webpack --mode=production", "test": "echo \"Error: no test specified\" && exit 1" }, ... } - In your terminal, run the following command:
$ npm run build
This command will call the build script in your
package.jsonfile, and this, in turn, will ask webpack to bundle your code referencing the config file you created earlier.Following successful compilation, you should have the following output in your terminal:

Figure 1.2 – webpack bundling successful output
Upon successful completion of the preceding steps, you can navigate to the dist folder where you will find an extra file – bundle.js. This file has already been referenced by the index.html file, and as such will be executed anytime we load the index.html file in the browser.
To test this, open the index.html file in your default browser. This can be done by navigating to the directory and double-clicking on the index.html file.
Once you have the index.html file opened in your browser, you should open the developer console, where you can find your code output, as in the following screenshot:

Figure 1.3 – index.js output in the browser console
This shows that you have successfully transpiled and bundled your modern JS code into a format that can be executed in any browser, be it old or new.
Further reading
Bundling files can quickly become difficult and confusing, especially as the project gets bigger. If you require further understanding of how to bundle files, you can reference the following resources:
* Getting Started (https://webpack.js.org/guides/getting-started/) with webpack
* Usage Guide (https://babeljs.io/docs/en/usage) for Babel
* How to enable ES6 (and beyond) syntax with Node and Express (https://www.freecodecamp.org/news/how-to-enable-es6-and-beyond-syntax-with-node-and-express-68d3e11fe1ab/)
In the next section, you'll learn how to set up testing and perform unit testing in your JavaScript application.
Unit testing with Mocha and Chai
Writing tests for your application code is very important, but rarely talked about in most books. This is why we have decided to add this section on unit testing with Mocha. While you may not necessarily write verbose tests for every sample app you'll be building in this book, we will show you the basics you need to get by and you can even use them in your own project.
Testing, or automated testing, is used during development to check that our code actually behaves as expected. That is, you, the writer of a function, will generally know beforehand how the function behaves and therefore can test the outcome with the expected outcome.
Mocha is a popular and feature-rich test framework for JavaScript. It provides various testing functions, such as it and describe, which can be used to write and run tests automatically. The beautiful thing about Mocha is that it can run in both node and browser environments. Mocha also supports integration with various assertion libraries such as Chai (https://www.chaijs.com/), Expect.js (https://github.com/LearnBoost/expect.js), Should.js (https://github.com/shouldjs/should.js), or even Node.js' built-in assert (https://nodejs.org/api/assert.html) module. In this book, we'll use the Chai assertion library, as it is one of the most commonly used assertion libraries with Mocha.
Setting up a test environment
Before we begin writing tests, we'll set up a basic Node.js project. Perform the following steps to achieve this:
- In your current working directory, create a new folder called
unit-testing:$ mkdir unit-testing $ cd unit-testing
- Initialize a new Node.js project using
npm, as shown in the following command:$ npm init -y
- Install Mocha and Chai as development dependencies:
$ npm install mocha chai --save-dev
- Following successful installation, open your
package.jsonfile and change thetestcommand inscriptsto the following:{ ... "scripts": { "test": "mocha" }, ... }This means that we can run tests by running the
npm run testcommand in the terminal. - Create two folders,
srcandtest. Thesrcfolder will contain our source code/scripts, while thetestfolder will contain corresponding tests for our code. Your project tree should look like the following after creating the folders:├── package-lock.json ├── package.json ├── src └── test
- In the
srcfolder, create a script calledutils.js, and add the following functions:exports.addTwoNumbers = function (num1, num2) { if (typeof num1 == "string" || typeof num2 == "string"){ throw new Error("Cannot add string type to number") } return num1 + num2; }; exports.mean = function (numArray) { let n = numArray.length; let sum = 0; numArray.forEach((num) => { sum += num; }); return sum / n; };The preceding functions perform some basic computation. The first one adds two numbers and returns the result, while the second function computes the mean of numbers in an array.
Note
We are writing pre-ES16 JavaScript here. This is because we do not plan to set up any transpiler for this sample project. In a project using modern JavaScript, you'll typically transpile source code before testing it.
- In your
testfolder, add a new file, also calledutils.js. This naming convention is recommended, as different files should bear the same name as their corresponding source code. In theutils.jsfile in yourtestfolder, add the following code:const chai = require("chai"); const expect = chai.expect; const utils = require("../src/utils"); describe("Test addition of two numbers", () => { it("should return 20 for addition of 15 and 5", () => { expect(utils.addTwoNumbers(15, 5)).equals(20); }); it("should return -2 for addition of 10 and -12", () => { expect(utils.addTwoNumbers(10, -12)).equals(-2); }); it("should throw an error when string data type is passed", () => { expect(() => utils.addTwoNumbers("One", -12)).to.throw( Error, "Cannot add string type to number" ); }); }); describe("Test mean computation of an array", () => { it("should return 25 as mean of array [50, 25, 15, 10]", () => { expect(utils.mean([50, 25, 15, 10])).equals(25); }); it("should return 2.2 as mean of array [5, 2, 1, 0, 3]", () => { expect(utils.mean([5, 2, 1, 0, 3])).equals(2.2); }); });In the first three lines of the preceding code snippet, we are importing
chaiandexpect, as well as theutilsscripts, which contain our source code.Next, we use Mocha's
describeanditfunctions to define our test cases. Note that we have twodescribefunctions corresponding to the two functions we have in our source code. This means that eachdescribefunction will contain individual unit tests that test different aspects of our code.The first
describefunction tests theaddTwoNumberfunction and includes three unit tests, one of which tests whether the correct error is thrown on a passing string data type. The seconddescribefunction tests themeanfunction by providing different values. - To run our test, go to your terminal and run the following command:
$ npm test
This command executes the script test defined in your
package.jsonfile, and outputs a formatted test case report, as shown in the following screenshot:

Figure 1.4 – Mocha test output showing all tests passed
By following the preceding steps, we were able to write and run some tests that passed on the first run. This may not be the case most times, as your test will generally fail a lot before passing, especially when you have numerous unit tests for different edge cases.
As an example, we'll add a new test case that expects an error when the array passed to the mean function contains no element.
In the test script, under the second describe function, add the following unit test:
...
 it("should throw error on empty array arg", () => {
    expect(() => utils.mean([])).to.throw(Error, "Cannot compute mean of empty array")
  });
...
By running the test again, we'll see the following error:
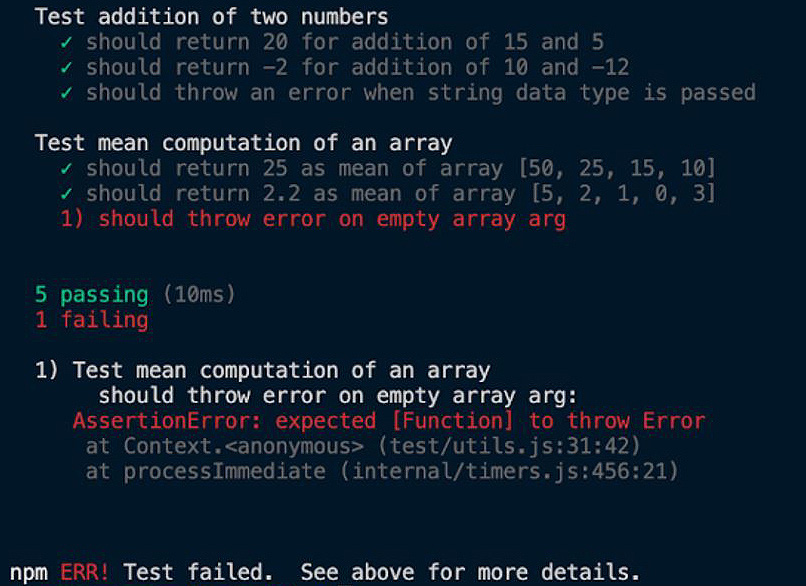
Figure 1.5 – Mocha test output showing one failed test
The error message provided by Mocha tells us that our function is expected to throw an error when an empty array is passed, but it is currently not doing that. To fix this error, we'll go to our source code and update the mean function, as shown in the following code block:
exports.mean = function (numArray) {
  if (numArray.length == 0){
    throw new Error("Cannot compute mean of empty array")
  }
  let n = numArray.length;
  let sum = 0;
  numArray.forEach((num) => {
    sum += num;
  });

  return sum / n;
};
Now, if we run the test again, we should see it pass successfully:
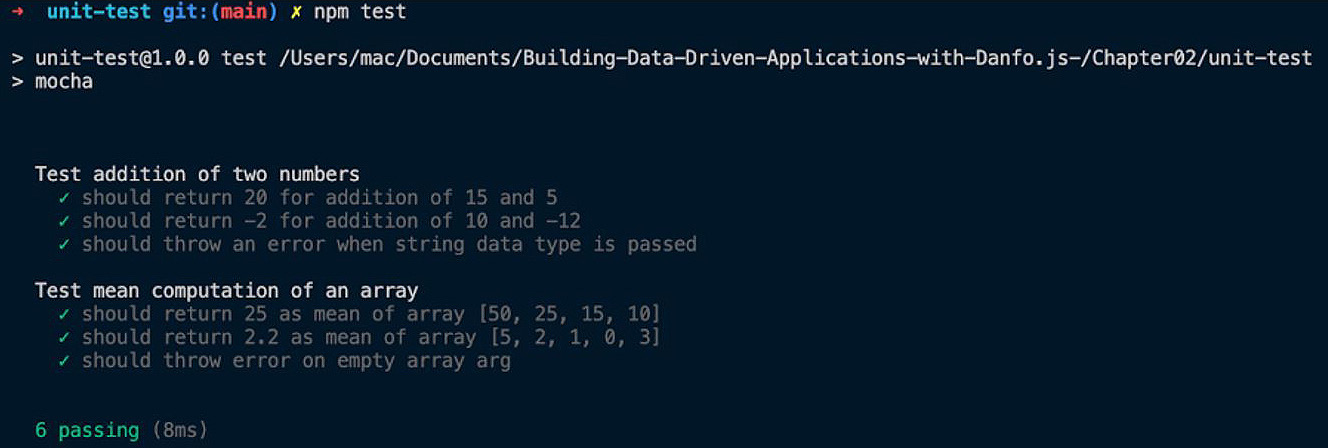
Figure 1.6 – Mocha test output showing that all tests passed
Further reading
Mocha is versatile and provides support for almost all test cases and scenarios you'll encounter. To learn more, you can visit the official documentation here: https://mochajs.org/.
Chai, on the other hand, provides numerous assertion statements and functions that you can use to enrich your test. You can learn more about these assertions here: https://www.chaijs.com/api/.
Congratulations on making it to the end of this chapter! It was a lengthy one, but the concepts covered are important, as they will help you build better data-driven products, as you'll see in future chapters.
Summary
In this chapter, we introduced and discussed some of the modern JavaScript syntax introduced in ECMA 6. We first considered the difference between let and var and discussed why let is the preferred method for initializing variables. Following that, we discussed destructuring, the spread operator, scopes, and also closures. We then went on to introduce some important methods of arrays, objects, and strings. Following that, we talked about arrow functions, including their advantages over traditional functions, and then we moved on to discuss JavaScript promises and async/await.
We then looked briefly at OOP concepts and support in JavaScript with examples showing how to write classes. We also learned how to set up a modern JavaScript environment with transpiling and bundling support using tools such as Babel and webpack. Finally, we introduced unit testing using Mocha and the Chai library.
In the next chapter, we will introduce Dnotebook, an interactive computing environment that enables quick and interactive experimentation in JavaScript.