Download code from GitHub
Games are fun, and they're super cool. They've quickly replaced baseball as America's favorite pastime (heck, the world's for that matter). But with teams of hundreds of people developing games for major development companies, how do indie developers, small companies, or even marketing agencies keep up with the amount of work to get a game to market in time? Enter Buildbox, a code-free game development tool for mobile and desktops alike.
Before we really get started, let's set some expectations. Just like a contractor building a house, a video game developer has several tools in their toolbox, each with their own purpose. Although these may (at times) overlap, each development platform has its strengths and weaknesses.
Buildbox is a truly code-free solution for developing video games. You won't be developing any First Person Shooter (FPS, such as Call of Duty) games using Buildbox, nor any (Massive Multiplayer Online Role Playing Games (MMORPGs, such as World of Warcraft). But what you can do is quickly develop entertaining mobile and computer games that are 2D or 2.5D (isometric).
And that's why you should choose Buildbox to develop such a game... speed. In fact, what you'll find through the course of this book is that the most time-consuming part of using Buildbox isn't actually Buildbox. It's creating the graphic and audio assets for your games using your favorite graphics and audio software.
When considering what your game will be, it's important to factor the limitations of your target platform into the equation. It seems like forever that Android mobile platforms limited applications to 50 MB in base size (one could make them bigger with extensions, but this could require some extra coding). A 50 MB video game is not very exciting, especially when you consider that a mere 10 minutes of music for such a game would take up around 10 MB or 20% of the game package.
Luckily, in late 2015, the powers that be raised that limitation of the base application (also known as an APK file) to 100 MB. While that's still not a lot by today's standards, it's still plenty for developing an entertaining game. Since Android's limitation is 100 MB—and so is iOS (Apple)—that's what we'll use as our hard limit. However, if we were strictly developing a game for Windows or Macintosh computers, we could ignore this limitation. This brings us to...
Buildbox is pretty amazing in that it can export games for several platforms. As each platform has its own unique intricacies, you can see just how exciting it is that a developer may create one project that exports to several different distribution channels for several platforms. Let's take a quick look:

Note
Downloading the color images of this book:
We also provide you with a PDF file that has color graphics of the screenshots/diagrams used in this book. These graphics will help you better understand the changes in the output. You can download this file at the following link: http://www.packtpub.com/sites/default/files/downloads/Buildbox2xGameDevelopment_ColorImages.pdf.
The preceding image shows the various platforms Buildbox 2 is designed to support. Again, with Buildbox, you won't be making the next PlayStation or XBOX FPS. But you can make the next Flappy Bird or Mario Bros.
The actual process for getting the games onto the various platforms is a bit more complex than the previous image implies. We'll get into the nuts and bolts of the various workflows for export in a later chapter. Suffice it to say, though, that the ability to use one project is definitely a big check mark in the pros column for Buildbox.
You'll notice that there is some duplication of platforms among the various distribution channels (Windows EXE and Steam, or Amazon and Google Play). This is because exporting and some parameters differ between those distribution channels. Confused? Don't worry, we'll clear up the differences between distribution channels and platforms in just a bit.
Before we dive into the interface, and dive further into what we're going to cover in this book, let's clear up some terms (such as distribution channels and platforms):
- Asset: Any element used in your project. An asset can be anything from a graphic to a sound effect MP3.
- Project: The Buildbox file used to create the game.
- Element: The use of a visual asset within Buildbox, for example, a button on a menu screen is considered an element.
- Animation: The movement of an element within Buildbox.
- Animated element: An element consisting of an image sequence giving the appearance of animation, for instance, a running sequence (known as a walk cycle) on the main character to show them running when moving.
- Physics: A type of animation within Buildbox allowing movement based on environmental parameters (falling with gravity, bouncing with collisions, and so on).
- Export: A set of files generated by Buildbox.
- Compile: The act of taking exported files from Buildbox and creating an executable program (or app) from those exported files.
- Compiler: Software used to compile.
- Platform: A system that will run your compiled program or application, for example, an iOS device or a Windows computer.
- Distribution channel: The location where customers will be able to find your compiled game and download it, for example, Google Play, iTunes, Windows Store, Steam, and so on.
- UI: The user interface. This includes menus, buttons, score counters, anything the user interacts with or can derive information from.
Of course, you should have either a device or emulator for every platform you intend to compile for. An emulator is a piece of software that can mimic a device on the desktop of your computer. You'll need these devices and/or emulators to make sure your app isn't taxing the processing power and memory of a device too much. Although a game could test fine on your desktop, it may prove to be too much for a device to handle.
Additionally, you'll definitely need a Mac of some sort to compile for Apple devices. Unfortunately, the compiler for iOS, tvOS, and Macintosh only runs on Mac. We'll be developing (using Buildbox) on a PC, and compiling for Apple using a Mac Mini for the projects in this book.
To effectively develop a game, you'll also need some sort of image editing software. In this book, we'll be using Adobe Photoshop CC2015 and Illustrator CC2015; however, there are freeware solutions available (such as GIMP—available here: https://www.gimp.org/downloads/).
A worthwhile game absolutely must have good sound. Therefore, a developer must have a decent audio editing application. In this book we'll be using a combination of Presonus Studio One 3 Professional and Adobe Audition CC2015. Again, a freeware option known as Audacity is available from SourceForge at https://sourceforge.net/projects/audacity/.
Finally, to create animated assets (such as enemies, explosions, and so on), it's advisable to get a 3D animation program to speed things up. In this book we shall use LightWave 3D 2015; however, yet again, a freeware option known as Blender is available (https://www.blender.org/).
It is not entirely necessary for a developer to create their own graphic and audio assets. You could always hit up Fiverr (https://www.fiverr.com/) or similar services to have custom graphics and audio made for you. However, as this is a complete book on developing a game using Buildbox, we will be covering how to create these assets yourself.
Granted, this greatly exceeds the minimum needed for game development with Buildbox. However, this should give you a good idea of the capabilities necessary, and it's nice to have for game development.
|
Processor |
Intel I7 5960X |
|
Memory |
32 GB 3000Mhz DDR4 |
|
Hard drives |
512 GB Solid State Boot Drive
10TB RAID 0 SATA II Internal
10TB RAID 1 USB 3.1 External Backup
4TB Seagate Baracuda Docked USB 3.0 Archival Backup
|
|
Motion capture (not necessary at all for Buildbox, but helpful for graphics creation) |
XBOX One Kinect with USB 3.0 adapter |
|
Color accuracy (not necessary at all for Buildbox, but helpful for graphics creation) |
Pantone Huey Pro |
|
Monitor |
Samsung 4K oLED |
|
Audio |
Presonus FireStudio Project USB 3.0 Interface with Presonus powered speakers |
|
Music hardware |
Roland Fantom X6, Roland MC 909, various guitars and basses |
|
Software |
Windows 10 Pro x64, Buildbox 2.0, Android SDK 2, Adobe Creative Cloud 2015, LightWave 3D 2015, Brekel Pro motion capture, Presonus Studio One 3 Pro |
Developing a game is only half the picture. Yes, it's cool to be able to play your own games, but wouldn't it be better to have the world play them? Better yet...wouldn't it be better to make a profit? That's where distribution channels come in.
Distribution channels, such as iTunes, Steam, and Google Play, are places where platform owners go to shop for new apps and games. But for each device, there are unique distribution channels, and in some cases multiple ones (such as Google Play and Amazon Apps for Android devices).
In order to develop for Apple devices, you're going to need a subscription to the Apple Developer Program. It is an annual fee, and can be expensive (when compared to Android). Speaking of which, you'll also need a membership to the Google Play developer program, and Amazon developer program.
For Windows games, you will need a Steam account, and to authorize it, to submit programs to Steam Greenlight. You will also need a Windows Dev Center account.
As you can see, if you sign up for all of the various services as a developer, the costs can run up. So, it's probably going to be important to make up your mind on the target for your games before you begin developing. The bonus is that if your game does well on one platform, it's very easy to port it to another (because one Buildbox project can generate the same game across multiple platforms).
Now that we've got a bit of a foundation, let's get into Buildbox itself. We'll spend the rest of this chapter giving you a tour of the Buildbox interface, and in the next chapter we'll go over a template project that comes with Buildbox before creating our own Ramblin' Rover game. Alright, here we go...
When you first open Buildbox, you're greeted with the Welcome screen. The following screenshot shows this screen. Buildbox has taken a page straight out of Adobe's UIX design team with this. If this is the first time you've opened the Welcome screen, you should immediately uncheck Open Buildbox at startup:
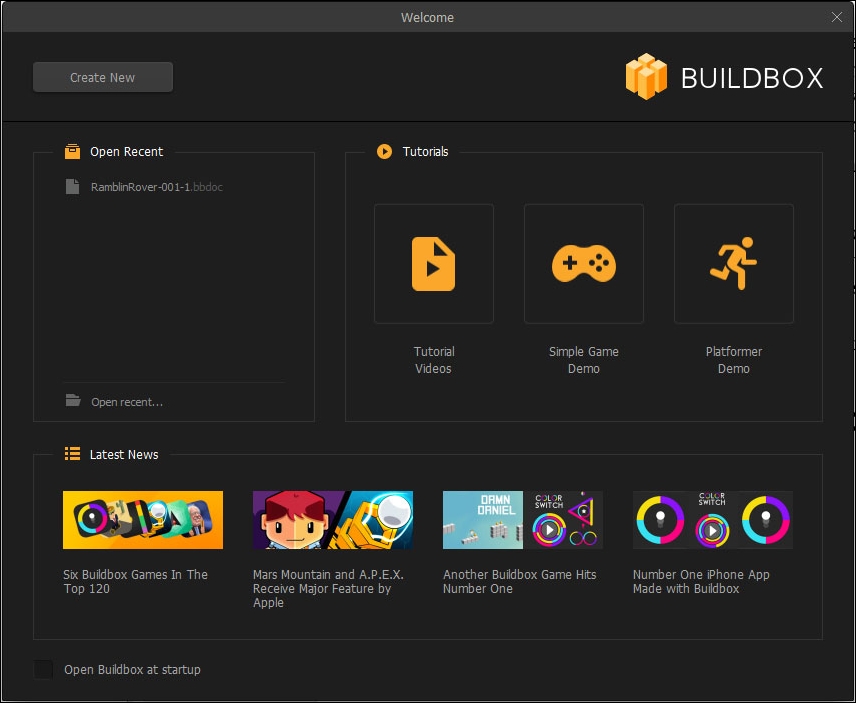
Unless your computer's sole purpose is for Buildbox development, we suggest unchecking this immediately to minimize your frustration upon startup of your computer. For some reason, the Buildbox team believes that everyone would want Buildbox to start every time they restart their computer by default.
Let's take this interface from the bottom up (since we started with the Open Buildbox at startup option).
The area near the bottom with the Latest News heading is just that. It's the area where you can see what the latest patches and updates are. This is also where you can see how other games made with Buildbox are doing. Clicking these links takes you to the web page(s) where the related stories are.
Just above Latest News on the left side of the screen is the Open Recent window. It's pretty self-explanatory, but this is where you can easily click on recent Buildbox projects you've been working on to open them.
Now, looking to the right, we see the Tutorials section. This is where you can check out some examples and videos on how to use Buildbox. Let's take a look at these one by one:
- Tutorial Videos: By clicking this, you'll be taken to a page on the Buildbox website that hosts several videos showing how to use various aspects of the Buildbox software
- Sample Game Demo: This will open a very rudimentary game demo with some text overlays to give you a high level overview of the development environment
- Platformer Demo: Clicking on this option will open another rudimentary game demo showing off some of the features of developing a platformer-style video game
Finally, there is the Create New button on the top-left of the screen. This is exactly what it sounds like. It will enable you to create a new project by launching the Creator screen. This brings us to...
Welcome to the Creator screen (shown in the following screenshot). This is where you'll set up your basic parameters for a new game. Let's take a look at these parameters one by one.

In the Name field, you can type in a plain English name for your project. This actually has no bearing on the final game, it's really just a name for your project.
Looking down and to the left, we have the Basic Settings of a game. Inside, we have the Orientation, and Score Type settings. Orientation lets you determine whether a game will be Landscape (wide screen) or Portrait (tall screen). If you're developing a computer game, this should almost always be Landscape. Some examples of game types that might use Portrait are an avoidance or zig-zag type game on mobile devices (we'll define these better in just a bit).
The next setting is the Score Type. This will depend on the type of game you're using, and your monetization model. There are three basic types of scoring in Buildbox:
- Distance: Just as it sounds, this scoring is based on how far you travel in the game. Motocross, avoidance, zig-zag, and even some platformers (among others) use this type of scoring.
- Coins Collected: Think of Nintendo's Super Mario Bros. here. A typical platformer game will give you score based on the number and type (some pickups being worth more coins than others) of coins collected.
- Points Collected: If you're planning on instituting a Coin Store but want a scoring style similar to Super Mario Bros., you'd want to use this scoring motif. You can assign points to objects in parallel with coins (for example, collecting an object may be worth 10 points, and 1 coin). This way, users can compete against other users with score, and still purchase items in the Coin Store without affecting their score balance.
As alluded to in the Points Collected bullet, your Score Type is an important setting because this is how players will be able to measure their performance against others. Yes, you may implement leaderboards (on most platforms) that are web-enabled to spur competition among users. When designing a game, your scoring method should be one of the first things you consider.
This is probably the most important setting selection on this screen. The Gameplay Type drop-down menu sets up the template for your whole game. As described, this is where you set what type of game you'll create. Let's take a quick look at the types of games in the stock templates(we'll get deeper into these in Chapter 8, Building Other Popular Game Types):
Default: This template is a kind of bouncy ball game that allows you to move a character to the left and right (as well as slow the descent of the ball).360 Shooter: Think Asteroids with this template. Here, you can create a game where a spaceship turns 360 degrees, avoids obstacles, and shoots others.Around the World: Here, you can create a game where you're fighting the orbital gravity of a planet while avoiding obstacles.Avoidance: A constantly scrolling game where you must move your character to avoid obstacles.Dog Fight: For this, think Spyhunter or Gallaga. Similar to the 360 Shooter, but your gun is pointing in one direction. You must avoid obstacles and kill enemies.Downward Bounce: Another bouncy ball game. But instead of merely slowing the descent of your ball, you can dribble it like a basketball.Fall Buttons: Here, you guide a character as it falls down through a series of objects. You can use left/right controls to influence your character as gravity makes it fall.Fall Switch: Almost the same asFall Buttons, but instead you have a single button control that simply switches the direction (left or right) of your character. Much more fast-paced.Flappy: Just like it sounds, think Flappy Bird or Drone Challenge. Here you guide your character through obstacles using Joust-style flapping controls to keep your character in the air.Gravity Portal: This is kind of a mind-bender. Here your game will have two game fields: one the right way up and one upside down. On tapping the screen, the character will fly up off screen, and return coming up through the bottom.Gravity Runner: Similar toGravity Portal, except instead of going off screen, you have a ceiling and floor. A tap of the screen makes the ceiling the gravity source and tapping it again changes gravity back to the floor.Impossible: This is kind of a platformer game. However, you cannot stop, nor reverse direction. The game keeps you moving and you must jump to avoid obstacles.ISO Jump Slide: Isometric (2.5D) game where you jump over some obstacles and slide under others.ISO Jump: Almost exactly the same. Here, you can jump, but not slide through a constantly moving Isometric field.Jetpack: Think Jetpack Joyride with this. Very similar to Flappy.Jumping: Here, you guide a character through a vertical world using a flap-style jump control while avoiding obstacles.Motocross: A vehicle side-scroller where you guide a vehicle over various obstacles while doing flips.Platformer: Truly the Super Mario Bros. experience. You guide your character and jump over obstacles to collect coins and points.Racing: A top-view racing game where you must avoid other cars while the game vertically scrolls.Runner: Like Jetpack on the ground, you must avoid obstacles by jumping. You can move backward, but don't go too far!Shooting Runner: Just likeRunnerwith the addition of guns to shoot enemies.Side Shooter: Same exact game as360 Shooterwithout the ability to turn your gun to shoot in other directions.Stage Clear: Pac-Man style game where you must collect everything/destroy all enemies to win the stage.Sticky Jump: Here, you jump to avoid obstacles as you would in a platformer. However, the game only scrolls while you are in the air.Wall Jump: In this game, the screen scrolls vertically, and gravity is on one side. You have to move left and right to avoid obstacles by jumping to the other side, or letting your character fall to the gravity wall.Wall Reverse: A strange type of game that is a combination of Jetpack and Wall Jump. You just use arrows and jump to get your character to a goal object.Zig-Zag: This type of game is a combination of Wall Jump and Gravity Runner. Think of it as a vertical version of Gravity Runner.
Now that we've outlined all of the game types that Buildbox has to offer, we still advise you to go take a look at them one by one. You really have to experience them to fully understand them. You can also combine types of games by adding other elements and rules as we'll do in Ramblin' Rover, which will be a combination of a motocross, a platformer, and a shooting runner.
Don't confuse the Game Type drop-down menu here with the Gameplay Type drop-down menu in Gameplay Settings. The Game Type drop-down menu lets you select whether this game will have a single world, or many unique worlds. A unique world will have a different background, can have different obstacles, characters, and even different physics parameters.
The World End Action parameter allows you to further define the structure of your game by choosing whether your game will be endless (repeat scenes within a world at random endlessly) or have an end scene once a goal is reached.
This area has checkboxes for Pause, Game Over, Coin Shop and Info, and allows you to set up what other interfaces you'd like to include.
For instance, checking the Pause option will create a unique screen that will appear when a user pauses the game. An Info screen can be used to give credits to your staff, instructions for gameplay, or anything you can think of that fits in no other category. And a Coin Shop is an area that will allow users to buy more coins to unlock other characters and abilities within the game.
The image below shows the world editor. As a Buildbox developer, this is where you'll spend most of your time. It also happens to be the most fun screen in Buildbox. A world consists of many scenes in Buildbox. They all share the same backgrounds and characters. Let's start with the scene editor:

In the following , you can see that we have a start scene, as well as an additional five scenes. Editing is easy: just click the scene you'd like to edit, and work with it:

On the right side of the scene editor, you'll notice the + Add button, and the ^ button. The + Add button allows you to add a blank scene to your world (although you can also duplicate the currently selected scene with the keyboard shortcut of D for duplicate.) The ^ button opens the timeline editor:

As you can see in the image above, this timeline plays each scene sequentially. However, you could overlap scenes, or even have them all run in parallel. This type of layout enables the scenes to be played in random order, giving the player a unique experience every time they play. The parallel layout is optimal for endless games, while the sequential layout is best for goal-oriented games.
The game field (shown in the following screenshot) is where you'll actually build your scenes. Here, you can add objects, text, background graphics, decorations, and all kinds of effects and logic elements. On the left side of the game field, you'll see the layer editor (Outliner), which enables you to bring objects forward or back, select objects easily, hide, or even lock them. This area greatly helps keep your scene organized:

On the upper-right you have various display options for the game field,viz:
Show Game Field: This shows where your character can travel and sets boundaries (barriers and lethal barriers) for it:

Lock Backgrounds: Locking backgrounds prevents you from accidentally shifting them when moving other objects around on your stage:

Snap Movement: This lets objects snap to a grid or other objects as you move them around on your stage:

Activate Connection Mode: By activating connection mode, you can connect (parent) objects to other objects (for example, if you apply physics, this will help you make swinging laps):

Apply Debug Mode: In Debug mode, you can see collision shapes. This will allow you to make sure objects have proper shapes, and ensure that your game is playable:

On the right side of the screen, you'll find the parameters area. This will show (and enable you to edit) parameters for any selected object. Currently, the start scene is selected, so what is showing right now are the parameters for the start scene in our example (as shown in the following screenshot):

On the far left you'll notice the library window. Here is where all of your objects are kept for you to use. They are grouped by type. The following screenshot shows the library window:

Once you import an object once, you only need to find it into the library. Importing an object twice is not advisable (as it creates a duplicate of the same asset, and can use up more resources than necessary). Instead, come to the library and find it. Here are the categories and what they mean:
- Characters: Objects that the user controls. This is like Mario in Super Mario Bros.
- Objects: These are any non-character, and non-action objects such as platforms, obstacles, decorations, and enemies.
- Actions: Action objects are things such as coin and point pickups.
- Effects: These come in very handy. Effects include particle emitters, flags, and trails. They can add a bit more punch to your look. Be careful, though. They can be resource intensive.
- Logic: Here is where you'll find tools to make your game more interesting. Hidden level teleports, portals, even character multipliers (cloning your character) can be found here.
- Labels: Labels are merely text objects you can throw onto your stage. They can be quite useful to help with instruction during a training world, or to add statements such as Start or WATCH OUT! to your game.
At the upper-right of your screen, you'll see four buttons that are very useful. Let's take them from left to right:

- Preview: This button allows you to try out your game using the game preview screen. We'll show you this screen at the end of this chapter.
- Preview Current Scene: By previewing only the current scene, you can skip to what is relevant to what you're working on.
- Font Editor: Fonts in Buildbox must be packaged with your final compiled game. This will allow you to add fonts from your computer to the game. We'll save this screen for a later chapter.
- Game Settings: This screen allows you to set up your game for export by adjusting parameters such as the game's icon, build ID, and various advertising and monetization settings. We'll save this screen for a later chapter.

Finally, at the upper-left of the screen, you'll notice this button. This button will close your world and bring you to the Game Mind Map.
The image below shows the Game Mind Map of our basic game. This screen is where you can edit the structure of your game. As you'll also notice, as our world is selected, you can edit the parameters of the world in the parameter window:

This is how you change the gravity settings for individual worlds to give a wider spectrum of user experience to your players. This is a simple game (and is aptly titled). Let's take a look at what Ramblin' Rover will look like when it's near completion:

Here, you can see why a node-based editor for the structure of a game is important. This is Ramblin' Rover with the first two of the three worlds we'll create completed. Don't feel overwhelmed. By the end of this book, this screen will look extremely simple to you. I invite you to come back and look at it once you've completed the book to see just how far you've come!
All graphics assets in Buildbox are handled as sprites via an atlas. Confused? Don't worry, we will get deeper into the atlas editor in a later chapter. For now, we just wanted to make you aware that this editor exists. This is considered an advanced screen, so be patient. We will cover this later:

This is the most gratifying interface in Buildbox. The following image shows the Game Preview interface:

This is where you can actually play and test your game. You may recognize the Debug Mode button on the upper-left of the interface. This will let you actually play the game while viewing all your connections and collision shapes. Very useful indeed.
Also on the screen is a screenshot button, which will let you save screenshots of your game for later (quite useful for when you go to put your game on a distribution channel). You can also emulate the resolutions on various devices using the drop-down menu (currently at 1920x1080 Full HD) and another drop-down menu allows you to scale the percentage to blow up the image or shrink it.
If you have multiple monitors, or a monitor with a high enough resolution, you can always leave this window open, and when you want to play your game with any changes you made, just hit the Refresh button (upper-right).
In this chapter, you've learned about setting up your development environment, the capabilities of Buildbox, and you've even gotten a tour of the interface. There's still a lot to learn before we dive head first into the Ramblin' Rover project. So, in the next chapter we're going to take a closer look at some of the procedures of Buildbox so you can gain some familiarity with the methodologies within the software using the Platformer Demo from the tutorials section on the Welcome screen.
Ready to take a look at this example project before we dive into making Ramblin' Rover? Let's do this!