


 Download code from GitHub
Blender as a Video Editor for YouTube
Blender is a fantastic tool for 3D content creation, but it also has some impressive tools related to video production. In the following chapter, you will learn how to find and activate the video production options and also locate the Blender Video Sequencer.
With the Sequencer, you have a fully functional non-linear video editing space that you can use to either cut and edit a series of footage or take 3D content and make an animation.
You will also learn about video standards and how to prepare Blender to use media footage. Here is what you will learn:
- How to use workspaces in Blender
- How to navigate the Video Sequencer
- How to make a video preview
- How to manipulate video strips
- How to prepare footage for import
- How to embed footage to Blender projects
That's just the start! In the following chapters, you will also apply animation and motion graphics techniques to produce all types of video-related material for your professional or personal use.
Technical requirements
You will be required to have Blender 2.80 installed to follow this procedure. Even if you have a later version of Blender, the described example should work with no significant problems.
The media files of this chapter can be found on GitHub:
https://github.com/PacktPublishing/Blender-for-Video-Production-Quick-Start-Guide/tree/master/Chapter01
Check out the following video to see the procedures in action:
http://bit.ly/2DNPPKm
Using Blender as a video editor
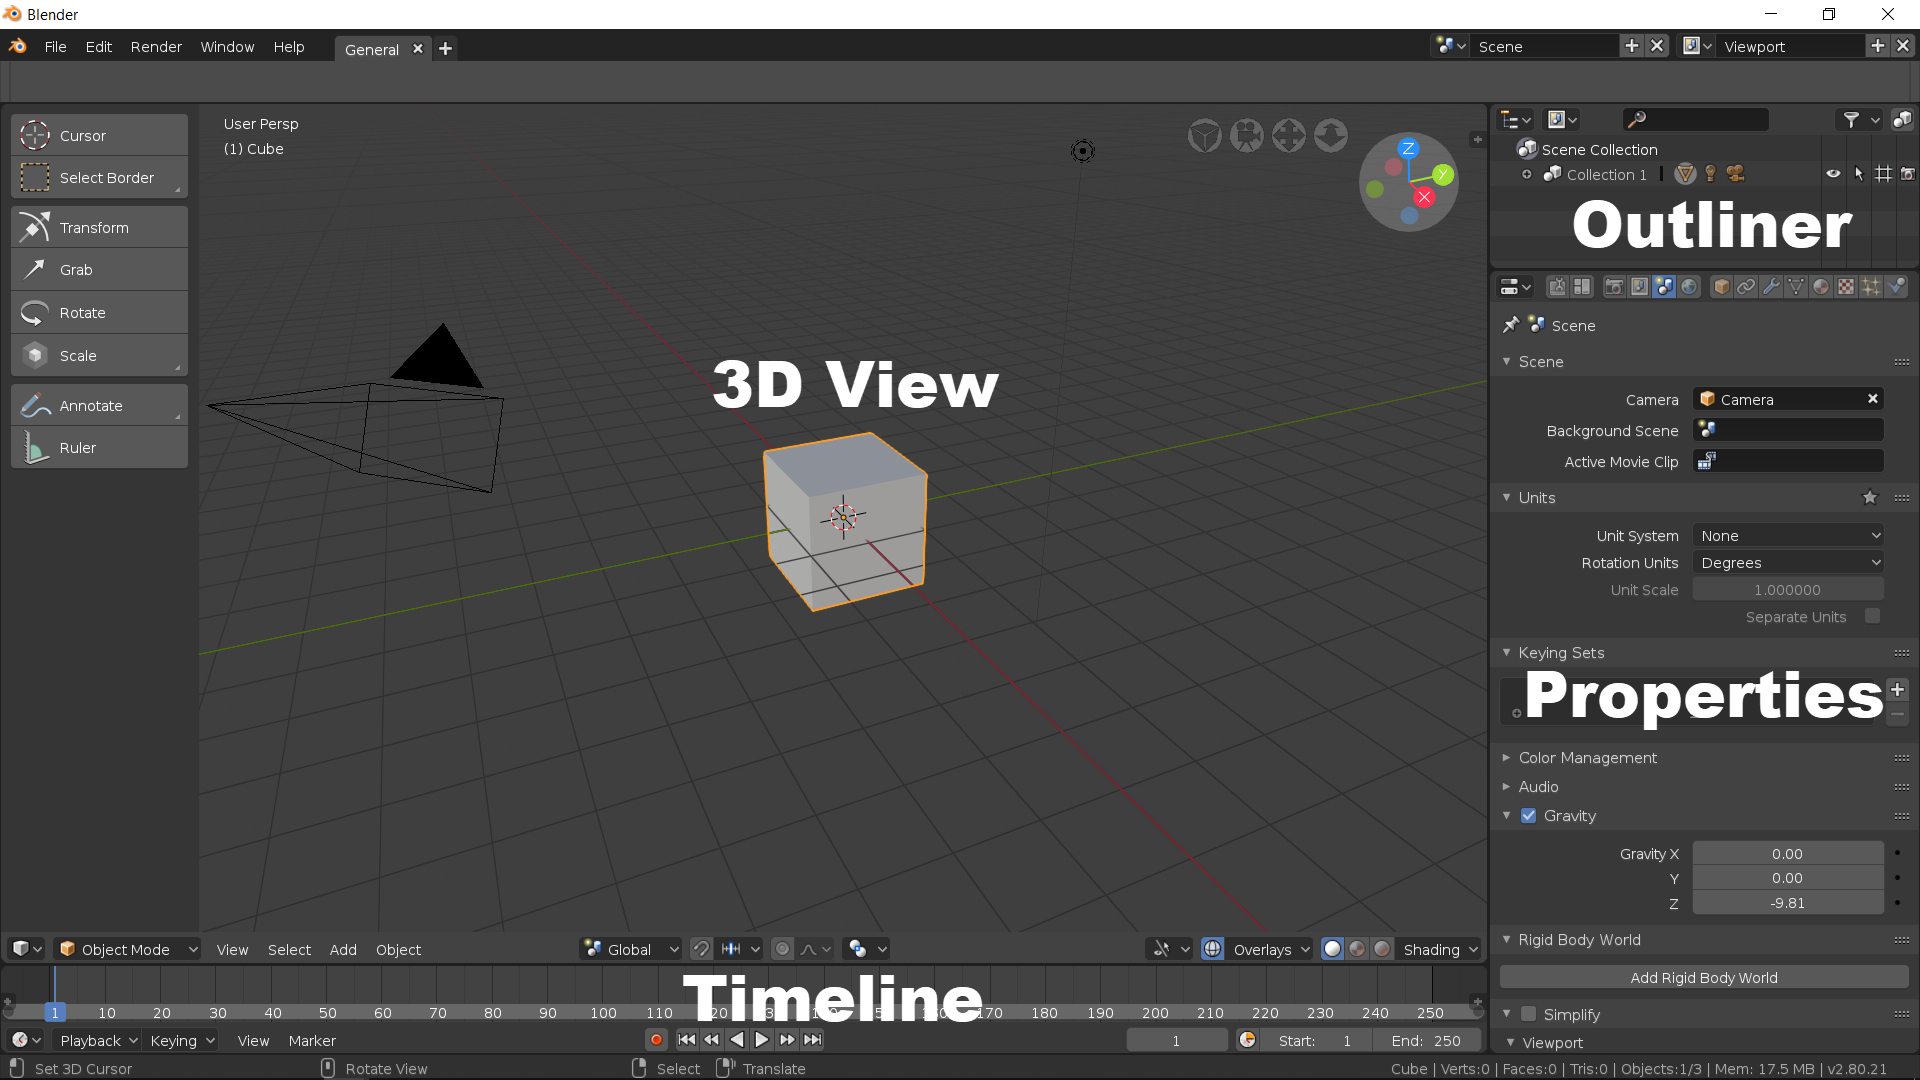
The first time you open Blender, you will see a user interface with lots of tools and buttons and a big area to create 3D content (Figure 1.1). One of the primary goals of Blender is to make 3D content for animation, effects, and other types of productions. How is it possible to edit video in Blender? Take a look at the following screenshot:
Besides having all those tools for 3D content creation, Blender will also feature a lot more options. One of those options is a video editor inside the software. Unlike many competitors in 3D content creation, Blender's developers wanted to create a tool that could handle all aspects of media production.
If you have an idea that requires 3D content creation that will result in a video file, you can create that in Blender. Better yet, you will be able to get additional footage and blend it with your 3D content.
One crucial aspect of the Blender user interface that you will notice is that you can change and manipulate almost all aspects related to windows. Look at Figure 1.1, and you will see divisions at the interface. Each division might assume a unique function, depending on what you want to do with the software.
The main windows available in the default user interface are the following:
- 3D View: The sizeable 3D space with a tray cube that will allow you to add and manipulate such content
- Timeline: At the bottom of your 3D View you will see a horizontal window showing options to play back and set animation
- Properties: On the right-hand side, you have a tall vertical window called Properties, where you will get options to render and change lots of options regarding a scene
- Outliner: Finally, we will also find a small window in the upper-right corner with a word, Collection 1, where you can organize 3D content in your scene
Which one of these will be the best option for video editing? None of them. We have to use another window that is not part of the default user interface.
The Blender Video Sequencer and workspaces
If you want to edit video footage in Blender, you need a specific window to manipulate and handle that type of data. You can swap the window type in Blender for an other depending on your project. To change your window type, you can use the small selector available on the left-hand side of each division, as shown in Figure 1.2:

Figure 1.2: Window selector
To edit and manipulate video, we must use a window called Video Sequencer (Figure 1.3). Using a large window space like the one with our 3D View will give you plenty of room to work with video editing:

Once you open the video editor, you will see that such a window has a lot of horizontal spaces. Each of those parallel spaces is a channel, which works like layers. You can stack video footage on top of each other to create a composition.
The footage on channel zero will be at the bottom of the pile, and anything placed at higher channels will be at the top.
We will import and manipulate video and audio inside those channels for any project related to video production.
Previewing our video project
The Video Sequencer is a great tool to edit and manipulate video footage, but you will quickly notice that it doesn't have any particular area showing a preview of what you have in your project. We can enable a split view of our sequencer with a preview area to help us see the final result.
In the upper-left corner of your Video Sequencer, you will find a button for the View Type that will be set to Sequencer by default. If you change the button to Sequencer/Preview, you will enable the preview window in your Sequencer as shown (Figure 1.4):

Once you activate the preview, you will be able to see all video footage at the small top division. That is not a new window, but a divided area of your Sequencer.
Workspace for video and YouTube
Having a window like a Video Sequencer is excellent for video production, but wouldn't it be better to have a full interface optimized for video? In Blender, you will find something called workspaces, a user interface layout that has all windows and options for a given task.
You will find the workspaces selector at the top of your user interface (Figure 1.5). Click on the + icon to open all options related to workspaces:

By default, you will have a generic workspace called General whenever you start Blender, but we can create many more. From the workspace selector, you can choose different types of user interface arrangements. From that list, you will find the Video Editing option.
If you choose that workspace, you will see a complete change to the interface (Figure 1.6):

You still have four windows in the interface, but now with the following layout:
- Graph Editor: The upper-left corner has a graph editor to change and manipulate animation data.
- Video Sequencer Preview: Still at the top, but on the right hand side, you will find a Video Sequencer set to preview only. Look at the View Type option, and you will see the Image Preview option.
- Video Sequencer Channels: In the middle of your screen, we will get a Video Sequencer with the channels, and the Properties tab opened.
- Timeline: From the default interface, we have the Timeline window.
At the top of your screen, you can see the new workspace as a tab. Whenever you need to use the default interface, click on the General option and you go back to the default arrangement. To close a workspace tab, you can press the X icon on the right hand side of your workspace name.
Importing video footage to Blender
Having a tool to edit and cut video is an excellent resource for Blender, but how can we import video footage to Blender? There are two ways to import or add media to the Video Sequencer. The first one is with the Add menu, where you can click at the option and choose from several alternatives (Figure 1.7):

As you can see from the screenshot, we have an option to add the following:
- Movie: Using this option will import a video file to the Sequencer.
- Image: If you have to work with images, use this option. It will import either a single file or a sequence of images.
- Sound: For music and sound, you must use this option.
The Add menu has a shortcut for quick access in the Video Sequencer. If you press the Shift + A keys when your mouse cursor is anywhere, the Video Sequencer window will show a pop-up menu with the same options.
Why does the cursor position matter? Blender has a lot of shortcuts that will save you time on different tasks. Since some shortcuts work in a unique way for specific windows, you must tell the software where you want to use a shortcut.
For instance, if you press the Shift + A keys with the cursor over the Timeline window, nothing will happen. Why? Because in some windows you can't create any objects. If you press the Shift + A key with the cursor over a 3D View window, you will be able to create 3D geometry and not import video footage.
Blender calls the window where your cursor is at the moment the active window. All shortcuts will trigger the action in the active window.
When you press a shortcut and you don't have the expected behavior, look for your cursor.
Once you hit the Movie option in the menu, you will see a big window in Blender asking you to locate the video file. On the left-hand side of your screen, you will see some options that you might want to review before importing (Figure 1.8):
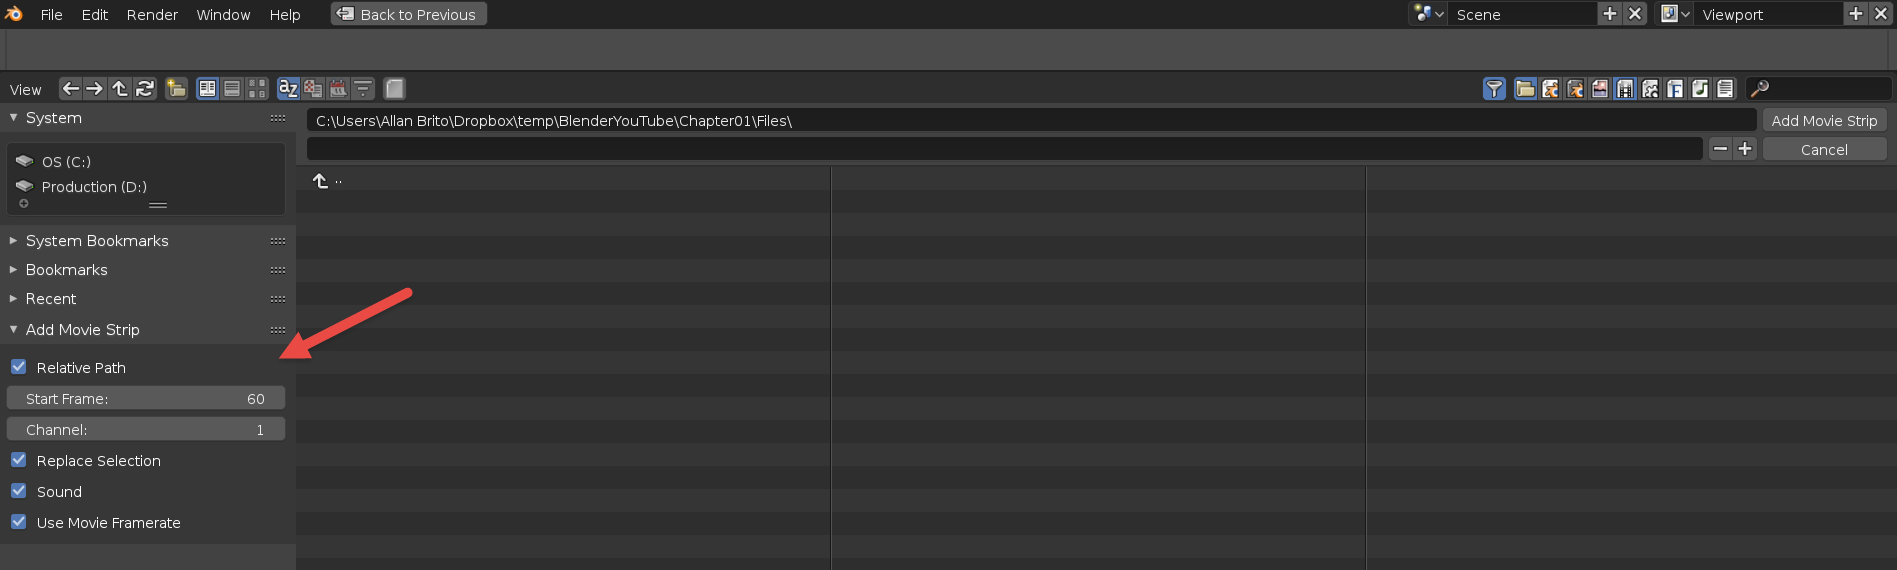
From top to bottom, here are the options:
- Relative Path: Since a movie file is an external resource for Blender, it will need a path to locate the file. The recommendation here is to save your Blender project in a folder and copy all media files there for consistency. If you leave this option enabled, Blender will try to make a relative path to the video file.
- Start Frame: The place in your timeline where Blender will place the video file.
- Replace Selection: If you have an existing video strip selected in your Sequencer, Blender will replace that video with the selected file.
- Sound: Do you need the audio from your video? If you want the video and no sound, disable this option.
- Use Movie Framerate: Here is an important option! You will have to match the frame rate of your video to Blender's timeline. Otherwise, you might have problems with the playback. By marking this option, Blender will try to make the adjustments for you.
Some of those options need your attention before you import anything to Blender, such as the suggestion to save your Blender file in a folder and copy all the media you will use to that same place to keep relative paths.
Matching video footage frame rate
Before you start any project related to video in Blender, you should take a look at your video source technical details, to match them in Blender. One of the aspects that you need to identify is the frame rate.
The frame rate is the speed in which all still frames from a video will play. Nowadays, you will find several different types of frame rates for a video—24, 30, 48, and 60 are the most used.
To avoid any potential problems, you must match the frame rate of your video sources to Blender's internal frame rate. For instance, if making a video with your smartphone using 30 FPS, which is the abbreviation for Frames Per Second, you must change Blender settings to match.
In Blender, you must go to the Render Tab in your Properties window (Figure 1.9). Look at the Frame Rate setting and change it to a value matching your video footage:

Using the General workspace will give you quick access to that window.
What happens if you don't match the frame rate? If you forget to match the value, you will experience playback issues related to speed. For instance, if you have a video file using 60 FPS and Blender is set to use 24 FPS, your playback speed will be slower than the video.
As a result, you will see a slow-motion version of your footage. The opposite also applies, where you might have video footage in 24 FPS and using anything higher will speed up the video playback.
On the other hand, you might want to use Blender to create original content for a video such as an infographic or animation. For the cases where you don't have video footage to work, it is essential to set a frame rate for the whole project and stick to that value for all available resources.
Video container compatibility
Working with video files can be a challenging task if you don't have all the required software to read the data. The problem is that a video file, also known as a container, is a type of file that has two parts:
- Video
- Audio
Each of those data types could come in a compressed or uncompressed format. Usually, a camera or video exporting software will apply some compression to the data to reduce their size.
How big is an uncompressed video file? The exact size will depend on several factors, but you can estimate:
- FullHD Video (1920 x 1080) at 24 FPS: 445 GB for 1 hour of video or 127 MB/Second
- FullHD Video (1920 x 1080) at 60 FPS: 742 GB for 1 hour of video or 211 MB/Second
- 4K Video (3840 x 2160) at 24 FPS: 1.33 TB for 1 hour of video or 380 MB/Second
- 4K Video (3840 x 2160) at 60 FPS: 3.33 TB for 1 hour of video or 950 MB/Second
With such large sizes, it is easy to understand why most video captured with smartphones or consumer cameras has compression. The compression software used for video and audio is what we call the CODEC. It is the same principle as when you get a ZIP file in your email and have to extract the file to get the contents.
If you have a video container, you need the CODEC to both read and compress video and audio files.
What is the best CODEC? There are several options in the market, but for digital video for YouTube or the web, it would be wise to follow some standards. For instance, using H.264 for video and AAC for audio are the recommendations from YouTube in an MP4 (MPEG-4) container.
The good news is that Blender supports MP4 video containers using H.264 and ACC for reading and exporting!
Data compression types
Another important aspect about a CODEC is the type of compression it applies to data. There are two types of compression available:
- Lossy compression: Here we have a process that tries to exclude unnecessary data to save on file size. As a result, files are usually smaller.
- Lossless compression: Some compression types will try to shrink data with no data loss, resulting in larger files but with all data intact.
Which one is the compression from an H.264 file? It uses lossy compression, the same that you will also find in a JPEG image file.
That means you must avoid processing the video data as much as possible because, every time you treat the data, your CODEC will try to exclude something to shrink down your file.
Adjusting the Sequencer zoom and time code
Now that you know more about video containers and compression, we can focus on adding that data to the Video Sequencer of Blender. Once you go to the Add menu and choose the Movie option, pick any MP4 that you want and import it to the Sequencer.
After you import the data, you will start to see a video strip, which is the name Blender uses to identify video data in the Sequencer (Figure 1.10):

You probably will start with a limited view of your video file like the one from Figure 1.10. Several tools will help you manipulate the zoom or viewing of channels.
The most convenient is the Home key on your keyboard. If you press this key, Blender will fit all video strips in your Sequencer window.
For more zoom controls, you can hold the Ctrl + middle mouse button and move your cursor. If you move up and down, you will adjust the zoom vertically, and going from left to right will adapt it horizontally.
In longer videos, you will probably want to get a broader view of your channels, like the one shown in Figure 1.11:

Another aspect of the Video Sequencer that you will probably want to change is the time code. In case Blender doesn't display seconds as time code, you can enforce that in the View menu. There you will find an option called Show Seconds that will use the unit instead of frames (Figure 1.12):
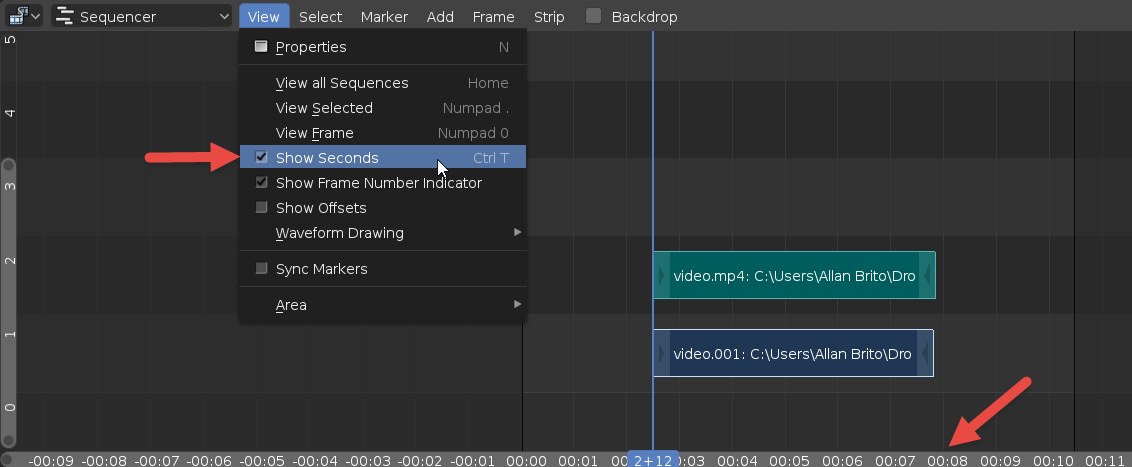
The same principle also applies to the Timeline window, and you can use the View menu and choose Show Seconds.
For the times where you have a close view of a strip, a strange time code will appear in your Sequencer. It will have a number, a plus sign, and another number. It might look like 0+00. What does it mean?
Since Blender won't display fractions of a second, it will show the corresponding video seconds plus the frames. A code showing 1+06 means that you are at one second plus six frames.
Selection of video strips
With a video strip in your Sequencer, we can start to manipulate that data to place it in different locations in a project. The first thing we have to learn about video strips is how to select them. In Blender, you must use the right mouse button to select entities.
Once you right-click on any video strip, Blender will immediately display additional information about the video. For instance, you will see the length of a strip and the source name (Figure 1.13):

After selecting a strip, you can duplicate the content using the Shift + D keys. Just press the keys, and you will be able to create a copy of a selected strip. When you press the keys, it will be possible to slide the copy somewhere else in your Sequencer. Just move the cursor and left- click at the location you want to place your copied strip.
For the times where you have multiple strips in your Sequencer, a few shortcuts will help you manage selection:
- Shift + right-click: Add or remove strips to/from selection (for various picks)
- A Key: Select all strips in your Sequencer
- Alt + A: Remove all strips from the selection
- Alt + I: Invert the selection of strips
In case you want to make a more extensive selection, you can also use the B key to draw a box around any given number of strips. Using the left mouse button, click and drag to draw a box (Figure 1.14):

One of the benefits of using Blender is the consistency about shortcuts, because you will also be able to use all those options for all other parts of the software. For instance, using Shift + right-click will also help you with a selection of objects in 3D modeling or editing animation.
Transforming video strips
Since your video strips are just 2D objects, we don't need the full range of transformations Blender uses for modeling. Instead, we will only work with the move transformation. To move your strip anywhere in the Sequencer, press the G key with any given number of selected strips.
After pressing the G key, you can move your mouse to relocate the strips, even between channels (Figure 1.15):

Blender will also display the start and end frames of a strip to help you relocate the video.
In some cases, you can even change some strips, length using the G Key. Look at the beginning and end of any strip, and you will see two triangles pointing to the center. They work as location controls. To select them, you can right-click on the triangle, and by pressing the G key, you will be able to change only the start or end frames (Figure 1.16):
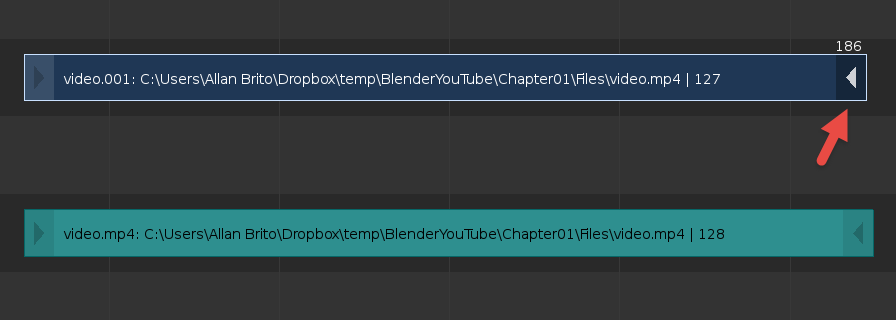
Use this option with caution on strips with video and audio, because you might either cut or create some blank space. There are other ways to change a strip length. The triangles will work best to set width for static content such as images, text, and effects.
Saving a video project
How do you save a video project in Blender? To keep your source files and project saved for future reference and updates, you should always save the project. How does Blender handle video files?
Before we discuss how Blender deals with video files, you can save any project by going to the File menu and choosing Save As... like most other tools.
It will create a file with a .blend extension. The file will feature all animation and Sequencer data, but none of the external files, unless you explicitly ask Blender to incorporate them into the project.
For instance, suppose you have a project containing two external video files named video1.mp4 and video2.mp4. The first thing you should do is to create a folder in your system to store all the files for that project. Copy all important media to that folder.
In Blender, save the .blend file to that folder. Once you import the footage to the Sequencer, you will be able to have relative paths to the media. It would be something like \video1.mp4 and not a full system address.
Why is that important? Because, with relative paths to media files, you can open the project anywhere without any broken links. It will be possible to place the project on network drives or flash storage to move it around.
Embedding media to Blender files
Another option you should consider is to embed the media to Blender files. To achieve that, you must use an option from the File menu in the External Data group. There you will find an option called Pack All into .blend to add all media to the project file (Figure 1.17):
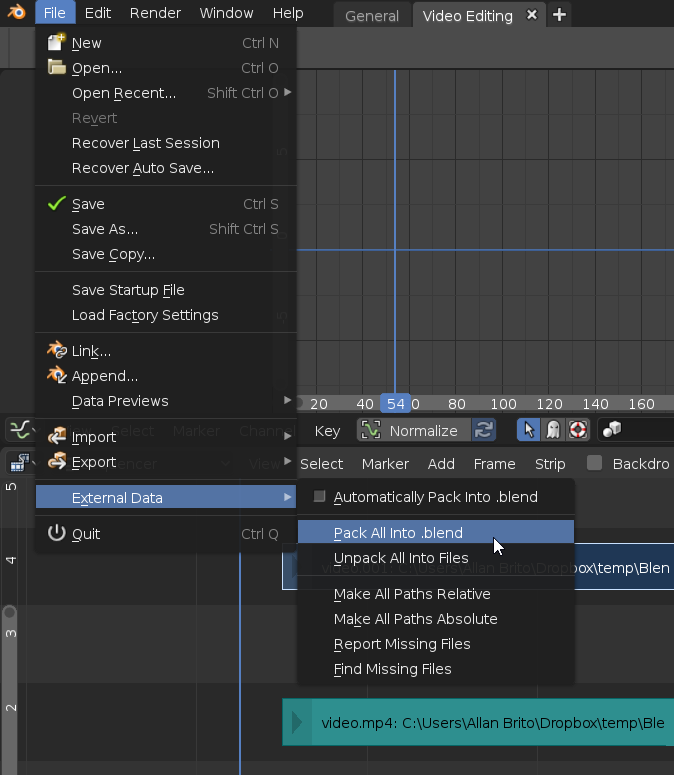
After using this option, you will have all video footage, audio, and images attached to the blend file. You won't have to worry about any folders or missing links.
The downside of using such an option is the file size. You might end up with a blend file of a few gigabytes in size. To extract the contents of a blend file that has embeded media, use the Unpack All into Files option from the same menu.
Summary
You now have a solid base on how to import and add footage to the Video Sequence Editor in Blender. Once you get media as strips, you can use Blender tools to edit and manipulate the content.
The next step is to go even further by editing and rearranging strips any way you want. That is what we will learn in Chapter 2, Editing and Cutting Video Footage in Blender.


![Blender 2.8 UV Mapping [Video]](https://static.packt-cdn.com/products/9781839219566/cover/9781839219566-original.png)
![Learn the Foundations of Blender [Video]](https://static.packt-cdn.com/products/9781838982843/cover/smaller)
