Download code from GitHub
Chapter 1: Undertaking a Colossal Project
Considering the increasing complexity of applications and websites these days, this chapter will introduce you to what it takes to tackle a colossal project of your own. We will explore the concepts of enterprise-level development, and then take a peek at the many different paths we could take. We will discuss methods and tools that help us to draft plans for a project, essentially building the blueprints that we will need to get started. Every project also needs hardware for its software to live on, so we will be exploring what service options are available to provide the hardware we need. Of the options provided, we will settle upon one choice for a hosting provider and demonstrate working with that provider throughout this book.
The project itself can be used with any hosting provider or even run on a self-built server; however, keep in mind that certain settings may be configured specifically for the host that we will be using. By the end of this chapter, we will have created a hosting account with the provider chosen and picked the simplest, free plan for use with this book. We will also be creating and configuring multiple working environments on that hosting plan for the code to run in. We will also connect each environment in that hosting plan to a remote repository, keeping the code in a safe place.
In this chapter, we will be covering the following topics:
- Building an enterprise
- Designing and planning
- Hosting and deployment
Most people would suggest using a UNIX- or Linux-based operating system, such as Ubuntu or macOS, when working with Django. Django is built to be so versatile that the concepts and code examples that will be demonstrated throughout the course of this book can run on all three major platforms (Windows, Mac, and Linux) and beyond. Personally, I have been using Django on a Windows-based machine ever since I started to learn and work directly with this framework. I did so because I came from a Windows background; about half of my jobs provided the equipment or mandated the use of certain software on a Windows-based machine. Later on, more and more companies started to give developers the choice to work on whatever machine they were most comfortable with. I continued to choose Windows because I was already familiar with it.
Technical requirements
Whether you are using a Windows, Mac, or Ubuntu system, Python will need to be installed. Python version 3.9.0 is the latest version available at the time of writing this book. It is highly likely that this code will still work with future versions of Python but there is no guarantee that all of the code will continue to work and there could be some hiccups in future versions. You can find the Python installation files for all platforms on their website here: https://www.python.org/downloads/. For non-Windows users, the most straightforward way of installing Python is with Homebrew, which creates for you a symlink to the package that you installed.
For Windows users, an easy way to install Python is through the Microsoft Store. Search for Python and select 3.9 from the list. During installation, if you see the Add Python to Environment Variables option, select the checkbox to include it! This sets a path to your global library of Python packages/libraries on your development machine. These are different from the packages that are included in your project, which we will discuss in Chapter 2, Project Configuration.
A command-line tool is needed to execute commands that interact with and use Django. PowerShell is a common command-line shell that comes standard in Windows today. This command-line utility comes packed with some of the coolest features from an assortment of other existing shells, all merged into one. It is also available on the Mac and Linux operating systems. However, iTerm2, or the built-in Terminal app, is what most developers tend to gravitate toward using. Regardless, PowerShell has become a popular tool used by many developers for automating the management of various systems today.
You will also need to install the PIP Python Package Manager, if it was not already installed during your Python installation. Starting with Python 3.4 and after, pip is included by default with the Python binary installers; thus, it is likely it was already installed on your machine. If Python was installed using Homebrew, then pip is not included, and you will need to install it separately. Install pip via the official installation guide found here: https://pip.pypa.io/en/stable/installation/. Since this is a package manager, it is likely that any version of pip in the future will continue to work with the rest of the code and concepts discussed in this book. However, not every third-party package discussed in this book is guaranteed to be supported in the future by that provider. Regardless, the concepts of using a third-party package and how they would be configured and used in a project are taught in this book and can be used to find a package of your own.
Tip
Whatever operating system you are working on, if you get an error message while working with any command throughout this book, such as pip/python is not recognized as an internal or external command, it means that you need to configure environment variables on your system to point to the corresponding file directories. To manually configure your environment variables in any of the three major platforms, visit these links:
• Windows: https://phoenixnap.com/kb/windows-set-environment-variable
• macOS: https://phoenixnap.com/kb/set-environment-variable-mac
• Ubuntu: https://help.ubuntu.com/community/EnvironmentVariables
If a command is not recognized as an internal or external command, you may need to add the path to where that item was installed on your machine. In Windows, this is commonly the Path variable. For example, if python is not recognized as a command, add the path to where Python was installed on your machine to your global Path variable in Windows. The same applies to Linux or Mac but is most commonly a problem on Windows.
All of the code created and used in this book can be found here: https://github.com/PacktPublishing/Becoming-an-Enterprise-Django-Developer. This chapter doesn't actually dive into any code at this time. However, for those of you who are already familiar with Django or are new to Django who have already read through Chapter 2, Project Configuration, and come back to this chapter, an app called chapter_1 is included with the code of this book to demonstrate a diagramming package introduced in the subsection titled Entity relationship diagrams of this chapter.
Check out the following video to see the Code in Action: https://bit.ly/3OfagBj.
Building an enterprise
Building an Enterprise Application Software (EAS) is not an easy task to tackle. The task requires many different technical specialists all working together with a high level of collaboration and preplanning to complete. Failure to perform adequate planning can result in the project taking far more time and money than anticipated. Important features that your business model relies on could be left out of the equation, resulting in disruptions in everyday flow when a new system turns on.
Enterprise-level software is geared toward satisfying the needs of a business as a whole. EAS takes all of the business logic of an organization and encompasses that into one system, thought of as a collection of many smaller subsystems. The software eliminates the need for paperwork, reduces the steps involved in completing a task, and provides self-automated or even artificially intelligent solutions to all kinds of problems in the world today. The website itself is only a small fraction of what the entire system actually comprises.
Reasons to choose enterprise-level applications
Enterprise-level software is usually thought of as a solution for organizations that already have a system in place and need to improve upon that. Whether or not that system is something digital or a manual process, as in paper in filing cabinets, companies are always searching for ways to simplify everyday tasks. Thus, enterprise-level software can consist of one or a collection of many different consumer-level applications. If you need more than just a website and need a system that also takes on your business management tasks, you will likely need to scale up to the enterprise level. However, Django can still be used for the simplest of websites as well as large-scale projects beyond your wildest dreams. Applications can also be broken down into individual Django projects.
Let's say you have an organization with many departments and many users, all consisting of different permission roles. You need a way to connect them all so that they may generate and share reports, send notifications, store and manage customer/user data, create invoices, and work with other systems. Maybe you found that your organization needs to connect employees working remotely from home to be more productive and efficient at their job. The idea is that each user type will interact with the system in a completely different way and even have different permission levels granting them access to different parts of your system.
Generally speaking, when someone thinks enterprise level, they also think of something that is unique and custom crafted. Such software is termed proprietary or closed-source software and is not intended to be redistributed to the public by any means. However, not all EAS has to be proprietary; the distribution license can be set to anything you desire it to be. For example, the main system may be branded for one parent company and yet parts of the system may be branded for its subsidiaries, or copies can be distributed and rebranded per your license agreement. It may also be a good idea to speak with a technical lawyer to help write your software license agreement should your project(s) be extremely complex. Inviting the help of a technical lawyer at the beginning is a good way to prevent lawsuits later on.
Next, we will discuss some of the major types of enterprise systems.
Types of enterprise systems
There are many different kinds of enterprise-level systems but we can consolidate them into six major categories, as follows:
- Customer Relationship Management (CRM)
- Enterprise Content Management (ECM)
- Enterprise Asset Management (EAM)
- Enterprise Resource Planning (ERP)
- Supply Chain Management (SCM)
- Enterprise Information System (EIS)
In this book, we will not actually be building any of these systems in their entirety. Instead, we will touch on the key Django programming concepts that, when combined, will get you part of the way to the end zone. Not every concept can fit into this book but Django is fully capable of handling all of the features that each of these types of systems includes. It is really up to your team to take on each of the rest of the concepts discussed in this book and use them as another tool in your toolbox when building your system. Let's discuss briefly what each of these six major types of enterprise-level systems is and what they are primarily used for.
Customer Relationship Management
CRM systems can typically be thought of as lead management, marketing communications, sales and inventory control, retail management, and so much more. The systems can be thought of as everything but the actual selling of products and services. They can even go further to include customer support and data analytics. These systems are designed to develop better relationships with your business partners, customers and potential customers, and anyone else in the equation.
Enterprise Content Management
An ECM system can best be described as a system for people working in fields that deal with creative and other intellectual property in some kind of way. Newspapers, magazines, and other news companies today have a great deal of content that they make available to the internet on a daily basis. A Content Management System (CMS) provides a less technical and rapid way to build new pages and enter that content onto the web. Enterprise level just means you are adding more and more tools to your toolbox for your organization to use.
Enterprise Asset Management
In an EAM system, products and inventory of all kinds can be entered into a system in the same way as a CMS. This is often known as an e-commerce or shopping cart website. It's where you make your physical goods and assets available online. These systems allow the tracking of inventory, project management, and document control, such as contracts and other legal documents. These systems may even consist of physical assets, such as real estate, automobiles, and music records.
Enterprise Resource Planning
An ERP system is typically thought of as a way to manage people, the employees of the company, or what is commonly known as the Human Resources (HR) department. The system can handle on-boarding and off-boarding procedures and store all personnel records. It could serve as a tool for project management, risk assessment, and record keeping. It can even serve as a knowledge base such as in the form of the Frequently Asked Questions (FAQs) area. A knowledge base is often used to point people to and have them find common questions and answers in order to reduce the workload on your staff. These can also be used for training purposes, such as generating quizzes or asking trivia questions and playing tutorials.
Supply Chain Management
SCM systems are similar to CRM and EAM systems. These are systems that manage inventory in every aspect of its development in the supply chain. These systems manage inventory on a national or even a global scale. They communicate with suppliers, connect to buyers, track packages, predict future supply orders, and may even automatically place those orders. One way to look at the difference between a CRM and SCM system is that a CRM is mostly used for sales and marketing while an SCM is mostly used for production and distribution. Both deal with products but in different ways and a large company or a conglomerate would need both.
Enterprise Information System
An EIS is a system that generally combines a CRM and SCM system to handle a wider range of business needs. An EIS may even integrate some or all of an ERP system and act as one giant central nervous system. Depending on the needs, this may consist of numerous databases and even numerous development projects all working together, comprising the brains of everything. These systems are known for storing and processing large volumes of data and connecting many different systems all together into one.
We will now take a look at why people gravitate toward using Python and Django when they are building any of these enterprise-level systems. We'll see why it suits a variety of projects and what features it is best known for.
Why Python/Django?
Python was created in 1991 by Guido van Rossum. He came up with the name Python after reading the script for Monty Python's Flying Circus. The language was created primarily for the purpose of code readability and reliability. Python has been growing in popularity as the preferred backend framework for several years now. Python plays an important role in some very popular websites today, such as Google, NASA, Netflix, Spotify, Uber, and Dropbox, just to name a few. The Python language has become desirable among many developers for its ease of use, quickness to learn, and overall adaptability of the code written.
Django came into existence in late 2003 by the newspaper publisher Lawrence Journal-World in Lawrence, Kansas. Similar to Python, it had one goal in mind: to create complex database-driven websites in a simple and easy-to-read way. Along with readability, it was designed with rapid development and a Don't Repeat Yourself (DRY) code structure in mind. Readability is why Python was chosen as Django's foundation for the framework. Django is best referred to as a backend framework because of how it works to build and manage databases. It comes with many concepts built in surrounding the architecture of websites, which makes it appealing to most web developers.
Many people use Django today for their backend; but the framework can also serve as your frontend. If you have ever used Shopify's Liquid template language, otherwise known as Liquid syntax, or even ASP.NET's Razor syntax and how that is used in conjunction with C# .NET or Visual Basic .NET, you will notice commonalities with the Django template language, which is Django's method of using Python to build HTML files. Django uses context when the page is rendered to serve up user-generated content or database-driven data onto that page. The template language syntax is fairly easy to read and quick to learn. Some examples of sites that use Django are Bitbucket, Instagram, National Geographic, Spotify, The Washington Post, and YouTube.
Django's features include the following:
- Caching framework
- Data serialization
- Extensibility
- Form handling and validation
- Scalability
- Security
- Template language
- Testing framework
Of these features, extensibility means that Django is built to allow easy integration of other third-party services. Your developers can spend more time focusing on the specific needs of the project versus trying to figure out how to connect your project to a third-party servicer's system. Django makes it easy to connect to virtually anything that exists today. If a functionality doesn't already come built in, there is usually a pip package for it.
Django does not need to be used to build only websites. It can be used to build an API that stands as the central hub for anything, communicating with a REpresentational State Transfer (REST) framework, which is a common architecture for standardizing communication between computer systems on the internet. From here, you can use any variety of common existing tools to build an iOS app for iPhones or even Android apps. Depending on your particular business requirements, deciding to tap into smartphones can be beneficial in many ways. With somewhere around 85% of Americans owning a smartphone today, some companies might want to build an app where a user can install that app on their personal phone (https://www.pewresearch.org/internet/fact-sheet/mobile/), versus the company having to purchase additional hardware to distribute devices to all of their employees. APIs can be used for many other things as well, from microservices to large-scale external web systems and databases.
Personally, when it comes to using the Django template language and a JavaScript-based framework such as React or Angular together, I would recommend against doing that as it can get far too complex to work with. If you are using React, Angular, Vue.js, or Handlebars.js, to name a few, to work as your frontend, then Django would just serve as your backend where context is served up through your API. You can still keep your frontend and backend files in the same Django project folder.
I have a few recommendations to help you choose. If you want to build an Android or iOS app or a Single-Page App (SPA) website, use Django as an API on the backend. Then, for the frontend, you can use a common JavaScript-based framework to build mobile apps. For multipage websites, just use the Django template language along with your context to work as your frontend. There are ways to build an SPA website without the use of React or Angular and just rely on Django alone, but even then, you will still need something such as jQuery, AJAX, or vanilla JavaScript to help you process triggers and events that send requests to your API. I often resort to preloading my base .html file with jQuery, which I will discuss how to do in Chapter 4, URLs, Views, and Templates. Many people prefer to use vanilla JavaScript so that they can write simple tasks without loading the entire jQuery library. When it comes to adding bells and whistles on the frontend of things, in all of the projects that I have worked on, I find that I can pretty much do everything that I need to do with just the Django template language and jQuery. I may be biased on this one but it is really simple to use. However, there are a lot of benefits of using ECMAScript, which is actually a set of international standards for building and compiling JavaScript, such as ES8, ES9, or ES10. Using ECMAScript is something I should be focusing on more in my projects.
Tip
When working with Django and Python, ask your developers to adopt the Python Enhancement Proposal 8 (PEP-8) style guide for Python code. This is an officially adopted formatting guide to keep code consistent among developers. This can be strict or relaxed. Personally, I like to choose a more relaxed version where I can make things a bit more broken down and readable. If you are building something proprietary, for internal use, it is not necessary to follow this exactly and you may prefer to choose a style that your team will be happy with. If you are building a package that will be shared publicly with anyone, I would recommend you follow the PEP-8 format exactly. It may actually be a requirement for submitting a package to the Python Package Index (PyPI) library. You can find out more about the official style guide here: https://www.python.org/dev/peps/pep-0008/.
PyPI is the official repository for third-party Python package libraries both public and private. It's a wonderful resource when looking for new packages to play around with and it provides information on how to work with the code as well: https://pypi.org/.
A package called Black can be used as a code linter to help developers make sure they are following PEP-8 style formatting. You can learn about Black here: https://pypi.org/project/black/.
Next, let's explore what the different types of Application Programming Interface (API) are and why we might need to know about these when planning for a project.
Types of APIs
An API is a means for two systems to communicate with each other through what are known as endpoints or a URL.
We can categorize APIs into three main categories:

Figure 1.1 – Types of APIs
In the following sections, we will discuss what each of these API types is and what they are used for. Depending on the requirements of the project, we may need to choose one or the other as a type of system that we want to build.
Open APIs
Open APIs are open to the public and are sometimes referred to as an external API. This typically means there are no restrictions and anyone can be granted access. Sometimes, a simple registration or API key may be required before developers can gain access but they usually have the freedom to do with it as they wish. These APIs can be open bidirectionally as well, meaning the system is open for all GET, POST, PUT, PATCH, and DELETE requests coming to and from your system.
Partner APIs
Partner APIs are commonly found in business-to-business relationships. The general public cannot gain access and permission is only granted to strategic partners who need to use your API in order to do business with you. Limitations can be defined depending on your agreements with each party. These are fairly common in the world today when business mergers occur and your team is tasked with making two external systems communicate with each other. Sometimes, you have to build a central database in between the two existing systems for various reasons, such as your business model is based on granting access to your API in order for companies to sell their goods on your platform. A common example of this is the Amazon Selling Partner API (SP-API), which is used for selling goods on the Amazon Marketplace.
Private APIs
Private APIs are the most secure; these APIs are locked down because they are intended to be used internally by that company or organization only. Large financial institutions or corporate retail entities may use these to manage any aspect of their internal functions. The public and any other external sources may not be granted access unless a specific need for it is warranted. Common examples are government organizations using APIs to connect to systems that keep legal records and documents. Another example could be a university granting an educational department access to student and class records.
By now, we have brushed up on what enterprise-level software is, in terms of what types of enterprise-level systems exist today and how we can classify them. We also discussed how Python and Django play a role in enterprise-level software. Now that we have learned about these various concepts, let's begin designing and planning for a project of our own.
Designing and planning
Every project, however big or small, needs a clear plan for what it is and how it will be built. The larger the project, the more work should be put into the beginning phase of preparing for development. It is no surprise that enterprise-level development should also require a great deal of preliminary work before actual development begins. Whether you are working for a company or are a company providing a solution to a client, you should have a clear plan of what needs to be done. There is a lot of flexibility here based on factors such as cost, lack of developers, and deadlines. Prepare as much as possible and try to stick to the timelines that are set to keep you on track to completion. Remember that too little planning could come back to haunt you later.
Developers should be given as much information as possible to help them understand what they are building. If your developers are not provided with enough documentation, blueprints, and other materials, then they will be left to make assumptions on their own, assumptions that later on are found in the testing and Quality Assurance (QA) phases of development as bugs in your application. When this happens, you may discover that a particular feature needs to be rebuilt, requiring major foundational changes that will take a great deal of time to refactor. If we think about something other than programming for a moment, such as building a house, we all know a foundation needs to be built before a team can frame the house. In turn, that foundation needs to be completed before a team can build the roof, wire up the electrics, install plumbing, and so on. You can't start building a roof without a frame, and you can't build a frame without a foundation to put it on.
Let's discuss how to gather requirements for your project.
Requirements gathering
Gathering requirements is important to help document the build process and to allow both parties, the developer and the owner of the software, to reference it at any time during development. This ability is essential in order to ensure things stay on track until completion and are also completed on time. There should be an initial brainstorming phase to get a feel for the scope of the project. One good trick is to have all the stakeholders get together and debate the needs of the system, while you record any key points raised during the debate and include them in your requirements findings. You should always start by asking questions, and you should ask alternate questions for different sets of people. After you have spoken to stakeholders, move on to directors, project managers, developers, and employees, known as end users. Interview as many different types of users as possible. For extremely large entities, you could create a questionnaire, distribute that questionnaire to a number of users, and then come to a conclusion based on the results.
If there is a legacy system currently in place, even if it's a manual versus digital process of some kind, you should try and get a feel for how it works and identify any pain points within that process. My favorite tactic is User Observation, where I watch a user as they go through the flow of an everyday task and then try to identify things that may slow them down. The next thing I would do is try Role Playing , which is a method where you jump in and use the system as a user would perform a task. You could also ask two different kinds of users to swap positions and ask them what was easy or hard about doing the other person's task or what they think could improve the workflow. There must be bottlenecks of some kind or else there wouldn't be a need to build something better. These are things that bog down your everyday tasks and end up costing the company a lot of money in terms of time and resources. You need to keep an eye open and identify the pain points that your client could not identify themselves or they will have a difficult time communicating with you. Your client won't always know the best solution to a problem, and they may not even know a particular problem is even a problem until you reveal a way to improve that process for them.
Research and discovery
Find out whether this will be an internal, partner, or public project. If it is a partner project, you may have certain limitations based on the partner's specific needs. This is when we get into the difference between business requirements and functional requirements. Functional requirements are things such as determining what hosting plan and server to live on, a backend framework, a frontend framework, and a set of pages. Business requirements, on the other hand, encompass the vision, goals, and objectives of the business as a whole. They are specific to the needs of the organization or the partners they are working with. The structure of a set of web pages or API endpoints may be defined by the business model of that company versus some other logical reason that may otherwise be chosen. Do your stakeholders have any goals, suggestions, or requests that you need to consider? Here are 15 common questions that can help you formulate your set of questions. You shouldn't limit yourself to just these questions alone; use them for brainstorming:
- Do you have business-specific requirements?
- Why do you need a new system?
- What does your current system prevent you from doing; are there any bottlenecks?
- What new features would you like to add; do you need any improvements?
- What old features would you like to keep or remove?
- Who will you interact with in the system; what types of users and roles?
- Will you need reporting, email messaging, or any other kind of notification system?
- Will the system connect with any third-party or partner systems in any way?
- What kind of traffic or load on the server are we predicting?
- When does this new system need to be operational?
- What kind of budget have you allocated toward completing this project?
- Will data need to be migrated from the old system to the new system?
- How will development be divided up among the development team members?
- What skills does the development team have; what are the team's strengths and weaknesses?
- How should the User Interface (UI) flow work; should it be multipage or single page?
Decision making
From the common questions listed previously, you can formulate dozens, if not hundreds, of other questions to fit your unique set of needs. Then, these questions can be grouped into several categories of development, each category with a unique set of requirements and guidelines. You will want to focus heavily on usability, data migration, performance, security, scalability, and reliability. It's good to know this information beforehand so that you can choose the best direction that your development should move forward with.
These will be decisions such as what frontend framework you will choose, who you will go to for hosting, whether you will be building your own servers or renting space at a data center in the cloud, and how your server will be configured. There are countless possibilities to consider. When it comes to the UI, there is a number of questions that need to be asked regarding form field layout, form field validation (server side and client side or both), placeholders, labeling placement, and the flow from start to finish. Flow here refers to whether the user should complete part or all of a form before proceeding and/or whether those parts should be included in a separate form.
Keep in mind that when it comes to form field validation, Django will only validate your data on the server side. Your project does not need both server- and client-side form field validation. However, a healthy website will implement both. So, when a postback error occurs, anomalies will emerge, such as not displaying your form or the field errors that are present, if your form is not visible when the page first loads, for example, when a user needs to scroll down really far on the page or perform several actions before the form becomes visible to the user. Client-side form field validation solves this problem by checking for data to be valid before it is sent to the server, known as data integrity. This validation also reduces work for the server to process and provides for event handling, letting you write functions to help you format HTML and CSS on your page. When it comes to decision making, you can choose whether or not field validation will take place on the client side or the server side, or both. If client-side validation will take place, then you can choose what tools will be used, which are usually JavaScript based.
For example, take input attributes such as required, minlength, and maxlength, which can exist in your HTML. These are usually generated by Django when rendering form fields that have specific field arguments set, such as the following example. We will discuss rendering forms in detail in Chapter 5, Django Forms:
# Demo Code
<input type="text" name="field" id="field-id" class="form-input" maxlength="150" minlength="5" required="">
Most browsers will natively restrict a user from submitting a form if these attributes are present and the data does not satisfy them. All browsers will handle and style these error states differently from one another as well, like Mac versus Windows or Chrome versus Safari. The reason for this is that they are developed by separate entities competing against each other in the market and as a result have different branding. This difference hinders the ability of Django to serve up a postback displaying the error message that was defined in your code for that field. If for some reason the user is able to submit a form with invalid data, the postback may not display the form if, as I mentioned previously, the form is hidden from sight on page load. This is why your project may require both client- and server-side form validation.
Handling error state messages between your server-side code where you define your form fields and your client-side implementation can be tricky as well, meaning you have to store the same error message in two different locations within your source code: one for server-side validation and one for client-side validation. Over time, and with many different developers, this will get very messy, especially when someone remembers to change one but not the other when edits, additions, or deletions are made to these messages. If you have a strict need to make sure they are both worded exactly the same, it might be necessary to create a data dictionary that your source files could access, allowing you to put all your error messages in one spot. How you do that will take some thinking. This file will also need to be accessible via both Python and JavaScript.
Visualization and interpretation
When it comes to the actual design of how the UI will look, there is a number of factors involved. Large corporations may have specific branding guidelines that they mandate for marketing and other legal reasons that can restrict the overall design of your frontend. Sometimes, these corporations will have an in-house creative and marketing department or they may outsource to a third-party creative company to mock up a set of Illustrator or Photoshop documents to assist your frontend developers in doing their jobs. For smaller projects, you are free to design something yourself, but that often takes up time and developers often experience a type of writer's block when tasked with actually designing something versus building something.
One big misconception about frontend developers is that everyone automatically assumes they are designers, which is not always the case. Similar to how a construction worker reads blueprints to build a house, someone else usually drafts the blueprints for them. For this reason, you can use open source templates and boilerplates in the form of HTML, CSS/SCSS, or even JavaScript from online suppliers such as Envato Market, formerly known as ThemeForest (https://themeforest.net/), or Nicepage (https://nicepage.com/html-templates). I have resorted to using design templates from sources such as these in my own Django projects before. Each of these templates and template providers is different. Some are free, while others can be used for a price, and usage licenses vary. Independent research will have to be done on your part before deciding whether any of these sources can work for you. These design templates may also require a bit of digging around in order to make sure they fit in your project nicely, but they can still save a lot of time and provide a stylish-looking site that may be far better than what someone who lacks a creative eye for designing something from nothing could create for you.
Many of these HTML, CSS, and JavaScript templates may resort to the use of the Node Package Manager (NPM) for you to build source files into production-ready files. Similar to PyPI, NPM is used to store and distribute JavaScript libraries that are used in development. They rely on Node.js to run them. There are even pip packages that you can use within your Django project to help you build source files using an NPM package. I will discuss managing pip packages and dependencies further in Chapter 2, Project Configuration. There is a number of Python packages that can help you transpile SCSS, auto-prefix, bundle, and minify files. I have played around with a lot of different Python packages and out of them, I have found only a select few resorting to the use of NPM to do the heavy lifting at the end of the day. This means, as a requirement for your project, your developers may need to have NPM installed on their machine or even on their server depending on how you want to use Node.js. For the examples in this book, I will gravitate toward Python packages as much as possible and you are free to integrate these into your project as you see fit. I'll try to avoid going into code examples pertaining to NPM packages, but I encourage you to use the packages in your development environments.
Tip
The latest and most stable version of Node.js and NPM can be found here: https://nodejs.org/en/download/. For Windows users, there is an easy-to-use installer file that will install both Node.js and NPM for you.
You can find the Gulp installation guide here: https://gulpjs.com/docs/en/getting-started/quick-start/. Gulp requires that the Gulp Command-Line Utility (CLI) is installed first, then install Gulp itself. Gulp is considered a task runner and helps to automate a vast majority of development tasks, such as SCSS transpiling, CSS linting, vendor prefixing, minification, and bundling; ECMAScript compiling; and other code linting.
Designing doesn't mean how the project should look; the process should also focus on how it will work or rather the nuts and bolts of the engine. When it comes to designing a project, use as many diagrams as possible to visualize each process. Visualization can be broken down into two main categories: Behavioral Diagraming and Structural Diagraming. Once you have created a set of diagrams, those can be used for collaboration with your stakeholders to ensure that you have everything needed. Your developers will also use these as blueprints for what they will be building.
There are many different diagram types in the Unified Modeling Language (UML), as listed here:
- Activity diagram
- Class diagram
- Communication diagram
- Component diagram
- Composite diagram
- Deployment diagram
- Entity relationship diagram
- Flowchart
- Interaction diagram
- Object diagram
- Package diagram
- Profile diagram
- Sequence diagram
- State diagram
- Timing diagram
- Use case diagram
Discussing each of these diagrams in depth can be rather lengthy. In the following subsections, we will discuss only six of the most commonly used diagrams today and how they can help you build a project of any size and type.
Class diagrams
A class diagram is used to illustrate the different classes or components of a system and how they relate to each other. A class is best known as a group of objects with shared or similar roles within your system. Similar to an Entity Relationship Diagram (ERD), class diagrams depict the objects that would be tables in a database, the interactions that could take place, and any other main elements of your system. This diagram is usually structured in a way where the top compartment is the class name, the middle compartment contains all the attributes, also known as the fields, and the bottom compartment shows any functions or actions that could take place.
The following figure shows the relationship between a user, team, and award. The class diagram shows how a team can have a collection of users and a team may also have a collection of awards issued to them. In this example, awards are given to teams and not individual users themselves. A Team model object can have a function called getAwards(), where it will get a collection of all the awards that the team has earned:
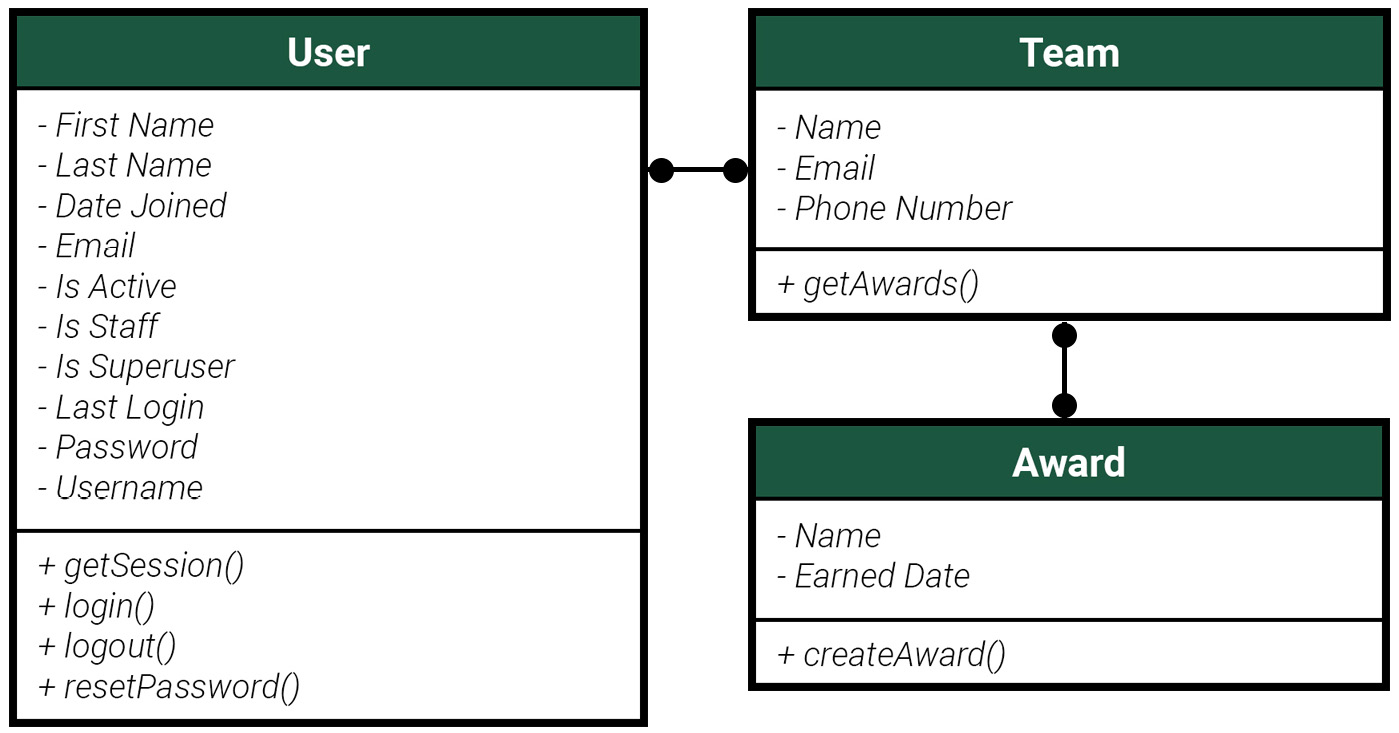
Figure 1.2 – Class diagram
Deployment diagrams
A deployment diagram is used for high-level planning. This is how developers will collaborate and code will be updated between different environments. Network engineers will use the diagram to map out physical nodes that will be used within their configuration. Developers will use it to have a better understanding of how code will update between different environments and where they may need to push or pull that code to and from when updates need to be made. The primary components of a deployment diagram include artifacts, devices, and nodes:
- An artifact is a digital asset, such as a file or an executable script of some kind.
- A device is a node that represents a computational resource, such as the application server or the domain server.
- A node is a physical entity that executes a component, subsystem, or process. Nodes can comprise a physical hardware component or a virtual, cloud-based component.
Entity relationship diagrams
An ERD visualizes the relationships between objects within your system. It's best used for mapping how different tables are linked within a database and is sometimes called an entity relationship model after modeling relationships in a database. These are used by your backend to help create the structure of the database and what fields should be included. On the other hand, these can be created by accessing existing databases to help map the current structure of a system and help you to see how best to rebuild it. It's like accessing blueprints of an existing building. Auto-generating these can mean they are so accurate that they even tell you about renovations done to that building after those initial blueprints were first drafted.
There are many ways to automatically generate an ERD. I'll share with you two of my favorite ways to go about doing that, assuming you already have a Django project up and running when reading and following along with this chapter. If not, I explain how to start a Django project from scratch as well as how to install the pgAdmin tool in the next chapter, Chapter 2, Project Configuration. The first way is with pgAdmin, which is a popular database tool used by Django developers today for working with PostgreSQL databases. This is very easy if you are using the most recent version of pgAdmin; older versions do not have this feature. The current version of pgAdmin, as of the time of writing this book, is v5.6. Just right-click on the database for which you want to generate a diagram and click Generate ERD.
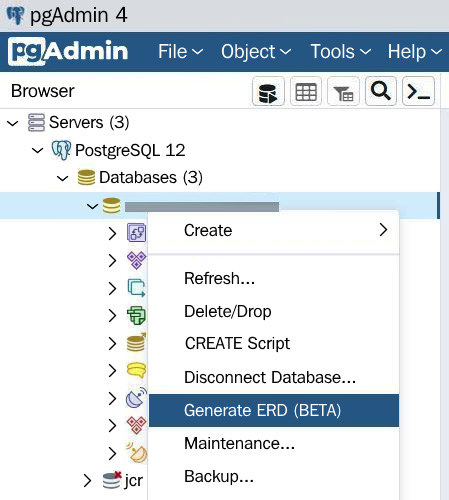
Figure 1.3 – Generate ERD with pgAdmin
The second way is using a popular command-line tool called Graph Models. You can find this in a pip package called django-extensions. This is the example where I have provided a Django app called chapter_1 with the code provided with this book for people who are already familiar with Django. You can run these examples in your existing project. For people new to Django, it is recommended to skip to the next subsection of this chapter, titled Flowcharts, and then come back and practice using this package after you have worked through the examples provided in Chapter 2, Project Configuration, to configure your project for the very first time.
To install the django-extensions package on an existing Django project, follow these steps:
- Run the following command:
PS C:\Your_Project_Folder> pip install django-extensions
- In your
settings.pyfile, add this app to yourINSTALLED_APPSvariable:# /becoming_a_django_entdev/settings.py INSTALLED_APPS = ( ... 'django_extensions', ... )
- You will also need to install a diagram generator that will draw the diagram for you. This is done using the
pydotpluspip package:PS C:\Your_Project_Folder> pip install pydotplus
- Now, you can run the following command to generate all of the tables:
PS C:\Your_Project_Folder> python manage.py graph_models -a -o diagrams/chapter_1/all_models.png
Specific models can be targeted, or a set of models can be targeted, separated by a comma with no spaces. In the following example, we are targeting the User, Team, and Award models:
PS C:\Your_Project_Folder> python manage.py graph_models -a -I User,Team,Award -o diagrams/chapter_1/team_models.png
The following diagram was auto-generated by running the last command, generating the User, Team, and Award models and their relationships with one another:

Figure 1.4 – ERD from Graph Models
For a complete breakdown of how to use the Graph Models plugin, go to https://django-extensions.readthedocs.io/en/latest/graph_models.html.
Note
For Windows users, you will also need to install the GraphViz application on your computer for the graph_models command to work. Also, select Add Graphviz to the system PATH for all or current users when performing the install: https://graphviz.org/download/.
There is also an installer for Linux, Mac, and Solaris operating systems. GraphViz may also be required to generate these diagrams on those operating systems. If you are experiencing errors running the preceding commands on Linux, Mac, or Solaris, try installing GraphViz on your system.
Next, let's discuss flowcharts and what they are used for.
Flowcharts
Flowcharts represent the flow of data within the system. They provide a step-by-step approach to solving a particular problem or task. These diagrams are used by developers to gain an understanding of what rules apply when writing code. Rules can include logic such as data validation scenarios before proceeding to the next step. Flowcharts can be simple to fairly complex, and often provide decisions the user can make along the way. This diagram type depicts a user's possible interactions within a particular flow or set of flows.
If you have a single page that has a form broken down into many parts that the user must complete before navigating to a new page, a flowchart can be a handy tool for your frontend developer or even your designer to understand how a user will proceed from one step to another within the form and one page to another within the larger flow of the site. The diagrams can be broken down into smaller, more granular or defined flows as needed.
The following diagram is a small example to show the flow of a user as they log into a system. Does a page require a user to be logged in? If so, a decision must be made: is the user logged in? If no, prompt the login screen; if yes, a new decision must be made: does the user have permission to view the page?
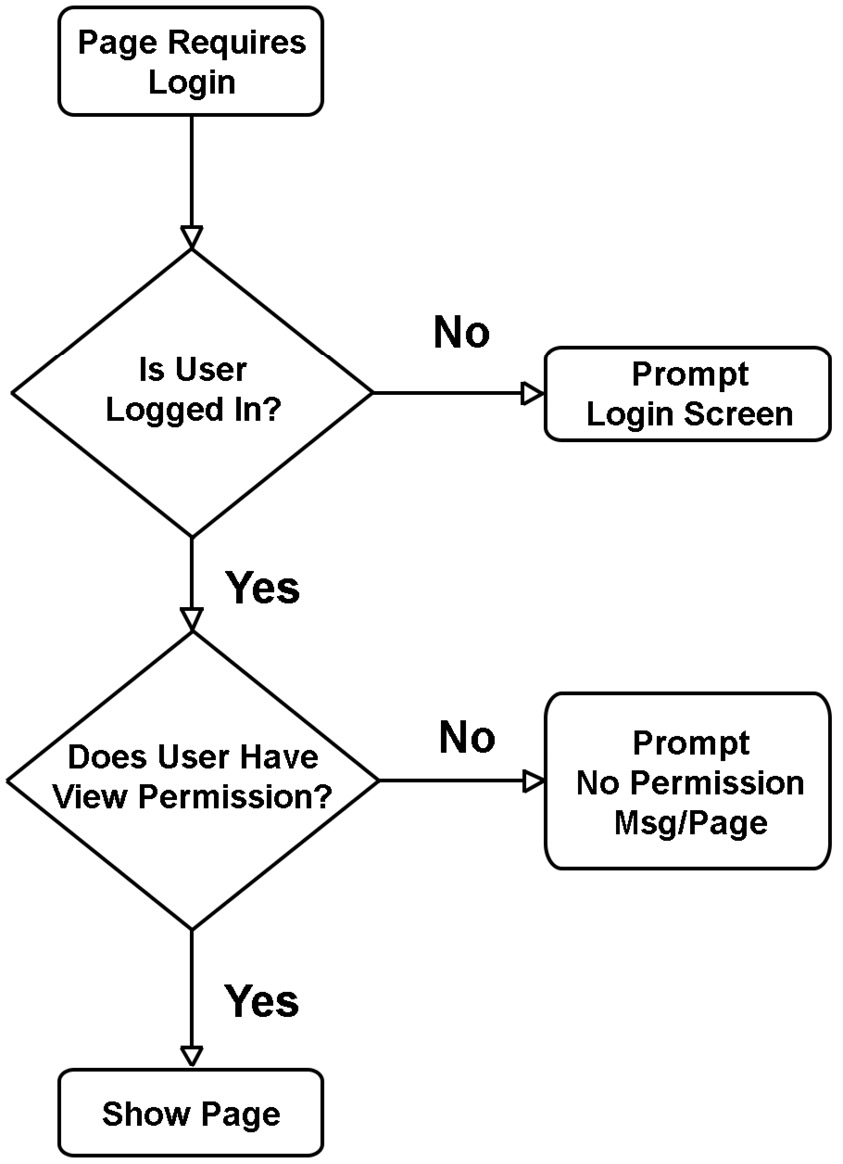
Figure 1.5 – Flowchart
State diagrams
A state diagram shows the behavior of objects within a system. The diagram shows possible conditions or states that something can be in at any given time, such as depicting whether a user is either logged in or logged out; an order is either received, processing, or out for delivery, or an order is fulfilled or returned. These are great for showing a particular shift in behavior versus decisions that can be made. They may even depict certain triggers that cause a state to change as an operation moves through its life cycle toward completion.
Use case diagrams
A use case diagram represents the behavior of a user and the system. These are fairly similar to a flowchart but often focus on the bigger picture. These are used by teams such as the creative department, stakeholders, project managers, and directors, to help understand the concept of what this particular flow or use case will do.
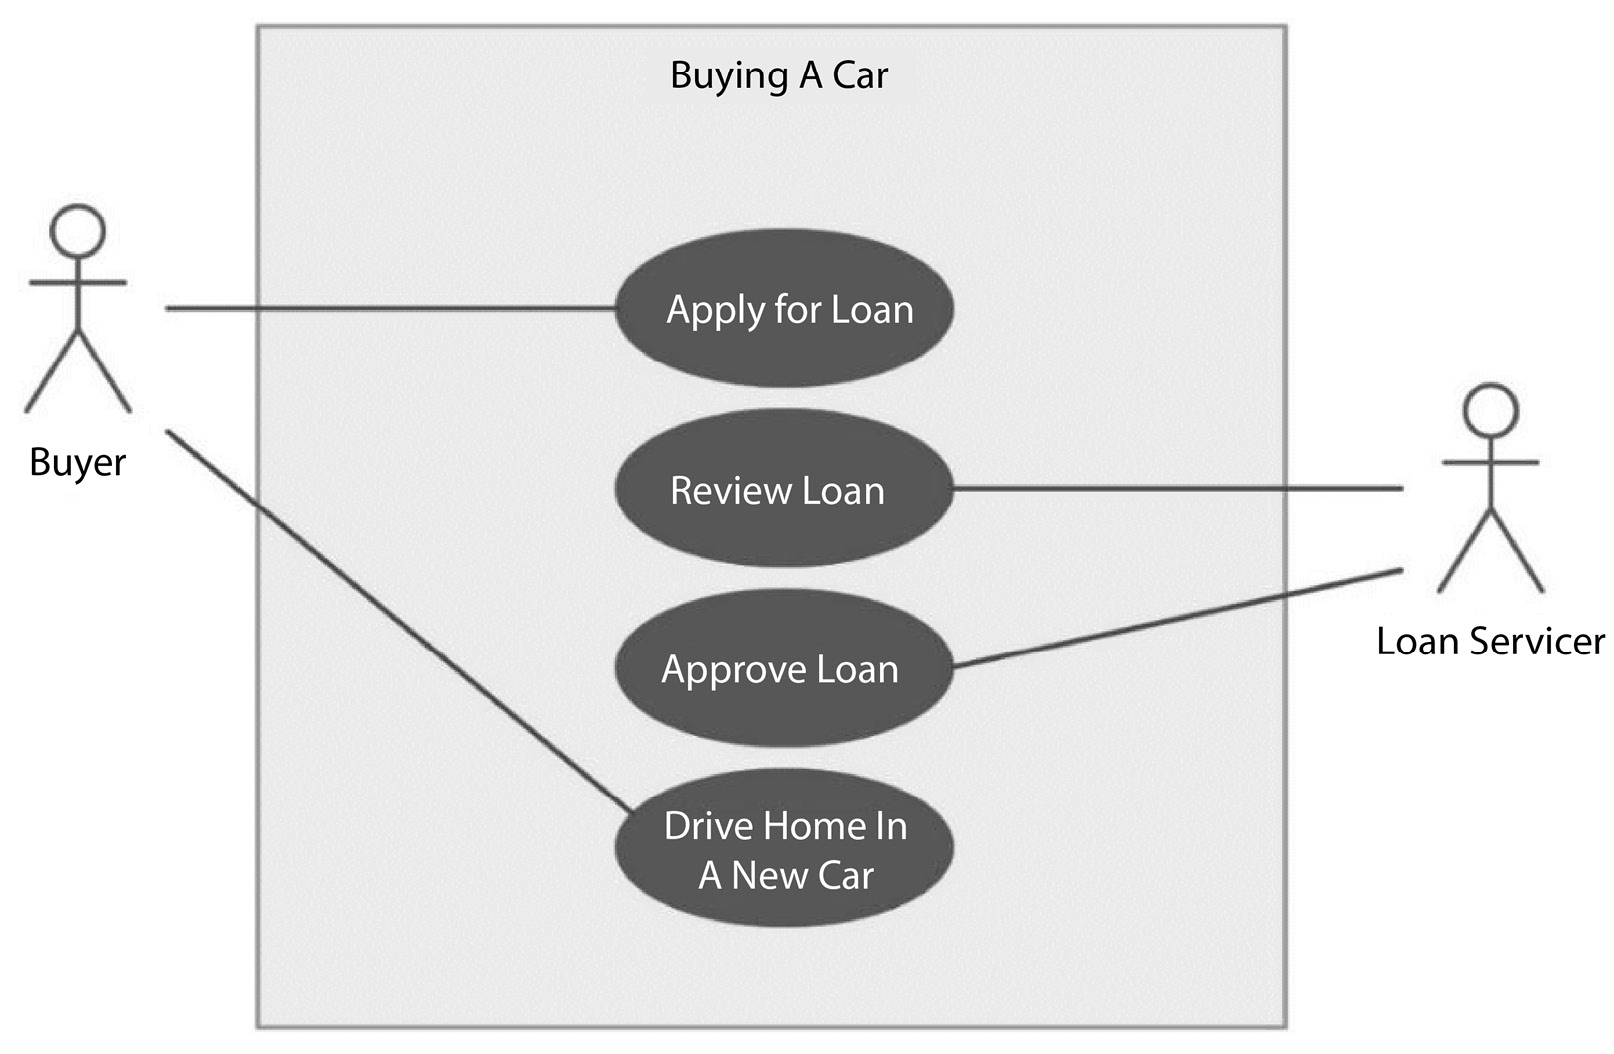
Figure 1.6 – Use case diagram
At this point, we have gone over common ways people plan for and design web applications today. Use these concepts to plan for your project the best that you can. In the next section, we'll discuss hosting your application as well as different deployment methodologies.
Hosting and deployment
All websites and apps need a physical location for all of their files to live in; this is also known as web hosting. Web hosting is a service that provides the physical hardware for files to live in and where information is processed. A hosting plan provides a solution consisting of an operating system, such as Linux, and includes the actual hardware of the networking system. Servers will come with a web server of some kind installed for you, such as NGINX or the Apache web server.
A web server, otherwise known as a Hypertext Transfer Protocol (HTTP) server, is software that will send and receive HTTP requests, which are basically messages sent over the internet. Web servers can be thought of as software that runs on the operating system using HTTP, which is a standard network protocol used to distribute your website or application over the internet. With the HTTP that all browsers use today, a user can access your site when they navigate to your domain through the browser's address bar. Web servers help you with load balancing and caching and serve as your reverse proxy server, which makes your files available to the rest of the world via the internet. Hosting services will often provide you with options to scale up when your site experiences an increase in user traffic and data access, where you need more processing power or storage space.
Huge projects tend to gravitate toward services such as Amazon Web Services (AWS) or Microsoft Azure and even Heroku. These are cloud-based hosting services, meaning your sites' files will live on physical hardware that is likely shared with other clients. However, options to have a dedicated and far more secure server space are available for a price from any of these providers. Hosting plans also provide advanced options that give you the ability to install and configure your own operating system and/or your own web server. NGINX is the preferred choice when working with Django projects because the web server has a reputation for performing far better than an Apache installation and can handle far more HTTP requests per second. When thinking of performance, it is of no surprise that many Django projects use NGINX for their web server. If you do need to configure your very own web server, you can start with the official NGINX installation manual, found here: https://www.nginx.com/resources/wiki/start/topics/tutorials/install/. The Apache web server will also work with Django and is desirable because it is far easier to install than an NGINX installation. If Apache is the route you need to go down, start by reading the official Django documentation on working with the Apache web server here: https://docs.djangoproject.com/en/4.0/howto/deployment/wsgi/modwsgi/.
Creating and configuring a Heroku plan
For the examples provided in this book, I will be using the free plans that Heroku offers because of the service's ease of use, zero-cost features, and growing popularity. Heroku is known as a Platform as a Service (PaaS), meaning that it enables developers to build, run, and deploy websites and apps entirely in the cloud. You can be up and running in a matter of minutes with this option, which can cut down the cost of hiring teams of network engineers to run a system for you. To follow along with this exercise, go to the Heroku website and sign up for a free account at https://www.heroku.com/. Then, once you have verified your email address and logged into your account, navigate to your dashboard at https://dashboard.heroku.com/apps and click on New | Create New App, then fill in the page, as depicted here:
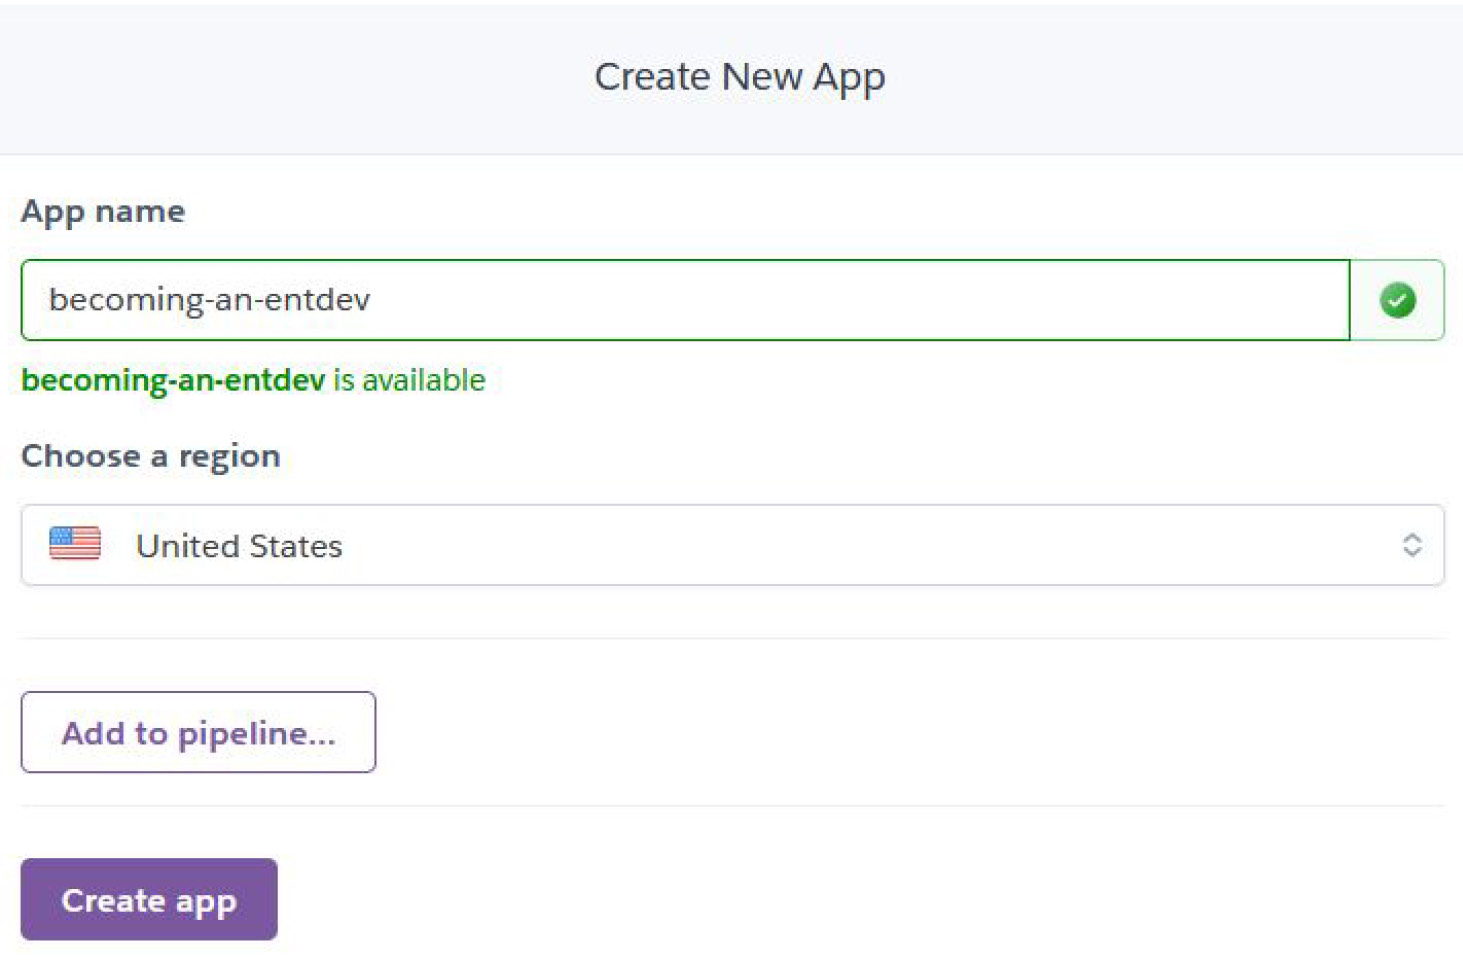
Figure 1.7 – Creating a new Heroku app
Enter a name for this app. The name is for internal use only and does not need to be exact. Keep in mind that since the app name must be unique within all Heroku apps, you will need to choose a different name from the name provided in this demonstration, becoming-an-entdev. Also, don't worry about pipelines just yet. We can always add them later if we need or want to. We will go over pipelines later, in the Advanced deployment subsection of this chapter. You may want to change your region to one closer to you if the United States is not your closest region.
Since we are building a Django project, we will need to select the Python buildpack. A buildpack is Heroku's way of using scripts to automatically build and compile various kinds of apps on Heroku. From the dashboard of your Heroku app that you just created, scroll down to the Buildpacks section and select Add Buildpack. The following screenshot depicts the popup that should appear next:

Figure 1.8 – Heroku buildpack choices
You may add any buildpack that is relevant to the needs of your project, but for anything related to this book, python is the only buildpack needed. If you choose any other buildpack, additional configuration steps may be required that have not been provided in this book, so use with caution.
Next, we'll discuss environments, which in this context refers to the testing and development stages, where we will present code running in action at different stages of development. Environments can be used in other contexts, such as a web server or operating system. Environment can have many meanings in the world of programming and generally refers to a configuration, setup, or structure of something that you are working with, on, or in.
Configuring Heroku environments
A Heroku app, in its most basic form, will consist of at least two environments, the first being a production environment, where your site or app will be accessed by the public and its users, and the second being your local machine, which is the computer where you and your development team will do all of your coding and where you will run the site locally. Heroku will default to using Heroku Git when an app is created, where it uses the Heroku CLI to commit changes from your local machine to your production environment. On your Heroku accounts dashboard at https://dashboard.heroku.com/apps, click the Deploy tab to see the choices shown in the following screenshot:

Figure 1.9 – Heroku deployment methods
Using the Heroku CLI
You will need to install the Heroku CLI on Mac, Windows, or Linux, by downloading the appropriate installer found here: https://devcenter.heroku.com/articles/heroku-cli#download-and-install.
For Windows users, remember to select the checkbox labeled Set PATH to heroku when you are prompted to do so during your install.
Next, navigate to the folder where you want your project to live on your local machine, and then open a new terminal or command-line window within that directory. You will need to log into Heroku using the following command:
PS C:\Projects\Packt\Repo> heroku login
Remember, you will need to log in any time you open a new terminal or command-line window and perform tasks. It will prompt you to open a new browser tab to log in. Once you have done so, you should see a message such as the following:
heroku: Press any key to open up the browser to login or q to exit:
Opening browser to https://cli-auth.heroku.com/auth/cli/browser/03be4a46-28f4-479a-bc10-8bd1bdcdd12b?requestor={{ ... }}
Logging in... done
Logged in as {{ youremail@yourdomain.com }}
PS C:\Projects\Packt\Repo>
If you see the preceding message, then you have successfully logged into your account and may begin using the Heroku commands.
Tip
In Windows, an easy way to run PowerShell as an administrator is to navigate to the folder that you wish to run commands from within the File Explorer window and then click File | Open Windows PowerShell | Open Windows PowerShell as administrator. This will start the command line in that directory, reducing the steps needed to navigate to it by typing a series of change directory commands.
Clicking the options in Figure 1.10 will open the command line in the following directory:
PS C:\Projects\Packt\Repo>
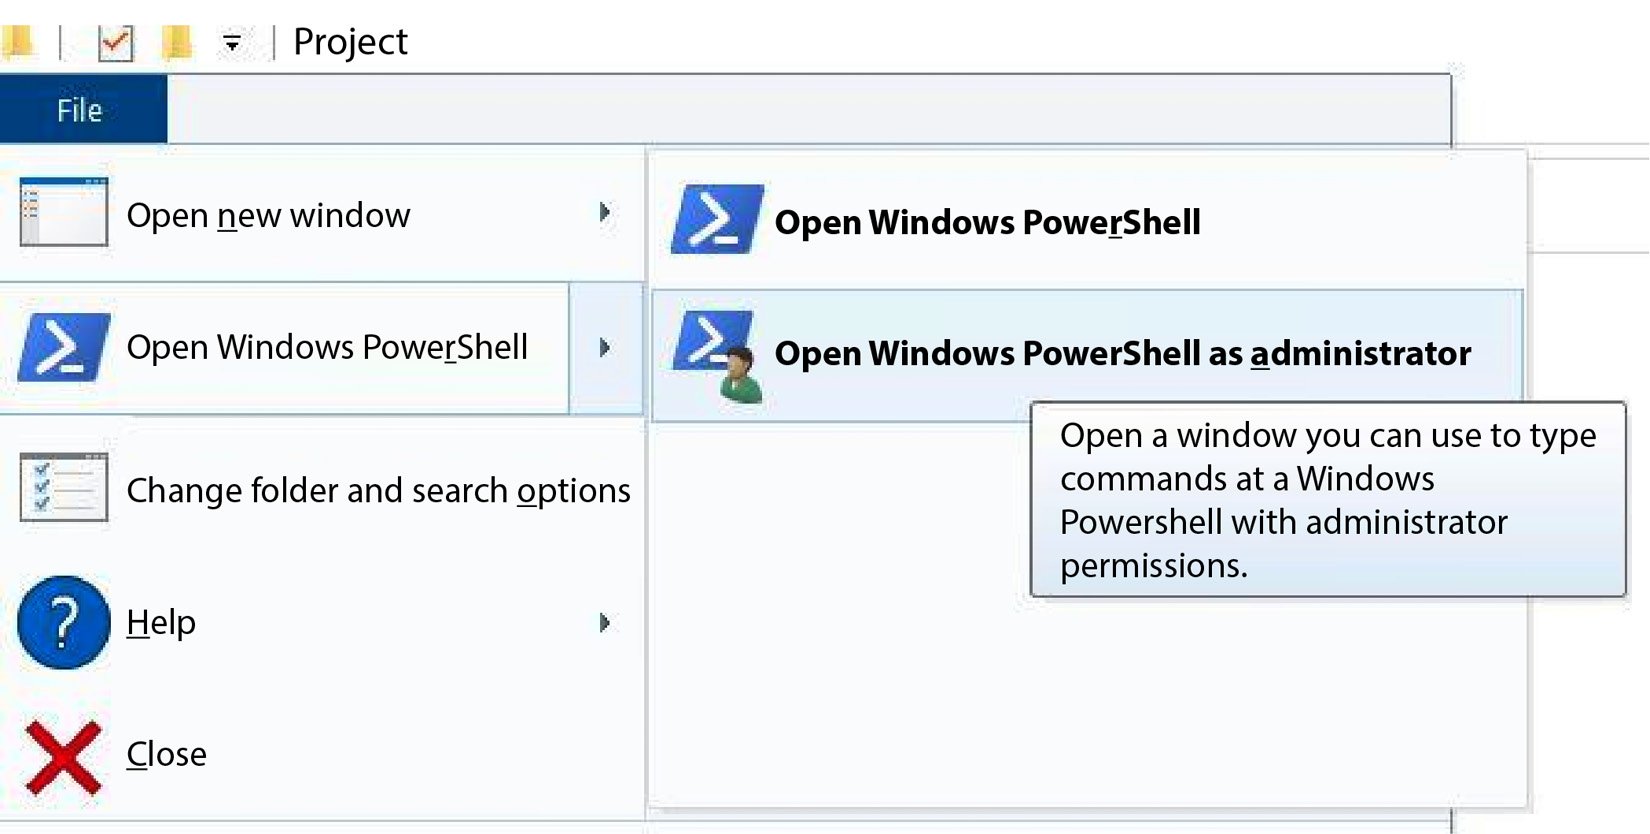
Figure 1.10 – Open Windows PowerShell as administrator
Next, let's initialize our local Git repository for the first time.
Initializing a Git repository and commiting changes
To say you are initializing a Git repository on your local machine means that you are generating a .git folder in the directory of your choice. The configuration files found in the .git folder are responsible for establishing a line of communication between your local repository and the remote repository. The remote repository we are going to link to is the location of the Heroku app.
Follow these steps to configure your Git settings:
- Execute the following commands to first log into your Heroku account and then initialize a local Git repository linking your local repository with your Heroku app:
PS C:\Projects\Packt\Repo> heroku login
PS C:\Projects\Packt\Repo> git init
PS C:\Projects\Packt\Repo> heroku git:remote -a {{ your_project_name }}
This directory is where your Django project's source code files will live. In Chapter 2, Project Configuration, we will explain how to create your first Django project. For now, we just need to perform our first commit in order to establish a proper line of communication with each remote environment. In order for Heroku to accept a commit, the Heroku system needs to detect that it is a valid app that is being committed. Certain files must exist in order to pass this test. The first file is not necessarily required but I am suggesting you include it anyway; this is a README file. A README.md file uses Markdown language, which is a lightweight markup language used to store information such as your build processes or instructions for how a developer can get up and running for the first time. It's commonly used on the web to allow for the quick and easy formatting of plain text to keep important notes that can be viewed with many different web-based text editors today. When this file is viewed in the web browser, it is viewed, formatted, and styled in an easy-to-read format.
- To do this, create a file by running the following
touchcommand from the root of your local repository:PS C:\Projects\Packt\Repo> touch README.md
For a complete guide on how to use Markdown language to style your README documents, visit https://guides.github.com/features/mastering-markdown/.
Tip
Windows users will likely have to install touch-cli via NPM, if you haven't already done so. You need to do this before you can use the preceding touch command. Alternatively, you can right-click and select New | Text Document within your File Explorer, using your mouse instead.
To install touch-cli, run the following command using the -g attribute to denote that this is a global package for your development machine and not local to this project only:
PS C:\Projects\Packt\Repo> npm install touch-cli -g
- Go ahead and add what you like to your README file and get ready to make your first commit to your Heroku Git repository.
We will also need to create one more file in order to perform a successful commit on Heroku, that being a requirements.txt file. Otherwise, Heroku will give you an error when it sees that this file does not exist. The error message will read App not compatible with buildpack. This error suggests that you did not include the Python buildpack for your Heroku app as noted at the beginning of this section, but it also means that the requirements.txt file does not exist in the root of your repository. These files can both remain blank for now if you desire, but the requirements.txt file must at least exist.
- Run the following command to create your
requirements.txtfile from the root of your local repository:PS C:\Projects\Packt\Repo> touch requirements.txt
- To perform your commit, just run these commands:
PS C:\Projects\Packt\Repo> git add .
PS C:\Projects\Packt\Repo> git commit -am "Created Blank README and Requirements Files"
PS C:\Projects\Packt\Repo> git push heroku main
The -am option performs the action of staging all modified files that are being tracked and allows us to add a personal commit message at the same time.
Next, we will clone an existing Heroku repository.
Cloning an existing Heroku Git repository
If you have already performed the steps in the previous subsection, where you have an existing repository for your project, you now need another developer to clone a copy of it to begin working. The next two commands will be needed. Don't forget to log in first if you have not already done so:
PS C:\Projects\Packt\Repo> heroku login
PS C:\Projects\Packt\Repo> git init
PS C:\Projects\Packt\Repo> heroku git:remote -a {{ your_project_name }}
Then, run this command to clone the repository:
PS C:\Projects\Packt\Repo> heroku git:clone -a {{ your_project_name }}
To run any standard Git command, such as push or pull, use the following command, changing pull to push as needed:
PS C:\Projects\Packt\Repo> git pull heroku main
Managing environments in Heroku
It's generally unwise to manage large projects with only two basic environments: standard production and local environments. The purpose of having many environments in your Software Development Life Cycle (SDLC) is to provide an application to your client with as few bugs as possible at the time of delivery. Use those environments to filter out as many bugs as possible in the process. Each environment or team that tests the application from beginning to end acts as a filter, weeding out different problems along the way.
You can implement as many or as few environments in your deployment strategies as you see fit. Most projects include at least a development and staging environment in addition to the first two baseline environments: production and local. Development would be used by your developers as a way to do their own testing, just for the sake of running their project on something other than their own computer for the first time to see what the project does. Common build problems are spotted here that would otherwise just waste the time of a team testing for data and flow bugs. Then, when the developer is happy with how the code runs in the development environment, it can be pushed to a staging environment. Here, a different testing team can review the app, going through the flow and searching for ways to intentionally break the system. Then, when they are happy, the code can get pushed to your production environment. Theoretically, no bugs should exist in this environment; however, this is not a perfect world and so we just want our primary goal to be having as few bugs as possible when the project gets to production.
Open your terminal or command-line window and navigate to the directory of your repository on your local machine. You can run the two commands shown in the following code block to create a development and staging environment for your app. If you haven't already done so, make sure you are logged into your Heroku account:
PS C:\Projects\Packt\Repo> heroku login
PS C:\Projects\Packt\Repo> heroku create --remote development
PS C:\Projects\Packt\Repo> heroku create --remote staging
You should see the following message, indicating the operation was a success:
Creating app... done,pure-atoll-19670
https://pure-atoll-19670.herokuapp.com/ | https://git.heroku.com/pure-atoll-19670.git
Basically, what you are doing in this process is creating a new Heroku app that this environment lives in. That is done automatically for you.
Now, we can take the same two files we created earlier, README.md and requirements.txt, which should still be in your folder, and push them to development and staging. We can rest assured at this point of the SDLC that all three environments are exactly the same. We ensure this by executing the following two commands, pushing our code to those environments:
PS C:\Projects\Packt\Repo> git push development main
PS C:\Projects\Packt\Repo> git push staging main
Let's discuss using custom third-party repositories, such as GitHub, next.
Custom repositories
You are not limited to using just Heroku to store your files; you are welcome to use a cloud-based repository hosting service, such as GitHub or Bitbucket, to store them. There are a lot of reasons to decide on using a custom repository in addition to the repository location Heroku offers you. Many people just like to keep things organized and since they already have an account with another repository, they may want to keep all of their projects together. If you do make the decision to use something such as GitHub to store your project files, you would choose the GitHub | Connect to GitHub button, as shown in Figure 1.9, found earlier under the Configuring Heroku environments subsection of this chapter. Keep in mind that if you want to create additional environments, you should still have performed all of the steps prior to this section first. Each environment will be linked to a Git remote of that repository within your GitHub account.
When you choose to connect through GitHub, you will be prompted with a pop-up window in your browser that will ask you to log into your GitHub account. In this example, from within my GitHub account, I created a private repository named becoming-an-entdev. In your Heroku account, link your GitHub repository to this Heroku app by searching for the name of the repository that you created. Click Connect and if everything was a success, you should see this section change, containing a message reading Connected to Your Repo Location.
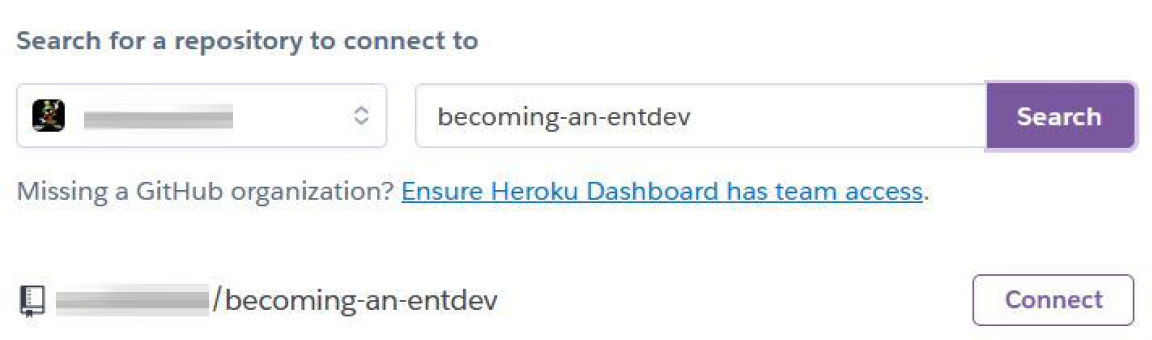
Figure 1.11 – Linking an external GitHub repository to Heroku
Automatic deployment
Next, you can choose to enable automatic deployment every time a change has been detected to a specific branch of the repository you linked to your Heroku app. In the following section, on the same page in your Heroku dashboard, select the branch from the following dropdown and click Enable Automatic Deploys:

Figure 1.12 – Automatic deployment
There is an option to work with Continuous Integration (CI) tools, which are also helpful for large-scale projects. Simply enable the checkbox labeled Wait for CI to pass before deploy if you need your CI tools to pass their tests before allowing deployment. CI and delivery can get inherently complex to talk about, but they are used to automate the integration of all contributors' work, such as running test scripts or build processes. Heroku's CI does this in regular intervals, sometimes multiple times a day.
If your automatic deployment was successfully linked to your GitHub repository, you will see a new webhook for that repo. A webhook is a fancy term in web development used to describe a signal that is sent to a listener on another system when some kind of event or trigger occurs. For example, when you push changes to your GitHub repository, a signal is sent to Heroku triggering a script to grab all the latest changes and merge them into the Heroku app automatically. Webhooks are sometimes referred to as reverse APIs because they just send a signal; there is no request to send the signal followed by a response, as is the default behavior of any standard API request. You can find webhooks in your settings for your repository within your GitHub account. If you are using a different service, just look for something similar to a webhook or reverse API.
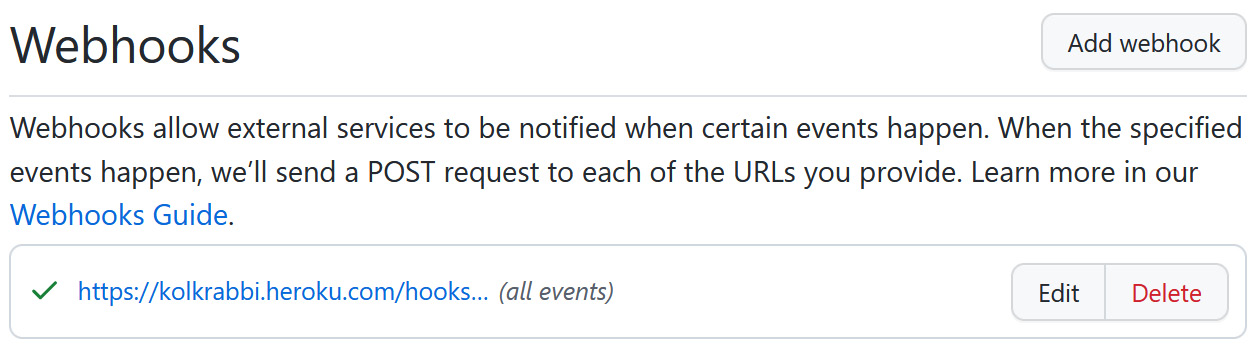
Figure 1.13 – GitHub Heroku webhook
Configuring remotes
Now that you have a GitHub repository that is created and linked to your production Heroku app and you have also wired up automatic deployments, you will need to specify in your local Git repository your remotes for linking your local repository to the production environment. Start by creating a git-production remote linked to your GitHub repository by using the Git URL provided in your account. You may name this anything you want.
Follow these steps to configure your remotes:
- Run this command to create your remotes:
PS C:\Projects\Packt\Repo> git remote add git-production https://github.com/{{ your_username }}/becoming-an-entdev.git
The preceding command is run only if you have already run the git init command to create your local repository first.
- Next, create a
mainbranch for this remote:PS C:\Projects\Packt\Repo> git branch -M main
I am naming the branch main to remain consistent with the branches on the Heroku apps.
- Now, you can push your first two files to this remote branch by running the following command. If you have made new changes to these files, remember to stage and commit them before the push:
PS C:\Projects\Packt\Repo> git push -u git-production main
- Now that we have the main repository to work with in production, we need to include the other environments, called development and staging. While Heroku separates environments into completely separate apps, you can either create new branches on
git-productionand call them development and staging or go into your GitHub account and create completely new repositories to link these to. For this book, we will separate them into completely new repositories for demonstration and practice. I went ahead and created two new repositories in my personal GitHub account calledbecoming-an-entdev-devandbecoming-an-entdev-staging. - We will link them using the following example commands:
- For the development environment, use the following:
PS C:\Projects\Packt\Repo> git remote add git-development https://github.com/{{ your_username }}/becoming-an-entdev-dev.git PS C:\Projects\Packt\Repo> git branch -M main PS C:\Projects\Packt\Repo> git push -u git-development main - For the staging environment, use the following:
PS C:\Projects\Packt\Repo> git remote add git-staging https://github.com/{{ your_username }}/becoming-an-entdev-staging.git
PS C:\Projects\Packt\Repo> git branch -M main
PS C:\Projects\Packt\Repo> git push -u git-staging main
- For the development environment, use the following:
Next, we will configure our Git branches.
Configuring branches
All of the remotes in the examples provided have a branch named main that serves as the parent to all of the children branches and forks created when moving forward; some people also call this master. For working locally, you'll want to create local branches that are set up to track one of your remote branches. Tracking, in Git terminology, simply means a local branch is mapped to a remote repository or branch located somewhere else.
Similar to how we ran the git branch -M main command previously, which we did for the sake of creating the main branch to be used for the remote version only, locally, we will run the following command to add a new local branch to our Git config file that helps track or map it to the environment we set:
PS C:\Projects\Packt\Repo> git branch production git-production/main
PS C:\Projects\Packt\Repo> git branch development git-development/main
PS C:\Projects\Packt\Repo> git branch staging git-staging/main
If you are using something such as Sourcetree as a GUI for interacting with Git repositories, you should see something as in the following screenshot on the left sidebar of the app:
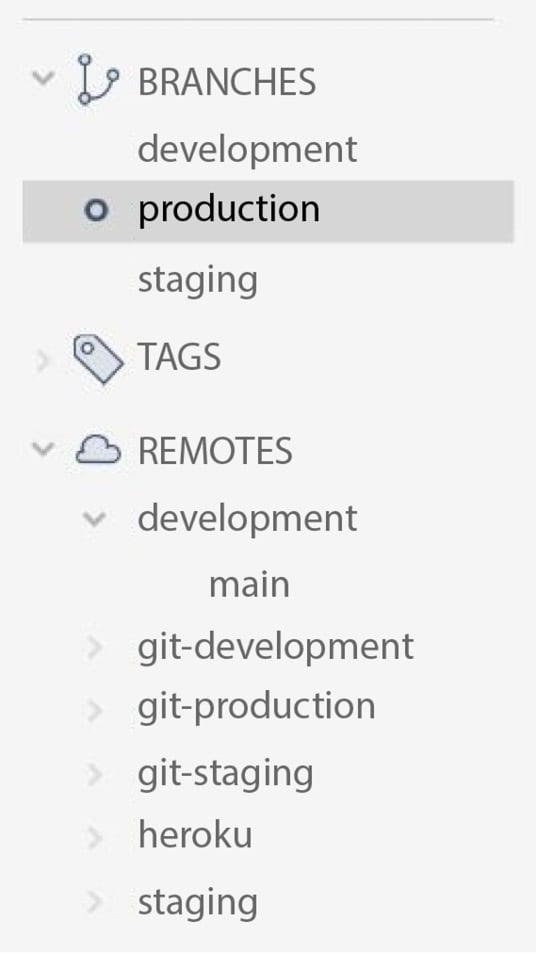
Figure 1.14 – Sourcetree sidebar – branches and remotes
The default name given by Heroku to reference the production environment of the app that you are working with is heroku. If you were to expand all of the remote repositories in the list, you would see that they all have a main branch, as depicted in the preceding screenshot under the repository named development. Now, from one single folder on your hard drive, you can navigate to and from all of these environments, also known as versions of your app, to work as needed.
Some simple and helpful commands are provided here:
- Switch branches with the following:
PS C:\Projects\Packt\Repo> git checkout development
This command switches to the development remote.
- Stage everything and include a message to commit changes with the following:
PS C:\Projects\Packt\Repo> git commit -am "Added notes to README File"
- Push code specifying a HEAD location with the following:
PS C:\Projects\Packt\Repo> git push development main
If you run into an error stating error: src refspec main does not match any when you try to run the preceding command, try the following command instead:
PS C:\Projects\Packt\Repo> git push development HEAD:main
Up to now, each remote repository we created only consisted of one branch. Your team will need other branches, which for the most part will branch off of the main branch when they are created. Other times, you may want to branch off a child branch for a number of reasons. Many people may even prefer one repository where each environment is a different branch. I won't go into all the different methodologies for organizing and using a specific Git workflow because this subject is so complex. You would have to adopt something that best fits your needs, but a good start would be to review this guide or anything on the subject of Git workflows: https://backlog.com/git-tutorial/branching-workflows/.
You may need to separate branches by feature. My favorite approach is to give each developer their own branch named after themselves, which they can use to commit all of their daily work to at the end of each day. Later, a designated person can then merge all pull requests into the main branch at designated intervals throughout the SDLC. One option can be to store all these branches in your development environment and then, in your staging and production environments, you can leave just one branch, called the main branch. Then, when it comes time to push or pull something from development into staging, just push those changes into the main branch on staging. The choices are nearly infinite and there is no definitive right or wrong way to go about this.
You could create branches on your other environments if you wanted to. Just keep an eye on versions of your app getting out of sync with one another. The idea is that as long as it makes sense and it doesn't create a lot of wasted time and headaches when merging, you are on the right path. In any strategy, it's usually wise to pull the main branch into a current working branch as often as possible while a developer works, in order to keep code in sync with other developers who have already merged their code into main. That developer could work out conflicts they know are specific to them on their machine, saving time later when working on other merge conflicts that could arise when it comes time to push this working branch into main. It's very easy to fall behind the changes that other developers are contributing, and merging your code into main later could prove to be difficult with the number of code conflicts that can result.
Advanced deployment
Of course, not everything has to be fully automated. A much smaller team or project can get by when they dedicate a single person to merge branches manually, edit code conflicts, and perform a final build of all the asset files before pushing to a test or production environment. If your team is building enterprise-level software, then you most certainly have the need to automate this step of production as much as possible. Since there are so many ways this can be done, the rest of this lies beyond the scope of this book. You may even hire a dedicated person or team of people whose only job is to build and manage deployment strategies, write build scripts, process pull requests, work through code conflicts, and test for bugs.
Build scripts can be used to compile ES6 to JavaScript or even transpile SCSS to CSS, where a smaller team may do this manually when merging branches. Test scripts can help you run test cases. You can test every method or class and even get to a granular level by testing specific data that is inputted into the system. Look into writing and running Node.js and Python build scripts on deployment based on your project's own needs.
Two more things for you to explore are pipelines and containers, which add additional layers of enhancements to a project. We will discuss them next.
Pipelines
A pipeline in software development is commonly known as a series of objects that are linked together where the output of one functions as the input of the other. This is best described as linking your development environment to your staging environment and then linking your staging environment to your production environment. There are a lot of tools that can be inserted here that can help with reviewing your code every step of the way. Services such as Heroku and GitHub offer ways to allow your developers to create pull requests, which comprise a method of submitting your code to a shared development project. The method even provides ways to create tickets, which are used to track and manage bugs or issues found in your application. They can be assigned to one or many people, and a status can be assigned to them providing team leaders or project managers with a method of knowing what is done and what is being worked on.
If you did decide to follow along with this chapter and use Heroku, their service offers many different ways to work with and configure pipelines. They can get very complex if you need them to be. One really cool feature of how Heroku manages pipelines is that a brand-new review app will automatically be created when a developer creates a pull request. A pull request is a way of submitting a request to merge code into a shared project. The request is sent to a reviewer who will merge the code and approve or deny the changes. If the reviewer has trouble resolving conflicts found in the merging of the code, they may reject the code and send it back to the developer to revise. This gives the reviewer a very easy way to launch the app with the code contained in the pull request to see whether it works or not.
In other words, you can run whatever version, or whatever state the app is in, with that pull request without affecting your current development, staging, or production environments in any way. When a new app is created via a Pull request, that new app does not show up on your main dashboard, but instead is considered a review app of the environment or Heroku app that you are reviewing. Heroku will also automatically deploy changes to the main branch of the environment that is next in line in your pipeline queue, whenever a reviewer has approved changes included in a particular pull request.
Containers
A virtual environment in Python is best described as a way to encapsulate all of the packages or dependencies that your project relies on. What is known as a container, or containerization, is a step above, in that it encapsulates the entire operating system, your Django project, its own virtual environment, and all of its packages and dependencies. Docker containers are used to create images that are exact replicas of their production environments and are used by developers in every stage of development during the app's development life cycle. The benefit of doing this is that no matter what operating system your developers are working on, they will all virtually be running the same setup and should face little to no issues.
In my experience, the phrase "it works on my computer" is often used among developers. This isn't a genuine issue often, but it does happen where a project on a Windows machine will act differently from the same project running on a Mac or Linux machine and vice versa. Containers let your developers continue to use the operating systems that they have become the most comfortable and familiar with during their careers. They ensure consistency among every moving part in development.
Another benefit of using containers is that they can help to get a brand-new developer or new hire to the team to get their project to run locally for the first time in as little time as possible. A container repository is similar to a traditional repository but is used to store a collection of container images. These can be completely different projects or a collection of different versions or environments of the same app. Either way, a container repository is used to store and distribute these images to developers who need them. If you predict many developers will come and go throughout the life cycle of your project, I highly recommend taking the time to build a container image for your team.
If you are using Heroku along with this book, choose the Container Registry | Use Heroku CLI button, as shown in Figure 1.9, found earlier in the Configuring Heroku environments section of this chapter. From here, you can integrate your container image into your deployment. The image can include any add-ons and app variables and even work with your pipelines and review apps. Heroku and Docker also work together with third-party CI services, such as Codefresh, CodeShip, and CircleCI. There is quite a bit more configuration that will need to be done to use these third-party services, but you can review their documentation to help you get started.
Domain Name System
When an environment or a review app is created, Heroku will generate a new URL based on the name of the app that you created. Since Heroku's system is set up to use the name of your app as a subdomain of its URL structure, the name of your app must be unique. For example, the main project on Heroku for this book is named becoming-an-entdev and generates the URL https://becoming-an-entdev.herokuapp.com/. The development app created for this book automatically generates the URL https://mighty-sea-09431.herokuapp.com/, and the staging environment generates the URL https://pure-atoll-19670.herokuapp.com/. mighty-sea-09431 and pure-atoll-19670 are the names of the apps that were automatically created by Heroku when those environments were created.
The final step in the app configuration is to link the Heroku URL to a Domain Name System (DNS), which is best described as a public phone book of websites that links the URL names to individual IP addresses like names to phone numbers. While Heroku may generate a URL for your app that looks like https://pure-atoll-19670.herokuapp.com/, it still produces a numeric IP address that you can use to register to your site when someone goes to www.your-domain.com. You will have to link your app to this phone book registry so that the public can get to your website or API using your domain name and not the URL provided by Heroku.
Popular registrars, such as Domain.com, Bluehost, GoDaddy, and Namecheap, allow you to register a domain name, which will look like www.your-domain.com or http://www.your-domain.custom.tld/, where .tld refers to any of the over 1,500 Top-Level Domains (TLD) that are available to choose from today, such as .edu, .gov, or .food, to name a few. Some TLDs are restricted to certain entities and may not be available to everyone. There are two ways you can link your Heroku app to a DNS. The first way is to use domain forwarding. You'll need to work with your domain registrar to set up forwarding in your app. Domain forwarding will point www.your-domain.com to your Heroku app location where the user will no longer see your domain in the browser's address bar. Instead, they will see becoming-an-entdev.herokuapp.com in the address bar. If you want the user to continue to see www.your-domain.com in their browser's address bar, along with your site as the body content, you'll need to set up forwarding with masking as an option instead. Masking will keep your domain in the address bar but will also mask Search Engine Optimization (SEO), such as your title, description, and keywords, embedded in the <head> of your document.
Forwarding with masking is generally considered bad in terms of SEO, which is ways to improve the visibility of your site in search results on search engines such as Google, Bing, and Yahoo. It's usually difficult or more complex for a search engine to link information from one site via an IP address and map it to your physical domain, and generally, you will get a lower search rating because of that. It may be that search engines are working to improve upon this in the future or at least working to not penalize websites for using forwards and redirects. For now, you should not consider this if SEO is a big requirement for your project.
The alternative to using domain forwarding would be to map your domain to the system's nameservers that deliver your app. Whichever you are using, you need to first make your Heroku app available to the domain of your choice if it is anything other than the standard Heroku domain. Start by adding your domain to your app in Heroku by running the following command. Make sure to log in first if you haven't already done so:
PS C:\Projects\Packt\Repo> heroku login
PS C:\Projects\Packt\Repo> heroku domains:add www.your-domain.com --app becoming-an-entdev
To use subdomains to act as your different environments, run the next two commands:
PS C:\Projects\Packt\Repo> heroku domains:add dev.your-domain.com --app mighty-sea-09431
PS C:\Projects\Packt\Repo> heroku domains:add staging.your-domain.com --app pure-atoll-19670
Here, we append the --app attribute setting and specify the app we want to link to. Since we created different environments, we need to include this specification or we will get an error. The dev and staging subdomains are used in the preceding commands as the environment-specific domains of our site. If the command is successful, it will print out your DNS target, but you can always run this command to list all of the domains, and it will also print out your DNS target for you:
PS C:\Projects\Packt\Repo> heroku domains --app {{ your_project_name }}
=== {{ your_project_name }} Heroku Domain
{{ your_project_name }}.herokuapp.com
=== {{ your_project_name }} Custom Domains
Domain Name DNS Record Type DNS Target SNI Endpoint
www.your-domain.com CNAME {{ randomly_generated_name }}.herokudns.com undefined
You will then need to use the DNS target that was provided to configure your DNS records within your registrar's account for your domain. If you're using domain forwarding, many registrars have an option to create a forward and will ask you a few questions. For manually mapping your domain to your nameserver, this is usually done by editing A-Record in your DNS settings by providing a name of @ and giving it a value of the DNS target that was provided previously.
You can even set up a custom subdomain for different projects, departments, and versions of your app or environments, such as dev.your-domain.com or staging.your-domain.com. Subdomains can be linked by creating a new CNAME-Record with the names dev or staging and giving the records the value of the DNS target that was provided in the examples previously for their respective apps. For registrars that won't accept a value that is not a numeric IP address, you will have to use something such as Cloudflare, which is a web infrastructure and security company, to sit in the middle and act as your nameserver. It acts as a content delivery network and your nameserver, which you can then configure in your registrar using the nameserver settings provided by Cloudflare. Nameserver records are known as NS-Record within the DNS settings of your registrar.
Summary
It can be very easy for someone to get caught up in how to do something versus actually doing something. Overthinking is a very common thing among programmers. Sometimes, it's wise to just accept a certain level of work is needed for your workflow and then scale up and extend as much as needed later on as the need arises. While gathering requirements is important to obtain a clear understanding of what it is you are trying to achieve, many of the steps and concepts discussed in this chapter can be thought of as just another tool in your toolbox, or in other words, the right tool for the right job.
Things such as containerizing your project with Docker can be easily added to your workflow and deployment routines later on. The same can be said if you need to add additional environments to your workflow later on. New developers could easily be given a new branch as the need also arises. Teams who dedicate one person to manually run, build, and test tasks can always automate their tasks later on when work begins to pile up. Pipelines can be created even after you have been developing a project for a while. However, other decisions, such as choosing what framework to use on your frontend, can prove to be disastrous if you decide to change the technology halfway through the development life cycle.
What is known as agile development is the process of an ever-changing and always fluid development environment. This is where many different collaborators share ideas and those ideas often change over time, meaning that the scope of the project will also change. A lot of projects today are built in an agile setting. Use your initial requirements gathering to probe for possible changes in the future and then align yourself with as many open doors as possible. Remember that a strong home always needs a strong foundation to rest upon; a weak foundation will result in your home crumbling to the ground.
This chapter focused on pouring the foundation of a home. In the next chapter, Chapter 2, Project Configuration, we will be building what can be considered the frame of the house that sits upon that foundation. The frame of that house will consist of building a project, virtual environment and database needed for development.