


 Download code from GitHub
The best software teams ship early and often. In order to successfully plan and track a software project, it is important to understand the types of work involved in software delivery. All work that's undertaken for software delivery can be categorized into one of the following four categories:

Technical debt is a metaphor for the eventual consequences of poor software or infrastructure within your organization. It is considered debt because it is work that needs to be done before a particular project can be considered complete. If you don't pay down technical debt, then your unplanned work will continue to increase. Left unchecked, technical debt will ensure that the only work that gets done is unplanned work.
Azure DevOps Server allows you to plan and track work using work items. Work items can be used to classify work into different categories. Work items allow you to decompose high-level ideas into smaller, workable units. These can then be prioritized, planned, and scheduled into iterations. Every team has a unique process for shipping software. Regardless of whether you follow Agile or Waterfall, Azure DevOps Server offers a range of out-of-the-box process workflows, along with giving you the option to create your own custom process workflows.
Over the last decade, agile software methodologies such as Scrum and Kanban have mostly displaced traditional Waterfall-driven software delivery for complex systems with evolving system requirements. Agile methodologies feature self-organizing teams that are empowered to achieve specific business objectives. Agile methodologies focus on the rapid and frequent delivery of partial solutions (also known as minimum viable products) that can be evaluated and used to determine the next steps for the business. In this way, solutions are built in an iterative and incremental manner. Agile methodologies have been shown to deliver higher-quality products in less time, resulting in improved customer satisfaction. The annual Agile survey report available here http://bit.ly/agileReport (refer to page 8) shows why organizations are adopting Agile software development over traditional methodologies.
While most organizations are very diligent when tracking planned work, unplanned work doesn't always get tracked. Work is work – whether it's planned or unplanned, it needs to be tracked. Hidden work robs you of focus. The primary goal of any DevOps setup within an organization is to improve the delivery of value for customers and the business; things that aren't tracked aren't measured. In the famous words of Peter Drucker, "you can't manage what you can't measure."
We've all been on a project where no data of any kind was tracked, and it was hard to tell whether we were on track for release or getting more efficient as we went along. On the other hand, many of us have had the misfortune of being on projects where stats were used as a weapon, pitting one team against another to justify mandatory weekend work. So, it's no surprise that most teams have a love/hate relationship with metrics. There are as many ways to measure a project as there are to build it. If you only measure one key metric, it is easy to get tunnel vision. Whether the teams are focusing on just making the metric better (often through gaming the system) or management is using the measure to drive all decisions, you can end up with a product or organization that looks good but is really driving off a cliff. To foster a culture of continuous improvement, Agile teams tend to focus on the following metrics:
- Lead time
- Cycle time
- Cumulative flow
- Velocity
- Product burn-down and product burn-up
We'll cover some of these metrics and how they can be tracked using Azure DevOps in detail later on in this chapter. Read on to learn how work items allow you to plan and track work in your software projects.
In this chapter, we will cover the following recipes:
- Creating a team project for an Agile team
- Importing requirements from Excel
- Getting social with work items
- Portfolio backlog hierarchies and decomposing work
- Configuring and customizing backlog boards
- Preparing and planning a sprint
- Visualizing progress in a sprint
- Delivery plans to track multiple teams
- Dashboards for planning and tracking work
Azure DevOps Server provides a set of integrated tools that allow teams to effectively manage the life cycle of their software project. The team in Azure DevOps Server is encapsulated within the container of a team project. A team project is a logical container that's used to isolate all tools and artifacts associated with a software application in a single namespace.
The conceptual boundary that was introduced through the team project eliminates the problem of having access to unrelated artifacts such as code, work items, or release information that isn't relevant to your application's development. Related team projects can be grouped together into a team project collection. Team project collections can be used to introduce a physical separation between a group of related team projects by hosting them in separate databases.
An instance of Azure DevOps Server is capable of supporting multiple team project collections, and each team project collection can internally host multiple team projects. A team project can house multiple teams. As illustrated in the following diagram, the process template is scoped at the team project level. Multiple team projects in a team project collection can use different process templates; however, multiple teams within a single team project will need to use the same process. Teams, however, have autonomy on the level of the backlogs they choose and the workflows on the Kanban board. The delivery framework of choice is applied through the Process Template, which, in turn, applies the delivery framework-specific terminology, artifacts, and workflows to the team project and all teams within the team project:

The process template defines the set of work item types, queries, and reports that can be used to plan and track the project. In this recipe, we'll learn how to create a new Team Project using the Scrum template.
Note
TFS 2018 and later versions no longer support native integration with SharePoint products. If you're planning to upgrade to Azure DevOps Server 2019, read About SharePoint integration (https://docs.microsoft.com/en-us/azure/devops/report/sharepoint-dashboards/about-sharepoint-integration?view=azure-devops) to learn about the options available to you.
To create a team project, you need to be a member of the Project Collection Administrators group. If you aren't already part of this group, gain membership by following the steps provided here https://docs.microsoft.com/en-us/vsts/security/set-project-collection-level-permissions. Alternatively, follow the steps provided at https://docs.microsoft.com/en-us/vsts/security/set-project-collection-level-permissions to be added to one.
To create a new team project from the web, follow these steps:
- Launch a browser and navigate to the Azure DevOps Server Portal.
- From the top right side, click the
+Create projectbutton:

- Provide a name for your new team project, select its initial source control type, and select a process to create a team project. The work item process is a one time choice and cannot be changed once set. See Choosing the right version control for your project (https://docs.microsoft.com/en-us/azure/devops/repos/tfvc/comparison-git-tfvc?view=azure-devops) and Choose a process (https://docs.microsoft.com/en-us/azure/devops/boards/work-items/guidance/choose-process?view=azure-devops) for guidance:

Note
The ability to work from both Git and TFVC repositories from the same team project has been supported since TFS 2015 Update 1. See Git team projects (https://docs.microsoft.com/en-us/azure/devops/repos/git/team-projects?view=azure-devops) or TFVC team projects (https://docs.microsoft.com/en-us/azure/devops/repos/git/team-projects?view=azure-devops) for more information.
The following items are created for you as part of the team project creation process:
Dashboards: A canvas to bring key information radiators to raise visibility within and outside the teamCode: A code repository (Git/TFVC) based on your selection is provisionedWork: All agile planning and tracking tools are nested under this hub.Team: A default team with the same name as the team project is provisioned.Area Path: A default Area Path with the same name as the name of the Team is provisioned. The teams' backlog is configured to show work items assigned to this Area Path.Iteration Path: The set of iterations is pre-created for the team.Team Portal: The Team Portal allows the Team members to connect to TFS to manage source code and work items, and build and test efforts.
Build & Release: Automated pipelines to build and release your applicationTest: Plan, track, and execute testsWiki: To share knowledge and documentation with the team
These are shown in the following screenshot:

Azure DevOps Server makes the process of setting up a new team project very straightforward—so much so that you may be inclined to create a new team project for every software project. I would generally not recommend this; with support for multiple teams and backlog isolation at the team level, it is possible to have a logical separation, along with the ability to share within a team project. In principle, you should consider a team project for each product, and a team for each work stream. The only time you should consider splitting a product team out into a separate team project is if it needs to follow a unique process, since process templates are scoped at the team project rather than at the team level.
If you find yourself organically needing to grow out into a new team project to use a different process template, you can consider leveraging theVSTS Migration Toolkit (https://nkdagility.com/vsts-sync-migration-tools/) to carry out a full fidelity migration.
In Scrum, the taskboard is a visual display of the progress of the Scrum team during a sprint. It presents a snapshot of the current sprint backlog, allowing everyone to stay synchronized and focused on the work to be done. Most of the time, smaller teams are distributed across multiple locations, and in these situations, tracking work with a digital tool helps distributed teams synchronize more effectively. Some of us are lucky enough to land on green field projects, which gives us the opportunity to start tracking the requirements of work items from inception. Other times, projects are planned in tools that don't natively support integration with Azure DevOps Server. Luckily, most planning tools allow you to extract the data to Excel. Azure DevOps Server natively supports importing work items through Excel, but the challenge is mostly working out which fields in the spreadsheet should map out to work items in Azure DevOps Server. In this recipe, we'll learn how to import requirements from Excel into work items and refresh updates from work items back into Excel.
If you don't have Office Excel, install it. For Azure DevOps Server 2019, you'll need Office 2013 or a later version. The Excel plugin for Azure DevOps Server is installed by installing one of the latest editions of Visual Studio or the Azure DevOps Server Standalone Office Integration installer. Azure DevOps Server Standalone Office Integration supports connecting to Azure DevOps Server from Excel, Microsoft Project, and the PowerPoint-based storyboard tool.
If you don't intend to install Visual Studio but need Office integration, download and install Azure DevOps Server Standalone Office Integration (free) from https://www.visualstudio.com/downloads/. Once the installation is complete, the Excel Plugin will show up under the Team ribbon in Excel, as shown in the following screenshot:

If you don't see the Team ribbon, perform the following steps to enable it:
- Click the
Filetab in Excel and chooseOptions. - In the
Categoriespane, clickAdd-ins, and verify thatTeam Foundation Add-inshows up in theDisabled Application Add-inssection. - In the manage box, select disabled items and click
Go. - Select the
Azure DevOps Server Add-inand clickEnable. Finally, exit the dialog by clickingClose.
Note
If you are continuing to run into issues with Add-in not showing up in Excel, you may be able to resolve the issue with the procedures provided at the following link: https://docs.microsoft.com/en-us/vsts/work/backlogs/office/tfs-office-integration-issues.
Now that we have the Azure DevOps Sever excel plugin installed, in this section we'll learn how to use it.
Start by performing the following steps:
- Launch Excel and start with a blank sheet. Navigate to the
Teamribbon. - Click on
New Listto connect to your project in TFS.
- If you are connecting to Azure DevOps Server from Excel for the first time, you will have to add your server details to the list of recognized servers. The steps for this are shown in the following screenshot:

- Select the
PartsUnlimitedteam project and clickConnect:

- When asked which type of work item list you want to create, choose
Input list. An Input list gives you a blank template that is linked to your team project:

- Your worksheet will now be bound to your team project as a flat list. What this means is that you can add work items to the team project from the worksheet or add work items to the worksheet from the team project. Fill out the details of the work items you want to add and their work item type. The Excel plugin defaults the list type to flat, but you can change it to a tree list if you wish. A tree list allows you to create and view hierarchically linked work items, like so:

- Publish the changes by clicking the
Publishbutton from the Team ribbon.
To validate whether the changes have been synchronized to Azure DevOps Server, launch the web portal in a browser, and navigate to the work hub in the PartsUnlimited team project. The newly added work item should show up under the features backlog, as shown in the following screenshot:

Follow these tips to keep your work in sync:
- When you first open a saved worksheet, use the
Refreshbutton in Excel on the Team ribbon to download the latest data from the data store - Enter data for additional fields by adding columns to the worksheet using the
Choose Columnicon in Excel on theTeamribbon - To avoid data conflicts, publish your additions and modifications often
- To prevent loss of data before you publish or refresh, save your workbook periodically
The Azure DevOps Server Excel plugin uses the Azure DevOps Server REST APIs, which are wrapped into an SDK. This allows for safe and secure bulk editing of work items. The plugin supports two-way updates, and changes that are made to work items in Azure DevOps Server web portal can be refreshed back into Excel by clicking the Refresh button. Refreshing the data does not overwrite any calculations or formatting that you may have applied to the worksheet. If you spend a lot of time using Microsoft Project, you'll be excited to know that the Azure DevOps Server plugin can also be used from Microsoft Project.
The marketplace features the Azure DevOps Open in Excel extension (https://marketplace.visualstudio.com/items?itemName=blueprint.vsts-open-work-items-in-excel). This is a free extension that was created by Microsoft DevLabs, and adds the option of opening work items in Excel from various access points, such as work item queries, backlogs, and selective work items:

Another noticeable extension in the marketplace is the Requirements Integrator (https://marketplace.visualstudio.com/items?itemName=jgarverick.RequirementsIntegrator). This is an open source extension that was created by Microsoft MVP Josh Garverick, which introduces the capability of mapping external requirements into Azure DevOps Server to create a traceability matrix with work items. This extension introduces a new sub-tab called Requirements in the work hub, which allows you to import external requirements into TFS using a predefined Excel template:

The extension allows you to do the following:
- Manage requirements to work item mapping
- Display a sprint view that shows the requirements covered by a sprint
- Display a traceability matrix, including gaps, for requirements that are imported and mapped to WIs
- Restrict import usage to non-CMMI process templates
- Requirement visualization (visual traceability)
- Export requirement information to Excel
I encourage you to look at the marketplace (https://marketplace.visualstudio.com/) as it has a range of extensions that enhance the experience of planning, tracking, and managing work items. While this extension isn't necessarily a replacement for the Excel add-in, you'll find that it enhances the work planning, tracking, and management experience.
To provide a fresher, more modern experience in tracking work, the old and clunky work item form has been given a makeover. Along with the noticeable responsive form layout, the new form introduces a lot of new features. In this recipe, we'll see how to put the newly added work item discussion control to work. The following screenshot shows the new work item form:
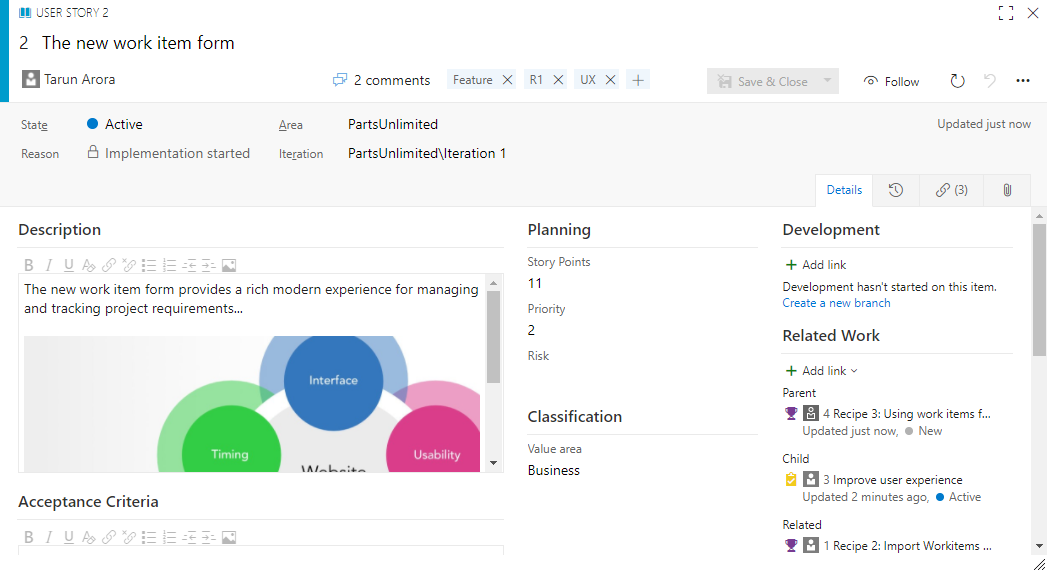
It's fair to say that projects are tracked using work items, while discussions are tracked using email. Often, decisions aren't reflected back into work items, which results in work needing to be done later. The new work item form makes it really easy to stay on track by letting you have conversations within a work item. The discussions control provides a rich editor, giving you the ability to associate images, mention people, and link work items. The power of work item search and the social features of alerts and notification follow work items, and my work items make it really easy to stay involved and informed.
Before we dig into work item discussions, let's see how easy it is to populate your team project with sample data. The sample data widget, which can be found at https://marketplace.visualstudio.com/items?itemName=ms-devlabs.SampleDataWidget, is a free extension that was developed by Microsoft DevLabs, and it makes it really easy to generate demo work items in bulk. This extension also provides an option to generate and set up work item data inline with the Scaled Agile Framework (SAFe), giving you a great jump-start into implementing SAFe with TFS.
Once you've installed the extension, navigate to the dashboard in the PartsUnlimited project web portal. Add the sample data widget to the dashboard, select Getting started in the dropdown, and click Create. Once this awesome extension has completed its magic, you'll see your team project become populated with new features, user stories, and active iterations—all ready for you to start playing with everything they offer.
Let's perform the following steps:
- Launch the PartsUnlimited web portal and select the
Search work itemscontrol:

- In the work item search box, type
add. The keywordaddis searched across all work items in the team project. The search results are summarized in the left-hand side panel. The search results are ordered by relevance, and can be reordered using a different field:


- Double-click the first work item in the search result and navigate to the
Discussionsection in the work item form. Here, you can add a comment, use#to link a work item, or use@to mention a person:

- Click
Saveto persist the changes. The linked work item is automatically linked to the work item as a related work item. This mention triggers a notification workflow, and an email is sent out to the mentioned individual, in addition to others who are following this work item. You can clickMaximize Discussionto enter an expanded discussion view:

- My favorite feature is being able to paste images into the work item form without having to save them and attach them manually. In your discussions, you can use rich formatting, links, images, and more:

It is super easy for you to access artifacts that are most important for you. The redesigned account page has a personalized experience that shows the Projects, Favorites, Work, and PullRequests you care about. You can go to one place and quickly find everything you need to do and care about.
Start your day with the My work items page to be able to easily access all the work items that have been assigned to you across all projects. It also lets you check and access the status of all the work items that you are following, those you have been mentioned in, or those that you have recently viewed:

Work item search allows you to search across all projects. You can scope the search and drill down into an area path of choice. You can easily search across all work item fields, including custom fields, which enables more natural searches. The snippet view indicates where matches were found. Quick inline search filters let you refine work items in seconds. The dropdown list of suggestions helps you complete your search faster. For example, a search such as AssignedTo: Tarun WorkItemType: Bug State: Active finds all active bugs assigned to a user named Tarun.
One of the design principles of the work item search team has been to keep the search actionable. The work item search interface integrates with familiar controls in the Work hub, giving you the ability to view, edit, comment, share, and much more, right from the search results.
Notifications help you and your teams stay informed about activity in your team projects. TFS 2018 introduced a new experience that makes it easier to manage what notifications you and your teams receive. Users have their own account-level experience for managing notification settings (available via the Profile menu).
This view lets you manage personal subscriptions and also view subscriptions that have been created by team administrators for all the projects in your account:

You can set up new notifications by clicking on the New subscription link. This new notification experience gives you access to WIQL so that you can create filter criteria for specific conditions. In addition to this, you can set up notifications to be delivered to other email addresses and soap endpoints:

You, as an individual, also have the option of unsubscribing and opting out of a team or OOB notification subscription. Whether you are an administrator or not, toggling a shared team subscription from your notification settings only impacts you and not other team members.
Note
You must configure an SMTP sever in order for team members to see the Notifications option from their account menu and to receive notifications. This can be done by following the steps provided at https://docs.microsoft.com/en-gb/vsts/tfs-server/admin/setup-customize-alerts.
The TFS marketplace features the Activity Feed extension, available at https://marketplace.visualstudio.com/items?itemName=davesmits.VSTSActivityFeed. This free extension, created by Dave Smits, brings in the capability of viewing what's happening in your team project at a glance in one place. The extension is available as a dashboard widget, as well as a subpage in the work hub. Activity Feed gives a summary of all recent changes in work items, commits, pull requests, and builds. It tells who changed a task, who logged a bug, and who committed code. The extension supports configuration, so you can decide to filter out what's not relevant or simply configure which backlogs the work updates should be published from:

The team rooms functionality has been completely removed in TFS 2018 https://blogs.msdn.microsoft.com/devops/2017/01/04/deprecation-of-the-team-rooms-in-team-services-and-tfs/. However, the introduction of social experiences built around you, including the search, follow, and comment features in work items and the activity feed extension, provides a far more engaging solution.
Requirements come in all shapes and sizes! While many teams can work with a flat list of items, sometimes, it helps to group related items into a hierarchical structure. Perhaps you would like to start with a big picture and break it down into smaller deliverables. Or, perhaps you've got an existing backlog and now need to organize it. No matter your starting point, TFS offers you hierarchical backlogs so that you can bring more order to your backlog. Two backlog levels are enabled in each team project by default—in the Agile process template, it's features and stories. An additional backlog level—Epic—can be enabled optionally. The user story backlog level is used for sprint planning; the feature backlog level and the epic backlog level, also known as the Portfolio backlog, can have multiple uses. This is shown in the following diagram for ease of understanding:

Use your backlogs in conjunction with portfolio backlogs to plan your project and do the following:
- Manage a portfolio of features that are supported by different development and management teams
- Group items into a release train
- Minimize size variability of your deliverables by breaking down a large feature into smaller backlog items
With portfolio backlogs, you can quickly add and group items into a hierarchy, drill up or down within the hierarchy, reorder and reparent items, and filter hierarchical views.
TFS 2018 allows you to add one-level child links to work items with ease. However, when you are in a planning discussion, you sometimes want to rapidly create sub items at different levels of work item hierarchies. The TFS marketplace features the decompose extension (https://marketplace.visualstudio.com/items?itemName=cschleiden.decompose), a free extension that was created by Christopher Schleiden, which allows you to quickly break down work items into sub-hierarchies. Appropriately named, this extension makes decomposing work items into sub-items very easy, and very useful during team discussion and planning sessions. Once you've installed this extension, you'll see the Decompose work item option in the work item context menu and the backlog and boards work item context menu:

Let's perform the following steps:
- Launch the PartsUnlimited team portal and navigate to the work hub.
- To configure the team settings, click the gear icon under the velocity chart in the backlog view. The team settings window has several options to configure and style backlogs and boards, which we'll cover in later recipes:

- In the
Settingswindow, under the Generalsection, clickBacklogs. This presents the backlog levels that are available to your team. This setting is configurable per team. Adding or removing a backlog level will only affect the team for which it's being done to, and not every team in a team project. To add the Epics backlog level for the PartsUnlimited team, simply check the Epics backlog level and clickSave:


The newly created work items are linked to each other. You can see this linking by expanding the linked work items in the Epics backlog:

With the growth in work item usage, there will be growth in the work item dependency tree. I usually find a list of dependencies meaningful until the depth of 3, after which I hope I could just visualize the dependency through a graph. Luckily, the TFS marketplace features the Work Item Visualization extension (https://marketplace.visualstudio.com/items?itemName=ms-devlabs.WorkItemVisualization), which is a free extension that was developed by Microsoft DevLabs. It allows you to visualize work item dependencies from within the work item form. The unique selling point of this extension is that it allows you to see how work items relate to each other, as well as code, tests, test results, builds, and external artifacts. You can even drill into your commits to explore the changeset details. Among other things, the extension also allows you to annotate and export visualizations, an example of which is provided by the following screenshot:

Story mapping is a popular way of visualizing the product backlog with Agile teams. Story mapping is a top-down approach of requirement gathering. Story mapping starts from an overarching vision. A vision is achieved via goals. Goals are reached by completing activities. To complete an activity, users needs to perform tasks. And these tasks can be transformed into user stories for software development. Story maps are traditionally created using sticky notes on walls or whiteboards, and have proven to be popular among Agile development teams. However, these traditional storyboards are not without their disadvantages: walls are not transportable and the physical nature of these maps means they are only temporary.
The TFS marketplace features the SpecMap extension (https://marketplace.visualstudio.com/items?itemName=techtalk.specmap), which was created by TechTalk software, and gives you the ability to create digital storyboards. This extension allows you to use existing work items in the system, which means that SpecMap goes further than just depicting story maps: creating a story map in SpecMap helps you plan iterations in TFS and structure your backlog items in the process. The following screenshot depicts a story map of the PartsUnlimited iOS feature team, who are identifying the user journey for the new iOS application that they are creating for both free and paid users:

Backlogs display work items as a list, while boards display them as cards. In TFS, each backlog comes with its own board. The backlog board is also known as a Kanban board. To maximize a team's ability to consistently deliver high-quality software, Kanban emphasizes two main practices. The first, visualize the flow of work, requires that you map your team's workflow stages and configure your Kanban board to reflect this. The second, constrain the amount of work in progress, requires you to set work-in-progress (WIP) limits. You're then ready to track progress on your Kanban board and monitor key metrics to reduce lead or cycle time.
Your Kanban board turns your backlog into an interactive signboard, providing a visual flow of work. As work progresses from idea to completion, you update the items on the board. Each column represents a work stage, and each card represents a user story or a bug at that stage of work. The Kanban board has come a long way from when it was first introduced in TFS 2012. In TFS 2018, boards offer great flexibility to adapt to the processes, workflows, and customizations that work best for you and your teams.
Kanban literally translates as signboard or billboard. Accordingly, your number-one task is to visualize your team's workflow. You do this by identifying the types of work and handoffs that occur regularly as your team moves items off the backlog and into a shippable state. The main workflow stages performed by our PartsUnlimited team are captured here as Analyze, Develop, Test, Deploy, and Feedback. Each column corresponds to a work stage the team performs on each item before it can be considered done:

The work item does not have all of these states, but the beauty of the Kanban board is that it allows you to map multiple workflow stages to a work item state. So, in our example, the develop, test, and deploy stages can be mapped to the work item state active. This can be done right from within the Configure team settings dialog in the board view, without having to modify the process template. Columns allow you to visualize the workflow that's used to deliver requirements to production. Swim lanes, on the other hand, help visualize the different streams of work. Let's see how we can set up columns and swim lanes.
Let's perform the following steps:
- Launch the PartsUnlimited team portal and navigate to the work hub. Open the
Storiesboard and click on the gear icon to configure the team settings. - The
Columnssection in the Settings dialogue allows you to configure board columns. Rename theActivecolumn toAnalyzeand update theDefinition of donesection:

- Add a new column for
Develop,Test,Deploy, andFeedback, and map this to the work item state Active. The WIP limit should be set to limit overloading a specific team will more work than they can deliver at one time, which would only end up creating a bottleneck in your delivery workflow. You can also track bugs on the board, since you have the option of mapping a different workflow for bugs:


- Next up, use the fields section to add the fields you would like to see on the cards in the Kanban board. A good idea might be to include the field for
Value Area. With this change, the cards on the backlog will display the value area the work item delivery is contributing to.
- Use the styles and tag colors section to define styling rules using a combination of fields and values. It might be a good idea to create a styling rule to show the card background as red if there is a tag that's blocked, for example. This can be done by using the following styling rule:

Setting up a workflow using columns and streams of work with swim-lanes, in addition to styling rules, makes visualizing requirements a lot easier. As you can see in the following screenshot, the columns have an information icon, which reflects the Definition of done setup through the team configuration dialog:

I've briefly touched on WIP limits in the implementation steps. To optimize the flow of value, you want to identify and eliminate bottlenecks. Bottlenecks indicate that waste exists in the overall workflow process. By monitoring your Kanban board over time, you can learn where bottlenecks occur. When several items sit in a column that hasn't worked for several days, a bottleneck has occurred. Bottlenecks typically occur when WIP limits are too high. On the other hand, no bottlenecks could indicate that WIP limits are too low. There is no right answer to what the correct WIP limit is for a column; this is something that can be discovered using empirical data by using the process and tools over time.
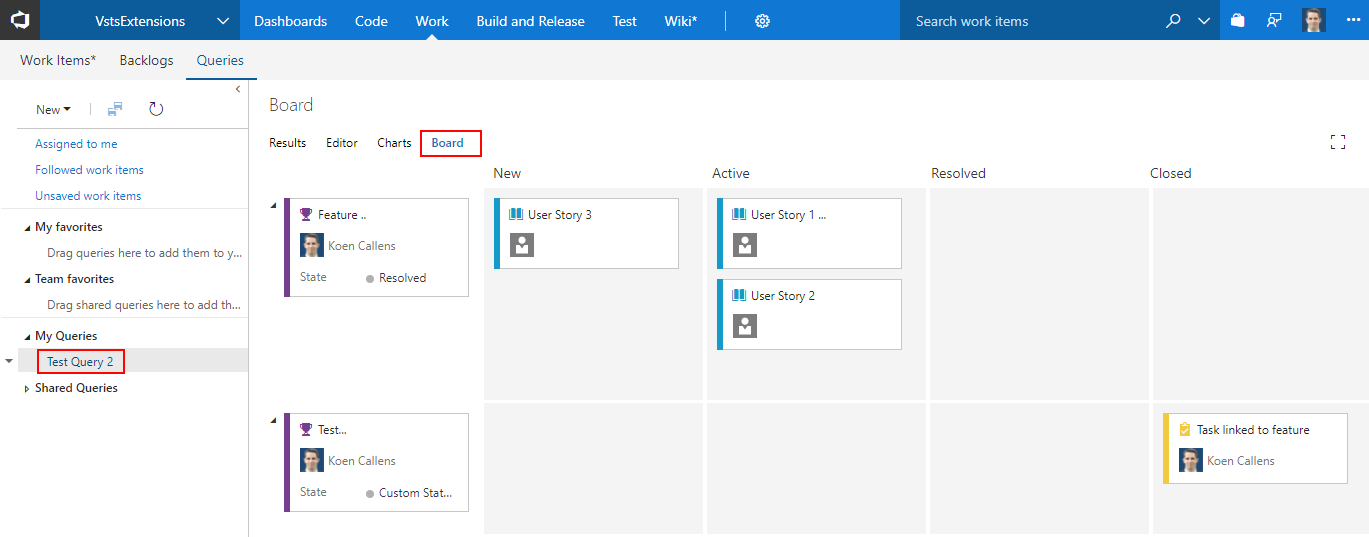
The TFS marketplace features the free Query based boards extension (https://marketplace.visualstudio.com/items?itemName=realdolmen.querybasedboards), which was created by RealDolmen, and allows you to visualize the result of work item queries on a board. After installing the extension, navigate to the Work hub and select Queries. When opening a query, a new tab called Board will be available to visualize the results on a board:
The extension is available as a dashboard widget, as well as a subpage in the work hub. The Activity Feed gives a summary of all the recent changes that have been made to work items, commits, pull requests, and builds. It tells you who changed a task, who logged a bug, and who committed code. The extension supports configuration, so you can decide to filter out what's not relevant or simply configure which backlogs work updates should be published from. Some people would agree that the more boards, the merrier!
The product backlog shows the list of work that has been planned by the team, and the items at the top are usually more valuable. A product team constantly reviews the backlog and pre-prioritizes the backlog based on user feedback and changing business priorities. Agile planning tools in TFS support defining and managing work within sprints.
This process is started off by defining a time box, referred to as a sprint, that corresponds to the cadence your team delivers. Many teams choose a two or three-week cadence. However, you can specify a shorter or longer sprint cycle. TFS also allows you to wrap multiple sprints into a release schedule. The sprint backlog represents a subset of the backlog; the team builds the sprint backlog during the sprint planning meeting. Planning meetings typically consist of two parts. In the first part, the team and product owner identify the backlog items that the team feels it can commit to competing in the sprint. These items get added to the sprint backlog. In the second part, your team determines how it will develop and test each item. They then define and estimate the tasks that are required to complete each item. Finally, your team commits to implementing some or all of the items based on these estimates.
Let's start off by prioritizing the product backlog. To do this, navigate to the Backlog view for the PartsUnlimited example team. Frequently reviewing and prioritizing your backlog can help your team know what's most important to deliver next. Reorder your backlog by simply dragging work items. Alternatively, if you prefer the keyboard route, hold the Alt key and use the up and down arrows:

A prioritized backlog without an estimate of how big the work is only half as good. It is suggested that software development teams review and resize the backlog multiple times in a sprint, as this keeps the backlog in a ready state for future sprint planning sessions. While there are many sizing techniques, Fibonacci numbers are a good way to size the work into logical buckets. Once the work items have an estimate, you can use the Forecast tool to get an idea of how many items you can complete within a sprint. By plugging in velocity, you can see which items are within scope for the set of sprints the team has activated. Teams use the forecast tool to help their sprint planning efforts. By plugging in a value for the team velocity, the Forecast tool will show which items in the backlog can be completed within future sprints. Both tools are team-specific tools that rely on the team's ability to estimate backlog items:

With a sized and prioritized backlog in place, there is just one more thing left to do before you start to plan the sprint. To quickly get started, you can use the default sprints, also referred to as iterations, that were added when your team project was created. Note that you must be a member of the Project Administrators group in order to add sprints and schedule sprint dates. Choose Iteration under the Backlog tab and then click the dates to edit them. With the dates configured, you are now ready for sprint planning:

Sprint planning is a real team effort and a great way to get everybody aligned. The planning is kicked off by discussing the sprint goal. The Product Owner then shares the vision of the sprint goal with the team. The appropriate PBIs (which should be on top of the backlog by now) are selected to meet this sprint goal. Follow these steps to get started:

The Product Owner then starts reading the stories out and going through the acceptance criteria. This is a great opportunity to briefly discuss and clarify any requirements or acceptance criteria. Team velocity is a good measure of how many story points of backlog items the team takes into the sprint. The TFS marketplace features the quick calc extension (https://marketplace.visualstudio.com/items?itemName=duffy.vsts-quick-calcs), a free extension that was developed by Mike Duffy and allows you to quickly see total effort, % complete, and other metrics for a selection of work items. This is especially useful during a sprint planning meeting when you want quick answers on the total count of story points for the selected work items. This extension is shown in the following screenshot:

Next, the team needs to know the total available capacity within the sprint. The availability of each individual and their role can be tracked using the capacity tools in TFS. Whereas velocity correlates your team estimate requirements, capacity correlates to actual task time. Capacity takes into account variations in work hours of team members, as well as holidays, vacation days, and non-working days. Most teams specify the capacity in terms of hours, but you can also specify it in days if you so wish:

Now, you have a clear view of how much work your team can commit to. In the next part of the sprint planning meeting, the team creates a plan of work by breaking the requirements into tasks and then estimating them. Tasks capture the plan of action and add as many tasks as needed to capture the work required to complete each item. Tasks can represent different work that needs to be done, such as design, code, test, content, and sign off. TFS makes the process of adding tasks friction free, giving you the ability to access and add task functionality from multiple entry points without any overhead. Tasks can be added right from the sprint backlog, the sprint board, and the product backlog board:

You can capture as much detail as you need in the task, including the effort estimate to complete the work. The effort estimate is netted against the actual capacity to provide a view of whether the work has been overscheduled:

With the team capacity set up, the product backlog decomposed, and the tasks estimated, the sprint plan is ready. The team members can now allocate work to themselves by dragging the tasks to their names:

After you've defined all the tasks for all the items, check whether your team is at or over capacity. If your team is under capacity, you can consider adding more items to the sprint. If your team is over capacity, you'll want to remove items out of the backlog. Next, check whether any team member is under, at, or over capacity, or if someone hasn't even been assigned any work. Use the capacity bars to determine this. Once you have done this, the sprint backlog provides a view that should allow you to start delivering your sprint with confidence:

The TFS marketplace features the Sprint Goal extension (https://marketplace.visualstudio.com/items?itemName=keesschollaart.sprint-goal), a free extension that was created by Kees Schollaart allows you to record the sprint goal in sprint planning tools. Once you've installed the extension, you'll see a new tab called Sprint goal in the sprint planning tools. This is a great way to make the sprint goal visible to the entire team.
Sometimes, people with unique skills are shared across multiple teams, which makes it hard to track their available capacity. The TFS marketplace features the team capacity management extension (https://marketplace.visualstudio.com/items?itemName=tfc.team-capacity), which was created by TFS consulting and provides an overview of the assigned capacity of individual team members across multiple teams within a team project. This gives you a bird's-eye view of capacity across all the teams in the team project. It provides a single pane of glass so that you can see where the team members are active and how much of their time has been allocated:

During a sprint, the team can use the taskboard and the sprint burndown chart to track progress. The sprint burndown chart provides you with an at-a-glance visual so that you can determine whether your team is on track to meet their sprint plan. Your taskboard provides a visualization of the flow and status of each sprint task. With this, you can focus on the status of backlog items, as well as work that has been assigned to each team member. It also summaries the total amount of remaining work to complete for a task or within a column. The taskboard supports pivoting the work by stories and people, and further filtering on individuals. The taskboard supports customization of the cards, which helps you surface more information during standup or generally out to stakeholders. The taskboard can be customized using the team settings dialogue (which we looked at earlier for backlog board customization). The field setting gives you the option to track bugs on the taskboard, as shown in the following screenshot:

The Fields settings allow you to display more work item fields on the taskboard for product backlog items, tasks, and bugs. For example, you may be interested in seeing the priority of the bugs and which area of the application they belong to versus the board column for the product backlog item. Additionally, you can create styling rules to configure the style for the cards. For example, by rendering impeded work as red, you can base the style on work items tagged as blocked:

When a lot of work is being done, it is sometimes hard to visualize the dependencies between multiple tasks that could result in key deliverables being delayed. In this recipe, you'll learn how you can organize tasks in a sprint on a calendar view and identify dependencies between them.
The sprint burndown chart is a great indicator of whether the team will be able to complete all remaining work within the sprint time box, and the taskboard helps you visualize the remaining work on each task. The Sprint Drop Plan extension (https://marketplace.visualstudio.com/items?itemName=yanivsegev.Drop-plan-extension), which was created by Yaniv Segev, is an organizational tool that helps team members sync their tasks by visualizing their work status and dependencies on a sprint-based calendar.
Once you've installed the extension from the marketplace, you'll see a new tab called Drop Plan in the sprint tools:


When you hover over a task of interest, the drop plan will render dependency links out to tasks that are related to the task you have selected, in addition to the product backlog item all the tasks are linked to. In this case, you now know that the product backlog item has three key tasks in flight, one of which is only likely to complete on the last day of the sprint. This gives you an opportunity to discuss the order in which the tasks are scheduled. For example, in this case, if you think the task scheduled for the last day of the sprint has more value, it should be brought forward in place of something else. In addition to this, the extension allows you to visualize an individual's and team's days off, as well as blocked tasks:

The team foundation marketplace features the Team Calendar extension (https://marketplace.visualstudio.com/items?itemName=ms-devlabs.team-calendar), which was created by the Microsoft DevLabs team and helps busy teams stay on track and informed about important deadlines, sprint schedules, and upcoming milestones. Team Calendar is the one place where you can view and manage the dates that are important to your teams, including sprint schedule, days off (for individuals or the team), and custom events:

There was a certain revolution a few years back that was instigated by one single team project that was tracking and managing work for all teams and projects. This stemmed from the lack of tooling to track and manage work across multiple teams and projects. When you're planning and tracking work, it's often necessary to view work across teams and projects. While there were natural benefits from this approach, it also cluttered a single team project with code and artifacts from multiple unrelated initiatives. With TFS 2017, Microsoft released the delivery plans extension to address this gap. With delivery plans in the mix, I don't really advocate one large team project. Instead, you should have a team project for every software product in your organization.
A delivery plan is a view of the work from multiple teams (and multiple projects) laid out on a calendar with each team's iterations. Each row in the view represents the work from a team's backlog, with each card corresponding to a work item – user story, feature, or epic. As you horizontally scroll through the calendar, work in future (or past) iterations comes into view. Like the Kanban board, a delivery plan is an interactive work board, although one was designed for multiple teams. You can add teams from across all the projects in your collection. If the plan needs updating, you can simply drag cards to update the iteration path. Like the Kanban board, you can customize card fields so that you can see relevant information for your work.
Install thedelivery plans extension (https://marketplace.visualstudio.com/items?itemName=ms.vss-plans) from the marketplace. Developed and maintained by Microsoft, this extension is free for all TFS users except stakeholders. With the extension installed, you'll see the Plans page in the work hub:

To see all the features of the Plans extension, you need multiple teams and projects. Use the sample data widget we discussed in the Getting social with work items recipe to create multiple projects. Since delivery plans are based on creating a portfolio of work in flight, it relies on a sprint's schedules for the teams.
Let's perform the following steps:
- Click on the
New planbutton to create a new plan. Call the planmyDeliveryPlan:


- The delivery plan brings the feature backlogs of the selected teams onto the canvas. You'll notice in the following screenshot that the sprint cadence of the PartsUnlimited team is different from the bike 360 and Fabrikam Fiber team, but the delivery plan makes it possible to visualize their feature backlogs on a single canvas:

- Next, click the
Configure plansettings gear icon on the top right-hand side of the page to personalize the delivery plan. AddMarkers *for key milestones, such as bug bash, scrum of scrums, team review, and any other key dates:

Last but not least, similar to other boards, the plans also support customizing cards. This allows you to surface more information by including more fields in work item cards.
With the configuration for the plan complete, the final result is a delivery board that rolls up the work items from multiple teams and projects into a single view along with markers. The board supports all drag and drop operations and makes it really easy to use this view to take actions during planning and tracking sessions. As teams continue to become more distributed and the size/scope of work continues to grow, delivery plans make it easy to visualize your portfolio of teams and projects from across the organization:

Dashboards in TFS provide a customizable canvas that allows your team to visualize and monitor progress. Dashboards replace the previous Team Overview page, providing easy-to-read, real-time information. At a glance, you can make informed decisions without having to drill down into other parts of your team project. Visibility of work is a core concept of Agile software development, and dashboards make it really easy to create an information radiator for your team and stakeholders.
Every team project is created with a default dashboard. You can access the PartsUnlimited dashboard by navigating to the dashboard hub. Anyone with access to the team project, including stakeholders, can view dashboards. Dashboards use widgets to surface information. There is no limit on how many dashboards you can create. Let's start off by creating a new dashboard for sprint 1. At this point, don't add any widgets to the dashboard. Click the Settings icon in the top right-hand corner of the page and select the option to auto-refresh the sprint 1 dashboard. Auto-refresh keeps the dashboard up-to-date; it's fantastic if you intend to project the dashboard view on a television screen.
The TFS marketplace features the Product Vision widget (https://marketplace.visualstudio.com/items?itemName=agile-extensions.product-vision), a free extension that was developed by Agile extensions and allow you to make product vision visible to the whole team by surfacing it to a dashboard via a widget. The sprint countdown widget (https://marketplace.visualstudio.com/items?itemName=ms-devlabs.CountdownWidget) is also a free extension and was developed by the Microsoft DevLabs team, and allows you to count down to a configurable moment in time, or down to the end of the current sprint.
Let's perform the following steps:
- Open the
Sprint 1dashboard and click the+icon from the lower right-hand side of the page. This launches theAdd widgetpane. - Search and add the sprint countdown, product vision, markdown widget, sprint capacity, charts widget, query results widget, sprint burn down, and the sprint overview widget, as shown in the following screenshot:
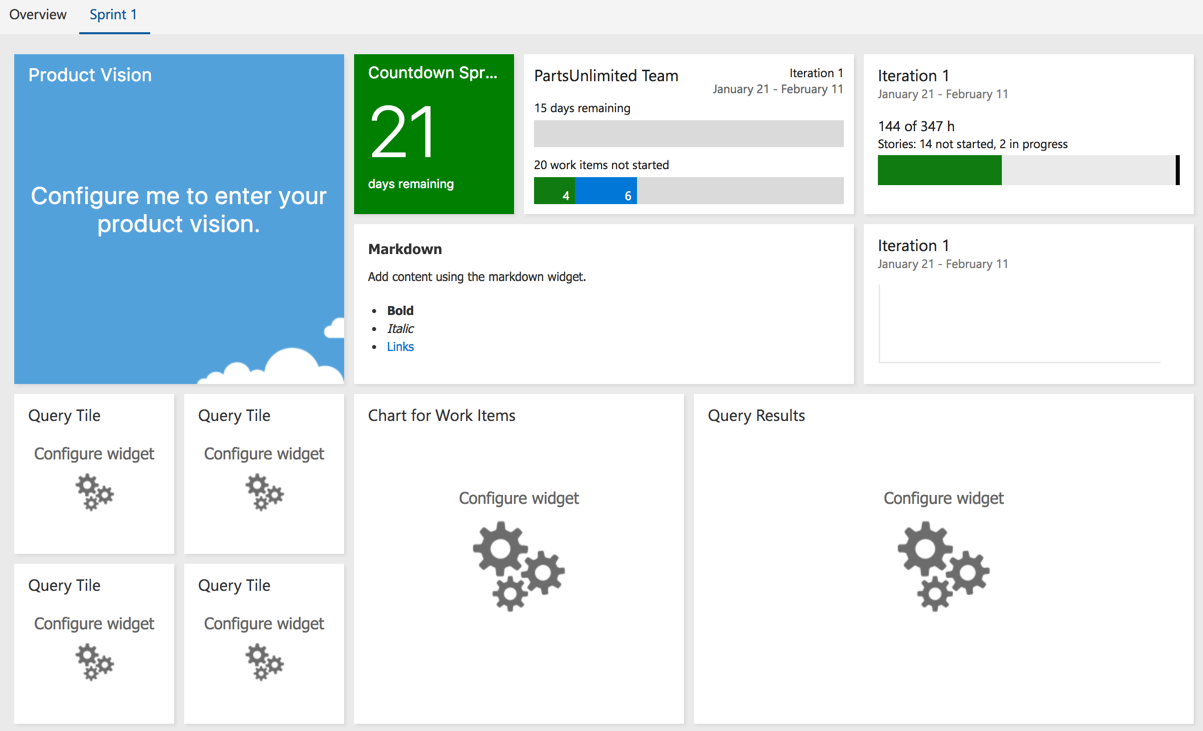
- With the relevant widgets on the board, click on individual widgets to start configuring them. The
Configure workflow on all the tasksoption is very intuitive, for example, the query tile allows you to configure a work item query to it and specify a styling rule to change the color of the widget based on the number of work items returned by the query. The chart for the work items query allows you to render the results of the work item query as a chart of your choice, with further customization options for colors. The query result returns the work item list for the work item query that was configured by you, giving you the option of which columns to return.
Widgets use the TFS REST API to retrieve information. The dashboard canvas allows you to move widgets aroundand scale them to different sizes. Widgets support interactivity; for example, clicking on the Query Tile would take you straight into the Work Item Query window. Once the widgets on the dashboard have been configured, you'll see output similar to the following:

The TFS marketplace (https://marketplace.visualstudio.com/search?term=widget&target=VSTS&category=All%20categories&hosting=onpremises&sortBy=Relevance) features a lot of useful widgets, with an evergrowing collection of widgets – some of which will be of interest to you.


