AWS Fundamentals
Amazon Web Services (AWS) was the pioneer in cloud computing, launching its offering over a decade ago, and it continues to rapidly introduce new services and features based on customer demand. AWS was developed by Amazon.com when the company decided to turn its expertise in building large-scale, reliable, and cost-efficient internet systems into a product that could be used by customers to host their own sites and services.
At the time of writing, AWS has 136 services listed on its web console, ranging from foundational services such as Identity and Access Management (IAM) and Elastic Compute Cloud (EC2) to high-level machine learning services such as Rekognition. The breadth and depth of the services that are available make it possible to implement almost any idea quickly and efficiently – your imagination is the only true limit to what you can do. But all of those services mean that you – as a developer, systems administrator, or solutions architect – have a lot to learn!
Luckily, we are here to help, and if you stick with us throughout the next 12 chapters, you will have a solid foundation for establishing yourself as an AWS expert.
In this chapter, we will cover the following topics:
- Signing up for an AWS account
- Understanding AWS's global infrastructure
- Using the web console
- Learning the basics of AWS CloudFormation
- Using the AWS CLI
Signing up for an AWS account
To follow along with the recipes in this book, you will need to set up an AWS account. Follow all of these steps to learn how to create an account that you will securely access with an IAM user and a Multi-Factor Authentication (MFA) device.
How to do it...
Follow these steps to create an AWS account:
- Create an account at https://aws.amazon.com/ by clicking on the Sign Up button and entering your details:

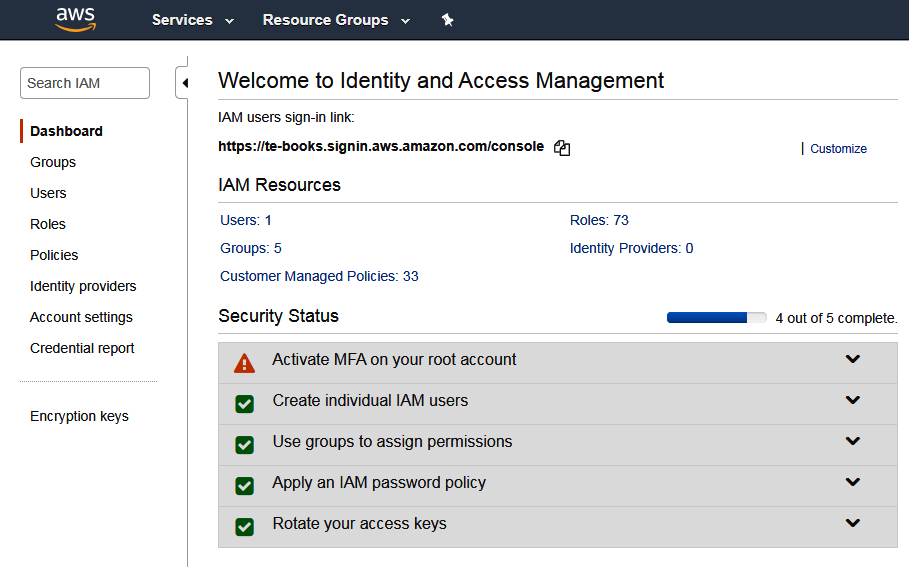
- Before we get started using that shiny new account, let's go over some best practices regarding basic account security. The very first thing you should do as the owner of an AWS account is enable MFA on the root login:
https://www.okta.com/identity-101/why-mfa-is-everywhere/.
- As you can see, when you first visit the IAM console, AWS recommends that you Activate MFA as the next step to improve your security status. Expand the Activate MFA section and click through it to get to your security credentials screen:
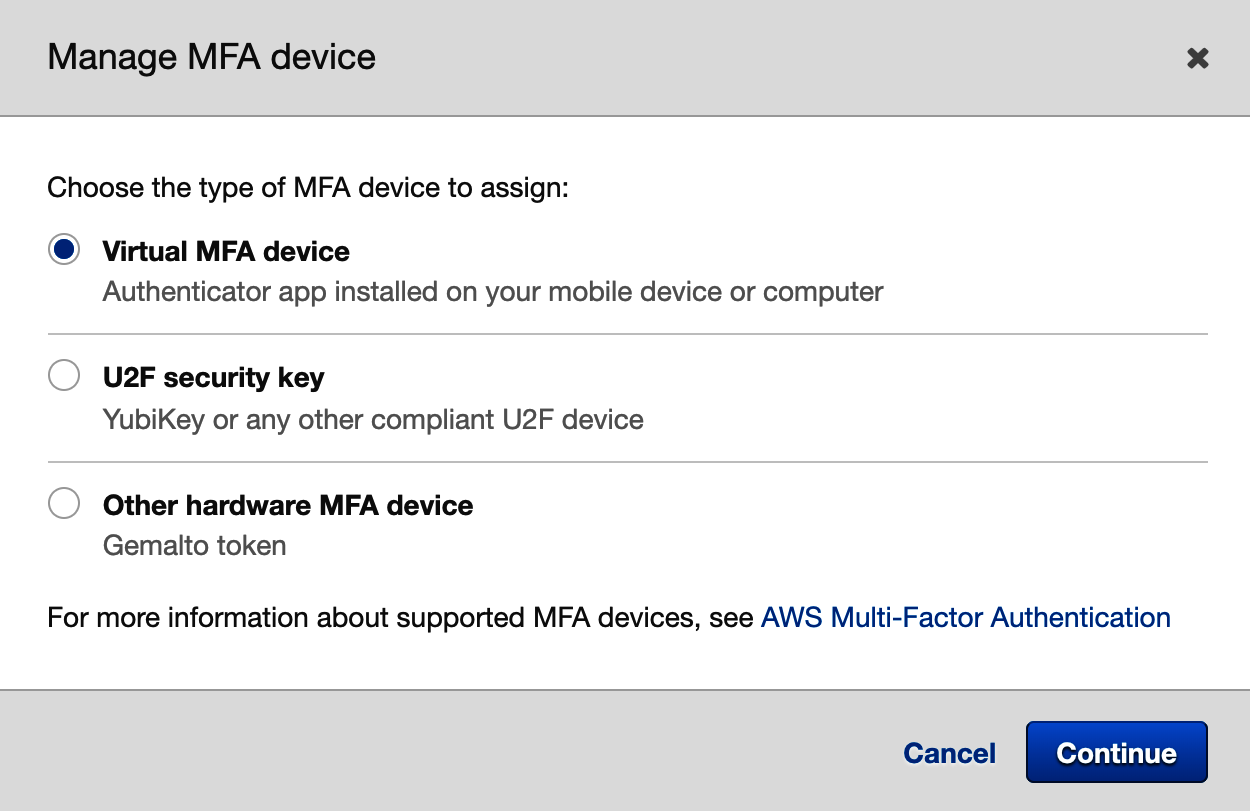
- Choose the type of MFA device you prefer and complete the setup. If you choose to use a virtual device, note how the app on your phone saves your data. Some apps, such as Google Authenticator, don't back up your data to the cloud, so, if you lose your phone, you will no longer be able to log in to your account. Try apps such as Authy or LastPass Authenticator if you want your MFA device to be synced with an online account.
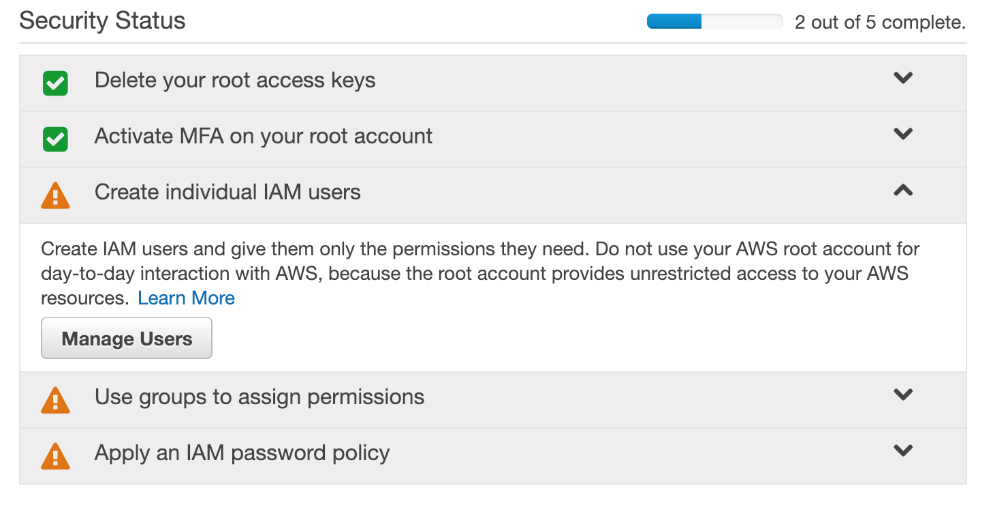
MFA is an essential extra layer of security that you should apply to all of your online accounts, not just AWS. Now that you have protected your root login with MFA, it's time to take your account security to the next level by creating an IAM account for routine access. Let's get started:
- Expand the Create individual IAM users section and click Manage Users:
- Add a new user account:
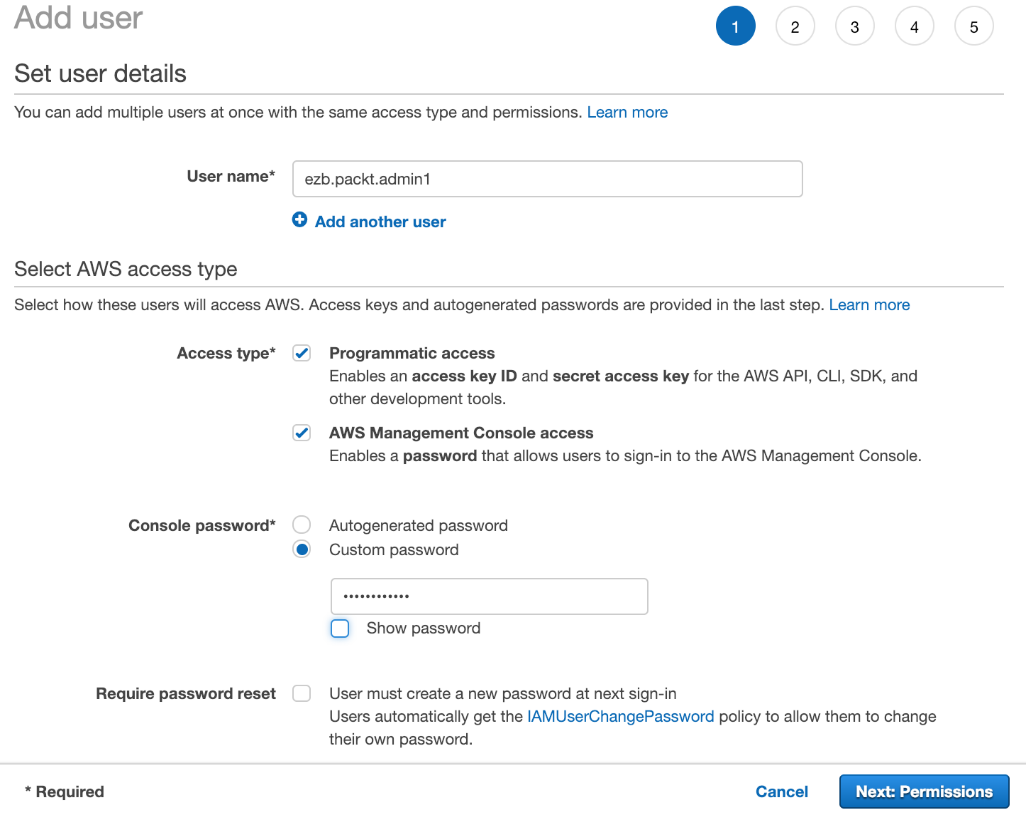
This will be the user account that you use to complete the exercises in this book. On the next screen, you will be asked to create a group for this user.
- Create a group called Admins and select AdministratorAccess:
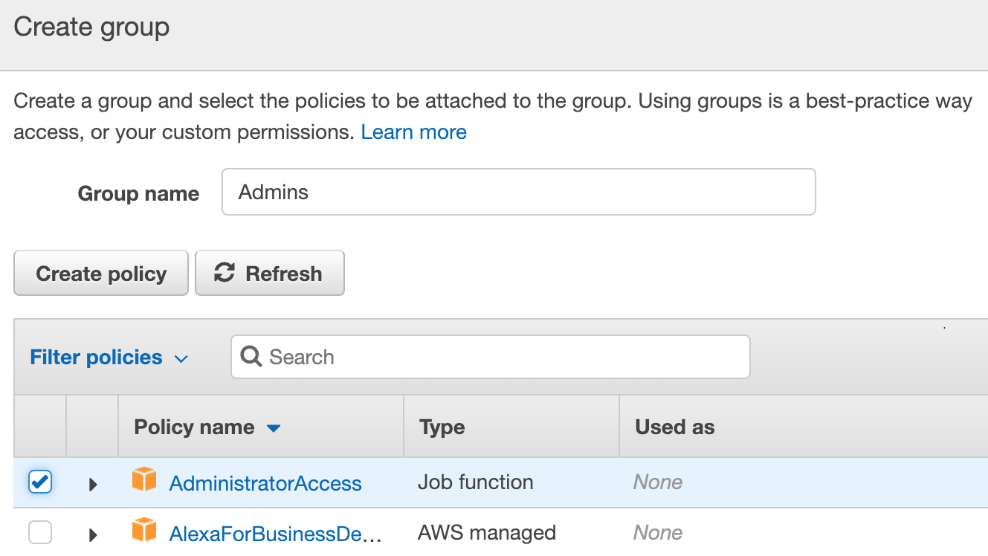
Once you have finished creating the new IAM user, make sure that you save these credentials so that you can access the CLI later.
- One last thing we will do before logging out of the root is apply a password policy to the account so that all the users are required to have strong passwords:
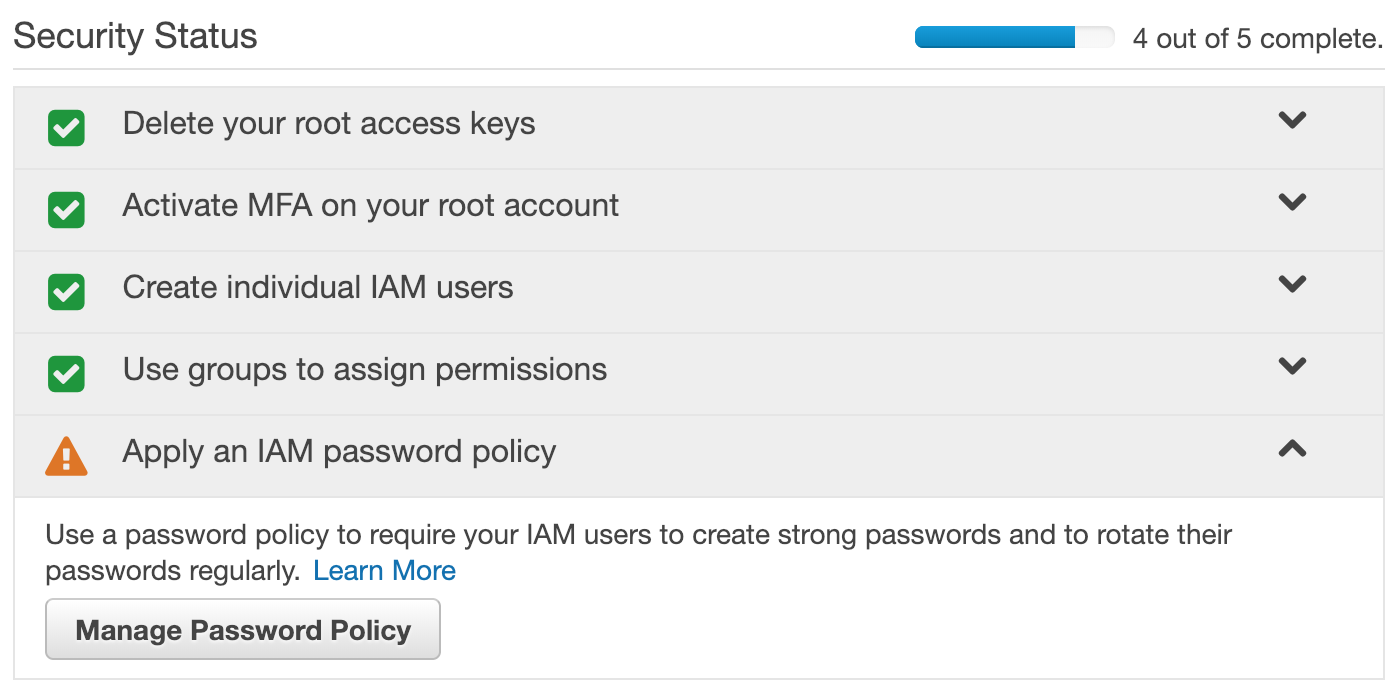
- Once you have done this and see five green checkboxes under Security Status, log out of the root user and log back in as your newly created user.
How it works...
When you create an IAM user within your AWS account, you are addressing authentication, which answers the question, Who is this user? By itself, a user has no rights to accomplish anything in your account. Access management, or authorization, determines what the principal identities within your account can do. Authorization answers the question, What is this user allowed to do? In AWS, you create policies that define what those principals are allowed to do. Policies are attached to users, roles, and groups.
There's more...
Keep in mind that changes that are made to users, groups, and roles need to be consistent eventually. This means that those changes might not be immediately available across your entire account. AWS recommends that you do not include IAM changes in latency-sensitive code.
See also
- Check out the AWS Organizations and AWS Control Tower recipes in Chapter 2, Account Setup and Management, for an in-depth look at setting up multiple accounts for your company's cloud-based applications
Understanding AWS's global infrastructure
One of the primary benefits of building your applications on the AWS cloud is that you can deploy globally in minutes. The global infrastructure is divided up into segments called regions. Each region is completely isolated from other regions, meaning that a region has its own independent installations of AWS services, and customer data will never flow out of that region unless an application is designed to export it over the internet. At the time of writing, there are 20 regions around the world.
Regions and availability zones
A region is further subdivided into availability zones (AZ), of which there are currently 60. A typical region has three availability zones, which are closely placed clusters of data centers with link speeds high enough that all resources within an availability zone are essentially treated as a single local network. AWS carefully plans the location of data centers within an AZ so that the separate AZs within a region have unique geographic profiles – for example, flood plains are taken into consideration so that, if a rare natural disaster occurs, only one of the AZs within the region will be affected. However, AZs are still close enough together that the network connection between them is very fast.
The design of this global infrastructure allows customers to create highly fault-tolerant and performant applications. An example of the resilience that can be created by using multiple availability zones is Amazon S3, which achieves an incredible 11 x 9s of durability for objects stored by customers. That's 99.999999999%, which means that, in theory, if you stored 10 million objects in S3, you would expect to lose only 1 object every 10,000 years!
AWS is steadily adding more regions throughout the world to give customers more options regarding where their applications are deployed. Some countries have strict compliance regulations that require data to be stored in a region within a country, so be sure to research those regulations before making your choice.
See https://aws.amazon.com/about-aws/global-infrastructure/ for the most up to date list of regions and availability zones.
Global resources
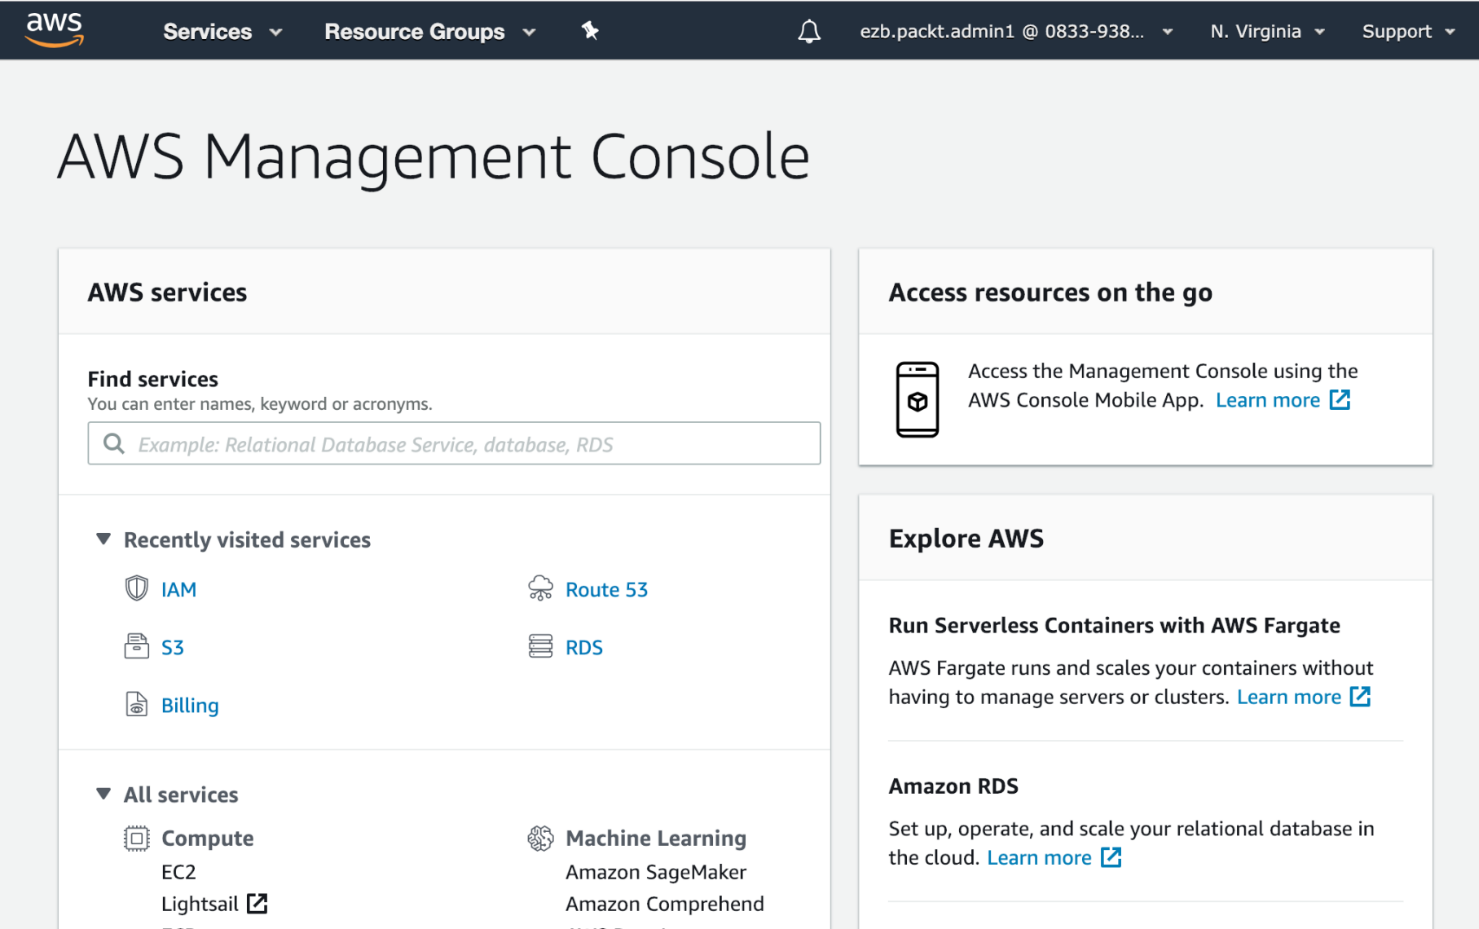
It's important to understand that there are some AWS services that are considered global, meaning that those services are configured once per account and apply to all regions. In the web console, look at the upper right-hand corner of the screen to see which region you are currently viewing:

Now, select the IAM service, and note that you are no longer referencing a single region. When you create users, groups, and roles in IAM, those entities apply to all AWS regions. It isn't necessary to recreate your IAM resources each time you deploy to a new region:

Other examples of global services are Amazon Route 53, Amazon CloudFront, and AWS WAF.
Using the web console
You have already had some exposure to the AWS administration console at https://console.aws.amazon.com. For some users, the web interface is all they ever need to create and administer their cloud resources. Later in this chapter, we will introduce CloudFormation and the command-line interface (CLI) as worthy options for using a web browser. As good practice for production accounts, we highly recommend automating all of your resource changes with a templating system such as CloudFormation.
However, for routine discovery and education, the web console is an excellent tool, so we will highlight some of its features here. Keep in mind that the UI evolves over time, so the screenshots you see in this section may not exactly match what you see when you log in:
The menu bar
Let's start by dissecting that top menu bar and see what it has to offer.
AWS logo
The AWS logo takes you back to the top-level page of the console. It actually ends up being very useful when you decide you want to open a new console window without leaving the page you are currently viewing – just middle-click it or right-click and open the page in a new tab:

Services
Expand the Services dropdown to see a screen with all the AWS services listed, and a recent history of the services you visited on the left. The search box will end up being the fastest way for you to find the service you are looking for:

Resource Groups
Resource Groups are a way to manage groups of resources – a topic that we will explore in detail in Chapter 9, Managing Costs:

Pins
Click the pin icon to view a list of service widgets that can be added to the menu bar:

Alerts
The bell icon shows alerts and notifications that are relevant to your account:

Click View all alerts to see an event log of all the operational issues that may have affected your account recently.
Account
Click on your username to see links to the various screens related to your AWS account:

You already spent some time on the My Security Credentials screen when you created your account and set up security for the root login and your first IAM user. We will go into more detail about My Organization, My Billing Dashboard, and Switch Role in Chapter 2, Account Setup and Management and Chapter 9, Managing Costs.
Region and support
Click on the region selector to see all the regions that are available to you in your account:

Remember that selecting a new region takes you to a completely isolated AWS environment, so any regional resources you had set up in the previous region will no longer be visible. If you ever find yourself in a panic because it looks like one of your resources, such as an RDS database or an EC2 instance, seems to have disappeared, it's probably because you are in the wrong region.
Finally, we have the Support link, which exposes several support resources.
Learning the basics of AWS CloudFormation
We'll use CloudFormation extensively throughout this book, so it's important that you have an understanding of what it is and how it fits into the AWS ecosystem. There should be enough information here to get you started, but, where necessary, we'll refer you to the AWS documentation.
What is CloudFormation?
The CloudFormation service allows you to provision and manage a collection of AWS resources in an automated and repeatable fashion. In AWS terminology, these collections are referred to as stacks. Note, however, that a stack can be as large or as small as you like. It might consist of a single S3 bucket, or it might contain everything needed to host your three-tier web app.
In this chapter, we'll show you how to define the resources to be included in your CloudFormation stack. We'll talk a bit more about the composition of these stacks and why and when it's preferable to divvy up resources between a number of stacks. Finally, we'll share a few of the tips and tricks we've learned over the years building countless CloudFormation stacks.
Why is CloudFormation important?
By now, the benefits of automation should be starting to become apparent to you. But don't fall into the trap of thinking CloudFormation will only be useful for large collections of resources. Even performing the simplest task of, say, creating an S3 bucket, can get very repetitive if you need to do it in every region.
We work with a lot of customers who have very tight controls and governance around their infrastructure, especially in the network layer (think VPCs, NACLs, and security groups). Being able to express their cloud footprint in YAML (or JSON), store it in a source code repository, and funnel it through a high-visibility pipeline gives these customers confidence that their infrastructure changes are peer-reviewed and will work as expected in production. Discipline and commitment to IaC SDLC practices are, of course, a big factor in this, but CloudFormation helps bring us out of the era of following 20-page run-sheets for manual changes, navigating untracked or unexplained configuration drift, and unexpected downtime that's caused by fat fingers.
Infrastructure as Code (IaC)
AWS CloudFormation is an Infrastructure as Code (IaC) service. IaC has emerged as a critical strategy for companies that are making the transformation to a DevOps culture. DevOps and IaC go hand in hand. The practice of storing your infrastructure as code encourages a sharing of responsibilities that facilitates collaboration.
There are many benefits to IaC, some of which are as follows:
- Modeling your infrastructure as code gives you a single source of truth to define the resources that are deployed in your account.
- Once there are no manual steps to create your resources, you can fully automate deployment. You can deploy changes to an existing environment or create a brand new environment from scratch automatically by launching stacks based on your CloudFormation templates.
- Treating your infrastructure as code allows you to apply all the best practices of modern software development to your templates. Use code editors, distributed version control, code reviews, and easy rollbacks as part of your process.
The layer cake
Now is a good time to start thinking about your AWS deployments in terms of layers. Your layers will sit on top of one another, and you will have well-defined relationships between them.
Here's a bottom-up example of what your layer cake might look like:
- VPC with CloudTrail
- Subnets, routes, and NACLs
- NAT gateways, VPN or bastion hosts, and associated security groups
- App stack 1: Security groups and S3 buckets
- App stack 2: Cross-zone RDS and read replica
- App stack 3: App and web server autoscaling groups and ELBs
- App stack 4: CloudFront and WAF config
In this example, you may have many occurrences of the app stack layers inside your VPC, assuming that you have enough IP addresses in your subnets! This is often the case with VPCs living inside development environments. So, immediately, you have the benefit of multi-tenancy capability with application isolation.
One advantage of this approach is that, while you are developing your CloudFormation template, if you mess up the configuration of your app server, you don't have to wind back all the work CloudFormation did on your behalf. You can just scrap that particular layer (and the layers that depend on it) and restart from there. This is not the case if you have everything contained in a single template.
We commonly work with customers for whom the ownership and management of each layer in the cake reflect the structure of the technology divisions within a company. The traditional infrastructure, network, and cybersecurity folk are often really interested in creating a safe place for digital teams to deploy their apps, so they like to heavily govern the foundational layers of the cake.
Even if you are a single-person infrastructure coder working in a small team, you will benefit from this approach. For example, you'll find that it dramatically reduces your exposure to things such as AWS limits, timeouts, and circular dependencies.
CloudFormation templates
This is where we start to get our hands dirty. CloudFormation template files are the codified representations of your stack and are expressed in either YAML or JSON. When you wish to create a CloudFormation stack, you push a template file to CloudFormation through its API, web console, command-line tools, or some other method (such as the SDK).
Templates can be replayed over and over again by CloudFormation, thus creating many instances of your stack.
YAML versus JSON
Up until recently, JSON was your only option. We actually encourage you to adopt YAML, and we'll be using it for all of the examples that are shown in this book. Some of the reasons for this are as follows:
- It's just nicer to look at. It's less syntax-heavy, and should you choose to go down the path of generating your CloudFormation templates, pretty much every language has a YAML library of some kind.
- The size of your templates will be much smaller. This is more practical from a developer's point of view, but it also means that you're less likely to run into the CloudFormation size limit on template files (50 KB).
- The string-substitution features are easier to use and interpret.
- Your EC2 UserData (the script that runs when your EC2 instance boots) will be much easier to implement and maintain.
A closer look at CloudFormation templates
CloudFormation templates consist of a number of parts, but these are the four we're going to concentrate on:
- Parameters
- Resources
- Outputs
- Mappings
Here's a short YAML example:
AWSTemplateFormatVersion: '2010-09-09'
Parameters:
  EC2KeyName:
    Type: String
    Description: EC2 Key Pair to launch with
Mappings:
  RegionMap:
    us-east-1:
      AMIID: ami-9be6f38c
    ap-southeast-2:
      AMIID: ami-28cff44b
We declare a parameter and mappings to start the template. Mappings will be covered in Chapter 10, Advanced AWS CloudFormation. Next, we define Resources:
Resources:
  ExampleEC2Instance:
    Type: AWS:EC2::Instance
    Properties:
      InstanceType: t2.nano
      UserData:
        Fn::Base64:
          Fn::Sub': |
            #!/bin/bash -ex
            /opt/aws/bin/cfn-signal '${ExampleWaitHandle}'
      ImageId:
        Fn::FindInMap: [ RegionMap, Ref: 'AWS::Region', AMIID ]
      KeyName:
        Ref: EC2KeyName
Then, in the final section of the template, we define WaitHandle, WaitCondition, and Outputs:
  ExampleWaitHandle:
    Type: AWS::CloudFormation::WaitConditionHandle
    Properties:
  ExampleWaitCondition:
    Type: AWS::CloudFormation::WaitCondition
    DependsOn: ExampleEC2Instance
    Properties:
      Handle:
        Ref: ExampleWaitHandle
      Timeout: 600
Outputs:
  ExampleOutput:
    Value:
      Fn::GetAtt: ExampleWaitCondition.Data
    Description: The data signaled with the WaitCondition
Outputs give you a way to see things such as auto-generated names, and, in this case, the data from the wait condition.
Parameters
CloudFormation parameters are the input values you define when creating or updating a stack, similar to how you provide parameters to any command-line tools you might use. They allow you to customize your stack without making changes to your template. Common examples of what parameters might be used for are the following:
- EC2 AMI ID: You may wish to redeploy your stack with a new AMI that has the latest security patches installed.
- Subnet IDs: You could have a list of subnets that an autoscaling group should deploy servers in. These subnet IDs will be different between your dev, test, and production environments.
- Endpoint targets and credentials: These include things such as API hostnames, usernames, and passwords.
You'll find that there are a number of parameter types. In brief, they are as follows:
- String
- Number
- List
- CommaDelimitedList
In addition to these, AWS provides some AWS-specific parameter types. These can be particularly handy when you are executing your template via the CloudFormation web console. For example, a parameter of the AWS::EC2::AvailabilityZone:: type causes the web console to display a dropdown list of valid AZs for this parameter. In the ap-southeast-2 region, the list would look like this:
- ap-southeast-2a
- ap-southeast-2b
- ap-southeast-2c
The list of AWS-specific parameter types is steadily growing and is so long that we can't list them here. We'll use many of them throughout this book, however, and they can easily be found in the AWS CloudFormation documentation.
When creating or updating a stack, you will need to provide values for all the parameters you've defined in your template. Where it makes sense, you can define default values for a parameter. For example, you might have a parameter called debug that tells your application to run in debug mode. Typically, you don't want this mode enabled by default, so you can set the default value for this parameter to false, disabled, or something else your application understands. Of course, this value can be overridden when you're creating or updating a stack.
You can – and should – provide a short, meaningful description for each parameter. These are displayed in the web console, next to each parameter field. When used properly, they provide hints and context to whoever is trying to run your CloudFormation template.
At this point, we need to introduce the built-in Ref function. When you need to reference a parameter value, you use this function to do so:
KeyName:
  Ref: EC2KeyName
While Ref isn't the only built-in function you'll need to know about, it's almost certainly going to be the one you'll use the most. We'll talk more about built-in functions later in this chapter.
Resources
Resources are your actual pieces of AWS infrastructure. These are your EC2 instances, S3 buckets, ELBs, and so on. Almost any resource type you can create by pointing and clicking on the AWS web console can also be created using CloudFormation.
It's not practical to list all the AWS resource types in this chapter. However, you will get familiar with the most common types as you work your way through the recipes in this book.
There are a few important things to keep in mind about CloudFormation resources.
New or bleeding-edge AWS resources are often not immediately supported. CloudFormation support typically lags a few weeks (sometimes months) behind the release of new AWS features. This used to be quite frustrating for anyone who found that infrastructure automation was key. Fast-forward to today, and this situation is somewhat mitigated by the ability to use custom resources. These are discussed later on in this chapter.
Resources have a default return value. You can use Ref to fetch these return values for use elsewhere in your template. For example, the AWS::EC2::VPC resource type has a default return value, which is the ID of the VPC. It looks something like this:
vpc-11aa111a
Resources often contain additional return values. These additional values are fetched using the built-in Fn::GetAtt function. Continuing from the previous example, the AWS::EC2::VPC resource type also returns the following:
- CidrBlock
- DefaultNetworkAcl
- DefaultSecurityGroup
- Ipv6CidrBlocks
- Outputs
Just like AWS resources, CloudFormation stacks can also have return values, called outputs. These values are entirely user-defined. If you don't specify any outputs, then nothing is returned when your stack is completed.
Outputs can come in handy when you are using a CI/CD tool to create your CloudFormation stacks. For example, you might like to output the public hostname of an ELB so that your CI/CD tool can turn it into a clickable link within the job output.
You'll also use them when you are linking pieces of your layer cake together. You may want to reference an S3 bucket or security group that's was created in another stack. This is much easier to do with the new cross-stack references feature, which we'll discuss later in this chapter. You can expect to see the Ref and Fn::GetAtt functions a lot in the output section of any CloudFormation template.
Dependencies and ordering
When executing your template, CloudFormation will automatically work out which resources depend on each other and order their creation accordingly. Additionally, resource creation is parallelized as much as possible so that your stack execution finishes in the timeliest manner possible.
Let's look at an example where an app server depends on a DB server. To connect to the database, the app server needs to know its IP address or hostname. This situation would actually require you to create the DB server first so that you can use Ref to fetch its IP and provide it to your app server. CloudFormation has no way of knowing about the coupling between these two resources, so it will go ahead and create them in any order it pleases (or in parallel, if possible).
To fix this situation, we use the DependsOn attribute to tell CloudFormation that our app server depends on our DB server. In fact, DependsOn can actually take a list of strings if a resource happens to depend on multiple resources before it can be created. So, if our app server were to also depend on, say, a Memcached server, then we would use DependsOn to declare both dependencies.
If necessary, you can take this further. Let's say that, after your DB server boots, it will automatically start the database, set up a schema, and import a large amount of data. It may be necessary to wait for this process to complete before we create an app server that attempts to connect to a DB expecting a complete schema and dataset. In this scenario, we want a way to signal to CloudFormation that the DB server has completed its initialization so that it can go ahead and create resources that depend on it. This is where WaitCondition and WaitConditionHandle come in.
First, you create an AWS::CloudFormation::WaitConditionHandle type, which you can later reference via Ref.
Next, you create an AWS::CloudFormation::WaitCondition type. In our case, we want the waiting period to start as soon as the DB server is created, so we specify that this WaitCondition resource DependsOn our DB server.
After the DB server has finished importing data and is ready to accept connections, it calls the callback URL provided by the WaitConditionHandle resource to signal to CloudFormation that it can stop waiting and start executing the rest of the CloudFormation stack. The URL is supplied to the DB server via UserData, again using Ref. Typically, curl, wget, or some equivalent is used to call the URL.
A WaitCondition resource can have a Timeout period too. This is a value that's specified in seconds. In our example, we might supply a value of 900 because we know that it should never take more than 15 minutes to boot our DB and import the data.
Here's an example of what DependsOn, WaitConditionHandle, and WaitCondition look like when combined:
ExampleWaitHandle:
  Type: AWS::CloudFormation::WaitConditionHandle
  Properties:
ExampleWaitCondition:
  Type: AWS::CloudFormation::WaitCondition
  DependsOn: ExampleEC2Instance
  Properties:
    Handle:
      Ref: ExampleWaitHandle
    Timeout: 600
Functions
CloudFormation provides some built-in functions to make composing your templates a lot easier. We've already looked at Ref and Fn::GetAtt. Let's look at some others you are likely to encounter.
Fn::Join
Use Fn::Join to concatenate a list of strings using a specified delimiter, for example:
"Fn::Join": [ ".", [ 1, 2, 3, 4 ] ]
This would yield the following value:
"1.2.3.4"
Fn::Sub
Use Fn::Sub to perform string substitution. Consider the following code:
DSN: "Fn::Sub"
  - mysql://${db_user}:${db_pass}@${db_host}:3306/wordpress
  - { db_user: lchan, db_pass: ch33s3, db_host: localhost }
This would yield the following value:
mysql://lchan:ch33s3@localhost:3306/wordpress
When you combine these functions with Ref and Fn::GetAtt, you can start doing some really powerful stuff, as we'll see in the recipes throughout this book.
Other available built-in functions include the following:
- Fn::Base64
- Fn::FindInMap
- Fn::GetAZs
- Fn::ImportValue
- Fn::Select
Conditionals
It's reasonably common to provide a similar but distinct set of resources based on which environment your stack is running in. In your development environment, for example, you may not wish to create an entire fleet of database servers, instead opting for just a single database server. You can achieve this by using conditionals, such as the following ones:
- Fn::And
- Fn::Equals
- Fn::If
- Fn::Not
- Fn::Or
Permissions and service roles
One important thing to remember about CloudFormation is that it's more or less just making API calls on your behalf. This means that CloudFormation will assume the very same permissions or role you use to execute your template. If you don't have permission to create a new hosted zone on Route 53, for example, any template you try to run that contains a new Route 53-hosted zone will fail.
On the flip side, this has created a somewhat tricky situation where anyone developing CloudFormation typically has a very elevated level of privileges, and those privileges are somewhat unnecessarily granted to CloudFormation each time a template is executed.
If my CloudFormation template contains only one resource, which is a Route 53-hosted zone, it doesn't make sense for that template to be executed with full admin privileges to my AWS account. It makes much more sense to give CloudFormation a very slim set of permissions to execute the template with, thus limiting the blast radius if a bad template were to be executed (that is, a bad copy-and-paste operation resulting in deleted resources).
Thankfully, you can use service roles to define an IAM role and tell CloudFormation to use that role when your stack is being executed, giving you a much safer space to play in.
Cross-stack references
When using the layered cake approach, it's very common to want to use outputs from one stack as inputs in another stack. For example, you may create a VPC in one stack and require its VPC ID when creating resources in another.
For a long time, you needed to provide some glue around stack creation in order to pass the output between stacks. Cross-stack references provide a more native way of doing this.
You can now export one or more outputs from your stack. This makes those outputs available to other stacks. Note that the name of this value needs to be unique, so it's probably a good idea to include the CloudFormation stack name in the name you're exporting to achieve this.
Once a value has been exported, it becomes available to be imported in another stack using the Fn::ImportValue function – very handy!
Make sure, however, that during the time an exported value is being referenced, you are not able to delete or modify it. Additionally, you won't be able to delete the stack containing the exported value. Once something is referencing an exported value, it's there to stay until there are no stacks referencing it at all.
Updating resources
One of the principles of IaC is that all the changes should be represented as code for review and testing. This is especially important where CloudFormation is concerned.
After creating a stack for you, the CloudFormation service is effectively hands-off. If you make a change to any of the resources created by CloudFormation (in the web console, command line, or by some other method), you're effectively causing configuration drift; CloudFormation no longer knows the exact state of the resources in your stack.
The correct approach is to make these changes in your CloudFormation template and perform an update operation on your stack. This ensures that CloudFormation always knows the state of your stack and allows you to be confident that your infrastructure code is a complete and accurate representation of your running environments.
Changesets
When performing a stack update, it can be unclear exactly what changes are going to be made to your stack. Depending on which resource you are changing, you may find that it will need to be deleted and recreated in order to implement your change. This, of course, is completely undesired behavior if the resource in question contains data you'd like to keep. Keep in mind that RDS databases can be a particular pain point.
To mitigate this situation, CloudFormation allows you to create and review a changeset prior to executing the update. The changeset shows you which operations CloudFormation intends to perform on your resources. If the changeset looks good, you can choose to proceed. If you don't like what you see, you can delete the changeset and choose another course of action – perhaps choosing to create and switch to an entirely new stack to avoid a service outage.
Other things to know
There are a few other things you should keep in the back of your mind as you start building out your own CloudFormation stacks. Let's take a look.
Name collisions
Often, if you omit the name attribute from a resource, CloudFormation will generate a name for you. This can result in weird-looking resource names, but it will increase the replayability of your template. Using AWS::S3::Bucket as an example, if you specify the BucketName parameter but don't ensure its uniqueness, CloudFormation will fail to execute your template the second time around because the bucket will already exist. Omitting BucketName fixes this. Alternatively, you may opt to generate your own unique name each time the template is run. There's probably no right or wrong approach here, so just do what works for you.
Rollback
When creating a CloudFormation stack, you are given the option of disabling rollback. Before you go ahead and set this to true, keep in mind that this setting persists beyond stack creation. We've ended up in precarious situations where updating an existing stack has failed (for some reason) but rollback has been disabled. This is a fun situation for no one.
Limits
The limits that are the most likely to concern you are as follows:
- The maximum size allowed for your CloudFormation template is 50 KB. This is quite generous, and if you hit this limit, you almost certainly need to think about breaking up your template into a series of smaller ones. If you absolutely need to exceed the 50 KB limit, then the most common approach is to upload your template to S3 and then provide an S3 URL to CloudFormation to execute.
- The maximum number of parameters you can specify is 60. If you need more than this then, again, consider whether or not you need to add more layers to your cake. Otherwise, lists or mappings might get you out of trouble here.
- Outputs are also limited to 60. If you've hit this limit, it's probably time to resort to a series of smaller templates.
- Resources are limited to 200. The same rules apply here as they do for the previous limit.
- By default, you're limited to a total of 200 CloudFormation stacks. You can have this limit increased simply by contacting AWS.
Circular dependencies
Something to keep in the back of your mind is that you may run into a circular dependency scenario, where multiple resources depend on each other for creation. A common example is where two security groups reference each other in order to allow access between themselves.
A workaround for this particular scenario is to use the AWS::EC2::SecurityGroupEgress and AWS::EC2::SecurityGroupIngress types instead of the ingress and egress rule types for AWS::EC2::SecurityGroup.
Credentials
Under no circumstances do you want to have credentials hardcoded in your templates or committed to your source code repository. Doing this doesn't just increase the chance that your credentials will be stolen – it also reduces the portability of your templates. If your credentials are hardcoded and you need to change them, that obviously requires you to edit your CloudFormation template.
Instead, you should add credentials as parameters in your template. Be sure to use the NoEcho parameter when you do this so that CloudFormation masks the value anywhere the parameters are displayed.
Stack policies
If there are resources in your stack you'd like to protect from accidental deletion or modification, applying a stack policy will help you achieve this. By default, all resources can be deleted or modified. When you apply a stack policy, all the resources are protected unless you explicitly allow them to be deleted or modified in the policy. Note that stack policies do not apply during stack creation – they only take effect when you attempt to update a stack.
Using the command-line interface (CLI)
The AWS command-line interface (CLI) tool is an important piece of the AWS administrator's toolkit.
The CLI tool is often one of the quickest and easiest ways to interact with the API. As a text-based tool, it scales much easier than using the web console. Unlike the console, it can be automated, for example, via scripts. The AWS application programming interface (API) represents all the functionality that's available to you as an AWS administrator. It is also easier to keep track of through your command-line history. Like all good CLI tools, simple individual commands can be chained (or piped) together to perform complex tasks.
Installation
The CLI tool requires Python 2.6.5 or greater.
The easiest way to install it is to use the Python package manager, pip:
pip install awscli
This will make the aws command available on your system.
Upgrade
AWS frequently releases new services and functionality. To use these new features, you will need to upgrade the CLI tool.
To upgrade the CLI tool, run the following pip command periodically:
pip install --upgrade awscli
Configuration
Authentication between the CLI tool and the AWS API is done via two pieces of information:
- Access key ID
- Secret access key
Once you have created a user, you can configure the tool so that you can use it for authentication purposes.
While you can configure the CLI tool with access keys directly, this should be avoided. Instead, you should use profiles to store your credentials. Using profiles gives you a more consistent and manageable centralized location to secure your secret keys.
Default profile
Without any additional configuration or options, your CLI tool commands will use the default profile.
To set up the default profile, you can use the following command:
aws configure
This will prompt you for an access key ID, secret access key, region, and output format.
Named profiles
In addition to the default profile, you can configure other, named profiles. This is useful for switching between users with different levels of access (for example, read-only and administrator) or even between users in different accounts:
aws configure --profile <profile-name>
Once you have responded to these prompts, you can reference the named profile by passing the --profile <profile-name> option with your command.
Environment variables
You can also configure the CLI via the use of environment variables:
export AWS_PROFILE=<profile-name>
While you should prefer to use profiles over setting your access ID and secret keys directly, sometimes you may have to do so. If you must set your keys directly, do so via environment variables so that you don't need to pass your keys around or hardcode them:
export AWS_ACCESS_KEY_ID=<access-key-id>
export AWS_SECRET_ACCESS_KEY=<secret-access-key>
Instance roles
When running the CLI tool on an EC2 instance, you can leverage the instance's IAM role to make calls. This means that you don't need to configure credentials or set environment variables (manually).
Behind the scenes, the instance will retrieve and set its own AWS environment variables that allow API calls. You need to ensure that the instance has the appropriate permissions.
Usage
All CLI tool commands are service-based. By using service commands and subcommands, you can make calls directly to the AWS API.
Commands
Each command represents an AWS service. While most services have one command associated with them, some services have multiple commands (for example, S3 has s3 and s3api).
Subcommands
Each command has a selection of subcommands to perform service-specific actions.
Options
Subcommands take options and start with --.
While most are optional (hence the name), those that are not surrounded by square brackets ([]) are required. You will get an error message (with the appropriate details) if you don't include them.
The built-in documentation is the best place to start looking for answers. There are usually examples after all of the options have been described. Otherwise, there are plenty of examples available online.
Some options are available for all or most commands, so they are particularly useful to know.
Output
The CLI tool can be configured to output in JSON, table, or text format. To control the output type, use the --output option.
To set a default output type for all your commands, set the output parameter for your profile.
JSON
JavaScript Object Notation (JSON) (http://json.org/) is a standard machine- and human-readable information interchange format. Here's what the AZs in the us-east-1 (North Virginia) region look like, represented as JSON:
aws ec2 describe-availability-zones --output json
{
    "AvailabilityZones": [
        {
            "State": "available",
            "ZoneName": "us-east-1a",
            "Messages": [],
            "RegionName": "us-east-1"
        },
        {
            "State": "available",
            "ZoneName": "us-east-1b",
            "Messages": [],
            "RegionName": "us-east-1"
        },
        ...
    ]
}
Table
The table format displays a text/ASCII table of results. This can be useful for generating printable reports:

Text
The text output format only displays the resulting key/value response. No additional formatting or display characters are added:

The text format is the default and is suitable for most routine CLI tasks.
Querying
The CLI tool supports transforming the response from the API with the --query option. This option takes a JMESPath query as a parameter and returns the query result.
As the query is processed as part of the command, it takes place on the server, not the client. By offloading work to the server, you can reduce the size of the resulting payload and improve response times.
JMESPath can be used to transform the response that you receive:
$ aws ec2 describe-availability-zones \
  --output json \
  --query "AvailabilityZones[].ZoneName"
  [
  "us-east-1a",
  "us-east-1c",
  "us-east-1d",
  "us-east-1e"
  ]
It can also be used to filter the data that is received:
$ aws ec2 describe-availability-zones
  --output json
  --query "AvailabilityZones[?ZoneName == 'us-east-1a'].State"
  [
  "available"
  ]
Using the --query option can open up a number of possibilities to give you flexible options for solving problems with the AWS CLI.
Generating a CLI skeleton
When performing complex tasks with the CLI tool, it may be easier to pass a JSON object of options. This kind of interaction may signify that you should use one of the AWS software development kits (SDKs).
Input
To generate a sample JSON object that will be accepted, run any command with the --generate-cli-skeleton option:
$ aws ec2 describe-availability-zones --generate-cli-skeleton
{
"DryRun": true,
"ZoneNames": [
""
    ],
"Filters": [
        {
"Name": "",
"Values": [
""
           ]
        }
    ]
}
You can then copy, edit, and use this object to define your command options without passing lots of individual options. It works best for commands with arrays of options or a variable number of options.
Output
You can also get a preview of the output of a command by calling the command with the --generate-cli-skeleton output option. This can speed up the process of combining CLI commands as you can see a response without actually calling the API:
$ aws ec2 describe-availability-zones --generate-cli-skeleton output
{
  "AvailabilityZones": [
    {
      "ZoneName": "ZoneName",
      "State": "State",
      "RegionName": "RegionName",
      "Messages": [
        {
          "Message": "Message"
        } ]
    } ]
}
Pagination
The results that are returned by the CLI tool are limited to 1,000 resources by default.
This is not normally an issue, but at a certain scale, you may run into pagination issues. A common example is a list of files in an S3 bucket.
The following options allow you to control the number and starting point of the results that are returned to you from the API:
- --page-size: This limits how many resources will be displayed to you, but does not actually limit the number that's returned. The default number of items (that is, 1,000) will still be processed and returned to you.
- --max-items: This sets an upper limit on how many items will actually be returned in the response. You may receive fewer items, but you will not receive more than this number.
- --starting-token: This changes where the response starts. Use this to display subsequent results, beyond the first page:
aws s3api list-objects --bucket bucket-name --max-items 100 --starting-token [TOKEN]
Use a token that's been returned by a previous CLI command to continue where you left off.
Autocomplete
You can enable tab completion of commands, subcommands, and options by configuring the completer included with the CLI tool.
On macOS, Linux, and Windows systems with a bash shell, you can load the completer with the following command:
complete -C 'which aws_completer'aws
By default, the aws_completer program is installed in /usr/local/bin. If your tool is installed to a non-standard location, you will need to find it and change the which aws_completer command to the relevant path.
There's more...
At the time of writing, AWS is previewing a new tool called aws-shell. You can check it out at https://github.com/awslabs/aws-shell. When using aws-shell, you can use all the same commands offered by the CLI, but without the aws prefix. It also offers robust auto-completion, including the ability to autocomplete resources such as EC2 instance names.
See also
- Chapter 10, Advanced CloudFormation, will dive into more complex scenarios and features, such as custom resources