


 Download code from GitHub
Chapter 1: Setting Up the AWS Environment
Amazon Web Services (AWS) has changed the way we do system administration. Think of a pre-cloud era where if we planned to set up a new data center, it would go through a month of planning, which would involve choosing the location, ordering hardware, setting up the networking infrastructure (such as routers and switches); and the list goes on and on. With AWS, setting up a new data center can be performed with the help of few clicks or can be done with the help of application programming interface (API) calls.
This chapter will start by setting up the environment. We will begin by installing and configuring the AWS command-line interface (CLI), which we will use throughout the book. Next, we will install Boto3, a Python software development kit (SDK), and a feature-rich object-oriented API that provides low-level access to AWS services. Then, we will look at setting up CloudFormation and Terraform. Both these tools can be used to automate your AWS infrastructure, but there is a subtle difference between them. CloudFormation, on the one hand, is an AWS proprietary solution, whereas Terraform is an open source project. The other key difference between the two is that Terraform supports other cloud providers such as Google Cloud and Azure, whereas CloudFormation is native to AWS. The question of which one to use depends on your use case and requirement and your expertise.
Before we get our hands dirty with various AWS offerings, let's set up tools that we will use to interact with various AWS services and build the infrastructure.
In this chapter, we're going to cover the following main topics:
- Setting up the environment
- Introducing Python Boto3
- Introducing CloudFormation
- Introducing Terraform
- Installing tools in an automated way
Technical requirements
There are no special technical requirements to follow through and understand this chapter; however, familiarity with the Linux command line will help you better grasp the concepts that will be discussed.
Here is the GitHub link for solution scripts:
https://github.com/PacktPublishing/AWS-for-System-Administrators/tree/master/Chapter1
Check out the following link to see the Code in Action video:
Setting up the environment
The AWS CLI is a significant way to automate the AWS infrastructure. Its features are as follows:
- Single unified tool for managing all AWS resources
- Supports Linux, macOS, and Windows
- Supports 200+ top-level commands
For the AWS CLI to interact with Amazon's API, it uses an AWS access key and a secret access key. These keys are used to authenticate and authorize any request sent to AWS. The steps to create an IAM user and retrieve the keys are as follows:
- In order to generate these credentials, go to the Identity and Access Management (IAM) console (https://aws.amazon.com/console/) and log in with your credentials, and search for
IAM, as illustrated in the following screenshot:
Figure 1.1 – AWS Management Console
- Click on the Users tab: https://console.aws.amazon.com/iam/home?#/users.
- Create a new user or use an existing user.
- If you are creating a new user, click on Add user, which will take you to the following screen:

Figure 1.2 – IAM Add user screen
Important note
Please make sure you click on Programmatic access (as this will enable/create an access key and a secret access key).
- Click Next: Permissions, and in the next screen, assign the AdministratorAccess policy to the user and click Next: Tags, as illustrated in the following screenshot:

Figure 1.3 – IAM Set permissions screen
Important note
As an AWS security best practice, never give admin access to any user. Please follow the principle of least privilege. In the next chapter, we will tighten security and only assign the necessary privileges to the user.
- The tag field is optional. I am leaving it blank, but please feel free to add tags to the newly created user depending upon your requirements. The field is shown in the following screenshot:

Figure 1.4 – IAM tags (optional field)
- Review all the settings such as User name, AWS access type, and Permissions boundary, and click Create user, as illustrated in the following screenshot:

Figure 1.5 – Review user creation
- Please take a note of the Access key ID and Secret access key values, illustrated in the following screenshot:

Figure 1.6 – The newly created IAM user
Important note
This is your only chance to see/retrieve the secret access key. There is no way to retrieve this key in the future. Keep this file confidential and never share this key, and never ever accidentally commit these keys to the GitHub/public code repository.
Installing the AWS CLI
The AWS CLI package works on Python and supports the following Python versions:
- 2.7.x and greater
- 3.4.x and greater
The AWS CLI installation is pretty straightforward. Run the following command to download, unzip, and install the AWS CLI:
curl "https://awscli.amazonaws.com/awscli-exe-linux-x86_64.zip" -o "awscliv2.zip"
unzip awscliv2.zip
sudo ./aws/install -i /usr/local/aws-cli -b /usr/local/bin
Note
The AWS CLI v2 is still not available in the Python Package Index (PyPI) repository. Please check the bug at the following link for more info: https://github.com/aws/aws-cli/issues/4947.
Run the following command to verify the installation:
aws --version
aws-cli/2.0.24 Python/3.7.3 Linux/4.15.0-1065-aws botocore/2.0.0dev28
Note
Throughout this book, we're going to discuss and use the AWS CLI version 2, which comes with its own set of features (for example: auto-prompt; wizard; YAML Ain't Markup Language (YAML) support). Please make sure to update or uninstall the AWS CLI v1 before continuing. See the following page for more information: https://docs.aws.amazon.com/cli/latest/userguide/install-cliv2-linux.html#cliv2-linux-upgrade.
Configuring command-line completion
To enable command-line completion, run the following command from the shell (for example: bash) that we are using:
$ complete -C '/usr/local/bin/aws_completer' aws
This command connects aws_completer to the aws command. As we execute these commands in the current shell, these changes will be lost as soon as we log out of this shell. To make this change permanent, add the preceding entry in ~/.bashrc.
Once the command-line completion is done, we can type any partial command and press the Tab key on the keyboard to see all the available commands, as illustrated in the following code snippet:
aws s<TAB>
s3                      sagemaker-runtime       securityhub   ses                     snowball                sso-oidc
We have configured the command-line completion, so let's go ahead and configure the AWS CLI.
Configuring the AWS command line
With command-line completion in place, our next step is to see how the AWS CLI will interact with the AWS API, and the fastest way to achieve this is via the aws configure command, as illustrated in the following code snippet:
aws configure
AWS Access Key ID [None]: XXXXXXXXXXXX
AWS Secret Access Key [None]: XXXXXXXXXXXX
Default region name [None]: us-west-2
Default output format [None]: json
As you can see, when we run this command, the AWS CLI asks for the following four sets of information:
- Access key ID/secret access key ID: Think of the access key and the secret key as a username/password. To access the AWS console, you need your username and password, but to access the AWS API, you need your access/secret keys. We already created an access key and a secret access key earlier in this chapter.
- AWS region: The location where we set up the AWS infrastructure (for example,
us-west-2if we set up our infrastructure in Oregon). - Output format: Specifies how the result is formatted (supported formats: JavaScript Object Notation (JSON) (default), YAML, text, and table).
Note
Please make sure that the computer date and time is set correctly, because if it is not in sync or is way off, AWS will reject the request.
These credentials (access/secret key, region, and output) are stored in ~/.aws/credentials, and the default region and output format are stored in ~/.aws/config, as illustrated in the following code snippet:
cat ~/.aws/credentials
[default]
aws_access_key_id = XXXXXXXX
aws_secret_access_key = XXXXXXXXXXXXX
cat ~/.aws/config
[default]
region = us-west-2
output = json
The AWS CLI stores this information (access/secret key, region, and output) in a default profile and the configuration file. In the next section, let's explore more about the location of the configuration file.
Understanding the AWS CLI command structure
The AWS CLI command is split into four parts and we need to specify these parts in order, as illustrated in the following code snippet:
aws <command> <subcommand> [options and parameters]
As you can see in the preceding command, the following apply:
- Everything starts with the
awsprogram. - The top-level command is the service supported by the AWS CLI (for example:
s3in the following example). - The sub command specifies the operation to perform (
lsin the following example). - Options or parameters required by the operation are provided (
s3://example-bucket).
Examples of the preceding syntax commands are shown here:
$ aws s3 ls
2020-04-26 15:59:11 my-test-s3-bucket-XXXXXXX
$ aws s3 ls s3://example-bucket
2020-06-07 18:28:47        166 testfile
Other commands that can be used to verify the AWS CLI are listed here:
aws ec2 describe-instances: This command describes the specified instances or all instances.aws s3 mb s3://mytestbucket1235334: This is used to create a Simple Storage Service (S3) bucket.aws iam list-users: This is used to list the IAM users.
We now have the AWS CLI configured and ready to use. In the next section, we will see how to install and configure Boto3.
Introducing Python Boto3
Python Boto3 is the AWS SDK for Python. It is useful for end users to manage their AWS services—for example, IAM or Elastic Compute Cloud (EC2). Its features are as follows:
- Feature-rich object-oriented API
- Provides low-level access to various AWS services
Installing Python Boto3
Boto3 is written in Python. We can use the pip package installer for Python. This comes pre-installed with the OS in many OSes but is straightforward to install manually, with the following command:
sudo apt-get install python3-pip
Once we have pip installed in the system, the installation of AWS Boto3 is simple in Linux by running the following command:
pip3 install boto3
Before we begin using Boto3, we need to set up the authentication credentials, which Boto3 will use to connect to AWS. We already have these credentials configured as part of the AWS CLI setup, via the aws configure command.
Verifying the Boto3 setup
To verify the setup, please follow these steps:
- First get the Python command, to get the python shell run the following command:
python3
Python 3.6.9 (default, Oct  8 2020, 12:12:24)
[GCC 8.4.0] on linux
Type "help", "copyright", "credits" or "license" for more information.
- To use Boto3, we first need to import it, as follows:
import boto3
- We need to tell Boto3 which service to use (for example: S3 in this case), as follows:
s3 = boto3.resource("s3") - Print all the bucket names, like this:
for bucket in s3.buckets.all():
...     print(bucket.name)
...
my-test-s3-bucket-XXXXXX
Here, I have given you a brief introduction to Boto3. Boto3 is powerful, and in a future chapter, we will see how it will be helpful in automating recurring tasks.
Introducing CloudFormation
If you are looking for a tool that will automate your entire AWS infrastructure deployment, then CloudFormation is the right solution. It gives you the ability to create resource templates to define the AWS resource you need to create. You can version-control these templates, and using these templates replicate your infrastructure quickly and in a repeatable manner, as illustrated in the following screenshot:
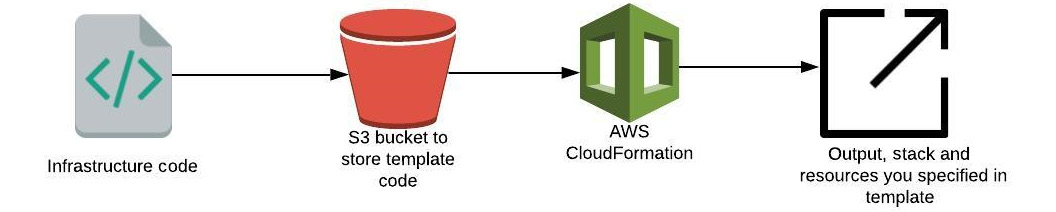
Figure 1.7 – How CloudFormation works
For example, we can instruct the CloudFormation template to do the following:
- Create a security group.
- Create an EC2 machine using this security group.
CloudFormation creates this for us, in exactly the right order and with the exact configuration that we provide.
Here are some advantages of using CloudFormation:
- We can version-control the CloudFormation code using Git (GitHub, GitLab, Bitbucket...).
- You can code your infrastructure using JSON or YAML.
- Before pushing the change, someone in the team can review the code.
- CloudFormation works as Infrastructure as Code (IaC); that is, no resources are created manually.
- CloudFormation is free of charge.
- It automatically creates a diagram for your template.
- It involves declarative programming, which means we define the end goal, and CloudFormation will figure out how to achieve that goal.
Important note
For CloudFormation, we don't need to install any separate tool. The AWS CLI is sufficient in order to create the stack from the command line, and we can also create it with the help of the AWS console.
Writing your first CloudFormation template
Let's start with a basic CloudFormation stack template that simply launches an EC2 instance. A CloudFormation stack is a group of AWS resources. To create an AWS resource, we can create, update, or delete the stack.
To create a stack, we need the following:
- AWSTemplateFormatVersion section (optional): AWS only allows you to use
2010-09-09as a template version (only valid value). The version of the template defines what this template is capable of. - Description (optional): If you want to define your template or add a comment, you can add that in a description section.
- Resources (required): This is the mandatory section of the CloudFormation template, where you define the resource you want to create—for example, for an Amazon EC2 instance (
AWS::EC2::Instance) or an Amazon S3 bucket (AWS::S3::Bucket). - Amazon Machine Image (AMI): This is an operating system image used to run EC2 instances. For this example, I am using the
ami-0bc06212a56393ee1CentOS 7 image.To find out the AMI ID for the CentOS 7 image, run the following command (the last column of the query returns the AMI ID—for example:
ami-0bc06212a56393ee1):aws ec2 describe-images --owners aws-marketplace --filters Name=product-code,Values=aw0evgkw8e5c1q413zgy5pjce --query 'Images[*].[CreationDate,Name,ImageId]' --filters "Name=name,Values=CentOS Linux 7*" --region us-west-2 --output table | sort -r | 2020-03-09T21:54:48.000Z| CentOS Linux 7 x86_64 HVM EBS ENA 2002_01-b7ee8a69-ee97-4a49-9e68-afaee216db2e-ami-0042af67f8e4dcc20.4 | ami-0bc06212a56393ee1 | | 2019-01-30T23:43:37.000Z| CentOS Linux 7 x86_64 HVM EBS ENA 1901_01-b7ee8a69-ee97-4a49-9e68-afaee216db2e-ami-05713873c6794f575.4 | ami-01ed306a12b7d1c96 | | 2018-06-13T15:58:14.000Z| CentOS Linux 7 x86_64 HVM EBS ENA 1805_01-b7ee8a69-ee97-4a49-9e68-afaee216db2e-ami-77ec9308.4 | ami-3ecc8f46 | | 2018-05-17T09:30:44.000Z| CentOS Linux 7 x86_64 HVM EBS ENA 1804_2-b7ee8a69-ee97-4a49-9e68-afaee216db2e-ami-55a2322a.4 | ami-5490ed2c | | 2018-04-04T00:11:39.000Z| CentOS Linux 7 x86_64 HVM EBS ENA 1803_01-b7ee8a69-ee97-4a49-9e68-afaee216db2e-ami-8274d6ff.4 | ami-0ebdd976 | | 2017-12-05T14:49:18.000Z| CentOS Linux 7 x86_64 HVM EBS 1708_11.01-b7ee8a69-ee97-4a49-9e68-afaee216db2e-ami-95096eef.4 | ami-b63ae0ce | | DescribeImages | ----------------------------------------------------------------------------------------------------------------------------------------------------------------- +--------------------------+----------------------------------------------------------------------------------------------------------+-------------------------+ +--------------------------+----------------------------------------------------------------------------------------------------------+-------------------------+
- Instance type: The type of EC2 instance to run, as every instance type provides different capabilities (CPU, memory, input/output (I/O)). For this example, I am using
t2.micro(one virtual CPU; 1 GB memory).
The CloudFormation template will look like this. Save the following code as ec2-instance.yml or download the file from https://github.com/PacktPublishing/AWS-for-System-Administrators/blob/master/Chapter1/cloudformation/ec2-instance.yml:
{
  "AWSTemplateFormatVersion" : "2010-09-09",
  "Description" : "Simple Stack to launch an EC2 instance.",
  "Resources" : {
    "Ec2Instance" : {
      "Type" : "AWS::EC2::Instance",
      "Properties" : {
        "InstanceType": "t2.micro",
        "ImageId" : "ami-0bc06212a56393ee1"
      }
    }
  }
}
Now, we have created our first CloudFormation template. In the next section, we will create our first stack using this template.
Creating a CloudFormation stack using the AWS console
To create a stack on the AWS CloudFormation console, follow these steps:
- Go to the AWS console and search for CloudFormation (https://us-west-2.console.aws.amazon.com/cloudformation/home?region=us-west-2#/).
- In the CloudFormation screen, click on Create stack, as illustrated in the following screenshot:

Figure 1.8 – CloudFormation stack creation wizard
- Click on Upload a template file and upload the earlier-mentioned CloudFormation template, then click Next.
- Provide a Stack name and click Next, as illustrated in the following screenshot:

Figure 1.9 – Specify stack name
- Keep the rest of the parameters as default and click the Create stack button at the bottom of the page, as illustrated in the following screenshot:

Figure 1.10 – Create stack
- Monitor the progress of stack creation by clicking on the Events tab, as illustrated in the following screenshot:

Figure 1.11 – CloudFormation Events
Once the stack creation is completed, the CREATE_COMPLETE event is displayed, as shown in the following screenshot:

Figure 1.12 – CloudFormation Events completion
- Verify the instance ID (Physical ID) under the Resources section, as illustrated in the following screenshot:

Figure 1.13 – CloudFormation resource
- The instance ID can also be verified via the EC2 console (https://console.aws.amazon.com/ec2/v2/home?region=us-west-2), as illustrated in the following screenshot:

Figure 1.14 – EC2 console
Up to this point, you now understand how to create a CloudFormation stack using the AWS console. In the next part, you will see how to create it using the AWS CLI.
Creating a CloudFormation stack using the AWS CLI
In the previous example, you created the CloudFormation stack using the AWS console. We can perform the same steps with the help of the AWS CLI, to assist in automating the entire process, as follows:
- Validate the template to make sure there is no syntax error, as follows:
aws cloudformation validate-template --template-body file://ec2-instance.yml { "Parameters": [], "Description": "Simple Stack to launch an EC2 instance." } - Create the stack by specifying the template file and the necessary IAM capabilities, as follows:
aws cloudformation create-stack --stack-name first-ec2-instance-creation --template-body file://ec2-instance.yml --capabilities "CAPABILITY_IAM" "CAPABILITY_NAMED_IAM" { "StackId": "arn:aws:cloudformation:us-west-2:XXXXXXXX:stack/first-ec2-instance-creation/cf6e6100-b3ed-11ea-b69a-0a233d312e0a" } - The command will wait, and the user will not get Command Prompt back until the stack creation is complete, as illustrated in the following code snippet:
aws cloudformation wait stack-create-complete --stack-name first-ec2-instance-creation
aws cloudformation describe-stacks --stack-name first-ec2-instance-creation
- Execute the
describe-stackscommand, which will return the description of the created stack, as follows:aws cloudformation describe-stacks --stack-name first-ec2-instance-creation --query 'Stacks[].[StackName,StackStatus]' --output text first-ec2-instance-creation CREATE_COMPLETE
- To verify all the resources have been created successfully, we are going to use
describe-stack-resourceswithaws cloudformation. From the output, we can verify the newly created instance ID (PhysicalResourceId": "i-0dfaad58d59b59717), as follows:aws cloudformation describe-stack-resources --stack-name first-ec2-instance-creation { "StackResources": [ { "StackName": "first-ec2-instance-creation", "StackId": "arn:aws:cloudformation:us-west-2:XXXXXX:stack/first-ec2-instance-creation/cf6e6100-b3ed-11ea-b69a-0a233d312e0a", "LogicalResourceId": "Ec2Instance", "PhysicalResourceId": "i-0dfaad58d59b59717", "ResourceType": "AWS::EC2::Instance", "Timestamp": "2020-06-21T18:34:51.773000+00:00", "ResourceStatus": "CREATE_COMPLETE", "DriftInformation": { "StackResourceDriftStatus": "NOT_CHECKED" } } ] } - Once you are done with your testing (as this will cost you), to clean up the CloudFormation stack, please pass
delete-stackto thecloudformationcommand, as follows:aws cloudformation delete-stack --stack-name first-ec2-instance-creation
In this section, you have understood different CloudFormation components and how to create a stack using the CloudFormation template. In the next section, we will learn about another popular infrastructure automation tool Terraform.
Introducing Terraform
To provision your AWS infrastructure, there are a variety of tools available, and Terraform is one of them. Terraform is an open source Infrastructure as Code (IAC) tool created by HashiCorp that enables users to provision an infrastructure or manage IAC. Terraform also supports multiple cloud providers such as AWS, Google Cloud Platform (GCP), Azure, and more, as illustrated in the following diagram:
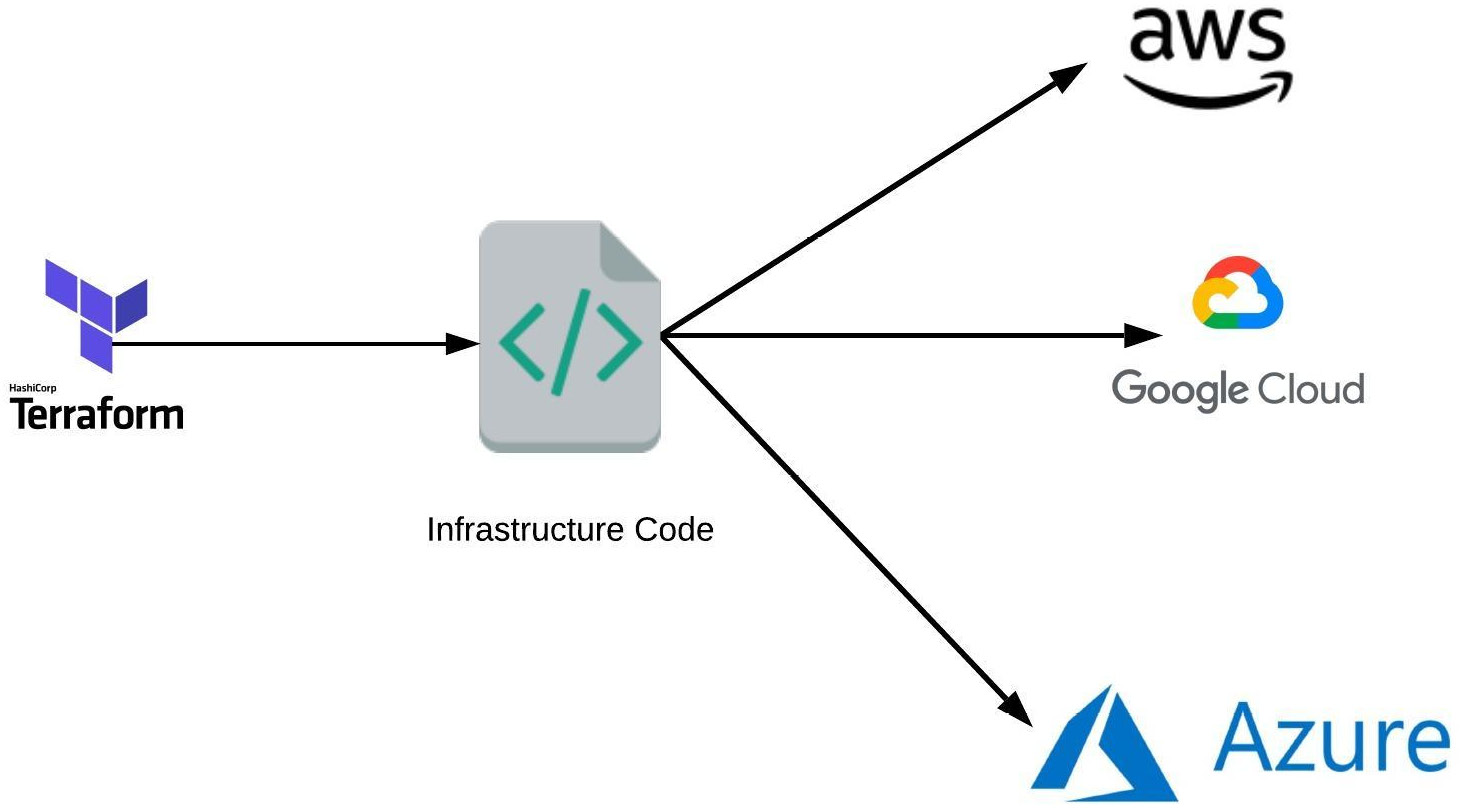
Figure 1.15 – How Terraform works
The way Terraform works is by reading the code and translating it to API calls to providers (AWS, in our case).
Here are some of the Terraform features:
- We can write Terraform code in HashiCorp Configuration Language (HCL) or, optionally, in JSON.
- All code files end with the extension of
.tf. - It is a declarative language (we need to define what infrastructure we want and Terraform will figure out how to create it).
In this section, you have learned what Terraform is and about its advantages. In the next section, we will explore how to install it and create your AWS resources using it.
Installing Terraform
To install Terraform, find the appropriate package for your system (https://www.terraform.io/downloads.html) and download the ZIP archive by following these steps:
- Download the package, like this:
wget https://releases.hashicorp.com/terraform/0.12.26/terraform_0.12.26_linux_amd64.zip
- Unzip it, like this:
unzip terraform_0.12.26_linux_amd64.zip
- Add the binary to the
PATHenvironment variable and change the permission, as follows:sudo cp terraform /usr/local/bin/ sudo chmod +x /usr/local/bin/terraform
- Log out and log back in.
- Verify the installation by running the following command:
terraform version
Terraform v0.12.26
Creating resources using Terraform
As with the AWS CLI and Boto3, for Terraform to interact with the AWS environment, it needs to know the credentials to authenticate with AWS, which we already set up as a part of the aws configure command. To create resources via Terraform, we need to define the following prerequisites:
- Resource: This defines one or more infrastructure objects such as an
ec2instance or ans3bucket. - Logical name: Then, we need to define the logical name, such as
test_instance. The name is used to refer to this resource from elsewhere in the same Terraform code/module, but has no significance outside of the scope of a module. - Instance type: The type of EC2 instance to run, as every instance type provides different capabilities (CPU, memory, I/O). For this example, I am using
t2.micro(one virtual CPU; 1 GB memory).You can verify the instance type supported in each region, as follows:
aws ec2 describe-instance-type-offerings --query InstanceTypeOfferings --output table
------------------------------------------------
|         DescribeInstanceTypeOfferings        |
+---------------+-------------+----------------+
| InstanceType  |  Location   | LocationType   |
+---------------+-------------+----------------+
|  m5dn.8xlarge |  us-west-2  |  region        |
|  m5ad.8xlarge |  us-west-2  |  region        |
|  z1d.metal    |  us-west-2  |  region        |
|  g3s.xlarge   |  us-west-2  |  region        |
|  r5dn.16xlarge|  us-west-2  |  region        |
|  m5n.large    |  us-west-2  |  region        |
|  m5.16xlarge  |  us-west-2  |  region        |
|  t2.medium    |  us-west-2  |  region        |
|  t2.micro     |  us-west-2  |  region        |
|  i3en.xlarge  |  us-west-2  |  region        |
|  c5d.12xlarge |  us-west-2  |  region        |
|  c5.12xlarge  |  us-west-2  |  region        |
- AMI: This is an operating system image used to run EC2 instances. For this example, I am using the
ami-0bc06212a56393ee1CentOS 7 image.
Creating an AWS instance using Terraform
Now that we have all the prerequisites in place, let's follow these steps to create a Terraform resource:
- First, let's create our first Terraform code with a filename ending with
.tf(for example:ec2-instance.tf), as follows:resource "aws_instance" "test_instance" { ami = "ami-0bc06212a56393ee1" instance_type = "t2.micro" } - The next step is to clone the GitHub repository, like this:
git clone https://github.com/PacktPublishing/AWS-for-System-Administrators
cd AWS-for-System-Administrators/tree/master/Chapter1/terraform
- The first command we are going to run to set up our instance is
terraform init. This downloads code for a provider (AWS) that we are going to use. The command is shown here:terraform init
Important note
It is safe to run the
terraform initcommand multiple times as it is idempotent. - The next command we are going to run is
terraform plan, which tells us what Terraform will execute (+,-, and~sign, where+means the addition of resources,-is the deletion of resources, and the ~ sign is a modification of resources) before making any changes, as follows:terraform plan
This is an effective way of making any sanity check before making actual changes to the environment.
The output of the
terraform plancommand looks like the Linuxdiffcommand, and is described here:- (
+sign): Resource going to be created- (
-sign): Resource going to be deleted- (
~sign): Resource going to be modifiedWe need to manually specify the region where we want to set up the infrastructure (for example:
us-west-2). We will discuss more about how to automate this process in future chapters.If this is the first time you are using the CentOS AMI, you might see this error:
Error launching source instance: OptInRequired
In order to use this AWS Marketplace product, you need to accept the terms and subscribe. To do so, please visit https://aws.amazon.com/marketplace/pp?sku=aw0evgkw8e5c1q413zgy5pjce. The CentOS AMI console is shown in the following screenshot:

Figure 1.16 – Centos AMI console
- To apply these changes, run the
terraform applycommand, as follows:terraform apply
Important note
You need to type
yesto accept the changes. - Go to the EC2 console and verify that it is creating an instance, as illustrated in the following screenshot:

Figure 1.17 – EC2 console
- To perform a cleanup of resources we have created so far, run the
terraform destroycommand, as follows:terraform destroy
Important note
As with
planandapply, you need to specify the region, and you need to typeyesto accept changes.
Terraform makes the life of a system administrator or DevOps engineer easy by creating an infrastructure using a few code lines. In this chapter, you have learned how to install it. In future chapters, we will create our AWS infrastructure using this tool.
Installing tools in an automated way
So far, we have installed all these tools manually, but wouldn't it be great if we had an automated way to install these tools?
Here is the script that automates the installation process of all these tools:
git clone https://github.com/PacktPublishing/AWS-for-System-Administrators
cd AWS-for-System-Administrators/tree/master/Chapter1
chmod +x env_setup.sh
sudo bash env_setup.sh
In this section, you have learned how rather than installing tools manually with the help of a simple shell script, we can automate the installation of tools such as the AWS CLI, Boto3, and Terraform.
Summary
In this chapter, we learned about the installation of tools such as the AWS CLI, Boto3, CloudFormation (verification), and Terraform. We also wrote simple code to verify these applications. Now that we have installed all the tools and set up the environment, we will use these tools in future chapters to build the AWS infrastructure.
In the next chapter, we will see how to tighten security using AWS IAM, by applying IAM policies and roles. We will also look at some real-world examples on how to restrict users to specific instance types using IAM policy, and rotate access and secret keys using a Python Boto3 script.


