Download code from GitHub
Working with Azure Virtual Machines
This is the first chapter of the book Architecting Azure Solutions. This book will cover all the objectives for the 70-535 exam. When relevant, we will provide you with extra information and further guidance on how to design and architect robust, future-proof, and effective solutions on the Azure platform.
This chapter introduces the Microsoft Azure Virtual Machine (VM) objective. We will cover information about series and sizes. We will also cover how to design VM deployments using Availability Sets, fault domains, and update domains. In addition, we will show you how to create an Availability Set from the Azure Portal, as well as from Azure PowerShell. Finally, we will cover how to design and manage VM Scale Sets from the Azure Portal.
In this chapter, the following topics will be covered:
- Designing solutions for virtual machines
- Virtual machine series and sizes
- Availability Sets
- Fault domains and update domains
- Managed Disks
- Creating highly available VMs
- VM Scale Sets
- Disaster recovery
Technical requirements
This chapter uses the following tools for its examples:
- Azure PowerShell: https://docs.microsoft.com/en-us/powershell/azure/install-azurerm-ps?view=azurermps-5.6.0&viewFallbackFrom=azurermps-5.1.1
The source code for this chapter can be downloaded here:
Designing solutions for virtual machines
In Azure, you can run both Windows VMs as well as Linux VMs. Virtual machines come in all sorts of sizes and a variety of prices, ranging from VMs with a small amount of memory and processing power for general purposes to large VMs that can be used for GPU-intensive and high-performance computing workloads.
To create a virtual machine, you can choose from a number of predefined images. There are images available for operating systems such as Windows Server or Kali Linux, as well as predefined applications, such as SQL Server images and complete farms, which consist of multiple VMs that can be deployed at once. An example of a farm is a three-tier SharePoint farm.
VMs can be created and managed either from the Azure Portal, PowerShell, or CLI. If you're planning on using PowerShell, please note that there are multiple versions of Azure PowerShell available, and that there is a notable difference between Azure PowerShell, which supports the classic deployment model, and the new Azure PowerShell. To install and configure Azure PowerShell, please refer to the beginning of this chapter.
Designing the most effective virtual machine solution depends on a few things, such as deciding which size and series to use, deciding if your VMs need high availability, and if your solution will need to scale up and down easily.
Virtual machine series and sizes
There are a lot of different VM sizes available to choose from in Azure. Note that it is important to know what options there are from a design perspective, because choosing the wrong VM size can have a negative impact on the performance of your VM, or your application installed on the VM. Choosing between the different available options will also have a huge effect on the overall costs. For example, if your company or client wants to reduce costs by migrating data centers to Azure, choosing your VMs wisely will either make your project a success or a failure.
Azure VMs are organized into machine series, starting with the A-series, which are VMs mainly used for general purposes. There are also VM sizes that are optimized for compute, memory, storage, and GPU, as well as high-performance compute VMs. All of the available series and sizes are explained in more detail in the following section.
Available VM series and sizes
At the time of writing this book, the following VM series are available:
| Sizes | Type | Description |
| A0-7, Av2, B, D, DS, Dv2, DSv2, Dv3, Dsv3 | General purpose | These VMs have a balanced CPU-to-memory ratio and are ideal for testing and development scenarios. They are also suitable for small and medium databases and web servers with low to medium traffic. |
| F, Fs, Fsv2 | Compute optimized | These VMs have a high CPU-to-memory ratio and are suitable for web servers with medium traffic, application servers, and network appliances for nodes in batch processing. |
| D, DS, Dv2, DSv2, Ev3, Esv3, G, GS, M | Memory optimized | These VMs have a high memory-to-CPU ratio and are suitable for relational database servers, medium to large caches, and in-memory analytics. |
| Ls | Storage optimized | These VMs have high disk throughput and IO and are suitable for big data, SQL, and NoSQL databases. |
| NC, NCv2, NCv3, ND, NV | GPU | These VMs are targeted for heavy graphic rendering and video editing, deep learning applications, and machine learning model training. These VMs are available with single or multiple GPUs. |
| A8-11, H | High-performance compute | These are the fastest VMs available. They offer the most powerful CPU with optional high-throughput network interfaces (RDMA). |
Availability Sets
To create a reliable infrastructure, adding your virtual machines to an Availability Set is key. There are several scenarios that can have an impact on the availability of your Azure Virtual Machines. These are as follows:
- Unplanned hardware maintenance event: When hardware is about to fail, Azure fires an unplanned hardware maintenance event. Live migration technology is used, which predicts the failure and then moves the VM, the network connections, memory, and storage to different physical machines without disconnecting the client. When your VM is moved, the performance is reduced for a short time because the VM is paused for 30 seconds. Network connections, memory, and open files are still preserved.
- Unexpected downtime: The virtual machine is down when this event occurs because Azure needs to heal your VM inside the same data center. A hardware or physical infrastructure failure often causes this event to happen.
- Planned hardware maintenance event: This type of event is a periodic update from Microsoft in Azure to improve the platform. Most of these updates don't have a significant impact on the uptime of VMs, but some of them may require a reboot or restart.
To provide redundancy during these types of events, you can group two or more VMs in an Availability Set. By leveraging Availability Sets, VMs are distributed across multiple isolated hardware nodes in a cluster. This way, Azure can ensure that during an event or failure, only a subset of your VMs is impacted and your overall solution will remain operational and available. This way, the 99.95% Azure SLA can be met.
Fault domains and update domains
When you place your VMs in an Availability Set, Azure guarantees to spread them across fault and update domains. By default, Azure will assign three fault domains and five update domains (which can be increased to a maximum of 20) to the Availability Set.
When spreading your VMs over fault domains, your VMs sit over three different racks in the Azure data center. So, in the case of an event or failure on the underlying platform, only one rack gets affected and the other VMs are still accessible.

Update domains are useful in the case of an OS or host update. When you spread your VMs across multiple update domains, one domain will be updated and rebooted while the others remain accessible.

Managed Disks
Azure Managed Disks are the default disks selected when you create a VM in the Azure Portal. They handle storage for your virtual machines completely. Previously, you would have to manually create storage accounts to store VM hard disks, and when your VM needed to scale up, you have to add additional storage accounts to make sure you didn't exceed the limit of 20,000 IOPS per account.
With Managed Disks, this burden is now handled for you by Azure. You can now create 10,000 VM disks inside a subscription, which can result in thousands of VMs inside a subscription, without the need to copy disks between storage accounts.
Creating highly available virtual machines
VMs can only be added to an an Availability Set by creation. When you want to add existing VMs to an Availability Set, this will result in recreating your VMs. This is something to be aware of when designing your solutions.
Creating highly available virtual machines from the Azure Portal
Follow the given steps to create a VM from the Azure Portal:
- Navigate to the Azure Portal by opening https://portal.azure.com/.
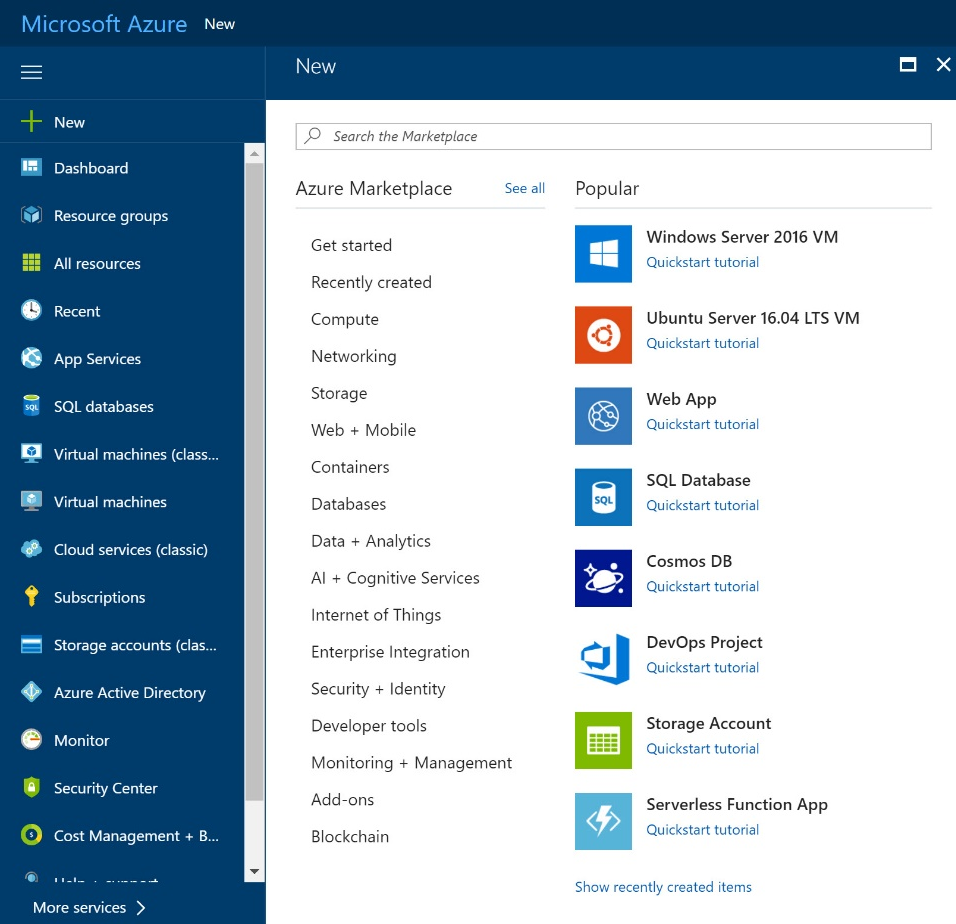
- Click on New and, on the right-hand side, choose an image (or you can type an image name in the search bar). For this demo, we have selected the Windows Server 2016 VM image:
- A new blade opens up where you can fill in the basic settings of the VM. Add the following details and click on OK:

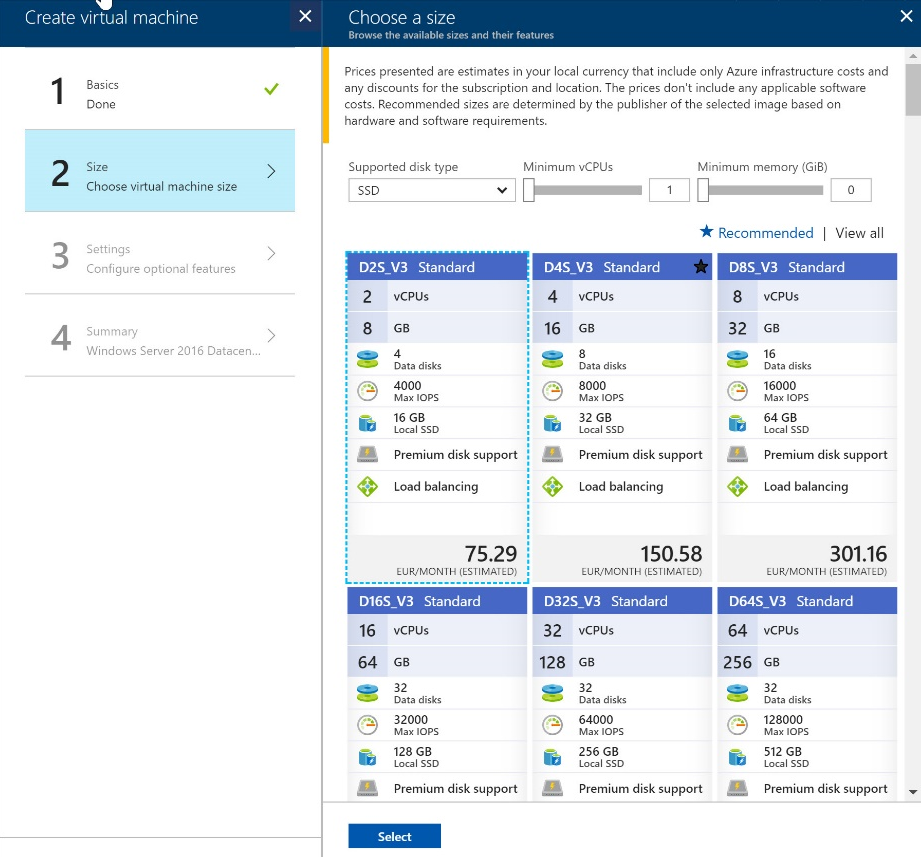
- A new blade will open where you can choose the VM type and size. By default, only the recommended VMs are displayed, but you can choose to display all VMs by clicking on View all and then clicking on Select, as shown in the following screenshot:
- A new blade opens up where you can configure additional options. Here, select Availability set and then click Create new:
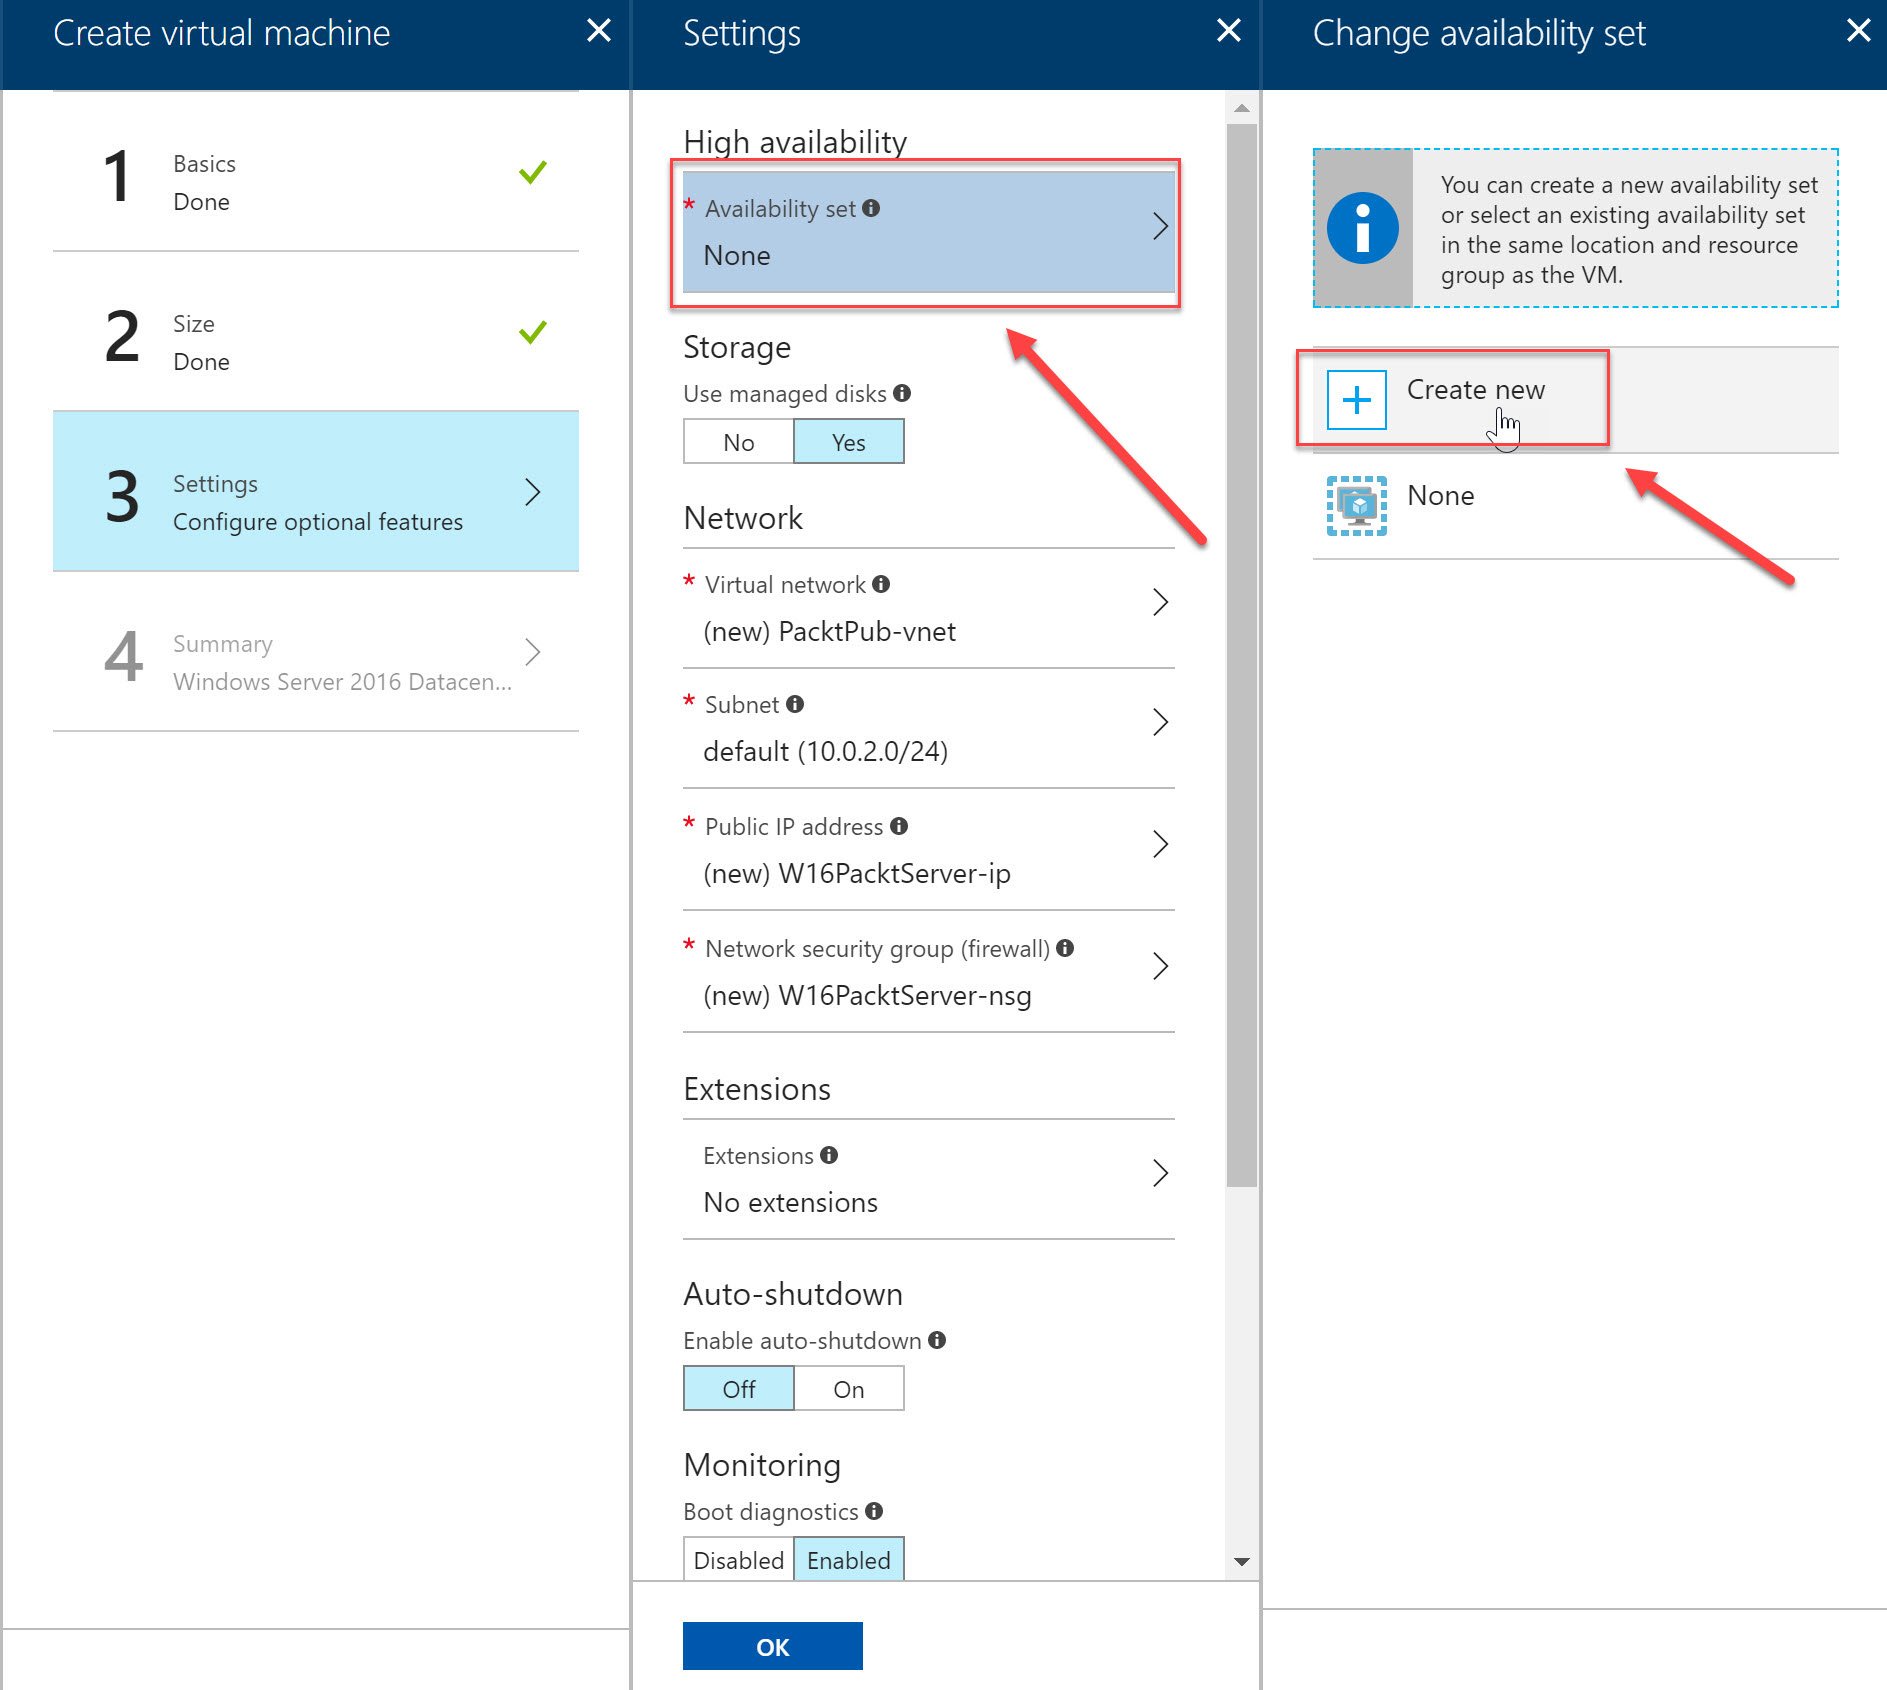
- By default, your VMs are assigned two fault domains and five update domains. Accept the default settings here and click on OK twice when prompted.
- The last blade opens up, which provides a summary with all the settings you've entered. Check the permission box.
- Click on Create and your VM is now created. Next to the Create button, you should see a link where you can download the ARM template of this virtual machine.
- Create the second VM and, instead of creating a new Availability Set, add the second VM to the Availability Set that we have already created using the previous steps.
Creating highly available virtual machines from PowerShell
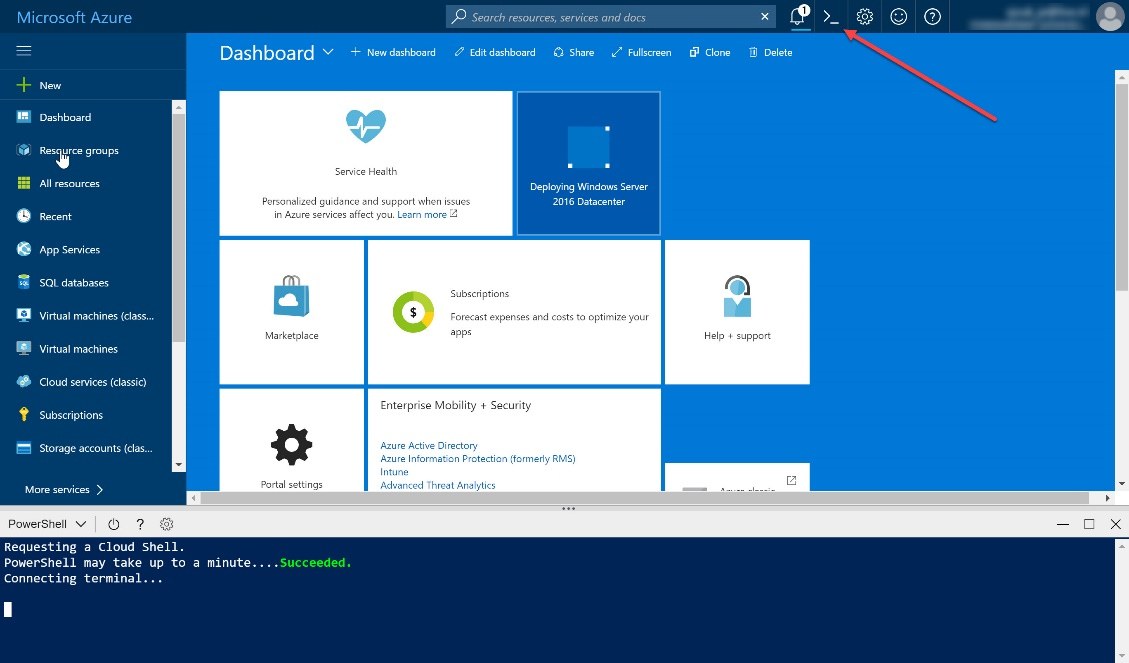
VMs and Availability Sets can be created using PowerShell as well. Besides the traditional PowerShell, you can also use the Azure Cloud Shell to create your Availability Set. By using the Azure Cloud Shell, you are basically using PowerShell from inside the browser. Inside the Azure Cloud Shell, Windows users can opt for PowerShell and Linux users can opt for Bash. You can open the Azure Cloud Shell from the Azure Portal, as shown in the following screenshot:
To create two VMs and add them to an Availability Set, add the following PowerShell statements to Azure Cloud Shell or Windows PowerShell (note that when using the Azure Cloud Shell, you don't have to log in):
Login-AzureRmAccount
If necessary, select the right subscription, shown as follows:
Select-AzureRmSubscription -SubscriptionId "********-****-****-****-***********"
Create a resource group:
New-AzureRmResourceGroup -Name PacktPubPS -Location WestEurope
Now, create an Availability Set:
New-AzureRmAvailabilitySet -Location WestEurope -Name AvailabilitySet02 -ResourceGroupName PacktPubPS -Sku Aligned -PlatformFaultDomainCount 2 -PlatformUpdateDomainCount 2
Next, we need to create the two VMs and add them to the Availability Set. This is done by setting the -AvailabilitySetId parameter to the ID of the Availability Set. When running this script, you will be prompted for the username and password for your VM, as shown in the following snippet:
$availabilitySet = Get-AzureRmAvailabilitySet -ResourceGroupName PacktPubPS -Name AvailabilitySet02

$cred = Get-Credential -Message "Enter a username and password for the virtual machine."

$subnetConfig = New-AzureRmVirtualNetworkSubnetConfig -Name PacktSubnet -AddressPrefix 192.168.1.0/24
$vnet = New-AzureRmVirtualNetwork -ResourceGroupName PacktPubPS -Location WestEurope -Name PacktVnet -AddressPrefix 192.168.0.0/16 -Subnet $subnetConfig

$nsgRuleRDP = New-AzureRmNetworkSecurityRuleConfig -Name PacktNetworkSecurityGroupRuleRDP -Protocol Tcp -Direction Inbound -Priority 1000 -SourceAddressPrefix * -SourcePortRange * -DestinationAddressPrefix * -DestinationPortRange 3389 -Access Allow

$nsg = New-AzureRmNetworkSecurityGroup -Location WestEurope -Name PacktSecurityGroup -ResourceGroupName PacktPubPS -SecurityRules $nsgRuleRDP

# Apply the network security group to a subnet
Set-AzureRmVirtualNetworkSubnetConfig -VirtualNetwork $vnet -Name PacktSubnet -NetworkSecurityGroup $nsg -AddressPrefix 192.168.1.0/24

# Update the virtual network
Set-AzureRmVirtualNetwork -VirtualNetwork $vnet


for ($i=1; $i -le 2; $i++)
{
 $pip = New-AzureRmPublicIpAddress -ResourceGroupName PacktPubPS -Location WestEurope -Name "$(Get-Random)" -AllocationMethod Static -IdleTimeoutInMinutes 4

 $nic = New-AzureRmNetworkInterface -Name PacktNic$i -ResourceGroupName PacktPubPS -Location WestEurope -SubnetId $vnet.Subnets[0].Id -PublicIpAddressId $pip.Id -NetworkSecurityGroupId $nsg.Id

 # Specify the availability set
 $vm = New-AzureRmVMConfig -VMName PacktVM$i -VMSize Standard_D2_v3 -AvailabilitySetId $availabilitySet.Id

 $vm = Set-AzureRmVMOperatingSystem -ComputerName myVM$i -Credential $cred -VM $vm -Windows -EnableAutoUpdate -ProvisionVMAgent
 $vm = Set-AzureRmVMSourceImage -VM $vm -PublisherName MicrosoftWindowsServer -Offer WindowsServer -Skus 2016-Datacenter -Version latest

 $vm = Add-AzureRmVMNetworkInterface -VM $vm -Id $nic.Id
 New-AzureRmVM -ResourceGroupName PacktPubPS -Location WestEurope -VM $vm
}
VM Scale Sets
VM Scale Sets are used for deploying multiple VMs at once without the need for manual actions or using scripts. You can then manage them all at once from a single place. VM Scale Sets are typically used to build large-scale infrastructures, where keeping all of your VMs in sync is key. The maintenance of VMs, including keeping them in sync, is handled by Azure.
VM Scale Sets use Availability Sets under the hood. VMs inside a scale set are automatically spread over the fault and update domains by the underlying platform. VM Scale Sets use Azure autoscale by default. You can, however, add or remove instances yourself instead of using autoscale.
When creating a scale set, a couple of artifacts are created for you automatically. As well as the number of VMs you have specified being added to the set, an Azure Load Balancer and Azure Autoscaling is added, along with a virtual network and a public IP:

Creating a VM Scale Set from the Azure Portal
- Navigate to the Azure Portal by opening https://portal.azure.com/.
- Click on New and type in Scale in the search bar. Select Virtual machine scale set.
- In the next screen, click on Create and add the following settings before clicking the Create button:

After creation, you can manage the VM Scale Set from the Azure Portal as well as from PowerShell and CLI.
Accessing your VM Scale Sets
There are a number of ways to access your VM Scale Sets; they are as follows:
- Connect to VM instances using RDP or SSH: To connect to VM instances using RDP or SSH, you can configure a scale set to automatically assign a public IP address. This option is turned off by default. The VMs are inside a virtual network, making it impossible to connect to them using RDP or SSH.
- Connect to VM instances using a jumpbox: You can create a standalone VM inside the same virtual network to act as a jumpbox to connect to another scale set instance in the set. The standalone VM gets a public IP address, which can be connected using RDP or SSH. Once connected to the VM, you can use it to connect to other instances using the internal IP address.
- Connect to VM instances using NAT rules: You can also connect to VM instances using NAT rules that are created inside the load balancer. Those NAT rules assign the instances to a different RDP port.
- Distribute incoming traffic using load balancing: Incoming traffic can be distributed across VM instances using the round-robin approach. You can use the Azure Load Balancer and the Azure Application Gateway for this, where the former provides layer-4 load balancing rules, and the latter layer-7 load balancing rules.
VM Scale Set templates
You can also deploy VM Scale Sets using ARM templates. ARM templates are a great way to deploy solutions automatically, and you can even embed customization and extensions inside the template. You can, for instance, install an application inside a container and deploy it within the VM instances during the deployment process of your scale set.
There are also ARM templates provided by Microsoft and the community that have already been configured for different architectures; these can be downloaded and deployed to create Azure scale sets, with extensions to manage the scale sets included. Some examples of templates are as follows:
- Simple deployment of a VM Scale Set of Windows VMs behind a load balancer with NAT rules: https://github.com/Azure/azure-quickstart-templates/tree/master/201-vmss-windows-nat
- Simple deployment of a VM Scale Set of Linux VMs behind a load balancer with NAT rules: https://github.com/Azure/azure-quickstart-templates/tree/master/201-vmss-linux-nat
- Simple deployment of a VM Scale Set of Linux VMs with a jumpbox: https://github.com/Azure/azure-quickstart-templates/tree/master/201-vmss-linux-jumpbox
- Windows VM Scale Set with Application Gateway Integration: https://github.com/Azure/azure-quickstart-templates/tree/master/201-vmss-windows-app-gateway
Disaster recovery
Business continuity and disaster recovery is still key, even when you are deploying your virtual machines to the cloud. Azure provides two different services for this: the Azure Backup Service and the Azure Site Recovery Service. Together, they address disaster recovery needs natively in the cloud.
Backup and recovery
Azure uses the Azure Backup Service to back up virtual machines. You can use this service to back up your Azure VMs as well as your on-premises VMs. You can also use it to extend your backup solution in a hybrid configuration or fully replace your on-premises backup solution with Azure Backup. The service can back up files, folders, VMs, applications, workloads, system states, and volumes.
Azure Backup consists of the following backup components:
- Azure Backup (MARS) agent: This agent needs to be installed on a Windows Server VM (there is currently no support for Linux) that runs in Azure or resides on your on-premises infrastructure. You can use it to back up VMs, files, folders, and system states.
- Protection for system center Data Protection Manager (DPM) servers: You can use Azure Backup for a hybrid setup in conjunction with DPM servers. The DPM server can be deployed inside your on-premises data center or on a virtual machine in Azure. You can use it to store older data in the Azure Recovery Services Vault and use the disks for newer data, for instance.
- Azure Backup Server: This component is installed on an on-premises Windows server or a Windows VM in Azure. It offers backup support for Windows and Linux servers and it uses the Azure Recovery Services Vault to store backups.
- Azure IaaS VM backup: This consists of an agent that needs to be installed on your Azure VMs. These can be either Linux or Windows VMs. You cannot use this tool to back up your on-premises servers.
When using the Azure Backup Service to back up your VM, most of the work will be in preparing the virtual machines. Your VM must meet the prerequisites before the backup can be initiated to take snapshots from the virtual machines. First, you will need to create a Recovery Services Vault in Azure to store the backups. Then, the VM agent needs to be installed on the virtual machine. You also need to check your network connectivity at this point. When all the prerequisites have been met, you can back up your VMs to the Recovery Services Vault. These backups are easily created from the Azure Portal, PowerShell, or CLI. The snapshots are then stored inside the Recovery Services Vault, and from there you can also restore the snapshots. When restoring, you can choose to either restore the whole VM or only individual files or folders.
Replication
Azure Site Recovery Services offers a business continuity and disaster recovery solution from Azure by orchestrating and automating the replication of Azure VMs. It can replicate workloads and applications from a primary to a secondary location so that your VMs or applications are still up and running during a disaster. You can also easily fall back to the primary location when it is up and running again.
Azure Site Recovery Services offers the following features and capabilities:
- Azure VM, on-premises VM, and workload replication: You can set up the disaster recovery of Azure VMs from a primary region to a secondary region in Azure. You can replicate on-premises VMs and physical servers to Azure or to a secondary on-premises data center. You can replicate any workload from on-premises Hyper-V and VMware VMs, Windows/Linux physical servers, and Azure VMs.
- Data resilience: No application data is intercepted during replication. Data is stored in Azure storage, and during failover the VMs are created using data from Azure storage.
- Customized recovery plans: You can create customized recovery plans where you can group VMs together or add custom scripts or tasks.
- BDCR integration: You can integrate Azure Recovery Services with other BDCR solutions as well.
- Network integration: Azure Recovery Services is integrated with networking features in Azure. You can reserve IP addresses, configure load balancers, and integrate Azure Traffic Manager for network switchovers.
- Consistent apps: You can keep applications consistent during failovers using recovery points with application-consistent snapshots. These snapshots can capture disk data, all data in memory, and all transactions in process.
Summary
In this chapter, we covered the virtual machine objective. We covered the different sizes and series that are available from Azure. We also covered Availability Sets, fault and update domains, and how to create them. We also covered Managed Disks and we showed you how to create highly available VMs. We've talked about VM Scale Sets and when to use them, and finally we covered backup and recovery for your virtual machines.
The next chapter will cover compute-intensive applications using Azure services and Azure Batch.
Questions
Answer the following questions to test your knowledge of the information found in this chapter. You can find the answers in the Assessments section at the end of this book.
- Are Azure Managed Disks selected by default when creating a new virtual machine?
- Yes
- No
- If you want your virtual machines to be available when failure occurs in the underlying infrastructure, should you use Availability Sets?
- Yes
- No
- Are VMs spread over three fault domains, and four update domains when you add them to an Availability Set by default?
- Yes
- No
Further reading
You can check the following links for more information about the topics covered in this chapter:
- Managing the availability of Windows virtual machines in Azure: https://docs.microsoft.com/en-us/azure/virtual-machines/windows/manage-availability
- Example Azure infrastructure walkthrough for Windows VMs: https://docs.microsoft.com/en-us/azure/virtual-machines/windows/infrastructure-example
- Planned maintenance for virtual machines in Azure: https://docs.microsoft.com/en-us/azure/virtual-machines/windows/maintenance-and-updates
- Virtual Machine Scale Sets Documentation: https://docs.microsoft.com/en-us/azure/virtual-machine-scale-sets/
- Using a custom Docker image for Web App for Containers: https://docs.microsoft.com/en-us/azure/app-service/containers/tutorial-custom-docker-image
- Overview of the features in Azure Backup: https://docs.microsoft.com/en-us/azure/backup/backup-introduction-to-azure-backup
- Backing up Azure virtual machines to a Recovery Services Vault: https://docs.microsoft.com/en-us/azure/backup/backup-azure-arm-vms
- Planing your VM backup infrastructure in Azure: https://docs.microsoft.com/en-us/azure/backup/backup-azure-vms-introduction
- Site recovery: https://docs.microsoft.com/en-us/azure/site-recovery/site-recovery-overview