In this chapter, we will cover:
Choosing a Motion project
Importing files to the Canvas, Layers tab, and Timeline
Importing Photoshop and Illustrator files
Making selections with Expose
Changing the layer order
Groups versus layers
Making changes in the Properties tab, HUD, and Canvas
Moving and trimming layers in the Timeline and the mini-Timeline
Launching and customizing a template
Keyboard customization
Looking under the hood – key preferences for your workflows
Sequencing stills in the Timeline
Managing the Layers tab
Welcome to Apple Motion 5 Cookbook! We've all got our reasons for being here. It could be the awesome $50.00 price tag that got us excited. Maybe it was a 30-second motion graphic intro we saw on television last night and want to duplicate, or the effects and transitions we love to work with in FCP X that we want to customize just a little more. Whatever the reason, one thing remains true; Motion 5 is a deep, powerful, and flexible application for a variety of creative workflows and the reason you're here is to learn how to better utilize it. Motion 5's interface can be a bit overwhelming the first time you open it, but with a little knowledge about how it works out of the gate, the better prepared we will be to focus on the good stuff; making our projects dance!
What do we want out of Motion 5? Where do we want our projects to live? How big should it be? The minute we launch Motion, we are presented with a lot of choices. Let's take an in-depth look at some of those options.
To launch Motion, click on the application icon on your Dock or double-click it from the Applications folder.
Tip
Downloading the example code
You can download the example code files for all Packt books you have purchased from your account at http://www.packtpub.com. If you purchased this book elsewhere, you can visit http://www.packtpub.com/support and register to have the files e-mailed directly to you.
The high resolution colored images of the book can also be found in the code bundle.
Upon entering, we are presented with a welcome window called the Project Browser. It can be divided into three sections. On the left-hand side, we have the option of starting with a recent, blank, or pre-existing composition (this is where we can find our preinstalled Motion templates). Since this is our first time here, make sure Blank is selected from the list, as shown in the following screenshot:

In the middle, we can choose between five projects. Motion Project is usually chosen when we want to start and finish our work solely in Motion. If we choose Final Cut Effect, Generator, Transition, or Title, we are telling Motion that when we save our project, we want to make it available in Final Cut. Depending on the type of project you select, it will save in the corresponding section in FCP X's Media Browser, as shown here. For now, make sure Motion Project is selected.

On the right, you can choose from a variety of different presets depending on the material you're working with or where you're exporting. Say your footage was shot in Europe with a DSLR camera. You could choose a Broadcast HD 1080 setting with a Frame Rate value of 25. The duration could match the length of the files you're bringing in and you could choose to display it as timecode, frames, or seconds. For this exercise, let's choose the Broadcast HD 720 setting with a frame rate of 29.97 and a 6 second duration. Press Open.
The Motion interface launches and we're ready to bring in some media to work with.
Here's a little more information on the different types of Motion projects and the attributes associated with them.
If you choose Composition from the left-hand side of the Project Browser window, you can choose from one of the pre-existing Motion templates available.
If you open Motion by choosing Motion Project, you can still make it available in Final Cut by going to File | Save As and then clicking Final Cut Generator from the dialog box.
Most of the parameters we see in Motion can be brought into Final Cut. In fact, we can even create rigs where a slider, checkbox, or pop-up widget can change several parameters at once.
While saving a Motion project for use in FCP X is already powerful, nothing beats being able to take specific parameter controls from Motion's architecture and make them available inside FCP X. You'll learn more about this extremely powerful workflow in Chapter 11, Publishing Your Work to FCP X.
Publishing a Motion 5 generator and its parameters to FCP X in Chapter 11, Publishing Your Work to FCP X.
Creating an effect for FCP X in Chapter 11, Publishing Your Work to FCP X.
Creating a transition for FCP X in Chapter 11, Publishing Your Work to FCP X.
Motion 5 gives us several options to bring in the material we want to work with. Some of this material can be from Motion's own library.
For these recipes, we're going to use the File Browser to load in our material. Think of it as a gateway to our system and its files displayed graphically.
If it's your first time to Motion, here's a brief breakdown of the interface:
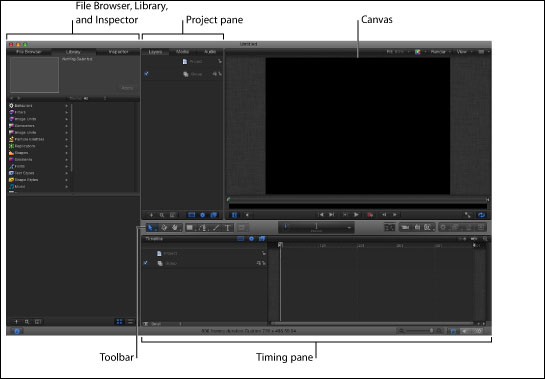
The Motion workspace can be broken down into the following sections:
File Browser, Library, and Inspector: The left-hand side of the Motion interface contains three areas—File Browser, Library, and Inspector. You can click on the corresponding tab to see each area or use a keyboard shortcut. The File Browser is where you view the clips from your system and import them into your project. The Library allows us to see behaviors, effects, and tons of content directly within Motion that we can utilize for our projects. The Inspector is similar to the Inspector in FCP X. It allows us to change the parameters of a selected item.
Toolbar: This contains tools for creating content and manipulating elements in your project. There are tools for creating shapes, manipulating cameras, and adding behaviors for automatic animation.
Canvas: This allows you to view the current frame your playhead is on. You can also manipulate layers visible in the Canvas. The Canvas contains playback and view controls for both 2D, as well as 3D workflows.
The Project pane: This pane contains the Layers, Media, and Audio tab, which display items in your project. You can view each tab by clicking on it or using a keyboard shortcut. The Layers list shows all elements (that is, still images, film clips, filters, behaviors) used in your composition; the Media list shows all external images, clips, and audio files you imported to your current project; and the Audio tab displays all the sound files you imported in your project.
The Timing pane: This pane allows you to make changes to your elements over the span of your project. It contains three unique areas—the Timeline, Audio Timeline, and the Keyframe Editor.
Before we begin, locate a clip on your system you would like to import into Motion or feel free to use a clip that comes with some of the later recipes. Launch Motion and choose a project based on the setting of your clip.
Follow these steps to import files to the Canvas:
With a blank Motion project open, navigate to the File Browser by clicking it on the left-hand side of the interface, or press Command + 1.
Locate the movie file on you system that matches your project's settings.
With the clip selected, drag it from the File Browser straight to the Canvas window but don't release your mouse.
By default, as you hold your clip you should see yellow lines appear. These are called dynamic guides. You can turn them on and off by going to View | Overlays | Dynamic Guides. These guides can help you align your video directly to the center of the Canvas.
Wait until you see both the vertical and horizontal guides. When you do, release your mouse as shown in the following screenshot:

If your video seems too big, press Shift + Z to fit it into the Canvas window.
This is how we can import files to the Layers tab:
With a blank Motion project open, navigate to the File Browser by clicking it on the left-hand side of the interface, or press Command + 1.
Locate the movie file on your system that matches your project's settings.
With the clip selected, drag it from the File Browser straight on top of the empty group in the Layers tab.
Wait for the plus icon and release your mouse, as shown in the following screenshot:

The video should appear directly centered in your Canvas window, If your video seems too big, press Shift + Z with the Canvas window selected to make it fit.
Follow these steps to import files into the Timeline:
With a blank Motion project open, navigate to the File Browser by clicking it on the left-hand side of the interface, or press Command + 1.
Locate the movie file on you system that matches your project's settings.
With the clip selected, drag it from the File Browser straight to the Timeline. Press the Shift key to help it snap to the playhead, but don't release the mouse.
Eventually a menu will appear asking us whether we want to composite or insert our images into the Timeline. Since there is nothing in our project, both options do the same thing. Choose Composite, as shown in the following screenshot:

The video should appear directly centered in your Canvas window. If your video seems too big, press Shift + Z with the Canvas window selected to make it fit.
Your playhead acts as where you position things in time. Keep track of where it is.
The playhead is your friend. It shows you which frame you're currently viewing in the Canvas. It also acts as the location to which any file will go when you bring it into the project based on the default settings. Be aware of where your playhead is and know at what time your media starts. You can also change Motion's Preferences setting to always have layers created on the first frame of the project.
You can choose to change between icon and list view in the File Browser as you navigate your system. The following screenshot shows the view being currently set to icon. Simply click on the icon at the bottom of the window to switch between the views; you can also search and add folders in it too.

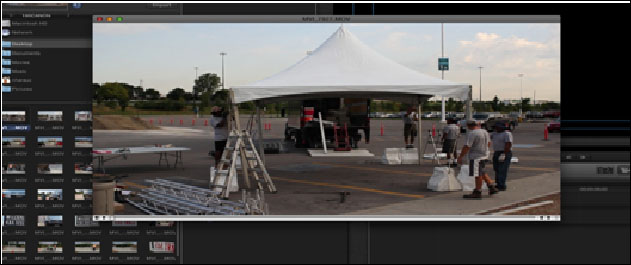
To preview a clip in the File Browser, simply single-click the file and a small preview will play in the upper-left hand corner. For a bigger preview, double-click the file to bring up a floating window, as shown in the following screenshot:
We can import Adobe Photoshop (.psd) and Illustrator (.ai) files using any method from the previous recipe, but
sometimes we may want more from these files. For instance, Motion can allow us to work with individual Photoshop layers but we need to import it in a specific way.
Locate a Photoshop file (PSD only) and Illustrator file (AI only) to use in the upcoming recipes.
From the File Browser, navigate to the Photoshop .psd file on your system, preferably one with multiple layers.
Follow these steps to import Photoshop files to Motion:
With a blank Motion project open, navigate to the File Browser by clicking it on the left side of the interface, or press Command + 1.
With the
.psdfile selected, drag it from the File Browser straight to the Canvas or the Layers tab without releasing your mouse.By default, a pop-up menu appears allowing you to choose from merging the Photoshop file, selecting one of the individual layers, or importing all layers.
Choose Import All Layers, as shown in the following screenshot:

If your video seems too big, press Shift + Z to fit it into the Canvas window.
You may notice that the Photoshop file has all of its layers contained within a group (named after the Photoshop project) of a group (the default group for the Motion project). It's good practice to release the Photoshop layers from the Photoshop group and have them solely within the Motion group.
This is how we import Illustrator files:
With a blank Motion project open, navigate to the File Browser by clicking it on the left side of the interface, or press Command + 1.
With the
.aifile selected, drag it from the File Browser straight to the Canvas or the Layers tab and release your mouse. You cannot see an Illustrator file's individual layers.If your video seems too big, press Shift + Z to fit it into the Canvas window.
At first, everything looks fine, but as soon as we start scaling the file we'll notice some deterioration of the graphic. Press F1 to navigate to the Properties tab of the Inspector. Locate the Scale property and scale up the image by double-clicking on it and entering a new value. Keep scaling till you notice pixelation.
Vector-based images from Illustrator are supposed to allow us to scale up the image to infinity and beyond. The problem is the minute we put the file in Motion, it places the file into a pixel-based world. To have this infinite scaling opportunity, we need to tell Motion to not give this file boundaries or take away its fixed resolution. To do this, navigate to the Media tab and select the AI file from the list; use the following screenshot for reference:

Press F4 to go to the Media tab of the Inspector, and deselect the checkmark next to Fixed Resolution, as shown in the following screenshot:

Try scaling up the object again from the Properties tab of the Inspector and notice how crisp it looks.
Sometimes when you try to make a selection from the Canvas window, things can get frustrating. You'll want to select an item, but because images overlap quite often, Motion gets confused and will select the wrong image. Say hello to Expose. Expose will break apart all of your layers temporarily and allow you to easily select what you need. Let's see it in action.
Launch Motion and select the Swarm template category. Under the Swarm category, select the Swarm-Menu template and click Open a copy.
Move your playhead to 5 seconds.
What you really want to do is select the background, but because of all the foreground elements it's difficult to get to. Press X for expose.
Notice how all your layers have been separated in the Canvas, and can be easily selected as you hover over them with your mouse. Find and select the Background Menu, as shown in the following screenshot:

The Canvas view goes back and the background is selected.
In 2D projects, layer order matters. Let's say we had a project with three backgrounds. The background that would appear at the top of the layer stack is what we will see. The other two layers would be invisible.
From this chapter's exercise files, open the
01_05project.There are three gradient layers in this project but in the Canvas we only see the You can see me layer. Select this layer and drag it underneath the I'm hidden too layer without releasing the mouse. Make sure you see a blue line with an icon and not the plus symbol, as shown in the following screenshot. If you do, drag with your mouse slightly to the right and then release your mouse.

Notice that you can now see the I'm hidden layer being displayed. Select the I'm hidden too layer and drag it above the I'm hidden layer.
The I'm hidden too layer should now be seen.
We can easily move layers in the Layers tab using shortcuts.
Whenever we add a layer to our Motion projects, it has to be contained in a group. But what exactly is the difference between layers and groups? Well, for one thing, a layer is an element—a picture, movie, text object you've brought in or created. A group is a container for those elements. It can be used to organize materials in your project or perform operations to several elements at once. For those of you who use Final Cut Pro X, you may be familiar with compound clips. Compound clips allow you to reverse render operations or make universal changes to several objects at once. Let's take a brief look at some of the fundamental differences between groups and layers in this following exercise.
From this chapter's exercise files, open the
01_06project by double-clicking on it.There is one group that contains a circle and a square. Click on the Library tab.
Select Filters | Distortion | Bulge and compare your results to the following screenshot:

Notice how the bulge only affects the rectangle. Press F3 to open up the Filters tab of the Inspector. Adjust some of the parameters to get a feel for what it does.
Select the Bulge filter and drag it from Rectangle to Group. Notice how the bulge now affects both the circle and the rectangle, as shown in the following screenshot:

Delete Bulge by selecting it and pressing Delete.
Select the Circle layer and press F1 to go to the Properties tab of the Inspector.
Drag the Scale slider to the right up to 150, or double-click on the scale number and manually type it in, as shown in the following screenshot:

Go to the Edit menu and select Undo until you get back to 100.
Select the group and press F1 to go to the Properties tab if needed. Drag the Scale slider up and notice how both the circle and rectangle increase in size, as shown here:

A default group was created with the Motion project. If you want to create a group in Motion from multiple layers, you can select them; just go to the Object menu and select Group. There is also a plus icon at the bottom of the Layers tab, as shown in the next screenshot. This creates an empty group above the selected group. If nothing is selected, the group goes to the top of the Layers tab.

I cannot stress enough that it pays to learn your keyboard shortcuts. It will allow you to perform tasks more quickly and efficiently instead of going to menus.
In this recipe, you went to the Edit menu to undo your last action. If you look under that menu, you will see that the shortcut key is Command + Z. This is one of the shortcut keys that isn't only good in this application, but on the majority that run on your OS system.
Here is a brief list of some keyboard shortcuts that are great to start learning and are exactly the same in most Mac applications:
Command + A: Select all
Shift + Command + A: Deselect all
Shift + Command + G: Create a new group
Command + O: Open
Command +S: Save
Shift + Command + S: Save a copy
Command + X: Cut
Command + C: Copy
Command + V: Paste
Motion is all about allowing you to make changes to the elements in your project. Some of these changes will be animation tweaks while others will be regular scaling and repositioning tasks. Let's take a look at a different way of changing the scale and position of a still image.
With a blank Motion project open, navigate to the File Browser by clicking it on the left-hand side of the interface, or press Command + 1.
Locate a still image file on your system that is large enough for your project's settings.
With the still selected, choose Import from the top of the File Browser.
Select the still image in the Layers tab and press F1 to go to the Properties tab of the Inspector.
Adjust the Position, Rotation, and Scale settings of the still to your liking.
Click the reset arrow at the top of the Transform section to reset all of the properties, as shown in the following screenshot:

If your photo was larger than your project's properties, it may now be larger than your Canvas. Motion's default method when importing photos is to scale them down to fit the project. When you reset a still image, it goes to its original scale value. If this is the case, all you need to do is scale the photo down until it fits nicely in the Canvas window.
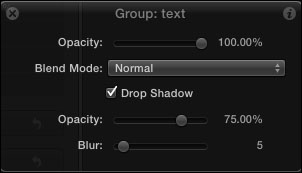
With the photo selected, go to the Window menu and select Show HUD:

The Head Up Display (HUD) is a semi-transparent floating window that shows certain properties of a selected layer, filter, or behavior. In certain instances, it provides us with quick access to some of the most used parameters of the current selection. In the case of this still, it gives us Opacity and Blend Mode. Adjust the Opacity value to around
80. Go to the Edit menu and choose Undo.With the still selected, notice the bounding box around your photo. If you can't see it because the photo is full-frame, press Command + - to zoom out on your Canvas. We can manipulate several Transform category properties directly in the Canvas, and this bounding box allows us to do just that.
Drag any side corner of the image and scale the image down. Notice how the image doesn't scale uniformly unlike how it did in the Inspector. Press Command + Z to undo.
Hold down the Shift key and grab the side corner again. Notice how the image scales uniformly. Press Command + Z to undo.
Press F1 to open the Properties tab of the Inspector. Hold down the Shift + Option key and click the side corner again. Scale the image downwards while paying attention to the Inspector. Notice how the scale updates. Also notice that by pressing Shift + Option not only does the object scale uniformly, but it also scales from the center.
Some of you may have noticed the i icon at the upper-right hand corner of the HUD, as shown in the following screenshot:
By clicking it, we got to the Inspector. Whenever you work in Motion and the HUD doesn't have what you're looking for, go to the Inspector for more options.
Also, when we held down the Shift and Option modifier keys, we were able to scale our photo uniformly from the center. The general rule is this: modifier keys can make our life easier when trying to manipulate properties in the Canvas and the HUD.
For example, if you try to rotate your image in the Canvas by dragging the circle to the right of the center and hold down Shift, we can force our still to move in 45 degree increments.
In the HUD, sometimes when you try to adjust properties, the slider moves too fast. If you Option + click the line, you can then move properties in smaller increments.
So eventually as Motion graphic designers, we're going to have to animate stuff and part of that battle lies is our ability to move around and adjust layers efficiently in the application.
There are two ways by which we can adjust the timing as well as trim layers in Motion—by using the Timeline and mini-Timeline. The big question is why choose one over the other. As of Motion 5, both areas are displayed as soon as you enter a project. The Timeline will show all of your layers and the relationship those layers have with one another, spread over time.
The mini-Timeline only shows the selected element from the Layers tab (that is, filter, behavior, clip, and so on).
The Timeline is great for making timing adjustments when they revolve around the relation of one layer to another. On the other hand, the Timeline can become a very busy place, very quickly. The mini-Timeline is a great place to focus in on the selected item at hand. Let's have a look at adjusting layers in both the areas.
From this chapter's exercise files, open the
01_08project.There are two groups in this project; a text group and background. Press the Space bar to play the project.
This animation was done with behaviors, which we'll explore in Chapter 3, Making It Move with Behaviors. Simply, one text layer fades in after another. Before fixing the timing of the text, you may have noticed that the text appears off alignment. Click on the Disclosure tab for the Text group and click on the THREE layer and Shift + click the ONE layer. From the Object menu select Alignment | Distribute Vertical Centers. Your text is now distributed evenly.
In the following screenshot, you can see the order of our number layers in the Timeline. We want to change the order of the layers by fading in the first layer, followed by the second, and the third. We're going to make our first change in the mini-Timeline. To hide the Timeline temporally, go to Window | Timeline. Select the THREE layer, and from the Mark menu, choose Go To | Selection In Point. We want ONE to begin at
1second. Select ONE and drag the layer's in-point value until it reads00:00;01:00.
Move your playhead to the beginning of the Timeline by pressing the home key or Fn + ← on a laptop. Play the animation. While the ONE layer now fades in at the same time as the THREE layer, you'll notice that it cuts off at the end. Drag the ONE layer's out-point in the mini-Timeline so it lasts till the end of the project.
Let's finish the rest our work in our Timeline. Press Command + 7 to toggle back to the Timeline.
Let's move the THREE layer to where the TWO layer ends. Drag the THREE layer while holding down the Shift key. Wait for its in-point to snap to the TWO layer's out-point and then release the mouse.
Make sure nothing is selected by pressing Shift + Command + A. Type
2, followed by the return to move to the two-second mark. Select the TWO layer and press I to trim its in-point to the playhead.Press the home key and then the Space bar to check if the timing works. Use the following screenshot to guide you:

You can move your playhead by entering in numeric values. It's a good habit to make sure no layer is selected before attempting this operation. Press Shift + Command + A. Now, press Shift + = + 1 + . followed by Enter to move the playhead one second forward. Press – + 1 + . and hit Enter to move the playhead one second back, and press 5 + . and hit Enter to move the playhead to approximately five seconds.
You can move layers the same way you move your playhead. Select the layer you want to move in the Timeline and press Shift + =, or the minus symbol, followed by the number of frames or seconds you want to move it by.
One of my favorite things to do when I first started learning Motion was to open some of the templates the application shipped with and try to figure out how it was created. This gave me a real feel for the inner workings of Motion and the possibilities! Let's open one of Motion 5's templates and customize some of the features.
Launch Motion from the Dock or the Applications folder.
From the left-hand side of the Project Browser, choose the Skyline template folder.
Select the Skyline Menu project, and from the bottom-right hand side, choose Open a copy.
Press Shift + Z in the Canvas window to fit the project and press the Space bar to play it back.
The project starts off with a radial background where buildings and a ribbon grow from offscreen to onscreen followed by a few titles fading in over top of them. After reviewing, we've decided we'd like to change the color of our background, the color of the ribbon, and put in some text to suit the project better. Move your playhead to an area where you can see all of your elements onscreen, or double-click in the Time field and enter
3.25.In the Layers tab, reveal the content of the Background Group by clicking the disclosure triangle. You will see a single layer that is a still image; it has a radial gradient, as shown in the following screenshot:

Since this is a still image from another application, we have to add a filter to change its color. Press Command + 2 to go to the Libraries tab of the Inspector. Go to the Filters category, select the Color Correction folder and locate Colorize (use the following screenshot as your guide). Drag it to the Background Elements layer. Press F3 to go to the Filters tab of the Inspector. Control-click the Remap White value and select a blue color of your liking.

Let's repeat this step for the ribbon. Click the disclosure triangle to close the Background group. Click the disclosure triangle to reveal the content of the Graphics group and the Ribbon group, as shown in the following screenshot:

The Ribbon group is composed of three rectangle objects that have behaviors animating them onscreen. While we can locate the original rectangle shapes and tweak their color, it's a lot easier if we add a filter to the group and change the color for all the elements within that group. Press Command + 2 to go to the Library tab. Go to the Filters category, select the Color Correction folder, and locate Colorize. Drag it to the Ribbon group in the Layers tab, as shown in the following screenshot:

Press F3 to go to the Filters tab of the Inspector. Right-click on the Remap White value and select a yellow color of your liking. Repeat this step for Remap Black with a slightly off yellow color from your previous selection.
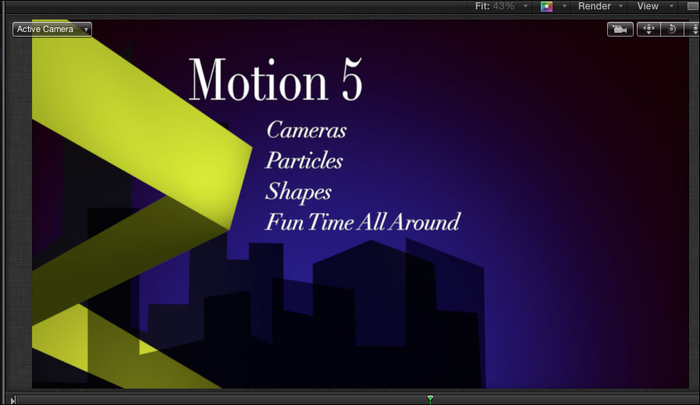
Click the disclosure triangle to close the Graphics group. Open the Text group. There are five text elements, one for each text line onscreen. To change the text, select the Title here group. Press F4 to go to the Text tab of the Inspector. At the bottom, change Title info here to Motion 5. Repeat this step for the subtitle layers. The following screenshot shows the Format Pane tab in the Inspector for the Subtitle group:

The following is a shot of the Canvas showing the template once all subtitle groups have been changed:
When you open a template, you never switch the original file on the system. That's why in this recipe when you selected the template, Motion only gave you the option to open a copy. The original templates will never be overwritten.
Motion also allows us to solo our layers.
Having trouble differentiating what every item is? Here comes solo to the rescue. Simply select a group or layer and go to Object | Solo or press Ctrl + S. You can see that item all by its lonesome. To unsolo, go back to the Object menu and click Solo again.
Sometimes trying to remember all the keyboard shortcuts from several applications can be a daunting task. We can easily customize our keyboard in Motion to suit our individual needs.
With a blank Motion project open, go to the Motion menu and choose Commands | Customize. For those of you who use FCP X, the following interface should look very familiar:

The keyboard is currently using the standard shortcuts that ship with Motion (shown in the next screenshot). In order to make changes, we need to duplicate the keyboard. Click on the Keyboard Set menu and choose Duplicate. Rename the keyboard to your liking.

Click on the letter A. Notice that in the Key detail field, all the commands associated with A show up. One of them is Record Animation. Notice that it's color coated, allowing us to see what category it belongs to under Command List. The A key in FCP X is the selection tool. Let's remap our keyboard to reflect that in Motion.
Click on the Record Animation field in the No Modifier column and drag it out of the box until you see a puff of smoke; now release your mouse.
In the Command List, choose Tools. Locate the Edit tool and drag this to the Key Detail | No Modifier section of A. Now, click Save.
Test out your newly-mapped keyboard by hitting T to activate the Text tool followed by A to jump back to the Edit tool.
Like Final Cut Pro X, Motion 5 has a number of preferences we can change to modify the way it works from its default settings. Let's look at a few key preferences we can change which may be able to assist us in our workflows.
With a blank Motion project open, go to frame 10 of your project by clicking Shift + the right arrow.
Press Command + 2 to open the Library tab.
Navigate to the Content folder near the bottom. Select Particle Images | AquaBall and click on the Apply button at the top of the window. The following screenshot shows the AquaBall image being added to the tenth frame in the mini-Timeline:

There are two default preferences at play here that we should be aware of. The first is that when you import a layer into Motion, it will always get added at the playhead position. When you're first starting to use the application, this can be very frustrating. Second, this was a still image and, by default, if you drag it 10 frames to the left, you'll notice it matches the length of the project. Let's change this now. Select the AquaBall image in the Layers tab and press Delete.
Go to the Motion menu and choose Preferences. Click on the Project tab.
Under the Still Images & Layers settings, notice that Default Layer Duration is set to Use project duration and Create Layers at is set to Current frame, as shown in the next screenshot. Set Default Layer Duration to Use custom duration and set the length to one second.

Set Create Layers at to Start of project.
Let's close the preference window. With your playhead still at 10 frames and the AquaBall visible in the Library tab, apply it to the project again. Notice its length and where it gets added, as shown here:

Go back to Motion | Preferences and change back the preferences to their defaults.
We've only scratched the surface of some of the preferences available to us in Motion. Go back to the Preferences menu and get more familiar with some of the other preferences under the different tabs.
For instance, under the Canvas tab, the grid and ruler controls refer to items we can turn on under our View menu (View | Show Rulers and View | Overlays | Show Grid) to help us align objects in the Canvas.
Sometimes, it is beneficial to be able to grab a group of stills and have them sequentially laid out in the Timeline with the click of a button. This recipe explains how we can set up our preferences and select multiple photos and perform this recipe in a flash.
Launch Motion. Select a Motion project, set Preset to Broadcast HD 720p, Frame Rate to 59.94, and Duration to 20 seconds. Choose Open.

Go to the Motion menu and choose Preferences. Click on the Project tab.
Under the Still Images & Layers settings, notice that Default layer Duration is set to Use project duration. Change Default Layer Duration to Use custom duration and set the length to one second. Close Preferences.
Press Command + 1 to navigate to the File Browser and locate the
Chapter 1exercise folder.Turn off the Collapse Image Sequences icon on the lower-right corner of the File Browser so you can see all the photos. You should see 20 photos displayed; change from icon view to list view, as shown in the following screenshot:

Make sure your playhead is on the first frame of the project. Click the first photo and Shift + click the last one.
Drag the photos into the Timeline and try to align it with your playhead while holding down the Shift key. Wait for the pop-up window, and choose Sequential, as shown here:

Press Command + 1 to close the File Browser and F5 to close the Layers tab. Drag upward between the Timeline and the Canvas to get a better view of the Timeline:

Change the Layer view in the Timeline from Small to Mini to fit more layers on screen, as shown here. Scroll down on the right-hand side to see more of them.

Press Shift + Z to fit the Canvas to the window and the Space bar to play it back. Notice how every second a photo appears until the project ends.
Go back to Motion | Preferences and change back the preferences to their defaults.
At the start of this recipe, we chose to turn off Collapse Image Sequences when bringing in our photos. What happened is because some photos were named sequentially, Motion flagged this and thought we wanted to treat it as an image sequence. In the later chapters, we'll see how image sequences can be extremely useful in Particles and Replicator cells.
Using an image sequence in a particle emitter, Chapter 7, Let's Make Particles.
In some of the previous recipes, you may have seen that the Layers tab can become a very busy place. It's important as Motion graphic designers to feel comfortable where we're working. Let's look at a few tricks we can use to manage our Layers tab as we work in Motion.
Launch Motion. Under Composition, select the Pulse category and choose Pulse – Open. Click Open a copy.
The project has three groups comprising of various elements from the project. Press Command + 1 to close the File Browser and Command + 7 to close the Timeline, so that we can have a little more room to view our Layers tab.
Let's play back the project to get a feel for it. Press the Space bar. This project consists of four different views of our animating circles and pulses.
Let's look at this project a bit deeper. Go to the beginning of the project. Click the disclosure triangle for the Text Elements group, as shown in the following screenshot. Notice how the group is slightly less highlighted than the Camera Light Graphics and Background Elements groups. This indicates that at the current frame, this group doesn't exist. We get further confirmation of this by looking in our mini-Timeline and seeing the Text Elements group start a lot later. Press Shift + I to move to the in-point of the group.
Notice how the group now becomes highlighted but the Subtitle layer does not, as shown in the following screenshot:

Drag your playhead forward until you see the word Subtitle onscreen or go to frame
273. Notice it's now highlighted. Hit the disclosure triangle for the Subtitle group. Notice that there is a Sequence Text behavior on the text. (We will be going in depth with behaviors in Chapter 3, Making It Move with Behaviors, but right now think of it as what's causing the text to animate in). Sometimes when we add filters, masks, and behaviors to clips, our workspace in the Layers tab can get cluttered. We can easily turn off the visibility of these filters, behaviors, and masks at the bottom of the Layers tab. Press the gear icon (shown in the following screenshot) and notice how the Sequence Text disappears. Press it again so you can see it.
When we work, it's also advantageous to solo elements in the project. It allows us to focus our work rather than worry about hundreds of items. To see the layers in the Text Elements group by themselves, select it and click the square within the rectangle icon. Notice how the graphic disappears and the text moves slightly to the side. Click it again to unsolo it.
Close the Text Elements group and open the Cameras Light Graphics group. Notice there are four scenes in this group that correspond to the four circle and pulse animations that take place over time. Get a feel for when each scene starts and stops by looking in the Layers tab and in the mini-Timeline for when a group is highlighted.
Twirl open scenes four through one by clicking the disclosure triangle for each of them. This may cause some of the layers to go outside the view, and in order to see them you have to scroll. Instead, click the icon at the bottom-left of the Layers tab with the little head on it. Drag the slider to your right to resize the layers.
Close the Camera Lights and Graphics group.