Download code from GitHub
In this chapter, we will understand the fundamentals of sensors and explore what the sensor world looks like from an Android perspective. We will also look at the classes, interfaces, and methods provided by the Android platform to access sensors. This chapter will also focus on the standards and best practices for using Android sensors.
You will learn the following topics in this chapter:
- What are sensors?
- Different types of sensors and values.
- Individual sensor descriptions and their common usage.
- How to use sensor coordinate system?
- What is Android Sensor Stack?
- Understanding the Sensor framework APIs and classes.
- Understanding the sensor sampling period, frequency, and reporting mode.
- Specific sensor configuration and sensor availability based on the API level.
- Best practices to access and use sensors.
In simple words, sensors measure a particular kind of physical quantity, such as force acting on device, light falling on a surface, or the temperature in a room. These are examples of a basic physical quantity that sensors can measure. Most Android phones come with advance sensors that can measure valuable information such as relative humidity, atmospheric pressure, magnetic field, steps taken, the rate of rotation of a device on the x, y, and z axes, proximity to an object, and many more. The majority of the sensors are Micro Electro Mechanical Sensors (MEMS), which are made on a tiny scale (in micrometers), usually on a silicon chip, with mechanical and electrical elements integrated together.
The basic working principle behind MEMS is to measure the change in electric signal originating due to mechanical motion. This change in electric signals is converted to digital values by electric circuits. The accelerometer and gyroscope are the main examples of MEMS. Most of the sensors in an Android phone consume minimal battery and processing power. We will discuss all the important sensors in detail in the coming chapters.
Sensor can be broadly divided into the following two categories:
- Physical Sensors: These are the actual pieces of hardware that are physically present on the device. They are also known as hardware sensors. Accelerometers, gyroscopes, and magnetometers are examples of physical sensors.
- Synthetic Sensors: These are not physically present on the device, and they are instead derived from one or more sensors. They are also called virtual, composite, or software sensors. Gravity, linear acceleration, and step detector are examples of synthetic sensors.
The Android platform doesn't make any distinction when dealing with physical sensors and synthetic sensors. The distinction is mostly theoretical to understand the origin of the sensor values.
Sensor values can be broadly divided into the following three categories:
- Raw: These values are directly given by the sensor. The operating system simply passes these values to the apps without adding any correction logic. Accelerometers, proximity sensors, light sensors, and barometers are sensors that give raw values.
- Calibrated: These values are computed by the operating system by adding extra correction algorithms, such as drift compensation and removing bias and noise over the raw values given by sensors. Step detector, step counter, and significant motion are sensors that give calibrated values by using an accelerometer as their base sensor. The magnetometer and gyroscope are special kinds of sensor that give both raw and calibrated values.
- Fused: These values are derived from a combination of two or more sensors. Generally, these values are calculated by leveraging the strength of one sensor to accommodate the weaknesses of other sensors. Gravity and linear acceleration give fused values by using the accelerometer and gyroscope.
The Android platform supports mainly three broad categories of sensors: the motion, position, and environment-based sensors. This categorization is done based on the type of physical quantity detected and measured by the sensors.
Motion sensors are responsible for measuring any kind of force that could potentially create motion in the x, y, and z axes of the phone. The motion could be either a linear or angular movement in any direction. This category includes accelerometers, gravity, gyroscope, and rotational vector sensors. Most of these sensors will have values in the x, y, and z axes, and the rotational vector will especially have extra value in the fourth axis, which is the scalar component of the rotation vector.
The following table summarizes the motion sensor usage, types, and power consumption:
|
Sensor |
Type |
Value |
Underlying Sensors |
Description |
Common Usage |
Power Consumption |
|
Accelerometer |
Physical |
Raw |
Accelerometer |
This measures the acceleration force along the x, y, and z axes (including gravity). Unit: m/s2 |
It can be used to detect motion such as shakes, swings, tilt, and physical forces applied on the phone. |
Low |
|
Gravity |
Synthetic |
Fused |
Accelerometer, Gyroscope |
This measures the force of gravity along the x, y, and z axes. Unit: m/s2 |
It can be used to detect when the phone is in free fall. |
Medium |
|
Linear Acceleration |
Synthetic |
Fused |
Accelerometer, Gyroscope |
It measures the acceleration force along the x, y, and z axes (excluding gravity). Unit: m/s2 |
It can be used to detect motion such as shakes, swings, tilt, and physical forces applied on phone. |
Medium |
|
Gyroscope |
Physical |
Raw, Calibrated |
Gyroscope |
This measures the rate of rotation of the device along the x, y, and z axes. Unit: rad/s |
It can be used to detect rotation motions such as spin, turn, and any angular movement of the phone. |
Medium |
|
Step Detector |
Synthetic |
Calibrated |
Accelerometer |
This detects walking steps. |
It can be used to detect when a user starts walking. |
Low |
|
Step Counter |
Synthetic |
Calibrated |
Accelerometer |
It measures the number of steps taken by the user since the last reboot while the sensor was activated |
It keeps track of the steps taken by the user per day. |
Low |
|
Significant Motion |
Synthetic |
Calibrated |
Accelerometer |
It detects when there is significant motion on the phone because of walking, running, or driving. |
It detects a significant motion event. |
Low |
|
Rotation Vector |
Synthetic |
Fused |
Accelerometer, Gyroscope, Magnetometer |
This measures the rotation vector component along the x axis (x * sin(θ/2)), y axis (y * sin(θ/2)), and z axis (z * sin(θ/2)). Scalar component of the rotation vector ((cos(θ/2)). Unitless. |
It can be used in 3D games based on phone direction. |
High |
Position sensors are used to measure the physical position of the phone in the world's frame of reference. For example, you can use the geomagnetic field sensor in combination with the accelerometer to determine a device's position relative to the magnetic North Pole. You can use the orientation sensor to determine the device's position in your application's frame of reference. Position sensors also support values in the x,y, and z axes.
The following table summarizes the position sensor's usage, types, and power consumption:
|
Sensor |
Type |
Value |
Underlying Sensors |
Description |
Common Usage |
Power Consumption |
|
Magnetometer |
Physical |
Raw, Calibrated |
Magnetometer |
This measures the geomagnetic field strength along the x, y, and z axes. Unit: μT |
It can be used to create a compass and calculate true north. |
Medium |
|
Orientation (Deprecated) |
Synthetic |
Fused |
Accelerometer, Gyroscope, Magnetometer |
This measures the Azimuth (the angle around the z axis), Pitch (the angle around the x axis), and Roll (the angle around the y axis). Unit: Degrees |
It can be used to detect the device's position and orientation. |
Medium |
|
Proximity |
Physical |
Raw |
Proximity |
This measures the distance of an object relative to the view screen of a device. Unit: cm |
It can be used to determine whether a handset is being held up to a person's ear. |
Low |
|
Game Rotation Vector |
Synthetic |
Fused |
Accelerometer, Gyroscope |
This measures the rotation vector component along the x axis (x * sin(θ/2)), y axis (y * sin(θ/2)), and z axis (z * sin(θ/2)). It is the scalar component of the rotation vector (cos(θ/2)). Unitless. It is based only on the Gyroscope and Accelerometer and does not use the Magnetometer. |
It can be used in 3D games based on phone direction. |
Medium |
|
Geomagnetic Rotation Vector |
Synthetic |
Fused |
Accelerometer, Magnetometer |
This measures the rotation vector component along the x axis (x * sin(θ/2)), y axis (y * sin(θ/2)), and z axis (z * sin(θ/2)). It is the scalar component of the rotation vector (cos(θ/2)). Unit less. * It is based only on the Magnetometer and Accelerometer and does not use the Gyroscope. |
It can be used in augmented reality apps, which are based on the phone and compass direction. |
Medium |
Environment sensors are responsible for measuring environmental properties, such as temperature, relative humidity, light, and air pressure near the phone. Unlike motion and position sensors, which give sensor values multi-dimensional arrays, the environment sensors report single sensor values.
The following table summarizes the environment sensor's usage, types, and power consumption:
|
Sensor |
Type |
Value |
Underlying Sensors |
Description |
Common Usage |
Power Consumption |
|
Ambient Temperature |
Physical |
Raw |
Thermometer |
This measures the ambient air temperature. Unit: Degrees Celsius |
It is used for monitoring temperatures. |
Medium |
|
Light |
Physical |
Raw |
Photometer |
This measures the ambient light level (illumination). Unit: lx |
It can be used to dim the screen brightness of the phone. |
Low |
|
Barometer |
Physical |
Raw |
Barometer |
This measures the ambient air pressure. Unit: mPa or mbar |
It can be used to measure height relative to sea level. |
Medium |
|
Relative Humidity |
Physical |
Raw |
Relative Humidity |
This measures the relative ambient humidity in percentage. Unit: % |
It can be used for calculating the dew point, and absolute and relative humidity. |
Medium |
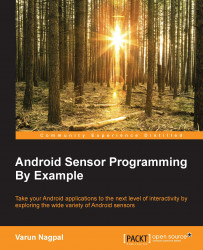
Most of the sensors use the standard 3-axis coordinate system to represent the sensor values. This coordinate system is similar to the 3-axis coordinate system used to measure the length, breadth, and height of any 3D object in space, along with the difference of the frame of reference and the orientation of the 3-axis. As depicted in the following figure, the origin of this coordinate system lies in the center of the screen. When the device is in its default orientation (generally the portrait mode), the x axis is in the horizontal direction with the right-hand side having positive values and the left-hand side having negative values. Similarly, the y axis is in the vertical direction and the z axis is coming out of the phone screen. Points above the origin in a vertical direction are positive, and the ones below the origin in vertical direction are negative for the y axis. Similarly, the points coming out of the screen are positive, and the points behind the phone screen are negative for the z axis.
This particular x, y, and z axis orientation stands good for all the devices that have their default orientation as portrait mode, as shown in the previous figure. But for any device, especially tablets, the orientation of the x and y axes are swapped when their default orientation is in landscape mode. The z axis' orientation remains the same. So, before making any assumption about the orientation of an axis, it's always a good practice to confirm the default mode of the device. In this coordinate system, we always use the device's frame as a point of reference. The device coordinate system is never changed or swapped, especially when the phone is moved or rotated in any direction. The OpenGL (Graphic library) uses the same coordinate system and rules to define its values.
Some position sensors and their methods use a coordinate system that is relative to the world's frame of reference, as opposed to the device's frame of reference. These sensors and methods return data that represents the device motion or device position relative to the earth. The Orientation Sensor, Rotation Vector Sensor, and getOrientation() method use the world's frame of reference coordinate system, while all the other position, motion, and environmental sensors use the device's frame of reference coordinate system.
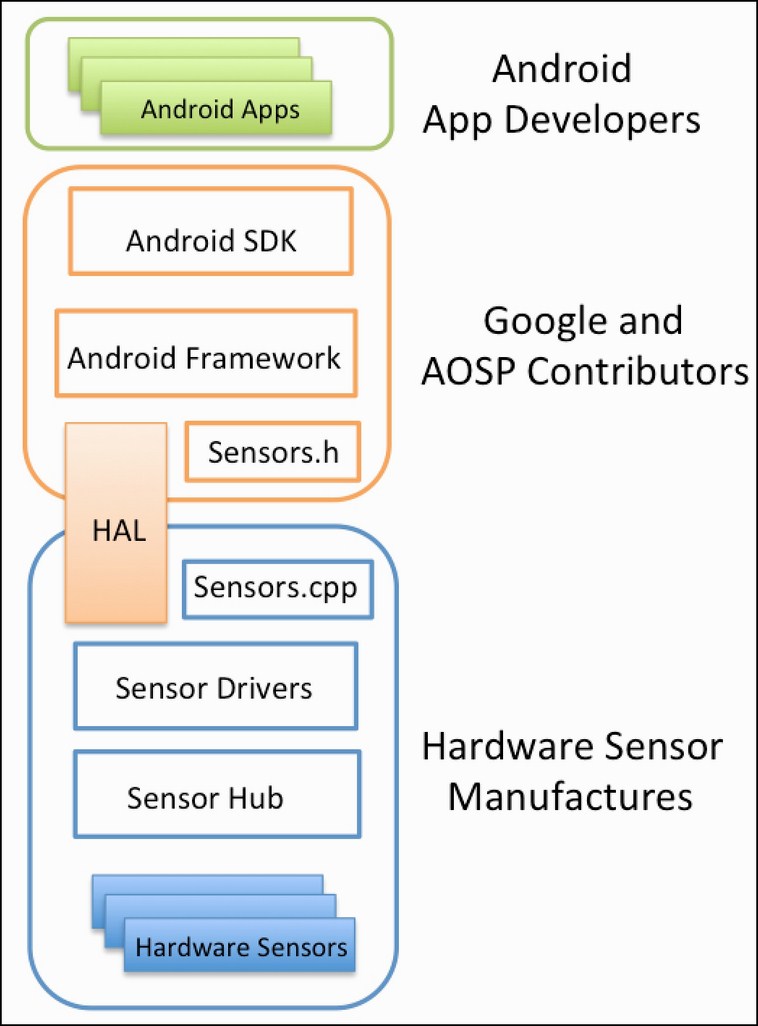
The following figure represents the layers in the Android Sensor Stack. Each layer in the sensor stack is responsible for a specific task and communicating with the next layer. The top-most layer consists of Android Apps, which are the consumers of the data from sensors. The second layer is the Android SDK layer, through which the android applications can access the sensors. The Android SDK contains APIs to list the available sensors to register to a sensor and all the other sensor functionality. The third layer consists of the Android Framework, which is in charge of linking several applications to a single HAL client. The framework consists of various components to provide simultaneous access to multiple applications. It is discussed in detail in the next section. The fourth layer is called HAL (Sensors' Hardware Abstraction Layer), which provides the interface between the hardware drivers and the Android framework. It consists of one HAL interface sensor and one HAL implementation, which we refer to assensors.cpp. The HAL interface is defined by the Android and AOSP (Android Open Source Project) contributors, and the implementation is provided by the manufacturer of the device. The Sensor Drivers are the fifth layer of the stack, and they are responsible for interacting with the physical devices.
In some cases, the HAL implementation and the drivers are the same software entity, while in other cases, the hardware integrator requests the sensor chip manufacturers to provide the drivers. The Sensor Hub is the sixth optional layer of the stack. The Sensor Hub generally consists of a separate, dedicated chip for performing low-level computation at low power, while the application processor is in the suspended mode. It is generally used for sensor batching and adding hardware FIFO queue (which is discussed in detail in the Wake locks, wakeup sensors, and FIFO queue section of Chapter 4, Light and Proximity Sensors). The final seventh layer consists of the physical hardware sensors. Mostly, they are made up of the MEMS silicon chip, and they do the real measuring work.
Android has provided methods, classes, and interfaces for accessing sensors and their data that is available on an Android device. These sets of methods, classes, and interfaces are collectively referred to as the sensor framework and are a part of the android.hardware package. It consists of four major components: SensorManager, Sensor, SensorEvent, and SensorEventListener. The entry point to the framework is the SensorManager class, which allows an app to request sensor information and register to receive sensor data. When registered, sensor data values are sent to a SensorEventListener interface in the form of a SensorEvent class that contains information produced from a given sensor. Let's look at each component in detail.
SensorManager is the class that makes it possible for your app to get access to the sensors. It creates the instance of the system sensor service, which provides various APIs to access sensor information on the device. It exposes the methods that list the available and default sensors on the device. This class also provides several sensor constants that are used to report sensor accuracy, sampling period, and calibrate sensors. One of the important tasks of this class is to register and unregister sensor event listeners for accessing a particular sensor.
SensorEventListener is the interface that provides two callbacks to receive the sensor notification (sensor event). OnSensorChanged() is the first method of the interface, which is called whenever there is any change in the sensor values. The change in sensor value is communicated through the SensorEvent object, passed as a parameter to this method. OnAccuracyChanged() is the second method, which is called whenever there is a change in the accuracy of sensor values. The sensor object and newly reported accuracy in integers are sent as parameters to this method. There are four accuracy integer constants supported by SensorManager. They are as follows:
SENSOR_STATUS_ACCURACY_HIGHSENSOR_STATUS_ACCURACY_MEDIUMSENSOR_STATUS_ACCURACY_LOWSENSOR_STATUS_ACCURACY_UNRELIABLE
Sensor is the class that is used to create an instance of a specific sensor. This class provides various methods that let you determine a sensor's capabilities:
- Maximum Range
- Minimum Delay
- Name
- Power
- Resolution
- Reporting Mode
- Type
- Vendor
- Version
- isWakeUp Sensor
We will be discussing each capability and method in detail in the Time for action - knowing the individual sensor capability section of Chapter 2, Playing with Sensors.
SensorEvent is a special kind of class that is used by the operating system to report changes in the sensor values to the listeners. This SensorEvent object contains the following four elements:
values[]: This is a multidimensional array that holds the sensor valuestimestamp: This refers to the time in nanoseconds at which the event happenedaccuracy: This is one of the four accuracy integer constantssensor: This is the sensor type that generated this data
The following class diagram depicts the important methods and variables for the four key components of the Sensor Framework:

When you are registering an event listener, you can suggest a sampling period or delay between the sensor event values in microseconds. This sampling period is only a signal to the operating system to send the sensor values at the suggested sampling rate via the OnSensorChanged() method. The operating system might choose a bigger delay, depending on the load on the processer, and that's why it is discouraged to build a time-sensitive logic that relies on the delay between the sensor events.
You can only specify the absolute delay from Android 3.0 (API Level 11) and above. Prior to this version, you could only use the following four constants supported by the platform:
SENSOR_DELAY_FASTEST: This has a default value of 0 microseconds. It is not recommended to use this delay, as it increases the CPU cycles by multiple times and drains the battery much faster.SENSOR_DELAY_GAME: This has a default value of 20,000 microseconds. It is only recommended for those games that need the highest degree of precision and accuracy.SENSOR_DELAY_UI: This has a default value of 60,000 microseconds and is recommended for most cases.SENSOR_DELAY_NORMAL: It has a default value of 200,000 microseconds and is used for reducing the extra CPU cycles and saving the battery.
It's the choice of the developer to either use the delay constants or specify their own delay value. Power consumption and the degree of precision are the two important factors to consider before deciding the right sampling period. The power consumption of any sensor can be checked via the getPower() method of the sensor object, which returns the power in mA. Among the physical sensors, the accelerometer is the most power efficient and has the least battery consumption. The gyroscope and magnetometer come after the accelerometer with regard to power efficiency and battery consumption.
You will often hear the terms delay and sampling period being used interchangeably because they mean the same thing. There is another term called sampling frequency, which is the inverse of the sampling period (in seconds) and is measured in Hertz (Hz). For example, if you are using the sampling period of 60,000 microseconds for a sensor, then the sampling frequency will be 16.66 Hz. This conversion is just a two-step process. First, convert the time into seconds, as 1 second is 10 to power 6 microseconds, so 60,000 microseconds will be 0.06 seconds. Now, the frequency (the inverse of delay) is 1/0.06 = 16.66 Hz.
Sensors can generate events in different ways called reporting modes. Each sensor has a particular type of reporting mode. The reporting mode is an Integer constant of the Sensor class, which can be obtained using the getReportingMode() method of the Sensor object. Knowing the reporting mode of a sensor can help developers write an efficient logic. Reporting modes can be categorized into following four types:
- Continuous: In continuous reporting mode, the sensor events are generated at a constant rate defined by the sampling period. This sampling period is set at the time of registering the listener for the sensor. For example, the sensors using the continuous reporting mode are the accelerometer and gyroscope.
- On Change: In the on-change reporting mode, the sensor events are generated only if the measured values have changed from the last known values. For example, sensors using the on-change reporting mode are the step counter, proximity, and heart rate sensors.
- One Shot: The one shot reporting mode is based on the fire and forget concept. They are triggered only once in the entire duration of the event. The significant motion sensor uses the one shot reporting mode to notify the event. It is only fired once, when the sensor detects the start of significant motion because of walking, running, or driving.
- Special Trigger: The special trigger is fired on each occurrence of a particular event. Upon the detection of an event, the sensor values are generated and passed to the listener. The sampling period is ignored in this case. The step detector sensor is an example of the special trigger reporting mode, which is fired on every step taken.
There might be some scenarios in which certain features of your application might depend on a specific sensor, and that sensor is not present on the device. In such cases, a good option would be to either turn off that dependent feature or not allow the user to install the application. Let's explore each option in detail.
If you have a weather utility app, and it uses the pressure sensor on the phone to check the atmospheric pressure, then it's not a good idea to directly use the sensor. There are many Android phones that don't have a pressure sensor on them. If such cases are not handled properly, your application might even crash, which will be a bad user experience.
It's always recommended to check the availability of a sensor before using it in the application. The following code snippet shows how to check the availability of the sensor:
private SensorManager mSensorManager;
...
mSensorManager=
(SensorManager)getSystemService(Context.SENSOR_SERVICE);
if(mSensorManager.getDefaultSensor(Sensor.TYPE_PRESSURE)!=null){
  // Success! There's a pressure sensor.
}else{
  // Failure! No pressure sensor.
}
If measuring atmospheric pressure using the phone pressure sensor is the main feature of your application, then you may not want to support those devices that don't have a pressure sensor in them. The Android platform supports this functionality by declaring uses-feature filters in the AndroidManifest.xml file:
<uses-feature android:name="android.hardware.sensor.barometer" android:required="true" />
This code snippet informs the Android platform that the pressure sensor is required for this app to function. Google Play uses this uses-feature to filter out those devices that don't have the pressure sensor in them, and hence your app is only installed on the supported devices. The sensors that are supported by uses-feature are the accelerometer, gyroscope, light, barometer (pressure), compass (geomagnetic field), and proximity sensors.
If your application uses a sensor for some feature, but can still run without that sensor by turning off that feature, then it's advisable to declare the sensor in uses-feature but still set the required value to false (android:required="false"). This informs the operating system that your application uses that sensor, but it can still function without it. It's the developer's responsibility to check the availability of the sensor at runtime.
There is a wide variety of sensors that are supported on Android devices. As Android evolved over a period of time, new sensors were added, and some old, inefficient sensors were removed. With the release of newer versions of Android, they got better and more accurate, and the list of supported sensors got bigger. Most of the apps have to support older versions of Android to target the wider audience. But at the same time, not all sensors are supported by older versions of Android. It's a tradeoff between supporting older versions of Android versus getting to use the latest and more advanced sensors that are only available in newer versions of Android.
The following table provides the sensor availability list based on the Android version and API levels. This table illustrates four major platforms to show availability, as the major changes were made in these four platforms only:
|
Sensor |
Android 6.0 (API Level 23) |
Android 4.0 (API Level 14) |
Android 2.3 (API Level 9) |
Android 2.2 (API Level 8) |
|
Accelerometer |
Available |
Available |
Available |
Available |
|
Ambient temperature |
Available |
Available |
NA |
NA |
|
Gravity |
Available |
Available |
Available |
NA |
|
Gyroscope |
Available |
Available |
Available |
NA |
|
Light |
Available |
Available |
Available |
Available |
|
Linear acceleration |
Available |
Available |
Available |
NA |
|
Magnetic field |
Available |
Available |
Available |
Available |
|
Orientation |
Deprecated |
Deprecated |
Deprecated |
Deprecated |
|
Pressure |
Available |
Available |
Available |
NA |
|
Proximity |
Available |
Available |
Available |
Available |
|
Relative humidity |
Available |
Available |
NA |
NA |
|
Rotation vector |
Available |
Available |
Available |
NA |
|
Step Detector |
Available |
NA |
NA |
NA |
|
Step Counter |
Available |
NA |
NA |
NA |
|
Temperature |
Deprecated |
Deprecated |
Available |
Available |
Android devices are manufactured by different OEMs (Original Equipment Manufactures) and come with various configurations. Each OEM is free to support its own set of sensors, which again come from different vendors. This creates the problem of device fragmentation. This problem is further complicated by addition and deprecation of sensors with different Android API levels. The following are some best practices that will help you deal with this device fragmentation problem and avoid common pitfalls and mistakes:
- Before using the sensor coordinate system, confirm the default orientation mode of the device and check for the orientation of the x and y axes.
- Check the availability, range, minimum delay, reporting modes, and resolution of the sensor before using it.
- Before selecting the sampling period of any sensor, check for its power consumption. Also, keep your application precision and accuracy needs in mind before deciding the sampling period. It's recommended that you select one of the constants given by the operating system.
- Do not block or do heavy processing on the
OnSensorChanged()method. Your app might miss callbacks or go into ANR (Application Not Responding) mode. The app might even crash in the worst cases if this callback is blocked. - Every registration of the event listener should be paired with the un-registration of the same listener. This should be done at the right time and place. (More on this, in the next chapter).
- Avoid using deprecated sensors and any of the deprecated APIs.
- Never write any kind of application logic based on the delay between the sensor events. Always use the timestamp from the sensor event to do your time-related calculations.
- If some sensors are mandatory for your application to function, then use the
uses-featurefilter in theManifest.xmlfile and change the required value to true. - Check your application and its sensor behavior on more than one device, as the sensor values and range may vary with different devices.
We looked at the important concepts of sensor, their types, values, and common uses. The best practices discussed in this chapter will save you from common errors and mistakes that developers make while writing the code for sensors. It is advisable that you give a second thought to selecting the right sampling period of a sensor, before using them in your code.
This chapter prepared you to dive deep into the Android world of sensors. In the next chapter, we will take a closer look at the classes, interfaces, and methods for accessing sensors, and we will also start writing the code for sensors.