


 Download code from GitHub
Welcome to Android Programming for Beginners, Second Edition. In this first chapter, we won't waste any time in getting started developing Android apps.
We will look at what is so great about Android, what exactly Android and Java are, how they work and complement each other, and what that means to us as future developers.
Moving quickly on, we will set up the required software so we can build and deploy a simple first app.
By the end of this chapter, we will have have achieved the following:
Discovered what is new in this second edition
Learned how Java and Android work together
Set up our development environment, Android Studio, which takes care of all the components involved in building Android apps that we will learn about next
Learned about the Java Development Kit (JDK), the Android Application Programming Interface (API), and how we use them through Android Studio
Deployed the app on an Android emulator
Run our app on an Android emulator and a real device
That's a lot to get through, so let's get started.
All the major apps have been changed. The three big apps from the earlier edition have been replaced by four new apps. In this edition, we will build a Memo app, a drawing app, a database app, and a fully playable clone of the classic Snake game. In addition, many of the mini-apps have been scrapped, updated or improved, and over the course of this book, you will get to build over a dozen functioning mini-apps to put into practice what you learn.
Furthermore, I have added more images, tips, and information boxes to help emphasize and clarify important points, as well as adding to and improving virtually every page. Even if you have already read the first edition, there is still plenty in this book for you.
When Android first arrived in 2008, it was a bit drab compared to the much more stylish iOS on the Apple iPhone. But quite quickly, through a variety of handset offers that struck a chord with both the practical and price-conscious and the fashion-conscious and tech-savvy, Android user numbers exploded.
For many, myself included, developing for Android is the most rewarding pastime and business bar none.
Quickly putting together a prototype of an idea, refining it, and then deciding to run with it and wire it up into a fully-fledged app is such an exciting and rewarding process. Any programming can be fun, and I have been programming all my life, but creating for Android is somehow extraordinarily rewarding.
Defining exactly why this is the case is quite difficult. Perhaps it is the fact that the platform is free and open. You can distribute your apps without needing the permission of a big controlling corporation—nobody can stop you. And, at the same time, you have the well-established, corporate controlled mass markets, such as Amazon App Store and Google Play Store.
More likely, the reason developing for Android gives such a good feeling is the nature of the devices themselves. They are deeply personal. You can develop apps that interact with people's lives to educate, entertain, tell a story, and so on, but it is there in their pocket ready to go—in the home, in the workplace, or on holiday.
You can certainly build something bigger for the desktop, but knowing that thousands (or millions) of people are carrying your work in their pockets and sharing it with friends is more than just a buzz.
No longer is developing apps considered geeky, nerdy, or reclusive. In fact, developing for Android is considered highly skillful and the most successful developers are hugely admired, or even revered.
If all this fluffy and spiritual stuff doesn't mean anything to you, then that's fine too; developing for Android can make you a living, or even make you wealthy. With the continued growth of device ownership, the ongoing increase in CPU and GPU power, and the non-stop evolution of the Android operating system itself, the need for professional app developers is only going to grow.
In short, the best Android developers—and, more importantly, the Android developers with the best ideas and most determination—are in greater demand than ever. Nobody knows who these future Android app developers are, and they might not even have written their first line of Java yet.
So why isn't everybody an Android developer? Obviously, not everybody will share my enthusiasm for the thrill of creating software that can help people make their lives better, but I am guessing that because you are reading this, you might do?
Unfortunately, for those that do share my enthusiasm, there is a kind of glass wall on the path of progress that frustrates many aspiring Android developers.
Android uses Java to make apps. Every Android book, even those aimed at so-called beginners, assumes readers to have at least an intermediate level of Java, and most need an advanced level. So, good-to-excellent Java knowledge was a prerequisite for learning Android.
Unfortunately, learning Java in a completely different context to Android can sometimes be a little dull, and much of what you learn is not directly transferable into the world of Android anyway. You can see why beginners to Android and Java are often put off from starting.
But it doesn't need to be like this. In this book, I have carefully placed all the Java topics you would learn in a thick and weighty Java-only beginner's tomb and reworked them into four multi-chapter apps and more than a dozen quick mini-apps, starting from a simple memo app and progressing to a cool drawing app, a database app, and a playable game.
If you want to become a professional Android developer or just want to have more fun when learning Java and Android, this book will help.
Before we start our Android quest, we need to understand how Android and Java work together. After we write a program in Java for Android, we click a button and our code is transformed into another form, the form that is understood by Android. This other form is called Dalvik Executable, or DEX code, and the transformation process is called compiling.
Note
We will see this process in action right after we set up our development environment later in the chapter.
Android is a complex system, but you do not need to understand it in depth to be able to make amazing apps.
To get started, we only need to understand the basics. The part of the Android system that executes (runs) the compiled DEX code is called the Dalvik Virtual Machine (DVM).
The DVM itself is a piece of software written in another language that runs on a specially adapted version of the Linux operating system. So, what the user sees of Android is itself just an app running on yet another operating system.
Android is a system within a system. The typical Android user doesn't see the Linux operating system and most probably doesn't even know it is there.
The purpose of the DVM is to hide the complexity and diversity of hardware and software that Android runs on, but, at the same time, exposing all its useful features. This exposing of features works in two ways:
Let's continue by talking more about the Android API.
The Android API is code that makes it easy to do exceptional things. A simple analogy could be drawn with a machine, perhaps a car. When you press on the accelerator, a whole bunch of things happen under the hood. We don't need to understand about combustion or fuel pumps because some smart engineer has made an interface for us; in this case a mechanical interface—the accelerator pedal.
For example, the following line of Java code probably looks a little intimidating at this stage in the book, but it serves as a good example of how the Android API helps us:
locationManager.getLastKnownLocation(LocationManager.GPS_PROVIDER)
Once you learn that this single line of code searches for available satellites in space, then communicates with them in their orbits around the Earth, and then retrieves your precise latitude and longitude on the surface of the planet, it becomes easy to begin to glimpse the power and depth of the Android API in conjunction with the DVM.
For sure, that code does look a little challenging, even mind boggling at this stage of the book, but imagine trying to talk to a satellite some other way!
The Android API has a whole bunch of Java code that has already been written for us to use as we like.
Note
There are many different estimates to the number of lines of code that has gone into Android. Some estimates are as low as 1 million, some as high as 20 million. What might seem surprising is that despite this vast amount of code, Android is known in programming circles for being.
The question we must ask, and the one this book tries to answer, is as follows:
How do we use all this code to do cool stuff? Or, to frame the question to fit the earlier analogy: How do we find and manipulate the pedals, steering wheel, and sunroof of the Android API?
The answer to this question is the Java programming language and the fact that Java was designed to help programmers handle complexity. Let's talk a bit about Java and object-oriented programming (OOP).
Java is a programming language that has been around a lot longer than Android. It is an object-oriented language. This means it uses the concept of reusable programming objects. If this sounds like technical jargon, another analogy will help. Java enables us and others (like the Android development team) to write Java code that can be structured based on real-world things, and here is the important part: it can be reused.
So, using the car analogy, we could ask the following question: if a manufacturer makes more than one car in a day, do they redesign every part for each and every car?
The answer, of course, is no. They get highly skilled engineers to develop exactly the right components, honed, refined, and improved over years. Then that same component is reused again and again, as well as being occasionally improved.
If you are going to be fussy about my analogy, then you can point out that each of the car's components still has to be built from the raw materials using real-life engineers or robots.
This is true. What the software engineers do when they write their code is build a blueprint for an object. We then create an object from their blueprint using Java code, and once we have that object we can configure it, use it, combine it with other objects, and more besides.
Furthermore, as well as this, we can design blueprints ourselves and make objects from them as well. The compiler then transforms (manufactures) our bespoke creation into DEX code. Hey presto! We have an Android app.
In Java, a blueprint is called a class. When a class is transformed into a real working "thing", we call it an object or an instance of the class.
Note
Objects in short
We could go on making analogies all day long. As far as we care at this point:
Java is a language that allows us to write code once that can then be used repeatedly.
This is very useful because it saves us time and allows us to use other people's code to perform tasks we might otherwise not have the time or knowledge to write for ourselves.
Most of the time, we do not even need to see this code or even know how it does its work!
One last analogy: We just need to know how to use that code just as we need to learn to drive a car.
So, some smart software engineer up at Android HQ writes a desperately complex Java program that can talk to satellites. He then considers how he can make this code useful to all the Android programmers who want to make amazing apps that use users' locations to do cool things. One of the things he will do is make features such as getting the device's location in the world into a simple one-line task.
So, the single line of code we saw previously sets in action many more lines of code that we don't see and don't need to see. This is an example of using somebody else's code to make our code infinitely simpler.
Note
If the fact you don't have to see all the code is a disappointment to you, then I understand how you feel. Some of us, when we learn about something, want to learn every intricate detail. If this is you, then be reassured that the best place to start learning how the Android API works internally is to use it as the API programmers intended. And, throughout the book, I will regularly point out further learning opportunities in which you can find out the inner workings of the Android API. Also, we will be writing classes that are themselves reusable, kind of like our own API, except that our classes will focus on what we want our app to do.
Welcome to the world of object-oriented programming (OOP). I will constantly refer to OOP in every chapter and there is the big reveal in Chapter 10, Object Oriented Programming.
To get things done on Android, we write Java code of our own, which also uses the Java code of the Android API. This is then compiled into DEX code and run by the DVM, which in turn has connections to an underlying operating system called Linux that handles the complex and extremely diverse range of hardware that are the different Android devices.
The manufacturers of the Android devices and of the individual hardware components obviously know this too, and they write advanced software called drivers that ensure that their hardware (for example, CPU, GPU, GPS receivers, memory chips, and hardware interfaces) can run on the underlying Linux operating system.
The DEX code (along with some other resources) is placed in a bundle of files called an Android application PacKage (APK), and this is what the DVM needs to run our app:

Note
It is not necessary to remember the details of the steps that our code goes through when it interacts with the hardware. It is enough just to understand that our Java code goes through some automated processes to become the apps that we will publish to the Google Play Store.
The next question is where exactly does all this Java coding and compiling into DEX code, along with APK packaging, take place? Let's look at the development environment we will be using.
A development environment is a term that refers to having everything you need to develop, set up, and be ready to go in one place. We need two things to get started.
We talked a fair bit about compiling our Java code, as well as other people's Java code, into DEX code that will run on the DVM on the user's Android device. To use Java code, we need some free software called the Java Development Kit (JDK). The JDK also includes even more code from other people that is separate from the Android API.
There is an entire range of tools needed to develop for Android, and we also need the Android API, of course. This whole suite of requirements is collectively known as the Android Software Development Kit (SDK). Fortunately, downloading and installing a single application will give us these things all bundled together. The application is called Android Studio.
Android Studio is an integrated development environment (IDE) that will take care of all the complexities of compiling our code and linking with the JDK and the Android API. Once we have installed Android Studio, we can do everything we need inside this single application and put to the back of our minds many of the complexities we have been discussing.
Note
Over time, these complexities will become like second nature. It is not necessary to master them to make further progress.
So we had better get our hands on Android Studio.
Setting up Android Studio is quite straightforward, if a little time-consuming. Grab some refreshment and get started with the following steps:
Visit developer.android.com/studio/index.html. Click the big green DOWNLOAD ANDROID STUDIO button to proceed:

Accept the terms and conditions by checking the checkbox, and then click the big blue button DOWNLOAD ANDROID STUDIO FOR WINDOWS:

When the download is complete, run the file you just downloaded. It has a name that starts
android-studio-ide…, while the end of the name of the file will vary based on the current version at the time of reading.Click the Next > button to proceed:

Leave the default options selected, as shown in the following screenshot, and click the Next > button:

Next, we need to choose where to install Android Studio, as shown in the following screenshot:

The install wizard recommends 500 MB of free space, but you probably noticed from the previous screen that 2.1 GB was suggested. However, there are even more requirements later in the install process. Furthermore, it is much easier if you have all your Android Studio parts, as well as your project files, on the same hard drive.
For these reasons, I recommend having at least 4 GB of free space. If you need to switch drives to accommodate this, then use the Browse... button to browse to a suitable place on your hard drive.
When you are ready, click the Next > button.
In this next window, you are choosing the folder in your start menu in which Android Studio will appear. Leave it at the default, as shown next:

Click Install. This step might take some time, especially on older machines or if you have a slow internet connection. When this stage is done, you will see the following screen:

Click Next >.
Android Studio is now installed—kind of. Check the Start Android Studio checkbox and click the Finish button:

You will be greeted with the Welcome screen, as shown in the following screenshot:

Choose Standard install type, as shown in the following screenshot:

Choose whichever color scheme looks nice to you. I chose IntelliJ, as shown in the following screenshot:

Click Next.
Now you will see the Verify Settings screen:

Click the Finish button. Android Studio will now commence some more downloads, which could take some time.
When Android Studio is ready, you will have the option to run Android Studio. At this point, click the Finish button. Android Studio is most likely ready. You can leave it open if you are carrying straight on with the next section, or you can close it and then reopen it when instructed in the next section.
Using your preferred file manager software, perhaps Windows Explorer, create a folder called AndroidProjects. Make it at the root of the same drive where you installed Android Studio. So, if you installed Android Studio at C:/Program Files/Android, then create your new folder at C:/AndroidProjects.
Or, if you installed Android Studio at D:/Program Files/Android, then create your new folder at D:/AndroidProjects.
Note
Note that the screenshots in the next section show the AndroidProjects folder on the D: drive. This is because my C: drive is a bit full up. Either is fine. I did the install tutorial screen captures on a borrowed PC with plenty of space on the C: drive because that is the default for Android Studio. Keeping it on the same drive as the Android installation is neater and could avoid future problems, so do so if you can.
Notice that there is no space between the words Android and Projects, and that the first letter of both words is capitalized. The capitalization is for clarity and the lack of a space is required by Android Studio.
Android Studio and the supporting tools that we need are installed and ready to go. We are really close now to building our first app.
Now, let's look a little bit at the composition of an Android app.
We already know that we will write Java code that will itself use other people's Java code and will be compiled into DEX code that runs on the DVM on our users' Android devices. In addition to this, we will also be adding and editing other files that get included in the final APK. These files are known as Android resources.
Our app will include resources such as images, sound, and user interface layouts that are kept in separate files from the Java code. We will slowly introduce ourselves to them over the course of the book.
They will also include files that have the textual content of our app. It is convention to refer to the text in our app through separate files because it makes them easy to change, and makes it easy to create apps that work for multiple different languages and geographical regions.
Furthermore, the actual User Interface (UI) layout of our apps, despite the option to implement them with a visual designer, are actually read from text-based files by Android.
Android (or any computer) of course cannot read and recognize text in the same way that a human can. Therefore, we must present our resources in a highly organized and predefined manner. To do so, we will use Extensible Markup Language (XML). XML is a huge topic, but fortunately, its whole purpose is to be both human-and machine-readable. We do not need to learn this language; we just need to note (and then conform to) a few rules. Furthermore, most of the time we interact with XML, we will do so through a neat visual editor provided by Android Studio. We can tell when we are dealing with an XML resource because the filename will end with the extension .xml.
You do not need to memorize this as we will constantly be returning to this concept throughout the book.
In addition to these resources, it is worth noting that Java as used in Android has a structure to its code. There are many millions of lines of code that we can take advantage of. This code will obviously need to be organized in a way that makes it easy to find and refer to. It is organized into packages that are specific to Android.
Whenever we create a new Android app, we will choose a unique name known as a package. We will see how we do this in the section "Our first Android app". Packages are often separated into sub-packages, so they can be grouped together with other similar packages. We can simply think of these as folders and sub-folders, which is almost exactly what they are.
We can think of all the packages that the Android API makes available to us as code from a code library. Some common Android packages that we will use include the following:
android.graphicsandroid.databaseandroid.view.animation
As you can see, they are arranged and named to make what is in them as obvious as possible.
Note
If you want to get an idea of the sheer depth and breadth of the Android API, then look at the Android package index: https://developer.android.com/reference/packages
Earlier, we learned that the reusable code blueprints that we can transform into objects are called classes. Classes are contained in these packages. We will see in our very first app how we can easily import other people's packages, along with specific classes from those packages for use in our projects. A class will almost always be contained in its own file with the same name as the class, and it will also have the .java file extension.
In Java (and therefore Android), we further break up our classes into sections that perform the different actions of our class. We call these action-oriented sections methods. It is most often the methods of the class that we will use to access the functionality provided within all those millions of lines of code.
We do not need to read the code. We just need to know which class has what we need, which package it is in, and which methods from within the class give us precisely the result we are after.
The following diagram shows a representation of the Android API. We can think of the structure of the code we will write ourselves in the same way, although we will usually have just one package per app.
Of course, because of the object-oriented nature of Java, we will only be using selected parts from this API. Notice also that each class has its own distinct data. Typically, if you want access to the data in that class, you need to have an object of that class:

You do not need to memorize this as we will constantly be returning to this concept throughout the book.
By the end of this chapter, we will have imported multiple packages, as well as dozens of classes from them, and we will have used many of their methods as well. By the end of Chapter 2, First Contact: Java, XML and the UI Designer we will have even written our very own methods.
Now we can get started on the first app. In programming, it is tradition for the first app of a new student to use whatever language/OS they are using to say hello to the world. We will quickly build an app that does just that, and in Chapter 2, First Contact – Java, XML, and the UI Designer, we will go beyond that and add some buttons that respond to the user when they are pressed.
Note
The complete code as it stands at the end of this chapter is in the download bundle in the Chapter 1 folder for your reference. You can't simply copy and paste this code, however! You still need to go through the project creation phase explained in this chapter (and at the beginning of all projects), as Android Studio does lots of work behind the scenes. Once you become familiar with these steps and understand which code is typed by you, the programmer, and which code/files are generated by Android Studio, you will then be able to save time and typing by copying and pasting the files I supply in the download bundle.
Follow these steps to start the project.
Run Android Studio in the same way you run any other app. On Windows 10, for example, the launch icon appears in the start menu.
You will be greeted with the Android Studio welcome screen, as shown in the following screenshot. Locate the Start a new Android Studio project option and left-click it:

After this, Android Studio will bring up the New Project window. This is where we will perform the following:
Name the new project
Choose where on our computer the project files should go
Provide a Company domain to distinguish our project from any others in case we should ever decide to publish it on the Play Store
The name of our project is going to be
Hello World,and the location for the files will be yourAndroidProjectsfolder that we created in the Setting up Android Studio section.The company domain can be almost anything you like. If you have a website, you could use the format
Yourdomain.com. If not, feel free to usegamecodeschool.com,or something that you just make up yourself. It is only important when you come to publish.To be clear, in case you can't see the details in the following screenshot clearly, here are the values I used. Remember that yours might vary depending upon your choices of company domain and project location:
Option
Value entered
Application name:
Hello WorldCompany domain:
gamecodeschool.comInclude C++ support
Leave this option unchecked (see the next information box if you want to know more)
Project location:
D:\AndroidProjects\HelloWorldNote
Note that the application name has a space between "Hello" and "World," but the project location does not and will not work if it does.
The following screenshot shows the New Project screen once you have entered all the information:

In the previous screenshot, you can see that Android Studio has auto-generated a Package name based on the information entered. Mine is com.gamecodeschool.helloworld. Yours might be the same or it may differ; it doesn't matter.
Note
You can write Android apps in a few different languages, including C++ and Kotlin. There are various advantages and disadvantages to each compared to using Java. Learning Java will be a great introduction to other languages, and Java is also the official language of Android. Most top apps and games on the Play Store are written in Java.
Click the Next button, and then we will continue to configure the Hello World project. The following set of options is the Target Android Devices window. We can leave the default options selected as we are only making apps for Phone and Tablet. The Minimum SDK option can be left as it is because it means our game will run on most (nearly all) Android devices, from Android 4.0 to the latest version.
Note
We already know that the Android SDK is the collection of packages of code that we will be using to develop our apps. Like any good SDK, the Android SDK is regularly updated, and each time it gets a significant update the version number is increased. Simply put, the higher the version number, the newer the features you get to use; the lower the version number, the more devices our app will work on. For now, the default API 15, Android 4.0.3 (Ice Cream Sandwich), will give us lots of great features and near 100% compatibility with the Android devices currently in use. If, at the time of reading, Android Studio is suggesting a newer API, then go with that.
If you are reading this some years in the future, then the Minimum SDK option will probably default to something different, but the code in this book will still work.
This next screenshot shows the Target Android Devices window we have just discussed, mainly just for your reference:

Click the Next button, and then we will move on.
The window that follows has the slightly obscure-sounding title Add an Activity to Mobile. These are some useful project templates that Android Studio can generate for you depending on the type of app you are going to develop. We will learn all about Android Activity as the book progresses.
Note
As a brief introduction, an Activity is a special class from the API and every Android app must have at least one. It is the part of the code in which our app will begin when it is launched by the user and handles interaction with the user. The options on this screen provide different ready-made templates of Activity class code to give programmers a fast start when creating various types of app. As we are starting from scratch, the most appropriate option for us is Basic Activity.
We will use the Basic Activity option. Android Studio will auto-generate a small amount of code and a selection of resources to get our project started. We will discuss the code and the resources in detail in the next chapter.
Select Basic Activity. Here is a screenshot of the Add an Activity to Mobile tab with the Basic Activity option selected:

Make sure Basic Activity is selected and click Next.
On the Customize Activity screen, which you should now be looking at, we have a few changes to make. We could leave the defaults as they are, but then Android would generate more files than we need. In addition, we want to change the Activity Name to something more appropriate than MainActivity. Follow this short list of changes to configure the Customize Activity screen:
Change Activity Name to
HelloWorldActivityNotice that Layout Name changes automatically to activity_hello_world. Leave this as it is. We will explore the significance of this in the next chapter.
Notice that Title changes automatically to HelloWorldActivity. Change it to My First Activity.
Leave the Use a Fragment option unchecked. We will explore Android Fragments later in the book.
Check that this is what the Customize Activity screen looks like when you're done with the previous step:

Finally for this section, you can click the Finish button and we will explore a little of what we (and Android Studio) have just achieved.
Android Studio will prepare our new project for us. This might take a few seconds or a few minutes, depending upon how powerful your PC is.
At this stage, you might be ready to proceed, but depending on the install process, you might need to click a couple of extra buttons.
Look in the bottom window of Android Studio to see if you have the following message:
Note
Note that if you do not see a horizontal window at the bottom of Android Studio like the one shown below, you can skip these two extra steps.


Before we explore any of the code and learn our first bit of Java, you might be surprised to learn that we can already run our project. It will just be a fairly featureless screen, but as we will be running the app as often as possible to check our progress, let's see how to do that now. You have three options:
Run the app on the emulator on your PC (part of Android Studio) in debug mode
Run the app on a real Android device in USB debugging mode
Export the app as a full Android project that can be uploaded to the Play store
The first option (debug mode) is the easiest to set up because we did it as part of setting up Android Studio. If you have a powerful PC, you will hardly see the difference between the emulator and a real device. However, screen touches are emulated by mouse clicks and proper testing of the user's experience is not possible in some of the later apps, such as the drawing app and the Snake game. Furthermore, you might just prefer to test out your creations on a real device; I know I do.
The second option of using a real device has a couple of additional steps, but once set up it is as good as option one and the screen touches are for real.
The final option takes about five minutes (at least) to prepare, and then you need to manually put the created package onto a real device and install it (every time you make a change to the code).
Probably the best way is to use the emulator to quickly test and debug minor increments in your code, and then fairly regularly use USB debugging mode on a real device to make sure things are still as expected. Only occasionally will you want to export an actual, deployable package.
Note
If you have an especially slow PC or a particularly aging Android device, you will be fine running the projects in this book using just one option or the other. Note that a slow Android phone will probably be OK and will cope, but a very slow PC will probably not handle the emulator running some of the later apps and you will benefit from running them on your phone/tablet.
For these reasons, I will now go through how to run the app using the emulator and USB debugging on a real device.
Follow these simple steps to run the game on the default Android emulator:
On the Android Studio main menu bar, select Tools | Android AVD Manager. AVD stands for Android Virtual Device (an emulator). You will see the following window:

Notice that there is an emulator in the list. In my case, it is Pixel 2 XL API 28. If you are following this sometime in the future, it will be a different emulator that was installed by default. It won't matter. Click the green play icon (to the right) shown in the following screenshot and wait while the emulator boots up:

Now you can click the play icon on the Android Studio quick-launch bar as shown in the following screenshot, and when prompted, choose Pixel 2 XL API 28 (or whatever your emulator is called) and the app will launch on the emulator:

You're done. Here is what the app looks like so far in the emulator. Remember that you might (and probably do) have a different emulator—that's fine:
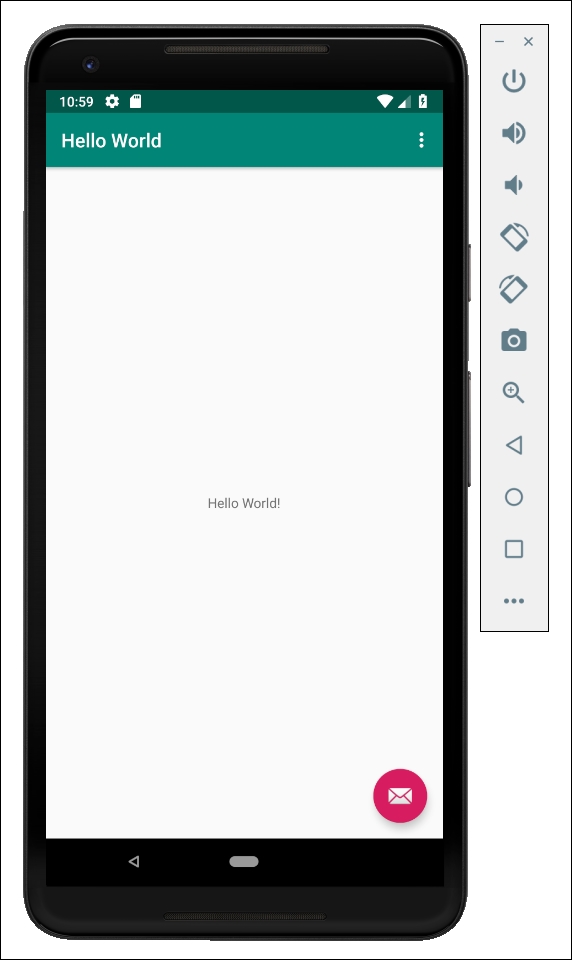
Clearly, we have more work to do before we move to Silicon Valley and look for financial backing, but it is a good start.
We need to test and debug our apps often throughout development to check for any errors, crashes, or anything else unintended.
Note
We will see how we get errors and other feedback for debugging from our apps in the next chapter.
It is also important to make sure it looks good and runs correctly on every device type/size that you want to target. Obviously, we do not own one of each of the many thousands of Android devices. This is where emulators come in.
Emulators, however, are sometimes a bit slow and cumbersome, although they have improved a lot recently. If we want to get a genuine feel for the experience our user will get then you can't beat deploying to a real device. So, we will want to use both real devices and emulators while developing our apps.
Note
If you are planning on using the emulator again soon, leave it running to avoid having to wait for it to start again.
If you want to try out your app on a tablet, you're going to need a different emulator.
Note
Creating a new emulator
If you want to create an emulator for a different Android device, this is simple. From the main menu, select Tools | AVD Manager. In the AVD Manager window, left-click Create New Virtual Device. Now left-click on the type of device you want to create—TV, Phone, Wear OS, or Tablet. Now simply left-click Next and follow the instructions to create your new AVD. Next time you run your app, the new AVD will appear as an option to run the app on. We will create a new tablet emulator step by step in the next chapter.
Now we can look at how to get our app onto a real device.
The first thing to do is to visit your device manufacturer's website and obtain and install any drivers that are needed for your device and operating system.
The next few steps will set up the Android device for debugging. Note that different manufacturers structure the menu options slightly differently to others. But the following sequence is probably very close, if not exact, for enabling debugging on most devices:
Tap the Settings menu option or the Settings app on your phone/tablet.
This next step will vary slightly for different versions of Android. The Developer options menu is hidden away so as not to trouble regular users. You must perform a slightly odd task to unlock the menu option. Tap the About device or About Phone option. Find the Build Number option and repeatedly tap it until you get a message informing you that You are now a developer!
Go back to the Settings menu.
Tap Developer options.
Tap the checkbox for USB Debugging.
Connect your Android device to the USB port of your computer.
Click the play icon from the Android Studio toolbar, as shown in the following screenshot:

When prompted, click OK to run the game on your chosen device.
We are now ready to learn some Java and add our own Java code to the Hello World project.
Q1) So, Android isn't really an operating system. Is it just a virtual machine and all the phones and tablets are really Linux machines?
A) No, all the different subsystems of an Android device, which include Linux, the DVM, and the libraries and drivers together, are what makes up the Android operating system.
Q2) I still don't understand all these technical terms, such as DVM, object-oriented and APK. Should I re-read this chapter?
A) No, this isn't necessary, as we just need to introduce this jargon and will be revisiting it all, as well as clarifying it as the book progresses. If you understand the following two points, you are ready to proceed to Chapter 2, First Contact: Java, XML and the UI Designer:
We will be writing Java code and creating other resources
Android Studio with the help of the JDK and will turn this code and resources into real Android apps.
So far, we have set up an Android development environment and created and deployed an app on both an emulator and a real device. If you still have unanswered questions (and you probably have more than at the start of the chapter) don't worry, because as we dig deeper into the world of Android and Java things will become clearer.
As the chapters progress, you will build a very rounded understanding of how everything fits together, and then success will just be a matter of practice and digging even deeper into the Android API.
In the next chapter, we will edit the UI using the visual designer and raw XML code, as well as write our first Java methods and get to use some of the methods provided for us by the Android API.