


This chapter serves as an installation instruction for all the development toolkits required to develop Android on Windows environment. It is separated into the following subtopics:
- Brief introduction to the Android platform
- Installing the Java Development Kit (JDK)
- Installing the Android SDK
- Installing the Eclipse (Juno)
- Installing the Android Development Toolkits (ADT) in Eclipse (Juno)
- Linking the Android SDK to the Eclipse
Before we proceed with the installation guide, there is some basic information an Android developer must know.
Introducing the Android platform
In simple terms, Android is a Linux based operating system for touch screen devices developed by Android Inc., financed by Google and was bought in later 2005. The beta version of Android came back in November 2007 and the commercial version 1.0 was released in September 2008. As of 2013, over 500 million active devices use the Android OS worldwide.

Android is a software stack for mobile devices that includes an operating system, middleware and key applications (platform). The Android Software Development Kit (SDK) provides the tools and Application Programming Interfaces (APIs) necessary to begin developing applications on the Android platform using the Java programming language. The kernel of Android is Linux.
A mobile software application that runs on Android is an Android app. The apps use the extension of .apk as the installer file extension. There are several popular examples of mobile apps such as Foursquare, Angry Birds, Fruit Ninja, and so on.
Primarily in an Eclipse environment, we use Java, which is then compiled into Dalvik bytecode (not the ordinary Java bytecode). Android provides Dalvik virtual machine (DVM) inside Android (not Java virtual machine JVM). Dalvik VM does not ally with Java SE and Java ME libraries and is built on Apache Harmony java implementation.
Dalvik VM is a register-based architecture, authored by Dan Bornstein. It is being optimized for low memory requirements and the virtual machine was slimmed down to use less space and less power consumption.
API level is an integer value that uniquely identifies the framework API revision offered by a version of the Android platform.
The Android platform provides a framework API that applications can use to interact with the underlying Android system. The framework API consists of:
The latest distribution statistics until May 1, 2013, are shown in the following screenshot. It indicates that Android 2.3.3 has the largest market share; however, Android 4.1.x is gaining momentum and will have the dominant share. It is important to know that if the app is primarily targeted to an Android version, it will not run on the previous version of Android.
For instance, if you are developing an app for Android 2.2 (API level 8), then the application will not run on Android 2.1 (API level 7) and below. However, the app is compatible for Android 2.2 and later.

Pie chart of the Android API level distribution (Source: http://developer.android.com/about/dashboards/index.html)
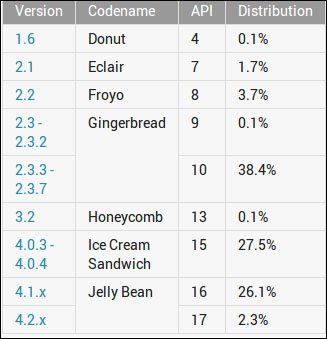
The Android API level distribution (Source: http://developer.android.com/about/dashboards/index.html )
In this part of the chapter, we will see how to install the development environment for Android on the Eclipse Juno (4.2). Eclipse is the major IDE for Android development (see the following screenshot). We need to install eclipse extension ADT (Android Development Toolkit) for development of the Android Application:

ADT on Eclipse in action
To download Android packages a Google API internet connection is a must, hence take this in notice before moving further. The steps on Windows using Eclipse Juno are as follows:
Software needed:
To check whether your PC has an existing JDK and it is installed correctly, go to command prompt, and type javac –version (as shown in the following screenshot). It is recommended to install JDK 1.6.x for Android Application Development as it may complain that the compiler compliance level is greater than 6, and could run into problems:

Checking the JDK version
You may download JDK 1.6 (Java Development Toolkit) from the download site and install it. Make sure that JAVA_HOME is set after the installation, and check the version executing the preceding command.http://www.oracle.com/technetwork/java/javase/downloads/index.html (see the following screenshot).
This step can be skipped if we have java 1.6.x installed:

Java PATH setting
Create a folder named android-dev (android-dev is just a suggestion; you may create another name instead). The folder android-dev will be used consistently throughout this chapter. This folder is to hold all the software that is needed for Android development. This folder is needed again in another procedure.
Download from http://developer.android.com/sdk/index.html, and install this software in the android-dev folder. Bear in mind this download only provides the basic tools of Android SDK, not the complete installation. Later, we need to download the Android system images, APIs, examples, documentations and other libraries:

Android SDK download page
After completion of the download, install the SDK in the folder mentioned earlier; in C:\android-dev\android-sdk as shown in following screenshot.
During the installation, the Android SDK will detect the Java Development Kit in the machine. If we have installed the latest JDK, it should have no problems:

Android SDK installation path
Eclipse Juno (4.2) is available for download at http://www.eclipse.org/downloads/:

Download page of Eclipse Classic
The Eclipse comes in a ZIP file, so just unzip it and find the eclipse.exe file to run it.
Immediately extract Eclipse in the folder as created earlier (in C:\android-dev). After the extraction, create a desktop shortcut to make life easier, as depicted in the following screenshot:

Create Eclipse shortcut
Run Eclipse by identifying the Eclipse installation folder and double-click eclipse.exe (or double-click the shortcut in the Desktop). Provide a folder to store all the projects' source codes. And once again, create this folder under the android-dev folder, as shown in the following screenshot:

Select Eclipse Workspace
This new Eclipse installation does not provide the Android Developer Toolkits (ADT) plugins. To install this plugin navigate to Window | Preferences to open the Preferences panel. Click on Install/Update | Available Software Sites (on the left panel). Click on the Add button (on the right panel) to add a software download site (again an Internet connection is needed).
Another window will appear. Provide ADT in the Name (for example), and the Location https://dl-ssl.google.com/android/eclipse/(as provided in http://developer.android.com/sdk/eclipse-adt.html):

In the Available Software dialog, select the checkbox next to Developer Tools and click on Next. In the next window, you'll see a list of the tools to be downloaded. Select all except NDK plugins and click on Next. We will be discussing the tools in the next chapters:

Selecting the ADT and SDK tools
Read and accept the license agreements, then click on Finish. If you get a security warning saying that the authenticity or validity of the software can't be established, click on OK. When the installation completes, restart Eclipse.
Run Eclipse. In the Windows | Preferences, click on Android. Locate the folder of the android-sdk from the step where you installed the android-sdk, as shown in the following screenshot:

Android preferences in Eclipse
Click on Apply and hit OK.
The next thing to do is to download the Android APIs and the operating system images. Installing Android SDK is time consuming. It requires a smooth broadband line because after the installation you need to download the API package for Android and Google API.
To start this, click on the Android SDK Manager icon, as shown in the following screenshot:
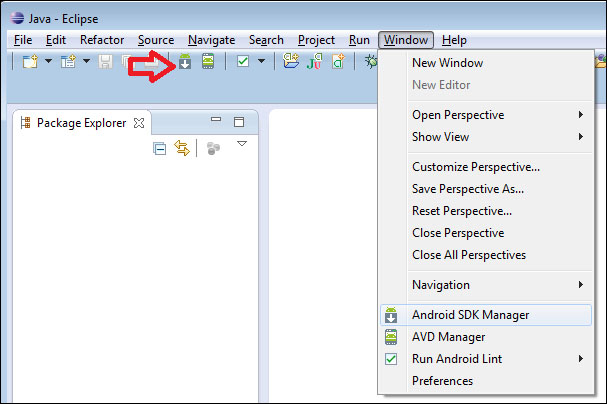
The Android SDK Manager icon
You will be provided with the list of all SDK Platforms for all Android versions. I suggest you be selective, just download your target platform first. If you are to develop an app for Froyo (Android 2.2) you need to download the API version 8. Later, when you have more time, you could come back and download for the other version. If you do not have any time and Internet data constraints then you may download all. It will fetch API packages, Android OS images, debugging tools and other softwares related to Android development.
For this time, we will download the latest SDK with Jellybean system image and API level 16, as shown in the following screenshot:

Installing SDK with API level 16
Before hitting the Install button, there is one important tip I'd like to share. While conducting this procedure, we may encounter a connection reset problem for no specific reason. To get over this issue, on the Android SDK Manager window, navigate to Tools | Options. Uncheck the Force https://...sources to be fetched using https://... option, and Close (shown in the following screenshot). You may start the SDK and API installation now:

After the SDK, APIs and system images have been downloaded, restart Eclipse. The wait is worth it! After almost a couple of hours of installation and downloading packages, I got this nice graphical interface for the screen layout arrangement, as shown in the following screenshot. Check the Android Preferences window, and you may see the Android 4.1 in the API list. To add another API, again you need to download through the Android SDK Manager:

List of Android APIs
To avoid earlier steps on setting up ADT with Eclipse and kick start development please download the ADT bundle from http://developer.android.com/sdk/index.html and follow the steps for setting up at http://developer.android.com/sdk/installing/bundle.html.
In the next chapter, we will look into tools of an ADT environment that eases the development.