Creating and Enhancing PDF Files from Scans
Many publications produced on paper are being moved to an electronic format. Old contracts, books that were written long before computers existed, and typed letters are being scanned and made available online. This process has been taking place for quite some time. Reading archives from a library in a small town in Eastern Europe, for example, can lead to a great discovery. Likely, the chosen format for posting this information is PDF. The process of transferring these documents to the internet begins with scanning.
Scanning is also at the heart of communicating by fax. Faxes depend on bitmap images to transfer document pages. The most common graphic file format utilized by faxes is .tiff, which is a bitmap. This method of communication, though, is no longer sufficient. Readers need to search text, make corrections, and extract text and images for other projects. Therefore, enhancing scans is an important feature of Acrobat Pro.
This chapter will detail the process of scanning paper pages and converting them to PDF. We will also discuss how images from tablets or smartphones are converted to PDF and enhanced and optimized in Acrobat.
We’ll cover the following topics in this chapter:
- Creating a PDF by using a scanner
- Enhancing a scanned image through OCR
- Optimizing a scanned document
Creating a PDF by using a scanner
All photos and scans are pixel-based images. File formats vary depending on the editing software or the selection of output by the user. The most common application-independent formats are the following:
- JPEG (or JPG), short for Joint Photographic Experts Group
- PNG, short for Portable Network Graphics
- GIF, short for Graphics Interchange Format
- TIFF, short for Tagged Image File Format
Bitmap or raster image (as opposed to vector) means that it is built by tiny squares arranged in columns and rows. Each square contains color information. You do not see pixels; you only see the content until the view is magnified very closely on the screen. Here are some examples of pixel-based images:
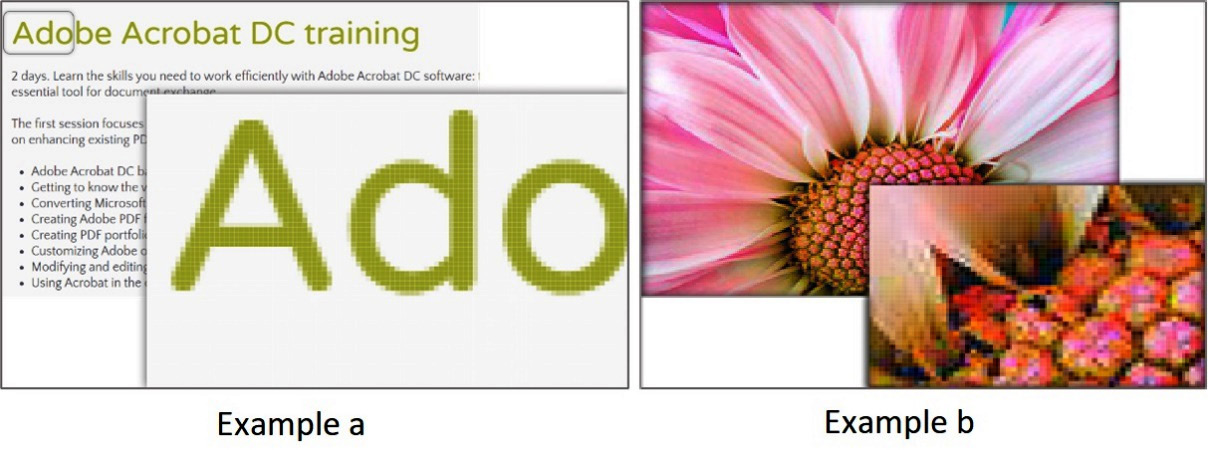
Figure 2.1 – Examples of text and photo in pixel-based images
The limitation of pixel-based images is that they are flat, meaning text is not editable. Therefore, scanned pages of publications need to be enhanced so that the text can be searched, copied, and possibly reused if the process does not infringe on copyrights.
The following discussion will take you through two separate though similar paths in creating PDFs from scans:
- Using a scanner connected to a desktop system with Acrobat Pro
- Using an image captured from a camera, and saved and opened in Acrobat Pro
For more information on the Adobe Scan mobile application, see the Using a mobile device as a scanner section in Chapter 1, Understanding Different Adobe Acrobat Versions and Services.
Scanning document pages
Scanners, as opposed to cameras, provide an optimal environment for converting paper pages to a digital format, especially pages with a lot of text. It is much easier to align paper edges and the content is more accurately represented in the scan, as opposed to photos, which need quite a bit of alignment adjustment.
Scanners come with their own application, but you can also work directly from Acrobat by selecting a connected scanner device (TWAIN scanner drivers and Windows Image Acquisition (WIA) drivers are supported). This allows you to also use the scanner interface and buttons.
![]() On macOS, Acrobat supports TWAIN and Image Capture (ICA). Configuration options appear after you choose a scanner and click Next.
On macOS, Acrobat supports TWAIN and Image Capture (ICA). Configuration options appear after you choose a scanner and click Next.
Important note
The options and specific steps are different in Microsoft Windows and macOS. I will do my best to at least acknowledge the differences and when possible include information for Mac users; however, our examples will focus on Windows and Microsoft Office for a Windows environment.
We will now learn how to scan a paper document. Here are the steps in Windows:
- Select the File | Create | PDF from scanner options. If you prefer using the Tools panel, select the Create PDF | Scanner options.
- The Scan & OCR options page opens with multiple choices to refine the output of the scanned pages. They will vary slightly based on the selected scanning device, which may include a smartphone if it is connected to your system. If you select a scanner, the following warning may appear: WIA Scanner Driver might face problems using “Hide Scanner’s Native Interface” mode. Switching to “Show Scanner’s Native Interface” mode.
The following are the steps on macOS:
- Select the File | Create | PDF from scanner options. This will open a window with options. If you prefer using the Tools panel, select the Create PDF | Scanner | Next options to open the available settings.
- The Scan & OCR options page opens with multiple choices to refine the output of the scanned pages. The settings will vary based on the scanning device connected to your system.
The following options are consistent in both the Mac and Windows OSs, though the specific location of each setting may vary. You can probably figure this one out. We are going to base our examples on Windows. We will go through the choices for optimizing scan quality.
- You can select the option to append to an existing file in a specified location. This will allow you to create a multipage scan saved in a specific location.
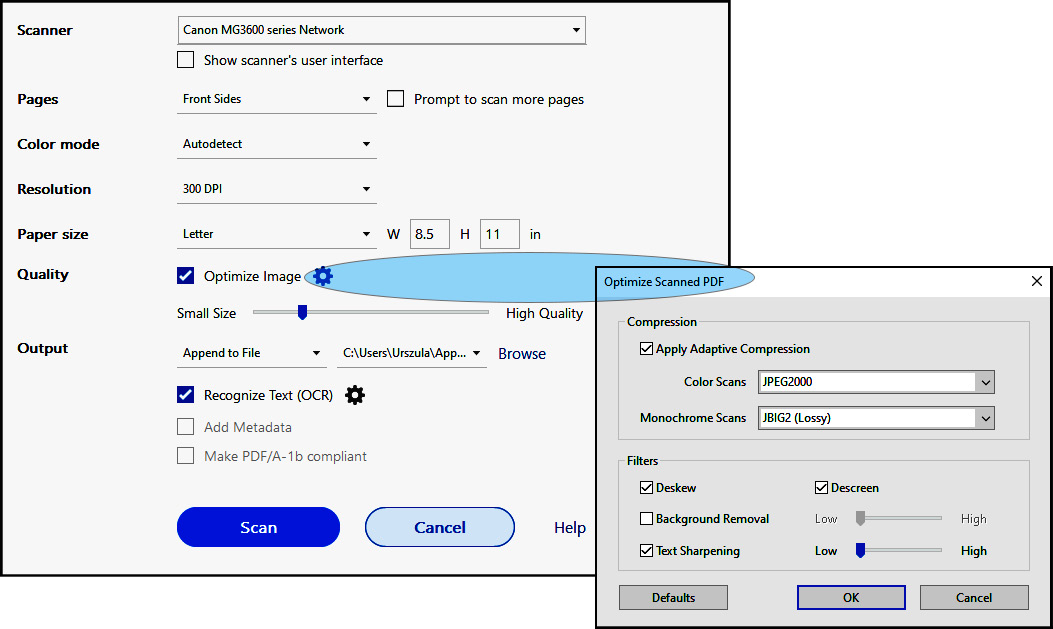
Figure 2.2 – Scanner options (availability of options depends on the selected scanner)
- Selecting the Scan | Default Settings options will open a dialog box, as shown in Figure 2.2, with options based on the selected scanner type. Here are some settings that you can define if you are using a Canon MG3600 series scanner:
- Whether the front or both sides of the page are to be scanned.
- The color model. The Black and White option is the best choice for black text on white pages, typically for office memos, forms, contracts, and more.
- The resolution of the scan, where the higher the resolution, the larger the file size. The recommended scanning resolutions are 300 dpi for grayscale and RGB input, or 600 dpi for black-and-white input for pages with a very small font size, 9 points or lower.
Important note
OCR stands for optical character recognition. It is a process where software analyzes an image of the text created by bitmaps/pixels and converts it into font-based editable type. Since fonts are mapped to international text character standards, enhancing a scanned image of text with OCR adds a dimension to a .pdf file. It makes its text content accessible, searchable, and editable, allowing it to expand document features to include other interactive enhancements.
Selecting the proper resolution setting for scanning sets a good balance between page image quality that affects OCR accuracy and file size. For black-and-white, mostly text pages, 300 dpi is optimal. Lower settings, such as 150 dpi or lower, produce a higher rate of font-recognition errors. On the other hand, 400 dpi or higher resolution slows down the scanning process and produces much larger file sizes.
For pages with very small font sizes, you may need to increase the resolution value to prevent OCR unrecognized word errors. To scan text-rich pages, the Black and White setting works best.
- The Deskew option rotates any page that is not square with the sides of the scanner bed, to make the PDF page align vertically. Choose a checked or unchecked box.
- Background Removal should be applied to pages with photos. What you see as white paper color is not pure white when interpreted by a scanner. To increase the contrast, this function whitens almost all white areas of grayscale and color to produce a white background. This is not needed in black-and-white input.
- The Descreen setting allows you to remove halftone dots. Photos printed on paper are built with tiny dots of ink: Cyan, Magenta, Yellow, and Black (CMYK) arranged in a very precise pattern to create a wide range of colors. When pages containing photos are scanned, a new pattern is created and it often disrupts the original pattern of dots, which degrades the quality of images. In the print industry, it is called a moire pattern. If text is part of a photo, the moire pattern also makes it difficult to recognize it by OCR. Toggling this setting on applies a filter that improves legibility for the OCR. If pages have no photos, the setting should be turned off.
- Text Sharpening sharpens the text of the scanned
.pdffile. The default value is set to Low but works for most documents. Increase it if the quality of the printed document is low and the text is unclear. - Paper size provides many standards listed as options or fields where you can type a custom page size.
- The Optimize Image options let you choose the format for color photo output, such as
.jpeg,.jpeg2000, or monochrome (black and white) images:- The
.jpegformat refers to a standard for images established by the Joint Photographic Experts Group designed to balance image quality and file size in digital photography. The format is lossy, meaning the process of compression deletes pixel data. It was created in 1992 and since then has been widely adopted by all browsers on the World Wide Web and social media. .jpeg2000was created in the year 2000 by the same group with the intent to address the limitations of the original format caused by loss of pixel data in images. It preserves transparency and a higher level of compression, keeping the file size smaller while preserving the high quality of images. Unlike its predecessor, it has not gained universal acceptance and it is largely used in professional imaging environments such as medical diagnostics or digital cinema production. Do not use.jpeg2000when creatingPDF/A-compliant files.- ZIP compression refers to the
.tifflossless format used for compressing large-file-size images used in print only. They cannot be used on the internet as they are not supported by browsers.
- The
- Output provides choices to create a new PDF, append an existing one, or save multiple files.
- The gear icon next to OCR lets you choose one of 42 languages and provides a choice for Editable Text and Images, which creates a new custom font that closely resembles the original while preserving the page background using a low-resolution copy. The Searchable Image option deskews the original image if needed and places a text layer over it.
- Metadata such as document title, author, keywords, and others may be added.
- Scanned pages may automatically be made compliant with the PDF/A-1b standard designed for archiving PDFs. This ensures they meet internationally recognized formats and that documents can be preserved for viewing over a very long time.
Important note
PDF/A-1b is a version of PDF designed for archiving that meets basic levels of conformance. PDF/A compliant means your file meets the requirements of the PDF/A format. The most basic PDF/A requirements are as follows: all content is embedded (fonts, colors, text, images, and so on) and does not contain audio or video. The file is not encrypted. It follows standards for metadata, does not contain JavaScript, does not contain references to external content, and is not an XFA form created in LiveCycle Designer.
Creating a digital image of a paper page through scanning is the first step in creating a quality PDF. Options selected will affect how clean and sharp pages look. This will also have an impact on how accurately OCR will render live text in an invisible layer.
In the following section, we will discuss the options available to enhance both the visible content of a page (ink on paper) and text output after OCR conversion. We will start the process with a scanned or photographed page, where conversion or enhancements were not applied.
Enhancing a scanned image through OCR
Scanned pages and saved images may be enhanced in many ways. This section will guide you through those choices.
The process begins with clicking the File | Create PDF From File… option. Then, select and open the desired file.
The file is in the process of conversion at this point. Until it is saved, the title bar area filename is only temporary. You may also open a file that was already converted to PDF but no enhancements have been applied yet. It is a good idea to know what you’re working with before you begin the process. Here are two methods to find out whether any enhancements have been applied to a document:

Figure 2.3 – Acrobat selection and hand grabber tools
The Acrobat default options from the Select & Zoom Toolbar displayed at the top of the screen are the Selection (the black arrow) and Panning (the hand grabber) tools, similar but meant for specific functions. The Selection tool (the arrow) changes its appearance as you move it over different areas of a page. We will use it to examine the page using one of these methods:
- Method #1: Use a selection tool and move it over the page. If it is an image-only file, your cursor will have the shape of a crosshair even when positioned over the text area. When you click anywhere on the page, the entire page will be selected, since it is only a bitmap image at this point. This means that no enhancements have been applied yet.
- Method #2: We can test searching the text from the Edit | Find menu options or use the Ctrl + F keyboard shortcut (or Command + F on Mac). A search dialog box will open, as in this screenshot:
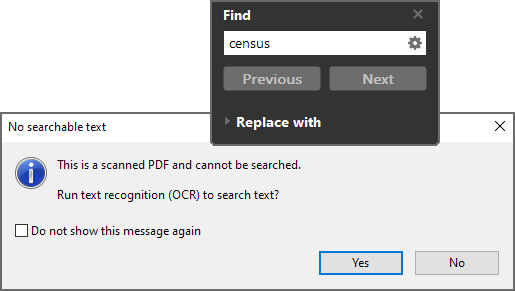
Figure 2.4 – Scan .pdf alert
Type a word of text that you see on the page in the Find field and click the Next button. The No searchable text alert appears giving you a choice to run text recognition (OCR):
- Choosing Yes will automatically perform the scan.
- Choosing No will give another alert saying Adobe Acrobat has finished searching the document. No matches were found for the phrase that you searched.
The alerts appear only when no enhancements have been applied to the scanned document and the page still contains only an image of text.
Important note
Acrobat offers to begin OCR immediately after you use the search function. Choosing the No option at this point is the better choice. Rather than depending on default settings, you will have access to options and more precise control of the scanning process using the Scan & OCR tool.
Now that we confirmed that the page is only a bitmap image, we can begin the process of applying enhancements using the Scan & OCR tool options.
If the tool is not visible in the Tools column on the right, open Tools in the bar directly below the menu:
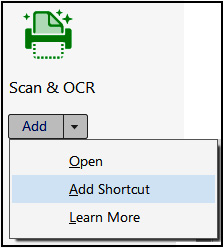
Figure 2.5 – Scan & OCR tool options
- Adding a shortcut will place the tool in the column of other tools from now on
- Clicking on the shortcut will open a toolbar at the top of the screen:

Figure 2.6 – Scan & OCR toolbar options
The Insert dropdown allows you to add another page using the From File… or From Scanner option.
The Enhance dropdown gives the Scanned Document and Camera Image options. Enhancement choices and their meaning are consistent with options covered in detail in the earlier discussion on scanner settings in the Scanning document pages section:
- The Scanned Document settings let you choose which page to enhance if you work with a multipage document. Optimization Options gives separate output settings for color or grayscale images and monochrome, typically text pages. Filters and Text Recognition Options can also be changed.

Figure 2.7 – Scan & OCR | Enhance | Scanned Document | Filters options
- The Camera Image choice gives you more options. In addition to recognizing text, it adjusts the contrast level of the background image. Settings contained in this function are especially useful when a document is a photo with skewed edges, a typical problem when taking pictures rather than scanning pages (Image 1):
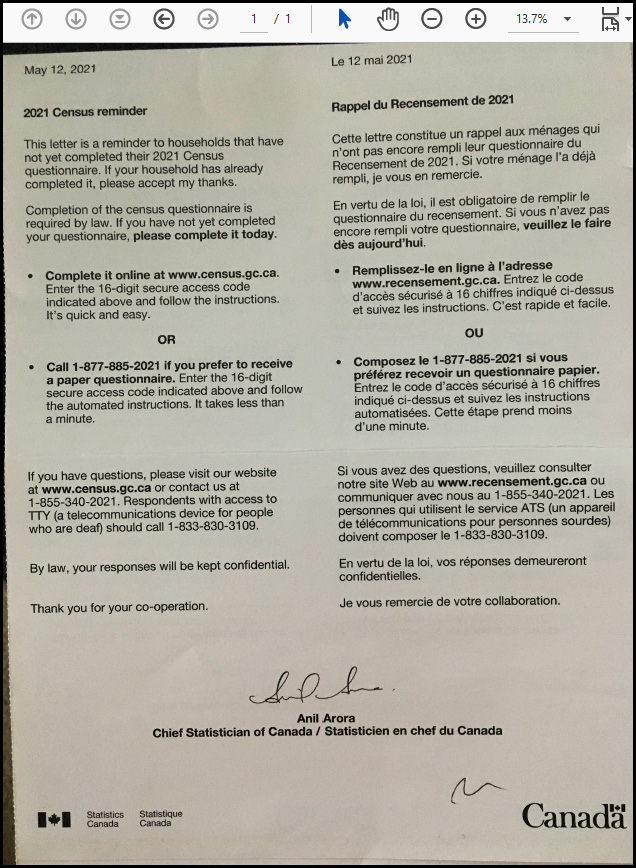
Figure 2.8 – Image 1: page with no enhancements
- Choosing the Whiteboard setting will give you the highest contrast for text pages with no photo images: white background for black text, as in forms or memos. Selecting the Auto Detect or Document options balances the contrast between text and images on the page. You can manually adjust the edges by sliding the corner blue handles (Image 2):
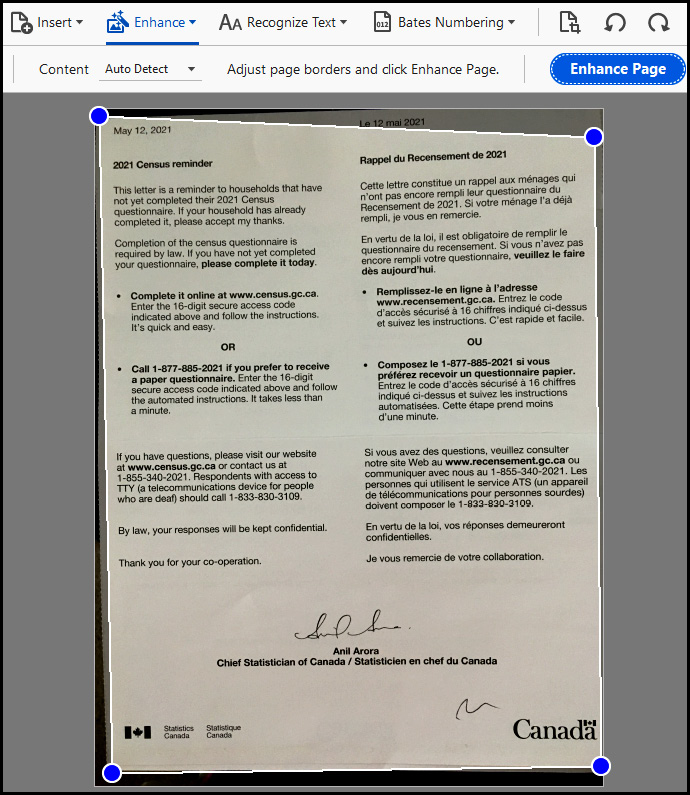
Figure 2.9 – Image 2: manual adjustment of page edges using blue handles
- After you click Enhance Page, the contrast is greatly improved, and the edges of the page are adjusted and aligned as a true rectangle (Image 3). The Adjust enhancement level slider at the top allows you to further control the level of contrast helpful to improve the quality of the visible text while balancing the quality of photos on the page. Ready for the next step?
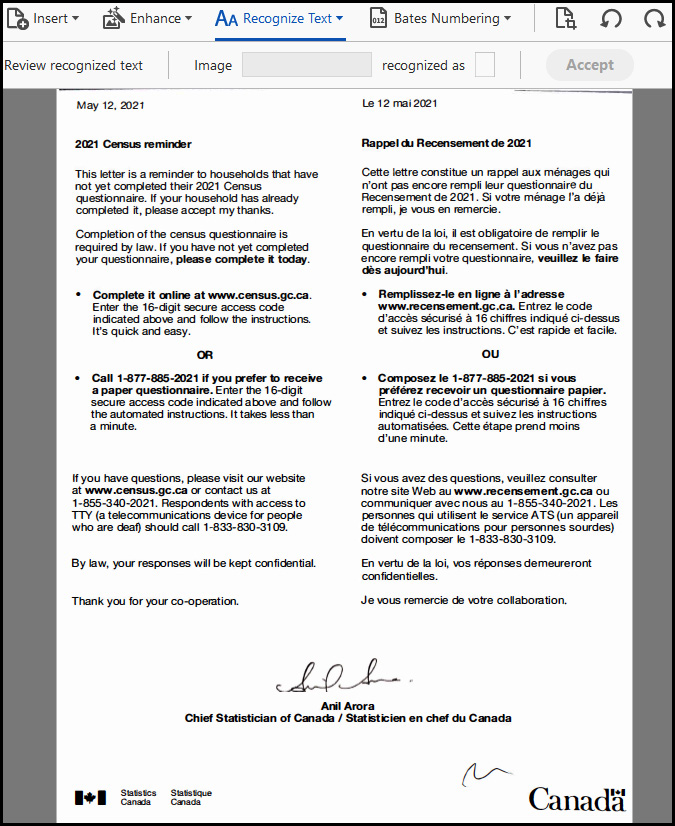
Figure 2.10 – Image 3: result after enhancement and OCR
You can now click on Recognize Text, which will give you choices for one or multiple files. After you make a selection, another toolbar opens with more options:
- You can select a language for the OCR engine to identify the characters. Not all text is in English. Can you see French on the sample page? In fact, you can expand the language choices to use Asian languages and right-to-left Hebrew if needed. Normally, the locale chosen at the time of installation determines the local language.
- You can adjust settings for output and resolution for this document only. When you click the Recognize Text button, OCR analyzes bitmaps of text and substitutes those areas with words and characters. If it is uncertain, the phrase is marked as suspect. Suspects appear in the
.pdffile as the original bitmap of the word, but the live text is included on an invisible layer and highlighted by red-bordered temporary rectangles, making it easy to spot problem areas, as seen in this screenshot:
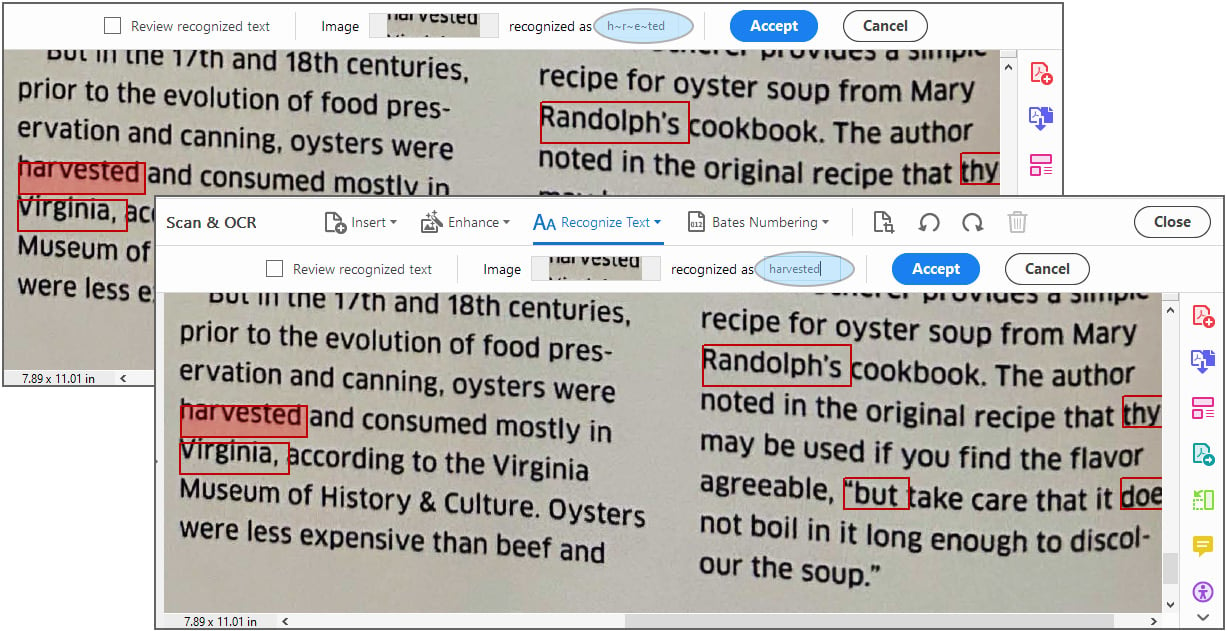
Figure 2.11 – Correcting recognized text
- Use Correct Recognized Text from the Recognize Text toolbar option to correct the suspects in this invisible layer. Using the toolbar field and highlighted areas of the page, you can type the correct text. If there are no suspects, you will see an alert saying Acrobat didn’t find any text needing correction.
Important note
The OCR accuracy level will vary depending on the document type, scan quality, and enhancements applied. Additionally, the Language setting may affect the reliability of the OCR results, with English being rather stable, but other languages may need more attention. To ensure acceptable quality of text recognition output, it should always be checked for suspects.
We can now test the usefulness of using OCR and other enhancements. Do you recall the file test at the start of our discussion? Now that we have applied enhancements, we will repeat testing the document with the same two methods mentioned earlier – Method #1 and Method #2. Note the differences in results:
- Method #1: Use a selection tool and move the cursor over the page. If it is not an image-only file anymore, your cursor will have the shape of a crosshair only on the margin and photo areas if there are any. Over the text area, the cursor changes to an I-beam, and when you click on the text, the insertion point signals that you can work with the text. It can be searched, selected, copied, and so on.
- Method #2: Test searching the text from the Edit | Find menu or use the Ctrl + F keyboard shortcut (or Command + F for macOS). Type a word of text that you see on the page in the Find field. Acrobat finds all phrases on the page and in parentheses tells you how many it has found. Click the Next or Previous button to find all instances.
So, now your document has been enhanced. Improved contrast and straightened edges make it much easier to read, and OCR made it searchable for text. The next section will show you how to take advantage of those newly added features.
Searching and using content in the enhanced PDF
Now that the document contains live text, you can find any phrase by selecting the Find | Replace with options and then entering the text in the field. If needed, you can also replace those phrases with different text, or you can change their formatting. Here are the steps:
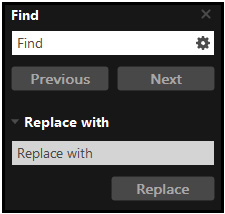
Figure 2.12 – Find/Replace with dialog box (Ctrl + F or Command + F)
- Type text in the Find field. The Options button will open a menu so that you can refine the search to whole words only, case sensitive, and include bookmarks text, or use the Open Full Acrobat Search… option. If no refinements are needed, click the Next or Previous button.
- Open the Replace with field by clicking the small pointing triangle on the left.
- Type the replacement text.
You can see that the Edit PDF tool with all formatting options opens in the Tools column. We will discuss in detail all the edits that can be done using this tool in Chapter 4, Modifying and Editing PDF Files.
- Replace the selected text by clicking Replace.
Great job! Taking some time to apply enhancements really paid off. The file is much more functional now and you learned how to take advantage of the enhancements. It does take quite a bit of effort to produce high-quality scanned pages. But it is worth it. In Chapter 5, Remediation for Accessibility in PDF Publications, we will add even more features to the scanned document and learn how to make it compliant with accessibility standards.
There is one more thing that needs to be discussed. No one wants to have beautiful pages posted online that readers can’t access because the file size is too large. In the next section, we will explain what optimizing is and why it is important in scanned PDFs.
Optimizing a scanned document
Optimizing scanned pages means finding a balance between image quality and file size. Text-heavy pages contain much less bitmap information than color pages with photos and charts.
Important information
The process of creating PDFs discussed here should only be used when no digital version of the publication exists in a file format that could be edited in an authoring application, such as Microsoft Word or InDesign. We assume you work with paper copies with no trace of the electronic files that created them.
Acrobat performs multiple tasks all at once when we scan a page. Selections made before scanning discussed earlier can deliver great results. This is a good time to look at the file size of the finished, optimized PDF and compare it with our initial file, before any enhancement, including optimization, was done.
Use the menu to open the File | Properties… options, then click on the Description tab at the top of the dialog box.
The bottom-left area of the dialog box will display the file size. Our sample file initially had 1.33 MB of data. All those color bitmaps added up to quite a size. And this was only one page. Imagine a file size of 200 pages. You can do the math…
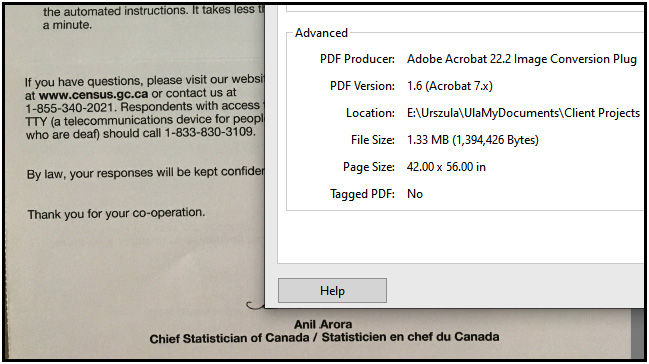
Figure 2.13 – File size before optimization
On the other hand, the completed, functional, and optimized file had 61.60 KB – just a fraction of the initial file size, yet much easier to read on screen and much more functional with a layer of live text that can be searched. If you emailed me a copy, I would rather open the optimized file.
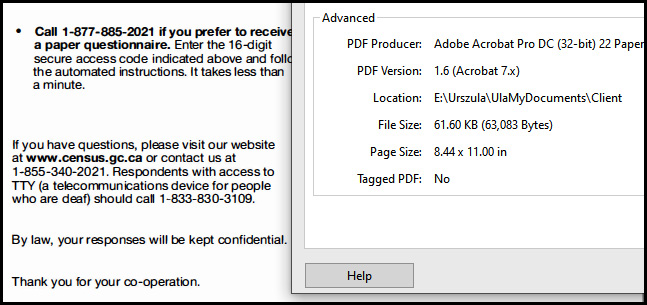
Figure 2.14 – File size after optimization
In review, how did we get here? We selected the Scan & OCR | Enhance | Camera Image | Whiteboard options, where Acrobat converted the background to white and the text to black.
In documents that have a mix of text and photos, it is helpful to know that a default setting for the Enhance Scanned PDF | Optimization Option options is Apply Adaptive Compression. This algorithm divides each page into black-and-white, grayscale, and color regions and chooses a representation that preserves the appearance yet highly compresses each type of content. Scanning resolutions at 300 dpi for color and grayscale and 600 dpi for black-and-white content and/or for pages with very small font sizes provide the best image quality-to-file size balance.
Summary
The scanning of printed pages will continue since paper publications, especially older archives, preserve mountains of information that needs to be available to a wider audience. Online distribution requires that PDF files can be searched, opened globally, and available for a very long time. From the very first step of scanning or taking a photo to a final searchable document, this chapter guided you on how to do it to get the best results.
You learned about the different scanning options, how to enhance a page that originated as a bitmap image, and finally, how to make text searchable, and why it is important to optimize a .pdf file.
In the next chapter, we will go through the process of creating PDF files as a final output in a disciplined workflow using Microsoft Office PDFMaker, where fully featured PDFs are produced and exported from fully featured authored files. As you examine the final output, you will enjoy knowing that to accomplish all that, you do not need new tools. You already have them! And it will take no time to do it.