


 Download code from GitHub
Optimizing Forests, Domains, and Trusts
Back in the year 2000, when Active Directory was introduced to the larger public, we lived in a different world. The internet was only just starting to deliver value to businesses. That's why, in Windows 2000 Server, Active Directory was largely disconnected from the internet. Windows 2000 Server's default Domain Name System (DNS) settings even came with a root domain; so, if you wanted to connect to the internet, you'd need to delete the . DNS zone manually.
Fast forward to today, and the internet and cloud services seem omnipresent. The default . DNS zone has disappeared from Windows Server, but the concepts of trees and forests in Active Directory has persisted, and they still allow for some confusion among Active Directory admins.
To explain domains, trees, and forests in Active Directory, we need to acknowledge Active Directory's past. To create anything in Active Directory, you'll need to create a domain. It starts with the name. For a hypothetical organization, Lucern Publishing, four typical domain names would be as follows:
| Type | Domain Name |
| Public DNS domain name | lucernpub.com |
| Internal part of a public DNS domain name | ad.lucernpub.com |
| Non-public DNS domain name | lucernpub.local |
| Single-label domain name | lucernpubcom |
The first two options are the preferred options, as they adhere to RFC 822 (https://www.w3.org/Protocols/rfc822). The third option is a common option, but doesn't comply with RFC 2606 (https://tools.ietf.org/html/rfc2606) and should be avoided. The fourth option is a typical single-label domain. They are usually the result of a common error among Active Directory admins migrating from Windows NT 4 Server's model to Active Directory. Products that once supported Windows NT 4 Server's single-label domains are no longer around, or they no longer support single-label domain names, including Microsoft.
Lucern Publishing may be quite a successful organization, so they might expand their operations from Switzerland to Europe, North America, and Asia. For reasons that we'll discuss later, they might want to separate Active Directory domains for each of their territories, but they want them to keep working together like one organization. This is where a domain tree comes into play. Now, Lucern Publishing might choose to create three subdomains under lucernpub.com:
- eu.lucernpub.com
- usa.lucernpub.com
- asia.lucernpub.com
They've created a tree of Active Directory domains, sharing the same DNS namespace. Of course, Lucern Publishing might also choose to create multiple trees, next to the lucernpub.com domain or tree, to accommodate an organizational layout with different names for their global expansions, such as Austin Publishing and Wuhan Publishing. In this case, it will make sense to create separate domains such as austinpub.com and wuhanpub.com. Effectively, Lucern Publishing will create three trees this way, belonging to the same Active Directory forest. Yes, some Active Directory environments are large structures with many large trees, but the default Active Directory forest consists of just one tree, with one Active Directory domain.
In this chapter, we'll discuss the reasoning behind creating domains and forests. We'll also discuss userPrincipalName (UPN) suffixes and trusts. The goal of this chapter is to help you make the right choices in terms of your Active Directory structure.
The following recipes will be covered in the chapter:
- Listing the domains in your forest
- Using adprep.exe to prepare for new AD functionality
- Raising the domain functional level to Windows Server 2016
- Raising the forest functional level to Windows Server 2016
- Creating the right trust
- Verifying a trust
- Securing a trust
- Extending the schema
- Enabling the Active Directory Recycle Bin
- Managing UPN suffixes
Before going through these recipes, we will look at a few aspects that you will need to know for this chapter.
Let's begin!
Choosing between a new domain or forest
In organizations, sometimes, an expansion or business change requires changes in Active Directory too. In Active Directory terms, the change might require creating a new Active Directory domain or a new Active Directory forest. In this recipe, we'll look at the reasoning between these two choices, taking the entire life cycle of Active Directory into consideration.
Why would you have a new domain?
A new Active Directory domain—as either a subdomain of an existing domain, or a new domain tree in an existing forest—provides a boundary.
The boundary of domains in Active Directory relates to the following:
- DNS name: An additional domain tree offers the possibility to add a DNS domain name to the organization to, for instance, correctly label a new business venture. An alternative might be to add an additional UPN suffix.
- Domain DNS zones replication: Throughout an Active Directory forest, all domain controllers replicate to exchange information on objects, schema, and configuration. Between domains, a distinction can be made to limit the replication of information on Active Directory-integrated DNS zones. That way, this information is only replicated within the domain.
- Password and account lock-out policies: Fine-grained password and account lock-out policies can only be applied within an Active Directory domain. The information can be viewed by any account in the domain. If you want to shield this information or create completely separate policies, an additional domain is the route to go.
- Group Policy: Group Policy Objects (GPOs) only replicate within a domain. The only exception is the GPOs that are linked to Active Directory sites; these are copied between domains instead, since Active Directory sites are created at the forest level.
However, the boundary of domains in Active Directory does not include the following:
- An Active Directory schema
- The scope of the enterprise administrators group
Essentially, a new Active Directory domain is an administrative boundary, which you can create for an organization to allow for delegated management.
What are the downsides of a new domain?
Microsoft's advice is to keep Active Directory as simple as possible. When you create additional domains, the organization ends up with the following:
- At least two additional domain controllers
- Active Directory trusts between the current domain(s) and the new domain
- An increase in administrative burden
Why would you create a new forest?
A new Active Directory forest is basically a completely new Active Directory environment. When you create it, it does not have a relationship with an existing Active Directory environment, unless you choose to create Active Directory trusts afterward.
Since the new Active Directory forest is separate, a boundary is created for the following reasons:
- Schema and configuration partitions: The schema and configuration partitions hold information on the way that objects can be created, what attributes are required for these objects, what attributes are optional for these objects, and the domains within the forest. Since many applications require Active Directory schema extensions, introducing a legacy or cutting-edge application might result in schema conflicts. In these types of scenarios, creating an additional Active Directory forest is the best way forward. An alternative might be to add an Active Directory Lightweight Directory Services (AD-LDS) instance to the environment.
- Global catalog replication: Domain controllers with the additional global catalog role hold partial information on the most requested attributes for objects in Active Directory. With multiple global catalogs, the information is replicated throughout the forest. To shield this information, an additional Active Directory forest can be created.
- Forest DNS zones replication: To overcome the default boundary for Active Directory-integrated DNS zones, the Forest DNS zone replication scope, an additional Active Directory forest can be created.
When requirements apply in terms of schema or replication, creating an Active Directory forest is the right choice. One thing that might be good here is to state that the forest is a security boundary as well as an administrative boundary.
Additionally, since the forest is a separate environment, by default, it can also be separated afterward. In acquisition and divestiture scenarios that can be overseen for the life cycle of Active Directory, an Active Directory forest is also the right choice.
What are the downsides of a new forest?
A separate Active Directory environment, of course, requires double the administrative effort of Active Directory admins. Additionally, since the environments are separate, creating an address list in Microsoft Exchange Server or sharing common applications, services, and/or systems is hard.
Now we can look at the recipes covered in this chapter.
Listing the domains in your forest
In an Active Directory environment with multiple domains and forests, it can be hard to distinguish the trees from the forest. As authentication is often per forest, an easy way to list the domains per forest will be welcome.
Getting ready
Alas, the only reliable way to list the domains in a forest is to use PowerShell.
For this recipe, we'll need one of the following:
- A domain controller running Windows Server 2012 with Desktop Experience (or a newer version of Windows Server)
- A domain-joined member server running Windows Server 2012 with Desktop Experience (or a newer version of Windows Server) with the Active Directory module for Windows PowerShell installed
- A domain-joined device running Windows 8.1 (or a newer version of Windows) with the Active Directory module for Windows PowerShell installed
On domain controllers running Server Core installations of Windows Server 2012 (and on newer versions of Windows Server), the availability of the Active Directory module for Windows PowerShell depends on the -IncludeManagementTools option for the Install-WindowsFeature Windows PowerShell cmdlet used to install the Active Directory Domain Services role.
Installing the Active Directory module for Windows PowerShell on Windows Server
To install the Active Directory module for Windows PowerShell on a Windows Server with Desktop Experience, follow these steps:
- Open Server Manager ( servermanager.exe).
- In the top gray pane, click Manage.
- Select Add Roles and Features from the context menu.
- In Add Roles and Features Wizard, click Next > until you reach the Select Features screen.
- On the Select Features screen, scroll down in the list of features until you reach Remote Server Administration Tools.
- Expand Remote Server Administration Tools.
- Expand Role Administration Tools.
- Expand AD DS and AD LDS Tools.
- Select the Active Directory module for Windows PowerShell feature:

- Click Next > until you reach the Confirm installation selections page.
- Click Install.
- Click Close.
To install the Active Directory module for Windows PowerShell on a Server Core installation of Windows Server, run these two commands:
PowerShell
Install-WindowsFeature RSAT-AD-PowerShell
Installing the Active Directory module for Windows PowerShell on Windows
To install the Active Directory module for Windows PowerShell on a Windows device, download the separately available Remote Server Administration Tools (RSAT) package for your version of Windows. After you install the package, all the RSAT will be available, including the Active Directory module for Windows PowerShell.
Required permissions
To list all the domains in a forest, use an account that is a member of the Enterprise Admins group in Active Directory.
How to do it...
On the system, start an elevated Windows PowerShell window or Windows PowerShell ISE window using the domain credentials for any account.
Then, type the following lines of PowerShell:
Import-Module ActiveDirectory
Get-ADForest | select domains
How it works...
On the first line, we verify that the Active Directory module for Windows PowerShell is installed, correctly configured, and ready.
On the second line, we use the Get-ADForest cmdlet from the Active Directory module to get the information for the current Active Directory forest. Then, we pipe the output of that command to select only the domains, since that's what we're after.
You can now make the best choices for implementing new domains and/or forests, and/or decommissioning domains and/or forests.
Using adprep.exe to prepare for new Active Directory functionality
The Active Directory schema defines the way that objects can be created, and what attributes are required or are optional for these objects. With every version of Windows Server, the base schema has been improved and extended.
Many features require certain schema versions for Active Directory. For instance, when you want to deploy a Windows Server 2016-based Active Directory Federation Services (AD FS) farm, you'll need the Windows Server 2016 schema.
Since Windows Server 2012, Microsoft updates the Active Directory schema automatically when you promote the first Windows Server 2012-based member server to an Active Directory domain controller.
However, consider what will happen if you want to do any of the following:
- Update the Active Directory schema only, because your organization doesn't want domain controllers running the latest version
- Delegate the promotion of the first domain controller to a lesser-privileged user, instead of an admin that is a member of the Schema Admins group
- Control the proper replication of the schema update to all domain controllers, before promoting the first domain controller
- Avoid the default time-out that the Active Directory Configuration Wizard provides for proper replication
- Perform all Active Directory preparations, including the Group Policy preparation step
In these situations, you'll want to update the Active Directory schema manually, using adprep.exe from the Windows Server installation media.
Getting ready
Copy the entire contents of the \support\adprep folder from the Windows Server installation media to a temporary folder on your system's hard disk.
Required permissions
The Active Directory preparation process consists of four separate stages. You'll need an account with the following group memberships for each stage:
|
Stage |
Required group memberships |
|
Preparing the forest |
Enterprise Admins Schema Admins Domain Admins in the forest root domain |
|
Preparing the forest for Read-only Domain Controllers (RODCs) |
Domain Admins in the forest root domain |
|
Preparing the domain |
Domain Admins |
|
Fixing up Group Policy permissions |
Domain Admins |
How to do it...
Start Command Prompt in the file explorer window of the folder where you've copied the files to.
The Active Directory preparation process consists of four separate stages:
- Preparing the forest
- Preparing the forest for RODCs
- Preparing the domain
- Fixing up Group Policy permissions
After these steps, you'll want to check proper Active Directory replication.
Preparing the forest
Perform these steps to prepare the Active Directory forest:
To prepare the Active Directory forest, run the following command:
adprep.exe /forestprep /forest lucernpub.com /user EntAdmin /userdomain lucernpub.com /password P@ssw0rd
Replace the value for the domain and the values for the credentials with values that make sense for your Active Directory environment.
Next, you issue the c command type, followed by Enter.
The following line at the end of the output indicates the successful preparation of the Active Directory forest:
Adprep successfully updated the forest-wide information
Preparing the forest for RODCs
The /rodcprep switch for adprep.exe triggers the preparation of the forest for RODCs. This action only needs to be performed when the intention is to run RODCs in the Active Directory forest:
To prepare the Active Directory forest for RODCs, run the following command:
adprep.exe /rodcprep /forest lucernpub.com /user DomAdmin /userdomain lucernpub.com /password P@ssw0rd
Replace the value for the domain and the values for the credentials with values that make sense for your Active Directory environment.
The following line at the end of the output indicates the successful preparation of the Active Directory forest for RODCs:
Rodcprep completed without errors. All partitions are updated. See the ADPrep.log in directory C:\Windows\debug\adprep\logs\ <date> for more information.
Preparing the domain
Perform these steps to prepare the domain:
To prepare the Active Directory domain, run the following command:
adprep.exe /domainprep /domain lucernpub.com /user DomAdm /userdomain lucernpub /password P@ssw0rd
Replace the value for the domain and the values for the credentials with values that make sense for your Active Directory environment.
The following line at the end of the output indicates the successful preparation of the Active Directory domain:
Adprep successfully updated the domain-wide information
Fixing up Group Policy permissions
Group Policy preparation, as part of adprep.exe, adds two pieces of functionality to Active Directory:
- Cross-domain planning functionality for Group Policy
- Resultant Set of Policy (RSoP) planning mode
GPOs are stored in both the System Volume (SYSVOL) and Active Directory. Both locations require an update of the permissions for existing GPOs, in order to take advantage of the preceding functionality.
If the Active Directory domain already contains custom or delegated permissions, Group Policy preparation kicks off the replication of all Group Policy files in the SYSVOL, and may deny the functionality of RSoP to delegated admins until their permissions are recreated.
To fix up Group Policy permissions, run the following command:
adprep.exe /domainprep /gpprep /domain lucernpub.com /user DomAdm /userdomain lucernpub.com /password P@ssw0rd
Replace the value for the domain and the values for the credentials with values that make sense for your Active Directory environment.
The following line at the end of the output indicates the successful preparation of the Active Directory domain:
Adprep successfully updated the Group Policy Object (GPO) information.
Checking the preparation replication
When done with the preparation steps, the Active Directory schema base version should be upgraded to a higher number, corresponding to the new schema version.
The following table shows the version numbers in accordance to the Active Directory level:
|
Windows Server version |
Schema version |
|
Windows 2000 Server |
13 |
|
Windows Server 2003 |
30 |
|
Windows Server 2003 R2 |
31 |
|
Windows Server 2008 |
44 |
|
Windows Server 2008 R2 |
47 |
|
Windows Server 2012 |
56 |
|
Windows Server 2012 R2 |
69 |
|
Windows Server 2016 |
87 |
|
Windows Server 2019 |
88 |
You can manually check the schema version per domain controller with the following command from any of your domain controllers:
repadmin.exe /showattr * "cn=schema,cn=configuration,dc=lucernpub,dc=com" /atts:objectVersion
Replace lucernpub and com with values for your Active Directory environment.
When all domain controllers report the same schema version, the Active Directory preparation has replicated successfully to all domain controllers.
How it works...
In Windows Server 2012 (and later versions), the whole Active Directory preparation process is automated. When you promote a Windows Server 2012-based member server (or any newer version of Windows Server) to an additional domain controller for a domain, or upgrade a domain controller running a previous version to Windows Server 2012 (or any newer version of Windows Server), the Active Directory Domain Services Configuration Wizard determines whether the environment needs to be prepared as part of the promotion process.
Larger organizations often separate the schema or preparation work from the actual domain controller-promotion process work to minimize risk, adhere to small change windows, and more.
However, adprep.exe is still available to prepare the Active Directory forest and/or Active Directory domain(s) manually.
There's more...
Unless there is a big reason not to, preparing for the latest available Active Directory schema version is the best way to go. A reason not to do this is when an organization doesn't want to enable the promotion of the latest version(s) of Windows Server to domain controllers in a delegated environment.
Raising the domain functional level to Windows Server 2016
When implementing new Active Directory domain controllers and removing domain controllers running previous versions of Windows Server, many admins forget to raise the Active Directory domain functional level (DFL) to the earliest Windows Server version still running as domain controllers. After upgrading all domain controllers from Windows Server 2008 R2 to Windows Server 2012 R2, for instance, they would not raise the DFL to Windows Server 2012 R2, but keep it at the Windows Server 2008 R2 level.
It's a shame, really, because many new Active Directory features and optional Active Directory features are only available when the functional level is raised. Furthermore, the DFL dictates the lowest version of Windows Server that admins can use to promote new domain controllers. In addition, since Windows Server 2008 R2, the DFL can also be reverted, as long as no new optional features have been enabled and the Active Directory forest functional level (FFL) is the same as the DFL that you want to revert to, or lower.
From an Active Directory point of view, the Windows Server 2008 DFL (or any newer version of the DFL), is required when you want to deploy Windows Server 2016-based domain controllers.
Getting ready
Microsoft recommends raising the DFL from the Active Directory domain controller that holds the Primary Domain Controller emulator (PDCe) Flexible Single Master Operations (FSMO) role.
To locate this domain controller, run the following command on any domain-joined device, member server, or domain controller:
netdom.exe query fsmo
Alternatively, use the following lines of PowerShell on a domain-joined system that has the Active Directory module for Windows PowerShell installed:
Import-Module ActiveDirectory

Get-ADDomain | Format-List PDCEmulator
Required permissions
Use an account that is a member of the Domain Admins group in the Active Directory domain for which you want to raise the DFL.
How to do it...
On domain controllers running Windows Server with the Desktop Experience, follow these steps:
- Sign in to the domain controller holding the PDC emulator FSMO role.
- Open Active Directory Domains and Trusts (domain.msc).
- In the left navigation pane, right-click the domain for which you want to raise the functional level, and then click Raise Domain Functional Level.
The Raise domain functional level window appears:

- From the Select an available forest functional level drop-down list, select the desired DFL, and then click Raise.
Alternatively, you can use the following two PowerShell commands:
Import-Module ActiveDirectory
Set-ADDomainMode lucernpub.com Windows2016Domain
Replace lucernpub.com with values for your Active Directory environment.
Even when under time pressure, you'll want to check for the proper replication of changes to Active Directory functional levels before making any other changes in Active Directory that might depend on them. Especially in large environments with elaborate replication technologies, replication might take a while.
To check for the proper replication of changes to Active Directory functional levels, use the following command:
repadmin.exe /showattr *.lucernpub.com "dc=lucernpub,dc=com" /atts:msDS-Behavior-Version
Replace lucernpub.com, lucernpub, and com with values for your Active Directory environment.
The command checks the value for the msDS-Behavior-Version attribute on each of the domain controllers in the respective Active Directory domain, and return the value.
The following table shows the msDS-Behavior-Version attribute value per Active Directory DFL:
|
DFL |
msDS-Behavior-Version |
|
Windows 2000 Server |
0 |
|
Windows Server 2003 Mixed |
1 |
|
Windows Server 2003 |
2 |
|
Windows Server 2008 |
3 |
|
Windows Server 2008 R2 |
4 |
|
Windows Server 2012 |
5 |
|
Windows Server 2012 R2 |
6 |
|
Windows Server 2016 |
7 |
|
Windows Server 2019 |
8 |
The output shows you the domain controllers that are replicating a change from a lower value to a higher value. When each domain controller returns the same value, the DFL has successfully replicated throughout the Active Directory environment.
How it works...
When a domain controller operates, it references the DFL to know how it can optimally interoperate with other domain controllers in the Active Directory domain. Additionally, when you want to enable optional Active Directory features, the msDS-Behavior-Version attribute is referenced to see whether it's a permittable action.
If there is a domain controller running a version of Windows Server that does not meet the requirements of a certain DFL, the level is grayed out in Active Directory Domains and Trusts and the level cannot be raised to this level (DFL). When you try to raise the DFL using Windows PowerShell or other programmatic means, it will error out.
Raising the forest functional level to Windows Server 2016
Just like the Active Directory DFL, the FFL also determines the availability of new Active Directory functionality. Where the DFL dictates the minimum version of Windows Server to run as domain controllers, the FFL dictates the minimum version of the DFL in the Active Directory forest.
The new functionality that is unlocked by raising the FFL includes the following:
- Privileged Access Management (PAM) that requires the Windows Server 2016 FFL
- Active Directory Recycle Bin that requires the Windows Server 2008 R2 FFL
- Linked-value replication that requires the Windows Server 2003 FFL
Getting ready
Microsoft recommends raising the FFL from the Active Directory domain controller that holds the Domain Naming Master FSMO role.
To locate this domain controller, run the following command on any domain-joined device, member server, or domain controller:
netdom.exe query fsmo
Alternatively, use the following PowerShell commands on a domain-joined system that has the Active Directory module for Windows PowerShell installed:
Import-Module ActiveDirectory

Get-ADForest | Format-List DomainNamingMaster
Required permissions
Use an account that is a member of the Enterprise Admins group in the Active Directory forest for which you want to raise the FFL.
How to do it...
On domain controllers running Windows Server with the Desktop Experience, follow these steps:
- Sign in to the domain controller holding the Domain Naming Master FSMO role.
- Open Active Directory Domains and Trusts (domain.msc).
- In the left navigation pane, right-click Active Directory Domains and Trusts, and then click Raise Forest Functional Level.
The Raise forest functional level window appears:

- From the Select an available forest functional level drop-down list, select the desired FFL, and then click Raise.
Alternatively, you can use the following two lines of PowerShell:
Import-Module ActiveDirectory

Set-ADForestMode lucernpub.com Windows2016Forest
Replace lucernpub.com with values for your Active Directory environment.
How it works...
When a domain controller operates, it references the FFL to know how it can optimally interoperate with other domain controllers in the Active Directory forest. Additionally, when you want to enable optional Active Directory features, the msDS-Behavior-Version attribute is referenced to see whether it's a permittable action.
When a new Active Directory domain is added to an Active Directory forest, the available DFLs for the domain are shown, based on the msDS-Behavior-Version attribute for the forest too.
If there is a domain running a DFL that does not meet the requirements of a certain FFL, the level is grayed out in Active Directory Domains and Trusts and the level cannot be raised to this level. When you try to raise the FFL using Windows PowerShell or other programmatic means, it will error out.
Creating the right trust
In an Active Directory environment with multiple domains, you're bound to have trusts. Trusts allow people to access resources in a domain or forest other than the domain or forest where their user accounts reside.
When Active Directory domains are added to an existing Active Directory domain, two-way transitive trusts are automatically created. However, in other situations, trusts have to be created manually. With many different types of trusts, two trust directions, and a choice in transitivity, which trust is the right trust for which situation?
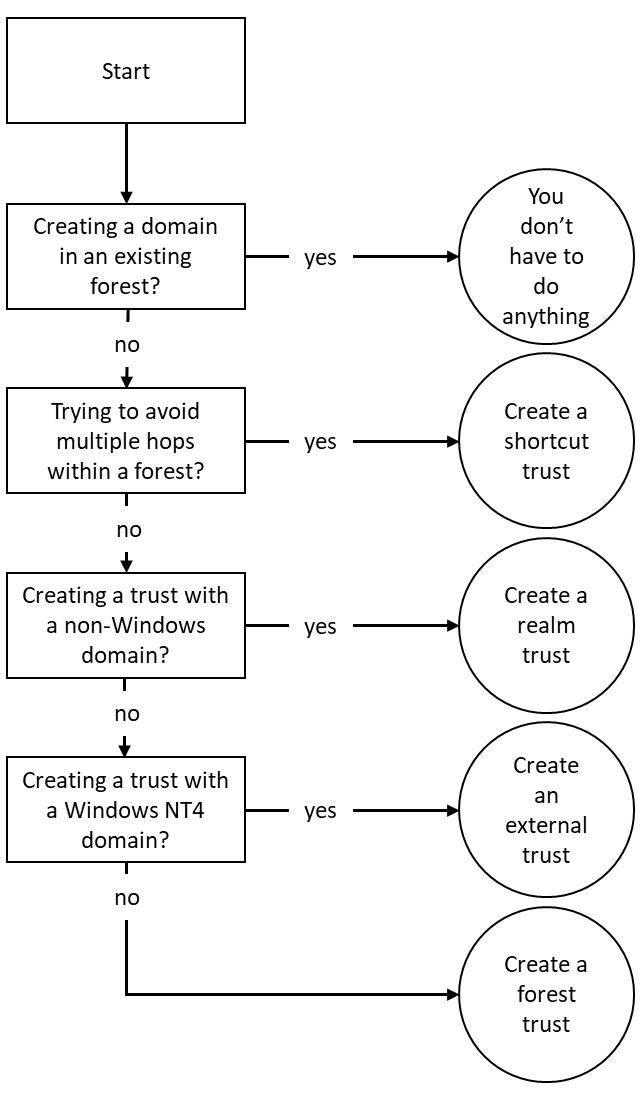
Let's take a look at the six types of trusts first:
- Parent-child trust: The parent-child trust is a trust type that is automatically created when you add a domain to a tree root. For example, a parent-child trust is automatically created between adatum.com and sub.adatum.com. You cannot manually create a parent-child trust.
- Tree-root trust: The tree-root trust is a trust type that is also automatically created, just like the parent-child trust. However, the tree-root trust is created when you add a new domain tree to an Active Directory forest. For example, when you add the domain to a forest that contains only the adatum.com domain. The difference between the tree-root trust and the parent-child trust is that with the former, you break the domain tree, whereas with the latter, you expand on it. You cannot manually create a tree-root trust.
- Forest trust: A forest trust is a trust type that you will have to create manually. When accounts in two separate Active Directory forests want to work together on each other's resources, then this is the right trust type to create between the two forest root domains. Creating a forest trust is highly preferable over creating an external trust, because the latter only supports older authentication schemes, whereas a forest trust supports Kerberos authentication.
- Realm trust: The realm trust type exists to help you connect with non-Active Directory environments, such as Samba-based environments and Novell eDirectory-based environments. The requirement for the other side of the trust is that it needs to support the Kerberos version.
- External trust: An external trust is a trust type that you will have to create manually. This trust type is truly versatile, as you can create a trust with any other environment, including Windows NT 4.0 Server-based environments. The downside is that it leverages NTLM as its authentication protocol; this is considered an outdated and weak protocol.
- Shortcut trust: In large Active Directory environments, authentication to access a resource may take a long time. As a user traverses trusts within an Active Directory forest, they have to perform Kerberos authentication up and down trees until they reach the domain with the resource they want to access. The rule of thumb is to create a shortcut trust when users in one domain regularly use resources in another domain (but within the same forest), and they have to traverse five, or more, trusts to get from the domain where their user accounts reside to the domain where the resources reside.
This creates the following flowchart:
Trust direction
The right direction of a trust can be simply explained with an analogy. Suppose that a friend wants to borrow your car; you share your keys to the car with them and then you give them permission to use the car.
In terms of the Active Directory trust, the friend will map to the user account, the car to a resource, and you will be the resource owner. The trust flows from the resource to the user. The admin of the resource has to create the trust.
Trust transitivity
The same analogy also works for transitivity. Suppose that you want to lend your car to a friend, but they also want to lend the car to their friends. If you trust the friend enough, you will probably allow them to do so. If you don't have this level of trust in your friend, or you know some of their friends and you don't trust them with your car, then it's a bad idea.
In terms of Active Directory trusts, the trust type where you trust all the user accounts in all the domains to access the resource, is a transitive trust; parent-child trusts, tree-root trusts, and forest trusts are transitive, by default.
The trust type where you only trust your friend and not all of their friends to access the resource is a non-transitive trust. Realm trusts and external trusts are non-transitive, by default.
One-way or two-way trust
Essentially, every trust is a one-way trust. All the trusts that you create manually are one-way trusts, by default. However, you can combine two one-way trusts in opposite directions to create a two-way trust. In the scope of a two-way trust, people on both sides of the trust can access resources on both sides of the trust using their user accounts.
Microsoft recommends creating a two-way trust when your goal is to migrate accounts and resources using the Active Directory Migration Tool (ADMT). After migrating everything over, the two-way trust can be torn down.
Getting ready
To create a trust between two environments, make sure that the two environments know how to find each other. In DNS, create any necessary (conditional) forwarders or stub zones to point domain controllers from one environment to the domain controllers or Kerberos Key Distribution Centers (KDCs) of the other environment.
Additionally, take care of proper networking; the domain controller holding the PDCe FSMO role and at least one global catalog for each domain on the route of the trust should be reachable from the device that someone uses to access the resource. The following firewall ports should be opened:
|
Service |
Protocol |
Port |
|
Kerberos authentication |
TCP and UDP |
88 |
|
RPC endpoint mapper |
TCP |
135 |
|
NetBIOS name service |
TCP and UDP |
137 |
|
File Replication Service (FRS) between domain controllers |
UDP |
138 |
|
Distributed File System Replication (DFSR), NetBIOS session service |
TCP |
139 |
|
Lightweight Directory Access Protocol (LDAP) |
TCP and UDP |
389 |
|
Server Message Block (SMB) |
TCP and UDP |
445 |
|
Kerberos password change |
TCP and UDP |
464 |
|
Lightweight Directory Access Protocol over SSL (LDAPS) |
TCP and UDP |
636 |
|
LDAP to global catalogs |
TCP |
3269 |
|
LDAPs to global catalogs |
TCP |
3269 |
Preferably, you should sign in to the domain controller that is running the Domain Naming Master FSMO role, or connect the Active Directory Domains and Trusts console to this specific domain controller.
To find this domain controller, right-click the Active Directory Domains and Trusts node and select Operations Master... from the menu. Alternatively, run the following command from any domain-joined device, member server, or domain controller:
netdom.exe query fsmo
Otherwise, you can use the following PowerShell commands on a domain-joined system that has the Active Directory module for Windows PowerShell installed:
Import-Module ActiveDirectory

Get-ADForest | Format-List DomainNamingMaster
Required permissions
For shortcut trusts, sign in with the credentials of an admin account that is a member of the Domain Admins group. For all other accounts, sign in with the credentials of an admin account that is a member of the Enterprise Admins group.
How to do it...
To create a trust on Windows devices or Windows Servers with the Desktop Experience use the Active Directory Domains and Trusts tool for the domain you (as a resource owner) want to give access to:
- Open Active Directory Domains and Trusts (domain.msc).
- In the console tree, right-click the domain that you want to allow access to, and then click Properties....
- Navigate to the Trusts tab, as follows:

- Click the New Trust… button.
- Run through the New Trust Wizard.
- In the Welcome to the New Trust Wizard screen, click Next >.
- In the Trust Name screen, type a name for the trust in the Name: field. Then, click Next > when done.
- In the Trust Type screen, choose between a Realm trust or a Trust with a Windows domain. For the latter, type the name of the domain, in case it's different to the trust name. Click Next >.
- In the Trust Type screen, choose between an External trust or a Forest trust. Click Next >.
- In the Direction of Trust screen, choose between a Two-way, One-way: incoming, or One-way: outgoing trust. Click Next >.
- In the Sides of Trust screen, choose between creating the trust for this domain only, or both this domain and the specified domain. Click Next >.
- In the User Name and Password screen, provide the credentials of an account that has administrative privileges in the Active Directory domain on the other side of the trust. Click Next >.
- In the Outgoing Trust Authentication Level-Local Forest and/or Outgoing Trust Authentication Level - Specified Forest screens, choose between Forest-wide authentication and Selective authentication. Click Next >.
- In the Trust Selections Complete screen, review the settings, and click Next > to create the trust.
- In the Trust Creation Complete screen, click Next >:

- In the Confirm Outgoing Trust and/or Confirm Incoming Trust screens, choose between No, do not confirm the outgoing trust and Yes, confirm the outgoing trust. Click Next >.
- In the Completing the New Trust Wizard screen, click Finish.
Alternatively, you can use the following commands:
netdom.exe trust TrustingDomain.tld /Domain:TrustedDomain.tld /TwoWay /Add
Replace TrustingDomain.tld with the DNS domain name of the Active Directory environment that gives access to its resources, and then replace TrustedDomain.tld with the DNS domain name of the Active Directory environment that gains access to the resources.
It's a recommended practice in Active Directory to remove objects and settings that have no use.
When a trust is no longer needed, it can be deleted. To do so, follow these steps:
- Open Active Directory Domains and Trusts.
- In the console tree, right-click the domain that you want to allow access to, and then click Properties.
- Navigate to the Trusts tab.
- From the list of Domains trusts by this domain (outgoing trusts):, or from the list of Domains that trust this domain (incoming trusts): select the trust that you want to remove.
- Click the Remove button next to the corresponding list.
Verifying and resetting a trust
After you create a trust, you might regularly want to check if the trust is working properly. You might be triggered by people who report that they can no longer access resources in other domains or forests, or it might be an activity that you perform on a regular basis.
When a trust is broken, there is a way to reset it. Also, when you want to reset the shared secret on both sides of the trust, a reset of the trust is needed.
Getting ready
It is recommended that you sign in to the domain controller that is running the Domain Naming Master FSMO role, or connect the Active Directory Domains and Trusts console to this specific domain controller, by right-clicking in the console on the Active Directory Domains and Trusts node and selecting Change Active Directory Domain Controller… from the context menu.
To find this domain controller, right-click the Active Directory Domains and Trusts node and select the Operations Master… from the context menu, or run the following command from any domain-joined device, member server, or domain controller:
netdom.exe query fsmo
Alternatively, use the following PowerShell commands on a domain-joined system that has the Active Directory module for Windows PowerShell installed:
Import-Module ActiveDirectory

Get-ADForest | Format-List DomainNamingMaster
Required permissions
For shortcut trusts, sign in with the credentials of an account that is a member of the Domain Admins group.
For all other accounts, sign in with the credentials of an account that is a member of the Enterprise Admins group.
How to do it...
Perform these steps:
- Open Active Directory Domains and Trusts.
- In the console tree, right-click the domain that you want to allow access to, and then click Properties.
- Navigate to the Trusts tab.
- From the list of Domains trusts by this domain (outgoing trusts):, or from the list of Domains that trust this domain (incoming trusts):, select the trust you want to verify.
- Click the Properties button next to the corresponding list.
The Properties window appears:

- Click the Validate button.
- For a two-way trust, choose between No, do not validate the incoming trust and Yes, validate the incoming trust. For the latter, provide the credentials of an account that has administrative privileges in the Active Directory domain on the other side of the trust. Click OK.
- In the Active Directory Domain Services popup window, click OK to confirm that the outgoing trust has been validated. It is now in place and active.
- In the Active Directory Domain Services popup window, notifying you of UserPrincipalName suffix routing, click Yes.
Alternatively, you can use the following command:
netdom.exe trust TrustingDomain.tld /Domain:TrustedDomain.tld /TwoWay /Verify /verbose
Replace TrustingDomain.tld with the DNS domain name of the Active Directory environment that gives access to its resources, and then replace TrustedDomain.tld with the DNS domain name of the Active Directory environment that gains access to the resources.
The option to reset the trust will be presented only if a problem has been identified during the process of verifying the trust relationship.
How it works...
When a trust is verified, the following characteristics of the trust are verified:
- Networking connectivity between both sides of the trust
- Existence of the trust on the far side of the trust
- Synchronization of the shared secret on both sides of the trust
Therefore, verifying a trust is a good point to start troubleshooting, because it might quickly be able to identify changes made by network admins or the Active Directory admin on the other side of the trust.
When a trust relationship cannot be verified, the option to reset it is displayed, as indicated previously.
Securing a trust
Trusts in Active Directory can be misused for purposes not intended by the admin of the trusting domain. There are three ways to secure a trust to make it more secure:
- Enable SID Filtering
- Enable Quarantine
- Enable Selective Authentication
SID Filtering is enabled on all trust relationships, by default. SID Filtering operates on the same surface as trust transitivity. When enabled, SID Filtering filters the user accounts over the trust to user accounts from the domain tree that is explicitly trusted, only. In a way, it allows for more granular transitivity.
Quarantine is enabled on all trust relationships, by default. Quarantine for a trust allows granular access, too. Where SID Filtering allows for limiting access to a trusted domain tree, quarantine limits access to a trusted domain.
Selective authentication is not enabled, by default. Where SID Filtering and Quarantine limit access to user accounts from trusted domains, selective authentication limits access to devices, member servers and domain controllers in trusting domains. This means that in a default trust, all resources in the trusting domain can be accessed.
By default, Active Directory trusts are pretty secure, since the SID Filtering and Quarantine features are automatically enabled. You can heighten this default level of security by enabling and managing selective authentication.
Getting ready
To use the selective authentication feature, both Active Directory forests on either side of the trust need to run the Windows Server 2003 FFL, or a higher forest functional level.
It is recommended that you sign in to the domain controller that is running the Domain Naming Master FSMO role, or connect the Active Directory Domains and Trusts console to this specific domain controller, by right-clicking in the console on the Active Directory Domains and Trusts node and selecting Change Active Directory Domain Controller… from the context menu.
To find this domain controller, right-click the Active Directory Domains and Trusts node and select the Operations Master… from the context menu. Alternatively, run the following command from any domain-joined device, member server, or domain controller:
netdom.exe query fsmo
Otherwise, you can use the following PowerShell commands on a domain-joined system that has the Active Directory module for Windows PowerShell installed:
Import-Module ActiveDirectory

Get-ADForest | Format-List DomainNamingMaster
Required permissions
Sign in with the credentials of an admin account that is a member of the Enterprise Admins group.
How to do it...
SID Filtering and Quarantine on trusts can only be managed using netdom.exe:
- To enable SID Filtering for a trust, use the following command:
netdom.exe trust TrustingDomain.tld /Domain:TrustedDomain.tld /EnableSIDHistory:yes
Replace TrustingDomain.tld with the DNS domain name of the Active Directory environment that gives access to its resources, and then replace TrustedDomain.tld with the DNS domain name of the Active Directory environment that gains access to the resources.
-
To disable SID Filtering for a trust, use the following command:
netdom.exe trust TrustingDomain.tld /Domain:TrustedDomain.tld /EnableSIDHistory:no
Replace TrustingDomain.tld with the DNS domain name of the Active Directory environment that gives access to its resources, and then replace TrustedDomain.tld with the DNS domain name of the Active Directory environment that gains access to the resources.
-
To enable Quarantine on a trust, use the following command:
netdom.exe trust TrustingDomain.tld /Domain:TrustedDomain.tld /Quarantine:yes
Replace TrustingDomain.tld with the DNS domain name of the Active Directory environment that gives access to its resources, and then replace TrustedDomain.tld with the DNS domain name of the Active Directory environment that gains access to the resources.
-
To disable Quarantine on a trust, use the following command:
netdom.exe trust TrustingDomain.tld /Domain:TrustedDomain.tld /Quarantine:no
Replace TrustingDomain.tld with the DNS domain name of the Active Directory environment that gives access to its resources, and then replace TrustedDomain.tld with the DNS domain name of the Active Directory environment that gains access to the resources.
To manage Selective Authentication, we can use the graphical user interface (GUI). To do so, follow these steps:
- Open Active Directory Domains and Trusts.
- In the console tree, right-click the domain that you want to configure selective authentication for, and then click Properties.
- Navigate to the Trusts tab.
- From the list of Domains trusts by this domain (outgoing trusts): or from the list of Domains that trust this domain (incoming trusts):, select the trust that you want to configure selective authentication for.
- Click the Properties button next to the corresponding list.
- Navigate to the Authentication tab as follows:

- On the Authentication tab, select or deselect Selective Authentication.
- Click OK to finish.
Of course, selective authentication for trusts is also available on the command line.
To enable selective authentication for a trust, use the following command:
netdom.exe trust TrustingDomain.tld /Domain:TrustedDomain.tld /SelectiveAuth:yes
Replace TrustingDomain.tld with the DNS domain name of the Active Directory environment that gives access to its resources, and then replace TrustedDomain.tld with the DNS domain name of the Active Directory environment that gains access to the resources.
To disable selective authentication for a trust, use the following command:
netdom.exe trust TrustingDomain.tld /Domain:TrustedDomain.tld / SelectiveAuth:no
Replace TrustingDomain.tld with the DNS domain name of the Active Directory environment that gives access to its resources, and then replace TrustedDomain.tld with the DNS domain name of the Active Directory environment that gains access to the resources.
Now, the actual domain-joined resources, which a user from another domain or forest has access to, is governed per object. Follow these steps to manage this setting:
- Open the Active Directory Administrative Center.
- Search for the domain-joined device, member server, or domain controller that you want to grant access to over the trust. Use the search box in the Global Search field on the Overview screen of the Active Directory Administrative Center, or use the left navigation pane.
- Right-click the object and select Properties from the context menu.
- In the left navigation pane of the object's properties, click Extensions.
- Click the Security tab.
- Select the user object(s) and/or group(s) that you want to grant access to, wielding the Add… and Remove buttons underneath the field for Groups and user names:

- Select the Allow checkbox that is next to the Allowed to Authenticate permission.
- Click OK when you're done.
How it works...
Selective authentication leverages the Allowed to Authenticate option to give permission to allow or disallow requests coming from user accounts over the trust, because they are automatically added to the Authenticated Users group. When selective authentication is disabled (the default), every user account on the other side is allowed to authenticate. However, after selective authentication is enabled, only the user accounts with the Allowed to Authenticate permission explicitly set can authenticate to it over the trust, because they are not automatically added to the Authenticated Users group.
There's more...
To make managing the Active Directory trust possible for a trust that has selective authentication enabled, make sure that admins on both sides have the Allowed to Authenticate permission on each other's domain controllers. You can specify specific domain controllers only by fiddling with the DNS SRV records for domain controllers. However, make sure that you always include the domain controller holding the PDCe FSMO role, and at least one global catalog.
Extending the schema
Some applications require additional object types and/or attributes to store their information in Active Directory. Some good examples of these type of applications are Microsoft Exchange Server and Microsoft's free Local Administration Password Solution (LAPS).
These applications and their schema changes are thoroughly tested, but there's also the option to create your own custom Active Directory schema extension. For instance, you can introduce your own employee or customer ID type attribute to the user object class.
Getting ready
The domain controller holding the Schema Master FSMO role is authoritative for the Active Directory schema throughout an Active Directory forest. Microsoft recommends that you perform the following actions on the domain controller that is holding the Schema Master FSMO role.
To find this domain controller, run the following command on any domain-joined device, member server, or domain controller:
netdom.exe query fsmo
Alternatively, use the following PowerShell commands on a domain-joined system that has the Active Directory module for Windows PowerShell installed:
Import-Module ActiveDirectory

Get-ADForest | Format-List SchemaMaster
To gain access to the Active Directory schema using Microsoft tools, look on the domain controller holding the Schema Master FSMO role, the Schema MMC Snap-in needs to be registered. By default, this MMC Snap-in is hidden from view, due to its sensitive nature.
Run the following command to register the Schema MMC Snap-in:
regsvr32.exe C:\windows\system32\schmmgmt.dll
Required permissions
To extend the schema, perform the following actions using an account that is a member of the schema admins group.
To request permission to use an official identifier (OID) for your schema attribute or object, you will need to create it as part of your organization's OID branch. The following two websites allow you to view whether your organization has an official OID branch: www.iana.org/assignments/enterprise-numbers and www.alvestrand.no/objectid/.
If your organization does not have an assigned OID, go to your country's national registry to request one. Make sure that the registration is correct, but also leave room for further expansions, relocations, mergers, acquisitions, and divestitures.
How to do it...
Perform these steps to extend the Active Directory schema with a new attribute:
- Open a Microsoft Management Console window (mmc.exe).
- From the File menu, select Add/Remove Snap-in.
- From the left-hand list of Available snap-ins:, select the Active Directory Schema snap-in. Click the Add > button to add it to the right-hand list of Selected snap-ins:

- Click OK.
- In the left navigation pane, expand Active Directory Schema.
- Right-click the Attributes folder and select Create Attribute from the context menu:

- Click the Continue button to confirm that you want to extend the schema:

- Enter the information for the new attribute.
- Click OK when done.
Perform these steps to extend the Active Directory schema with a new object class:
- Open the Active Directory Schema snap-in.
- In the left navigation pane, expand Active Directory Schema.
- Right-click the Classes folder, and select Create Class from the context menu.
- Click the Continue button to confirm that you want to extend the schema.
The Create New Schema Class window appears:

- Enter the information for the new class.
- Click Next> when done.
- Enter any mandatory and optional attributes and click Finish.
There's more...
Any attributes and classes added to Active Directory cannot be removed. However, they can be defunct when they are no longer needed.
It's a best practice to keep the Schema Administrators group in Active Directory as empty as possible for as long as possible. When you're done, remove any accounts that you may have added to the Schema Administrators group.
If you want your Active Directory schema extension attributes to extend into Azure Active Directory as well, make sure it's a single-valued attribute.
Enabling the Active Directory Recycle Bin
The Active Directory Recycle Bin was introduced as a new Active Directory feature with Windows Server 2008 R2. It enables administrators to restore (accidentally) deleted objects.
There were features available to administrators before the advent of the Active Directory Recycle Bin – such as the Directory Services Restore Mode (DSRM) mode and object reanimation. In contrast to booting into the DSRM, the Active Directory Recycle Bin saves admins time. In contrast to reanimating objects, the Active Directory Recycle Bin prevents the typical loss of attributes and group memberships.
There are also numerous third-party solutions that are available to restore objects and their attributes. They typically expand on the functionality that is offered by the Active Directory Recycle Bin, by offering granular attribute restore and group policy versioning. These are two areas where the Active Directory Recycle Bin doesn't offer a solution.
Getting ready
The Active Directory forest needs to run the Windows Server 2008 R2 FFL (or a later version).
Microsoft recommends enabling the Active Directory Recycle Bin on the Active Directory domain controller that holds the Domain Naming Master FSMO role.
To find this domain controller, run the following command on any domain-joined device, member server, or domain controller:
netdom.exe query fsmo
Alternatively, use the following PowerShell commands on a domain-joined system that has the Active Directory module for Windows PowerShell installed:
Import-Module ActiveDirectory

Get-ADForest | Format-List DomainNamingMaster
Required permissions
Sign in to the preceding domain controller using an account that is a member of the Enterprise Admins group in Active Directory.
How to do it...
You can enable the Active Directory Recycle Bin from within the Active Directory Administrative Center, when you're signed in with an account that is a member of the Enterprise Admins group on a domain controller that runs Windows Server with Desktop Experience. To do this, perform the following steps:
- Open the Active Directory Administrative Center (dsac.exe).
- Select the forest name in the left navigation pane.
- In the action pane on the right, click the Enable Recycle Bin link.
Alternatively, you can right-click the domain name in the left navigation pane, and select the Enable Recycle Bin… option from the context menu.
The Enable Recycle Bin Confirmation popup appears:

- In the Enable Recycle Bin Confirmation pop up, click OK.
- The popup message labeled Active Directory Administrative Center appears:

- Click OK:

- After you refresh, a new container underneath the domain root named Deleted Objects appears.
On Server Core installations of Windows Server, use the following PowerShell commands:
Import-Module ActiveDirectory

Enable-ADOptionalFeature -Identity "CN=Recycle Bin Feature,CN=Optional Features,CN=Directory Service,CN=Windows NT,CN=Services,CN=Configuration,DC=lucernpub,DC=com" -Scope ForestOrConfigurationSet –Target "lucernpub.com"
Replace lucernpub, lucernpub, and com with values for your Active Directory environment.
How it works...
Since the inception of Active Directory, when an object such as a computer or a user is deleted, the isDeleted attribute is set to true. This allows the domain controller to replicate the change for the object. Each domain controller has the time configured as the tombstone lifetime period to replicate this change. Only after the tombstone lifetime period is the object removed from the database by each domain controller.
The Active Directory Recycle Bin introduces a new recycle lifetime and a new attribute: isRecycled. With the Active Directory Recycle Bin enabled, when an object is deleted it's isDeleted attribute is still set to true, but it's isRecycled attribute is untouched. This is the period where the object is visible in the deleted objects container, where it can be restored by simply right-clicking on it. After the recycle lifetime has expired, the isRecycled attribute is also set to true. This is when the tombstone lifetime kicks in. Only after the tombstone lifetime period has expired the object is removed from the database by each domain controller.
Managing UPN suffixes
In Active Directory, users and services can sign in using their pre-Windows 2000 logon name (the value of the sAMAccountName attribute) or their Kerberos user principal name (the value of the userPrincipalName attribute). As Kerberos relies heavily on DNS, the user principal name features an userPrincipalName suffix, in the form of a DNS domain name.
These userPrincipalName suffixes can be added to the list of available UPN suffixes for each Active Directory forest.
Getting ready
To make the most of UPN suffixes, make sure that you have an overview of the domain names and the publicly registered domain names for the organization.
How to do it...
UPN suffixes can be managed using Active Directory Domains and Trusts.
To do so, perform the following steps:
- Open Active Directory Domains and Trusts (domain.msc).
- Right-click Active Directory Domains and Trusts in the left navigation pane, and select Properties from the context menu:

- Type the new UPN suffix that you would like to add to the Active Directory forest, select the UPN suffix that you would like to remove, or simply glance over the list of UPN suffixes.
- Click Add or Remove, and then click OK.
How it works...
Both userPrincipalName and pre-Windows 2000 logon names can be used to sign in interactively to Windows. Windows' sign-in screen can handle both. However, in cloud scenarios, the userPrincipalName suffix is used, by default.
There's more...
An admin cannot assign a non-existing userPrincipalName suffix. However, when a UPN suffix is assigned to one or more accounts, there's no alert that mentions this when you remove a UPN suffix.