


In this chapter, we cover the following recipes:
Installing RSAT tools on Windows 10 and Windows Server 2019
Exploring package management
Exploring PowerShellGet and PSGallery
Creating an internal PowerShell repository
Establishing a code-signing environment
Implementing Just Enough Administration
Before you can begin to administer your Windows Server 2019 infrastructure, you need to create an environment in which you can use PowerShell to carry out the administration.
The recipes in this chapter focus on setting up a PowerShell administrative environment, which includes getting the tools you need, setting up an internal PowerShell repository, and (for organizations that require a high level of security) creating a code-signing environment. The chapter finishes with setting up JEA to enable users to perform administrative tasks (but only those assigned to the user).
In order to manage many of the feature of Windows Server 2019, you need to install and use the Windows Remote Server Administration (RSAT) tools. These tools include PowerShell modules, cmdlets, and other objects that enable you to manage the various features as described in this book.
This recipe configures several hosts: a domain controller (DC1), two domain-joined servers (SRV1, SRV2), and a Windows 10 domain-joined client (CL1).
This recipe enables you to use a Windows 10 computer to manage your Windows 2019 servers remotely. As needed, you can also log in to a server using remote desktop tools to carry out any needed administration locally.
This recipe assumes you have set up the VM farm for this book as described in the Preface to the book. In particular, this recipe uses a Windows Server 2019 host running as a domain controller (DC1), a Windows 10 client computer (CL1), plus two domain-joined servers (SRV1, SRV2).
Your client system should be Windows 10 Enterprise or Professional. Once you have installed the operating system, you should customize it with some artifacts used throughout this book, as follows:
#   Set execution Policy
Set-ExecutionPolicy -ExecutionPolicy Unrestricted -Force
#   Create Local Foo folder
New-Item C:\Foo -ItemType Directory -Force
#   Create basic profile and populate
New-Item $profile -Force -ErrorAction SilentlyContinue
'# Profile file created by recipe' | OUT-File $profile
'# Profile for $(hostname)'        | OUT-File $profile -Append
''                                 | OUT-File $profile -Append
'#  Set location'                  | OUT-File $profile -Append
'Set-Location -Path C:\Foo'        | OUT-File $profile -Append
''                                 | OUT-File $profile -Append
'# Set an alias'                   | Out-File $Profile -Append
'Set-Alias gh get-help'            | Out-File $Profile -Append
'###  End of profile'              | Out-File $Profile -Append
# Now view profile in Notepad
Notepad $Profile
# And update Help
Update-Help -Force
These steps create the C:\Foo folder, create a profile, and update the PowerShell help information. You can add other customizations to these steps, such as adding VS Code or other third-party modules.
From
CL1, get all available PowerShell commands:$CommandsBeforeRSAT = Get-Command -Module * $CountBeforeRSAT = $CommandsBeforeRSAT.Count "On Host: [$Env:COMPUTERNAME]" "Commands available before RSAT installed: [$CountBeforeRSAT]"
Examine the types of command returned by
Get-Command:$CommandsBeforeRSAT | Get-Member | Select-Object -ExpandProperty TypeName -Unique
Get the collection of PowerShell modules and a count of modules before adding the RSAT tools:
$ModulesBeforeRSAT = Get-Module -ListAvailable
$CountOfModulesBeforeRSAT = $ModulesBeforeRSAT.Count
"$CountOfModulesBeforeRSAT modules installed prior to adding RSAT"
Get the
Windows Client VersionandHardware Platform:$Key = 'HKLM:\SOFTWARE\Microsoft\Windows NT\CurrentVersion' $CliVer = (Get-ItemProperty -Path $Key).ReleaseId $Platform = $ENV:PROCESSOR_ARCHITECTURE "Windows Client Version : $CliVer" "Hardware Platform : $Platform"
Create a URL for the download file—note this recipe only works for
1709and1803:$LP1 = 'https://download.microsoft.com/download/1/D/8/' + '1D8B5022-5477-4B9A-8104-6A71FF9D98AB/' $Lp180364 = 'WindowsTH-RSAT_WS_1803-x64.msu' $Lp170964 = 'WindowsTH-RSAT_WS_1709-x64.msu' $Lp180332 = 'WindowsTH-RSAT_WS_1803-x86.msu' $Lp170932 = 'WindowsTH-RSAT_WS_1709-x86.msu' If ($CliVer -eq 1803 -and $Platform -eq 'AMD64') { $DLPath = $Lp1 + $lp180364} ELSEIf ($CliVer -eq 1709 -and $Platform -eq 'AMD64') { $DLPath = $Lp1 + $lp170964} ElseIf ($CliVer -eq 1803 -and $Platform -eq 'X86') { $DLPath = $Lp1 + $lp180332} ElseIf ($CliVer -eq 1709 -and $platform -eq 'x86') { $DLPath = $Lp1 + $lp170932} Else {"Version $Cliver - unknown"; return}Display what is to be downloaded:
"RSAT MSU file to be downloaded:"
$DLPath
Use BITS to download the file:
$DLFile = 'C:\foo\Rsat.msu'
Start-BitsTransfer -Source $DLPath -Destination $DLFile
Check the download's Authenticode signature:
$Authenticatefile = Get-AuthenticodeSignature $DLFile If ($Authenticatefile.status -NE "Valid") {'File downloaded fails Authenticode check'} Else {'Downloaded file passes Authenticode check'}$WsusArguments = $DLFile + " /quiet" 'Installing RSAT for Windows 10 - Please Wait...' $Path = 'C:\Windows\System32\wusa.exe' Start-Process -FilePath $Path -ArgumentList $WsusArguments -Wait
Now that RSAT features are installed, see what commands are available on the client:
$CommandsAfterRSAT = Get-Command -Module *
$COHT1 = @{
  ReferenceObject  = $CommandsBeforeRSAT
  DifferenceObject = $CommandsAfterRSAT
}
# NB: This is quite slow
$DiffC = Compare-Object @COHT1
"$($DiffC.Count) Commands added with RSAT"
Check how many modules are now available on
CL1:$ModulesAfterRSAT = Get-Module -ListAvailable $CountOfModulesAfterRsat = $ModulesAfterRSAT.Count $COHT2 = @{ ReferenceObject = $ModulesBeforeRSAT DifferenceObject = $ModulesAfterRSAT } $DiffM = Compare-Object @COHT2 "$($DiffM.Count) Modules added with RSAT to CL1" "$CountOfModulesAfterRsat modules now available on CL1""$($DiffM.Count) modules added With RSAT tools to CL1" $DiffM | Format-Table InputObject -HideTableHeaders
That completes adding the RSAT tools to the client; now we add the tools to
SRV1and look at comparisons with tools on other servers viaCL1.Get details of the features and tools loaded on
DC1,SRV1, andSRV2:$FSB1 = {Get-WindowsFeature} $FSRV1B = Invoke-Command -ComputerName SRV1 -ScriptBlock $FSB1 $FSRV2B = Invoke-Command -ComputerName SRV2 -ScriptBlock $FSB1 $FDC1B = Invoke-Command -ComputerName DC1 -ScriptBlock $FSB1 $IFSrv1B = $FSRV1B | Where-object installed $IFSrv2B = $SRV2B | Where-Object installed $IFDC1B = $FDC1B | Where-Object installed $RFSrv1B = $FeaturesSRV1B | Where-Object Installed | Where-Object Name -Match 'RSAT' $RFSSrv2B = $FeaturesSRV2B | Where-Object Installed | Where-Object Name -Match 'RSAT' $RFSDC1B = $FeaturesDC1B | Where-Object Installed | Where-Object Name -Match 'RSAT'Display details of the tools installed on each server:
'Before Installation of RSAT tools on DC1, SRV1'
"$($IFDC1B.Count) features installed on DC1"
"$($RFSDC1B.Count) RSAT features installed on DC1"
"$($IFSrv1B.Count) features installed on SRV1"
"$($RFSrv1B.Count) RSAT features installed on SRV1"
"$($IFSrv2B.Count) features installed on SRV2"
"$($RFSSRV2B.Count) RSAT features installed on SRV2"
Add the RSAT tools to the
SRV2server.$InstallSB = { Get-WindowsFeature -Name *RSAT* | Install-WindowsFeature } $I = Invoke-Command -ComputerName SRV1 -ScriptBlock $InstallSB $I If ($I.RestartNeeded -eq 'Yes') { 'Restarting SRV1' Restart-Computer -ComputerName SRV1 -Force -Wait -For PowerShell }Get details of RSAT tools on
SRV1vsSRV2:$FSB2 = {Get-WindowsFeature} $FSRV1A = Invoke-Command -ComputerName SRV1 -ScriptBlock $FSB2 $FSRV2A = Invoke-Command -ComputerName SRV2 -ScriptBlock $FSB2 $IFSrv1A = $FSRV1A | Where-Object Installed $IFSrv2A = $FSRV2A | Where-Object Installed $RSFSrv1A = $FSRV1A | Where-Object Installed | Where-Object Name -Match 'RSAT' $RFSSrv2A = $FSRV2A | Where-Object Installed | Where-Object Name -Match 'RSAT'Display after results:
"After Installation of RSAT tools on SRV1"
"$($IFSRV1A.Count) features installed on SRV1"
"$($RSFSrv1A.Count) RSAT features installed on SRV1"
"$($IFSRV2A.Count) features installed on SRV2"
"$($RFSSRV2A.Count) RSAT features installed on SRV2"
This recipe installs the RSAT tools on both a Windows 10 domain-joined computer (CL1) and on several Windows 2019 servers. The recipe also displays the results of the installation. You begin, in step 1, by getting all the commands available on the Windows 10 host and display a count.
Depending on the specific version of Windows 10 you use and what tools you may have already added to the client, the counts may be different. Here is what the output of this step looks like:

As you can see, 1528 total commands existed prior to adding the RSAT tools. In step 2, you examine the different types of command that make up that total, as shown here:

PowerShell includes aliases, functions, filters, and cmdlets as commands. Adding the RSAT tools increases the number of commands available. In step 3, you display a count of the modules installed currently, which looks like the following:

In step 4, you obtain the hardware platform and the Windows 10 version, which looks like this:

In step 5, you create a URL for downloading the RSAT tools. Different versions exist for different hardware platforms (for example, x86 and amd64) and for major Windows 10 versions (1709 and 1803). In step 6, you display the URL, which looks like this:

In step 7, you use the Background Intelligent Transfer Service (BITS) to retrieve the URL and store it as C:\Foo\Rsat.msu. The transfer produces no output.
In step 8, you check the Authenticode digital signature of the downloaded file to ensure the file was transferred correctly and has not been tampered with, which looks like this:

In step 9, you run the downloaded file that installs the RSAT tools. Aside from the message that the script is installing the RSAT tools, PowerShell runs this silently and there is no additional output from this step.
In Step 10, you determine that CL1 now has a total of 1270 commands, as shown:

In step 11, you discover the number of RSAT tools and the total of modules now available on CL1, as shown:

In step 12, you display the modules that were added to CL1, which looks like this:

The preceding steps complete the task of installing the RSAT tools on a Windows 10 client. In some cases, you may also want to install the relevant tools on some or all of your servers.
In this part of the recipe, you are installing the RSAT tools onto server SRV1. You then compare the tools added to SRV1 with what is available on other servers (for example, DC1 and SRV2). In this case, DC1 is a domain controller with other features added during creation of the DC1 server. SRV2, on the other hand, starts as just a domain-joined server with no additional tools.
In step 13, you determine the features available on the three servers—this produces no output. In step 14, you display a count of the features and RSAT features available on each server, which looks like this:

In step 15, you install the RSAT tools remotely on SRV1. To complete the installation, you also reboot the server if the installation requires a reboot. The output looks like the following:

In step 16, you determine the features now available on the three servers, producing no output, and finally, in step 17, you display the results, as follows:

In step 1, you saw that there were 1528 commands loaded on CL1 while in step 4 you saw that you had 77 modules on your system. PowerShell gets commands primarily from modules, although older PowerShell snap-ins also contain cmdlets. If you wish to use a command contained in a snap-in, you have to load the snap-in explicitly by using Add-PSSnapin. PowerShell can only auto-load commands found in modules.
In step 4 and step 5, you calculate and display a URL to download the RSAT tools. These recipe steps work for two versions of Windows 10 and for two hardware platforms. The URLs and versions of Windows 10 available may have changed by the time you read this. Also, the recipe caters just for Windows 10 versions 1709 and 1803. Download files for earlier versions are not available in the same way as for later versions. And for versions later than 1893, the mechanism may change again.
In step 15, when you displayed the results of adding features to SRV1, the output looked different if the formatting had been done on the server. On the server, PowerShell is able to display XML that states how to format output from WindowsFeature cmdlets. Windows 10 does not display XML, hence the list output in this step.
The PackageMangement PowerShell module implements a provider interface that software package management systems use to manage software packages. You can use the cmdlets in the PackageMangement module to work with a variety of package management systems. You can think of this module as providing an API to package management providers such as PowerShellGet, discussed in the Exploring PowerShellGet and PowerShell Gallery recipe.
The key function of the PackageMangement module is to manage the set of software repositories in which package management tools can search, obtain, install, and remove packages. The module enables you to discover and utilize software packages from a variety of sources (and potentially varying in quality).
This recipe explores the PackageManagement module from SRV1.
This recipe uses SRV1—a domain-joined server that you partially configured in the Installing RSAT Tools on Windows 10 and Windows Server 2019 recipe.
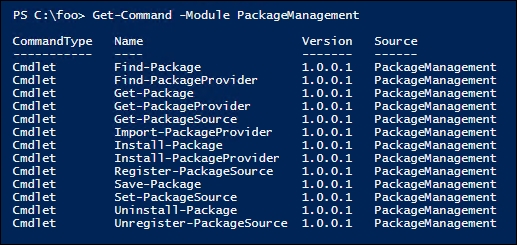
Review the cmdlets in the
PackageManagementmodule:Get-Command -Module PackageManagement
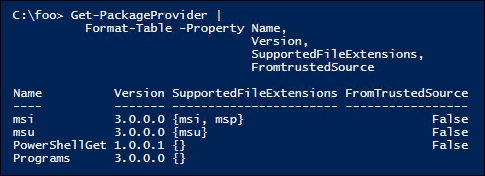
Review the installed providers with
Get-PackageProvider:Get-PackageProvider | Format-Table -Property Name, Version, SupportedFileExtensions, FromtrustedSourceGet details of a packages loaded on
SRV1of theMSUtype (representing Microsoft Updates downloaded by Windows Update):Get-Package -ProviderName 'msu' | Select-Object -ExpandProperty Name
Get details of the
NuGetprovider, which provides access to developer library packages. This step also loads theNuGetprovider if it is not already installed:Get-PackageProvider -Name NuGet -ForceBootstrap
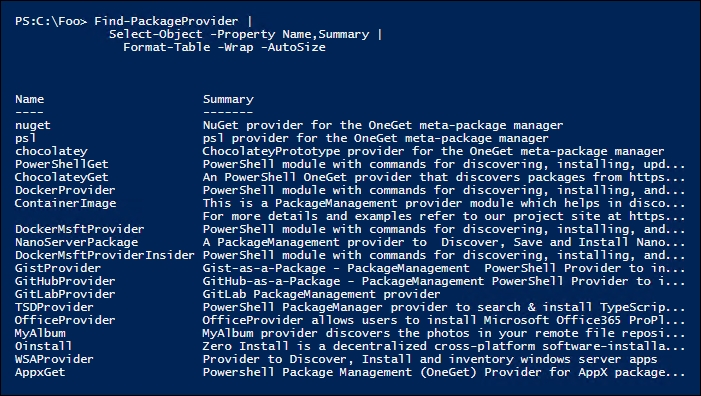
Display the other package providers available on
SRV1:Find-PackageProvider | Select-Object -Property Name,Summary | Format-Table -Wrap -AutoSizeChocolatey is a popular repository for Windows administrators and power users. You have to install the provider before you can use it, as follows:
Install-PackageProvider -Name Chocolatey -Force
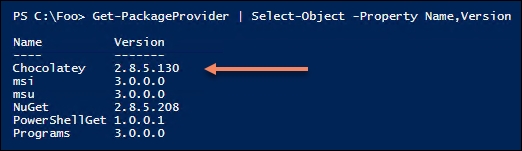
Verify that the
Chocolateyprovider is now available:Get-PackageProvider | Select-Object -Property Name,Version
Display the packages now available in
Chocolatey:$Packages = Find-Package -ProviderName Chocolatey "$($Packages.Count) packages available from Chocolatey"
In step 1, you review the cmdlets contained in the PackageManagement module, which looks like this:
In step 2, you review the package providers installed by default in Windows Server 2019, which looks like this:
In step 3, you examined the packages downloaded by the msu provider. In this case, you only see one update, but you may see more, and it looks like this:

In step 4, you examine details of the NuGet provider. If the provider doesn't exist, then using the -ForceBootstrap parameter installs the provider without asking for confirmation, like this:

In step 5, you search for additional package providers, like this:
In step 6, you install the Chocolatey package provider, which looks like this:

In step 7, you examine the list of package providers now available to confirm that the Chocolatey provider is available, which looks like this:
In step 8, you check to see how many packages are available to download from Chocolatey, as follows:

PowerShellGet is a module that enables you to work with external repositories. A repository is a site, either on the internet or internally, that hosts software packages. You use the cmdlets in this module to access one or more repositories that enable you to find, download, and use third-party packages from a package repository.
PowerShellGet leverages mainly the PSGallery repository. This repository, often referred to as a repo, is sponsored by Microsoft and contains a wealth of PowerShell functionalities, including PowerShell modules, DSC resources, PowerShell scripts, and so on. Many of the recipes in this book utilize PSGallery resources.
To some extent, the PowerShellGet module is similar to tools in the Linux world such as apt-get in Ubuntu or RPM in Red Hat Linux.
The PowerShellGet module implements a number of additional *-Module cmdlets that extend the module management cmdlets provided in the Microsoft.PowerShell.Core module.
It's simple and easy to find and install modules from the PSGallery. In some cases, you may wish to download the module to a separate folder. This would allow you to inspect the module, loading it manually before putting it into a folder in $env:PSModulePath (where commands might be auto-loaded).
This recipe runs on the SRV1 server. The recipe also assumes you have performed the previous recipes in this chapter. In particular, you should have added the latest version of the NuGet package provider to your system. If you have not already done so, ensure the provider is installed by performing the following:
Install-PackageProvider -Name NuGet -ForceBootstrap
Review the commands available in the
PowerShellGetmodule:Get-Command -Module PowerShellGet
View the
NuGetpackage provider version:Get-PackageProvider -Name NuGet | Select-Object -Property VersionView the current version of
PowerShellGet:Get-Module -Name PowerShellGet -ListAvailable
Install the
PowerShellGetmodule fromPSGallery:Install-Module -Name PowerShellGet -Force
Check the version of
PowerShellGet:Get-Module -Name PowerShellGet -ListAvailable
View the default
PSGalleryrepositories currently available to PowerShell:Get-PSRepository
Review the package providers in the
PSGalleryrepository:Find-PackageProvider -Source PSGallery | Select-Object -Property Name, Summary | Format-Table -Wrap -autosizeUse the
Get-Commandcmdlet to findFind-*cmdlets in thePowerShellGetmodule:Get-Command -Module PowerShellGet -Verb Find
Get the commands in the
PowerShellGetmodule:$Commands = Find-Command -Module PowerShellGet $CommandCount = $Commands.Count
Get the modules included:
$Modules     = Find-Module -Name *
$ModuleCount = $Modules.Count
Get the DSC resources available in the
PSGalleryrepository:$DSCResources = Find-DSCResource $DSCResourcesCount = $DSCResources.Count
Display the counts:
"$CommandCount commands available in PowerShellGet"
"$DSCResourcesCount DSCResources available in PowerShell Gallery"
"$ModuleCount Modules available in the PowerShell Gallery"
Install the
TreeSizemodule. As this is a public repository, Windows does not trust it by default, so you must approve installation or use-Force:Install-Module -Name TreeSize -Force
Review and test the commands in the module:
Get-Command -Module TreeSize
Get-Help Get-TreeSize
Get-TreeSize -Path C:\Windows\System32\Drivers -Depth 1

Uninstall the module:
Uninstall-Module -Name TreeSize
To inspect prior to installing, first create a download folder:
$NIHT = @{
  ItemType = 'Directory'
  Path     = "$env:HOMEDRIVE\DownloadedModules"
}
New-Item @NIHT
Save the module to the folder:
$Path = "$env:HOMEDRIVE\DownloadedModules"
Save-Module -Name TreeSize -Path $Path
Get-ChildItem -Path $Path -Recurse | format-Table Fullname
To test the downloaded
TreeSizemodule, import it:$ModuleFolder = "$env:HOMEDRIVE\downloadedModules\TreeSize" Get-ChildItem -Path $ModuleFolder -Filter *.psm1 -Recurse | Select-Object -ExpandProperty FullName -First 1 | Import-Module -Verbose
This recipe uses the cmdlets in the PowerShellGet module to demonstrate how you can obtain and leverage modules and other PowerShell resources from the public PSGallery site (https://www.powershellgallery.com/).
In step 1, you review the commands contained in the PowerShellGet module, which looks like this:

Because the NuGet package provider is required to use the PowerShell Gallery, you need to have this provider loaded. In step 2, you check the version of the provider, which looks like this:

PowerShellGet requires NuGet provider version 2.8.5.201 or newer to interact with NuGet-based repositories, including PSGallery. In this case, you have a later version of the NuGet provider.
In step 3, you check what version of PowerShellGet is currently installed on SRV1, which looks like this:

In step 4, you install the latest version of the PowerShellGet module from PSGallery, which produces no output. In step 5, you view the versions of PowerShellGet that are now available on SRV1, like this:

In step 6, you examine the repositories PowerShell knows about (thus far), like this:

In step 7, you examine other providers contained in the PSGallery, which you can download and use as needed:

To discover some of the things you can find using PowerShellGet, in step 8 you get the commands in the module that use the Find verb, like this:

There are a variety of resources you can obtain from the PSGallery. In step 9, step 10, and step 11, you get the command, modules, and DSC resources respectively that are in the PSGallery. This generates no output. In step 12, you display those counts, which looks like this:

In step 13, you install the TreeSize module from the PSGallery, which generates no output. In step 14, you look at the commands contained in the module (there is only one), then you run the command, which looks like this:

In step 15, you remove the module—this generates no output.
In some cases, you may wish to download the module to a separate folder to enable you to test the module before formally installing it. In step 16, you create a folder in your home drive, generating no output. Next, in step 17, you save the module into that folder and look at what's in the downloaded files folder, which looks like this:

In step 18, you load the module from the download folder. Using the -Verbose switch enables you to see what Import-Module is actually doing. The output is as follows:

Once you have imported the module you can then use either the Get-Treesize function or its alias, TreeSize.
In step 3, you discover that the version of the PowerShellGet module on the host is version 1.0.0.1 which ships with Windows 10. Since the initial release of Windows 10, PowerShellGet has become a community-developed project, based at GitHub. The latest version of the module is available both from GitHub or via PSGallery, with the latter being easier to work with for most IT pros. Visit the GitHub site to get more information: https://github.com/PowerShell/PowerShellGet.
In step 4, you added the latest version of the PowerShellGet module onto your system and in step 5, you saw you now had two versions. PowerShell, by default, uses the later version, unless you explicitly load an earlier version prior to using the commands in the module.
In this recipe, you downloaded, used, and removed the TreeSize module—one of thousands of modules you can freely download and use. Other popular modules in the PSGallery include:
Azure modules (including
MSOnline): Azure provides a large number of smaller modules and most of these are frequently downloadedPowerShellGetandPackageManagementPSWindowsUpdatePSSlackIISAdministrationSQLServerCredentialManagerPosh-SSH
For most IT pros, PSGallery is the go-to location for obtaining useful modules that avoid you having to re-invent the wheel. In some cases, you may develop a particularly useful module (or script or DSC resource), which you can publish to the PSGallery to share with others.
See https://docs.microsoft.com/en-us/powershell/gallery/concepts/publishing-guidelines for guidelines regarding publishing to the PSGallery. And, while you are looking at that page, consider implementing best practices in any production script you develop.
Public galleries such as PSGallery are great sources of interesting and useful modules. You can also create your own PowerShell repository for either personal or corporate use.
There are several ways to set up an internal repository, for example using a third-party tool such as ProGet from Inedo (see https://inedo.com/ for details on ProGet). The simplest way is to set up an SMB file share and use the Register-PSRepository command to set up the repository. Once set up, you can use the Publish-Module command to upload modules to your new repository and then use the repository to distribute organizational modules.
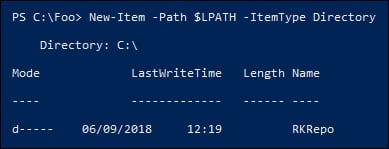
Create the repository folder:
$LPATH = 'C:\RKRepo'
New-Item -Path $LPATH -ItemType Directory
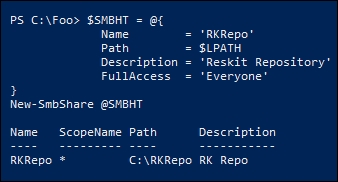
Share the folder:
$SMBHT = @{
  Name        = 'RKRepo'
  Path        = $LPATH
  Description = 'Reskit Repository'
  FullAccess  = 'Everyone'
}
New-SmbShare @SMBHT
Create the repository and configure it as trusted:
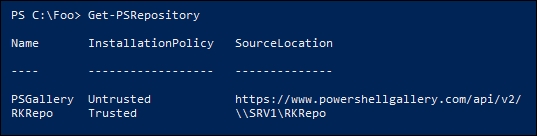
$Path = '\\SRV1\RKRepo'
$REPOHT = @{
  Name               = 'RKRepo'
  SourceLocation     = $Path
  PublishLocation    = $Path
  InstallationPolicy = 'Trusted'
}
Register-PSRepository @REPOHT
View the configured repositories:
Get-PSRepository
Create a Hello World module folder:
New-Item C:\HW -ItemType Directory | Out-Null
Create a very simple module:
$HS = @"
Function Get-HelloWorld {'Hello World'}
Set-Alias GHW Get-HelloWorld
"@
$HS | Out-File C:\HW\HW.psm1
Load and test the module:
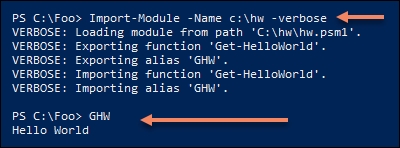
Import-Module -Name c:\hw -verbose
GHW
Create a module manifest for the new module:
$NMHT = @{
  Path              = 'C:\HW\HW.psd1'
  RootModule        = 'HW.psm1'
  Description       = 'Hello World module'
  Author            = 'DoctorDNS@Gmail.com'
  FunctionsToExport = 'Get-HelloWorld'
}
Publish the module to the
RKRepo:Publish-Module -Path C:\HW -Repository RKRepo
View the results of publishing the module:
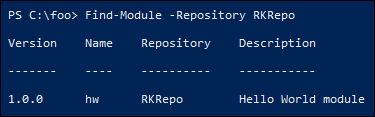
Find-Module -Repository RKRepo
Look at what is in the
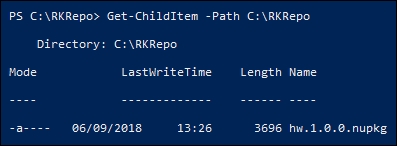
C:\RKRepofolder:Get-ChildItem -Path C:\RKRepo
You begin this recipe, in step 1, by creating the folder you are going to use to hold your repository, in this case C:\RKRepo, as follows:
In step 2, you share this folder, like so:
In step 3, you create the repository in the shared folder, which produces no output. In step 4, you view the repositories configured on the system, like this:
You next create a simple module to be published into your repository. You begin, in step 5, by creating a working folder for your module, then in step 6 you create a very simple script module with a single function. Neither step produces any output.
In step 7, you test the module by importing it from the working module folder. By using the -Verbose switch, you can observe how PowerShell imports the module, then you invoke the Get-HelloWorld function via its alias GHW, as follows:
Although the module works as-is, you need a manifest in order to publish the module. In step 8, you create a very simple module manifest and store it in the module folder. In step 9, you publish the module. None of these three steps produce any output.
With the module published, in step 10 you can use Find-Module to discover what is in the repository, like this:
The repository is just a file share holding a set of one or more NuGet packages. As you can see in step 11, our repository has just one item published, as shown here:
In step 2, you create a share that allows everyone full access to the repository. In a corporate environment, you should review the access to the repository. Perhaps you should give authenticated users read access, and grant write access to a smaller group of administrators.
As you can see in step 11, a PowerShellGet repository is just a file share that holds NuGet packages. One approach might be to keep your module source in your source code repository and publish it to the internal PowerShellGet repository as needed.
In some environments, it can be important to know that a program or PowerShell script has not been modified since it was released. You can achieve this with PowerShell scripts by digitally signing the script and by enforcing an execution policy of AllSigned or RemoteSigned.
After you digitally sign your script, you can detect whether any changes were made in the script since it was signed. Using PowerShell's execution policy, you can force PowerShell to test the script to ensure the digital signature is still valid and to only run scripts that succeed. You can set PowerShell to do this either for all scripts (you set the execution policy to AllSigned) or only for scripts you downloaded from a remote site (you set the execution policy to RemoteSigned).
One thing to remember—even if you have the execution policy set to AllSigned, it's trivial to run any non-signed script. Simply bring the script into PowerShell's ISE, select all the text in the script, then run that selected script. And using the Unblock-File cmdlet allows you to, in effect, turn a remote script into a local one.
Signing a script is simple once you have a digital certificate issued by a Certificate Authority. You have three options for getting an appropriate certificate:
Use a well-known public Certificate Authority such as Digicert (see https://www.digicert.com/code-signing) for details of their code-signing certificates).
Use an internal CA and obtain the certificate from your organization's CA.
Use a self-signed certificate.
Public certificates are useful but are generally not free. You can easily set up your own CA, or used self-signed certificates. Self-signed certificates are great for testing out signing scripts and then using them. All three of these methods can give you a certificate that you can use to sign PowerShell scripts.
Run this recipe on the Windows 10 client (CL1) you used in the earlier Installing RSAT Tools on Windows 10 and Server 2019 recipe.
Create a code-signing, self-signed certificate:
$CHT = @{
  Subject           = 'Reskit Code Signing'
  Type              = 'CodeSigning'
  CertStoreLocation = 'Cert:\CurrentUser\My'
}
$Cert = New-SelfSignedCertificate @CHT
View the newly created certificate:
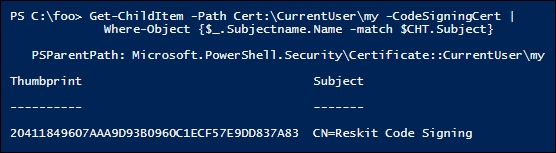
Get-ChildItem -Path Cert:\CurrentUser\my -CodeSigningCert |
  Where-Object {$_.Subjectname.Name -match $CHT.Subject}
Create a simple script:
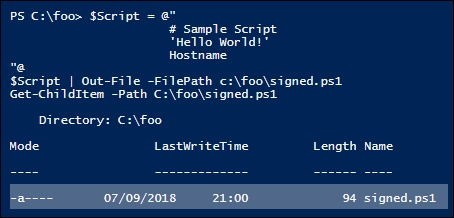
$Script = @"
  # Sample Script
  'Hello World!'
  Hostname
"@
$Script | Out-File -FilePath C:\Foo\signed.ps1
Get-ChildItem -Path C:\Foo\signed.ps1
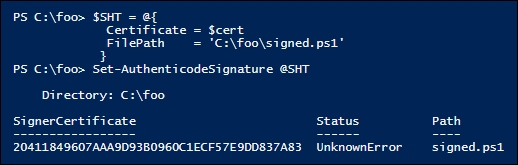
Sign the script:
$SHT = @{
  Certificate = $Cert
  FilePath    = 'C:\Foo\signed.ps1'
}
Set-AuthenticodeSignature @SHT -Verbose
Look at the script after signing:
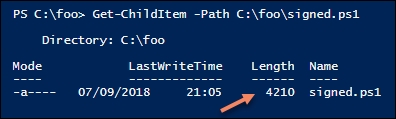
Get-ChildItem -Path C:\Foo\signed.ps1
Test the signature:
Get-AuthenticodeSignature -FilePath C:\Foo\signed.ps1 |
  Format-List
Ensure the certificate is trusted:
$DestStoreName  = 'Root'
$DestStoreScope = 'CurrentUser'
$Type = 'System.Security.Cryptography.X509Certificates.X509Store'
$MHT = @{
  TypeName = $Type
  ArgumentList  = ($DestStoreName, $DestStoreScope)
}
$DestStore = New-Object  @MHT
$DestStore.Open(
  [System.Security.Cryptography.X509Certificates.OpenFlags]::
    ReadWrite)
$DestStore.Add($cert)
$DestStore.Close()
Re-sign with a trusted certificate:
Set-AuthenticodeSignature @SHT | Out-Null
Check the script's signature:
Get-AuthenticodeSignature -FilePath C:\Foo\signed.ps1 |
  Format-List
In step 1, you create a self-signed code-signing certificate which you store in the current user's personal certificate store (also known as Cert:\CurrentUser\My). Since you store the certificate in $Cert, there is no output from this step. In step 2, you examine the code-signing certificates in the current user's personal certificate store, like this:
In step 3, you create a very simple PowerShell script, which you store in C:\Foo\Signed.ps1. Then you display the file's details, like this:
Now that you have a script, in step 4 you sign it. Note that this generates a status error of UnknownError (which means the signing certificate is not trusted). The output of this step looks like this:
In step 5, you view the script file and note the file is considerably larger (due to the length of the digital signature), which looks like this:
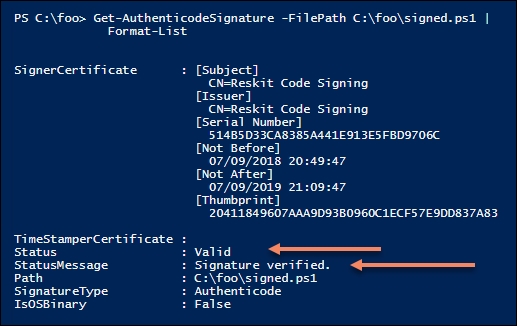
In step 6, you test the script to validate the signature, like this:
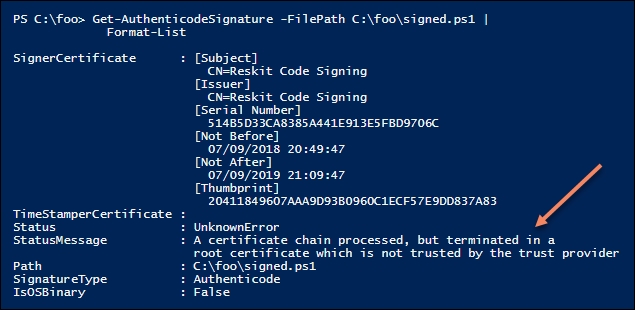
As you can see, the underlying reason for the UnknownError status is that the signing certificate is not trusted. You can configure Windows to trust your signed certificate by copying your self-signed certificate into the Root CA store (either for the current user or for the computer).
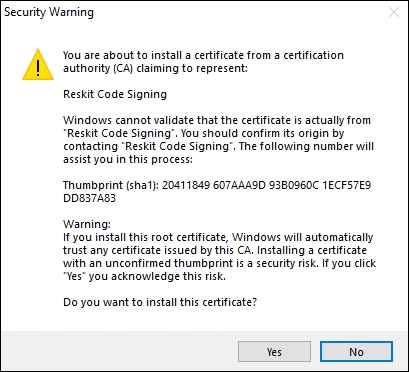
In step 7, you copy your self-signed certificate into the current user's Root CA store, using the .NET Framework. Copying a certificate into the root store produces no console output, but does generate a pop-up message, which looks like this:
Now that the signing certificate is trusted, in step 8 you re-sign the script, which produces no output. In step 9, you test the re-signed script, as shown here:
PowerShell's certificate provider does not support copying a certificate into the root CA store. You can overcome this limitation by dipping down into the .NET framework as shown in step 7, although this does generate a pop-up dialog box as shown previously.
Once you complete the steps in this recipe, you can experiment with an execution policy and make changes and observe the results. After signing the script, for example, as you did in step 8, try updating the script and running it with an execution policy set to AllSigned.
Establishing a secure code-signing environment can be a lot of work. Once you have the code-signing certificate, you need to keep it secure (for example on a smart card that is locked in a safe with highly limited access). Then you need procedures to enable the organization's scripts to be signed. Creating the infrastructure to manage the whole process, including dealing with the smart cards and the safe, is possibly overkill for many.
If you release PowerShell scripts commercially or publicly (for example via GitHub or PSGallery), signing what you publish is probably a good thing to do, preferably with a public CA-issued certificate.
See https://www.globalsign.com/en/blog/the-importance-of-code-signing-redux for some thoughts on the importance of code signing in general.
Whether or not you deploy code signing, it's useful to know how to do it.
Just Enough Administration, also known as JEA, is a security framework providing you with the ability to implement fine-grained administrative delegation. With JEA, you enable a user to have just enough administrative power to do their job, and no more. JEA is a more secure alternative to just adding users to the Domain Administrator or Enterprise Administrator groups.
With JEA, you could enable a domain user to access your domain controllers for the purposes of administering the DNS Service on the server. With JEA, you constrain what the user can do on the protected server. For example, you could allow the user to stop and start the DNS Service (using Stop-Service and Start-Service) but no other services.
JEA makes use of a number of objects:
JEA role capabilities file (
.psrc): This file defines a role in terms of its capabilities. The JEA roleRKDnsAdminsis allowed access to a limited set of cmdlets on the Domain Controller (those related to the role of administering DNS).JEA Role module: This is a simple module that holds the JEA role capabilities file within the module's
RoleCapabilitiesfolder. The module could be calledRKDnsAdmins.JEA session configuration file (
.pssc): This file defines a JEA session in terms of who is allowed access to the session and what they can do in the session. You could allow anyone in theRKDnsAdminsdomain security group to access the server using the JEA endpoint. The session configuration file defines the actions allowed within the JEA session by reference to the role capabilities file. The JEA protected session can only be used by certain people who can do whatever the role capabilities file dictates.
Once you have these files and the module in place, you register the JEA endpoint to the server (and test the configuration).
Once the JEA endpoint is registered, a user who is a member of the domain security group called RKDnsAdmins can use Invoke-Command or Enter-PssSession, specifying the remote server and the JEA-protected endpoint to access the protected server. Once inside the session, the user can only do what the role capabilities file allows.
The following diagram shows the key components of JEA:

Before you use the recipe, you need to create the domain accounts and groups that you use in this recipe. This includes a user (JerryG) and a security group (RKDnsAdmins) which contains the user, with both of these under an Organizational Unit (IT). You installed the RSAT tools in the Installing RSAT Tools on Windows 10 recipe on CL1—so you can run this step on either CL1 or on DC1. Creating these AD objects looks like this:
# Create an IT OU
$DomainRoot = 'DC=Reskit,DC=Org'
New-ADOrganizationalUnit -Name IT -Path $DomainRoot
# Create a user - JerryG in the OU
$OURoot = "OU=IT,$DomainRoot"
$PW     = 'Pa$$w0rd'
$PWSS   = ConvertTo-SecureString  -String $PW -AsPlainText -Force
$NUHT   = @{Name                  = 'Jerry Garcia'
            SamAccountName        = 'JerryG'
            AccountPassword       = $PWSS
            Enabled               = $true
            PasswordNeverExpires  = $true
            ChangePasswordAtLogon = $false
            Path                  = $OURoot
}
New-ADUser @NUHT
# Create ReskitDNSAdmins security universal group in the OU
$NGHT  = @{
  Name        = 'RKDnsAdmins '
  Path        = $OURoot
  GroupScope  = 'Universal'
  Description = 'RKnsAdmins group for JEA'
}
New-ADGroup -Name RKDnsAdmins -Path $OURoot -GroupScope Universal
# Add JerryG to the ReskitAdmin's group
Add-ADGroupMember -Identity 'RKDNSADMINS' -Members 'JerryG'
# Create JEA Transcripts folder
New-Item -Path C:\foo\JEATranscripts -ItemType DirectoryOn
DC1, create a new folder for theRKDnsAdminsJEA module:$PF = $env:Programfiles $CP = 'WindowsPowerShell\Modules\RKDnsAdmins' $ModPath = Join-Path -Path $PF -ChildPath $CP New-Item -Path $ModPath -ItemType Directory | Out-Null
Define and create a JEA role capabilities file:
$RCHT = @{
  Path            = 'C:\Foo\RKDnsAdmins.psrc'
  Author          = 'Reskit Administration'
  CompanyName     = 'Reskit.Org'
  Description     = 'Defines RKDnsAdmins role capabilities'
  AliasDefinition = @{name='gh';value='Get-Help'}
  ModulesToImport = 'Microsoft.PowerShell.Core','DnsServer'
  VisibleCmdlets  = ("Restart-Service",
                    @{ Name = "Restart-Computer";
                       Parameters = @{Name = "ComputerName"}
                       ValidateSet = 'DC1, DC2'},
                     'DNSSERVER\*')
  VisibleExternalCommands = ('C:\Windows\System32\whoami.exe')
  VisibleFunctions = 'Get-HW'
  FunctionDefinitions = @{
    Name = 'Get-HW'
    Scriptblock = {'Hello JEA World'}}
} # End of Hash Table
New-PSRoleCapabilityFile @RCHT
Create the module manifest in the module folder:
$P = Join-Path -Path $ModPath -ChildPath 'RKDnsAdmins.psd1'
New-ModuleManifest -Path $P -RootModule 'RKDNSAdmins.psm1'
Create the role capabilities folder and copy the role configuration file into the module folder:
$RCF = Join-Path -Path $ModPath -ChildPath 'RoleCapabilities'
New-Item -ItemType Directory $RCF
Copy-Item -Path $RCHT.Path -Destination $RCF -Force
Create a JEA session configuration file:
$P = 'C:\Foo\RKDnsAdmins.pssc'
$RDHT = @{
  'Reskit\RKDnsAdmins' = @{RoleCapabilities = 'RKDnsAdmins'}
}
$PSCHT= @{
  Author              = 'DoctorDNS@Gmail.Com'
  Description         = 'Session Definition for RKDnsAdmins'
  SessionType         = 'RestrictedRemoteServer'
  Path                = $P
  RunAsVirtualAccount = $true
  TranscriptDirectory = 'C:\Foo\JEATranscripts'
  RoleDefinitions     = $RDHT
}
New-PSSessionConfigurationFile @PSCHT
Test the JEA session configuration file:
Test-PSSessionConfigurationFile -Path C:\foo\RKDnsAdmins.pssc
Register the JEA session definition:
Register-PSSessionConfiguration -Path C:\foo\RKDnsAdmins.pssc -Name 'RKDnsAdmins' -Force
Check what the user can do with configurations like this:
Get-PSSessionCapability -ConfigurationName rkdnsadmins -Username 'reskit\jerryg'
Create credentials for the user
JerryG:$U = 'Reskit\JerryG' $P = ConvertTo-SecureString 'Pa$$w0rd' -AsPlainText -Force $Cred = New-Object System.Management.Automation.PSCredential $U,$P
Define two script blocks and an invocation hash table:
$SB1   = {Get-HW}
$SB2   = {Get-Command -Name '*-DNSSERVER*'}
$ICMHT = @{
  ComputerName      = 'LocalHost'
  Credential        = $Cred
  ConfigurationName = 'RKDnsAdmins'
}
Invoke the JEA defined function (
Get-HW) in a JEA session and do it asJerryG:Invoke-Command -ScriptBlock $SB1 @ICMHT
Get the
DNSServercommands in the JEA session that are available toJerryG:$C = Invoke-command -ScriptBlock $SB2 @ICMHT | Measure-Object "$($C.Count) DNS commands available"
Examine the contents of the JEA transcripts folder:
Get-ChildItem -Path $PSCHT.TranscriptDirectory
Examine a transcript:
Get-ChildItem -Path $PSCHT.TranscriptDirectory |
  Select -First 1 |
     Get-Content
This recipe sets up a JEA endpoint on DC1 and then uses that to demonstrate how JEA works. The recipe relies on a user (JerryG), who is a member of a group (RKDnsAdmins) in the IT organizational unit within the Reskit.Org domain. The recipe provides the user with the commands necessary to do the job of a DNS administrator, and no more.
In step 1, you create a temporary folder on DC1 that is to hold the role capabilities file, which you define in step 2. In step 3, you create a module manifest in the module folder. Then, in step 4, you create a folder for the Role Capacities folder inside the module and copy the previously created .PSRC file into this new folder. In step 5, you create the JEA session configuration file. There is no output from these five steps.
In step 6, you test the session configuration file, as shown here:

This step returns a value of True, which means the session configuration file can be used to create a JEA session.
With all the prerequisites in place, in step 7 you register the JEA endpoint, like this:

In step 8, you check to see what commands (including aliases, functions, cmdlets, and applications) a user would have if they used this JEA endpoint. Because the role capabilities folder was set up to enable the user to have access to all the DNS server commands, there are a large number of DNS cmdlets available which are not shown simply to conserve space, like this:

The final task is to discover what a user can do in a JEA session. In step 9, you create a credential object for the JerryG user and in step 10 you define hash tables for later use. These two steps produce no output.
In step 11, you invoke a script block that invokes the JEA-defined function Get-HW, which looks like this:

In step 12, you calculate how many DNS commands are available within an RKDNSAdmins JEA session, like this:

In step 13, you examine the contents of the JEA transcripts folder, which you defined as part of the session configuration file (for example in step 5). You can see the two transcripts created in response to the two calls to Invoke-Command (in step 11 and step 12), like this:

In step 14, you examine the contents of the first transcript (a result of step 11). In the transcript header, you can see that user RESKIT\JerryG remoted in as a virtual RunAs user using the RKDnsAdmins JEA endpoint on DC1. In the body of the transcript, you can see the call to the Get-HW function and the response. This transcript looks like this:

If you compare this output with the output of step 11, you can see that the transcript is a more detailed examination of precisely what happened in the remote JEA session.
The DNSServer module, which the recipe gives the RDDnsAdmins JEA endpoint access to, includes three aliases. Since these aliases are not explicitly allowed in the role capabilities file, they are not available in the JEA session.
In this recipe, you used Invoke-Command to run two simple script blocks in a JEA session. Once you have JEA set up on DC1 (or any other server for that matter), you can enter a JEA session like this:
#  Enter a JEA session and see what you can do
$ICMHT = @{
  ComputerName   = 'Localhost'
  Credential     = $Cred    # Reskit\JerryG
  ConfigurationName = 'RKDnsAdmins'
}
Enter-PSSession @ICMHT
Once in the remoting session, you can explore what commands are available to the JerryG user.
In this recipe, you examined the transcripts generated by each remoting session. In addition to transcripts, PowerShell also logs the use of a JEA endpoint in the event log. For more information on event log entries and the general topic of auditing and reporting on JEA, see: https://docs.microsoft.com/en-us/powershell/jea/audit-and-report.
In this recipe, you used some of the key lock-down features provided by JEA. But there is more! For a fuller look at the things you can do with JEA and how to go about them, look at the JEA documentation beginning at: https://docs.microsoft.com/en-us/powershell/jea/overview.


