Download code from GitHub
This chapter introduces you to the basics of Rust, a systems programming language designed to be secure and fast. Rust is a good candidate to write concurrent software and it helps to prevent bugs. After reading this chapter, you'll be ready to code cool projects in the subsequent chapters. After learning about the language itself, you'll install its compiler and package manager, and you'll start programming right away. You'll also learn about the following concepts:
- Variables
- Built-in data types
- Control flow (conditions and loops)
- Functions
- Custom data types
- References
- Pattern matching
- Traits and Generics
- Arrays and Slices
- Macros
Rust is a system programming language developed by Mozilla, whose version 1.0 appeared in 2015. A system language means that you have control over the memory used by the program—you decide whether you want to allocate the memory on the stack or the heap, and when the memory is freed. But don't worry; in Rust, the compiler is very helpful and prevents you from making the many mistakes you can make in C and C++ that lead to segmentation faults. A segmentation fault arises when the programmer tries to access some memory that is not accessible to its process. Memory unsafety leads to bugs and security flaws.
Moreover, the compiler is smart enough to know where to insert the memory deallocation instructions so that you don't need to manually free your memory, all of that without a garbage collector, which is one of its greatest features. Since Rust is safe and fast, it is the perfect candidate for writing operating systems, embedded programs, servers, and games, but you can also use it to develop desktop applications and websites. A great example of this power is the Servo web engine, also developed by Mozilla.
Rust is multi-paradigm: it can be used in an imperative or functional way and you can even write concurrent applications safely. It is statically typed, meaning that every type must be known at compile time, but since it uses type inference, we can omit the type for most local variables. It is also strongly typed, which means that its type system prevents the programmer from some kinds of errors, such as using the wrong type for a function parameter. And Rust is very good at writing concurrent software because it prevents data races, which is concurrent access to a variable where one is a write; this is an undefined behavior in other languages. One thing to remember when reading this book is that Rust prevents you from shooting yourself in the foot. For instance, Rust doesn't have:
- null pointers
- data races
- use after free
- use before initialization
- goto
- automatic coercion of Boolean, numbers and enumerations
Also, Rust helps to prevent memory leaks. However, all of this is possible with unsafe code, which is explained in Chapter 3, Events and Basic Game Mechanisms.
Without further ado, let's install the tools we'll need throughout the book.
In this section we'll install rustup, which allows us to install different versions of the compiler and package manager.
Go to https://rustup.rs and follow the instructions in order to download rustup-init.exe, then run it.
Unless your distribution provides a package for rustup, you'll need to install rustup by typing the following command in your terminal:
$ curl https://sh.rustup.rs -sSf | sh
info: downloading installer

Welcome to Rust!

[...]

Current installation options:

   default host triple: x86_64-unknown-linux-gnu
     default toolchain: stable
  modify PATH variable: yes

1) Proceed with installation (default)
2) Customize installation
3) Cancel installation
This downloaded rustup and asked you whether you want to customize the installation. Unless you have particular needs, you'll be okay with the default.
Note
Note: The $ represents your shell prompt and should not be typed; you must type the text following it. Also, a line of text that doesn't start with $ represents the text output of the program.
To proceed with the installation, enter 1 and press Enter. This will install the rustc compiler, and the cargo package manager, among other things:
info: syncing channel updates for 'stable-x86_64-unknown-linux-gnu'
info: latest update on 2017-07-20, rust version 1.19.0 (0ade33941 2017-07-17)
info: downloading component 'rustc'

[...]

  stable installed - rustc 1.19.0 (0ade33941 2017-07-17)


Rust is installed now. Great!

To get started you need Cargo's bin directory ($HOME/.cargo/bin) in your PATH
environment variable. Next time you log in this will be done automatically.

To configure your current shell run source $HOME/.cargo/env
As pointed out by the installer, you need to execute the following command in order to add the directory containing these tools in your PATH:
$ source $HOME/.cargo/env
# Which is the same as executing the following:
$ export PATH="$HOME/.cargo/bin:$PATH"
(This is only needed once because the rustup installer added it to your ~/.profile file.)
Now, test that you have both cargo and rustc, as you'll need them very soon:
$ cargo -V
cargo 0.23.0 (61fa02415 2017-11-22)
$ rustc -V
rustc 1.22.1 (05e2e1c41 2017-11-22)
Cargo is Rust's package manager and build tool: it allows you to compile and run your projects, as well as managing their dependencies.
At the time of writing this book, the stable Rust version was 1.22.0.
Let's try to build a Rust program. First, create a new project with cargo:
$ cargo new --bin hello_world
     Created binary (application) `hello_world` project
The --bin flag indicates that we want to create an executable project, as opposed to a library (which is the default without this flag). In the Rust world, a crate is a package of libraries and/or executable binaries.
This created a hello_world directory containing the following files and directory:
$ tree hello_world/
hello_world/
├── Cargo.toml
└── src
    └── main.rs

1 directory, 2 files
The Cargo.toml file is where the metadata (name, version, and so on) of your project resides, as well as its dependencies. The source files of your project are in the src directory. It's now time to run this project:
$ cd hello_world/
$ cargo run
   Compiling hello_world v0.1.0 (file:///home/packtpub/projects/hello_world)
    Finished dev [unoptimized + debuginfo] target(s) in 0.39 secs
     Running `target/debug/hello_world`
Hello, world!
The first three lines printed after cargo run are lines printed by cargo indicating what it did: it compiled the project and ran it. The last line, Hello, world!, is the line printed by our project. As you can see, cargo generates a Rust file that prints text to stdout (standard output):
$ cat src/main.rs
fn main() {
    println!("Hello, world!");
}
If you only want to compile the project without running it, type the following instead:
$ cargo build
    Finished dev [unoptimized + debuginfo] target(s) in 0.0 secs
This time, we didn't see Compiling hello_world because cargo did not see any changes to the project's files, thus, there's no need to compile again.
You can find the API documentation here: https://doc.rust-lang.org/stable/std/. The reference can be found here: https://doc.rust-lang.org/stable/reference/.
Let's look again at our first project source code:
fn main() {
    println!("Hello, world!");
}
It only contains a main function—this is where the execution of the program begins. It is a function that takes no arguments (hence the empty parentheses) and returns a unit, also written (). The body of the function, between curly brackets, contains a call to the println!() macro—we can see this is a macro because it ends with !, as opposed to a function. This macro prints the text between parentheses, followed by a new line. We'll see what is a macro in the Macros section.
We'll now change the previous program to add a variable:
fn main() {
    let name = "world";
    println!("Hello, {}!", name);
}
The {} part in the string literal is replaced by the content of the name variable. Here, we see the type inference in action—we don't have to specify the type of the name variable and the compiler will infer it for us. We could have also written the type ourselves:
let name: &str = "world";
(From now on, I'll omit the main function, but this code should be written inside the function.)
In Rust, variables are immutable by default. As such, writing the following will cause a compile-time error:
let age = 42;
age += 1;
The compiler gives us a very helpful error message:
error[E0384]: cannot assign twice to immutable variable `age`
  --> src/main.rs:16:5
   |
15 |     let age = 42;
   |         --- first assignment to `age`
16 |     age += 1;
   |     ^^^^^^^^ cannot assign twice to immutable variable
To make a variable mutable, we need to use the mut keyword:
let mut age = 42;
age += 1;
Let's look at the basic types provided by the language, such as integers, floats, Booleans, and characters.
The following integer types are available in Rust:
Unsigned | Signed |
|---|---|
|
|
|
|
|
|
|
|
|
|
The u means unsigned, while the i means signed, and the number following it is the number of bits. For instance, a number of the u8 type can be between 0 and 255, inclusive. And a number of the i16 type can be between -32768 and 32767, inclusive. The size variants are the pointer-sized integer types: usize and isize are 64-bit on a 64-bit CPU. The default integer type is i32, which means that this type will be used by the type inference when it cannot choose a more specific type.
We'll now look at how to write conditions and loops in Rust. Conditions are useful to execute a block of code when a certain situation happens, and loops allow you to repeat a block of code a number of times, until a condition is met.
Similar to other languages, Rust conditions are expressed with the if and else keywords:
let number1 = 24;
let number2 = 42;
if number1 > number2 {
    println!("{} > {}", number1, number2);
} else {
    println!("{} <= {}", number1, number2);
}
However, they do not require parentheses around the conditional expression. Also, this expression must be of the bool type: you cannot use a number as you would in other languages.
One particularity of Rust conditions, like many other constructs, is that they are expressions. The last expression of each branch is the value of this branch. Be careful though, the type of each branch must be the same. For instance, we can get the minimum number of the two numbers and put it into a variable:
let minimum =
    if number1 < number2 {
        number1
    } else {
        number2
}; // Don't forget the semi-colon here.There are multiple kinds of loop in Rust. One of them is the while loop.
Let's see how to compute the greatest common divisor using the Euclidean algorithm:
let mut a = 15;
let mut b = 40;
while b != 0 {
    let temp = b;
    b = a % b;
    a = temp;
}
println!("Greatest common divisor of 15 and 40 is: {}", a);
This code executes successive divisions and stops doing so when the remainder is 0.
We had a brief introduction to functions when we saw the main function. Let's see how to create functions with parameters and a return value.
Here's how to write a function that returns the maximum of two numbers:
fn max(a: i32, b: i32) -> i32 {
    if a > b {
        a
    } else {
        b
    }
}
The parameters are between parentheses and must be explicitly typed since the type inference only infers the types of local variables. This is a good thing since this acts as a documentation. Moreover, this can prevent bugs when we change how we use the parameters or change the value that is returned. The function can be defined after it is used without any issue. The return type is after ->. When we return (), we can omit the -> and type.
The last expression in the body of a function is the value returned from the function. You don't need to use return. The return keyword is only needed when you want to return early.
Sometimes, we have multiple values that only make sense together, such as the two coordinates of a point. Structures are a way to create new types that contains multiple members.
Here is how we would create the aforementioned Point structure:
struct Point {
    x: i32,
    y: i32,
}
To create a new point and access its members, we use the following syntax:
let point = Point {
    x: 24,
    y: 42,
};
println!("({}, {})", point.x, point.y);
What if we want to print the point as a whole?
Let's try the following:
println!("{}", point);The compiler does not accept this:
error[E0277]: the trait bound `Point: std::fmt::Display` is not satisfied
 --> src/main.rs:7:20
  |
7 |     println!("{}", point);
  |                    ^^^^^ `Point` cannot be formatted with the default formatter; try using `:?` instead if you are using a format string
  |
  = help: the trait `std::fmt::Display` is not implemented for `Point`
  = note: required by `std::fmt::Display::fmt`
The {} syntax is used to display a value to the end user of the application. Nevertheless, there's no standard way to display arbitrary structures. We can do what the compiler suggests: using the {:?} syntax. That requires you to add an attribute to the structure, so let's change it:
#[derive(Debug)]
struct Point {
    x: i32,
    y: i32,
}

println!("{:?}", point);
The #[derive(Debug)] attribute tells the compiler to automatically generate the code to be able to print a debug representation of the structure. We'll see how this works in the section about traits. It prints the following:
Point { x: 24, y: 42 }Sometimes, the structure contains a lot of nested fields and this representation is hard to read. To remedy that, we can use the {:#?} syntax to pretty-print the value:
println!("{:#?}", point);This gives the following output:
Point {
x: 24,
y: 42
}The documentation describes what other formatting syntax can be used: https://doc.rust-lang.org/stable/std/fmt/.
Let's try the following code, which would work in other programming languages:
let p1 = Point { x: 1, y: 2 };
let p2 = p1;
println!("{}", p1.x);
We can see that Rust doesn't accept this. It gives the following error:
error[E0382]: use of moved value: `p1.x`
 --> src/main.rs:4:20
  |
3 |     let p2 = p1;
  |         -- value moved here
4 |     println!("{}", p1.x);
  |                    ^^^^ value used here after move
  |
  = note: move occurs because `p1` has type `Point`, which does not implement the `Copy` trait
This means that we cannot use a value after it is moved. In Rust, values are moved by default instead of being copied, except in some cases, as we'll see in the next sub-section.
To avoid moving a value, we can take a reference to it by prefixing it with &:
let p1 = Point { x: 1, y: 2 };
let p2 = &p1;
println!("{}", p1.x);
This code compiles and, in this case, p2 is a reference to p1, which means that it points to the same memory location. Rust ensures that it is always safe to use a reference, since references are not pointers, they cannot be NULL.
References can also be used in the type of a function parameter. This is a function that prints a point, without moving the value:
fn print_point(point: &Point) {
    println!("x: {}, y: {}", point.x, point.y);
}
We can use it this way:
print_point(&p1);
println!("{}", p1.x);
We can still use the point after calling print_point, because we send a reference to the function instead of moving the point into the function.
An alternative to using references is to clone values. By cloning a value, we don't move it. To be able to clone a point, we can add derive to it:
#[derive(Clone, Debug)]
struct Point {
    x: i32,
    y: i32,
}
We can now call the clone() method to avoid moving our p1 point:
fn print_point(point: Point) {
    println!("x: {}, y: {}", point.x, point.y);
}

let p1 = Point { x: 1, y: 2 };
let p2 = p1.clone();
print_point(p1.clone());
println!("{}", p1.x);Some types are not moved when we assigned a value of these types to another variable. This is the case for basic types such as integers. For instance, the following code is perfectly valid:
let num1 = 42;
let num2 = num1;
println!("{}", num1);
We can still use num1 even thought we assigned it to num2. This is because the basic types implement a special marker: Copy. Copy types are copied instead of moved.
We can make our own types Copy by adding derive to them:
#[derive(Clone, Copy)]
struct Point {
    x: i32,
    y: i32,
}
Since Copy requires Clone, we also implement the latter for our Point type. We cannot derive Copy for a type containing a value that does not implement Copy. Now, we can use a Point without having to bother with references:
fn print_point(point: Point) {
    println!("x: {}, y: {}", point.x, point.y);
}

let p1 = Point { x: 1, y: 2 };
let p2 = p1;
print_point(p1);
println!("{}", p1.x);If we want to be able to mutable thought a reference, we need a mutable reference, since everything is immutable by default in Rust. To get a mutable reference, simply replace & with &mut. Let's write a function that will increment the x field of a Point:
fn inc_x(point: &mut Point) {
    point.x += 1;
}
Here, we see that the Point type is now &mut, which allows us to update the point in the method. To use this method, our p1 variable needs to be mut and we also need to take a mutable reference for this variable:
let mut p1 = Point { x: 1, y: 2 };
inc_x(&mut p1);We can add methods on custom types. Let's write a method to compute the distance of a point to the origin:
impl Point {
    fn dist_from_origin(&self) -> f64 {
        let sum_of_squares = self.x.pow(2) + self.y.pow(2);
        (sum_of_squares as f64).sqrt()
    }
}
There are a lot of new syntaxes here (impl Point, as, and .method()), so let's explain all of them. First of all, methods of a type are declared within the impl Type {} construct. This method takes a special parameter: &self. This parameter is the instance the method is called on, like this in other programming languages. The & operator before self means that the instance is passed by immutable reference. As we can see, it is possible to call methods on basic types in Rust—self.x.pow(2) computes the power of two of the x field. We can find this method, and many others, in the documentation, at https://doc.rust-lang.org/stable/std/primitive.i32.html#method.pow . In the last expression of the method, we cast the sum_of_squares integer to f64 before computing its square root, because the sqrt() method is defined only on floating points.
Let's create a method that will update the fields of the structure:
impl Point {
    fn translate(&mut self, dx: i32, dy: i32) {
        self.x += dx;
        self.y += dy;
    }
}
The difference with the previous method is that self is now a mutable reference, &mut.
Rust does not provide constructors, but a common idiom is to create a new() static method, also called an associated function:
impl Point {
    fn new(x: i32, y: i32) -> Self {
        Self { x: x, y: y }
    }
}
The difference with a normal method is that it does not take &self (or one of its variations) as a parameter.
Self is the type of the self value; we could have used Point instead of Self.
When the field name is the same as the value assigned, it is possible to omit the value, as a shorthand:
fn new(x: i32, y: i32) -> Self {
    Self { x, y }
}
When we create an instance of Point with the call to its constructor (let point = Point::new();), this will allocate the value on the stack.
We can provide multiple constructors:
impl Point {
    fn origin() -> Self {
        Point { x: 0, y: 0 }
    }
}
Tuples and structures are similar, except that tuples' fields are unnamed. Tuples are declared inside parentheses, with the element separated by a comma:
let tuple = (24, 42);
println!("({}, {})", tuple.0, tuple.1);
As you can see on the second line, we can access the elements of a tuple with .index, where index is a constant and this index starts at 0.
Tuples can be used to return multiple values from a function. For instance, the str::split_at() method returns two strings:
let (hello, world) = "helloworld".split_at(5);
println!("{}, {}!", hello, world);
Here, we assign the two elements of the tuple to the hello and world variables. We'll see why this works in the Pattern matching section.
While a structure allows us to get multiple values under the same variable, enumerations allow us to choose one value from different types of values.
For example, let's write a type representing an expression:
enum Expr {
    Null,
    Add(i32, i32),
    Sub(i32, i32),
    Mul(i32, i32),
    Div { dividend: i32, divisor: i32 },
    Val(i32),
}

let quotient = Expr::Div { dividend: 10, divisor: 2 };
let sum = Expr::Add(40, 2);
The Null variant does not have a value associated with it, Val has one associated value, and Add has two. Div also has two associated values, but they are named, similar to how we define a structure.
So how can we know which variant is in a variable whose type is an enumeration and how to get the values out of it? For that, we need to use pattern matching. The match expression is one way to do pattern matching. Let's see how to use it to compute the result of an expression:
fn print_expr(expr: Expr) {
    match expr {
        Expr::Null => println!("No value"),
        Expr::Add(x, y) => println!("{}", x + y),
        Expr::Sub(x, y) => println!("{}", x - y),
        Expr::Mul(x, y) => println!("{}", x * y),
        Expr::Div { dividend: x, divisor: 0 } => println!("Divisor
         is zero"),
        Expr::Div { dividend: x, divisor: y } => println!("{}",
        x/y),
        Expr::Val(x) => println!("{}", x),
    }
}
A match expression is a way to check whether a value follows a certain pattern and executes different codes for different patterns. In this case, we match over an enumerated type, so we check for each variant. If the expression is Expr::Add, the code on the right of => is executed: println!("{}", x + y). By writing variable names inside the parentheses next to Expr::Add, we specify that the actual values of this variant are bound to these names. By doing so, we can use these variable names on the right side of =>.
Figure 1.1 is a diagram showing how pattern matching works:
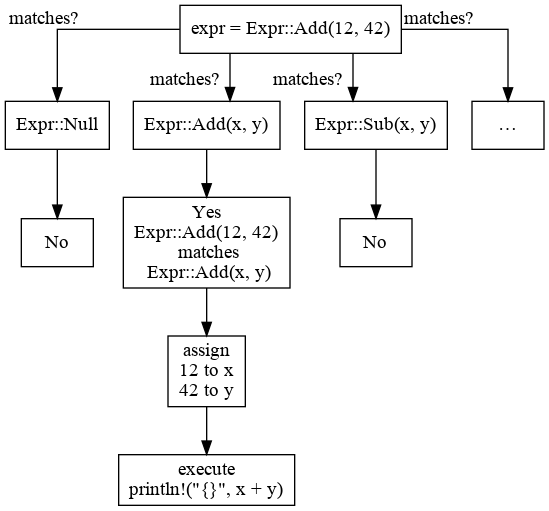
Figure 1.1
A match can also be used to check whether a number is within a range. This function converts an ASCII character (represented by u8 in Rust) to uppercase:
fn uppercase(c: u8) -> u8 {
    match c {
        b'a'...b'z' => c - 32,
        _ => c,
    }
}
Here, the ... syntax represents an inclusive range. And the underscore (_) is used to mean literally everything else, this is very useful in Rust because match needs to be exhaustive.
You can convert u8 to char using the as syntax, as shown earlier:
println!("{}", uppercase(b'a') as char);It is also possible to match against different patterns in a match by using the | operator:
fn is_alphanumeric(c: char) -> bool {
    match c {
        'a'...'z' | 'A'...'Z' | '0'...'9' => true,
        _ => false,
    }
}
There are alternative syntaxes to do pattern matching. One of them is the if let construct. Let's rewrite our uppercase function using if let:
fn uppercase(c: u8) -> u8 {
    if let b'a'...b'z' = c {
        c - 32
    } else {
        c
    }
}
Unlike a match, if let does not need to be exhaustive. It does not even require an else branch, the rules used for the normal if expression also applies to if let. This construct can be more appropriate than match when you only want to match against one or two patterns.
Another form of pattern matching is irrefutable patterns. A pattern is irrefutable when there's only one way to match it and it always succeeds. For instance, another way to get the elements of a tuple is with an irrefutable pattern:
let tuple = (24, 42);
let (a, b) = tuple;
println!("{}, {}", a, b);
In the second line, we assign the first element of the tuple to a and the second to b.
Traits are a way to specify that a type must implement some methods and/or some types. They are similar to interfaces in Java. We can implement a trait on a type and we'll be able to use the methods of this trait on this type as long as this trait is imported. This is how we can add methods to types defined in other crates or even the standard library.
Let's write a trait representing a bit set:
trait BitSet {
    fn clear(&mut self, index: usize);
    fn is_set(&self, index: usize) -> bool;
    fn set(&mut self, index: usize);
}
Here, we don't write the body of the methods, as they will be defined when we implement this trait for a type.
Now, let's implement this trait for the u64 type:
impl BitSet for u64 {
    fn clear(&mut self, index: usize) {
        *self &= !(1 << index);
    }

    fn is_set(&self, index: usize) -> bool {
        (*self >> index) & 1 == 1
    }

    fn set(&mut self, index: usize) {
        *self |= 1 << index;
    }
}
As you can see, the bitwise not operator is ! in Rust, as opposed to ~ in other languages. With this code, we can call these methods on u64:
let mut num = 0;
num.set(15);
println!("{}", num.is_set(15));
num.clear(15);
Remember the #[derive(Debug)] attribute? This actually implements the Debug trait on the following type. We could also manually implement the Debug trait on our type, using the same impl syntax, if the default implement does not suit our use case.
Traits can contain default methods, which can be convenient for the implementor of the trait since fewer methods will need to be implemented. Let's add a toggle() default method in the trait:
trait BitSet {
    fn clear(&mut self, index: usize);
    fn is_set(&self, index: usize) -> bool;
    fn set(&mut self, index: usize);

    fn toggle(&mut self, index: usize) {
        if self.is_set(index) {
            self.clear(index);
        } else {
            self.set(index);
        }
    }
}
Since the new method has a body, we don't need to update our previous implementation. However, we could do it to provide a more efficient implementation, for instance:
impl BitSet for u64 {
    // The other methods are the same as before.

    fn toggle(&mut self, index: usize) {
        *self ^= 1 << index;
    }
}We can also have types in a trait that need to be specified. For instance, let's implement the Add trait from the standard library on our Point type that we declared earlier, which allows us to use the + operator on our own types:
use std::ops::Add;

impl Add<Point> for Point {
    type Output = Point;

    fn add(self, point: Point) -> Self::Output {
        Point {
            x: self.x + point.x,
            y: self.y + point.y,
        }
    }
}
The first line is to import the Add trait from the standard library so that we can implement it on our type. Here we specify that the associated Output type is Point. Associated types are most useful for return types. Here, the Output of the add() method is the associated Self::Output type.
Now, we can use the + operator on Points:
let p1 = Point { x: 1, y: 2 };
let p2 = Point { x: 3, y: 4 };
let p3 = p1 + p2;
Having to specify the output parameter with an associated type (instead of setting it to Self) gives us more flexibility. For instance, we could implement the scalar product for the * operator, which takes two Points and returns a number.
You can find all the operators that can be overloaded on this page, at https://doc.rust-lang.org/stable/std/ops/index.html.
Since Rust 1.20, Rust also supports associated constants in addition to associated types.
There are some rules that must be followed in order to use traits. The compiler will throw an error if they are not respected:
- The trait must be imported in order to use its methods
- The implementation of a trait must be in the same crate as the trait or the type
The second rule is to avoid conflicts that could otherwise happen when using multiple libraries. We can have such a conflict when two imported traits provide the same method for the same type.
Generics are a way to make a function or a type work for multiple types to avoid code duplication. Let's rewrite our max function to make it generic:
fn max<T: PartialOrd>(a: T, b: T) -> T {
    if a > b {
        a
    } else {
        b
    }
}
The first thing to note is that there's a new part after the function name: this is where we declare the generic types. We declare a generic T type, : PartialOrd after it means that this T type must implement the PartialOrd trait. This is called a trait bound. We then use this T type for both of our parameters and the return type. Then, we see the same function body as the one from our non-generic function. We needed to add the trait bound because, by default, no operation is allowed on a generic type. The PartialOrd trait allows us to use the comparison operators.
We can then use this function with any type that implements PartialOrd:
println!("{}", max('a', 'z'));This is using static dispatch as opposed to dynamic dispatch, meaning that the compiler will generate a max function specific to char in the resulting binary. Dynamic dispatch is another approach that resolves the right function to call at runtime, which is less efficient.
An array is a fixed-size collection of elements of the same type. We declare them with square brackets:
let array = [1, 2, 3, 4];
let array: [i16; 4] = [1, 2, 3, 4];
The second line shows how to specify the type of an array. An alternative way to do that is to use a literal suffix:
let array = [1u8, 2, 3, 4];
A literal suffix is the composition of a literal (that is, a constant) and a type suffix, so with the 1 constant and the u8 type, we get 1u8. Literal suffixes can only be used on numbers. This declares an array of 4 elements of the u8 type. Array indexing starts at 0 and bounds checking is done at runtime. Bounds checking is used to prevent accessing memory that is out of bounds, for instance, trying to access the element after the end of an array. While this can slow down the software a bit, it can be optimized in many cases. The following code will trigger a panic because the 4 index is one past the end of the array:
println!("{}", array[4]);At runtime, we see the following message:
thread 'main' panicked at 'index out of bounds: the len is 4 but the index is 4', src/main.rs:5:20
note: Run with `RUST_BACKTRACE=1` for a backtrace.
Another way to declare an array is:
let array = [0u8; 100];
This declares an array of 100 elements, where all of them are 0.
Arrays are fixed-size, but if we want to create a function that works with arrays of any size, we need to use another type: a slice.
A slice is a view into a contiguous sequence: it can be a view of the whole array, or a part of it. Slices are fat pointers, in addition to the pointer to the data, they contain a size. Here's a function that returns a reference to the first element of a slice:
fn first<T>(slice: &[T]) -> &T {
    &slice[0]
}
Here, we use a generic type without bound since we don't use any operation on values of the T type. The &[T] parameter type is a slice of T. The return type is &T, which is a reference on values of the T type. The body of the function is &slice[0], which returns a reference to the first element of the slice. Here's how to call this function with an array:
println!("{}", first(&array));We can create slice for only a portion of an array, as shown in the following example:
println!("{}", first(&array[2..]));&array[2..] creates a slice that starts at the 2 index until the end of the array (hence no index after ..). Both indices are optional, so we could also write &array[..10] for the first 10 elements of the array, &array[5..10] for the elements with the 5 to 9 index (inclusive), or &array[..] for all the elements.
The for loop is another form of loops that can be used in Rust. It is used to loop over elements of an iterator. An iterator is a structure that produces a sequence of value: it could produce the same value indefinitely or produce the elements of a collection. We can get an iterator from a slice, so let's do that to compute the sum of the elements in a slice:
let array = [1, 2, 3, 4];
let mut sum = 0;
for element in &array {
    sum += *element;
}
println!("Sum: {}", sum);
The only surprising part here is * in sum += *element. Since we get a reference to the elements of the slice, we need to dereference them in order to access the integers. We used & in front of array to avoid moving it, indeed, we may still want to use this variable after the loop.
Let's write a function that returns the index of an element in a slice, or None if it is not in the slice:
fn index<T: PartialEq>(slice: &[T], target: &T) -> Option<usize> {
    for (index, element) in slice.iter().enumerate() {
        if element == target {
            return Some(index);
        }
    }
    None
}
Note
Note: A partial equivalence relation is both symmetric and transitive, but not reflexive. The Eq trait is used when these three properties are satisfied.
Here, we use again a generic type, but this time we use the PartialEq trait bound to be able to use the == operator on values of the T type. This function returns Option<usize>, meaning that it can either return no value (None) or the index (Some(index)). In the first line of the body, we use slice.iter().enumerate() to get the index in addition to the element of the slice. We use pattern matching right after the for keyword in order to assign the index and the element to variables. Inside the condition, we use the return keyword to return a value early. So if the value is found, it will return the index; otherwise, the loop will end and the None value is returned afterward.
Let's write another function that uses a for loop. It returns the minimum and the maximum of a slice, or None if the slice is empty:
fn min_max(slice: &[i32]) -> Option<(i32, i32)> {
    if slice.is_empty() {
        return None;
    }
    let mut min = slice[0];
    let mut max = slice[0];
    for &element in slice {
        if element < min {
            min = element;
        }
        if element > max {
            max = element;
        }
    }
    Some((min, max))
}
Here we return multiple values from a function by using a tuple. This time, & is on the left side of in, while previously it was on the right side of it; this is because this for loop is pattern matching against a reference by using &element. This is something we can do in Rust, thus we don't need to dereference the element anymore with *.
Macro rules, also called macros by example, are a way to avoid code duplication by generating code at compile time. We will implement a simple macro to implement our BitSet trait for integer types:
macro_rules! int_bitset {
    ($ty:ty) => {
        impl BitSet for $ty {
            fn clear(&mut self, index: usize) {
                *self &= !(1 << index);
            }

            fn is_set(&self, index: usize) -> bool {
                (*self >> index) & 1 == 1
            }

            fn set(&mut self, index: usize) {
                *self |= 1 << index;
            }
        }
    };
}
The name of the int_bitset macro is written after macro_rules!. A macro can have multiple rules, similar to match arms, but it matches on Rust syntactic elements instead, with types, expressions, blocks of code, and so on. Here we only have one rule and it matches against a single type since we use :ty. The part before :ty ($ty) is the name for the element that was matched. Inside the curly brackets, after the => symbol, we see the actual code that will be generated. It is the same as our previous implementation of BitSet for u64, except that it uses the meta-variable $ty instead of u64.
To avoid a lot of boilerplate code, we can then use this macro as follows:
int_bitset!(i32);
int_bitset!(u8);
int_bitset!(u64);
Let's write a macro that will simplify the implementation of the traits to overload operators. This macro will have two rules: one for the + and one for the - operators. Here's the first rule of the macro:
macro_rules! op {
    (+ $_self:ident : $self_type:ty, $other:ident $expr:expr) => {
        impl ::std::ops::Add for $self_type {
            type Output = $self_type;

            fn add($_self, $other: $self_type) -> $self_type {
                $expr
            }
        }
    };
    // …
In this pattern, we use other types of syntactic elements: ident, which is an identifier, and <span>expr, which is an expression. The trait (::std::ops::Add) is fully qualified so that the code using this macro won't need to import the Add trait.
And here's the rest of the macro:
    (- $_self:ident : $self_type:ty, $other:ident $expr:expr) => {
        impl ::std::ops::Sub for $self_type {
            type Output = $self_type;

            fn sub($_self, $other: $self_type) -> $self_type {
                $expr
            }
        }
    };
}
We can then use this macro with our Point type, like this:
op!(+ self:Point, other {
    Point {
        x: self.x + other.x,
        y: self.y + other.y,
    }
});

op!(- self:Point, other {
    Point {
        x: self.x - other.x,
        y: self.y - other.y,
    }
});
Let's see how the matching works:
For the first macro call, we start with +, so the first branch is taken because it matches +, which is the start of this branch. Next we have self, which is an identifier, so it matches the ident pattern and this is assigned to the $_self meta-variable. Then, we have : which matches the colon in the pattern. After that, we have Point, which matches the $self_type meta-variable of the ty type (for matching on a type). Then we have , which matches the comma in the pattern. Next, we have other, which matches the next item in the pattern, which is the $other meta-variable of the ident type. Finally, we have { Point { … } }, which matches the expression required at the end of the pattern. This is why these macros are called macros by example, we write what the call should look like and the user must match the example (or pattern).
As an exercise to the reader, try the following:
- Add the missing operators:
*and/ - Add the ability to specify the types of
$otherand the return type in the pattern - If you haven't already done this in the previous point, add more tokens so that it looks more like a function declaration:
+(self: Point, other: Point) -> Point { … } - Try moving the operator in the pattern after the
$self_typemeta-variable to see the limitations ofmacro_rules
In a macro pattern, it is also possible to match against an unlimited number of patterns, using the repetition operators + and *. They behave exactly like the same operators in regular expressions:
+matches 1 or more times.*matches 0, 1, or more times.
Let's write a very useful macro, a macro to provide syntactic sugar to create HashMaps:
macro_rules! hash {
    ($( $key:expr => $value:expr ),*) => {{
        let mut hashmap = ::std::collections::HashMap::new();
        $(hashmap.insert($key, $value);)*
        hashmap
    }};
}
As we can see, we use the * operator here. The comma before it specify the separator token: this token must be present between each occurrence of the pattern between parentheses (which is the pattern that can be repeated). Don't forget the leading $ before the opening parenthesis; without it, the macro will match the literal (. Inside the parentheses, we see a normal pattern, an expression, followed by the => operator, followed by another expression. The body of this rule is particular, since it uses two pairs of curly brackets instead of only one.
First, let's look at how we use this macro, and we'll go back to this peculiarity right after:
let hashmap = hash! {
    "one" => 1,
    "two" => 2
};
If we were to use only one pair of curly brackets, like this:
macro_rules! hash {
    ($( $key:expr => $value:expr ),*) => {
        let mut hashmap = ::std::collections::HashMap::new();
        $(hashmap.insert($key, $value);)*
        hashmap
    };
}
The compiler will try to generate the following code, which doesn't compile:
let hashmap = let mut hashmap = ::std::collections::HashMap::new();
    hashmap.insert("one", 1);
    hashmap.insert("two", 2);
    hashmap;
It doesn't compile because Rust wants an expression on the right-hand side of =. To transform this code into an expression, we simply need to add the curly brackets:
let hashmap = {
    let mut hashmap = ::std::collections::HashMap::new();
    hashmap.insert("one", 1);
    hashmap.insert("two", 2);
    hashmap
};
Hence the second pair of curly brackets.
There's one remaining line that requires an explanation in the body of the macro:
$(hashmap.insert($key, $value);)*This means that the statement will be repeated as many times as there are pairs of key/values. Notice that ; is inside the parentheses; and there's no separator before * because every statement needs to end with a semicolon. But it's still possible to specify a separator here, as shown in the following example:
let keys = [$($key),*];
This will expand all the $keys, separating them by a comma. For instance, with a call like:
hash! {
    "one" => 1,
    "two" => 2
}
It will results in:
let keys = ["one", "two"];
In the macro_rules system, there's no way to specify that a pattern is optional, like with the ? quantifier in regular expressions. If we wanted to allow the user of our hash macro to use a trailing comma, we could change the rule by moving the comma inside the parentheses: ($( $key:expr => $value:expr,)*).
However, it will force the user to write a trailing macro. If we want to allow both variants, we can use the following trick, which uses the * operator: ($( $key:expr => $value:expr ),* $(,)* ).
This means that a comma must be used between each pattern and we can use any number of commas after the last pattern, including no comma at all.
This chapter introduced you to the basics of Rust by showing you how to use variables, functions, control flow structures, and types. You also learned more advanced concepts such as references and ownership to manage the memory, and you saw how you can use traits, generics, and macros to avoid code repetition.
In the next chapter, you'll practise what you've just learned by creating a video game.