


Discovering the importance of streams
In an event-based platform such as Node.js, the most efficient way to handle I/O is in real time, consuming the input as soon as it is available and sending the output as soon as the application produces it.
In this section, we will give you an initial introduction to Node.js streams and their strengths. Please bear in mind that this is only an overview, as a more detailed analysis on how to use and compose streams will follow later in this chapter.
Buffering versus streaming
Almost all the asynchronous APIs that we’ve seen so far in this book work using buffer mode. For an input operation, buffer mode causes all the data coming from a resource to be collected into a buffer until the operation is completed; it is then passed back to the caller as one single blob of data. The following diagram shows a visual example of this paradigm:
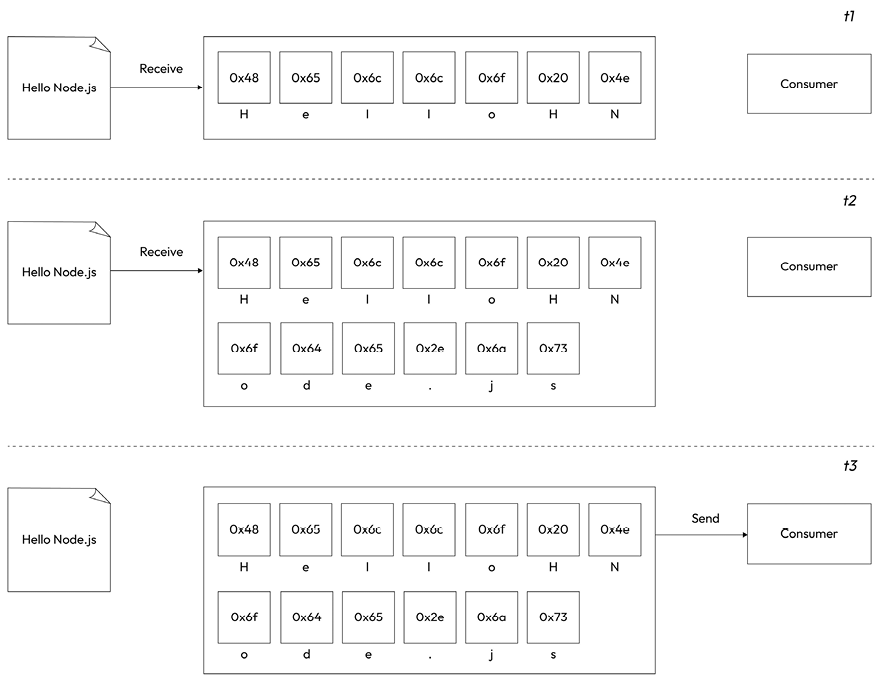
Figure 6.1: Buffering
In Figure 6.1, we aim to transfer data containing the string “Hello Node.js” from a resource to a consumer. This process illustrates the concept of buffer mode, where all data is accumulated in a buffer before being consumed. At time t1, the first chunk of data, “Hello N,” is received from the resource and stored in the buffer. At t2, the second chunk, “ode.js,” arrives, completing the read operation. With the entire string now fully accumulated in the buffer, it is sent to the consumer at t3.
Streams provide a different approach, allowing data to be processed incrementally as it arrives from the resource. This is shown in the following diagram:
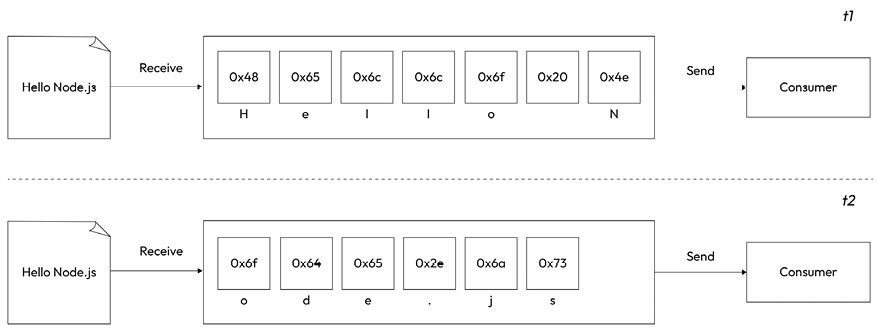
Figure 6.2: Streaming
This time, Figure 6.2 shows that, as soon as each new chunk of data is received from the resource, it is immediately passed to the consumer, who now has the chance to process it straight away, without waiting for all the data to be collected in the buffer.
But what are the differences between these two approaches? Purely from an efficiency perspective, streams are generally more efficient in terms of space (memory usage) and sometimes even in terms of computation clock time. However, Node.js streams have another important advantage: composability. Let’s now see what impact these properties have on the way we design and write our applications.
Spatial efficiency
First of all, streams allow us to do things that would not be possible by buffering data and processing it all at once. For example, consider the case in which we have to read a very big file, let’s say, in the order of hundreds of megabytes or even gigabytes. Clearly, using an API that returns a big buffer when the file is completely read is not a good idea. Imagine reading a few of these big files concurrently; our application would easily run out of memory. Besides that, buffers in V8 are limited in size. You cannot allocate more than a few gigabytes of data, so we may hit a wall way before running out of physical memory.
The actual maximum size of a buffer changes across platforms and versions of Node.js. If you are curious to find out what the limit in bytes is in a given platform, you can run this code:
import buffer from 'node:buffer'
console.log(buffer.constants.MAX_LENGTH)
Gzipping using a buffered API
To make a concrete example, let’s consider a simple command-line application that compresses a file using the GZIP format. Using a buffered API, such an application will look like the following in Node.js (error handling is omitted for brevity):
// gzip-buffer.js
import { readFile, writeFile } from 'node:fs/promises'
import { gzip } from 'node:zlib'
import { promisify } from 'node:util'
const gzipPromise = promisify(gzip) // note: gzip is a callback-based function
const filename = process.argv[2]
const data = await readFile(filename)
const gzippedData = await gzipPromise(data)
await writeFile(`${filename}.gz`, gzippedData)
console.log('File successfully compressed')
Now, we can try to run it with the following command:
node gzip-buffer.js <path to file>
If we choose a file that is big enough (for instance, 8 GB or more), we will most likely receive an error message saying that the file we are trying to read is bigger than the maximum allowed buffer size:
RangeError [ERR_FS_FILE_TOO_LARGE]: File size is greater than possible Buffer
That’s exactly what we expected, and it’s a symptom of the fact that we are using the wrong approach.
Note that the error happens when we execute readFile(). This is where we are taking the entire content of the file and loading it into a buffer in memory. Node.js will check the file size before starting to load its content. If the file is too big to fit in a buffer, then we will be presented with the ERR_FS_FILE_TOO_LARGE error.
Gzipping using streams
The simplest way we have to fix our Gzip application and make it work with big files is to use a streaming API. Let’s see how this can be achieved. Let’s write a new module with the following code:
// gzip-stream.js
import { createReadStream, createWriteStream } from 'node:fs'
import { createGzip } from 'node:zlib'
const filename = process.argv[2]
createReadStream(filename)
  .pipe(createGzip())
  .pipe(createWriteStream(`${filename}.gz`))
  .on('finish', () => console.log('File successfully compressed'))
“Is that it?” you may ask. Yes! As we said, streams are amazing because of their interface and composability, thus allowing clean, elegant, and concise code. We will see this in a while in more detail, but for now, the important thing to realize is that the program will run smoothly against files of any size and with constant memory utilization. Try it yourself (but consider that compressing a big file may take a while).
Note that, in the previous example, we omitted error handling for brevity. We will discuss the nuances of proper error handling with streams later in this chapter. Until then, be aware that most examples will be lacking proper error handling.
Time efficiency
We could talk about the time efficiency of streams in abstract terms, but it’s probably much easier to understand why streams are so advantageous by seeing them in action. Let’s work on something practical to appreciate how streams save both time and resources in real-world scenarios.
Let’s build a new client-server application! Our goal is to create a client that reads a file from the file system, compresses it, and sends it to a server over HTTP. The server will then receive the file, decompress it, and save it to a local folder. This way, we’re creating our very own homemade file transfer utility!
To achieve this, we have two options: we can use a buffer-based API or leverage streams. If we don’t expect to transfer large files, both approaches will get the job done, but they differ significantly in how the data is processed and transferred.
If we were to use a buffered API for this, the client would first need to load the entire file into memory as a buffer. Once the file is fully loaded, it will compress the data, creating a second buffer containing the compressed version. Only after these steps can the client send the compressed data to the server.
On the server side, a buffered approach would involve accumulating all the incoming data from the HTTP request into a buffer. Once all the data has been received, the server would decompress it into another buffer containing the uncompressed data, which would then be saved to disk.
While this works, a better approach uses streams. With streams, the client can start compressing and sending chunks of data as soon as they are read from the file system. Similarly, the server can decompress each chunk of data as soon as it arrives, eliminating the need to wait for the entire file. As a bonus, we have already seen how streams give us the ability to handle arbitrarily large files.
Let’s dive into how we can build a simple version of this stream-based approach, starting with the server:
// gzip-receive.js
import { createServer } from 'node:http'
import { createWriteStream } from 'node:fs'
import { createGunzip } from 'node:zlib'
import { basename, join } from 'node:path'
const server = createServer((req, res) => {
  const filename = basename(req.headers['x-filename'])
  const destFilename = join(import.meta.dirname, 'received_files',
    filename)
  console.log(`File request received: ${filename}`)
  req
    .pipe(createGunzip())
    .pipe(createWriteStream(destFilename))
    .on('finish', () => {
      res.writeHead(201, { 'content-type': 'text/plain' })
      res.end('OK\n')
      console.log(`File saved: ${destFilename}`)
    })
})
server.listen(3000, () => console.log('Listening on http://localhost:3000'))
In the preceding example, we are setting up an HTTP server that listens for incoming file uploads, decompresses them, and saves them to disk. The key part of this server is the handler function (the one passed to the createServer() function), where two important objects, req (the request) and res (the response), come into play. These objects are both streams:
reqrepresents the incoming request from the client to the server. In this case, it carries the compressed file data being sent by the client.resrepresents the outgoing response from the server back to the client.
The focus here is on req, which acts as the source stream. The code processes req by:
- Decompressing it using
createGunzip(). - Saving it to disk with
createWriteStream()in a directory namedreceived_files(in the same folder as this code example).
The pipe() calls link these steps together, creating a smooth flow of data from the incoming request, through decompression, to the file on disk. Don’t worry too much about the pipe() syntax for now—we’ll cover it in more detail later in the chapter.
When all the data has been written to disk, the finish event is triggered. At this point, the server responds to the client with a status code of 201 (Created) and a simple "OK" message, indicating that the file has been successfully received and saved.
Finally, the server listens for connections on port 3000, and a message is logged to confirm it’s running.
In our server application, we use basename() to remove any path from the name of a received file (e.g., basename("/path/to/file") would give us "file"). This is an important security measure to ensure that files are saved within our received_files folder. Without basename(), a malicious user could create a request that escapes the application’s folder, leading to potentially serious consequences like being able to overwrite system files and inject malicious code. For example, imagine if the provided filename was something like ../../../usr/bin/node. An attacker could eventually guess a relative path to overwrite /usr/bin/node, replacing the Node.js interpreter with any executable file they want. Scary, right? This type of attack is called a path traversal attack (or directory traversal). You can read more about it here: nodejsdp.link/path-traversalnodejsdp.link/path-traversal.
Note that here we are not following the most conventional way to perform file uploads over HTTP. In fact, generally, this feature is implemented using a slightly more advanced and standard protocol that requires encoding the source data using the multipart/form-data specification (nodejsdp.link/multipart). This specification allows you to send one or more files and their respective file names using fields encoded in the body. In our simpler implementation, the body of the request contains no metadata, but only the gzipped bytes of the original file; therefore, we must specify the filename somewhere else. That’s why we provide a custom header called x-filename.
Now that we are done with the server, let’s write the corresponding client code:
// gzip-send.js
import { request } from 'node:http'
import { createGzip } from 'node:zlib'
import { createReadStream } from 'node:fs'
import { basename } from 'node:path'
const filename = process.argv[2]
const serverHost = process.argv[3]
const httpRequestOptions = {
  hostname: serverHost,
  port: 3000,
  path: '/',
  method: 'POST',
  headers: {
    'content-type': 'application/octet-stream',
    'content-encoding': 'gzip',
    'x-filename': basename(filename),
  },
}
const req = request(httpRequestOptions, res => {
  console.log(`Server response: ${res.statusCode}`)
})
createReadStream(filename)
  .pipe(createGzip())
  .pipe(req)
  .on('finish', () => {
    console.log('File successfully sent')
  })
In the preceding code, we implement the client side of our file transfer system. Its goal is to read a file from the local file system, compress it, and send it to the server using an HTTP POST request. Here’s how it works:
The client reads the filename (to be sent) and the server’s hostname (serverHost) from the command-line arguments. These values are then used to configure the httpRequestOptions object, which defines the details of the HTTP request, including:
- The server hostname and port
- The request path and method
- The headers, including information about the file name (
x-filename), content type, and the fact that the content is gzip-compressed. - The actual HTTP request (
req) that is created using therequest()function. This object is a stream that represents an HTTP request going from the client to the server.
The source file is read using createReadStream(), compressed with createGzip(), and then sent to the server by piping the resulting stream into req. This creates a continuous flow of data from the file on disk, through compression, and finally to the server.
When all the data has been sent, the finish event is triggered on the request stream. At this point, a confirmation message (“File successfully sent”) is logged.
Meanwhile, the server’s response is handled in the callback provided to request(). Once the server responds, its status code is logged to the console, allowing the client to confirm that the operation was completed successfully.
Now, to try out the application, let’s first start the server using the following command:
node gzip-receive.js
Then, we can launch the client by specifying the file to send and the address of the server (for example, localhost):
node gzip-send.js <path to file> localhost
If we choose a sufficiently large file, we can observe how the data flows from the client to the server. The target file will appear in the received_files folder before the “File successfully sent” message is displayed on the client. This is because, as the compressed file is being sent over HTTP, the server is already decompressing it and saving it on the disk.
However, we still haven’t addressed why this paradigm, with its continuous data flow, is more efficient than using a buffered API. Figure 6.3 should make this concept easier to grasp:
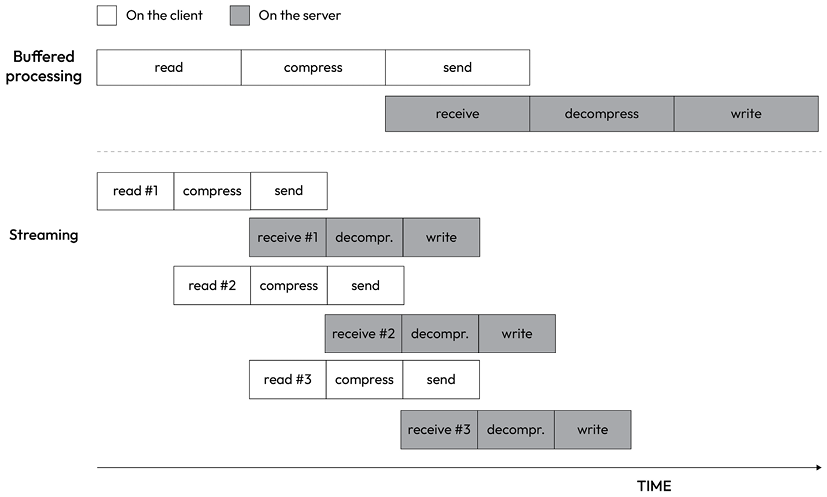
Figure 6.3: Buffering and streaming compared
When a file is processed, it goes through a number of sequential steps:
- [Client] Read from the filesystem
- [Client] Compress the data
- [Client] Send it to the server
- [Server] Receive from the client
- [Server] Decompress the data
- [Server] Write the data to disk
To complete the processing, we have to go through each stage like in an assembly line, in sequence, until the end. In Figure 6.3, we can see that, using a buffered API, the process is entirely sequential. To compress the data, we first must wait for the entire file to be read, then, to send the data, we have to wait for the entire file to be both read and compressed, and so on.
Using streams, the assembly line is kicked off as soon as we receive the first chunk of data, without waiting for the entire file to be read. But more amazingly, when the next chunk of data is available, there is no need to wait for the previous set of tasks to be completed; instead, another assembly line is launched concurrently. This works perfectly because each task that we execute is asynchronous, so it can be executed concurrently by Node.js. The only constraint is that the order in which the chunks arrive at each stage must be preserved. The internal implementation of Node.js streams takes care of maintaining the order for us.
As we can see from Figure 6.3, the result of using streams is that the entire process takes less time, because we waste no time waiting for all the data to be read and processed all at once.
This section might make it seem like streams are always faster than using a buffered approach. While that’s often true (as in the example we just covered), it’s not guaranteed. Streams are designed for memory efficiency, not necessarily speed. The abstraction they provide can add overhead, which might slow things down. If all the data you need fits in memory, is already loaded, and doesn’t need to be transferred between processes or systems, processing it directly without streams is likely to give you faster results.
Composability
The code we’ve seen so far demonstrates how streams can be composed using the pipe() method. This method allows us to connect different processing units, each responsible for a single functionality, in true Node.js style. Streams can do this because they share a consistent interface, making them compatible with one another at the API level. The only requirement is that the next stream in the pipeline must support the data type produced by the previous stream (binary data or objects, as we’ll explore later in this chapter).
To further demonstrate the composability of Node.js streams, let’s try to add an encryption layer to the gzip-send/gzip-receive application we built earlier. This will require just a few small changes to both the client and the server.
Adding client-side encryption
Let’s start with the client:
// crypto-gzip-send.js
// ...
import { createCipheriv, randomBytes } from 'node:crypto' // 1
// ...
const secret = Buffer.from(process.argv[4], 'hex') // 2
const iv = randomBytes(16) // 3
// ...
Let’s review what we changed here:
- First of all, we import the
createCipheriv()Transformstream and therandomBytes()function from thenode:cryptomodule. - We get the server’s encryption secret from the command line. We expect the string to be passed as a hexadecimal string, so we read this value and load it in memory using a buffer set to
hexmode. - Finally, we generate a random sequence of bytes that we will be using as an initialization vector (nodejsdp.link/iv) for the file encryption.
An Initialization Vector (IV) is a bit like giving a deck of cards a different shuffle before dealing them, even if you’re always using the same deck. By starting each round with a different shuffle, it becomes much harder for someone watching your hands closely to predict the cards you’re holding. In cryptography, the IV sets the initial state for encryption. It’s usually random or unique, ensuring that encrypting the same message twice with the same key produces different results. This helps prevent attackers from identifying patterns. Note that the IV is required for later decryption. The message recipient must know both the key and the IV to decrypt the message, and only the key must remain secret (generally, the IV is transferred together with the encrypted message, while the key is exchanged in some other secure way). The card-shuffling analogy isn’t perfect, but it helps illustrate how starting with a different configuration each time can significantly increase security.
Now, we can update the piece of code responsible for creating the HTTP request:
const httpRequestOptions = {
  hostname: serverHost,
  headers: {
    'content-type': 'application/octet-stream',
    'content-encoding': 'gzip',
    'x-filename': basename(filename),
    'x-initialization-vector': iv.toString('hex') // 1
  }
}
// ...
const req = request(httpRequestOptions, (res) => {
  console.log(`Server response: ${res.statusCode}`)
})
createReadStream(filename)
  .pipe(createGzip())
  .pipe(createCipheriv('aes192', secret, iv)) // 2
  .pipe(req)
// ...
The main changes here are:
- We pass the initialization vector to the server as an HTTP header.
- We encrypt the data, just after the Gzip phase.
That’s all for the client side.
Adding server-side decryption
Let’s now refactor the server. The first thing that we need to do is import some utility functions from the core node:crypto module, which we can use to generate a random encryption key (the secret):
// crypto-gzip-receive.js
// ...
import { createDecipheriv, randomBytes } from 'node:crypto'
const secret = randomBytes(24)
console.log(`Generated secret: ${secret.toString('hex')}`)
The generated secret is printed to the console as a hex string so that we can share that with our clients.
Now, we need to update the file reception logic:
const server = createServer((req, res) => {
  const filename = basename(req.headers['x-filename'])
  const iv = Buffer.from( req.headers['x-initialization-vector'], 'hex') // 1
  const destFilename = join('received_files', filename)
  console.log(`File request received: ${filename}`)
  req
    .pipe(createDecipheriv('aes192', secret, iv)) // 2
    .pipe(createGunzip())
    .pipe(createWriteStream(destFilename))
    // ...
Here, we are applying two changes:
- We have to read the encryption initialization vector sent by the client.
- The first step of our streaming pipeline is now responsible for decrypting the incoming data using the
createDecipherivTransformstream from thecryptomodule.
With very little effort (just a few lines of code), we added an encryption layer to our application; we simply had to use some already available Transform streams (createCipheriv and createDecipheriv) and included them in the stream processing pipelines for the client and the server. In a similar way, we can add and combine other streams, as if we were playing with LEGO bricks.
The main advantage of this approach is reusability, but as we can see from the code so far, streams also enable cleaner and more modular code. For these reasons, streams are often used not just to deal with pure I/O, but also to simplify and modularize code.
Now that you have had an appetizer of what using streams tastes like, we are ready to explore, in a more structured way, the different types of streams available in Node.js.
In this implementation, we used encryption as an example to demonstrate the composability of streams. Since our client-server communication relies on the HTTP protocol, a more standard and possibly simpler approach would have been to use HTTPS by simply switching from the node:http module to the node:https module. Regardless of which implementation you decide to use, make sure that, if you are transferring data over a network, you use some strong form of encryption. Never transfer unencrypted data over a network!


