


In this first chapter, we will describe WildFly's history, its prerequisites, where to get it, and how to install it. We will also explain the standalone and domain running modes, that is, how to run them up.
JBoss.org community is a huge community, where people all over the world develop, test, and document pieces of code. There are a lot of projects in there other than JBoss AS or the recent WildFly such as Infinispan, Undertow, PicketLink, Arquillian, HornetQ, RESTeasy, AeroGear, and Vert.x. For a complete list of all projects, visit the following site: http://www.jboss.org/projects/.
Despite marketing reasons, as there is no preferred project, the community wanted to change the name of the JBoss AS project to something different that would not collide with the community name. The other reason was the Red Hat JBoss supported version named JBoss Enterprise Application Platform (EAP). This was another point towards replacing the JBoss AS name.
How did the community change the name? How would they have decided? Easy—ask us, the community, for new names. The election process started, people from the JBoss Community, JBoss User Group (JBUGs), Java User Group (JUGs), and related communities all over the world, expressed their preferences.
The new name for JBoss AS should have suggested Java application server capabilities and affinities such as integration, cloud, mobile, messaging, nimbleness, strength, open source, free spirit, and so on. You guessed the winner!
"A wild fly is extremely agile, lightweight, untamed and truly free."
The brand new name was announced during the JUDCon 2013 in Brazil. Zzzzhhh... Welcome to WildFly!
Let's talk about the WildFly features and characteristics:
WildFly replaces JBoss AS. The first version of WildFly was 8.0, which was based on JBoss AS 7.1. To keep things simple the community decided to keep the same numbering.
WildFly has gained the Java EE 7 Full platform compatible implementations badge, which means it has the newest Java technologies. Easy development, better security, better integration, better management!
WildFly boots in seconds. All its services start up together, but just the ones that it needs. This is because there is a centralized metadata cache and a modular classloading system, which prevents the famous classpath hell.
Another big change is the default web server; WildFly now utilizes Undertow.
"Undertow is a flexible performant web server written in java, providing both blocking and non-blocking API's based on NIO."
It is lightweight, less then 1 MB for its core jar, and less then 4 MB at runtime. Undertow is embeddable, flexible; it supports WebSocket (HTTP upgrade protocols) and Servlet 3.1. Later in the book, we will see how to configure and tune Undertow embedded in WildFly.
With this new release of WildFly has been introduced a Role Based Access Control (RBAC) system. This new feature actually gives functionalities to define users, groups and roles. This way you will have not simply a Superuser, but a user to do its proper task without compromising on security. It's highly customizable and it can be integrated with most identity stores such as LDAPs and ADs.
WildFly has just one configuration file, so that all your settings are centralized in one place.
You can manage your configurations through the Admin Console (also known as Web Console), the Command Line Interface (CLI), the REST API and the Java API. All these tools give great powers to customize your management settings. Within this book we will concentrate mainly on the CLI and the Admin Console.
Having said that, let's start for real!
In the following recipes we will see what we need to start JBoss AS, ops, and WildFly, where to get it, what does its folder structure look like, and where to find its configuration files.
WildFly runs on top of the Java platform. It needs at least a Java Runtime Environment (JRE) version 1.7 to run (further references to versions 1.7 and 7 should be considered equal—the same applies for versions 1.8 and 8 as well), but it also works perfectly with the latest JRE version 8.
As we will also need to compile and build Java web applications, we will need the Java Development Kit (JDK), which provides the necessary tools to work with the Java source code. In the JDK panorama we can find the Oracle JDK, developed and maintained by Oracle, and OpenJDK, which relies on community contribution.
Nevertheless, after April 2015, Oracle will no longer post updates of Java SE 7 to its public download sites, as mentioned at http://www.oracle.com/technetwork/java/javase/downloads/eol-135779.html. Also, keep in mind that the Java Critical Patch Updates are released on a quarterly basis; thus, for reasons of stability and feature support, we will use the Oracle JDK 8, which is freely available for download at http://www.oracle.com/technetwork/java/javase/downloads/index.html.
While writing this book, the latest stable Oracle JDK is version 1.8.0_31 (as well as 8u31). Hereby, every reference to Java Virtual Machine (JVM), Java, JRE, and JDK will be intended Oracle JDK 1.8.0_31. To keep things simple, if you don't mind, use that same version.
In addition to the JDK, we will need Apache Maven 3, which is a build tool for Java projects. It is freely available for download at http://maven.apache.org/download.cgi. A generic download link can be found at http://www.us.apache.org/dist/maven/maven-3/3.2.5/binaries/apache-maven-3.2.5-bin.tar.gz.
To fully follow the recipes in the book, using the same environment is a fundamental requirement. As I cannot replicate the same recipe to suit different settings (such as Windows, Mac, and Linux), I'll use Linux (actually, Fedora 21) as the base operating system.
If you are running a different system and you want to carefully follow what's in the book, you can easily install and run Fedora 21 inside a virtual machine using the VirtualBox software, available at https://www.virtualbox.org/wiki/Downloads.
Choose the version that is compatible with your actual system. You can install Fedora 21 by downloading its image at https://getfedora.org/en/workstation/.
To install the Oracle JDK, you need to open your browser and point it to http://www.oracle.com/technetwork/java/javase/downloads/index.html.
Once there, click on the JDK download link, as depicted in the following image:

The link will take you to the download page, where you first need to mark the option of Accept License Agreement to enable the links, as depicted in the following screenshot:

As you accept the agreement, all the links get activated. Choose the one that best fits your hardware and operating system.
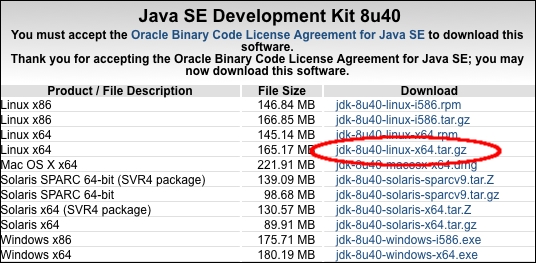
I'm running a Fedora 21 Linux machine, with a 64-bit hardware support, thus I'll use the jdk-8u40-linux-x64.tar.gz bundle. I could have used the RPM bundle, but I prefer installing the archive version to better fit my needs in terms of paths; what goes where.
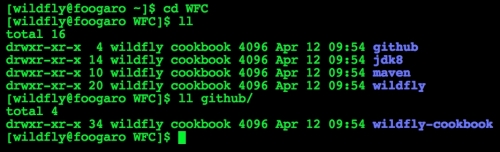
Next, we will create a folder named
WFC, which stands for WildFly Cookbook to store the contents of all the necessary software, codes, and files to follow all the recipes of the book. Open your terminal application and run the following command:$ cd && mkdir WFC
Choose the package archive; once the download is complete, open your command line and extract its contents to the
WFCfolder as follows:$ cd ~/WFC && tar zxvf jdk-8u40-linux-x64.tar.gzThis will extract the Oracle JDK software into the
jdk1.8.0_40folder, inside theWFCfolder starting from yourhomefolder. For convenience, we will use a different folder name, likejdk8, to refer to the preceding JDK installation folder. Run the following command:$ cd ~/WFC && mv jdk1.8.0_40 jdk8Now we need to set the
JAVA_HOMEenvironment variable and make the JDK commands available from our shell (also terminal).Open a text editor of your choice, and add the following directives to the
.bash_profilefile placed in yourhomefolder:export JAVA_HOME=~/WFC/jdk8 export PATH=$JAVA_HOME/bin:$PATH
The preceding two commands will set the
JAVA_HOMEvariable and export theJAVA_HOME/binpath into your PATH system variable, respectively. The tilde~symbol is a shortcut to the user home directory in Unix-like systems.For the changes to take effect, you can either log out and log back in, or just issue the following command:
$ source ~/.bash_profileOnce you are done with the installation phase, test your new environment by executing the
java -versioncommand in your terminal application and you should see (more or less) the output as depicted in the following image:
Next, we need to install Apache Maven 3. If you haven't downloaded it yet, click on the following link:
http://www.us.apache.org/dist/maven/maven-3/3.2.5/binaries/apache-maven-3.2.5-bin.tar.gz
Once the download is complete, open your command line and extract its content to the
WFCfolder:$ cd ~/WFC && tar zxvf apache-maven-3.2.5-bin.tar.gzThis will extract the Apache Maven (also known as Maven) software into the
apache-maven-3.2.5folder, inside theWFCfolder, starting from yourhomefolder. For convenience, we will use a different folder name, likemaven, to refer to the preceding Maven installation folder. Run the following command:$ cd ~/WFC && mv apache-maven-3.2.5 mavenNow we need to set the
M2_HOMEenvironment variable and make Maven's commands available from our shell (also terminal).Open a text editor of your choice, and add the following directives to the
.bash_profilefile placed in yourhomefolder:export M2_HOME=~/WFC/maven export PATH=$JAVA_HOME/bin:M2_HOME/bin:$PATH
The preceding two commands will set the
M2_HOMEvariable and export theM2_HOME/binpath into your PATH system variable, respectively. The tilde~symbol is a shortcut to the user home directory, in Unix-like systems.For the changes to take effect, you can either log out and log back in, or just issue the following command:
$ source ~/.bash_profileOnce you are done with the installation phase, test your new environment by executing the
mvn -versioncommand in your terminal application and you should see (more or less) the output as depicted in the following image:
Last, but not the least, we will need to install the
git, which is a distributed revision control system. It is mainly used with the source code, but it's also used as a configuration repository. To install thegittool, we will rely on theyumsoftware manager, which makes the installation process easy. Open a terminal and do as follows:$ sudo yum -y install gitOnce done, try to hit the following command:
$ git version
git version 2.1.0
Now that we have the git installed, we can proceed to download the code repository (or repo) used for this book, available on my GitHub account at the following URL: https://github.com/foogaro/wildfly-cookbook.git.
You can git-clone the repository or just download it as a ZIP archive. Either way, create a folder named github into the WFC folder and place the source into it.
Using the git-clone command, do as follows:
$ cd ~/WFC
$ mkdir github
$ cd github
$ git clone https://github.com/foogaro/wildfly-cookbook.git
Once the git has done cloning the repo, you will find a new folder named wildfly-cookbook where you can find all the projects used for the book.
To build a project, just go into the proper folder and execute the maven-package command.
For example, to build the project example, do as follows:
$ cd ~/WFC/github/wildfly-cookbook/example
$ mvn -e clean package
The preceding commands builds the project, and generate the web application artifact into a folder named target. There you can find the application example.war, ready to be deployed.
OK, we have finally finished installing all the software that we will need and use within the book. Just to be sure you are not missing any piece, you should have an environment as depicted in the following image:
In this recipe, we will learn how to get and install WildFly. As always, in the open source world you can do the same thing in different ways. WildFly can be installed using your preferred software manager or by downloading the bundle provided by the http://wildfly.org site. We will choose the second way, as per the JDK.
Just open your favorite browser and point it to http://wildfly.org/downloads/. You should see a page similar to the following screenshot:

WildFly's download page
At the time of writing this book, the latest WildFly was version 9.0.0.Beta2. The final version is now available and in use.
Now, download the latest version into the WFC folder.
Once the download is complete, open a terminal and extract its contents into the
WFCfolder, executing the following commands:$ cd ~/WFC && tar zx wildfly-9.0.0.Beta2.tar.gzThe preceding command will first point to our
WildFly Cookbookfolder; it will then extract the WildFly archive from it. Listing ourWFCfolder, we should find the newly created WildFly' folder namedwildfly-9.0.0.Beta2.To better remember and handle WildFly's installation directory, rename it
wildfly, as follows:$ cd ~/WFC && mv wildfly-9.0.0.Beta2 wildflyBy the way, WildFly can be also installed using the traditional
YUM, Fedora's software manager.Now we need to create the
JBOSS_HOMEenvironment variable, which is used by WildFly itself as base directory when it starts up (probably in future releases, this will be updated toWILDFLY_HOME). We will also create theWILDFLY_HOMEenvironment variable, which we will use throughout the whole book to reference WildFly's installation directory. Thus, open the.bash_profilefile, placed in yourhomefolder, with your favorite text editor and add the following directives:export JBOSS_HOME=~/WFC/wildfly export WILDFLY_HOME=$JBOSS_HOME
For the changes to take effect, you can either log out and log back in, or just issue the following command:
$ source ~/.bash_profile
If you followed the first two recipes carefully, your .bash_profile file should look like the following image:

Now that we have finished installing WildFly, let's look into its folders. This recipe is going to be a little theoretical.

The preceding image depicts WildFly's folders in the filesystem. Each is outlined in the following table:
|
Folder name |
Description |
|---|---|
|
|
Configuration files, deployment content, and writable areas used by the application client container run from this installation. |
|
|
Start up scripts, start up configuration files, and various command line utilities like Vault, add-user, and Java diagnostic report available for Unix and Windows environments. |
|
|
Contains a client jar for use by non-maven based clients. |
|
|
XML schema definition files. |
|
|
Example configuration files representing specific use cases. |
|
|
Configuration files, deployment content, and writable areas used by the domain mode processes run from this installation. |
|
|
WildFly is based on a modular class loading architecture. The various modules used in the server are stored here. |
|
|
Configuration files, deployment content, and writable areas used by the single standalone server run from this installation. |
|
|
Default Welcome Page content. |
In the preceding table, I've emphasized the "domain" and the "standalone" folders which are those that determine the mode which WildFly will run in: standalone or domain. In the next few recipes, we will have an overview of them, and get a deep insight later in the book.
WildFly in the standalone mode means a WildFly instance is launched and managed on its own. You can have as many standalone WildFly instances as you like, but you will have to manage them separately. This means that every configuration, datasource, deployment, and module has to be managed once per instance.
Note
The main difference between the standalone and domain modes is about management and not about capabilities. Capabilities are determined by the profile you choose to run WildFly with.
Let's have a look into the standalone folder:
|
Folder's name |
Description |
|---|---|
|
|
Configuration files used by the single standalone server run from this installation. |
|
|
Deployments content used by the single standalone server run from this installation. |
|
|
Libraries used by the single standalone server run from this installation. |
|
|
Log files created by the single standalone server run from this installation. |
So, the configuration folder contains all the configuration files. Yes, you can have more than one, but you will have to choose which one to run with. The deployments folder contains all your applications to deploy, deployed and undeployed (as we will see later, there is even a marker for failed deployments). The folder lib contains all the library jars referenced by your applications using the Extension-List mechanism. Lastly, the log folder contains WildFly's server.log file.
As previously mentioned, in the configuration folder you will find the following files:
|
File name |
Description |
|---|---|
|
|
Java Enterprise Edition 7 web profile certified configuration with the required technologies. |
|
|
Java Enterprise Edition 7 web profile certified configuration with high availability. |
|
|
Java Enterprise Edition 7 full profile certified configuration including all the required EE 7 technologies, including messaging—JMS. |
|
|
Java Enterprise Edition 7 full profile certified configuration with high availability. |
Along the lines of Java EE 7 profiles, WildFly defines its own profiles. For the standalone mode, each file corresponds to a WildFly profile, that is, standalone.xml corresponds to the default profile, standalone-ha.xml corresponds to the ha profile, standalone-full.xml corresponds to the full profile, and standalone-full-ha.xml corresponds to the full-ha profile. The same WildFly profiles will be found in the domain mode as well.
Let's try running WildFly in the standalone mode with its default settings, as follows:
$ cd $WILDFLY_HOME
$ ./bin/standalone.sh =========================================================================

  JBoss Bootstrap Environment

  JBOSS_HOME: /home/wildfly/WFC/wildfly

  JAVA: /home/wildfly/WFC/jdk8/bin/java

  JAVA_OPTS:  -server -XX:+UseCompressedOops  -server -XX:+UseCompressedOops -Xms64m -Xmx512m -XX:MaxPermSize=256m -Djava.net.preferIPv4Stack=true -Djboss.modules.system.pkgs=org.jboss.byteman -Djava.awt.headless=true

=========================================================================

Java HotSpot(TM) 64-Bit Server VM warning: ignoring option MaxPermSize=256m; support was removed in 8.0
08:43:50,658 INFO  [org.jboss.modules] (main) JBoss Modules version 1.4.2.Final
08:43:50,799 INFO  [org.jboss.msc] (main) JBoss MSC version 1.2.4.Final
08:43:50,850 INFO  [org.jboss.as] (MSC service thread 1-6) WFLYSRV0049: WildFly Full 9.0.0.Beta2 (WildFly Core 1.0.0.Beta2) starting
08:43:51,543 INFO  [org.jboss.as.controller.management-deprecated] (ServerService Thread Pool -- 26) WFLYCTL0028: Attribute enabled is deprecated, and it might be removed in future version!
08:43:51,564 INFO  [org.jboss.as.server] (Controller Boot Thread) WFLYSRV0039: Creating http management service using socket-binding (management-http)
08:43:51,592 INFO  [org.xnio] (MSC service thread 1-11) XNIO version 3.3.0.Final
08:43:51,601 INFO  [org.xnio.nio] (MSC service thread 1-11) XNIO NIO Implementation Version 3.3.0.Final
08:43:51,627 WARN  [org.jboss.as.txn] (ServerService Thread Pool -- 54) WFLYTX0013: Node identifier property is set to the default value. Please make sure it is unique.
08:43:51,626 INFO  [org.jboss.as.security] (ServerService Thread Pool -- 53) WFLYSEC0002: Activating Security Subsystem
08:43:51,631 INFO  [org.wildfly.extension.io] (ServerService Thread Pool -- 37) WFLYIO001: Worker 'default' has auto-configured to 16 core threads with 128 task threads based on your 8 available processors
08:43:51,635 INFO  [org.jboss.as.security] (MSC service thread 1-10) WFLYSEC0001: Current PicketBox version=4.9.0.Beta2
08:43:51,649 INFO  [org.jboss.as.jsf] (ServerService Thread Pool -- 44) WFLYJSF0007: Activated the following JSF Implementations: [main]
08:43:51,650 INFO  [org.jboss.as.clustering.infinispan] (ServerService Thread Pool -- 38) WFLYCLINF0001: Activating Infinispan subsystem.
08:43:51,680 INFO  [org.jboss.as.naming] (ServerService Thread Pool -- 46) WFLYNAM0001: Activating Naming Subsystem
08:43:51,686 INFO  [org.jboss.remoting] (MSC service thread 1-11) JBoss Remoting version 4.0.8.Final
08:43:51,687 INFO  [org.jboss.as.webservices] (ServerService Thread Pool -- 56) WFLYWS0002: Activating WebServices Extension
08:43:51,704 INFO  [org.jboss.as.connector.subsystems.datasources] (ServerService Thread Pool -- 33) WFLYJCA0004: Deploying JDBC-compliant driver class org.h2.Driver (version 1.3)
08:43:51,707 INFO  [org.wildfly.extension.undertow] (MSC service thread 1-5) WFLYUT0003: Undertow 1.2.0.Beta10 starting
08:43:51,707 INFO  [org.wildfly.extension.undertow] (ServerService Thread Pool -- 55) WFLYUT0003: Undertow 1.2.0.Beta10 starting
08:43:51,714 INFO  [org.jboss.as.connector] (MSC service thread 1-3) WFLYJCA0009: Starting JCA Subsystem (IronJacamar 1.2.3.Final)
08:43:51,725 INFO  [org.jboss.as.connector.deployers.jdbc] (MSC service thread 1-5) WFLYJCA0018: Started Driver service with driver-name = h2
08:43:51,813 INFO  [org.jboss.as.naming] (MSC service thread 1-5) WFLYNAM0003: Starting Naming Service
08:43:51,814 INFO  [org.jboss.as.mail.extension] (MSC service thread 1-7) WFLYMAIL0001: Bound mail session [java:jboss/mail/Default]
08:43:51,876 INFO  [org.wildfly.extension.undertow] (ServerService Thread Pool -- 55) WFLYUT0014: Creating file handler for path /Users/foogaro/wildfly9/wildfly-9.0.0.Beta2/welcome-content
08:43:51,904 INFO  [org.wildfly.extension.undertow] (MSC service thread 1-16) WFLYUT0012: Started server default-server.
08:43:51,926 INFO  [org.wildfly.extension.undertow] (MSC service thread 1-2) WFLYUT0018: Host default-host starting
08:43:51,990 INFO  [org.wildfly.extension.undertow] (MSC service thread 1-12) WFLYUT0006: Undertow HTTP listener default listening on /127.0.0.1:8080
08:43:52,122 INFO  [org.jboss.as.connector.subsystems.datasources] (MSC service thread 1-12) WFLYJCA0001: Bound data source [java:jboss/datasources/ExampleDS]
08:43:52,166 INFO  [org.jboss.as.server.deployment.scanner] (MSC service thread 1-5) WFLYDS0013: Started FileSystemDeploymentService for directory /Users/foogaro/wildfly9/wildfly-9.0.0.Beta2/standalone/deployments
08:43:52,244 INFO  [org.jboss.ws.common.management] (MSC service thread 1-11) JBWS022052: Starting JBoss Web Services - Stack CXF Server 5.0.0.Beta3
08:43:52,403 INFO  [org.jboss.as] (Controller Boot Thread) WFLYSRV0060: Http management interface listening on http://127.0.0.1:9990/management
08:43:52,403 INFO  [org.jboss.as] (Controller Boot Thread) WFLYSRV0051: Admin console listening on http://127.0.0.1:9990
08:43:52,403 INFO  [org.jboss.as] (Controller Boot Thread) WFLYSRV0025: WildFly Full 9.0.0.Beta2 (WildFly Core 1.0.0.Beta2) started in 1970ms - Started 202 of 379 services (210 services are lazy, passive or on-demand)
The first few lines tell you where WildFly is located and the JVM options. What follows is the Undertow HTTP Listener, which is the component that processes the HTTP request, listening on http://127.0.0.1:8080. As a matter of fact, you can test that WildFly is running correctly by pointing to the previous address, and you should see something like the following image:

WildFly's welcome content
Next are the logs about WildFly's management listeners which I have emphasized. The first listener is the HTTP management listener, which is actually an HTTP API used to invoke commands over HTTP. The second one is the Admin Console, which provides you with a Web Console to simplify most of WildFly's configuration. The HTTP management interface and the Admin Console are listening respectively on http://127.0.0.1:9990/management and http://127.0.0.1:9990.
To access the Admin Console, open a browser and point it to http://127.0.0.1:9990/. What you should see is a page as depicted in the following image:

WildFly's management error page
WildFly is up and running, but the Admin Console is not visible at the moment because there is no user registered to the "security context" (the proper WildFly term is Realm) that the Admin Console belongs to. We will talk about security and realms later in this recipe and in the upcoming chapters.
Note
Hereby, whenever I use the term Admin Console or Web Console, they are to intend the same thing.
Furthermore, the preceding screenshot tells you how to create a user to access the Admin Console. We need to create the admin user by using the add-user.sh script provided by WildFly in its bin folder.
Once again, open your command line (you should never close it, unless you are shutting down your PC) and execute the following command:
$ cd $WILDFLY
$ ./bin/add-user.sh
The following screenshot is the result of the preceding code:

Examining the script and its interaction:
In the preceding screenshot, the script first asks for a user type; in our case we need a management user. So just hit Enter or type
aand then hit Enter. We do not need to create a user at the application level, used to create security context.We specify the username, for example
wildfly.Then we need to enter the password following the specified policy. So we type
cookbook.2015and hit Enter.We confirm the password provided in the previous step by re-entering it.
We confirm that we want to add our user "wildfly" to the
ManagementRealmrealm. So we typeyesand hit Enter.In the final step, the script asks if the user will be used to connect one of the WildFly process to another one, or used to authenticate to an EJB. In this case, we type
noand hit Enter.
Now, let's point to the admin address http://127.0.0.1:9990 again. The page now asks you to enter the username and the password. Specify wildfly as username and cookbook.2015 as password, and you should see the WildFly Admin Console as follows:

WildFly's Web Console
We will take a deep dive into the standalone mode soon. In Chapter 2, Running WildFly in Standalone Mode, there will be described in detail all the configuration files, which one you should use, and how to manage your instance with both the Admin Console and the CLI. We will also deploy both the management tools.
The Domain mode is something totally new since JBoss AS 4, 5, and 6. It was first introduced in JBoss AS 7.
It's about grouping several WildFly instances into one single group, a server-group using the WildFly nomenclature. In fact, we group the WildFly server into one logical server-group, and all the WildFly instances will share the same configuration. By this we intend that they share the same WildFly profile (default, ha, full, and full-ha), same deployments, and so on. What will not be shared is specific instance configuration such as IP bind address, ports, and others.
Suppose you have an application and you want it to deploy on four servers of your infrastructure (or test rather than preproduction or production). You will need to configure a server-group, associate the four server instances to it, and you are done. Dealing just with the server-group, all your settings and changes will be spread to all the related server instances. This was definitely a big miss in JBoss AS, but now we have it.
When dealing with domain mode, there are two new terms to know and understand: domain controller (DC) and host controller (HC).
The first one, the DC, acts as the parent process, the "gran maestro" of an orchestra. Every single change is provided by the DC towards all the HCs of all server-groups. The DC configuration file is named domain.xml, whilst the HC configuration file is named host.xml.
Note
To avoid confusion, it's better to clarify the terminology that we will use in the book. We might refer to the server running the domain controller as the "master" or the "domain". Alternatively, we might refer to a running WildFly instance that is not the domain, as the "host", or "slave".
One more thing to know is that contrary to the standalone mode where you have different files for different profiles, in the domain mode you end up with just one file (there is another one named host.xml, but we will talk about it soon) having all the profiles configured in for you. Profiles are the same as for the standalone mode. We will learn how to associate a profile to a server-group in the chapter dedicated to the domain mode.
Let's have a look at the domain folder:
So, the configuration folder contains all the configuration files. Let's have a look at all of them:
|
File name |
Description |
|---|---|
|
|
This is the main configuration file that includes all WildFly profiles plus all other configurations needed to run the AS. When WildFly starts, it will look for a file named |
|
|
This is the host controller configuration file provided by the WildFly installation. In this you will find the entire specific configurations about server instances. When WildFly starts, it will look for a file named |
|
|
This is a host controller configuration example file provided by the WildFly installation. It shows you how to configure WildFly running only the domain controller. |
|
|
This is a host controller configuration example file provided by the WildFly installation used to configure WildFly running as slave and connecting to the domain controller. |
Let's try running WildFly in the domain mode with its default settings (two server-groups—first one with two instances named server-one and server-two, last one with one instance named server-three with auto-start disabled). Do as follows:
$ CD $WILDFLY_HOME
$ ./bin/domain.sh -b 0.0.0.0 -bmanagement 0.0.0.0
====================================================================

  JBoss Bootstrap Environment

  JBOSS_HOME: /home/wildfly/WFC/wildfly

  JAVA: /home/wildfly/WFC/jdk8/bin/java

  JAVA_OPTS: -Xms64m -Xmx512m -XX:MaxPermSize=256m -Djava.net.preferIPv4Stack=true -Djboss.modules.system.pkgs=org.jboss.byteman -Djava.awt.headless=true

====================================================================

Java HotSpot(TM) 64-Bit Server VM warning: ignoring option MaxPermSize=256m; support was removed in 8.0
08:50:53,715 INFO  [org.jboss.modules] (main) JBoss Modules version 1.4.2.Final
08:50:53,804 INFO  [org.jboss.as.process.Host Controller.status] (main) WFLYPC0018: Starting process 'Host Controller'
[Host Controller] Java HotSpot(TM) 64-Bit Server VM warning: ignoring option MaxPermSize=256m; support was removed in 8.0
[Host Controller] 08:50:54,154 INFO  [org.jboss.modules] (main) JBoss Modules version 1.4.2.Final
[Host Controller] 08:50:54,841 INFO  [org.jboss.msc] (main) JBoss MSC version 1.2.4.Final
[Host Controller] 08:50:54,869 INFO  [org.jboss.as] (MSC service thread 1-7) WFLYSRV0049: WildFly Full 9.0.0.Beta2 (WildFly Core 1.0.0.Beta2) starting
[Host Controller] 08:50:55,326 INFO  [org.xnio] (MSC service thread 1-7) XNIO version 3.3.0.Final
[Host Controller] 08:50:55,328 INFO  [org.jboss.as] (Controller Boot Thread) WFLYHC0003: Creating http management service using network interface (management) port (9990) securePort (-1)
[Host Controller] 08:50:55,332 INFO  [org.xnio.nio] (MSC service thread 1-7) XNIO NIO Implementation Version 3.3.0.Final
[Host Controller] 08:50:55,391 INFO  [org.jboss.remoting] (MSC service thread 1-7) JBoss Remoting version 4.0.8.Final
[Host Controller] 08:50:55,415 INFO  [org.jboss.as.remoting] (MSC service thread 1-1) WFLYRMT0001: Listening on 0.0.0.0:9999
[Host Controller] 08:50:56,189 INFO  [org.jboss.as.host.controller] (Controller Boot Thread) WFLYHC0023: Starting server server-one
08:50:56,199 INFO  [org.jboss.as.process.Server:server-one.status] (ProcessController-threads - 3) WFLYPC0018: Starting process 'Server:server-one'
[Server:server-one] 08:50:56,527 INFO  [org.jboss.modules] (main) JBoss Modules version 1.4.2.Final
[Server:server-one] 08:50:56,692 INFO  [org.jboss.msc] (main) JBoss MSC version 1.2.4.Final
[Server:server-one] 08:50:56,753 INFO  [org.jboss.as] (MSC service thread 1-7) WFLYSRV0049: WildFly Full 9.0.0.Beta2 (WildFly Core 1.0.0.Beta2) starting
...
[Host Controller] 08:50:57,401 INFO  [org.jboss.as.domain.controller.mgmt] (Remoting "master:MANAGEMENT" task-4) WFLYHC0021: Server [Server:server-one] connected using connection [Channel ID 56504cde (inbound) of Remoting connection 0f0a1d33 to /192.168.59.3:50968]
[Host Controller] 08:50:57,420 INFO  [org.jboss.as.host.controller] (Controller Boot Thread) WFLYHC0023: Starting server server-two
08:50:57,423 INFO  [org.jboss.as.process.Server:server-two.status] (ProcessController-threads - 3) WFLYPC0018: Starting process 'Server:server-two'
[Host Controller] 08:50:57,430 INFO  [org.jboss.as.host.controller] (server-registration-threads - 1) WFLYHC0020: Registering server server-one
...
[Server:server-two] 08:50:58,213 INFO  [org.jboss.modules] (main) JBoss Modules version 1.4.2.Final
[Server:server-two] 08:50:58,513 INFO  [org.jboss.msc] (main) JBoss MSC version 1.2.4.Final
[Server:server-two] 08:50:58,621 INFO  [org.jboss.as] (MSC service thread 1-6) WFLYSRV0049: WildFly Full 9.0.0.Beta2 (WildFly Core 1.0.0.Beta2) starting
The domain controller is responsible for initiating all local host controllers along with the configured instances. Now, opening the WildFly Admin Console, you can see an overview of the details of both your instances:

WildFly's runtime domain overview
From the domain perspective, you can see two server-groups named main-server-group with full profile and the other-server-group with full-ha profile. The latter is not running because its auto-start property is set to false.
We will take a deep dive into the domain mode soon. In Chapter 3, Running WildFly in Domain Mode, all configuration files will be described in detail apart from learning how to choose the correct profile and how to manage your instance with both the Admin Console and the CLI. We will analyze the domain and host controller processes. We will create various examples of server groups, running locally and in pseudo-different machines. We will also deploy both the management tools and analyze how this behaves in the domain mode.
In this recipe, you will learn how to install WildFly as a service, actually having WildFly run automatically when the OS starts. If you want to run Wildfly manually on demand, you can skip this recipe, unless for knowledge purpose.
Most Unix-like systems have different "runlevels" (think about them as steps) for various stages of the system running phase. At the operating system level, a service can be activated only if other services have been successfully activated. Thus if you activate a service that needs network before this one is up and running, it gets faulty or useless. This is essentially what "runlevels" are for.
The following is a list of runlevels:
rc1.d: Single user mode
rc2.d: Single user mode with networking
rc3.d: Multi-user mode—boot up in text mode
rc4.d: Undefined
rc5.d: Multi-user mode—boot up in X Windows
rc6.d: Shutdown
Most production Linux systems boot using runlevel 3 (UI is not needed and it will be a waste of resources), but to reach all audiences, we will use level 2, 3 and 5.
WildFly comes with a predefined script, which can be used to run WildFly as a service. This script is located in the bin/init.d folder of the WildFly installation folder. So we just need to copy the file inside the /etc/init.d system folder and set it as a service, as follows:
$ sudo cp $WILDFLY_HOME/bin/init.d/wildfly-init-redhat.sh /etc/init.d/wildfly
$ sudo chkconfig --add wildfly
$ sudo chkconfig wildfly on --level 235
There is also one more file that we need to take a look at, and it is the wildfly.conf, placed into the same bin/init.d directory of the WildFly installation folder. The following is the file as is:
# General configuration for the init.d scripts,
# not necessarily for JBoss AS itself.
# default location: /etc/default/wildfly

## Location of JDK
# JAVA_HOME="/usr/lib/jvm/default-java"

## Location of WildFly
# JBOSS_HOME="/opt/wildfly"

## The username who should own the process.
# JBOSS_USER=wildfly

## The mode WildFly should start, standalone or domain
# JBOSS_MODE=standalone

## Configuration for standalone mode
# JBOSS_CONFIG=standalone.xml

## Configuration for domain mode
# JBOSS_DOMAIN_CONFIG=domain.xml
# JBOSS_HOST_CONFIG=host-master.xml

## The amount of time to wait for startup
# STARTUP_WAIT=60

## The amount of time to wait for shutdown
# SHUTDOWN_WAIT=60

## Location to keep the console log
# JBOSS_CONSOLE_LOG="/var/log/wildfly/console.log"
The previous configuration file basically sets a series of parameters that tell init-script which WildFly mode to use, which configuration file, which user WildFly should run with, and so on. Any update should be placed into that file.
For the moment, we will rely on the defaults, except for the user that we will mention explicitly by uncommenting the line # JBOSS_USER=wildfly, by removing the hash # symbol. You may have noticed that you can also specify the mode which WildFly will run with: domain or standalone.
We now need to create the wildfly user, and give the ownership of the WildFly home folder to the wildfly user. Do as follows:
$ sudo groupadd -r wildfly
$ sudo useradd -r -g wildfly -s /sbin/nologin -c "WildFly user" wildfly
$ sudo passwd -d wildfly
$ sudo chown -R :wildfly $WILDFLY_HOME/*
Now if you reboot your system, you will have WildFly up and running as a service with the default settings, launched by the wildfly user.


