The first chapter in this book naturally is a review of concepts that are key to the rest of the book. In this chapter, we will look at:
How the NetScaler file system is laid out and what folders we are likely to often visit when troubleshooting
The different address types and their purposes
Request Switching and Connection Multiplexing
The different modes of operation, their significance, and considerations
The NetScaler code runs on top of FreeBSD as a userspace process, so it pays to understand the underlying file system structure.
Note
A question that comes up often, given the system is based on FreeBSD, is, "Is the system automatically vulnerable to any FreeBSD security issues that (as with any software systems) are reported by advisories?" The answer is, it depends; the NetScaler is a hardened appliance with several of its modules customized to reduce a potential security impact. For a definitive answer, you will need to contact Citrix Support, who would then work with a Security Response team for a validated response.
While the base layout will be familiar to anyone familiar with UNIX-based systems, the files that we would look at when troubleshooting are custom to the NetScaler.
Start by using df. This is also a great way to see how you are doing in terms of disk space:
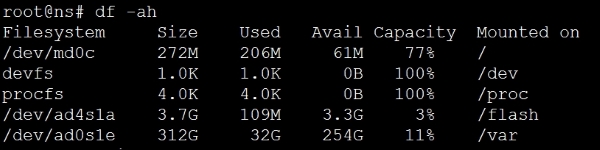
The command df stands for diskfree, a Unix command to show disk usage statistics. By using the –ah option, we are asking for all the folders to be displayed in a human readable format, with percentages, for easy comprehension.
Let's take a look at the two important ones here for troubleshooting: /flash and /var.
/flash, as you've probably guessed, maps directly to the Flash drive/SSD installed in the NetScaler. This is the most important partition on the NetScaler as it contains the operating system along with the configuration, license, and essentially everything needed to boot the NetScaler.
The /var, which is the largest of partition and equals the hard disk on the NetScaler, contains: logs, crashes, traces, and other items that are to do with the maintenance and monitoring of the NetScaler.
In the case of a VPX, which is a virtual appliance with no physical drives, these folders become references to virtual partitions on the drive. Let's have a brief look at the important subfolders among these.
/flash contains the following folders:
/nsconfig/: This contains the NetScaler configuration files (ns.conf.*). Each time you make a configuration change, it does get applied but doesn't get committed to the disk. To commit changes you need to click on Save config. Five such files, each resulting from a "save config", are saved in the/nsconfig/folder. So, you can get back to a last known good configuration if you are in trouble after saving configuration changes.
The best practice of course is to not leave it to chance and use well named backup files. The current versions offer a handy way to do this: navigate to System | Backup/Restore, choose a file name, and select either Basic backup (configuration, location database) or Full (basic backup along with certificates). You can then download the backup.
The
/nsconfig/folder is also home to other configuration files, most notably that of the routing engine ZebOS:/nsconfig/ssl: This contains the SSL certificates, keys, and requests.ns-root.*andns-server.*: These files come by default; thens-root.*files are used for signing, while thens-server.*files are bound to the internal services, so care must be exercised with any folder cleanup here. Thens-servercertificate is what you are presented with when accessing the NetScaler, and consequently, this is the key-pair that you would change as a best practice with a signed certificate you trust./nsconfig/monitors: This is the folder for anyUSER(script-based) monitors that you upload to the NetScaler.
Note
Monitors provided as
Perlfiles are used when creating a monitor of the typeUSER. Going by the list in the following screenshot, you can guess that these are usually monitors that provide application knowledge beyond basic port or protocol response checks. In newer versions, the home for these files is/netscaler/monitors/;it's when you upload any with modifications that they are stored in/nsconfig/monitors.
Notice that all this while that we've been referring to this all important folder as
/nsconfig/and not/flash/nsconfig/- that's because/nsconfig/is a link to/flash/nsconfig/and they represent the same folder.
/var/log contains text based logs. Let's look at some of the important ones:
ns.log: This is of paramount importance when troubleshooting, and as you will see during the course of this book, it is a file that we often turn to get a live view in easily readable messages in order to understand what is happening in the background, such as why is that User denied access, or why is the request blocked?messages.*: These are your standard Linux/FreeBSD system logs. This is where I would look first if I were to go back in time to understand when a reported reboot of the unit happened, or when a shell command was run.license.log: This is the log to look at if the licenses fail to apply, such as when thehostIDused during allocation is incorrect./var/nslog: This folder contains the binarynewnslogfiles. While thens.logfiles we just discussed are very easy to read by text and are our preferred go to when dealing in a controlled environment, we most certainly can't digest patterns in a heavily used production unit, and that's wherenewnslogscome in. This is a highly efficient form of logging that tracks the value of each counter (there's a few thousands of them) at every 7 second interval. These logs also serve as a basis for any external tool's plotting patterns, such as traffic, CPU, or errors.
This folder also contains the AppFirewall learning related logs:
/var/core: This contains any crashes related to the NetScaler software, and you will almost always have them labeled in the formatNSPPE-0x-xxxxwhere theNSPPEstands for the NetScaler packet engine, the firstxfor the packet engine number, and the rest for the PID; recall what we said about the Packet Engines running as User processes, therefore they will have PIDs./var/crash: This is where any core dumps by the Kernel will go.
In this section, we will briefly go over the various address types in NetScaler:

NetScaler IP (NSIP) is the Management IP address, unique to each unit. The following are some of the features:
Virtual IP (VIP) is the IP that users land on and is usually added as part of configuring a feature.
Mapped IP (MIP) is an IP that the NetScaler can also use to talk to the Server. Its features are as follows:
Essentially relaying requests and receiving responses on behalf of the client.
You can add as many MIPs as you like but only if they are from the same subnet as the NSIP.
MIP only exists these days for legacy reasons; everything you can do with a MIP you can do with a SNIP. So follow on to the next.
Subnet IP (SNIP) is the defacto IP for NetScaler to Server communication. This IP is everything the MIP is, but without the limitation of having to be in the same subnet as the NSIP.
As a bonus, adding a SNIP will also add a direct route on the NetScaler to facilitate communication with the Servers. Check out the illustration with a routing table, as follows:

Here, 192.168.1.150 is the NSIP that evidently sits in a different subnet from 172.16.1.151, which is the SNIP. In this case, the NetScaler will add a direct route to 172.16.1.0 with itself as the gateway.
You can, also use the SNIP to manage the NetScaler (among other IPs) by enabling management access. This especially helps in the HA environment by ensuring you always arrive at the primary when logging in to make any changes:
> set nsip 172.16.1.151 -mgmtAccess ENABLED
NetScaler's fundamental performance secret is a patented traffic handling technique called Request Switching. It allows the NetScaler to decouple Layer 7 protocol requests from TCP connections. This allows for a more granular load balancing by making decisions for each individual Layer 7 request.
NetScaler combines Request Switching with Connection Multiplexing. Connection Multiplexing is a technique where warm connections are maintained with each of the Servers using Keep-Alives. The result is that server side connections are already scaled up to maximum speed/window size. The NetScaler then multiplexes requests from several client side connections and potentially several users to a single server using a single TCP connection.
If you consider the server side processing cost of setting up a TCP connection and tearing it down, the round trips needed to do so, not forgetting that each of these connections also has a memory cost, the benefits of request switching become immediately apparent.
Along with helping the server scale better, there are also other benefits to this technique. Because NetScaler is looking at traffic at the request level instead of the connection level, it is capable of offering better protection by looking at individual requests, instead of letting all traffic on a connection through and similarly, policies and load balancing decisions can be applied more granularly on a per request basis.
Note
The patent number for anyone interested in delving deeper is 6,411,986. This was later licensed to other vendors.
The following screenshot shows NetScaler Request Switching and Connection Multiplexing:

Tip
For troubleshooting, you might, on occasion, want to temporarily disable Connection Multiplexing, for example, to rule out issues of it not playing well with the Server. To do so, you can either use a HTTP profile with -conMultiplex DISABLED bound to the service, or by setting -maxreq to 1 on the service. Make this change at the service level to avoid impacting the performance of the environment as a whole.
You have some options around what tools you can use to manage the NetScaler. This is a quick review of what's available and when best to use them.
This is the easiest of the lot to use, and comprehensive. Its benefits also include the ability to more easily spot DOWN entities such as services/VIPs. You can also navigate to System | Diagnostics | Command Line Interface to invoke the CLI/shell, though I would personally prefer the ease and speed of an SSH client if that access is needed.
The ability to view reports is huge when you are looking at performance issues. Apart from the standard port 80 or 443 for SSL, you also need Java ports 3008/3010.
Administrators coming from a Unix background might prefer CLI. This provides you an easy means to access the shell, which we use a lot for troubleshooting.
It is highly recommended that you have this access when you are making network-related changes to the NetScaler; many damage control operations have been possible when all network access to the unit was lost following a change, purely because console access was available.
Console access is also handy when recovering from a corrupt kernel or changing a lost password. Another way of accessing the console on some physical NetScalers is via the Lights Out Management (LOM) Interface. This is a dedicated module on the NetScaler that has its own network and SSL settings that you can use the NetScaler CLI to revert any recent changes you have made, or even remotely reboot the NetScaler.
Accessed from the CLI, shell commands are the preferred way to Grep log outputs as well as to look at counters, that is, you would spend a lot of your troubleshooting time using the shell.
Another use case (though not often) is when you need to manipulate files such as the rc.netscaler or the nsbefore.sh/nsafter.sh files.
Of course, shell access is mighty, so you might want to restrict who you provide access to using command policies.
Nitro is a move away from the original APIs that the older releases supported and has the inherent benefit of being lightweight and fast, and as with any API, it allows you to manage the NetScaler programmatically. It's a great way to automate configuration.
Here's an excellent text taken from the docs that describes it better. Source: http://support.citrix.com/proddocs/topic/netscaler-main-api-10-map/ns-nitro-wrapper-con.html:
NITRO exposes its functionality through Representational State Transfer (REST) interfaces. Therefore, NITRO applications can be developed in any programming language. Additionally, for applications that must be developed in Java or .NET, NITRO APIs are exposed through relevant libraries that are packaged as separate Software Development Kits (SDKs).
And here's a quick example to get you excited about the possibilities with Nitro. When you are ready to save the configuration on a unit next time, try the following URL from your browser: http://<your_ns_ip>/nitro/v1/config/nsconfig?action=save.
Now imagine being able to use several commands like this to build your own page of handy actions or write PowerShell scripts for the most common tasks you need to perform. The log to look for is /var/log/nitro.log.
Let's take a look at the various nodes that the NetScaler operates in. First, we'll look at two different ways in which the NetScaler behavior is influenced, based on how your Virtual IPs are configured.
Let's clarify upfront that this isn't a knob you will find on the NetScaler and, as such, it doesn't pertain to the set of options you can select under System | Settings | Configure Modes. Instead, it refers to how the NetScaler handles the TCP connection when features such as Compression, TCP Buffering, SSL Offload, and AppFw (which require the packet to be written) are in play.
As a consequence of this rewriting, when operating in the Endpoint mode, the NetScaler takes ownership of reliable TCP delivery, managing window sizes and MTU independently for both legs of the conversation. So, if in your troubleshooting, you see that NetScaler is ACKing a packet before the server has sent in its ACK, it is down to the NetScaler acting in the Endpoint mode.
Now, with this understanding out of the way, let's look at some of the modes that are not enabled by default and what their impact on your environment will be.
You need to consider what level of protocol processing is in play. NetScaler has the most to offer in performance when it's running a protocol natively (as in, you select a VIP type that matches the type of traffic), for example, HTTP. This is also where it can offer the most security as it is able to inspect pretty much everything in the flow.
When troubleshooting, however, you might occasionally see a situation where you will need to dumb down the processing for a moment so you can understand whether the optimizations that are being offered are causing the failure that you are troubleshooting. A technique I sometimes find myself using is to move momentarily from a VIP configured as the native protocol type (HTTP) to TCP. This will still offer TCP optimizations but will help to understand whether, for example, one of the packet rewriting features is causing the App to fail.
Very rarely have I had to consider going a level further down for troubleshooting purposes and reconfigure the same HTTP VIP as type ANY, such as when deliberately bypassing the inbuilt window-based protection mechanisms to prove raw throughput in a POC. By setting up the VIP as type ANY, we pretty much turned the NetScaler into a Layer 3 Load balancer.
Now, we're coming to the area that you can turn ON and OFF by navigating to System | Settings on the NetScaler.
Let's start with the ones that are enabled by default. The fact that they are enabled by default also means they play along well for the most part with most deployments.
Fast Ramp is a performance friend. Traditional (read RFC-based) TCP follows a very conservative approach to increasing window sizes; while this made perfect sense in the days of unreliable pipes, it stems the TCP connection from quickly reaching its top speed. Especially in the context of the NetScaler, which will sit closer to or at least have very solid connections to the Server, Fast Ramp works great and is one of those features that rarely has to be touched.
Even though it's enabled by default, the Edge Configuration mode only impacts very specific use cases. Notably, Link Load Balancing and Cache Redirection. It's called edge mode because it's sitting literally at the edge of the network learning services that are not even part of your infrastructure, purely with the goal of load balancing. There are two desired behaviors for such deployments:
To be able to increase the number of internal services that are allowed on the NetScaler
To turn off binary performance logging for such services, thereby increasing performance and at the same time reducing the impact on log size
Remember though, this is only when cache redirection or link load balancing are in use, not system wide.
As we discussed in the IP review section, SNIPs are the recommended way to configure IPs for the purpose of NetScaler to Server conversations. This mode, abbreviated as USNIP, simply enables your SNIPs to be used.
The Layer 3 mode is enabled by default. If you need the NetScaler to forward packets to an IP not owned by it, you need this mode. When enabled, NetScaler will behave like a router, looking at the routes it has learned or that has been configured with to forward packets. Disabling it will mean anything the NetScaler receives that doesn't have the destination IP as one of its IPs will be dropped. Situations where you would turn this off would be to prevent Servers in the backend from talking to each other or if you want routing to be entirely handled by a separate device (such as a router or firewall).
Path MTU Discovery, or PMTUD as it's known, is a pretty well-known networking technique that uses ICMP to learn what the lowest MTU along the path is. This way fragmentation is avoided and that is always a good thing. Fragmentation is inefficient, it costs performance at multiple points in the network, and then needs reassembly at end points.
First, let's get the advertisements out of the way—SRADV, DRADV, IRADV, SRADV6, and DRADV6.
When you enable dynamic routing on the NetScaler, you do so to have it participate in routing and learn routes from other routers in its neighborhood. You then also have the ability to have it advertise the routes it knows. This is when you choose to enable the respective advertisement.
Next, there are a couple of RISE-related enhancements. These are RISE_APBR and RISE_RHI. First let's begin by understanding what RISE is. Remote Integrated Services Engine is a Cisco technology, which allows the NetScaler when used with the Cisco Nexus series of appliances, provides a tight integration between the two products and this enables some configuration automation and in turn easier management.
Here is a quote from the Cisco Whitepaper. Reference: http://www.cisco.com/c/dam/en/us/products/collateral/switches/nexus-7000-series-switches/white-paper-c11-731370.pdf:
"Each device can retrieve and program the hardware and software tables of the other (for example, the forwarding tables, routing tables, and access control lists [ACLs])."
The two RISE modes represent two of the fundamental use cases of this integration:
RISE_APBR (RISE Auto PBR): USIP configurations require special routing handling in place so that the return traffic goes through the NetScaler; otherwise, the client that isn't expecting a response from the Server will drop it. APBR allows the PBRs needed for this to be set up dynamically, which helps with scale.
RISE_RHI (RISE Route Health Injection): Route Health Injection allows active-active load balancing of VIPs by using injecting routes into the routing table to point to one of the several NetScalers as the target for a given VIP. The RISE implication here is that the addition of these routes can be done dynamically.
Let's now get to the modes that we are most concerned with while troubleshooting:
Layer 2 Mode: As you can tell from the name, this turns the NetScaler into a switch, forwarding any packets that are not meant for its MAC addresses. So yes, this does induce a very real risk of a loop if enabled without proper network evaluation. This is why it's turned off by default. Luckily, most deployments do not require this option (a couple of such exceptions are the AppFw transparent mode and CloudBridge Connector).
Bridge BPDU: It's important to first note, that the NetScaler doesn't participate in understanding Spanning Tree Protocol. By default, it drops BPDUs, and this is perfectly okay for most deployments because the L2 mode is disabled by default. The best practice in fact is to not have STP enabled at all on any of the switch ports that the NetScaler (with L2 mode off) is plugged into, so that the instances come on instantly without cycling through the intermediate states. If you, however, are enabling the L2 mode, consider bridging BPDUs so that the switches can detect loops and turn off redundant interfaces if they need to.
Use Source IP (USIP): When enabled, NetScaler preserves the original client IP as visible to it while forwarding traffic to the Servers. As simple as that is, there are network implications to consider in order to avoid dropped packets. When USIP is enabled, the Server can see the Clients IP address, and unless it's set to route traffic back to the NetScaler, might attempt to talk directly to the client. This, of course, will be rejected by the client. To get around this, you will need to either set the NetScaler as the default gateway for the Servers, route traffic back to the NetScaler using PBR, set up a non-ARPing loopback address, or alternatively use NAT for the reverse traffic.
If it's purely for Client IP logging purposes that you are turning on USIP, consider Client IP Insertion or Web logging instead. The latter is especially designed for high performance logging. Another point to bear in mind while enabling USIP is that it reduces the reusability of a connection on the Server side. Why is that? Because when the NetScaler tries to look for a connection in its reuse pool, it looks for something that matches among other things, the source IP. Whereas, by default, you have a lot of matches given the SNIP remains somewhat a constant; with USIP, this gets chopped up into several small pools of connections.
A common question is what happens if both USNIP (which we discussed earlier) and USIP are enabled? USIP always overrides USNIP. Also, USIP can be enabled either at the Global level or at the service level. The service level setting takes precedence over the Global level setting.
Client Keep-Alive: Known as CKA, in short, this is a HTTP technique to allow for connection multiplexing on the Client-side of the connection. When enabled, NetScaler drops the
Connection: closeheader, which would have otherwise signified the end of the conversation and caused the client to close the connection and insert a replacement header of its ownConnection: Keep-Alive. The result is that the client doesn't need to re-establish newer connections for other requests on the page it's trying to load. The technique, as such, is perfectly valid and most browsers support it, however you might run into cases where the browser (by behavior) doesn't load the page until it receives theConnection: closeheader. This once manifested for me as a certain browser not redirecting me on seeing a HTTP 302 for 180 seconds! Such situations would require you to leave this mode disabled.TCP Buffering: In a typical deployment, the NetScaler has a much more reliable and faster connection to the Servers than it does to the Clients who are connecting to it. This could easily mean that the Server builds up a queue of responses that it hasn't been able to send out, as the Client doesn't acknowledge as fast as the Server is generating data. This is where TCP buffering comes in. When enabled, the NetScaler queues this data for the Server thereby taking the load off it and lets it continue working on data for other clients. The reason this mode is disabled by default is that it has, along with the memory requirement (configurable), a CPU impact. So, in summary this is a very helpful feature for Internet-based clients but proper testing to evaluate the impact for a given profile and the volume of traffic is needed.
MAC Based Forwarding: MBF is a cache-based forwarding technique. It notes the MAC address of the incoming Client request and automatically assumes what the destination MAC address should be for the response. For very static and symmetric environments, this could mean hugely increased forwarding performance as the whole route lookup process is bypassed. If your environment relies on specific routes for the return traffic (think PBR), those get bypassed too. So it needs careful consideration for such environments. There are certain scenarios, such as Firewall or VPN load balancing where MBF is indispensable due to the way it avoids asymmetric routing.
Let's quickly recap what we've covered in this opening chapter. We have looked at the NetScaler folder structure and the files and folders that are most interesting from a troubleshooting perspective. Key to note was the /var/log/ns.log file, which when used with a tail -f, spews out a lot of useful information while an issue is being reproduced.
The different IP addresses that you, as an Administrator, assign to the NetScaler and their purpose. We looked at Request Switching and Connection Multiplexing, which gives the NetScaler its high performance. We looked at the different ways to interact with the NetScaler and what each UI is best for.
We looked at the various modes of operation that the NetScaler functions in and those that can be configured. Among the modes that are configurable, we noted that there are very important considerations, especially for those features that are disabled by default. As we move to the next chapter, we will look at troubleshooting areas in the features that form the bulk of NetScaler deployments.