


"It is not the beauty of a building you should look at; it's the construction of the foundation that will stand the test of time." | ||
| --David Allan Coe | ||
In this chapter, we will cover:
Connecting to TFS using Team Explorer
Setting up your user profile in TFS
Creating a Team Project using the Scrum Template
Assigning a license, adding users, and auditing user access
Configuring Dashboards in Team Project
Setting up a welcome page for a Team Project
Creating and setting up a Team Room
Renaming a Team Project
Creating a new Team Project through the command line
Deleting a Team Project
Microsoft Visual Studio Team Foundation Server provides a set of integrated tools enabling Teams to effectively manage the life cycle of their software project. The Team in Team Foundation Server is encapsulated within the container of a Team Project. Simply put, Team Project is a logical container isolating all tools and artifacts associated with a software application together in a single namespace.
The conceptual boundary introduced through Team Project eliminates the problem of having access to unrelated artifacts such as code, Work Items, or release information not relevant to your applications development. Related Team Projects can be grouped together into a Team Project Collection. It can be used to introduce a physical separation between the groups of related Team Projects by hosting them in separate databases.
Team Foundation Server supports multiple Team Project Collections, each of which can internally host multiple Team Projects. Resources such as build pools are scoped at the Team Project Collection level. A Team Project can host multiple Teams; certain resources are set at the Team Project level and others at the Team level. As illustrated in the following screenshot, the selection of a source control repository (TFVC or Git) is made at the Team Project level; however, Teams have autonomy on the level of backlogs they choose and the workflows on the Kanban board. The delivery framework of choice is applied through the Process Template; this in turn applies the delivery framework-specific terminology, artifacts, and workflows to the Team Project and all Teams within the Team Project:

TFS Reporting warehouse is a traditional data warehouse consisting of a relational database organized in an approximate star schema and an SQL Server Analysis Services cube built on top of the relational database. All Team Projects, irrespective of the Team Project Collection they belong to, are aggregated into a single data warehouse.
Team Foundation Server provides a hierarchical security model. Permissions can be set through TFS Groups or AD Group membership through every level, right from the server through to the object level. Groups can be nested and set to inherit permissions through the hierarchy. Inheritance of permissions can be set to Denied where you want to control access to selected resources. A more in-depth breakdown of precreated groups with details of access and permissions can be found at http://bit.ly/1PPaU6l.

Permissions can be used to limit access to resources within or between Team Projects, Team Project Collections provide an isolation altogether. Team Project Collections also provide other functional and technical benefits such as:
The usage of a single TFS instance across multiple departments while still providing a level of isolation. Collections can be used to reflect an organizational structure too.
Flexibility in backup and restore. This can reduce downtime as restoring one collection will not impact users of other collections.
Scalability and load balancing by moving collections on separate SQL Server instances.
In this chapter, we'll touch on Administration and Process Templates; these topics are discussed at length in future chapters. The focus of this chapter is on creating and setting up various elements of a Team Project.
To build, test, track, or release your software, you'll need to connect the client of your choice to Team Foundation Server. As a software developer, you'll spend a lot of time in the Visual Studio IDE. Whether you store the code in the TFS Git repository or TFVC source control, you'll need to connect the IDE to TFS to interact with the code. In this recipe, you'll learn how to connect to TFS using Team Explorer.
If you have any Visual Studio 2015 SKU installed, you already have Team Explorer. With TFS 2015, a separate install of Team Explorer is no longer available; you will need to install Visual Studio Community at the very least to get Team Explorer.
Note
To connect to TFS via any of the office products, you can install the TFS Office Integration Installer: http://bit.ly/1k3wh7p. You can read more about the benefits of the TFS Office Integration Installer at http://bit.ly/1Grh3DS.
When you start Visual Studio for the first time, you'll be asked to sign in with a Microsoft account, such as Live, Hotmail, or Outlook, and provide some basic registration information. Choose a Microsoft account that best represents you. If you already have a MSDN account, it's recommended that you sign in with its associated Microsoft account. If you don't have a Microsoft account, you can create one for free. Logging in has various benefits such as the synchronization of Visual Studio settings across multiple machines. While logging in is advisable, it is not mandatory.
Open Visual Studio 2015.
Click on the Team toolbar and select Manage Connections...:

From within Team Explorer, click on the Manage Connections hyperlink and choose Connect to Team Project:

In the Connect to Team Foundation Server window, the drop-down shows a list of all the TFS Servers you have connected to before. If you don't see the server you want to connect to in the drop-down, click on Servers... to enter the details of the Team Foundation Server. Click on Add... and enter the details of your TFS Server. You may be required to enter the login details to authenticate with the server.

The authenticated user details along with server details will update on the Connect to Team Foundation Server window. Click on the Connect button to complete the operation.
You should be successfully connected to TFS via Team Explorer now:

Visual Studio now ships with a GitHub connector. Now, the Manage Connections dialog within the Team Explorer allows you to connect not only to TFS and VSO, but also GitHub. This is a great example of how Microsoft is embracing open source by enabling seamless integration for non-Microsoft products.

Note
If you are a GitHub free account user, you will be limited to just one account in Visual Studio; this is a limitation posed by GitHub. GitHub Enterprise users have the ability to map multiple accounts from Team Explorer 2015.
If you are in two minds whether to log in to Visual Studio with Microsoft account, weigh these benefits:
Synchronizes your Visual Studio settings: Visual Studio settings such as key bindings and color theme, apply immediately when you sign in to Visual Studio on any another device.
Extends the trial period: If you do not have a Visual Studio license, by logging in you can extend the trial period on Visual Studio Professional or Enterprise from 30 to 120 days.
Unlocks Visual Studio: If your Microsoft account is associated with your MSDN account, your copy of Visual Studio is automatically unlocked.
If you do not want to synchronize the settings, this feature can be disabled. In the Tools menu, chose Options. Look for Synchronized Settings under Environment and uncheck the option as shown in the following screenshot:

Team Foundation Server gives you the ability to personalize your experience by choosing your own settings. Every TFS user has a profile by virtue of a login. In this recipe, you'll learn how to customize your profile in TFS.
The top right-hand corner contains the name of the logged-in user. Click on the name to open the user profile control as shown in the following screenshot:

Click on My profile to view and customize your profile. Let's go through the general settings first.
To change your profile image, click on the Change picture hyperlink, choose an image less than 4 MB and click on Save Changes.
To change the display name, click on the Edit hyperlink, change the name from Tarun to
Tarun Arora, and click on Enter.To change the preferred e-mail, click on the Edit hyperlink, change the e-mail address to
tarun.arora@outlook.com, and click on Enter.The UI SETTINGS field can be changed from default to high contrast by selecting the High contrast theme from the drop-down:

Switch over to the locale settings by clicking on the LOCALE tab. The language and time zone settings can be changed from here.
User profile settings only apply to the individual; these settings will not impact other users. Your profile should now have an image, display name, preferred e-mail address, and a theme of your choice. Any alerts you may configure for Work Item, build, and code review will be delivered to your preferred e-mail address.
The time zone settings in TFS will override the time zone settings of the machine. For example, if your machine is in the UTC + 1 time zone, but your profile is configured to UTC + 5:30. On creating a new Work Item, the created time in the Work Item will be UTC + 5:30 and not UTC + 1.
Note
There are certain functions in the Team Foundation Server that are influenced by the time zone settings of where the Team Foundation Server is hosted. For example, if your Team Foundation Server is hosted in Washington, USA, and part of your distributed Team is in Delhi, India, the current sprint would end based on when the day ends in Washington.
When the profile is opened within the scope of a Team Project, you'll see the My alerts option in the Profile menu. Alerts allow you to configure e-mail notifications when certain events occur within a Team Project. For example, build completion, Work Item assignment, and so on.

Clicking on My alerts will launch the window to manage your TFS Alerts. Basic and Custom Alerts can be managed from within this window. Alerts can be customized with clauses. The window also contains a link to the advanced alerts management page that can be used to manage the Team Alerts.
In TFS, a Team Project is a logical container that stores artifacts such as Work Items, code, builds, and releases. Different Teams follow different processes to organize, manage, and track work. TFS allows process specification via Process Templates. The Scrum, Agile, and CMMI template are offered out of the box. The Process Template defines the set of Work Item types, queries, and reports that can be used to plan and track the project. In this recipe, you'll learn how to create a new Team Project using the Scrum Template.
Team Projects cannot be created from the Team Portal; in this recipe, we'll be using Team Explorer to create a new Team Project. If you haven't already, connect Team Explorer to TFS. Refer to the Connecting to TFS using Team Explorer recipe for more information on how this can be done.
In order to create a new Team Project, you will need the following permissions:
Create new projects permission: You inherit this permission by being a member of the Project Collection Administrators group. The Team Foundation Administrators global group also includes this permission.
Create new Team sites permission: This permission is granted by adding the user to a SharePoint group with full control rights on the SharePoint site collection. You don't need this permission if you decide not to create a SharePoint site as part of the Team Project creation.
In order to use the SQL Server Reporting Services, you must be a member of the Team Foundation Content Manager role in Reporting Services.
Note
To verify whether you have the correct permissions, you can download the Team Foundation Server Administration Tool from CodePlex available at https://tfsadmin.codeplex.com/. TFS Admin is an open source tool available under the Microsoft Public license (Ms-PL).
Open Visual Studio 2015 and connect Team Explorer to TFS:
From the Projects and My Teams submenu, click on New Team Project.... This will bring up the new Team Project creation wizard:

Enter the Team Project name and description, and click on the Next button:

Select the Scrum Process Template and click on Next. This is possibly the single most important decision you make as part of the Team Project creation process. Learn more about the differences between Process Templates at https://msdn.microsoft.com/library/vs/alm/work/guidance/choose-process.

Choose the Create a new SharePoint site option. Click on Configure... to specify the location for the new site. If you do not have SharePoint integration, chose the option to not configure a SharePoint site.

This source control selection screen presents the second most important decision that you'll be asked to make as a part of the Team Project creation process. TFS supports both centralized (TFVC) and distributed (Git) source control systems. In Chapter 2, Setting Up and Managing Code Repositories, we'll go deeper into both source control types. Choose Team Foundation Version Control and click on Next:

Once you have reviewed the settings, click on Finish to start the Team Project creation process:

Once the Team Project creation completes, you'll see a completion status on the form. Click on the View the team project creation log hyperlink (we'll discuss the contents of logs in the How it works… section).

Team Explorer is now updated with the details of the newly created Team Project:

The Process Template defines the set of Work Item types and reports that will be used to plan and track the project. The Process Template also applies the Work Item workflows and state transitions. Let's look at how the out-of-the-box templates differ broadly from one another:
The Scrum Template is designed to support the Scrum framework as defined by the Scrum organization. This Process Template tracks bugs at the same level as Product Backlog items and tracks estimates using an Effort field.
The Agile Template is designed to support Agile development for Teams that don't want to be restricted by Scrum. It supports estimating User Stories by using Story Points. Tasks contain fields to track the Original Estimate, Remaining, and Completed work fields. While originally the Agile Template didn't allow bug tracking on any backlog page, this can optionally be configured through Team settings in Team Portal.
The CMMI Template is designed to support formal change management processes. This template supports the estimated requirements using a Size field. Tasks contain fields to track original estimate, remaining, and completed work fields.
The out-of-the-box templates are designed to meet the needs of most Teams. All of them support using the Agile planning tools to create the Product Backlog and work in sprints with the task board. If your Team has different needs, you can customize a template and then create the Team Project, or you can create a Team Project from a template and then customize the project.
You can download the Process Template by going into the Process Template Manager from the Settings view in Team Explorer. Refer to https://msdn.microsoft.com/Library/vs/alm/Work/guidance/manage-process-templates for further instructions on how to download the Process Template.

Open ProcessTemplate.xml from the earlier download location; you'll note that it follows an XML structure that constructs a sequence of plugins and instructions for setting up the plugins. The Main Template is linked to sub modules that are defined by other XML structures. In the following representation, you'll see the correlation between these XML Templates and the instrumentation generated from the project creation workflow. Process Template customization is discussed in detail in Chapter 8, Extending and Customizing Team Foundation Server.

The following items are created for you as part of the Team Project creation process:
Code Repository: A code repository based on your selection is provisioned.
Team: A default Team with the same name as the Team Project is provisioned.
Area Path: A default Area Path with the same name as the name of the Team is provisioned. The Teams backlog is configured to show Work Items assigned to this Area Path.
Iteration Path: The set of iterations is precreated for the Team.
Team Portal: The Team Portal allows the Team members to connect to TFS to manage source code, Work Items, build, and test efforts.
Team Room: A room with the same name as the Team is provisioned. Team room is meant to be used for collaboration.
If your Team Foundation Server is configured to support SharePoint project portal and reporting, you'll see the Documents and Reports hub in Team Explorer. The Documents view offers deep integration with the SharePoint project portal. This allows you to create document libraries and organize and share documents with your Team members. The Reports view gives you a collection of precreated SSRS reports that you can use to track and manage the progress of work in your Teams:

A Scrum Team consists of a product owner, a development Team, and a Scrum master. While your stakeholders aren't part of the Scrum Team, they will need visibility into the product backlog. The Scrum Team is cross-functional and will have the skills to cover design, development, testing, and deployment of the increment. From a tooling point of view, not everyone in the Team may need the same access to TFS.
TFS offers three access levels: Stakeholder, Basic, and Advanced. The TFS license required for the access levels is listed here:
The product licensing has been significantly simplified over the last year. A few key licensing changes have been introduced in TFS 2015 and now in TFS 2015 Update 1:
The TFS CAL license has been changed to include access to even more TFS features:
Agile planning: All backlog management and sprint planning capabilities in TFS 2015 web access are now available to any user with a TFS CAL.
Chart authoring: Chart authoring and the ability to pin/share charts to your project home page are now available in the CAL.
Team Rooms: Team Rooms are now available with a CAL in TFS 2015.
Test Hub: With TFS 2015, the web-based test experience for executing test cases (for User Acceptance Testing such as scenarios) is now available in the TFS CAL.
Buying Visual Studio Team Services, Professional, or Advanced license gives you a free TFS CAL for that named user with it. This provides several advantages:
You can now "rent" a TFS CAL. Rather than having to pay a onetime $499 (list price) license cost, you can pay a much lower monthly cost for as long as you need it.
Companies using vendors/contractors now have a simple way to manage people who need temporary access to their TFS.
The CAL is "always up to date". Because it is a subscription rather than a onetime purchase, you don't have to deal with buying/renewing your CALs when new TFS versions come out. The CAL that comes with a VS Online license works with any TFS version, whereas a traditionally purchased CAL supports only a given TFS version and earlier.
Access Level and Role are two separate things in TFS. Access Level dictates the features you have the right to use, the Role dictates the permissions. For example, with the basic license, the Access Level includes grants for source control use; however, if you are in the reader role, you will not have permissions to edit the source code.
The Team Foundation Server Access Levels are closely related to the typical roles in a software project and the activities carried out in those roles. The following table summarizes the feature to access level mapping. So a project supporter will only need a stakeholder license, a project manager or developer will need a basic license, and a tester or portfolio manager will need an advanced license.
Feature
Stakeholder
Basic
Advanced
View and edit all Work Items
Yes
Yes
Yes
Standard features
Yes
Yes
Yes
Agile boards
Yes
Yes
Yes
Basic backlog and sprint planning tools
Yes
Yes
Yes
Chart viewing
Yes
Yes
Yes
Chart authoring
Yes
Yes
Code
Yes
Yes
Build
Yes
Yes
Request and manage feedback
Yes
Web-based Test execution
Yes
Yes
Web-based Test case management
Yes
Team rooms
Yes
Yes
Administer account
Yes
Yes
Advanced home page
Yes
Yes
Advanced backlog and sprint planning tools
Yes
Yes
Advanced portfolio management
Yes
Yes
Analyze test results and manage machine groups
Yes
Yes
With stakeholder access, users can create and modify all Work Items, and create and save queries on all Work Items under their
My Queriesfolder. (This is a change from limited access, in which users can create and modify only those Work Items that they created, and query and view Work Items they created.) Also, stakeholders can create and modify Work Items using Team Foundation clients such as Microsoft Excel, Microsoft Project, and Microsoft Feedback Client.Can view backlog pages and Kanban boards and add Work Items through the Quick Add panel, which appear at the bottom of the list. It can't move items on the page or use other features.
Can view sprint pages and task boards and add Work Items, but can't use other sprint planning tool features.
To set up new users in TFS, the user first needs to be assigned a license and then added to a Team. In this recipe, you'll learn how to allocate licenses and add members to a Team, you'll also learn how to audit user access in TFS.
In this recipe, we'll be allocating the license and permissions to the following users in the FabrikamTFVC Team Project.
|
Name (username) |
Access Level |
Comments |
|---|---|---|
|
John Smith
|
Stakeholder |
John usually provides feedback via the feedback client and creates Work Items in the product backlog. |
|
Brian Miller
|
Basic |
Brian is a developer and spends most of his time programming and unit testing. |
|
Aaron Cook
|
Basic |
Aaron is a developer and spends most of his time programming and unit testing. |
|
Willy Peter
|
Basic |
Willy is a scrum master and developer on the Team. Willy mostly focuses on integration and SQL Server report development. |
|
Annu Arora
|
Advanced |
Annu is a tester and spends most of her time functional and performance testing. |
|
Tom Hacker
|
Advanced |
Tom is a business analyst and spends most of his time programming and integration testing. |
|
Chris Wang
|
Advanced |
Chris is the product owner. He manages the product vision and portfolio. |
In order to add new users to the Access Levels, you'll need to be a collection administrator. To add new users to a Team Project, you need to be a project administrator; if you aren't already, arrange to be added to these groups.
Log into Team Portal and navigate to the Access Level administration screen by browsing to
http://tfs2015:8080/tfs/_admin/_licenses:
From the left panel, click on the Stakeholder access. From the right panel, click on the Add button and choose Add Windows user or group. In the Add new user or group window, enter the user details as TFS2015\JohnS and click the OK button:

Repeat this step to add all users into the Access Levels as specified in the user table in the Getting ready section of this recipe. At this point, you should have one Stakeholder, three Basic, and three Advanced users.
There are two ways to add users to the Team Project. One way is to navigate to the FabikamTFVC project security screen in Team Portal by browsing to
http://tfs2015:8080/tfs/DefaultCollection/FabrikamTFVC/_admin/_security. From the left panel, click on the Contributors group, from the right panel, click on the Members tab and the Add... button to add Windows user or group. Enter the user details and click on OK:
The other option is to navigate to the FabrikamTFVC project home page by browsing to
http://tfs2015:8080/tfs/DefaultCollection/FabrikamTFVC. From the Members widget, click on Manage..., in the MANAGE MEMBERS OF FABRIKAMTFVC TEAM window enter the user details and press OK. Repeat these steps to add other users listed in the user table in the getting started section.
In the next few steps, you'll learn how to extract an audit log to track the last login of users and groups and their access type:
Navigate to the Access Level screen in Team Web Access by browsing to
http://tfs2015:8080/tfs/_admin/_licenses.From the left navigation, click on Export audit log. Open the downloaded CSV file; we'll explore this in depth in the How it works... section.

The default Access Level is assigned to a user that is directly added via the Team Project security or members screen. It is recommended that the default Access Level be set to Basic. If a user is assigned to multiple Access Levels, the highest always takes precedence.
Next, let's review the audit log, import the data.csv into Excel. You should see a view similar to the following screenshot. The Last Accessed (UTC) column tells you whether the user has accessed TFS or not; you don't need to pay for a license for users that have not accessed TFS.

The Team Portal home page was traditionally used to pin charts, Work Item counts, and build status tiles to provide an at-a-glance view of the project to the Team members and stakeholders. The approach did not work well because the home page had hard-coded tiles that you were forced to have on the page. In addition, the page did not support grouping of the tiles or adding commentary to complement the visuals in the tiles. In TFS 2015 Update 1, the home page has been replaced by a new feature called Dashboards. The new feature comes with a library of widgets that can be used to create multiple Dashboards for your Team. In this recipe, you'll learn how to create a Dashboard using the widget catalog.
For permissions, you need to be a Team Administrator to create Dashboards. Only Team Administrators can create, customize, and move around widgets on a Dashboard. You don't need any special permissions to view the Dashboards. All Team members that have access to the Team Portal can view and interact with Dashboards.
The Team Portal home page has been replaced by the Overview Dashboard. All existing tiles from the home page have been migrated over into the Overview Dashboard. To see the Overview Dashboard, navigate to the FabrikamTFVC Team Portal by browsing to http://tfs2015:8080/tfs/DefaultCollection/FabrikamTFVC/_dashboards.
In the FabrikamTFVC Team Portal, click on the + icon to create a new Dashboard. Name the Dashboard
Team Updates:
From the bottom-right of the page, click on the big green circle to launch the Dashboard widget gallery. From the widget gallery, add the code tile:

Once the tile is added to the Dashboard, click on the tile to configure it. Set the name as
All Code Changesand set the code path to$/FabrikamTFVC. The tile will show the count of code changes under the source path$/FabrikamTFVCfrom the last 7 days. To commit the configuration changes, and click on Save:
Next, add the Query tile widget from the widget gallery. Select the Blocked Tasks query to map the query results to be displayed in the tile. Configure the background color to red if the count is greater than or equal to 1:

Format the background color of the tile based on the count of Work Items returned by the Work Item query
Add the Markdown widget. The widget is capable of render markdown; the tile can be scaled to different sizes. Choose the 3 x 2 size and add some commentary as indicated in the following screenshot:

The gallery has other widgets such as Work Item Query Results, New Work Item, Team Rooms, Sprint Capacity, Burndown, and other links; these can also be added to the Dashboard. There are no widgets for charts. Charts can be added from the charts view in the work hub, and this is covered in detail in the Creating charts using Work Item Queries recipe in Chapter 3, Planning and Tracking Work.
Dashboards provide a great way to create information radiators for sharing information internally with Team members and externally with stakeholders. Widgets are rendered as tiles in the Dashboard, the tiles use the TFS REST API to retrieve information from TFS. The information is loaded into the tiles using the template provided by the widget. The tiles can be moved around on the Dashboard and scaled to different sizes. The tiles support interactivity, for example clicking the Query tile would take you straight into the Work Item Query window. The tiles don't support cross-tile interaction yet. While it's possible to create multiple Dashboards, it is currently not possible to apply permissions for access to individual Dashboards. It is expected that in the long term more widgets will be added to the widget gallery and the API's will be made available to extend and create new widgets.
It is hard to summarize the objective of the Team Project by just its name or description. Software Teams are usually found creating introduction documents or README files to summarize the purpose of the project with references to other useful material. Traditionally, Teams would store these files in SharePoint. This information is all the more useful when seen in context with the Team Project. A new feature called project welcome pages provides the perfect solution here. In this recipe, you'll learn how to set up welcome pages using markdown files.
Project welcome pages are created using a very simple convention-based approach. The welcome page simply renders the markdown files checked into the source control of the project.
Note
For TFVC-based source control, the readme.md file needs to be at the root of the Team Project folder. For Git-based source control, the readme.md file needs to be at the root of the repository in the default branch.
Team project welcome pages require the underlying file to be written in a markdown format. Markdown is intended to be easy to read and easy to write with the main emphasis on readability. TFS offers a markdown editor in Team Portal to help you author the welcome pages. You can alternatively choose to author your markdown files using a desktop editor.
Open Team Web Access and navigate to the FabrikamTFVC Team Project
http://tfs2015:8080/tfs/DefaultCollection/Recipes.From the home hub, select the welcome view and click on Edit to start editing the
readme.mdmarkdown file.Copy the markdown snippet into the editor:
# Welcome to the FabrikamTFVC
----------
The team project contains the resources for the Fabrikam Software & Services.

## Contacts
---
* Project Owner - Tarun Arora [@arora_tarun](https://twitter.com/arora_tarun)

## Definition of Done
  All product backlog items need to abide to the definition of done before they can be marked done
 1. All source code is checked in
 2. All code passes CI & no failing unit tests
 3. Business services code coverage of > 60%
 4. All changes have been tested
 5. Deployment script added & updated
 6. Demo to Product Owner
     7. All associated tasks must be completed
## Definition of Bug
*Work in progress*
In the toolbar at the far right corner, you'll see the Show Content Preview icon. Click on the preview icon, the welcome page will now be rendered using the markdown:

Click on the Save icon to check in the
readme.mdfile into version control.
TFS supports common markdown conventions and GitHub-flavored extensions.
Tip
You can learn more about the Markdown syntax at http://bit.ly/1jJjRlI.
You can find out more about the GitHub-Flavored-Markdown at http://bit.ly/1jJl38D.
To simplify creating and editing markdown content, Team Foundation Server lets you link to other markdown files through both absolute and relative paths. When markdown is rendered as HTML, all headings automatically get IDs, so you can link to the headers by using the following convention [text to display](#heading id).
TFS also allows you to refer to a markdown page that does not yet exist; the engine is smart enough to give you the option to create the page when you click on the referred link. You can use the following format in markdown to do so: [new page](./newpage.md).
Collaborating is key to the success of any project delivery. While there are lots of ways to collaborate with your Team members, it is very difficult to track those conversations back to the context of the work. TFS offers a collaboration hub called Team Room and that makes tracking work, project updates, and Team collaboration easy. In this recipe, you'll learn how to create, set up, and use a Team Room.
Permissions required: Project Administrators groups can create and administer Team Rooms that they've created. Team administrators can only manage Team Rooms for Teams they're administrators of.
License required to access Team Rooms: Only Basic and Advanced license users have access to Team Rooms. Stakeholders cannot access Team Rooms and need to be upgraded to Basic to participate in Team Rooms.
Navigate to the Team Web Access home page by browsing
http://tfs2015:8080/tfs/_home.From the top panel, click on the Rooms tab, this will navigate you to the Team Room's hub. In this page you'll see a list of all available Team Rooms. A Team Room is created along with the creation of a Team Project:
Click on the New button to create a new Team Room. Enter the name as
FabrikamShipRoom. Click on OK to navigate to theFabrikamShipRoom:
Click on the Manage events... link to choose which TFS events are visible in the
FabrikamShipRoom:
From the Code changes tab, add a Team Project. The Team Room is not Team Project-specific, so you can select multiple Team Projects. You also have an option to select if you want all changes or changes specific to the users in the Team Room. In this case, choose the FabrikamTFVC, select By a room member, and click on Save and close.

Repeat these steps to enable events for Work Items, build, code reviews, and pull requests.
Click on the Manage users... link and choose Add TFS group to select FabrikamTFVC. This will add all FabrikamTFVC Team members to the
FabrikamShipRoom. To commit your changes click on Save:
In the post a message textbox, copy the following text:
Welcome @Aaron Cook @Annu Arora @Brian Miller @Chris Wang @John Smith @Tom Hacker @Willy Peter to the #FabrikamShipRoom :):
Increase Team productivity by discussing work in progress, asking questions, sharing status, and clarifying issues that arise. Your Team Room provides an area for fostering and capturing communication among Team members, both near and far. Team Rooms are not scoped to a Team Project collection, so you can track multiple projects in a Team Room. Team Rooms allow you to see conversations by date, to see historic conversations, click on the left arrow in the top bar in the Team Room. You can alternatively select a date from the calendar.
The manage events give you access to various events as follows:
The build events: When any of the following build definition is complete, an event will appear in the room indicating the status of the build.
Code changes: When code is pushed or checked into one of the following Team Projects, an event will appear in the room. You can opt to scope this to just members in the Team Room or anyone.
Work item updates: When a Work Item is created or an existing Work Item has the state or assignment changed in/under one of the following area paths, an event will appear in the room.
Code reviews: When a code review is created in/under one of the following area paths, an event will appear in the room.
Pull requests: When a pull request is created, approved, rejected, or completed in one of the following repositories, an event will appear in the room.

As you can see in the preceding screenshot, since the FabrikamShipRoom has a subscription for Work Items an alert gets published in the Team Room when product backlog ID 1 is created. The Team collaborates to figure out the root cause and fixes the issue.
Note
By prefixing a Work Item ID with #, TFS fully qualifies it. Clicking on #3 in the Team Room navigates you directly into the Work Item form for Work Item ID 3.
By clicking on the audio icon on the right panel, you can optionally mute and unmute the sound on new messages in the Team Room. The data for the Team Rooms is saved in Team Foundation Server. It is possible to retrieve the Team Room data using the TFS REST API's, we'll be covering this in Chapter 8, Extending and Customizing Team Foundation Server.
By default, a Team Room gets created with every Team or Team Project you create. Team Rooms can be renamed. It is also possible to delete a Team Room. However, once a Team Room has been deleted, it is not possible to recover the Team Room or any conversations from the Team Room. You'll see the Rename and Delete option in the context menu by clicking on the left of the Team Room name from the left panel in the Team Room hub.
Note
Interested in seeing which Team Rooms are most vibrant? The most recently accessed Team Rooms show up in the Team web access landing page.
Tip
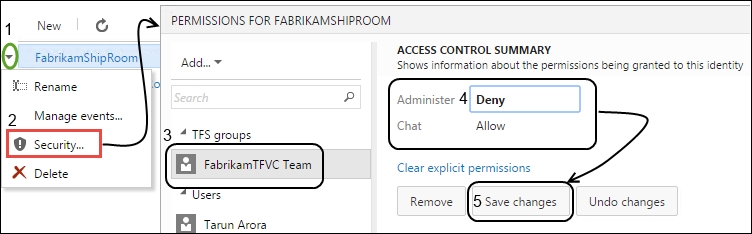
It is possible to manage Team Room permissions at a granular level. Choose Security... from the FabrikamShipRoom context menu. Both Chat and Administer permissions can be set to Allow or Deny from here. By setting the chat to Deny you limit the user to being a read only participant in the Team Room.
As your software evolves, at times you may find that the Team Project name you chose at the outset doesn't quite lend itself to the purpose of your project any more. Up until TFS 2015, it was fairly impossible to rename a Team Project once it was created. Team Project Rename has been the most voted feature on the Visual Studio User Voice website with over 6,000 votes. TFS 2015 now allows you to rename a Team Project. While the product has made it very simple to rename a Team Project, it is still a very disruptive process. In this recipe, you'll learn how to rename a Team Project and also go through the nuances of how to do so and what to watch out for when renaming a Team Project.
A Team Project Rename updates all of your version control paths, Work Items, queries, and other Team Project artifacts to reflect the new name. Team Projects can be renamed multiple times and older names can be reused as well. It is recommended to perform this action during off hours to minimize any impact. Things to consider are as follows:
In order to rename a Team Project, you need to be a member of the project administrator group.
Builds running during the rename might fail.
All users will need to restart Visual Studio.
Git remotes will need to be updated with the new project name.
Version control workspaces will need to be corrected by running the latest get version command.
Note
If individuals in the Team are using local workspaces then it is recommended to upgrade to Visual Studio 2013 update 5 or Visual Studio 2015 (release candidate or newer) to have the workspaces auto corrected for them at the next get. If they continue to use an earlier version of Visual Studio, then they will need to shelve any pending changes, create a new workspace, and unshelve their changes.
There are two entry points to the Project Rename feature through Team Web Access.
Navigate to the administration page for the Team Project by browsing
http://tfs2015:8080/tfs/DefaultCollection/FabrikamTFVC/_admin/.On the left where the project name and description for the project are listed, you can click on the project name textbox to amend the name:

Navigate to the collection administration page by browsing
http://tfs2015:8080/tfs/DefaultCollection/_admin.Rename the Team Project from the context menu:

Change the name of the project from
FabrikamTFVCtoFabrikamand proceed. You will receive a project rename warning message. Please read the warning message carefully and make sure that the users of the Team Project are aware of the rename.Note
When a Team Project is being renamed, any browsers with the Team Project opened may encounter some errors. These errors are due to caches held by the browser, which include the old Team Project name.

Tick the checkbox to acknowledge the warning and click RENAME PROJECT. The dialog will show the status. Click on Close once the rename is complete.

In this section, we'll focus on actions that need to be performed by the Team once the Team Project rename has been completed.
Restarting the editor: The editor you used to connect to the Team Project needs to be restarted. Be it Team Explorer, Eclipse, Office, Microsoft Test Manager, or any additional clients using the TFS Object Model.
Updating query-based test suites: Unlike Work Item queries, query-based test suites are stored differently and can't update the Team Project name after rename. If you have any query-based test suites, open those suites in the browser and update the queries to use the new Team Project name.
Updating SharePoint Team Sites and Reporting Integrations: Both SharePoint and Reporting Services Integrations continue to work, but some reports will not work as expected until the new Team Project name is populated. The old project name is still present until caches are updated with the new name. The reporting and SharePoint server administrator can manually run these jobs to immediately populate the new name.
Note
A Team Project name can't be reused if there are still workspace mappings addressing it. This is done to avoid the ambiguity case where a workspace can be mapped to two projects. You will need to reach out to the users that have these mappings and either delete them or update them to use the new name.
As a Team Foundation Server administrator, you'll find yourself creating Team Projects over and over again. Team Project creation process can be scripted thanks to Team Foundation Server Power Tools. A Team Project is a container that can host multiple Teams and simplifies sharing of various artifacts such as processes, master backlogs, build definitions, and code artifacts. More often than not, you'll find that a new Team Project has been requested in ignorance simply because the requestor doesn't fully understand how multiple Teams can be accommodated in a Team Project. It is always beneficial to have a conversation to fully understand why a new Team Project has been requested. In this recipe, you'll learn how to script the creation of a new Team Project using the command line.
Microsoft Visual Studio Team Foundation Server Power Tools are available through the Visual Studio Gallery. Power Tools are a set of tools, enhancements, and command-line utilities that can make a TFS administrator more productive. Download and install the Power Tools by browsing to http://bit.ly/1jJkEmt:

Download the Microsoft Visual Studio Team Foundation Server 2015 Power Tools from the Visual Studio Extensions Gallery
Installing TFS Power Tools installs the command-line utility Tfpt.exe. Tfpt.exe is a companion tool to tf.exe that offers additional version control commands, Work Item tracking, and Team Project manipulation. Open up a new command line and type tfpt.exe /?. If you do not see a list of available commands as shown in the following screenshot, the Power Tools haven't been installed correctly. Verify the installation before proceeding.

Create a new folder
TFSCookbook\Chapter01in theC:\ drive. Copy the text as follows in Notepad and save it toC:\TFSCookbook\Chapter01assettings.xml:<?xml version="1.0" encoding="utf-8"?> <Project xmlns="ProjectCreationSettingsFileSchema.xsd"> <TFSName>http://tfs2015:8080/tfs</TFSName> <LogFolder>C:\TFSCookbook\Chapter01</LogFolder> <ProjectName>ScriptedTeamProject01</ProjectName> <ProjectReportsEnabled>true</ProjectReportsEnabled> <ProjectSiteEnabled>true</ProjectSiteEnabled> <ProjectSiteTitle>ScriptedTeamProject01</ProjectSiteTitle> <SccCreateType>New</SccCreateType> <ProcessTemplateName>Scrum</ProcessTemplateName> </Project>In command prompt run the following command:
tfpt createteamproject /settingsfile:"C:\TFSCookbook\Chapter01\settings.xml" /validate /verboseYou should receive a message confirming whether the validation is successful. If not, check the error message against the information in the settings file:

To create the Team Project, run the earlier command by removing the
/validateswitch.tfpt createteamproject /settingsfile:"C:\TfsCookbook\Chapter01\settings.xml" /verboseWait for the Team Project creation process to complete.
The Team Project creation command takes the settings.xml file as an input; let's review the information that was provided in settings.xml:
TFSName: This tag is used to specify the connection details of the TFS Server where you want the new Team Project to be created.LogFolder: This tag is used to specify the folder directory for the log file. This path should exist on the TFS application tier.ProjectName: The Team Project name. If you specify a Team Project name that already exists, the Team Project creation process will fail during the validation process.ProjectReportsEnabled: Certain default project reports are created as part of the Team Project creation process. This tags accepts a Boolean value; passfalseto skip the default reports from being added.ProjectSiteEnabled: If your Team Foundation Server installation has SharePoint services enabled, you can pass a value oftruein this tag to have a SharePoint Team site created for the new Team Project.ProjectSiteTitle: This tag is ignored if the value ofProjectSiteEnabledisfalse. This tag is used to specify the name of the SharePoint Team site you have chosen to create as part of the Team Project creation process.SccCreateType: If atruevalue is passed in this tag, a new TFVC source control is created, alternatively an existing TFS source control path can be passed to create a TFVC source control from the contents of the specified TFS path.ProcessTemplateName: This tag is used to pass the name of the Process Template that the Team Project should be based on.Note
A list of all Process Templates available on your Team Foundation Server can be seen from Process Template Manager. To access Process Template Manager, open Visual Studio and connect to Team Foundation Server. From Team Explorer choose Settings. From the Settings view, click on Process Template Manager.
Now, let's review the createteamproject command:
tfpt createteamproject /settingsfile:"C:\TFSCookbook\Chapter01\settings.xml" /validate /verbose
The /settingsfile path is used to specify the location of the settings file. TFPT parses the settings file and triggers the Team Project creation process by connecting to the Team Foundation Server using the details specified in the settings file. The Team Project isn't created when the /validate switch is used; the whole process is run as a validation to identify any potential issues. The /verbose flag is used to log details of the operations being performed during this process. The verbose option can be very useful when troubleshooting issues.
The tfpt.exe command-line tools also provide many other useful commands. The two worth mentioning are addprojectportal and addprojectreports.
addprojectportal: Over time, one may recognize the need for creating or moving the project portal. This command supports both operations in an existing Team Project.tfpt addprojectreports /collection:http://tfs2015:8080/tfs /teamproject:"Fabrikam" /processtemplate:"Scrum" /webapplication:"" /relativepath:"pathfromwebapp" /validate /verboseaddprojectreports: The add reports operation creates the reports in the chosen Team Project. This command overwrites the reports if they already exist.tfpt addprojectreports /collection:"http://tfs2015:8080/tfs" / teamproject:"Fabrikam" /processtemplate:"Scrum" /validate /verbose
Deleting a Team Project permanently removes data associated with that project from the database. The data cannot be recovered later. Therefore, you should save Team Project data that you might want to access later. In this recipe, you'll learn how to delete a Team Project using the TFS Admin Console and the command line. We will also review the difference between the two approaches.
In order to delete the Team Project, you should be a member of the following groups:
Team Foundation Administrators group
SQL Server Administrators group
Farm Administrators group for SharePoint products (this is only required if TFS has been configured to integrate with SharePoint)
In this recipe, we'll review the two available options to delete a Team Project. The first option is to delete it from the TFS Admin Console, and the other option is to delete it from the command line. When a project is deleted from the admin console, any associated reports and SharePoint portal projects need to be manually deleted. The TFSDeleteProject command-line tool deletes all artifacts.
First let's look at how to delete the Team Project from the Team Project Administration Console:
Log into the server that hosts your Team Foundation Application Tier.
Open the Team Foundation Administration Console window and, from the left panel, click on Team Project Collections. Click on the Team Projects tab to see projects in the default collection:

Select the Fabrikam Team Project and click on Delete:

In the Delete Team Project window, select Delete external artifacts and Delete workspace data. Click on Delete button to continue.

The deletion workflow is triggered, flip to the Status tab to track the progress:

While all links to the project portal will be removed from Team Web Access, the SharePoint site that acts as the portal will need to be deleted manually from SharePoint Central Administration.
Now, let's look at how to delete the Team Project using the tfsdeleteteamproject command-line tool:

The command-line utility offers a few more switches:
/q: This is an option switch; it enforces quite mode wherein no prompts are raised for confirmation during the deletion process./force: This is an optional switch; it enforces that the deletion process should continue even if some components cannot be deleted./excludewss: This is an optional switch. If you do not want to delete the SharePoint site associated with the Team Project, use this switch.
The tfsdeleteproject command carries out the deletion in two phases. The first phase deletes the project data that includes data in version control, build and test manager, components of the Team Project in Team Explorer, Work Items, and any Work Item fields that exclusively belong to the Team Project. The next phase deletes the project websites. This includes any reports associated to the Team Project as well as project portals on SharePoint.
Note
If you try to access a Team Project that has been deleted, you are likely to get this error message. TF200016: The following project does not exist. Verify that the name of the project is correct and that the project exists on the specified Team Foundation Server.
The following data may remain undeleted when using tfsdeleteproject:
Team Project data in the cube: The Team Project data in the cube will only be removed with the next rebuild. The default rebuild for the warehouse is set to 2 hours.
Build drop files and folders: Build binaries, build log files, and log files containing test results are published during the build process. The locations for these files are not deleted. These files need to be manually removed from the folder locations.
Shared Work Item tracking metadata:
tfsdeleteprojectdoes not delete any metadata for Work Item tracking that is shared between Team Projects.Version control shelvesets containing shared code: Version control shelvesets are not deleted if code in the shelveset is from multiple Team Projects.


