Download code from GitHub
Chapter 1: Setting Up for AR Development
Augmented reality (AR) is widely recognized as the next-generation computing platform where digital content is seamlessly merged into real-world experiences. This book will help get you started with developing your own AR applications using the Unity 3D game engine and the AR Foundation toolkit provided by Unity.
In this chapter, you will take your first steps by setting up your computer for AR development using the Unity 3D game engine. We will begin by briefly defining augmented reality, thus setting the context for this industry and some of the basics of AR technology. We will then install the Unity software, the AR Foundation toolkit, and make sure your system has been set up to develop for Android and/or iOS mobile devices. Finally, we'll build and run a test scene to verify things are working as they should.
We will cover the following topics:
- Defining augmented reality
- Getting started with Unity, including installation and using Unity
- Preparing your project for AR development, including XR plugins, AR Foundation, Input System, and the Universal Render Pipeline
- Setting up for mobile development (Android ARCore and iOS ARKit)
Note for Experienced Readers
If you are already familiar with Unity, already have it installed on your system, and are set up to build for your iOS or Android mobile device, you may be able to skim through details related to those topics that are interspersed in this chapter.
Technical requirements
First, you need a PC or Mac that's capable of running Unity. The minimum requirements are not difficult; almost any PC or Mac today will be sufficient (see https://docs.unity3d.com/Manual/system-requirements.html).
If you are developing for iOS, you will need a Mac running OSX with the current version of XCode installed, and an Apple developer account. If you are developing for Android, you can use either a Windows PC or Mac. We will discuss this further throughout this chapter.
It is not practical to develop for AR without a device capable of running your application. For this chapter (and this book as a whole), you will need either an iOS device that supports Apple ARKit (search the web as Apple does not appear to publish a list; for example, https://ioshacker.com/iphone/arkit-compatibility-list-iphone-ipad-ipod-touch) or an Android device that supports ARCore (https://developers.google.com/ar/discover/supported-devices).
Because this chapter is largely about installing tools and packages according to your requirements, please work through the topics in this chapter for additional technical requirements and to learn how to install them. The GitHub repository for this book can be found at https://github.com/PacktPublishing/Augmented-Reality-with-Unity-AR-Foundation.
Defining Augmented Reality
According to the Merriam-Webster dictionary, the word augment means "to make greater, more numerous, larger, or more intense," while reality is defined as "the quality or state of being real." Considering this, we realize that "augmented reality" is all about using digital content to improve our real world to add better information, understanding, and value to our experiences.
Augmented reality is most commonly associated with visual augmentation, where computer-generated graphics are combined with actual real-world visuals. When using a handheld mobile phone or tablet, for instance, AR combines graphics with the on-screen video (I call this video see-through AR). Using wearable AR glasses, graphics are directly added to your visual field (optical see-through AR).
But AR is not simply a computer graphic overlay. In his acclaimed 1997 research report, A Survey of Augmented Reality (http://www.cs.unc.edu/~azuma/ARpresence.pdf), Ronald Azuma proposed that AR must meet the following characteristics:
- Combines the real and virtual: The virtual objects are perceived as real-world objects that are sharing the physical space around you.
- Interactive in real time: AR is experienced in real time, not pre-recorded. For example, cinematic special effects that combine real action with computer graphics do not count as AR.
To register a virtual object in 3D, the AR device must have the ability to track its location in 3D space and map the surrounding environment to place objects in the scene. There are multiple technologies and techniques for positional and orientation tracking (together referred to as pose tracking), as well as environmental feature detection, including the following:
- Geolocation: GPS provides low-resolution tracking of your location on the Earth (GPS accuracy is measured in feet or meters). This is usually good enough for wayfinding in a city and identifying nearby businesses, for example, but not for more specific positioning.
- Image Tracking: Images from the device's camera can be used to match the predefined or real-time 2D images, such as QR code markers, game cards, or product packaging, to display AR graphics that track an image's pose (3D position and orientation) relative to the camera space.
- Motion Tracking: Using the device's camera and other sensors (including inertial measurement by IMU motion sensors), you can compute your position and orientation in 3D, and detect visually distinct features in the environment. Academically, you may see this referred to as Simultaneous Localization and Mapping (SLAM).
- Environmental Understanding: As features are detected in the environment, such as X-Y-Z location depth points, they can be clusters to identify horizontal and vertical planes, as well as other shapes in 3D. These can be used by your application for object placement and interaction with real-world objects.
- Face and Object Tracking: Augmented selfie pictures use the camera to detect faces and map a 3D mesh that can be used to add a face mask or other (often humorous) enhancements to your image. Likewise, other shaped objects can be recognized and tracked, as may be required for industrial applications.
In this book, we will be using many of these techniques in real projects with Unity's AR Foundation toolkit, so that you can learn how to build a wide variety of AR applications. And we'll also be learning many other details and capabilities offered by Unity and AR software, all of which we'll use to improve the quality and realism of your graphics and provide engaging interactive experiences for your users.
Like all technologies, AR can potentially be used for better or for worse. A great exposé on a hypothetical disturbing future, where AR is ubiquitous and as consuming as today's mobile media technologies, can be found in this 2016 Hyper-Reality art video by Keiichi Matsuda (http://hyper-reality.co/). Hopefully, you can help build a better future!

Figure 1.1 – Hyper-Reality video by Keiichi Matsuda (used with permission)
In this book, we are using the Unity 3D game engine for development (https://unity.com/), as well as the AR Foundation toolkit package. AR Foundation provides a device-independent SDK on top of the device-specific system features provided by Google ARCore, Apple ARKit, Microsoft HoloLens, Magic Leap, and others. For further reading and to get a good introduction to mobile handheld augmented reality, check out the following links:
- ARCore Fundamental Concepts: https://developers.google.com/ar/discover/concepts.
- Introducing ARKit: https://developer.apple.com/augmented-reality/arkit/.
- Getting Started with AR Development in Unity: https://developers.google.com/ar/discover/concepts.
Let's start developing AR applications with Unity. First, you'll need to install Unity on your development computer.
Getting started with Unity
To develop AR applications with Unity, you need to install Unity on your development machine. In this section, we'll step through the installation process using Unity Hub, create a new Unity project, and introduce the basics of using the Unity Editor interface.
Installing Unity Hub
Unity Hub is a desktop application that serves as a portal to many of the resources developers may need to use Unity in their workflows. For now, we'll be using the Installs menu to install a version of the Unity Editor. Then, we'll use the Projects menu to create and manage our Unity projects. To do this, follow these steps:
- Please download and install the Unity Hub program from https://unity3d.com/get-unity/download. Generally, you'll always want to use Unity Hub to install versions of Unity rather than downloading a Unity version installer directly.
- If you haven't already, you may need to activate a Unity User License. This is free for the Student and Community plans; you can decide to upgrade to Plus or Pro at a later time. All license plans include the same versions of Unity; no features are disabled for free plans. The paid plans add access to professional cloud services that are very useful but not necessary for project development.
- Use the Download Unity Hub button, as shown in the following screenshot (you may need to agree to the Terms of Service first):

Figure 1.2 – Installing Unity Hub instead of downloading Unity directly
- With Unity Hub installed and open, you'll see menus for Learn and Community.
Clicking Learn takes you to Unity Learn projects and tutorials (including downloads for the various project assets). These can range from 5-minute tutorials to projects that take 15 hours to complete!
The Community menu provides links to many other Unity-hosted resources, including Unity Now conference talks, Unity Blog, Answers, Q&As, and Forums.
Now, let's install a version of the Unity Editor.
Installing a Unity Editor
When starting a new project, I like to use the latest Official Release, which has a leading edge without being a Beta or Alpha prerelease. If you are more cautious or have requirements to use the most stable release, choose the long-term support (LTS) version. These can be found under the Recommended Release heading in Unity Hub. Unity versions that are compatible with the writeups in this book are noted in the current .README file of this book's GitHub repository. Install a copy of the Unity Editor now, as follows:
- Select the Installs tab, then press ADD to open the Add Unity Version box.
- From here, you can select a version of Unity to install.
Note – Unity Versions
In the current Unity version numbering system, the major release number (for example, Unity 2020.x.x) loosely correlates with calendar years. The most stable versions are ones designated LTS, for Long-Term Support; for example, Unity 2020.3.14f1 (LTS). LTS versions receive periodic maintenance and security updates but no new features. Point releases lower than LTS (for example, Unity 2021.1.15f1) are considered technical releases, which are reasonably stable while new features and bug fixes are currently in development. For the more adventurous, Beta and Alpha prereleases include cutting-edge features but with added risks.
- Once you've selected the version of Unity you wish to install, click Next to see the Add modules to your install options. Here, you want to know what platforms and devices you expect to target with your projects.
Module software can be quite large and may take time to install, so only pick what you know you will need soon. You can always come back later and add (or remove) modules as needed. Specifically, if you are developing your AR project for Android and ARCore, choose Android Build Support. If you are targeting iOS and ARKit, choose iOS Build Support. Likewise, if you are targeting other devices such as HoloLens or Magic Leap, choose the corresponding modules.
- Depending on the modules you selected, you may need to press Next and accept an additional user license agreement. Then, press Done to download and install the software.
Tip – Where to Install Unity
Using the gear icon in the top-right of the Unity Hub window opens a Preferences window. Under the General preference tab, you can select the folder where your User Editors are installed on your computer. Since these can take up a considerable amount of disk space, you may not want to use the default location.
If you have any problems with Unity Hub or otherwise want to join in with discussions, visit the relevant section of the Unity community discussion forum at https://forum.unity.com/forums/unity-hub.142/.
Now, you're ready to create your first Unity project.
Creating and managing Unity projects
You will use Unity Hub to create new Unity projects. Projects are created in a specific folder on your system, with a set of subfolders populated with default settings and content based on the starting template you choose. Projects are opened with a specific version of Unity and continue to be associated with that specific version. To start a new project, complete the following steps:
- Open the Unity Hub, select the Projects tab, and then click the New button. Notice the down arrow of the New button, which lets you select a Unity version to use for the new project that's different from the one you currently have installed.
- The Create New Project box gives you the option to choose a Project Name, a Location where it should be created, and a starting Template. As shown in the following screenshot, I am selecting the Universal Render Pipeline template, in a folder named
D:\Documens\UnityProjects:
Figure 1.3 – Creating a new project with the URP template in Unity Hub
Note – We're Using the Universal Render Pipeline
Unity offers multiple alternative render pipelines. The legacy "built-in" render pipeline sports better support from older third-party assets as it came before the newer Scriptable Render Pipeline (SRP) system (https://unity.com/srp), but the newer SRP-based pipelines are more performant and flexible. These include the High Definition Render Pipeline (HDRP) for high-quality rendering using high-end graphics hardware. There's also the Universal Render Pipeline (URP), which is very fast, even on mobile devices, while providing excellent rendering quality. I recommend starting new AR projects with URP.
Tip – Avoid Spaces in Project Names
At the time of writing, there's a bug in some ARCore features that require that your project pathname contains no spaces, including the project name and all folder names up the tree.
- After pressing Create, it may take a few moments for Unity to create your new project, import the default assets, and perform other setup steps before opening the Unity Editor window.
Tip – Upgrading Unity Projects
A great thing about Unity Hub is its ability to manage multiple versions of Unity and all your Unity projects. I tend to start new projects with the latest official release, though inevitably, new versions of the Unity Editor will be released. In general, it's best to stick with the version of Unity you used to create your project. If you need to upgrade to a newer version, do so cautiously and deliberately.
Generally, going to a new minor update (for example, Unity 2021.2.3 to 2021.2.16) is safe. Going to a point release (for example, Unity 2021.2.x to 2021.3.x) is usually OK but you may encounter unexpected problems. Upgrading to a new major release is an unusual event for me in my projects. In any of these cases, be sure that your project has been backed up (for example, on GitHub) before opening the project in a different version of Unity, and schedule time to resolve unforeseen problems.
Unity includes automated tools to facilitate upgrading a project to a new version when it's opened in Unity. Your assets will be reimported. While upgrading to newer versions is supported, downgrading to a previous version is not.
When I create a new project in Unity, one of the first things I do is set Target Platform in Build Settings to the first platform that I know I will be using to develop and test my project. There are advantages to doing this as early as possible, as any new assets you add to the project will be imported and processed for your target platform. You are not required to do this now, but I do recommend that you perform the following steps. We will go into more detail later in this chapter (in the platform-specific topic sections).
With your project opened in Unity, follow these steps:
- Open the Build Settings window by going to File | Build Settings.
- In the Platform selection panel, choose your target platform. For example, if you're developing for Android ARCore, select Android, while if you're developing for Apple ARKit, choose iOS.
If the platform you require is not listed or is disabled, you may have forgotten to add the platform build module when you installed this version of Unity. Use Unity Hub to add the module now.
Tip – You Can Add Target Platform Modules via Unity Hub
If you are missing support for a target platform, open Unity Hub, click Installs, and then, for the specific Unity version you're using, click the 3-dot context menu and choose Add Modules. From there, you can use the checkboxes to add new modules.
- You don't need to worry about the other build settings right now. Press the Switch Platform button. It may take a few minutes to reimport your project's assets.
At this point, your Unity Editor should have opened a new Unity project, showing a default URP SampleScene. Feel free to explore the editor windows and scene objects. It may look daunting at first, but we'll review the user interface next to help you get more comfortable.
Introducing the Unity Editor interface
When you open the Unity Editor for the first time, you will notice that it has a lot of separate window panels that contain different content. Let's explore these together.
The following screenshot shows Unity Editor with the Universal Render Pipeline template's SampleScene. The windows are arranged in a default layout. This "under construction" scene demonstrates many of the awesome rendering features of Unity that may or may not be relevant in an AR project. But let's focus on Unity itself for a moment:
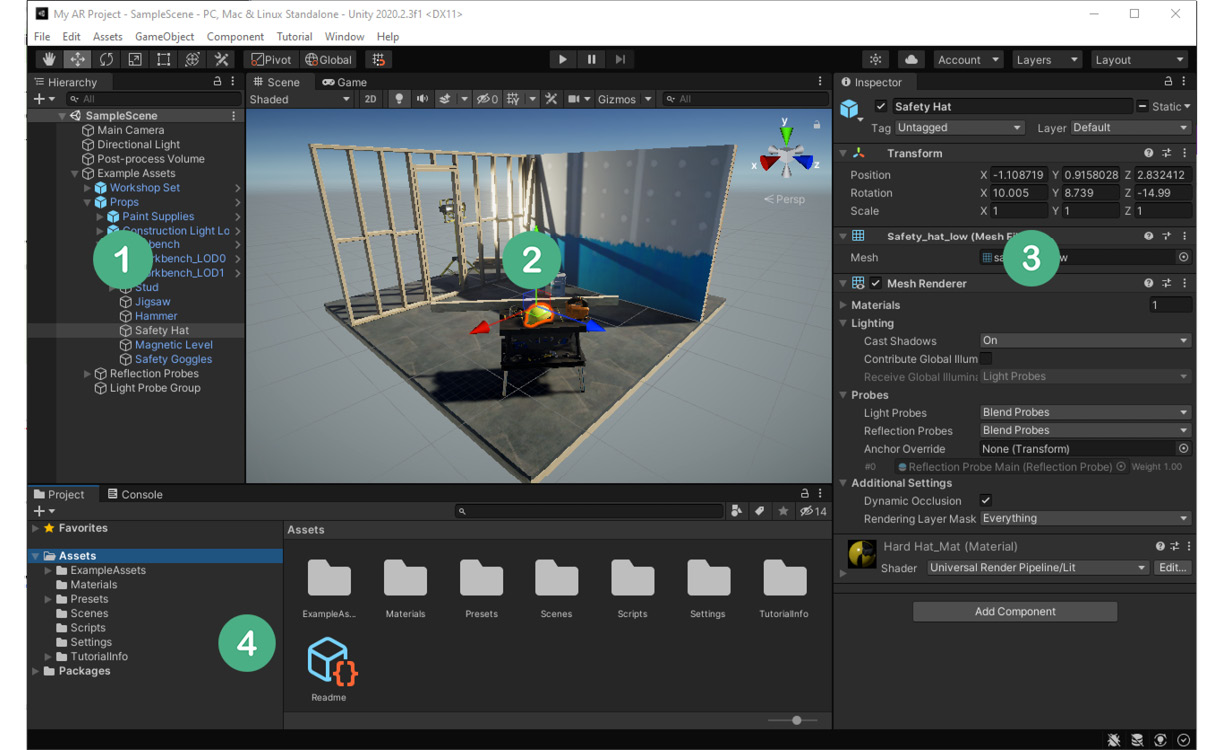
Figure 1.4 – Unity Editor with the URP sample scene open
The Unity Editor is arranged in a layout of separate tabbed windows. An Editor window is a UI panel containing specific types of information and controls. More windows can be opened via the Window main menu. Let's review each window in the preceding screenshot and introduce some other fundamental terminology since you're getting to know Unity:
- Hierarchy window (1): The tree view of the current scene's GameObjects. Shows the same content as the scene in a hierarchical tree view of parent-child objects.
You may have noticed in the preceding screenshot that, while examining both the Scene and Hierarchy windows, the Safety Hat GameObject is currently selected and highlighted. A Unity GameObject is an object that is part of a scene.
- Scene view window (2): This shows a 3D view of the current scene. Along the top of the scene window is an icon toolbar for controlling your working view of the scene.
- Inspector window (3): The components and properties of the selected GameObject.
GameObjects have components attached that define the runtime behavior of a GameObject. Unity includes many built-in components, and you can write your own using the C# programming language. Each component may have individual properties; that is, settings that control the component.
You can see that the Safety Hat has Transform and Mesh Renderer components, for instance.
GameObjects always have one Transform component. GameObjects may also have a 3D mesh, renderer, and materials that determine how it's rendered in the scene. There are many other components you can add that extend an object's behavior, physics, and interactions.
- Project assets window (4): In this window, you'll find the files stored on the hard drive in your project's
Assets/folder, located under the project's root directory.Assets include files that may be added to objects in a scene, such as images, audio, video, materials, and scripts. Scenes themselves are saved as assets. Complex predefined GameObjects can also be saved as assets, called prefabs.
- Console window (4, hidden behind Project tab): This shows error and information messages from your application.
- Game view window (2, hidden behind Scene tab): This shows the user's view, as rendered by the in-scene camera GameObject.
- Main Menu: At the top of the Editor window is a menu where you can access many features of Unity. Adding additional packages to your project may add more menu items.
- Main Toolbar: At the top of the Editor window and below the Main menu is an icon toolbar organized into three sections. On the left-hand side, there are tools for editing the Scene view (including Move Tool, Rotate Tool, and Scale Tool). In the center, there are the play mode controls (including Play and Pause). Finally, on the right, there are additional controls, including some that allow you to access your Unity account and cloud services.
Take a moment to explore the main menu items:
- The File menu is for creating, saving, and loading scenes and accessing your build settings.
- The Edit menu is for selecting and editing objects in the project, accessing project-specific settings and preferences, and other editor-related tools.
- The Assets menu provides tools for importing and managing project assets (as found in the Project window's
Assets/folder). - The GameObject menu lets you add new objects to the current scene.
- The Component menu provides a categorized list of components that you can add to the currently selected GameObject in the scene.
- The Window menu is where you can find and open additional windows that provide more features. Importing new packages into Unity may add new menu bar items.
Information – Using Play Mode in AR Projects
In most Unity projects, you can press the Play button (in the main toolbar) to go into play mode and run your scene in the Editor, running on your desktop rather than on the device. This is not so simple with an augmented reality scene since it requires an onboarding phase, where the software scans the environment for physical world features and then uses the physical device sensors for positional tracking. There are several solutions to facilitate your iterative developer workflow, all of which we will discuss in Chapter 3, Improving the Developer Workflow.
You can personalize and rearrange the editor's window layout to suit your needs and preferences. Layouts can be saved and loaded using the Layout selection menu in the top-right corner of the editor. The screenshots in this book use layouts that are different from Unity's default layout.
OK, enough talk – this is a hands-on book, so let's get hands-on right away and try out the Unity Editor.
Basics of using the Unity Editor
In this section, we'll build a trivial scene with a 3D cube that gives us more context to explain how to use Unity:
- Create a new scene from the main menu by selecting File | New Scene.
- A New Scene window will appear (Unity 2020+ only) that lets you select a scene template. Choose the one named Basic (Built-in). Then, press Create.
You will notice right away that the new scene contains two default GameObjects: a Main Camera and a Directional Light.
- Add a 3D cube to the scene by clicking GameObject | 3D Object | Cube. With that, the Cube will be added to the scene and be visible in both the Scene and Hierarchy windows.
- Ensure the Cube rests at the origin of our scene; that is, the
(0, 0, 0)X-Y-Z coordinates. With Cube selected in the Hierarchy window, look in the Inspector window and set its Transform | Position | X, Y, and Z values to zero. - Let's rotate the Cube. In the same Inspector Transform component, set its X-Rotation value to
-20.The scene may now look as follows:
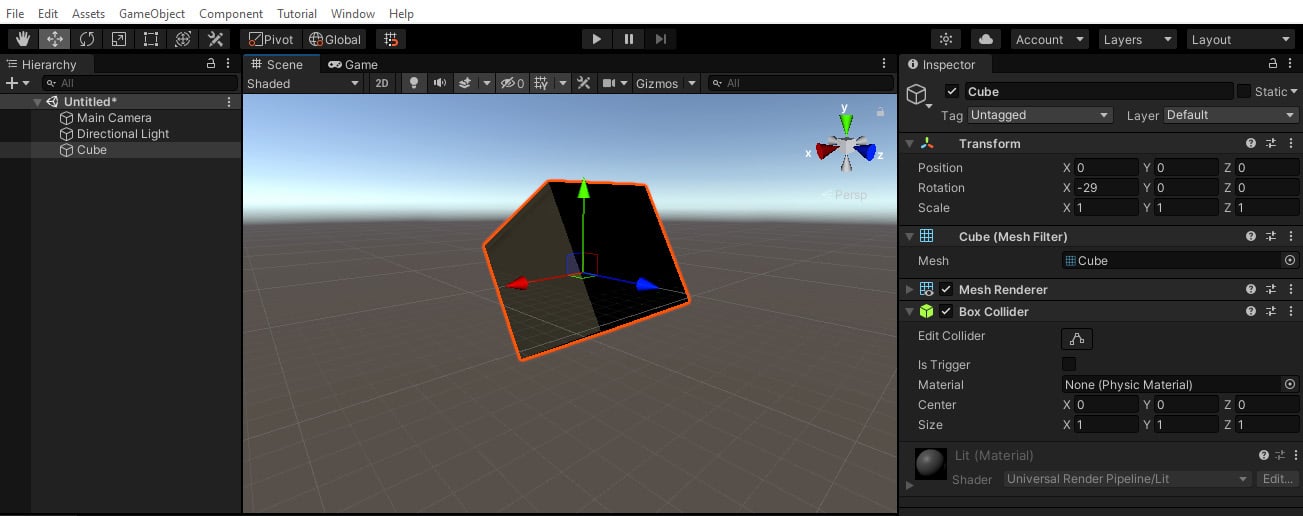
Figure 1.5 – New scene with a 3D cube
At this point, I encourage you to get familiar with the Scene view controls. Using a 3-button mouse on Windows, for example, right-click in the window to pivot the view, Alt + left-click to orbit the view around the "center" of the view, and center-click the mouse to move the view. To move closer or further out (zoom), use Alt + right-click or use the scroll wheel. Note that the directional gizmo in the top right of the Scene window indicates the current view showing the X, Y, and Z axes. For further information (including one- or two-button mice), see https://docs.unity3d.com/Manual/SceneViewNavigation.html.
Tip – RGB == XYZ
It's handy to remember that the red, green, and blue colors in gizmos correspond to the X, Y, and Z axes, respectively.
We modified the Cube's transform by editing its numerical values in the Inspector window. You can also transform an object by directly manipulating it in the Scene window. For example, in the main toolbar, select Rotate Tool. With the Cube currently selected, you should now see the rotate gizmo rendered on the object in the scene. You can grab one of the gizmo handles (X, Y, or Z) and drag it to rotate the object around that axis, as shown in the following screenshot:
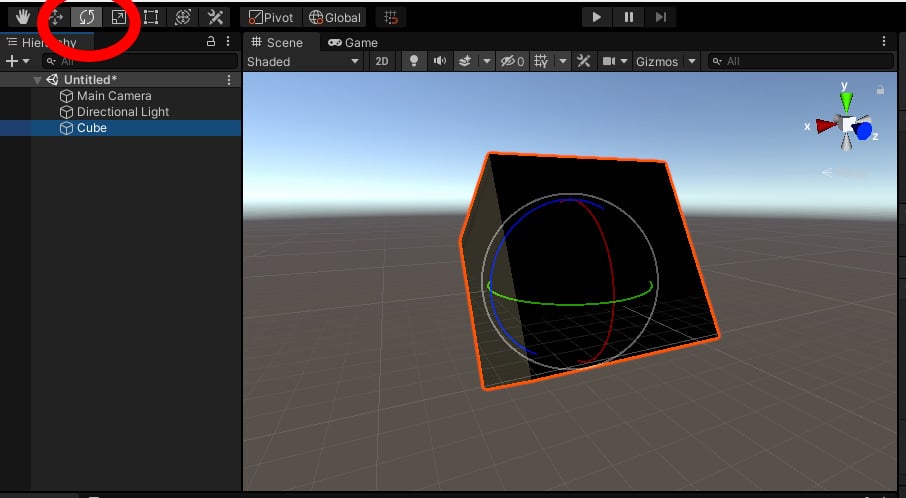
Figure 1.6 – Rotate tool selected
For more on transforming objects directly in the Scene window, see the Unity Manual (https://docs.unity3d.com/Manual/PositioningGameObjects.html).
This was a very brief introduction to get you started. As a matter of habit, you should always save your work after accomplishing something. Let's save the scene, as follows:
- From the main menu, select File | Save As, which will open the Save Scene window.
- Navigate to the
Scenes/subfolder (in your project'sAssetsfolder). - Give the scene a name, such as
My Cube, and press Save.Tip – Confused or Overwhelmed? Take it a Step at a Time
As with any professional development and creative application, there's a huge assortment of things you can do with Unity, and it provides many tools to help you achieve your objectives. If you are confused or overwhelmed, a great strategy is to try and focus only on the menu items and windows you need right now and ignore the rest. We'll walk you through this with simple step-by-step instructions. As you gain experience and confidence, you'll expand your radius of familiarity and see how it all fits together. To be honest, I still learn new things about Unity each time I work on a project.
Of course, this was just a brief introduction to Unity. If you need to find out more, please head over to Unity Learn, where there are some excellent beginner tutorials (using the https://unity.com/learn/get-started link or the Learn tab in Unity Hub).
Also, take a look at the Unity Manual introductory topics (https://docs.unity3d.com/Manual/UnityOverview.html).
Organizing your project assets
You have access to your project assets in the Project window. I like to keep the project assets that I create in their own top-level folder, separate from other assets I might import from third-party sources such as the Unity Asset Store.
Likewise, Unity's URP project template includes SampleScene and example assets. I suggest moving the URP example assets into their own folder to keep them separate from your own application assets. You can do this by following these steps:
- Create an
Assetsfolder namedURP-examples. In the Project window, click the + icon in the top left, select Folder, and name itURP-examples. - Drag each of the example folders into the
URP-examplesone, namelyExampleAssets,Materials,Scenes,Scripts,TutorialInfo, and theReadmefile. - Leave the
PresetsandSettingsfolders in the rootAssets/folder. - Create an
Assetsfolder named_App. I like to prepend an underscore to this folder's name so that it remains at the top of the list. - Create child folders inside
_App/namedMaterials,Prefabs,Scenes, andScripts. These subfolders will remain empty for now, but we'll add to them as we work through this book.
Organizing your assets by file type is a common convention in Unity, but you may have your own way of doing things. Unity does not depend on these folder names or asset file locations. (That said, there are a few reserved folder names with special meanings to Unity; see https://docs.unity3d.com/Manual/SpecialFolders.html). Your Project window may now look as follows:
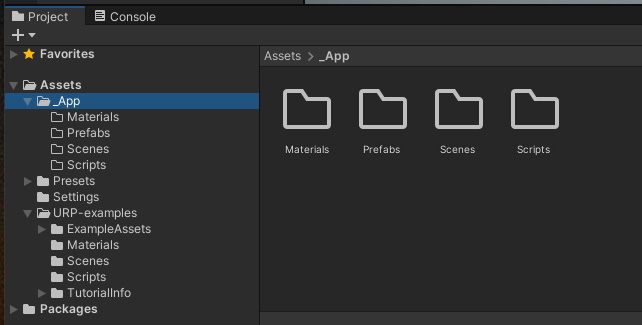
Figure 1.7 – Reorganized Project Assets folders
I think we're now ready to move on and continue setting up your system and installing the packages you need for AR development. We'll start by adding an AR device plugin to your project, and then do the same for the Foundation package.
Preparing your project for AR development
When you develop and build a project for augmented reality, Unity needs to know the device and platform you are targeting. This is a multi-step process that includes adding the device plugin to your project and setting the target platform in Build Settings. We'll address the device plugins now and Build Settings later in this chapter.
The following diagram shows the Unity XR technology architecture. As you can see, at the bottom of the stack are the various AR (and VR) provider plugins:
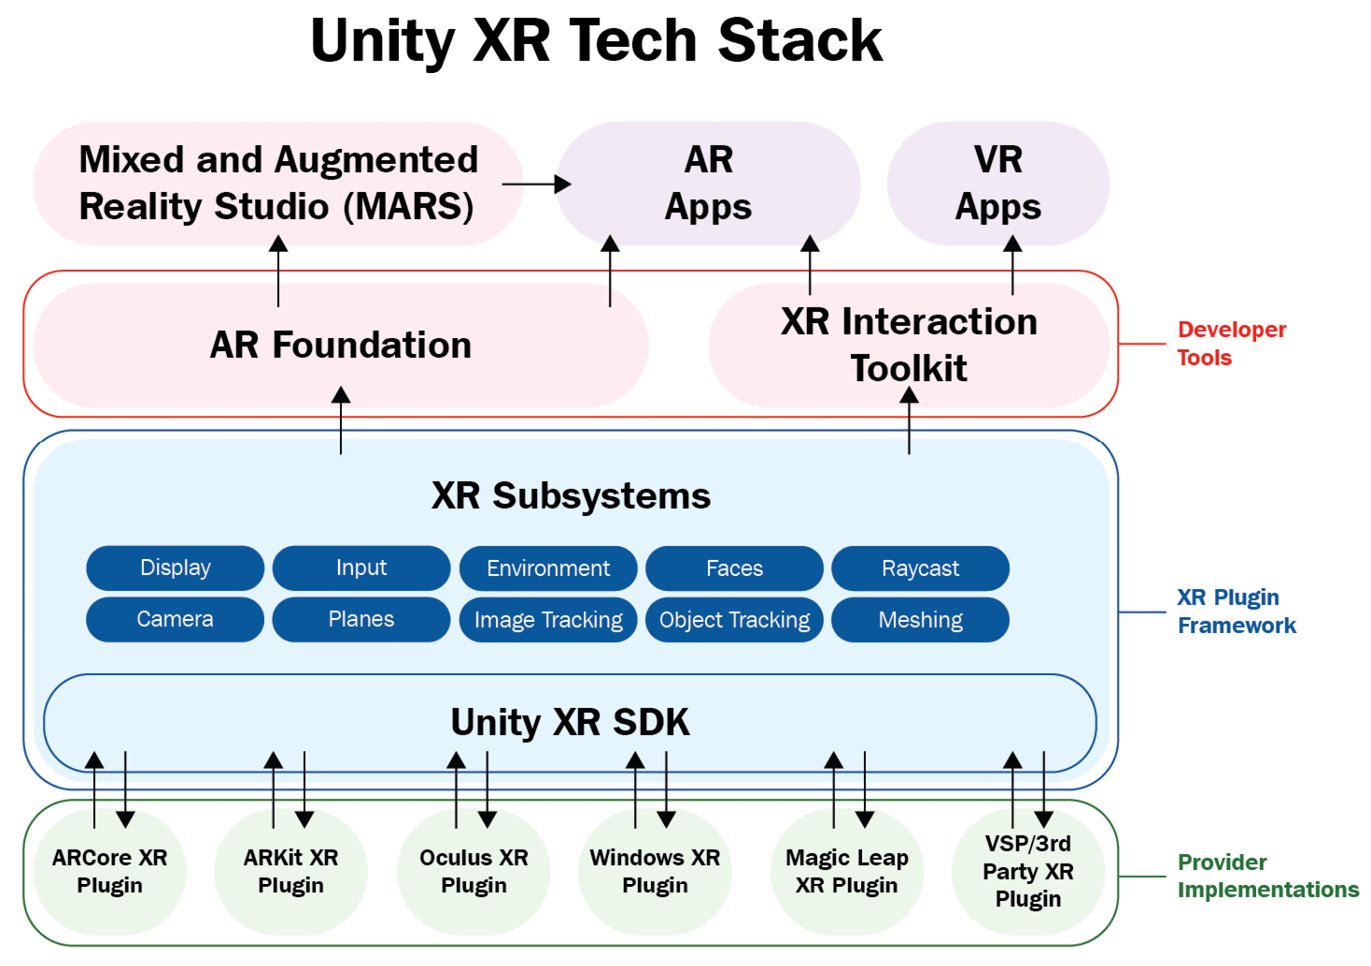
Figure 1.8 – The Unity XR tech stack
At the bottom of the stack is XR Plugins, separate provider packages that implement a software interface to a specific device. Plugins allow Unity to talk with a device by connecting the Unity XR subsystems with an operating system and runtime API. Ordinarily, you will not be using a plugin directly but a higher-level toolkit instead, such as AR Foundation (which we will install in the next section). Some plugins are provided and maintained by Unity Technologies; others are vendor-supported third-party plugins.
In the preceding diagram, at the top of the plugins are XR Subsystems, which form XR Plugin Framework. This abstracts sets of features into separate APIs. When an application is running, it can query the capabilities of the current runtime device and enable or disable sets of features in the app accordingly. Atop XR Subsystems is the AR Foundation toolkit (and XR Interaction Toolkit), which provides the main AR API for your Unity applications. We will be using AR Foundation extensively for the projects in this book.
Now, let's install the XR plugin(s) you need for this project.
Installing XR plugins for AR devices
To prepare our project for AR development, we'll install the AR device plugin for your target device via the XR Plug-in Management window. With your project open in Unity, follow these steps:
- Open the Project Settings window by selecting Edit | Project Settings from the main menu.
- In the Settings menu on the left, select XR Plugin Management.
- Click the Install XR Plugin Management button. It may take a moment for Unity to import and compile the package scripts.
- If necessary, click the XR Plug-in Management item again to show Plug-in Providers and other options. Notice that there are tabs for each of the target platforms. Select the one you will be targeting first.
For example, in the XR Plug-in Management window, the Android tab will be only available if you installed the Android Build Support module when you installed Unity via Unity Hub.
- Check the checkbox for the AR plugin you want to use. For example, for Android, select ARCore, while for iOS, select ARKit.
Tip – Don't Mix VR and AR Plugins in the Same Project
You'll see that the XR Plug-in Management window lets you choose any combination of AR and VR plugins. In our projects, we're only interested in the AR ones. Generally, do not include both AR and VR plugins in the same project as the build settings, player settings, camera rigs, and many other things can differ significantly between AR and VR projects. (Perhaps when you read this, there will be devices that support both modes in a single app, but I am not aware of any at this time.)
In the following screenshot of the Project Settings window, I have selected the XR Plug-in Management Settings menu. In my window, there are three tabs for each of the possible target platforms for this project that I have installed: Desktop, iOS, and Android (yours may be different). With the Android tab selected, you can see that I have checked the ARCore plugin. You'll also notice that, on the left-hand side, there's an additional ARCore menu item that you can click to see options that are specific to that plugin:
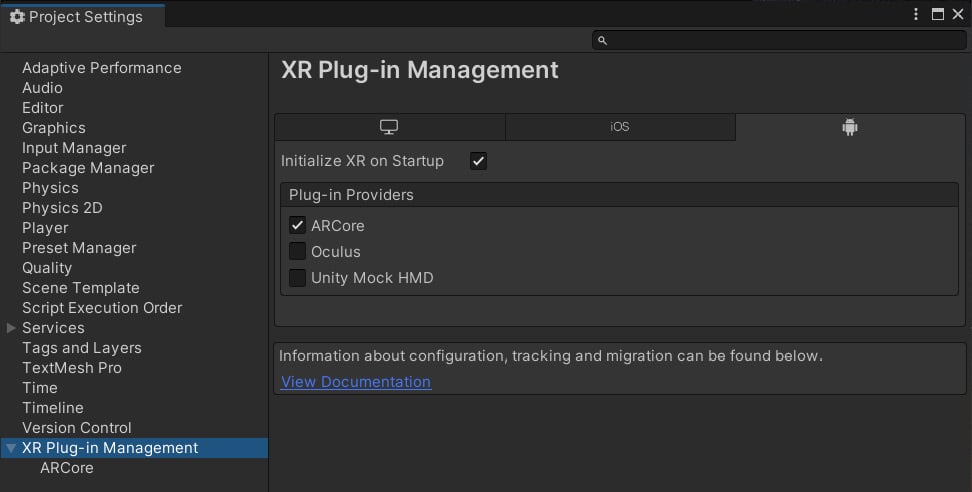
Figure 1.9 – XR Plug-in Management window with the ARCore plugin selected
Interestingly, XR Plug-in Manager is a shortcut to installing the corresponding packages in Package Manager. You can verify this by opening Package Manager and reviewing the installed packages by performing the following steps:
- Open Package Manager from the main menu and choose Window | Package Manager.
- Ensure the filter selection at the top left of the Package Manager window says Packages In Project.
- You should see your plugin in the list; for example, ARCore XR Plugin.
For example, in the following screenshot of Package Manager, which shows Packages In Project (top left of the window), ARCore XR Plugin has been installed and selected. You can see that this specific version of the plugin has been Verified for the Unity version being used by this project. It also shows a description of the plugin's features, links to its documentation, and other details. Also, I have unfolded the plugin's Other Versions list to show you how to review each of the plugin's versions; this is where you might upgrade (or downgrade) a plugin to a different version:
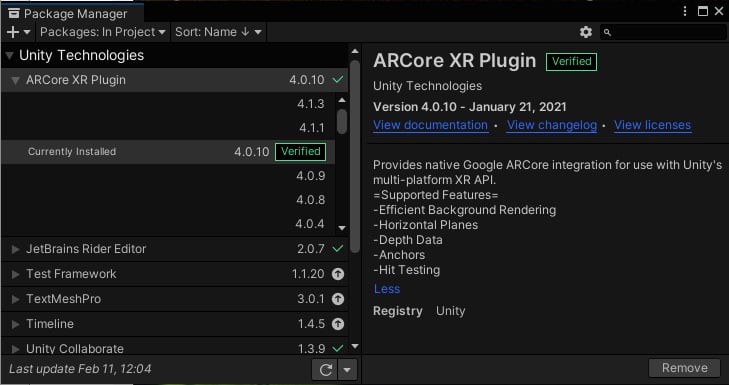
Figure 1.10 – Package Manager with the ARCore XR plugin installed in this project
At this point, you could begin developing an augmented reality project, if you wanted to write code directly using the XR subsystem's developer-facing C# interface. However, it's more likely that you will install a higher-level toolkit that is more Unity developer-friendly. Still, you may need to drop down into the plugin framework to access the XR subsystems directly. For example, you may wish to scan and start a particular subsystem, as shown in the example at https://docs.unity3d.com/Manual/xrsdk-runtime-discovery.html. Later in this book, we may need to access the plugin framework's SDK. For the most part, we will be using the higher-level AR Foundation toolkit.
Installing the AR Foundation package
AR Foundation is a package that provides a development layer between your application and the underlying device features and plugins. AR Foundation provides components and other assets that help you build AR projects once, then deploy for multiple mobile and wearable AR devices. Using a "unified workflow," as Unity says, your app can support current and future features that may or may not be currently available on your end user's specific device at runtime. This helps "future-proof" your AR apps. In this section, we'll install and explore AR Foundation.
The features that are supported by AR Foundation will depend on the current capabilities of the target devices and varies between versions of AR Foundation. The following chart shows the feature support per platform that AR Foundation offers:
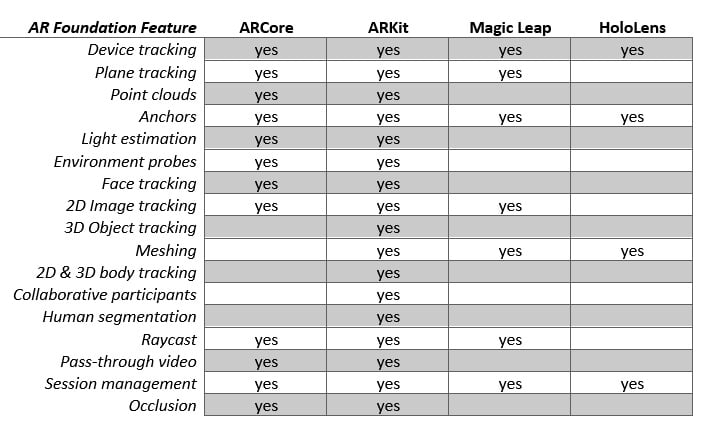
Figure 1.11 – AR Foundation 4.1.5 features per platform
See the Platform Support section of the AR Foundation documentation page (https://docs.unity3d.com/Packages/com.unity.xr.arfoundation@latest/index.html) for the most up to date details for the version you are using.
Unity provides a Package Manager, which enables you to expand Unity's core functionality by installing additional packages in your project. This way, you can choose just the features you need for a particular project. The XR plugins we installed in the previous section are packages. Now, we'll use the Package Manager to install the AR Foundation package.
Information – Advantages of Unity Packages
With Unity packages come many advantages. Unity can update the core Editor independently of other features. Likewise, packages can be updated outside of Unity's core release cycle. Decoupling their dependencies reduces the risk of schedule delays and technical problems, allowing for more agile development cycles and support for technology advances inside and outside the Unity offices. For example, if Apple releases an update to ARKit, then Unity can release an update to its ARKit plugin without having to wait for the next release of the Unity Editor, nor depending on the Unity core development team. If you've ever worked on a large project with multiple teams, you can appreciate the benefits of this architecture. Teams can be organized so that they focus on the details that their package provides, and then test for successful integration with the Unity core product.
You can install AR Foundation using Package Manager by following these steps:
- Open the Package Manager from the main menu by going to Window | Package Manager.
- Set the package filter in the top left to Unity Registry to see a list of all the official packages.
- In the search box, type
ar. You should now see all the AR-related packages in the list. - It is important to pay attention to the version numbers of the package, and whether that particular version has been verified with the Unity version you're using in your project.
- Select AR Foundation, and then press Install. It may take a moment to install.
Once installed, you may discover that new items have been added to the main menu bar, including options under GameObject | XR. Don't select any just yet – we'll get to that in the next chapter, Chapter 2, Your First AR Scene, where we will use the toolkit to create our first AR scene with AR Foundation.
You also need to choose an input handler for your project. We'll look at this in the next section.
Choosing an input handler
The Unity product is continually improving. One relatively recent advancement is the introduction of the new Input System, which is replacing the classic Input Manager. At the time of writing, Unity projects can be configured to use either one, or both in the same project. The input handler you choose can have a significant impact on your development because their usages are quite different. The classic Input Manager mostly uses polling, while the new Input System uses events (see https://blog.unity.com/technology/introducing-the-new-input-system). This is a generalization as both software patterns can be implemented using either handler, but the new Input System is better designed and more flexible. In the interest of advancing the state of the art, the projects in this book will use the new Input System.
However, some example scenes that you will be importing into your project, including the AR Foundation Samples in Chapter 2, Your First AR Scene, will use the classic Input Manager, so it's prudent to allow your project to support both.
To configure your project to use the new Input System, perform the following steps:
- To import the Input System package, open the Packager Manager by going to Window | Package Manager.
- Select Unity Registry from the filter selection in the top left of the window.
- Find Input System (use the search field and type in
input), and click Install. - You may be prompted to let Unity automatically change your Player Settings to use the new Input System. You can say "no" to this. We'll do this manually.
- Open the Player Settings window by going to Edit | Project Settings | Player.
- Locate Configuration | Active Input Handling and select Both (or if you prefer, select Input System Package (New)).
We will begin working with input in Chapter 2, Your First AR Scene, as well as the subsequent chapters.
You also need to set up the project's render pipeline for AR support. Let's learn how to do this.
Adding support for the Universal Render Pipeline
Because we created this project using the Universal Render Pipeline (URP), there's one additional thing you need to do – add AR video background support to the graphics forward renderer (see https://docs.unity3d.com/Packages/com.unity.xr.arfoundation@4.1/manual/ar-camera-background-with-scriptable-render-pipeline.html). This feature renders the device's video feed immediately on the screen before the virtual graphics are rendered on top of those pixels. Perform the following steps:
- In the Project window, locate the folder that contains the Scriptable Render Pipeline settings assets. This is usually the
Assets/Settings/folder. - Select the asset named ForwardRenderer.
- In the Inspector window, click the Add Renderer Feature button and select AR Background Renderer Feature. The resulting Forward Renderer settings are shown in the following screenshot:
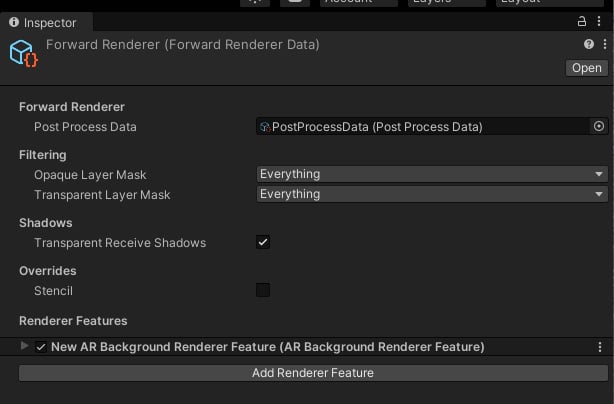
Figure 1.12 – ForwardRenderer data asset with the AR Background Renderer Feature added
Furthermore, as a reminder, if you import any assets into your project, you may need to convert their materials for the render pipeline. We will do this for the sample assets at the end of this chapter.
You have now installed Unity using Unity Hub, created and opened a new Unity project, installed XR plugins for your AR device, installed the AR Foundation package, selected an input handler for your project, and configured the render pipeline for AR. The next step is to continue setting up your project for the target platform.
Setting up for mobile development
Depending on the device platform you are targeting with your project, you will need to install additional software and development tools, as well as configure your Unity project with platform-specific settings.
If you are developing for Android ARCore, go to the Setting up for Android/ARCore Development section. If you are developing for Apple ARKit, go to the Setting Up for iOS/ARKit Development section. Finally, if you are developing for wearable AR devices, go to the Developing for wearable AR glasses section.
Setting up for Android/ARCore development
If you want to build and run your project on an Android device, there are a few extra steps in setting up your project for Android development and ARCore. I'll summarize the process here but naturally, things can change, and I recommend that you look at the documentation for the most current instructions, including Google's ARCore docs, in addition to the Unity Manual. Here is a list of some relevant links:
- ARCore Supported Devices: https://developers.google.com/ar/devices
- Unity Manual – Android Environment Setup: https://docs.unity3d.com/Manual/android-sdksetup.html
- ARCore Unity – Overview of Features: https://developers.google.com/ar/develop/unity
- Unity ARCore Extensions Installation: https://developers.google.com/ar/develop/unity-arf/enable-arcore
- Unity ARCore Plugin: https://docs.unity3d.com/Packages/com.unity.xr.arcore@4.1/manual/index.html (find the doc page for the version you are using)
You may have already completed the first few steps for setting up for Android and ARCore development, but I'll repeat them here briefly:
- Build support modules: In Unity Hub, ensure you have installed the Android platform build support modules for the specific version of Unity you are using with your project.
In the Unity Hub Add Modules window, there's a > icon for unfolding Android Build Support. Ensure you have checked the checkboxes for both Android SDK & NDK Tools and OpenJDK.
Note that if you need to customize the location of either the Android SDK, NDK, or JDK libraries, use the Unity Preferences window in the Unity Editor, by navigating to Edit | Preferences | External Tools, and specify the paths for Unity to find where you installed these separately.
- Target Platform: In the Unity Editor, open the Build Settings window by selecting File | Build Settings. Within the Platforms panel, select the Android platform from the list. If it is not already selected, please click the Change Platform button. If it is disabled, go back to Step 1.
- XR Plugin: Ensure the ARCore plugin is currently installed and selected. Select Edit | Project Settings, and then select XR Plug-in Management from the side menu (initializing it if necessary). Click the Android icon to see the list of Android plugins and check the ARCore checkbox if it is not already checked.
- USB Debugging: The next step is to enable USB debugging on your Android device (phone or tablet). Open the device's Settings > About window and find the Build Number item. (Depending on the brand, you may need to drill down another level or find the Build Number item in a slightly different location.) The next thing you must do I think is very funny – perform a magical incantation by clicking the Build Number item seven times! Then, magically, a Developer Options menu option will appear. Select that and enable USB Debugging.
You can now connect your device to your development machine, and it should be recognized as an attached peripheral device.
The next thing to consider is the Android Player settings in your project. A review of these options can be found here: https://docs.unity3d.com/Manual/class-PlayerSettingsAndroid.html. Specific settings are required for AR projects targeting ARCore. Please double-check the current requirements, as can be found in the Configure Project Settings topic on the Quickstart ARCore page (https://developers.google.com/ar/develop/unity-arf/quickstart-android). Continuing from the previous steps, I suggest doing the following:
- Player Settings: In Unity, navigate to Edit | Project Settings | Player to open the Player Settings window. It contains many options, including tabs at the top to switch between platform-specific settings. Generally, you can keep the default settings unless otherwise advised, or when you're optimizing your project builds. Initialize the following settings:
- Other Settings | Rendering: Uncheck Auto Graphics API. If Vulkan is listed under Graphics APIs, remove it as Vulkan is not yet supported by ARCore. To do so, select Vulcan and press the - (minus) icon in the lower right. Also, uncheck Multithreaded Rendering as it's (currently) not compatible with ARCore.
- Other Settings | Package Name: Create a unique app ID using a Java package name format. Unity chooses a default based on your project name; for example,
com.DefaultCompany.MyARProject. - Other Settings | Minimum API Level: If you are building an AR Required app, specify Android 7.0 'Nougat' (API Level 24) or higher. If you are building an AR Optional app, specify Android API Level 14 or higher.
Information – The Word "player" in Unity
The word "player" in Unity carries multiple meanings. The user of your application or game may be referred to as the player. In a game, the first-person GameObject (containing a camera controlled by the user) might also be referred to as the player. In a non-AR video game, the game controller might be called the player controller. However, in Project Settings, the player refers to the result of the build process; it is an executable program that is installed on your target device (along with other asset files and data) that "plays" your application. In this case, the word is akin to a media player, for example, that plays a music or video file. Player Settings in Unity configures how Unity is built and deployed to your target device.
Meanwhile, you also have the option to install additional capabilities provided by the ARCore Extensions package for Unity. This package extends AR Foundation to some more advanced features of ARCore that are currently not supported in AR Foundation. To install ARCore Extensions, perform the following steps:
- Download the latest
arcore-unity-extensions-*.tgztarball from the GitHub releases page at https://github.com/google-ar/arcore-unity-extensions/releases/. - Open the Package Manager using Window | Package Manager.
- In the top left of the window, click the + icon and choose Add package from tarball, as shown here:

Figure 1.13 – Adding a tarball package
- Locate the downloaded
arcore-unity-extensions-*.tgztarball. - Then, click Open. It may take a few moments to install the package and any dependencies.
Your project is now set up to target Android ARCore with AR Foundation. We'll verify your settings in the next chapter, Chapter 2, Your First AR Scene, when we create an AR scene, build it, and run it on your device.
Setting up for iOS/ARKit development
If you want to build and run your project on an Apple iOS device, there are a few extra steps in setting up your project for iOS development and ARKit. I'll summarize the process here, but naturally, things can change, and I recommend that you look at the necessary documentation for the most current instructions.
Developing for iOS requires a Mac computer running OSX. Then, you need to install the XCode development environment. It is also strongly recommended that you join the Apple Developer Program, which currently costs $99 (USD) per year for individuals. You can do some limited Unity development for iOS without becoming an Apple Developer but it's not practical, especially for AR, where you need to test your app on a physical device.
Here is a list of some relevant links:
- Apple Developer Program: https://developer.apple.com/programs/
- Unity Manual – Getting Started with iOS Development: https://docs.unity3d.com/Manual/iphone-GettingStarted.html
- Unity Manual – Building for iOS: https://docs.unity3d.com/Manual/UnityCloudBuildiOS.html
- Unity ARKit Plugin: https://docs.unity3d.com/Packages/com.unity.xr.arkit@4.1/manual/index.html (find the doc page for the version you are using)
Information – How to Develop for iOS Without a Mac
While iOS development requires a Mac computer running OSX, it's possible to work around this using Unity Cloud Builds. This process is not for beginners, nor those timid about DevOps procedures. You will still need access to a Mac development machine to set up your Apple license, provisioning profile, iOS certificate, and p12 file, but then you can use those to set up a Unity Cloud Build for iOS. See https://docs.unity3d.com/Manual/UnityCloudBuildiOS.html for more information. After each successful build, you'll download the built application's
.ipafile to your iOS device. This does not lend itself to a rapid development cycle! If you're in this situation, my recommendation is to buy a used Android phone that supports ARCore. Then, develop your app using AR Foundation on your Windows PC targeting Android first, and then periodically run iOS/ARKit builds to test and verify it runs on that device. Unity Cloud Builds requires a Unity Plus or Pro license or a Unity Teams Advanced subscription.
Developing for iOS and ARKit requires performing the following steps. You may have completed some of these steps already:
- Apple Developer Program: This is your admission ticket for developing for iOS. Go to https://developer.apple.com/programs/ to learn more and enroll.
- Xcode: Download and install the current copy of Xcode, the development environment required to develop any Apple products. It's available on the Mac App Store: https://apps.apple.com/us/app/xcode/id497799835.
- Build support modules: In Unity Hub, ensure you have installed the iOS platform build support modules for the specific version of Unity you are using with your project.
- Target Platform: In the Unity Editor, open the Build Settings window by selecting File | Build Settings. Within the Platforms panel, select the iOS platform from the list. If it is not already selected, please click the Change Platform button. If it is disabled, go back to Step 1.
- XR Plugin: Ensure the ARKit plugin is currently installed and selected. Select Edit | Project Settings, and then select XR Plug-in Management from the side menu (initialize it if necessary). Click the iOS tab to see the list of iOS plugins, and check the ARKit checkbox if it is not already checked.
- Player Settings: In the Edit | Project Settings | Player Settings window, there are settings you may need to use, including checking the Requires ARKit checkbox, providing a text value for Camera Usage Description (such as
Required for augmented reality support), setting Target minimum iOS Version to11, and Architecture | ARM64.
When Unity builds an iOS project, it does not actually build the app. Instead, it constructs an XCode project folder that is then opened in XCode, which, in turn, is used to build the app. One of the critical services XCode provides is ensuring you are authorized for development by provisioning your app, including the following:
- Installing a Development Provisioning Profile for each device where you plan to test your app. Follow the instructions at https://docs.unity3d.com/Manual/UnityCloudBuildiOS.html, under the Create a Certificate topic.
- Adding your Apple ID account to Xcode by going to Preferences | Accounts.
For more information on using Xcode and Unity, see the Unity Manual: Structure of a Unity Xcode Project (https://docs.unity3d.com/Manual/StructureOfXcodeProject.html) and other related pages.
This process can be confusing. Everyone who develops for iOS goes through a similar process, so you're certainly not alone, and there's a lot of answers to be found on the internet. Remember: "DuckDuckGo is your friend." And fortunately, you usually only need to do this once.
Note that you can also set your Signing Team ID in your Unity Player settings by navigating to Edit | Project Settings | Player | Identification.
Information – Apple's Own AR Development Tools
Upon reviewing the Apple web pages, you will discover that they provide their own AR development tools (https://developer.apple.com/augmented-reality/tools/) apart from Unity. Of course, I'm a big fan of Unity and AR Foundation, which give you device independence and all the other powerful features of Unity, but it's good to be aware of alternatives.
Your project has now been set up to target Apple ARKit with AR Foundation. We'll verify your settings in the next chapter, Chapter 2, Your First AR Scene, when we create an AR scene, build it, and run it on your device.
Developing for wearable AR glasses
AR Foundation supports not just handheld mobile AR devices using ARCore and ARKit, but also wearable AR glasses, including Microsoft HoloLens and Magic Leap. Likewise, targeting wearable AR devices may require configuring Unity to target a platform other than Android or iOS. Wearable AR glasses remain relatively expensive and outside the reach of the typical consumer as they're aimed at corporate or industrial applications. While this book can serve as a lovely starting point for developing these devices, and the projects can be adapted accordingly, it is outside the scope of this book to support wearable AR devices in the subsequent chapters.
For Microsoft HoloLens, you must set up Unity to target Universal Windows Platform (UWP), beginning with installing the required module via Unity Hub, as shown in the following screenshot:
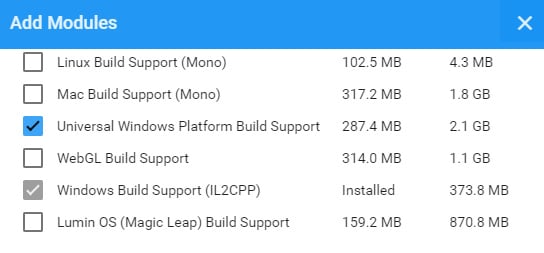
Figure 1.14 – Adding UWP build support for HoloLens
To set up for HoloLens development, you will need to use Visual Studio IDE and a compatible version of Windows 10 SDK. For additional information, here are some useful links:
- Unity for Windows Mixed Reality: https://unity3d.com/partners/microsoft/mixed-reality.
- Microsoft Mixed Reality – Install the Tools: https://docs.microsoft.com/en-us/windows/mixed-reality/develop/install-the-tools?tabs=unity (this includes an installation checklist too).
- Unity Windows XR Plugin: https://docs.unity3d.com/Packages/com.unity.xr.windowsmr@5.2/manual/index.html.You just have to find the document page for the version you are using. This page also includes recommended Build Settings and Player Settings.
Information – Microsoft Mixed Reality Toolkit (MRTK)
Note that Microsoft also offers its own open source cross-platform development kit, known as the Mixed Reality Toolkit (MRTK), for Unity, an alternative to AR Foundation. I think this framework has a very interesting implementation with a versatile architecture that supports a spectrum of devices from AR to VR. Learn more here: https://docs.microsoft.com/en-us/windows/mixed-reality/develop/unity/mrtk-getting-started.
For the Magic Leap wearable AR products, you must set up Unity to target Lumen OS, beginning with installing the required module via Unity Hub, as shown in the following screenshot:
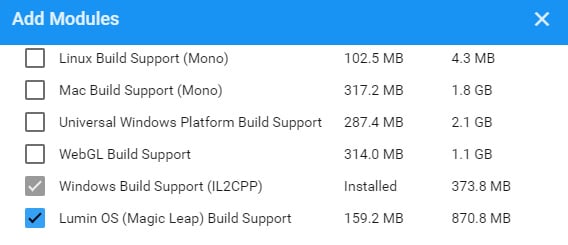
Figure 1.15 – Adding Lumen OS build support for Magic Leap
For additional information, here are some useful links:
- Unity for Magic Leap: https://unity3d.com/partners/magicleap
- Magic Leap Developer Portal: https://developer.magicleap.com/en-us/home
- Magic Leap Unity Development: https://developer.magicleap.com/en-us/learn/guides/unity-overview
- Using Magic Leap with AR Foundation: https://resources.unity.com/unitenow/onlinesessions/using-magic-leap-with-ar-foundation-in-unity-2020-1 (Unite Now presentation)
Interestingly, Magic Leap provides a Unity Template that you can add to Unity Hub as a starting point for new projects (https://github.com/magicleap/UnityTemplate).
Now that you have a project set up for AR development on your target platform and device, let's build a test to make sure things are working so far.
Building and running a test scene
Before moving on and building an AR project, it is prudent to verify your project has been set up properly so far by trying to build and run it on your target device. For this, we'll create a minimal AR scene and verify that it satisfies the following checklist:
- You can build the project for your target platform.
- The app launches on your target device.
- When the app starts, you see a video feed from its camera on the screen.
- The app scans the room and renders depth points on your screen.
I'll walk you through this step by step. Don't worry if you don't understand everything; we will go through this in more detail together in Chapter 2, Your First AR Scene. Please do the following in your current project, which should be open in Unity:
- Create a new scene named BasicTest by selecting File | New Scene, then Basic (Built-In) template, then File | Save As. From here, navigate to your
Scenesfolder, call itBasicTest, and click Save. - In the Hierarchy window, delete the default Main Camera (right-click and select Delete, or use the Del keyboard key).
- Add an AR Session object by selecting GameObject | XR | AR Session.
- Add an AR Session Origin object by selecting GameObject | XR | AR Session Origin.
- Add a point cloud manager to the Session Origin object by clicking Add Component in the Inspector window. Then, enter
ar pointin the search field and select AR Point Cloud Manager.
You will notice that the Point Cloud Manager has an empty slot for a Point Cloud Prefab, which is used for visualizing the detected depth points. A prefab is a GameObject saved as a project asset that can be added to the scene (instantiated) at runtime. We'll create a prefab using a very simple Particle System. Again, if this is new to you, don't worry about it – just follow along:
- Create a Particle System by selecting GameObject | Effects | Particle System.
- In the Inspector window, rename it
PointParticle. - On the Particle System component, uncheck the Looping checkbox.
- Set its Start Size to
0.1. - Uncheck the Play on Awake checkbox.
- Click Add Component, enter
ar pointin the search field, and select AR Point Cloud. - Likewise, click Add Component and select AR Point Cloud Visualizer.
- Drag the PointParticle object from the Hierarchy window to the Prefabs folder in the Project window (create the folder first if necessary). This makes the GameObject into a prefab.
- Delete the PointParticle object from the Hierarchy window using right-click | Delete or press the Del key.
The Inspector window of the PointParticle object should now look as follows:
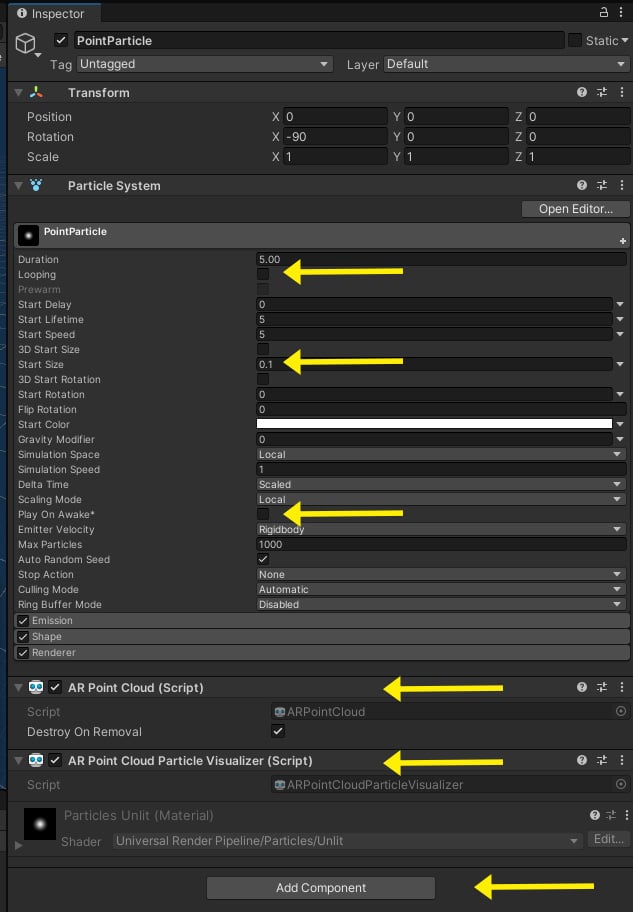
Figure 1.16 – Inspector view of our PointParticle prefab with the settings we're using highlighted
We can now apply the PointParticle prefab to the AR Point Cloud Manager, as follows:
- In the Hierarchy window, select the AR Session Origin object.
- From the Project window, drag the PointParticle prefab into the AR Point Cloud Manager | Point Cloud Prefab slot. (Alternatively, click the "doughnut" icon to the right of the slot to open the Select GameObject window, select the Assets tab, and choose PointParticle).
- Save the scene using File | Save.
The resulting AR Session Origin should look as follows:
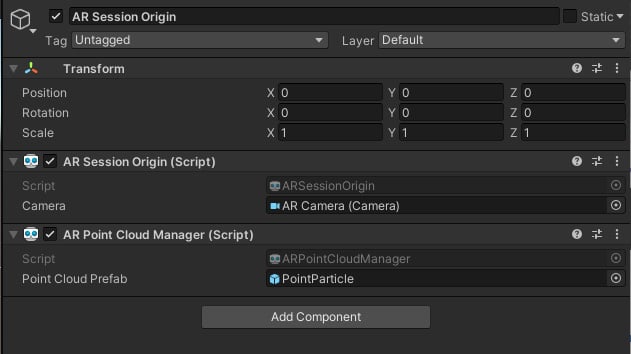
Figure 1.17 – Session Origin with a Point Cloud Manager component populated with the PointParticle prefab
Now, we are ready to build and run the scene. Perform the following steps:
- Open the Build Settings window using File | Build Settings.
- Click the Add Open Scenes button to add this scene to the build list.
- In the Scenes in Build list, uncheck all scenes except the BasicTest one.
- Ensure your device is connected to your computer via USB cable.
- Press the Build And Run button to build the project and install it on your device. It will prompt you for a save location; I like to create a folder in my project root named
Builds/. Give it a filename (if required) and press Save. It may take a while to complete this task.
If all goes well, the project will build, install on your device, and launch. You should see a camera video feed on your device's screen. Move the phone slowly in different directions. As it scans the environment, feature points will be detected and rendered on the screen. The following screen capture shows my office door with a point cloud rendered on my phone. As you scan, the particles in the environment that are closer to the camera appear larger than the ones further away, contributing to the user's perception of depth in the scene.

Figure 1.18 – Point cloud rendered on my phone using the BasicTest scene
If you encounter errors while building the project, look at the Console window in the Unity Editor for messages (in the default layout, it's a tab behind the Project window). Read the messages carefully, generally starting from the top. If that doesn't help, then review each of the steps detailed in this chapter. If the fix is still not apparent, do an internet search for the message's text, as you can be certain you're probably not the first person to have a similar question!
Tip – Build Early and Build Often
It is important to get builds working as soon as possible in a project. If not now, then certainly do so before the end of the next chapter, as it does not make a lot of sense to be developing an AR application without having the confidence to build, run, and test it on a physical device.
With a successful build, you're now ready to build your own AR projects. Congratulations!
Summary
In this chapter, after a quick introduction to augmented reality, you immediately got started on your road to developing your own AR projects. You installed Unity via Unity Hub and learned the importance of tracking the different versions of Unity, as well as its projects and packages. You got a brief tour of using the Unity Editor, including some key concepts that are fundamental to 3D and AR.
You then set up your project and system software for AR development, including installing an XR plugin, the AR Foundation package, tools for Android or Xcode, and other items necessary to get things set up. Lastly, we created a minimal AR scene (including a quick point cloud prefab using a particle system component) and built the scene to verify it builds and runs on your target device.
Setting up your machine may be intricate and painful, but it's your entry ticket to Unity development, and everyone has to do it. If you got through this chapter with everything running, you are a hero!
In the next chapter, we'll begin to take a closer look at AR development using Unity and AR Foundation by creating a new AR scene, step by step, explaining each component as we go.